1
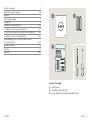
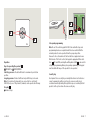
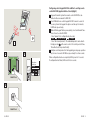
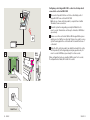
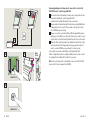
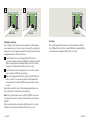
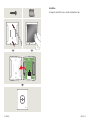
KLI 110
Instructions for control keypad
VAS 452423-2009-12
Contents of packaging
Important information / warnings
3
4-5
Operation
6
Set-up and programming 7
Security key
Configuring control keypad KLI 110
- in addition to existing remote control KLR 100
2
+
7
8-13
+
8-9
- to control electrical products connected to control unit KLC 500
10-11
- in addition to existing control keypad KLI 110
12-13
Removing/adding control of electrical products connected
to control unit KLC 500
b
14-15
Changing security key
16
Resetting
17
Installation
1
3
18-19
Contents of packaging
1 : Control keypad
2 : Two batteries (type AAA, 1.5 V)
3 :Screws, wall anchors and double-sided adhesive tape
2 VELUX
VELUX 3
Important information
Warning – To reduce the
risk of severe injury or
death:
Read instructions carefully before installing and operating. Please keep instructions for future reference and hand them over to any new user.
Safety
• Never let children play with the control keypad. The keypad should be fitted out
of reach of children at a minimum height of 5 feet (1.5 m).
• The product must not be put into operation until it has been fitted according to
these instructions.
• Before operating, ensure that the product can be operated without risk of damage to property or injury to people or animals.
• This product has been designed for use with genuine VELUX products.
• The control keypad has a Class 2 Low Voltage output (3 V d.c.).
• FCC ID: XSG863878 and IC ID: 8642A-863878: Remote control
This device complies with part 15 of the FCC and RSS-210 of the IC rules. Operation is subject to the following two conditions: (1) This device may not cause
harmful interference, and (2) this device must accept any interference received,
including interference that may cause undesired operation.
Product
• The control keypad has a built-in RF (radio frequency) unit and will not be operative if placed in a metal cabinet.
• Electrical products must be disposed of in conformity with all local codes,
ordinances, rules and regulations for electronic waste and not with household
waste.
• Used batteries have to be disposed of in conformity with the relevant environmental regulations and ordinances.
• The packaging can be disposed of with usual household waste.
• Radio frequency band: 2.4 GHz.
• Radio frequency range: 110 yards (100 m) free field. Depending on building
construction, the indoor range is approx 30 feet (10 m) However, constructions
with reinforced concrete, metal ceilings and plaster walls with steel members
may reduce the range.
Maintenance and service
• The product requires a minimal amount of maintenance. The surface may be
cleaned with a soft, damp cloth using a small amout of household cleaner diluted
in water.
• If you have any technical questions, please contact VELUX.
Installation
• The control keypad is for indoor use only.
• Installation in rooms with a high level of humidity and with hidden wiring must
comply with relevant regulations (contact a qualified electrician if necessary).
• Before fixing the control keypad to the wall, verify that it can operate the product in question from the proposed position.
• The control keypad should be fixed at a position where the product to be operated is within sight.
4 VELUX
VELUX 5
+
-
d
c
a
b
+
+ KEY
+
LED
PRG
-
Set-up and programming
Note: Do not fix control keypad KLI 110 to the wall until set-up and
programming have been completed and it has been verified that the
relevant products can be operated from the proposed position.
Operation
Keys for operating the product a OPEN/UP or
CLOSE/DOWN
Short key pressure: Product will travel to maximum top or bottom
position.
Long key pressure: Product will travel only until the key is released.
Note: If several electrical products are connected to a control unit
KLC 500, only one of the products (random) can be operated in this way.
Stop key b Product stops.
6 VELUX
Remove front section and insert the two batteries supplied as shown.
On the back of the front section, the keypad is equipped with two buttons c , KEY and PRG, and a light-emitting diode (LED) d to be used for
set-up and programming. During set-up and programming, the keypad
must be within RF range of the products to be operated.
Security key
Each product has a security key ensuring that external control devices
cannot communicate with your system. A common security key is
created automatically during the registration process ensuring that all
products in the system share the same security key.
VELUX 7
Configuring control keypad KLI 110 in addition to existing remote
control KLR 100 (supplied with electrical skylight)
1 Copy and transmit system from remote control KLR 100 as de-
scribed in the user manual for KLR 100.
2 Press PRG button on control keypad KLI 110 for max 2 seconds to
receive system in the keypad. Reception can take up to 2 minutes.
LED flashes green slowly.
3 When LED in keypad flashes green quickly, select and transmit functions of remote control KLR 100:
- Select products for configuration by choosing:
Menu Configure System Settings - Select all relevant products. The individual product can be idention the remote control for a short period of time.
fied by pressing
This will activate the product briefly.
4 Configure selected products in the keypad by pressing any operation
key for max 2 seconds. LED flashes green slowly for a few seconds.
1
2
3
System settings
PRG
Register product
Copy system
Security key
Configure
Enter
Back
P1
P2
When configuration has been completed, LED is green for 4 seconds.
If configuration has failed, LED is red for four seconds.
max 2 sec
4
max 2 sec
8 VELUX
VELUX 9
Configuring control keypad KLI 110 to control electrical products
connected to control unit KLC 500
4
2
1 Disconnect all products that are not to be controlled by control
3
max
5 sec
keypad KLI 110 from control unit KLC 500.
Note: In case of new electrical products, complete item 2 within
10 minutes from reconnection.
2 Transmit system from keypad by pressing the PRG button for
max 2 seconds. Transmission can take up to 2 minutes. LED flashes
green slowly.
3 Remove cover from control unit. When LED in keypad flashes green
quickly, press test button in control unit for max 5 seconds to receive
system from keypad in the control unit and to transmit functions of
control unit.
4 When the first electrical product runs briefly back and forth, configure the product(s) in the keypad by pressing any operation key for
max 2 seconds. LED flashes green slowly for a few seconds.
When configuration has been completed, LED is green for 4 seconds.
If configuration has failed, LED is red for 4 seconds.
PRG
max 2 sec
4
max 2 sec
10 VELUX
VELUX 11
Configuring control keypad KLI 110 in addition to existing control
keypad KLI 110
5
1 Disconnect all products that are not to be controlled by control
keypad KLI 110 from control unit KLC 500.
2 Transmit system from existing keypad by pressing the PRG button for
3-4 seconds. LED flashes green slowly.
3 Press PRG button on additional control keypad KLI 110 for
2
1
4 Remove cover from control unit. When LED in additional keypad
flashes green quickly, press test button in control unit for
max 5 seconds to receive system from keypad in the control unit and
to transmit functions of control unit.
2
3
PRG
5 When the first electrical product runs briefly back and forth, config-
ure the product(s) in the additional keypad by pressing any operation
key for max 2 seconds. LED flashes green slowly for a few seconds.
PRG
3-4 sec
4
3
max 2 seconds to receive system from existing keypad in the new
keypad. Reception can take up to 2 minutes. LED flashes green
slowly.
max
5 sec
max 2 sec
When configuration has been completed, LED is green for 4 seconds.
If configuration has failed, LED is red for 4 seconds.
Note: For configuration of control keypad KLI 110 in addition to existing interface KLF 100, please refer to instructions provided with the
interface.
5
max 2 sec
12 VELUX
VELUX 13
Removing/adding electrical products connected to control unit
KLC 500 from/to control keypad KLI 110
4
1 Disconnect all electrical products and reconnect only products to be
1
2
3
PRG
max
5 sec
removed from/added to control keypad KLI 110.
Complete item 2 within 10 minutes from reconnection.
2 Remove/add control and transmit functions by pressing PRG button
in keypad for max 2 seconds. This procedure can take up to 2 minutes. LED flashes green slowly.
3 Remove cover from control unit. When LED in keypad flashes green
quickly, press test button in control unit for max 5 seconds to receive
system in the control unit and to transmit function from control unit.
4 When the first electrical product runs briefly back and forth, configure the product(s) in the keypad by pressing any operation key for
max 2 seconds. LED flashes green slowly for a few seconds.
The product can now be controlled by control keypad KLI 110.
When configuration has been completed, LED is green for four seconds.
If configuration has failed, LED is red for four seconds.
Note: For electrical products controlled by a remote control KLR 100,
please refer to the user manual for KLR 100.
max 2 sec
4
max 2 sec
14 VELUX
VELUX 15
1
2
KEY
min 5 sec
PRG
KEY
min 5 sec
3-4 sec
Changing security key
Resetting
The security key of the system must be changed if security may have
been compromised, eg if a remote control is missing. The security key is
changed in one control keypad only and then transferred to the remaining keypads/remote controls in the system.
The control keypad KLI 110 can be reset to its initial factory settings.
Press PRG button for at least 5 seconds. LED flashes red quickly. When
resetting has been completed, LED is red for 4 seconds.
1 Press KEY button in one control keypad KLI 110 for at least
5 seconds to change security key. LED flashes red and green quickly.
When security key has been changed, LED is green for 4 seconds.
If change of security key failed, LED is red for 4 seconds.
2 Press KEY button in the same keypad for 3-4 seconds to transmit
new security key. LED flashes green slowly.
3 Other control keypads KLI 110 in the system: Press KEY button for
max 2 seconds to receive new security key in the keypad. Reception can take up to 2 minutes. LED flashes green slowly for a few
seconds.
Repeat items 2 and 3 for each of the remaining keypads/remote controls in the system to transfer the new security key.
Note: If the system includes remote control(s) KLR 100, receive new
security key in the remote control as described in the user manual for
KLR 100.
When security key has been transferred, LED is green for 4 seconds.
If transfer of security key has failed, LED is red for 4 seconds.
16 VELUX
VELUX 17
Installation
Fix keypad to wall with screws or double-sided adhesive tape.
+
+
18 VELUX
VELUX 19
www.velux.com
installation instructions for Kli 110. ©2009 VELUX Group
®VELUX and the VELUX logo are registered trademarks used under licence by the VELUX Group
USA:VELUX America Inc.
1-800-88-VELUX
CDN:VELUX Canada Inc.
1 800 88-VELUX (888-3589)
AUS:VELUX Australia Pty. Ltd
1300 859 856
NZ:VELUX New Zealand Ltd.
09-6344 126
J:VELUX-Japan Ltd.
03(3478)81 41