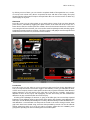
1
ARCA Sim Racing
BUMP-DRAFT
BY BOB SIMMERMAN
A RACER’S GUIDE TO “ARCA SIM RACING”
1
Bump-Draft
“Bump-Draft”
By BOB SIMMERMAN
A Racer’s Guide to “ARCA Sim-Racing”
"I feel like I got a pile of cattle chasing my ass, and I'm peddling as hard as I can
to stay in front of 'em. I'm looking behind me driving like hell."
—Rusty Wallace
Since its foundation in 1953 by John Marcum, the ARCA (the Automobile Racing Club of America)
sanctioning body has enjoyed an enormous growth in popularity while, simultaneously, proving
a fertile ground in the development of many of today—and yesterday’s—stock car greats. ARCA’s
major racing competition—the ARCA RE/MAX stock car series—has provided the NASCAR Sprint
Cup championship with many of its current (and past) stars: Names like Ryan Newman, Dale
Earnhardt, Jr., Tony Stewart, Benny Parsons, and Ken Schrader have all risen through the ranks of
the ARCA RE/MAX series.
—AutoSimSport Magazine
2
ARCA Sim Racing
Table of Contents
Foreword
4
Chapter One: Getting Started:
5
Chapter Two: Getting Better
11
Chapter Three: The ARCA Sim Racing Tracks
16
Chapter Four: The Ins’n’Outs Of ARCA Sim Racing
18
Credits And Legal
21
3
Bump-Draft
Foreword
Thank you for your purchase of ARCA Sim Racing, and welcome to the exciting world of ARCA
RE/MAX Series racing! You now hold in your hands a truly authentic and realistic representation
of one of the country’s oldest sanctioned racing series, dating back to 1953 when Jim Romine was
crowned ARCA’s first-ever Champion.
ARCA Sim Racing is a fully-licensed simulator for the PC which will allow you to take your pick
among Chevrolet, Pontiac, Dodge, Ford, and Toyota-branded 800 horsepower offerings, and race
them on every circuit on the ARCA calendar. Each car has been intricately laser-scanned for the
ultimate in accurate reproduction, and each track has been painstakingly recreated to be not only
topographically accurate, but visually accurate too, with full livery and sponsorship details. The
simulator also features custom-tuned physics and tire models based on real-world data provided
by the Hoosier Tire Company, meaning that each track has a specific model matching their realworld behavior in terms of grip levels. The track surfaces have been fully modeled and feature a
level of detail that will fully immerse you within the exciting world of ARCA/REMAX racing:
Whether turning a test lap, or battling for position in a race to the wire for the win, we have you
covered with the most authentic simulated-racing experience ever created.
Two years in the making, and with over one million miles driven by the beta testers and
development team (with over 50,000 laps logged on some tracks!) comes the assurance that
what you have in your hands is the most realistic stock car experience to date. With real- world
tire data, and aerodynamic and suspension data from several ARCA RE/MAX teams, ARCA Sim
Racing has covered all the angles (and turns!) and makes for a rich and rewarding experience,
both online, and off.
ARCA Sim Racing features industrial-strength multiplayer that ensures the only frustrations
you’re going to experience are those on the track! ARCA Sim Racing also supports broadcasting
features straight out-of-the-box, as well as Real-Time scoring plug-ins available via download.
ARCA Sim Racing allows you to enable driving aids to get started, or to leave them off for a truly
authentic racing experience. And who knows, with enough practice, you just might be the next
Frank Kimmel, nine-time series Champ’!
We hope you enjoy your purchase, and make sure to stop by the Sim Factory website often for
the latest information on developments and enhancements for ARCA Sim Racing.
—The Sim Factory Crew
4
ARCA Sim Racing
Chapter One: Getting Started
Features
ARCA Sim Racing is feature-rich and sports some of the best car and track modeling ever created
for a commercially-available simulator.
—Fifteen Degrees of Freedom (DOF) physics model
—Tire data provided by the Hoosier Tire Company, obtained by Calspan, and integrated into a
track-specific physics and tire modeling system, further enhanced by Active Grip Technology
(AGT) that accurately depicts differences in grip level and handling similar to what the real series’
drivers experience
—Advanced Suspension Modeling provides for realistic handling and detailed setup options,
complete with fender-flare modeling and Real-Time corner weight display. Also features a quick
setup option for those in a hurry
—Detailed aerodynamics modeling with Active Rear End (ARE) for realistic representations of
drafting and handling changes due to aerodynamic effects
—Simulated head movement and cockpit vibrations
—Laser-scanned car models for unprecedented realism and accuracy
—Advanced DirectX 9 graphics engine with Real-Time night and day transitions
—Detailed bump modeling—no billiard-table tracks here
—Fully-functional track scoring towers featuring Real-Time updates
—Gut-bending sound featuring the Miles Sound System
—Export replays to AVI with adjustable compression options
—Enhanced replay system and several realistically placed camera angles
—Industry-leading netcode fully integrated for a robust and dynamic multiplayer experience
—Race statistics automatically reported to SimStatsLive, allowing the driver to keep close track of
their virtual career. With SimStatsLive, you can join or view race details from the main interface,
search through past races, download XML race results, view an integrated ranking system
utilizing driver statistics, as well as server and user browsing capabilities
—Feature-rich admin’ and client environment with Buddy Lists, built in IRC chat, Boot or Ban
capability, Spectator mode for spotter duties or viewing, security checks to combat cheating, and
fully-functional and implemented ARCA RE/MAX Series rules
—Powerful League Tools feature set in an in-game Admin Panel for total race control, and ARCA
Hotlaps Plug-In, a Real-Time scoring module with live web exports (available as a download only)
System Specifications: Minimum Spec’
The complexity and detail of ARCA Sim Racing is such that the computer should meet, at a
minimum, the following specifications:
2.0 GHz processor
Windows XP/Vista, XP 64 (Windows 98SE, Windows Me, and Windows 2000 not supported)
512 MB RAM
GeForce 6800 or Radeon 9600, (older cards may work but at degraded performance)
128 MB video RAM
DirectX 9.0c
2.0 GB of hard drive space for installation
Internet connection required for online play
For a top of the line ride, the following specifications are recommended.
System Specifications: Recommended Spec’
Testing has proven that a motherboard with the Nvidia NForce 680 Sli Chipsets, paired with the
8800 Series GeForce Video card by Nvidia provides the best high-end results for users wishing to
run everything on maximum settings and at high resolutions.
—The Sim Factory Development Team
Intel Core 2 Duo E6600 processor or AMD Equivalent
Windows XP/VISTA
2.0 GB RAM
5
Bump-Draft
GeForce 8600GT/8800GT Optimal or Radeon X1900 GT and higher
256 MB video RAM
DirectX 9.0c
2.0 GB of hard drive space for installation
For online racing a high speed Internet connection is recommended.
Now, don’t worry too much if you don’t have the latest and greatest in terms of hardware—
ARCA Sim Racing features fully adjustable graphics and performance settings in-game that will
allow the user to strike the perfect balance between the eye candy we all love so much, and the
ever important frame rate. See the Menus and Interface section for further details on the specific
settings that have the greatest impact on performance, as well as optimization tips.
Installation
Insert the ARCA Sim Racing DVD into your drive and select ‘Install’ when prompted. Make sure to
shut off any non-necessary background applications such as virus checkers or background utility
programs as they can often interfere with successful installation. Accept the creation of the
desktop icon for ARCA Sim Racing.
Following installation, double click on the ARCA Sim Racing icon on the desktop to launch the
program. At first start, the ‘Configuration’ program will initiate and prompt you to adjust several
graphics options. After you have selected your preferences, click the ‘Next’ key to begin the
program. Subsequent launches of the simulator will not display this configuration utility:
However, should you find it necessary to tinker with your settings, you can find this option in the
root directory of ARCA Sim Racing.
Fire It Up!
After the intro sequence, you will be presented with a ‘Name Entry’ form. The name you enter
here will also be your online name, so keep that in mind that you should seek a bit of privacy in
your online endeavors.
This is your ‘Driver Profile’, and every setting and selection will be saved and unique to this
profile. Subsequent game launches will not bring up the driver creation window: However,
should you deem it necessary to create a new profile, you can find the ‘Driver Profile Creation’
option in-game.
Menus And Interface
There are several option tabs immediately visible—‘Game Settings’, ‘User Profiles’, ‘Media Center’,
‘Showroom’, ‘Test Session’, ‘Race Weekend’, ‘Race Online’, and ‘Exit Program’. The ARCA Sim
Racing experience is fully customizable, from controller setup to frame-rate locking, so let’s take a
closer look shall we …
Game Settings
There are four sub-menus in ‘Game Settings’, and chances are whatever you’re looking for you’ll
find here.
Game Settings—Controls
One of the most important things you will do before turning a lap will be setting up your
controller. After selecting the ‘Controls’ button, several options will appear. Mapping (that is,
assigning a button to a control) allows you to have any axis, button, or key activated by the
command of your choice. For example, if you have a shifter, you can select the ‘First Gear’ key,
then shift into first and bam—you are now all set up to shift. Of course, the rest of the gears, the
clutch, the brake pedal, the, well, you get the picture—pretty much anything can (and should) be
assigned here.
Those fortunate enough to have steering wheels with a few extra buttons find themselves able
to really go for the ultimate control configuration by mapping the ignition and starter switches as
well as the pit stop activation control. This is a powerful feature, and a few extra minutes spent
here will not go unrewarded: There are several commands such as camera controls and views
that, by default, are not mapped to any key or default location. Make sure to take a good look, as
it is definitely worth the extra effort. Also worth a quick glance is the ‘Calibration’ window where
you can double check that your axes (such as accelerator, wheel-turn, brake, and clutch
6
ARCA Sim Racing
parameters) are working right. There is also an adjustment for tuning the steering wheel range.
ARCA Sim Racing allows you to save any number of specific controller settings, and recall them at
any time, should you find it necessary.
If you are using a keyboard for control, the ‘Rates’ settings allows you to fine-tune—or detune—the behavior of an on/off type of key press situation. While ARCA Sim Racing can be
enjoyed with the keyboard, it is highly recommended that a wheel and pedal setup of some type
is used.
The ‘Controller 1’ and ‘Controller 2’ selections enable the user to fine-tune the sensitivity and
dead-zone regions of their particular controller (or controllers, depending on how many are
plugged in). One is plenty, however, so don’t worry about a backup plan! Each controller axis is
individually adjustable for maximum control and customization.
The ‘Force Feedback’ selection controls the Force-Feedback parameters for your particular
controller, provided that you control system supports it. Straight from the ARCA Sim Racing beta
team, the following values are recommended:
—FFB Type-Wheel
—FFB Effects—Full
—FFB Strength—(-100%)
Naturally, there has been quite a bit of speculation by many of us as to what a driver really
‘feels’ through the steering wheel in terms of road feedback. Certainly, the chassis communicates
bumps and undulations of the racing surface to the driver due to the fact they are, for all intents
and purposes, a part of the chassis due to the rigorous safety device known as the ‘seat belt’ (not
a conventional seatbelt, of course, but one that is secured at more than one location around the
driver with the intention being to keep the driver as motionless as possible), thereby making the
driver practically another part of the chassis.
The steering wheel, however, is aided by a power assist system not unlike those found in pretty
much every passenger car on the road today. As a result, not a lot of driver input—provided the
car is not all over the road—is required to change direction, nor is there a great deal of road
feedback being felt. It sounds extremely counter-intuitive—heck, my little G6 (and Former Monte
Carlo) communicated road bumps and what not just fine—but that is what the real drivers are
telling us: There isn’t that much feedback, and, in fact, the Force-Feedback many of us are used to
is not quite the way it really is inside an actual race car.
Of course, in a stock car, there is resistance when steering inputs are made, power steering or
not, since it takes a bit of muscle to haul a 3,500lbs stock car around the banking at Daytona, but
it is nowhere near the effort required when, back in the ‘old days’, there was no power assist, and
drivers often chose a higher racing line as that required less effort than hugging the inside turn of
a fast oval like Charlotte, or Atlanta in a 1967 Chevy of Some Sort.
The Sim Factory, however, recommends the following if you’re a purist: That the ForceFeedback setting is turned completely off, and the centering spring force is used instead. You can
configure this in your ‘Windows Controller’ setup utility. This setting should deliver a feel about as
close as you can get to a real stock car.
But, as always, it is all up to you—ARCA Sim Racing is all about bringing you the most realistic
stock car racing experience to date … on your terms. Don’t be afraid to experiment, you won’t
break anything! And don’t forget to visit the official forums for news, tips, hints, and answers to
any of your questions.
Game Settings—Graphics/Audio
Selecting the Graphics/Audio tab will bring up a menu with several settings. The settings are, for
the most part, self-explanatory, but a couple bear closer attention as they have a large impact on
frame rate. Frame rate is not only important for a smooth visual appearance, but for proper car
control as well—should the frame rate begin to drop, lag can occur causing a delay in steering
inputs by the driver. With this in mind, if you are having trouble getting a solid and steady 30
frames per second, try reducing the shadows and shadow blur settings first. You may not notice
the difference, but your computer sure will! In the lower right hand corner of this window are
further tips on optimization.
7
Bump-Draft
Game Settings—Difficulty
This screen allows the user to configure the difficulty and AI behavior of ARCA Sim Racing. The
options are, again, self-explanatory. You can also select a global difficulty level with the selector
at the top of the screen. For the full-on simulator experience, leave the aids turned off. It may be
difficult at first to drive quickly, but after some practice and familiarity with the setup adjustment
options, you will be picking up speed in no time. Adjust the AI difficulty as desired. Personally, I
like to set the AI, do a few laps at a track I know well, and compare my times to them. With a
default setup, my intention is that the AI be approximately 0.5 to 1.0 seconds quicker than I am.
My intention is also to close that gap with the proper practice time and setup adjustments. Of
course, you can choose any setting you wish, and with the fine nature of the adjustment slider,
getting the perfect AI speed that you seek is fairly straightforward.
The AI is also quite ‘race able’, and, given enough on-track practice with them, will provide for
very competitive offline racing. However, keep in mind that no AI is perfect, and that the odd
smash is no doubt bound to happen. A great way of getting to know the AI is to simply select the
TV camera view and watch them. Watch how they approach certain parts of the track—whether it
be a lone entry into the high banks of Daytona, or a heart stopping dive into turn one with cars
inside and outside at the Irish Hills of Michigan International Speedway. Once I have had a look at
how the AI is behaving at a particular track—and speed/aggression setting—I head out to the
track. I mentioned earlier that I like the AI a bit faster than me when I am hitting a track for the
first time, but for this exercise, I like the AI to be a bit slower than myself as it will provide for the
opportunity to mix it up at my leisure. And that is exactly what I try to do, position myself around
an AI car, or cars, and stay with them for as long as I can; that is, race with them, not just follow
them. Sort of like formation flying in a military jet, I find that the more I do this, the easier it is for
me to deal with whatever the AI may throw my way, and, just like their real world counterparts,
the AI are not immune from bad decisions—or bad luck!
While nothing beats the online experience for truly human competition, with a bit of tender
loving care and practice, racing the offline AI provides for a lot of fun, and definitely helps with
your online exploits; as you learn how to deal with the AI, you will find it much easier to deal with
those human enemies as well! Test laps on an empty track are extremely important, but it doesn’t
hurt to have a bit of the unknown thrown into the mix as it may prepare you for the unexpected
at a critical moment on the track during your online career. Remember, a quick car is worthless if
it can’t deal with traffic.
Game Settings—Multiplayer
ARCA Sim Racing boasts one of the most stable, feature rich, and easy to use multiplayer
components to be found anywhere in the industry, and from this screen you can make several
adjustments. Let’s take a quick tour: ‘Connection Type’, is what you’ll be using to connect to the
internet (and races), ‘Upload Rating’ is used primarily for hosting races, ‘Download Rating’, and
the ‘SimStatsLive’ reporting toggle are all set from this screen.
‘SimStatsLive’ is a tool that you will use should you wish to post your online race results to the
SimStatsLive system. SimStatsLive is a powerful enhancement to the online experience, and
definitely worth checking out. See the SimStatsLive section below for more information.
Once you have made your selection settings at the Multiplayer screen, they will be enforced
when you make the selection to race online from the main game interface screen.
User Profiles
This screen displays information about the currently selected driver profile, including lap records,
and laps run on a per-track per session basis. Optionally, you can enter further details about the
particular profile in the spaces available. New profiles can be created at any time, but all settings
will need to be adjusted from their default values as the new driver is created.
Media Center
This screen provides adjustment options for the replay system. Replay recording can be turned
on or off, and the length of the replay can be adjusted as well. The ‘Replay Fidelity’ represents
the level of detail that will be obtained during recording. This setting will not, however, have
any effect on the graphical appearance during actual game play; rather, it is simply a way to
ensure smooth playback. The window at the lower left is a listing of all replays recorded, and
8
ARCA Sim Racing
by clicking on one of them, you can view the complete details of that particular race, session,
or hot lap such as how many drivers competed, the time and date of the replay, the replay
length and other information unique to that particular file. You can also rename or delete any
of the replays at any time.
Showroom
From this screen, you can select which car you wish to drive. Some of the cars have alternate
paint schemes, selectable by toggling the option selector at the lower left of the screen. For a
better look at the laser-scanned precision models, select the showroom button for a full-screen
view. Using the left mouse button, you can move the model completely around, including a great
top-down perspective. And rest assured—all of those gizmos and gadgets seen through the front
windscreen are on the real cars, and in the correct locations.
Test Session
From this screen, you can select to run a test session at the track of your choice. Depending on
how you setup the ‘Private Test Session’ toggle in the ‘Difficulty’ screen, you will either be alone,
or have some company. Practice makes perfect, and in order to get the full extent of the ARCA Sim
Racing experience, you will need to turn more than a few test laps. Certainly, each track is
different in terms of size, layout, and topography, but The Sim Factory has also modeled the
differences in grip at each track that also come into play.
A freshly paved Talladega, for instance, is going to stick like glue, but a never-been-repaved
Daytona is most definitely going to present the driver with a grip situation vastly different than
that of the smooth blacktop of Talladega. As in reality, ARCA Sim Racing models the differences—
and difficulties—associated with car setup and car control as the venues change. Further, these
grip levels have been created using actual tire data provided by Hoosier Tire for the ultimate
driving experience, which is to say: If you want to compete, against the AI or HUMINT, you’re
going to be spending a lot of time selecting this Test Session option.
9
Bump-Draft
See the ‘A Few Laps at Pocono’ section for a detailed description of the complete on-track
experience of ARCA Sim Racing in terms of game play mechanics and practice techniques.
Race Weekend
When you are ready to hit the track for real, this is probably the best place to start. The options
for the ‘Race Weekend’ can be altered by hitting the ‘Options’ button at the middle lower
portion of the screen. ‘Practice’, ‘Qualifying’, and ‘Warm-up’ sessions are all available should
you decide to select them, as well as the number of AI drivers, the extent of the flag rules, and
many other options.
Race Online
Here is where the rubber meets the road—racing online against your buddies is one of the best
gaming experiences around, and from here you can view the list of available servers to join, have
a chat session with your racing buddies, or even host a race. The list of servers can be sorted by
left clicking on the heading tabs at the top of the lobby window.
You can join a race simply by clicking on its information line in the lobby window, after which
you will be taken to a password login—should there be one—and then to a ‘Car Selection’ screen.
From there, you are taken to the main race interface screen, called the ‘Monitor’, which you have
already seen during ‘Testing’, and ‘Race Weekend’ sessions. You don’t have to use the same car
online as you do for offline, as any statistics you generate for SimStatsLive, for example, will be
associated with your particular driver profile and not the car. However, the statistics for the car
itself—such as miles driven—will be kept on an individual vehicle basis.
Exit
Selecting this will exit the simulator and return to the Windows desktop.
10
ARCA Sim Racing
Chapter Two: Getting Better
A Few Laps At Pocono
Pocono is what I have chosen to give you a quick-fire tour of what it will take to succeed. Why
Pocono? Simply, because of its unique characteristics—as any fan of the sport already knows, you
will see examples of drafting, oval, and, believe it or not, road course techniques, on every lap.
Often referred to as a ‘roval’—that is, a combination of road and oval features—the front straight
at Pocono is also unique in that it is not uncommon to see cars going five wide at better than
180mph. The faint of heart need not apply. Especially when the five crack down Turn One where
only two-wide is possible; if three of the five don’t back down, you can imagine—and sometimes
you will see—the mess. Sometimes, they say, even two is ‘too’ many at Pocono …
The drafting you will see is not the all-out pedal-to-the-metal variety you will encounter at
Daytona either, but it definitely plays a role as the cars have 3,500 feet of front stretch to try it out
before they have to put on the road course driver hat for the first time and convert all of that
forward motion into brake system heat.
Nestled in the mountains north of Allentown, Pennsylvania, Pocono features some of the most
beautiful countryside of any track on the ARCA schedule, making it all the more appealing to fans
and drivers alike.
But aside from the pretty landscape, Pocono offers a unique challenge to the ARCA driver:
Each turn requires a different approach not only in terms of the way you—the driver—will
attack them, but also—and crucially—from a car setup point of view. Not only does each turn
differ in terms of banking angle, radius, and topography, but, due to the colossal length of the
front straight versus the relatively short stretch between turns Two and Three, there is the
unique requirement (in the ARCA series) for up-shifting and downshifting in order to get the
most out of the lap—and your time.
Pocono is a great place to get a taste of every type of track length, configuration, and layout on
the ARCA schedule, and the lessons you will learn here will be crucial as you head into a fullseason of ARCA-style racing. Pocono requires a blending of mindsets and strategies from distinct
and very different aspects of stock car racing, ovals and road courses. If you’re quick here, you’ll
be quick pretty much everywhere else.
Right! So tighten the straps, secure the Hans Device, and start up the motor—you’re going
racin’!
11
Bump-Draft
To The Track
Select ‘Test Session’ and then ‘Pocono’, and after the track has finished loading, you will be
presented with the main simulator interface, also known as the ‘Race Monitor’. There is a lot of
information here, including track conditions, driver times, and access to a fully featured garage
area. Have a quick look around, get acquainted with your mechanics, grab a last gulp of your
energy drink and, when you are ready, hit the ‘Race’ button.
You will find yourself in the garage area, with the engine off. In a moment, you will hear the
starter kick in, and then the unmistakable grunt of an 800BHP V-8 at idle. Before we navigate to
the track, let’s have a look around using some of the internal and external views. Tap the key you
assigned for looking left or right (‘V’ and ‘N’ by default) to have a look around the cockpit. Every
switch, gauge, light, and label you see is modeled with intricate attention to detail. Gauges for
fuel pressure, water temperature, oil temperature, and pressure, volts, and the ARCA-mandated
yellow cockpit indicator that will illuminate whenever a caution flag is thrown are all there. Make
sure you know what’s what—pounding into Turn One at 180mph is not the time to try and workout where your oil temp gauge is located!
Looking to the left and right also reveal portions of the seat headrest, as well as the electronics
mounted on the dash. Portions of the roll cage are also visible, giving a good idea of the
confining nature of the cockpit area. With the mirrors enabled, you can see the cockpit bars
reflected in them, obstructing a view to the rear. To your left, on the A-pillar, is a small circular
mirror that can prove invaluable as it provides a view with fewer obstructions, albeit with a
smaller region of coverage; every little bit, as you will soon discover, helps. Throw in the Spotter
feedback, and you will eventually, and intuitively, have a good feel of what is actually going
around you far above what the visual cues are giving you. Which is a good thing, because looking
left and right, and trying to work out who’s where when you’re five-wide at 180mph is a quick
way to end your career in a way we’d rather not contemplate at this stage …
Tap the ‘Page Up’ key to activate the Swingman camera. Using the keypad numbers you can
swing the view completely around, and you will also be able to zoom in and out. Give that a try
now—hit the ‘4’ key to bring the view around the front corner of the car. Now, give the throttle a
bit of gas, and note how the car body is rocking back and forth due to the torque of the power
plant. Literally, it wants to twist the car in half, and it must be kept in mind when trying to get the
most out of your car. The physics model in ARCA Sim Racing has been painstakingly and
meticulously crafted to mimic the real-life behavior of these beasts, and 800BHP is not something
you’ll be domesticating any time soon. Now is a great time to begin respecting that power!
Now let’s zoom out a bit, and see just where the track entrance is. It is advisable to learn this for
each track before leaving the garage for several reasons. First, it’s embarrassing to get lost in the
garage area (this is a simulator, and you will always find yourself in the garage—not the pit—
when you get into your mount), and, second, just pulling out of the garage might land you in
front of someone else already in motion. Just like the real garage areas, not looking where you are
going here can lead to extra hours in the body shop, and crashing into a HUMINT in the garage
area is a quick way to earn a reputation you don’t want to have. Hit the ‘7’ key to zoom out, then
use the ‘4’ key again to adjust the view so that you have a clear line of sight to the exit gate. Drop
the car into first, and—carefully—make your way to the gate. Once you get there, it will be clear
which way to turn onto pit lane. Make sure you go the right way, or you may find yourself blackflagged and excluded from the race weekend before you even get onto pit road.
Now that you’re rolling, let’s remember what you would invariably have been told by your
Chief Mechanic before you climbed behind the wheel—words that have been spoken to every
rookie in every series in history: We aren’t out to set any speed records today, and we definitely
don’t want to get too aggressive on accurately modeled cold tires. For now, we are going to have
a nice and easy lap around one of the most unique tracks in all of motor sports. A Sunday drive—
with the kids in the back and eggs in the trunk, okay?
The pit lane exit here can be a bit dicey at times due to the relatively short exit before you have
no choice but to enter the track. Some tracks have extensive entryways to the main track, so each
case will be different, but at Pocono, a good rule of thumb is to assume someone is coming from
behind no matter what! Once you have transitioned to the racing surface, bring the car up to
speed, and begin to think about braking point markers you may use, what other drivers—if the
test session is not private—are doing around you, what line you think is best through the turns,
and just where it is you want to shift.
12
ARCA Sim Racing
Personally, I like to get the shifting done before the corner entry, but as the laps wear on, and
my confidence grows, I find myself shifting almost at the corner apex, hugging the bottom but
remaining well-off the thin—and dangerous—curbing. Each of us will have different
preferences—just like the real drivers—but for now, it is a good idea to get a grip on the basics.
By now, you have made—I hope—your way through a warm-up lap or two, and are ready to
tackle the track at a more aggressive pace. As any pro’ will tell you—and as logic dictates—a track
is made up of turns and straights: How you come off the turns will dictate how fast you will be on
the straights, and how fast you are on the straights is usually a good indicator of how fast you will
be on the lap charts. So let’s begin at the start of the lap: Turn One.
Turn one at Pocono is deceptive. The pros on TV make it look like the easiest thing in the world
to navigate; the reality, however, is much different. Entry to the corner has a bit of an uphill
character to it before dropping noticeably left into the apex. Exit is also not a trivial matter as you
are not only headed uphill but there is also a bit of banking tossed in before spitting you out onto
relatively level ground. Depending on your exit, and your gear selection, you may or may not
need to up shift before the entry to Turn Two. As you exit Turn One, you will notice not only the
detailed track environment, but a part of the beautiful Pocono mountain range in the distance.
You did? Good—that means you’re going too slow!
Turn Two is quite a bit different than Turn One. The ‘dive’ into the corner is less daunting, and
the corner is of a greater radius. What makes this turn tricky, however, is that the banking is
noticeably less that of Turn One, not only through the corner, but at the exit as well. As such, you
will have to adjust your style to compensate for the change of banking from the previous turn.
And just like Turn One, there is plenty to see from the cockpit outside of the racing surface. Again,
we have the beautiful mountains in the distance, and a whole lot of RVs on the right hand side,
indicative of just how fun this is for the fans as well as the racers!
Only one more turn to go, Turn Three, the most critical turn on the circuit. Get through it
quick because it leads us back onto the massive front stretch, and to our lap time—a bad exit
here will destroy everything you have done to that point; this is one turn you cannot make a
mistake on. Flat, and with very little banking, you will be in third gear on entry as the stretch
from Two to Three is just not quite long enough for a gear change. Make sure to brake
smoothly on entry to this turn, and get back on the gas as soon as you can because you need
to hit the straight patch nice and smooth and straight. Throttle mistakes here can have a nasty
tendency of dumping you on the front stretch with the nose pointed the wrong way. Take your
time, and learn this corner well; while topographically less complex than Turns One and Two, it
is the critical moment of your lap.
Chances are that, by now, you are probably realizing something important: a perfect setup for
turns One and Two is probably doing you no favors coming through Turn Three. Or, depending
on your style, you’re perfect through turns One and Three, but not Two. As in the real sport,
compromises must be made as there is no one single ‘magic setup’ for any track, much less the
interesting confines of Pocono. And this is where the driver and team come into the picture,
because despite what you may have been led to believe, modern motor racing is a team sport, a
blend of mechanical and engineering acumen and driving talent. Making the necessary
compromises to the setup—combined with changes to the driving style—is crucial should you
want to be competitive.
Back at the garage, and on the ‘Monitor’, I noticed that I have just run out a 54.950. By left
clicking on my driver name in the Standings List, and then right clicking on the highlighted name,
all of the lap times that were obtained during my last stint will be shown.
Time for a debrief with the engineers, before the mechanics will get to work making setup
changes and adjustments based on my feedback. This is a good time to get a glimpse at the
garage area, and a feel for what changes are actually doing for—or against—us.
The Sim Factory has gone to great lengths to provide stable setups (by default) for each track,
and you don’t need to worry about fine-tuning chassis setups as soon as you get into the driver’s
seat. It won’t be long, however, before you realize that you can be quite a bit faster with an
adjustment or two to the setup. Just remember, however, that there is no perfect formula for
obtaining the optimum setup for your car; setups are unique to your style, and also to what you
want the setup to do for you. A quick qualifying setup may not be ideal for a 500 mile race; and a
setup based around a full tank may not be ideal should you decide to take it out with empty tanks
for a qualifying run.
13
Bump-Draft
Having said that, however, there are some changes we can make right away that should give us
a few extra tenths without spending hours in the garage. The reason for this is—as every rookie
will have discovered through the ages of motor sport—setups given to the ‘newbie’ are always
‘stable’. And stable is never the quickest way of going racing.
For this particular exercise, I found the car to be a bit on the ‘tight’ side, or, in other words, the
front end of the car did not respond to my steering inputs as much as I would have liked; it didn’t
‘roll’ through the corner, and throttle modulation was required—as in get off the throttle—in
order to bring the nose back in line before I hit the outside wall. This is clearly not ideal since time
spent off the throttle is time wasted; in an ideal world, you want to have your foot on the throttle
for the longest period of time as you can on a lap. To tackle this, I have chosen to remove one
round of wedge, or cross weight, from the chassis of the car. This will have the effect of putting
less weight on the front right tire, thereby reducing the ‘plowing’ effect of a tight car. In theory,
that is!
Hit the ‘Garage 2’ tab, and among the many settings found here, you will see the setting to
adjust the wedge in the lower middle portion of the screen. I am going to adjust it to negative 2,
and see where that leads. Remember—removing wedge will have a tendency to make the car
loose, or, susceptible to spinning out at the rear, and adding wedge will tighten the car up, or,
making it less likely to spin at the rear, but susceptible to a poor turning radius as the front will
slide along the direction of travel as opposed to following the steering inputs. In other words; less
wedge will cause the rear to try and catch up with the front; more wedge will mean the car will be
more stable, but less able to turn.
Our wedge adjustment made, it’s time to hit the track again. And just a note to the rookie, and
you’d be well-advised to remember this, as it is a staple to every single setup change you will ever
make in your racing career, virtual or real: One setup change at a time! Don’t mess with more than
one setting at a time, because setup building is about two things—making the change, and
testing the result. More than one change will mean you will have no idea which has caused what
effect when you’re out on the track, and going the wrong way—setup-wise—is a frustrating
process that won’t win you any applause from your fans—or your mechanics!
Now that you’re on the track, we’re going to be rather more exacting with our testing: We are
going to have a look at some Real-Time data feedback to get an idea of how the car is behaving—
before and after the tires come to temperature. Before leaving the garage, hit the ‘6’ key on the
keyboard, and then cycle through the various LCD pages until you come to the tire monitor page.
This page of the LCD will show you the condition and temperature of your tires, as well as your
fuel load and estimated amount of laps you can run on that load.
As you make your way down pit road and onto the track, you will notice all the tire indicators
are blue, indicating fresh tires with no temperature in them at all. You will also note a thin green
bar next to each tire icon; this is an indication of the overall tire wear, and the length of this bar—
as well as the color—will let you know just how ragged and worn the tires are. Sometimes, the
fuel will last a lot longer than the tires, so make sure you learn the tire wear characteristics at each
track for that extra bit of an edge.
You will quickly notice how our wedge adjustment has affected the car, at least in terms of tire
temperature. Observe how quickly the right rear tire is heating, relative to the others, as we drive
through the corners. That is the effect of our wedge adjustment, since we have placed more of a
burden on the right rear tire in terms of chassis weight loading, and the heating rate difference in
this tire versus the others lets us know that, as we make our way through these corners, we are
riding quite a bit on that one tire. And we will notice something else as well—the rear-end has
suddenly become a lot more active; that is, noticeably less ‘sticky’ than the default setup,
requiring some on-the-fly adjustments of driving style in order to not pound the right rear tire
into oblivion and, at the same time, keep it from getting out of control well before tire life has
been reached!
After a few laps with the single setup change, I found myself obtaining a 55.970 for a best time.
I also found that more effort, physical and mental, was required to get the car around due to the
need to consciously keep the rear from stepping out, or the right rear tire in particular from
overheating too early into the run. Not only did the car turn better, it turned too much, and any
advantage that I was personally gaining due to a better turn rate came at the expense of too
much opposite direction of travel input in order to maintain my comfort level. A loose race car is a
very unnerving thing, and, as they say, friends don’t let friends drive loose.
14
ARCA Sim Racing
Although I did not see any time improvement, a loss, actually, it was in fact the case that the car
was simply too difficult to drive, and it was interesting to note that just because a lap time is
reproducible, it doesn’t mean the car is going to feel the same doing the same time.
An important thing we have learned is just how dramatic an effect on car behavior a single
change can have. I wish I knew the secret path to setup glory, as I would love to share it, but the
fact is we all have different ‘comfort’ levels: That is, what one of us may find as an extremely loose
car, another may find to be a perfectly balanced car. My advice, when you’re tinkering with setup
changes, is to ‘save’ often, and develop your own naming system for your setups as you will most
likely want an ‘on the edge’ setup for qualifying, and a more reasonable and stable setup for the
race. Ultimately, it is up to you, and ARCA Sim Racing is the perfect playground to develop your
skills as a top level oval driver.
I think I will take a bit of a break to calm my nerves before putting that wedge back to the
normal side of sanity and attempting to shave some time from my extremely modest pace. Not
only that, but this is a great opportunity to check out some of the broadcast type camera views
built into ARCA Sim Racing.
At the ‘Monitor’ screen, left click in the viewing area to give that window a full screen format.
Hit the ‘+’ key to select a driver who is currently turning a lap on the track, and then tap the ‘Page
Up’ key to view this driver specifically. The camera angles will change automatically as the driver
navigates around the track, providing a realistic view of every aspect of their driving. Next, as the
driver enters a corner, tap the ‘End’ key, and you will notice that the camera is no longer tracking
the driver, but has become stationary—now, move the mouse! This is an interesting view, and
you can swing the camera around, as well as up and down, and any other way you can imagine: If
you can move the mouse, you can move the camera. Earlier in the manual, I mentioned several
unmapped game commands, and several of these are modifiers of some of the camera views.
Keep tapping the ‘End’ key, and you will automatically be taken to stationary cameras all over the
track, all of which provide for strikingly realistic vantage points.
What is the point of us in this section, you ask? It is often the case that, once you step out of
your car and watch your lap from the outside, that you are able to gauge problems with your
setup, or your lines, or your driving style. So if you’re off the pace, take a look at the pace setting
cars, and the compare to your lines—chances are you will be able to determine where you’re
losing time. Figuring out why, though, is when you’ll have been promoted from rookie to bonafide ARCA Sim Racer …
15
Bump-Draft
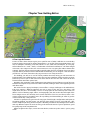
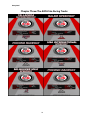
Chapter Three: The ARCA Sim Racing Tracks
16
ARCA Sim Racing
17
Bump-Draft
Chapter Four: The Ins’n’Outs Of ARCA Sim Racing
ARCA—Consistency Wins Championships
Points are awarded by several rules, and the official Points Rules (for the 2007 season) can be
found below, exactly as they are on the ARCA RE/MAX website. As you can see, if you want that
championship trophy at the end of the year, you are going to need to be consistently at the top
all the way through the season.
Even a streak of several wins in a row can be dampened by a couple of DNFs, and you may find
yourself in the unenviable position of needing another driver to run into a stretch of bad luck. It is
always best to ‘control your destiny’, because odds are that other guy may just have the most lucky
season of his career and win the points championship not due to sheer number of wins, but from
simply finishing every race, showing the consistency it takes for a serious championship effort.
Long story short—every point matters, and it is definitely in the best interest of the driver to
continue whenever possible should things go south in the race. If you get collected in an
accident, but the car is still drivable—perhaps the suspension is only slightly bent, hurting only
your time around the track, but not your ability to drive it—get out there, grit your teeth, and
finish up the race. Who knows, the leader might blow a motor with 10 laps to go.
Here then is the points system that governs the highly competitive world of ARCA Racing.
ARCA RE/MAX Series Point System Explanation
—Twenty-five points awarded upon pre-entering and competing
—Finishing positions: Points begin at 200 for first place, and fall in 5-point increments with
each position as follows: 1st: 200; 2nd:195; 3rd: 190; 4th: 185; 5th: 180, and so on down to 41st, the
final points-scoring position
—Qualifying points: 1st: 15; 2nd: 10; 3rd: 5. No other positions receive qualifying points
—Five points awarded to any official lap leader
—Five additional points awarded to the leader of the most laps
—Bonus points: 250 points awarded upon entering and competing in each pre-designated fiverace leg of the overall schedule. In other words; if you compete in the first five races; you will
receive the 250 point bonus at the conclusion of the five-race leg. If, for any reason, you miss one
or more of the five, then you will not receive the 250 point bonus. The same would also be true of
the second five-race leg: events six through 10, and so on
Note: If the sum of events in any given year does not add up in factors of five, the 250 point
bonus will also be awarded for the remaining races. In other words, if the schedule should, for
example, include 21, 22, 23, or 24 events, there will be a 250 point bonus attached for the
remaining races provided drivers compete in all of them, whether it is one, two, three, four … or
more. As in the case of the 2003 season (22 races), drivers must compete in the final two events to
pick up the 250 point bonus. The same would be true if the schedule had 26, 27, 28, or 29 events,
and so on. All bonus points attached immediately following each pre-designated leg. Why the
bonus points? It can encourage, from time to time, full-time participation.
While not as straightforward as a simple points table that awards by position only, the ARCA
sanctioning body has built in incentives for, literally, showing up to the race. A bit complicated,
perhaps, but the incentives spice things up a bit. And if the past Daytona ARCA RE/MAX race was
any indication—70-plus drivers qualifying for 43 positions—it is difficult to argue against the
logic.
18
ARCA Sim Racing
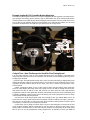
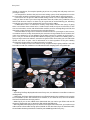
Example Logitech G-25 Controller Button Mappings
The following photograph illustrates an example of Mapping on the Logitech G-25 wheel. Views,
gear changes, pit strategy, driver statistics, and car information can all be obtained without the
need for keyboard use while driving. Note: Holding the left and right view commands at the same
time, in this case the paddles, will give a rearview look, so try and map them where you can easily
press both simultaneously: This will serve you well in your sim-racing career!
Cockpit Tour—How The Gauges Are Used For Fine-Tuning Speed
Turn the page and take a look at your cockpit: Memorize where everything is, and what teach
gauge represents because in the heat of battle is not the time to start wondering where your oiltemp gauge is located!
—Caution Light: This light will illuminate at the same time the yellow flag is displayed by track
officials. By placing a light in the cockpit, there is no question as to the conditions on the track,
regardless of their location relative to the driver. So if this is yellow, be prepared for some
evasive action!
—Water Temperature: Keep an eye on this gauge to aid in the fine-tuning of the grille tape
you’ll be using (higher grille tape means more ‘grip’ since less air will be sucked into the motor,
and forced over the car which, in turn, will push the car down onto the road). High ambient
temperatures and too much grille tape, however, will quickly lead to your motor overheating and
eventually exploding, so keep a keen eye on this during your testing and practice sessions. Keep
it around 220–230 for optimal operation.
—Fuel Pressure: If this drops below 9 PSI, start looking for the gas station! Make sure to do
some fuel runs at every track to learn the consumption numbers. Nothing can make—or break—
late race runs at victory like an empty fuel tank. And remember; nothing wastes fuel like a good
set of brakes, so make sure you‘re easy on the anchors!
—Tachometer: You’re going to want to make sure you’re not hitting the rev’ limiter at the end
of the longest straight, and the tachometer is just the gauge to fine-tune that aspect of the
gearing ratios. The tachometer is also critical for the purpose of maintaining the pit road speed
limit as you can use the speedometer setting (keyboard ‘5’ by default) to check your RPMs at
19
Bump-Draft
45mph in second gear, for example. Speeding in pit lane is a penalty that will pretty much ruin
your day in a hurry.
—Oil Temperature: Similar to the precious water cooling system, the oil temperature must also
be observed for possible overheating of the engine. Keep it around 240F for optimal operation.
—Oil Pressure: The oil pressure will fluctuate during normal use, but at high RPM, look for a
reading of about 70 PSI. If you notice large deviations from this under racing conditions, take a
look in-back because chances are there may be a giant trail of smoke following you, indicating
not only the true nature of your predicament, but a nice spot for a BBQ!
—A-Pillar Mirror: This is a small mirror used by many drivers with the view (sorry) of giving
them a much better view to their left, or, ‘inside’. But be careful to rely too much on this, as this
view is much smaller, circular, and distorted than real-life. Use it for checking things out-back, but
don’t plan a super precision maneuver trusting only this reflection.
—Rearview Mirror: A large mirror situated in a location similar to a passenger car, this mirror is,
in an ARCA stock car, heavily obstructed by the extensive roll cage within the car. However, the
mirror is not without use as you definitely can tell when someone is crawling up your bumper—
just in case you missed the bump-draft. Whether keeping your position at a drafting track, or
trying to help a team mate advance, remember to glance at this mirror when you can. Taken with
spotter cues, there is quite a bit of information to be had regardless of the poor visibility
characteristics for the driver in a modern day stock car cockpit.
—Volts: You need juice to fire one of these cars up, and juice to keep it going. Look for 13-14 volts
here under normal race conditions as an indication that the charging system is in good shape.
Flags
—Green Flag: This flag is displayed at the start of every race, or to indicate a re-start after a caution or
red flag period.
—Yellow Flag: This flag is displayed whenever race officials determine the conditions on the track to
be too hazardous to race. This could be for an accident, or, as is often the case, some sort of debris
that has found itself onto the racing surface.
—Black Flag: If you see this, officials have determined that you need to get off the track and fix
whatever is wrong with your car. Ignore this flag and risk disqualification.
—Blue Flag With Yellow Stripe: If you see this one in the upper left hand corner, you need to move
aside as there is faster traffic coming up from behind. On the other hand, if you are that faster traffic,
the AI of ARCA Sim Racing should move aside for you! HUMINT opposition may vary …
20
ARCA Sim Racing
—Checkered: The one we all want to see; catch this flag first, and you just caught the race!
Credits And Legal
ARCA SIM RACING 08 - ARCA RE/MAX Series
LEAD PRODUCERS
Nick Steelman
Robert Coulter
PRODUCERS
William "Zippy" Zimmerman
Mark Carter
Chris Coulter
Mike Rohr
Ricky Sanders
PHYSICS DESIGN
Robert Coulter
Nick Steelman
Michael Borda
Dennis "Boden" Rickard
Josh Buckwheat
TRACK DESIGN
Michael DiPonio
Josh Buckwheat
GRAPHICS/TEXTURE ARTISTS
Michael DiPonio
Josh Buckwheat
Robert Coulter
Nick Steelmam
Justin Wilkinson
Keith Bishop
CAMERA DESIGN
Robert Coulter
Michael Borda
Chris Coulter
SOUND DESIGN
Robert Coulter
Nick Steelman
CAR VIEWER DESIGN
Fred Anderson
STATISTICAL SYSTEMS DESIGN
Ken Richardson
SPOTTERS VOICE
TBD
21
Bump-Draft
TECHNICAL ADVISORS
Michael McDowell
Jeremy Clements
Justin Allgaier
Kevin Swindell
Ricky Sanders
Brandon Whitt
Willie Allen
Brad Coleman
AJ Allmendinger
Josh Krug
Blake Bjorklund
Dan Brode
Justin South
Parker Kligerman
Chris Cockrum
Cale Gale
Gary Sherman
Jeremy Petty
Jordan Sims
Dick Timmons
Michael Logan
Michael Johnson
Will Kimmel
Stackpole Engineering
BETA TESTERS
Scott "Tool" DeBoer
Carl "Paint" Taylor
Kenny Smith
Charles "Spoon" Thomas
Robert Roop
Nick Neben
Jerry Wolf
Bobby Leonard
Mike Henry Jr.
Mike "PRO86LOW" Costrello
Phil "PRO Lash" LHeureux
Dave Henrie
Justin Thomas
Michael Gizuk
David Reid
John Sikora
Josh Friedrichs
Dean Schmall
Ray Vachon
Mark Wheeler
Craig Lewis
Bobby Cruz
Dennis Putnam
Tony Johns
Aaron Markham
Matt Thomas
Tony Stevens
Dave Stanely
Ron McGrane
Keith Bishop
22
ARCA Sim Racing
Mark "Echoshill" Snyder
Tom Quattlebaum
Matt Bergeron
Pat Dotson
Bob Bryant
Ray Alfalla
Jeff Shrewsberry
Darin Gangi
Shaun Cole
Elliot Davis
Michael Pope
Matt Holden
Mackie McBroom
SPECIAL THANKS
ARCA Incorporated
Speedy Awards & Engraving
Stackpole Engineering
Richard Childress Racing
OnlineRacin.com
SimRacingTonight.com
ProSimRacing.com
RaceTrailerSales.com
DMP-Racing.com
Hixson Motorsports
Frank Kimmel Racing
Bill Kimmel
Premium Racing Online
RE/MAX International
Hoosier Tire Corp
Adrenaline Computers
InVIRON Sim Devices
NRT Game Servers
Stewart Warner
PitBoxes.com
Mr. Gasket
Amazing 3-D
K&N Filters
Cookies Bar"B"Q
Pork - The Other White Meat
Racing Electronics
Weld Wheels
Lincoln Welders
Stewart Warner
Holley
Accell
Hurst
Mallory
Hutcherson-Pagan
Nitro Pit Boxes
Hans Device
G-Force Racing Gear
Featherlite
CV Products
Intercomp
Casite
NAPA Auto Parts
23
Bump-Draft
Dominos Pizza
RPM-3d Inc.
Pure Voice Communications
Jason DeVriese
Dave Stanley
Gjon Camaj
Daren Havens
Dale Earnhardt Jr.
TJ Majors
Mark Gundrum
Wayne Hixson
Jeff Buice
Shaver Motorsports
Team CGW
Mackie McBroom
Martin Truex, Jr.
Brian Keselowski
‘BUMP-DRAFT’ USER GUIDE
Words: Bob Simmerman
Editing, Design, Production: Alex Martini
OFFICIALLY LICENSED BY:
Chevrolet:
Chevrolet is a trademark of General Motors
Pontiac:
Pontiac is a trademark of General Motors
Ford:
Ford is a trademark of Ford Motor Company
Toyota:
Toyota is a trademark of Toyota Motor Company
Dodge:
Dodge is a trademark of Chrysler LLC.
Kansas Speeway, Daytona International Speedway, Talladega Superspeedway, Chicagoland
Speedway and Michigan International Speedway are the registered trademarks and property of
International Speedway Corp.
Nashville Superspeedway, Gateway International Speedway and Dover Int'l Speedway are the
registered trademarks of Dover Motorsports.
Toledo Speedway
Pocono Raceway
Iowa Speedway
Kentucky Speedway
Milwaukee Mile
Salem Speedway
USA International Speedway
DuQuoin State Fairgrounds
Illinois State Fairgrounds
Berlin Speedway
New Jersey Motorsports Park
Cayuga Raceway
Winchester Speedway and all logos associated with each are the trademarks of their respective
owners. The #3 located on the in-game car of Austin Dillon is the registered trademark of Richard
Childress Racing.
All logos and decals used at tracks or on vehicles are the property of their respective owners.
ARCA driver photos are the property of ARCA Inc. and Bob Castanza.
MUSIC
24
ARCA Sim Racing
'Hot Chopps'
Created by and Courtesy of The Nick Steelman Band
RAD Software
Uses Miles Sound System
Copyright (C) 1991-2008 by RAD Game Tools, Inc.
TECHNOLOGY PROVIDED BY:
Image Space Incorporated (C) 2004-2008
All brand names, logos or registered trademarks are the property of their respective owners or their
subsidiaries in the United States or other countries.
Any file, information, content, idea, or other parts relating to this product, or its development or
format are proprietary to Sim Factory LLC and/or Image Space Incorporated.
(C) 2007-2008 Sim Factory LLC
All Rights Reserved.
PLEASE READ CAREFULLY BEFORE USING THE SOFTWARE:
This End User License Agreement ("EULA") is a legal agreement between you (either an individual or
a single entity) and The Sim Factory LLC ("TSF") for the software product “ARCA SIM RACING", which
includes computer software, data files, ASR Car viewer, League Tools, any/all Plug-Ins and associated
documentation ("Software"). The Software also includes any updates and supplements to the
original Software provided to you by TSF. Any product provided along with the Software that is
associated with a separate end-user license agreement is licensed to you under the terms of that
license agreement. By installing, copying, accessing or otherwise using the Software, you agree to
be bound by the terms of this EULA. If you do not agree to the terms of this EULA, do not install or
use the Software. TSF reserves all rights not expressly granted under this EULA. TSF may update this
agreement at any time and without notice by publishing this update on the The Sim Factory
website, http://www.thesimfactory.com/.
GRANT OF LICENSE
The Sim Factory LLC grants to you the right to use one copy of the Software on a single computer.
You may load one copy into permanent memory of one computer and may use that copy only on
that same computer.
LIMITED USE
Without the prior written consent of The Sim Factory LLC, you shall not, directly or indirectly, at any
time:
* Exploit, or permit the exploitation of, this Software or any of its parts commercially.
* Publicly display or permit the display of or charge a fee for the use of this Software or any of its
parts.
* Reverse engineer, tamper with encrypted files, derive source code, physics numbers, modify,
decompile, disassemble this Software, in whole or in part.
* Remove, disable or circumvent any copy protection or proprietary notices or labels contained on
or within the Software.
* Remove and use physics numbers, information, models or any/all encrypted files in any third party
programs.
* Use the software in a public exhibition manner without written consent of the SIm Factory or
an authorized Sim Factory represented.
* Rent a server without a fully licensed version of the software for each server rented. (Must be
approved by the Sim Factory LLC to use the dedicated server on multiple machines with only one
purchased copy of the title.)
OWNERSHIP OF THE SOFTWARE
25
Bump-Draft
All title, ownership rights and intellectual property rights in and to the Software and all copies are
owned or expressly licensed by The Sim Factory. The rights of the Software are protected by
national copyright laws and by international treaties.
PROPRIETARY INFORMATION
Any file, information, content, ideas, or other parts relating to this product or its development is
proprietary to The Sim Factory LLC.
NO WARRANTY, LIMITATION OF LIABILITY.
TSF HEREBY DISCLAIM ALL WARRANTIES, EXPRESS, IMPLIED AND STATUTORY, INCLUDING,
WITHOUT LIMITATION, THE IMPLIED WARRANTIES OF MERCHANTABILITY, FITNESS FOR A
PARTICULAR PURPOSE, TITLE AND NON-INFRINGEMENT OF THIRD PARTY RIGHTS WITH RESPECT TO
THE SOFTWARE PRODUCT. TSF DO NOT WARRANT THAT THE SOFTWARE PRODUCT IS ERROR-FREE
OR THAT ACCESS TO THE SOFTWARE PRODUCT WILL BE UNINTERRUPTED AND WITHOUT
COMPROMISE TO SECURITY SYSTEMS. YOU ACKNOWLEDGE AND AGREE THAT YOUR USE OF THE
SOFTWARE PRODUCT IS "AS IS," AND "AT YOUR OWN RISK."
TSF WILL NOT BE LIABLE FOR ANY SPECIAL, INCIDENTAL, INDIRECT, OR CONSEQUENTIAL
DAMAGES (INCLUDING, WITHOUT LIMITATION, DAMAGES FOR PERSONAL INJURY, LOSS OF
BUSINESS PROFITS, BUSINESS INTERRUPTION, LOSS OF BUSINESS OR CONFIDENTIAL INFORMATION,
LOSS OF PRIVACY, OR ANY OTHER PECUNIARY LOSS) ARISING OUT OF THE USE OF OR INABILITY TO
USE THE SOFTWARE, EVEN IF TSF HAVE BEEN ADVISED OF THE POSSIBILITY OF SUCH DAMAGES. IN
ANY CASE, THE ENTIRE LIABILITY OF TSF UNDER THIS AGREEMENT AND LIMITED WARRANTY SHALL
BE LIMITED TO THE AMOUNT ACTUALLY PAID BY YOU FOR THE SOFTWARE THAT CAUSES THE
DAMAGE.
Note: Third-party brands and names are the property of their respective owners.
Copyright 2006-2008 Sim Factory LLC - all rights reserved
26