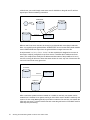
1
Steve Womer
Rick Troth
Mike MacIsaac
Kyle S. Black
Chapter 1.
Sharing and maintaining SLES 10
SP2 Linux under z/VM
This paper is divided into the following sections:
1.1, “History” on page 2 - a history of the two versions of the paper
1.2, “Overview” on page 2 - an overview of the entire paper
1.3, “Background of read-only root Linux” on page 3 - describes the shared root file
structure and the maintenance system
1.4, “Summary of virtual machines” on page 19 - summarizes the z/VM virtual machines
that comprise the system
1.5, “Building a read-write maintenance system” on page 20 - describes how to first build a
conventional read-write Linux system that can be cloned to other virtual servers
1.6, “Building a read-only root system” on page 43 - describes how to move to cloning
read-only root systems once the conventional read-write cloning is working
1.7, “Maintaining systems” on page 52 - discusses how to maintain cloned Linux images
1.8, “Other considerations” on page 63 - discusses other techniques for improving
performance and maintainability of systems
1.9, “Contents of tar file” on page 67 - describes the contents of the file associated with
this paper
1.10, “Linux code” on page 67 - lists the code of the Linux shell scripts
1.11, “z/VM code” on page 86 - lists the code of the z/VM REXX EXECs
This paper is based on z/VM Version 5.4 and Novell SUSE Linux Enterprise Server (SLES)
10 SP2.
1
1.1 History
This paper was originally published as the IBM Redpaper Sharing and maintaining Linux
under z/VM, largely based on input from architects and system administrators from
Nationwide Insurance, published in February of 2008, available on the Web at:
http://www.redbooks.ibm.com/abstracts/redp4322.html
In 2009, it was updated, with most input coming from system administrators at Penn State
University.
This paper is available on the Web page:
http://linuxvm.org/present
Specifically, the paper is at the URL:
http://linuxvm.org/present/misc/ro-root-S10.pdf
The tar file associated with the paper is available at:
http://linuxvm.org/present/misc/ro-root-S10.tgz
Changes in this paper
The changes made in this version of the paper are as follows:
It is based on z/VM 5.4 (previously 5.3).
Linux is based on Novell/SuSE SLES 10 SP2 (previously SLES 10).
Linux scripts and z/VM REXX EXECs have been updated or added.
The Linux script to create a read-only system is now named mnt2rogld.sh (formerly
mkror.sh) to better follow the naming convention.
Disk space of each Linux system increased: previously a read-write system occupied
3338 cylinders, or a single 3390-3. In this paper, a read-write system occupies 5008
cylinders, or half of a 3390-9. A read-only system has been increased to 1669 cylinders, or
half of a 3390-3.
The directory /var/lib/rpm/ is bind-mounted read-only over the read-write /var/ file
system. This allows the RPM database on the golden image to be used and kept
synchronized with the read-only clones.
A more detailed section on maintaining Linux, 1.7.2, “A more detailed maintenance
methodology” on page 53, was added.
1.2 Overview
Large operating systems, such as z/OS®, have, for several decades, leveraged shared file
structures. The benefits are reduced disk space, simplified maintenance and simplified
systems management. This paper describes how to create a Linux® solution with shared file
systems on IBM® System z™ hardware (the mainframe) running under z/VM®. It also
describes a maintenance system where the same Linux image exists on a test, maintenance
and gold virtual servers.
The benefits of such a system are the following:
Extremely efficient resource sharing: which maximizes the business value of running
Linux on System z
2
Sharing and maintaining SLES 10 SP2 Linux under z/VM
Staff productivity: fewer people are needed to manage a large-scale virtual server
environment running on z/VM
Operational flexibility: companies can leverage and utilize their IT infrastructure to
enhance their business results
A word of caution and a disclaimer are necessary. The techniques described in this paper are
not simple to implement. Both z/VM and Linux on System z skills are needed. It is not
guaranteed that such a system would be supported. Check with your Linux distributor and
your support company to verify the changes described in this paper will be supported. This
being said, this paper is based on a system that has been implemented and is in production
at Nationwide Insurance and at Penn State University.
1.2.1 Conventions
The following font conventions are used in this paper:
Monospace and bold
Commands entered by the user on the command line
<value>
Value inside angle brackets is to be replaced with a value specific to
your environment
monospace
File, directory and user ID names
The following command conventions are used in this book:
z/VM commands are prefixed with ==>
z/VM XEDIT subcommands are prefixed with ====>
Linux commands running as root are prefixed with #
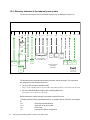
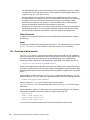
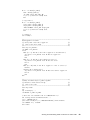
1.3 Background of read-only root Linux
The system is called read-only root because the root file system (/) is mounted with read
permission, not read-write. The common approach to sharing file systems is to ask “Which file
systems can be mounted read-only?”. The approach taken in this paper is the exact opposite.
The root file system is mounted read-only and the question that is asked is “Which file
systems need to be mounted read-write?”.
1.3.1 Why a read-only root?
By creating a read-only root file structure, the basic Linux system code can be shared among
many virtual Linux servers. This helps with Linux standardization. Most Linux servers can
share exactly the same version of Linux operating system. This environment makes
maintenance much simpler. It becomes possible to roll out a new version of Linux by updating
the master copy of the shared root and not each system that uses it.
1.3.2 Overview of the system
The root file system is read-only because it does not have to be read-write. Actually, four
directories are chosen to be read-write: /etc/, /var/, /srv/ and /root/. In addition, the /tmp/
directory is read-write, but is in-memory and built at boot time. The /proc/ and /sys/
pseudo-directories are abstractions of kernel control blocks and the permissions are not
under the control of the systems administrator.
Sharing and maintaining SLES 10 SP2 Linux under z/VM
3
During the boot process, read-write copies of the directories /etc/, /srv/, and /root/ are
bind-mounted from /local/ over the read-only copies, while /var/ is its own minidisk. There
is a background discussion on bind-mounts in section 1.3.5, “Overview of bind mounts” on
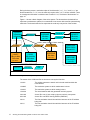
page 14.
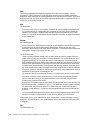
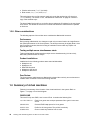
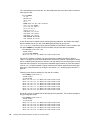
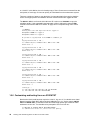
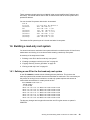
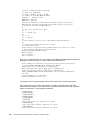
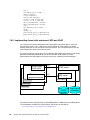
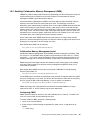
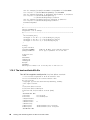
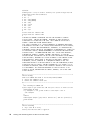
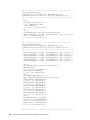
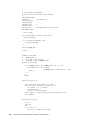
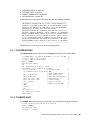
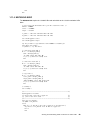
Figure 1-1 shows a block diagram of the entire system. The boxes above the dashed line
represent a maintenance system for conventional Linux servers with most file systems being
read-write. The boxes below the line represent the read-only root portion of the solution.
S10GOLD
11Bx disks
21Bx disks
MNT2TST
MNT2GOLD
S10RWMNT
1Bx disks
S10RWTST
1Bx disks
TST2MNT
9.60.18.222
CLONERO
CLONERW
RO2GOLD
mnt2rogld.sh
9.60.18.222
9.60.18.226
9.60.18.227
CMSCLONE
REXX EXECs
Shared 191
S10ROGLD
1Bx disks
LNX226
1Bx r/w disks
R/W clone
LNX227
1Bx r/o disks
R/O clone
9.60.18.222
LNXCLONE
Linux scripts
9.60.18.225
Key:
z/VM user ID
Linux script
REXX
EXEC
Figure 1-1 Block diagram of read-only root system
The names of the z/VM user IDs are chosen to convey their function:
4
S10GOLD
The golden systems are stored on this virtual machines disks but
never booted.
S10RWMNT
The read-write system on which maintenance is done
S10RWTST
The read-write system on which testing is done
S10ROGLD
The virtual machine with the generated read-only system
LNXCLONE
A user ID to run a Linux script to clone a read-only root system
CMSCLONE
A user ID to run REXX cloning EXECs (CMS files)
LNX226
The first read-write cloned Linux with the last octet of the IP address
being 226
LNX227
The first read-write cloned Linux with the last octet of the IP address
being 227
Sharing and maintaining SLES 10 SP2 Linux under z/VM
A more detailed summary of these systems is in section 1.4, “Summary of virtual machines”
on page 19.
1.3.3 High level approach of read-only root system
In the section that follows, the read-only root solution is described at a high level. In addition
to the read-only root environment, a maintenance process is also established. Details on
implementing the solution begin in section 1.5, “Building a read-write maintenance system”
on page 20.
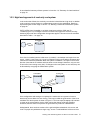
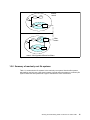
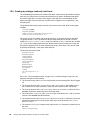
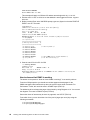
SLES 10 SP2 Linux is installed on an initial virtual server with the z/VM user ID
S10RWMNT(Figure 1-2). Packages to create a minimal Linux system are selected, security
hardening done and other configuration changes are applied. This server has the minidisks
described in Table 1-1 on page 16.
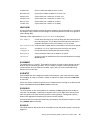
S10RWMNT
Install
media
Figure 1-2 Installing the first Linux system
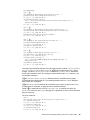
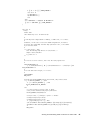
Once Linux is installed onto the initial server (S10RWMNT), it is shutdown and copied to a test
server, S10RWTST (see Figure 1-3). Linux is configured on this user ID where all features and
functions are tested and validated. When the system is validated, it is copied in the reverse
direction (note that the IP address and host name are not changed, therefore, only one user
ID can have Linux running at any time). If changes on the test system are not valid, they can
be discarded by recopying the maintenance system.
S10RW MNT
S10RW TST
In st al l
m ed ia
ts t
2
t
mn
m nt2
ex
ec
ec
ts t e x
CMSCLONE
Figure 1-3 Cloning the first Linux system
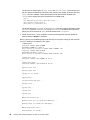
Once configuration and testing are completed, the read-write Linux system is frozen to
become the source disks for Linux cloning. This copy is called the gold version of the Linux
minidisks.This whole system is shown in Figure 1-4. A Linux script (cloneprep.sh) is written
to clean up the system before cloning. After running the cleanup script, the system is
shutdown, then the disks are copied to the gold user ID by means of a REXX EXEC.
At Nationwide, there are three versions of the gold minidisks maintained: old, current, and
next. This paper only addresses a single copy: current. To add additional versions such as
Sharing and maintaining SLES 10 SP2 Linux under z/VM
5
old and next, you would simply create more sets of minidisks on the gold user ID, with an
agreed upon device numbering convention.
S10RWMNT
S10RWTST
In stall
m edia
ts
GOLD
n
t2 m
mn
te
xe
st
t2t
c
ex
ec
mnt2gold exec
CMSCLONE
Figure 1-4 Freezing a golden copy of a Linux system
When a new Linux server needs to be cloned or provisioned with conventional read-write
disks, it is copied from the gold minidisks. A REXX EXEC is run from the CMS virtual machine
named CMSCLONE that copies from the gold minidisks to target Linux user IDs.
A script named /etc/init.d/boot.findself is also copied that is designed to run once at
boot time to uniquely configure the new Linux server. It modifies the IP address and host
name. This script will not modify the IP address and host name of the predefined S10xxxxx
user IDs, so they will all have to share the same values. As such, only one of these user IDs
can have Linux IPLed at any given time.
S10GOLD
CMSCLONE
clonerw
LINUX001
Figure 1-5 Cloning a read-write virtual server
After a read-write system has been created on S10RWMNT, a read-only root system can be
created from it. Another Linux system running on CMSCLONE is used to build the read-only root
system. A Linux script (mnt2rogld.sh) is provided to create the first read-only root system the
read-only root server, S10ROGLD used to test and create the gold version of minidisks used for
read-only root provisioning.
6
Sharing and maintaining SLES 10 SP2 Linux under z/VM
S10RWMNT
LNXCLONE
h
.s
or
k r ri p t
m sc
S10ROGLD
Figure 1-6 Creating a read-only root system with the mnt2rogld.sh script
Then the cleanup script is run on the first read-only root Linux system and the system is shut
down. Now a REXX EXEC (RO2GOLD) is executed to copy from S10ROGLD to the 21Bx minidisks
on S10GOLD. These are now the gold read-only root disks.
S10GOLD
r02gold
CM SCLONE
S10ROGLD
Figure 1-7 Freezing the read-only root system to S10GOLD
To clone a read-only root system, the process is similar, except that the target user ID is
defined to have three read-write minidisks and four read-only links to the gold disks. Then the
CLONERO EXEC only has to copy three minidisks, not seven.
Sharing and maintaining SLES 10 SP2 Linux under z/VM
7
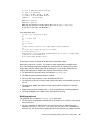
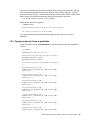
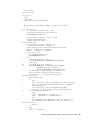
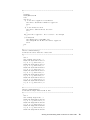
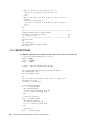
1.3.4 Directory structure of the read-only root system
The directory structure for the Linux shared read-only root is displayed in Figure 1-8.
Read Only Root
/
/mnt
/var
/etc /root
/dev
/local
/tmp
/bin
/sbin
/lib
RO
RO
RO
/lib64
/usr
/boot
/opt
RO
RO
RO
/proc
/sys
/home
/media
RO
/local/
dev
/etc
RW
local/etc
RW
bind
mount
RO
RW
RW
procfs
sysfs
/local/root
Bind
mount
/opt
/usr
/boot
/
/bin /sbin /lib /lib64
Bind
mount
/opt/IBM/db2
/tmp
tmpfs
/var
auto
All RO mounts are EXT2
And potentially
Can be shared
/etc /root /
dev
/local
SWAP
SPACE
Figure 1-8 Read-only root directory structure
The following section describes the directory structure used in this paper. The information
was adapted from the following resources:
The Linux File Hierarchy Standard (FHS):
http://tldp.org/LDP/Linux-Filesystem-Hierarchy/html/Linux-Filesystem-Hierarchy.html
The Linux Standards Base (LSB). See the following Web sites:
http://www.linux-foundation.org/en/LSB
Sections below are copied verbatim in accordance with their license.
To comply with the FHS the following directories, or symbolic links to directories, are required
in /.
/bin
/boot
/dev
/etc
8
Essential command binaries
Static files of the boot loader
Device files
Host-specific system configuration
Sharing and maintaining SLES 10 SP2 Linux under z/VM
/lib
/media
/mnt
/opt
/sbin
/srv
/tmp
/usr
/var
Essential shared libraries and kernel modules
Mount point for removable media
Mount point for mounting a file system temporarily
Add-on application software packages
Essential system binaries
Data for services provided by this system
Temporary files
Secondary hierarchy
Variable data
The following directories, or symbolic links to directories, must be in /, if the corresponding
subsystem is installed:
/home
/lib<qual>
/root
User home directories (optional)
Alternate format essential shared libraries (optional)
Home directory for the root user (optional)
Each of these directories is addressed in the section that follows.
/sbin
The /sbin directory is primarily used privileged commands such as shutdown, ifconfig,
reboot and others. The commands in this directory are mostly intended for system
administrators and usually require root access. The /sbin/ directory is in root’s PATH, but not
in the PATH of non-root users.
/bin
The FHS states:
“Unlike /sbin, the /bin directory contains several useful commands that are of use to both
the system administrator as well as non-privileged users. It usually contains the shells like
bash, csh, etc.... and commonly used commands like cp, mv, rm, cat, ls. For this reason
and in contrast to /usr/bin, the binaries in this directory are considered to be essential.
The reason for this is that it contains essential system programs that must be available
even if only the partition containing the root directory is mounted. This situation may arise
should you need to repair other partitions but have no access to shared directories (i.e.
you are in single user mode and hence have no network access). It also contains
programs which boot scripts may require to be present. “
/boot
The FHS states:
“This directory contains everything required for the boot process except for configuration
files not needed at boot time (the most notable of those being those that belong to the
GRUB boot-loader, not used in System z Linux) and the map installer. Thus, the /boot
directory stores data that is used before the kernel begins executing user-mode programs.
This may include redundant (back-up) master boot records, sector/system map files, the
kernel and other important boot files and data that is not directly edited by hand. Programs
necessary to arrange for the boot loader to be able to boot a file are placed in /sbin.
Configuration files for boot loaders are placed in /etc. The system kernel is located in
either / or /boot (or as under Debian in /boot but is actually a symbolically linked at / in
accordance with the FHS). The boot loader for IBM System z also resides in this
directory.“
In this paper, /boot/ is read-only, however, there may be times when a read-write copy is
necessary.
Sharing and maintaining SLES 10 SP2 Linux under z/VM
9
/dev
This directory highlights one important characteristic of the Linux file system - almost
everything is a file or a directory. If you look at this directory and you should see dasda1,
dasda2 etc, which represent the various partitions on the disk drive of the system. The entries
beginning with sda* are SCSI devices. Each logical minidisk would be represented as dasda
for the first, dasdb for the second, etc...
/etc
The FHS states:
“This is the nerve center of your system, it contains all system related configuration files
(or in subdirectories). A “configuration file” is defined as a local file used to control the
operation of a program; it must be static and cannot be an executable binary. For this
reason, it's a good idea to backup this directory regularly. Normally, no binaries should be
or are located here.”
/home
The LSB states that:
“Linux is a multi-user environment so each user is also assigned a specific directory which
is accessible only to them and the system administrator. These are the user home
directories, which can be found under /home/<username>. This directory also contains the
user specific settings for programs like IRC, X etc.”
The FHS states that:
“/home is a fairly standard concept, but it is clearly a site-specific file system. Different
people prefer to place user accounts in a variety of places. This section describes only a
suggested placement for user home directories; nevertheless we recommend that all
FHS-compliant distributions use this as the default location for home directories. On small
systems, each user's directory is typically one of the many subdirectories of /home such
as /home/smith, /home/torvalds, /home/operator, etc. On large systems (especially when
the /home directories are shared amongst many hosts using NFS) it is useful to subdivide
user home directories. Subdivision may be accomplished by using subdirectories such as
/home/staff, /home/guests, /home/students, etc.
The setup will differ from host to host. Therefore, no program should rely on this location.
If you want to find out a user's home directory, you should use the getpwent(3) library
function rather than relying on /etc/passwd because user information may be stored
remotely using systems such as NIS.
User specific configuration files for applications are stored in the user's home directory in a
file that starts with the '.' character (a “dot file”). If an application needs to create more than
one dot file then they should be placed in a subdirectory with a name starting with a '.'
character, (a “dot directory”). In this case the configuration files should not start with the '.'
character.
It is recommended that apart from autosave and lock files programs should refrain from
creating non dot files or directories in a home directory without user intervention.”
In this paper, /home/ is not addressed in detail, though there is a short discussion of using
automount, NFS and LDAP in 1.9.2, “Implementing /home/ with automount, NFS and LDAP”
on page 65.
/lib
The LSB states that:
10
Sharing and maintaining SLES 10 SP2 Linux under z/VM
“The /lib directory contains kernel modules and those shared library images (the C
programming code library) needed to boot the system and run the commands in the root
file system, i.e. by binaries in /bin and /sbin. Libraries are readily identifiable through their
filename extension of *.so. Windows® equivalent to a shared library would be a DLL
(dynamically linked library) file. They are essential for basic system functionality. Kernel
modules (drivers) are in the subdirectory /lib/modules/'kernel-version'. To ensure proper
module compilation you should ensure that /lib/modules/'kernel-version'/kernel/build
points to /usr/src/'kernel-version' or ensure that the Makefile knows where the kernel
source itself are located.”
/lost+found
The LSB states that:
“Linux should always go through a proper shutdown. Sometimes your system might crash
or a power failure might take the machine down. Either way, at the next boot, a lengthy file
system check using fsck will be done. Fsck will go through the system and try to recover
any corrupt files that it finds. The result of this recovery operation will be placed in this
directory. The files recovered are not likely to be complete or make much sense but there
always is a chance that something worthwhile is recovered.”
/media
The LSB states that:
“Amid much controversy and consternation on the part of system and network
administrators a directory containing mount points for removable media has now been
created. Funnily enough, it has been named /media.”
/mnt
The LSB states that:
“This is a generic mount point under which you mount your file systems or devices.
Mounting is the process by which you make a file system available to the system. After
mounting your files will be accessible under the mount-point.”
The FHS v2.3 has changed the purpose of this directory:
“This directory is provided so that the system administrator may temporarily mount a file
system as needed. The content of this directory is a local issue and should not affect the
manner in which any program is run.
This directory must not be used by installation programs: a suitable temporary directory
not in use by the system must be used instead.”
For this paper, the root directory (/) will be read-only and /mnt/ is not a separate file
system. Therefore mount points under /mnt/ may only be created by file system design.
/opt
The LSB states that:
“This directory is reserved for all the software and add-on packages that are not part of the
default installation. To comply with the FHS, all third party applications should be installed
in this directory. Any package to be installed here must locate its static files (i.e. extra
fonts, clipart, database files) in a separate /opt/'package' or /opt/'provider' directory tree
(similar to the way in which Windows will install new software to its own directory tree
C:\Windows\Progam Files\"Program Name"), where 'package' is a name that describes
the software package and 'provider' is the provider's LANANA registered name.”
Sharing and maintaining SLES 10 SP2 Linux under z/VM
11
“Although most distributions neglect to create the directories /opt/bin, /opt/doc,
/opt/include, /opt/info, /opt/lib, and /opt/man they are reserved for local system
administrator use. Packages may provide “front-end” files intended to be placed in (by
linking or copying) these reserved directories by the system administrator, but must
function normally in the absence of these reserved directories. Programs to be invoked by
users are located in the directory /opt/'package'/bin. If the package includes UNIX®
manual pages, they are located in /opt/'package'/man and the same substructure as
/usr/share/man must be used. Package files that are variable must be installed in /var/opt.
Host-specific configuration files are installed in /etc/opt.”
In the read-only root system at Nationwide, DB2® is installed under /opt/IBM/db2, MQ Series
is installed under /opt/mqm, with links into /usr/bin/ and /usr/lib/. So these mount points
are created early, while /opt/ is still read/write.
/proc
The LSB states that:
“/proc is very special in that it is also a virtual file system. It's sometimes referred to as a
process information pseudo-file system. It doesn't contain 'real' files but runtime system
information (e.g. system memory, devices mounted, hardware configuration, etc). For this
reason it can be regarded as a control and information center for the kernel. In fact, quite a
lot of system utilities are simply calls to files in this directory.”
/root
The LSB states that:
“This is the home directory of the System Administrator, 'root'. This may be somewhat
confusing ('root on root') but in former days, '/' was root's home directory (hence the name
of the Administrator account). To keep things tidier, 'root' got his own home directory. Why
not in '/home'? Because '/home' is often located on a different partition or even on another
system and would thus be inaccessible to 'root' when - for some reason - only '/' is
mounted.”
The FHS states that:
“If the home directory of the root account is not stored on the root partition it will be
necessary to make certain it will default to / if it can not be located.
We recommend against using the root account for tasks that can be performed as an
unprivileged user, and that it be used solely for system administration. For this reason, we
recommend that subdirectories for mail and other applications not appear in the root
account's home directory, and that mail for administration roles such as root, postmaster,
and web master be forwarded to an appropriate user.”
/tmp
The LSB states that:
“This directory contains mostly files that are required temporarily. Many programs use this
to create lock files and for temporary storage of data. Do not remove files from this
directory unless you know exactly what you are doing! Many of these files are important
for currently running programs and deleting them may result in a system crash. Usually it
won't contain more than a few KB anyway. On most systems, this directory is cleared out
at boot or at shutdown by the local system. The basis for this was historical precedent and
common practice. However, it was not made a requirement because system
administration is not within the scope of the FHS. For this reason people and programs
must not assume that any files or directories in /tmp are preserved between invocations of
12
Sharing and maintaining SLES 10 SP2 Linux under z/VM
the program. The reasoning behind this is for compliance with IEEE standard P1003.2
(POSIX, part 2).”
In the read-only root system /tmp is actually an in-memory only virtual file system as well, for
more information see tmpfs (also known as SHMFS).
/usr
The LSB states that:
“/usr usually contains by far the largest share of data on a system. Hence, this is one of
the most important directories in the system as it contains all the user binaries, their
documentation, libraries, header files, etc.... X and its supporting libraries can be found
here. User programs like telnet, ftp, etc.... are also placed here. In the original Unix
implementations, /usr was where the home directories of the users were placed (that is to
say, /usr/someone was then the directory now known as /home/someone). In current
Unices, /usr is where user-land programs and data (as opposed to 'system land' programs
and data) are. The name hasn't changed, but it's meaning has narrowed and lengthened
from “everything user related” to “user usable programs and data”. As such, some people
may now refer to this directory as meaning 'User System Resources' and not 'user' as was
originally intended.”
The FHS states:
“/usr is shareable, read-only data. That means that /usr should be shareable between
various FHS-compliant hosts and must not be written to. Any information that is
host-specific or varies with time is stored elsewhere.
Large software packages must not use a direct subdirectory under the /usr hierarchy.”
/var
The LSB states that:
“(/var) Contains variable data like system logging files, mail and printer spool directories,
and transient and temporary files. Some portions of /var are not shareable between
different systems. For instance, /var/log, /var/lock, and /var/run. Other portions may be
shared, notably /var/mail, /var/cache/man, /var/cache/fonts, and /var/spool/news. '/var'
contains variable data, i.e. files and directories the system must be able to write to during
operation.
The FHS states:
“If /var cannot be made a separate partition, it is often preferable to move /var out of the
root partition and into the /usr partition. (This is sometimes done to reduce the size of the
root partition or when space runs low in the root partition.) However, /var must not be
linked to /usr because this makes separation of /usr and /var more difficult and is likely to
create a naming conflict. Instead, link /var to /usr/var.
Applications must generally not add directories to the top level of /var. Such directories
should only be added if they have some system-wide implication, and in consultation with
the FHS mailing list.”
/srv
The FHS states:
“/srv contains site-specific data which is served by this system. This main purpose of
specifying this is so that users may find the location of the data files for particular service,
and so that services which require a single tree for read-only data, writable data and
scripts (such as CGI scripts) can be reasonably placed. Data that is only of interest to a
specific user should go in that users' home directory.
Sharing and maintaining SLES 10 SP2 Linux under z/VM
13
The methodology used to name subdirectories of /srv is unspecified as there is currently
no consensus on how this should be done. One method for structuring data under /srv is
by protocol, e.g. ftp, rsync, www, and cvs.
On large systems it can be useful to structure /srv by administrative context, such as
/srv/physics/www, /srv/compsci/cvs, etc. This setup will differ from host to host. Therefore,
no program should rely on a specific subdirectory structure of /srv existing or data
necessarily being stored in /srv. However /srv should always exist on FHS compliant
systems and should be used as the default location for such data.
Distributions must take care not to remove locally placed files in these directories without
administrator permission. This is particularly important as these areas will often contain
both files initially installed by the distributor, and those added by the administrator.”
Other directories
In addition to the directories defined by the Linux Standard Base, Nationwide has included
this directory.
/local
This directory contains local content specific to this server. The subdirectories for local copies
of /etc/, /dev/ and /root/ are located here, with bind mounts to the root directory.
1.3.5 Overview of bind mounts
The /var/, /root/ and /srv/ directories are implemented on the read-only root systems by
means of bind mounts. A background is given on these types of mounts to help explain how
the solution will work and text was taken from the IBM Redbook Linux on IBM eServer
zSeries and S/390: Large Scale Linux Deployment, SG24-6824. This redbook is online at:
http://w3.itso.ibm.com/abstracts/sg246824.html?Open
A bind mount expands the functionality of the device file system mount. Using bind mounts, it
is possible to graft a directory sub-tree from one part of the global file system to another. Bind
mounts differ from device mounts in that the source is the global file system itself - not a block
device.
As an example, consider a directory /guestvol/there containing a file named foo.bar. An
additional directory /mnt/here exists in the global name space. Issue the following command:
# mount --bind /guestvol/there /mnt/here
Now the same file, foo.abc, can be referenced by two path names:
/guestvol/there/foo.abc, the original path name, and /mnt/here/foo.abc, the bind mount
path name.
This is illustrated in Figure 1-9. Both names refer to the same underlying file. The following
bind mounts are added to the root file system to support a read-only root.
mount
mount
mount
mount
-n
-n
-n
-n
/local
--bind /local/etc /etc
--bind /local/root /root
--bind /local/srv /srv
The Linux kernel maintains coherence and consistency whichever name is used.
14
Sharing and maintaining SLES 10 SP2 Linux under z/VM
/mnt
Before
mount
here
/
guest
vol
there
/mnt
here
foo.bar
foo.bar
After
mount
/
guest
vol
there
foo.bar
mount –bind /guestvol/there /mnt/here
Figure 1-9 Overview of bind mounts
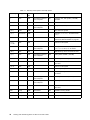
1.3.6 Summary of read-only root file systems
Table 1-1 summarize the file systems in the read-only root system. Note that file systems
which will be read-only use a type ext2, because a journal cannot be written to a read-only file
system. Read-write file systems use a type of ext3 which is more conventional.
Sharing and maintaining SLES 10 SP2 Linux under z/VM
15
Table 1-1 Summary of file systems and swap spaces
Directory
FS type
Attribu
tes
Device
Vaddr
Notes
/
ext2
R/O
/dev/disk/by-path/ccw
-0.0.01b1-part1
1B1
read-only root, 500 cylinder (~340 MB)
minidisk
/bin/
ext2
R/O
/boot/
ext2
R/O
/dev/
udev
R/W
The device file system
/etc/
bind mount
R/W
Stored in /local/etc/ - bind mounted to
/etc/
/home/
auto mount
R/W
Discussed in “Implementing /home/ with
automount, NFS and LDAP” on page 65
/lib/,
/lib64/
ext2
R/O
Part of root file system
/local
ext3
R/W
/mnt/
ext2
R/O
/opt/
ext2
R/O
/proc/
procfs
R/W
In memory kernel file system
/root/
bind
R/W
Stored in /local/root/ - bind-mounted at
boot time
/sbin/
ext2
R/O
Part of root file system
/sys/
sysfs
R/W
In memory file system
/tmp/
tmpfs
R/W
In memory file system - contents are lost at
shutdown
/usr/
ext2
R/O
/dev/disk/by-path/ccw
-0.0.01b7-part1
1B7
2290 cylinder minidisk (~1.6 GB)
/var/
ext3
R/W
/dev/disk/by-path/ccw
-0.0.01b6-part1
1B6
1019 cylinder minidisks (~716 MB)
/srv/
ext3
R/W
N/A
swap
R/W
/dev/dasdc1
1B2
64 MB in memory VDISK
N/A
swap
R/W
/dev/dasdd1
1B3
64 MB in memory VDISK
N/A
swap
R/W
/dev/dasde1
1B4
550 cylinder minidisk (~384MB)
16
Part of root file system
/dev/disk/by-path/ccw
-0.0.01b0-part1
/dev/disk/by-path/ccw
-0.0.01b5-part1
1B0
1B5
60 cylinder (~41 MB) minidisk
100 cylinder minidisk (~70 MB) - where
/etc/, /root/ and /srv/ are stored
R/W directory can be mounted over R/O
/dev/disk/by-path/ccw
-0.0.01b8-part1
1B8
489 cylinder minidisk (~343 MB)
Stored in /local/srv/ - bind mounted at
boot time
Sharing and maintaining SLES 10 SP2 Linux under z/VM
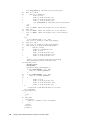
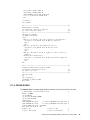
1.3.7 The modified boot process
During the normal Linux boot process, the root file system is initially mounted read-only, and
then later mounted read-write. In the read-only root system, it is not remounted read-write.
Figure 1-10 on page 17 shows the System z Linux boot process.
Start
Boot loader
zipl
Load Kernel
Initial Ramdisk
/ sbin/init
2
Inittab
1
Init.d/ boot
Run level
rc.d
boot.d
boot
boot
boot
boot .
boot
boot
boot .
boot
boot .
boot
boot
boot
boot
boot
boot
boot
boot
boot
boot
boot
/ random
/ coldplug
/ network
/ syslog
/ snmpd
/ multipathd
/ portmap
/ resmgr
/ nfs
/ nfsboot
/ fbset
/ sshd
/ xntpd
/ kbd
/ xinetd
/ hwscan
/ sendmail
/ cron
/ autodasd
proc
rootfsck
udev
loadmodules
device mapper
md
lvm
fstab mounts
localfs
findself
cleanup
clock
klog
scpm
udev_retry
crypto
localnet
swap
ldconfig
sysctl
ipconfig
boot. local
Figure 1-10 Modified boot process
In preparation for a read-only root, the directory /etc/init.d is moved to /sbin/etc/init.d.
The boot script is modified to use /sbin/etc/init.d as the boot.rc variable. This change
allows the boot.d scripts to be executed from /sbin/etc/init.d/boot.d. The initialization
script /etc/init.d/boot.rootfsck is modified during the creation of the first read-only root
system. The changes to this script are as follows:
Does not check (fsck) root (1B1 disk)
Sharing and maintaining SLES 10 SP2 Linux under z/VM
17
Checks and mounts /local/ (1B5 disk)
Bind mounts /etc/, /srv/ and /root/
This script leaves the root file system in read-only mode after performing a file check on
/local/ directory. The section 1.10.5, “Modified boot.rootfsck file” on page 81 contains a
copy of the modified script.
The boot.findself script will run on the first boot to update the IP address for the new virtual
Linux server. This allows the servers to be cloned with identical IP addresses then updated
on first boot.
1.3.8 Other considerations
The following aspects of the solution were considered at Nationwide Insurance.
Performance
During testing at Nationwide, the changes to read-only root were found to be insignificant to
the overall performance of the Linux systems. The boot process may be slightly faster, since
the I/O request is cached, thus the booting of hundreds of servers will only require one
physical disk read.
Testing multiple server simultaneous starts
Testing at Nationwide entailed starting multiple servers simultaneously (8-12 at a time),
without any identified waits or delays.
Product installations
Installations for the following products were tested at Nationwide:
Websphere 6.1
Websphere 5.1
DB2 UDB Version 8
Websphere IHS server
Websphere MQ series
Peer Review
The Linux systems administrators at Nationwide reviewed the read-only root environment to
validate that a consistent environment is being retained.
1.4 Summary of virtual machines
Following is a summary of the function of the virtual machines in the system. Refer to
Figure 1-1 on page 4 for a block diagram.
CMSCLONE
This user ID only runs CMS, Linux is never IPLed. It contains the following files:
18
<userID> PARM-S10
Each Linux guest uses a unique parameter file to get it's host name
and IP
SWAPGEN EXEC
Creates VDISK swap space for Linux guests
PROFILE EXEC
Profile for all Linux guests. They all link it read-only
CLONERO EXEC
Clones a read-only machine from S10GOLD
Sharing and maintaining SLES 10 SP2 Linux under z/VM
CLONERW EXEC
Clones a read-write machine from S10GOLD
MNT2GOLD EXEC
Copies the S10RWMNT minidisks to S10GOLD 11Bx
RO2GOLD EXEC
Copies disks from S10ROGLD to S10GOLD 21Bx
RO2GOLD2 EXEC
Copies disks from S10ROGLD to S10GOLD2 21Bx
MNT2TST EXEC
Copies disks from S10RWMNT to S10RWTST
TST2MNT EXEC
Copies disks from S10RWTST to S10RWMNT
LNXCLONE
A Linux system that contains of the tools used to create the S10ROGLD machine i.e. all shared
root images. It also contains the DVD images of all shared software for other Linux guests to
mount through NFS.
Following are the important files in /usr/local/sbin/ on this system:
boot.findself
On first boot, this script is run to set up the proper host name and IP of
the new Linux guest. The IP address and host name are read from a
parameter file specific to the virtual machine, on its 191 disk.
boot.rootfsck.diffs A diff file used to update the boot.rootfsck for read-only Linux guests
fstab.ror
A modified /etc/fstab copied to all new read-only Linux guests
cloneprep.sh
A script that removes extraneous files before cloning
mnt2rogld.sh
Copies read-write disks from S10RWMNT to S10ROGLD.
offliner.sh
A script to verify all minidisks are off-line and not linked before running
mks10rogld.sh.
S10RWMNT
The backup/mirror of S10RWTST. This machine's binaries are used to create shared-root gold
disks as well as read-write gold disks. There is usually no reason to boot and login to this
virtual machine. Once the binaries are stable, copy to the 11Bx series of minidisks using
RW2GOLD EXEC on CMSCLONE.
S10RWTST
All new RPMs and other changes are tested on this machine. Once tests have been made,
the cloneprep.sh script is run and the system is copied to S10RWMNT using the TST2MNT EXEC
on CMSCLONE.
If there is a need to roll-back the system from S10RWMNT because a change is not desired, that
can be accomplished using the MNT2TST EXEC on CMSCLONE
S10ROGLD
The Linux system on this virtual machine is created by the mnt2rogld.sh script residing on
LNXCLONE. It is essentially a read-only Linux guest. Here you can login before cloning a real
read-only guest to see if the read-only system is running properly. Testing new read-only
binaries and applications should be done from this virtual machine.
Once the binaries for read-only machines are good (stable), they should be copied to S10GOLD
using RO2GOLD EXEC on CMSCLONE.
S10GOLD
This virtual machine defines two series of minidisks to store the golden images. It cannot be
logged on.
Sharing and maintaining SLES 10 SP2 Linux under z/VM
19
11Bx
Read-write machines are cloned from this series of minidisks. These
minidisks were populated and updated from S10RWMNT.
21Bx
Read-only machines are linking these minidisks as RR. Consider this the
production binaries for shared-root.
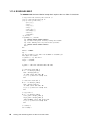
1.5 Building a read-write maintenance system
Before building a read-only root system, a system for maintaining and cloning a conventional
read-write Linux system is described. The read-write system is created with a maintenance
plan in mind. The read-write system is shown in the boxes shown above the dashed line in
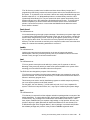
Figure 1-1 on page 4.
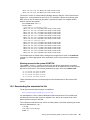
Following are the steps to create the read-write system:
1.
2.
3.
4.
5.
6.
7.
8.
“Creating z/VM user IDs”
“Populating CMS disks on CMSCLONE” on page 24
“Installing SLES 10 SP2 Linux” on page 26
“Copying Linux from S10RWMNT to S10RWTST” on page 33
“Customizing and testing Linux on S10RWTST” on page 34
“Copying Linux from S10RWTST to S10RWMNT” on page 38
“Copying read-write Linux to the gold disks” on page 39
“Cloning a read-write Linux system” on page 40
When the read-write system is tested and working, the second phase is to create a read-only
root system.
1.5.1 Creating z/VM user IDs
Five z/VM user IDs are defined: CMSCLONE, LNXCLONE, S10RWMNT, S10RWTST and S10GOLD.
Disk planning
A read-write system occupies 5008 cylinders, or half of a 3390-9. A read-only system
requires 1669 cylinders, or half of a 3390-3.
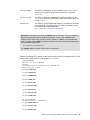
Four 3390-9s and one 3390-3 are reserved for this environment. The first three 3390-9s are
planned as shown in Figure 1-11 on page 21.
The read-write maintenance system, S10RWMNT, and the read-write test system, S10RWTST
share a 3390-9. The S10GOLD system is requires an entire 3390-9. The reference system of
read-only clones, S10ROGLD, is given half of a 3390-9 and the first read-write system, LNX226 is
given the other half.
CMSCLONE is given 130 cylinders for two small CMS minidisks and LNXCLONE is given the
remaining cylinders on that 3390-3.
20
Sharing and maintaining SLES 10 SP2 Linux under z/VM
DM63C9
3390-9
S10RWMNT
S10RWTST
DM63CA
3390-9
DM63CB
3390-9
S10GOLD
xxxGOLD
LNX226
S10ROGLD
11Bx, 21Bx
DM63CD
3390-9
LNX227
DM6364
3390-3
CMSCLONE
LNXCLONE
Figure 1-11 Disk planning with four 3390-9s and one 3390-3
Defining virtual machines
A user ID CMSCLONE is defined with the following directory definition. It is given two minidisks:
191
A small 30 cylinder minidisk for storing the cloning EXECs.
192
A 100 cylinder common disk that will become the Linux user IDs’ read-only 191
disk. It will store kernels, RAM disks, parameter files, the SWAPGEN EXEC, install
EXECs, etc. The ALL keyword is used for the read password in the MDISK statement
so that any user ID can link to the disk without a password.
Note the following:
The option LNKNOPAS is included so that the user ID can link to all minidisks without the
need for a password.
Class B permission is needed so the FLASHCOPY command can be invoked.
Authorization is needed to run the FLASHCOPY command, which is part of CP privilege class B.
It is possible to allow the FLASHCOPY command to be executed without class B permission by
creating a locally-defined privilege class that gives that authority and nothing else. Details are
outside the scope of this paper.
Following is the directory definition for the CMSCLONE user ID:
USER CMSCLONE PASSWD 64M 1G BG
INCLUDE IBMDFLT
OPTION APPLMON LNKNOPAS
IPL CMS
MACHINE ESA 4
MDISK 0191 3390 0001 0030 DM6364 MR PASSWD PASSWD PASSWD
MDISK 0192 3390 0031 0100 DM6364 MR ALL PASSWD PASSWD
Note: Don’t forget to modify the volume label (DM6364 in this example) to the value
appropriate for your environment.
A new user directory profile RORDFLT is created that will be common to all read-write Linux
virtual machines. It has the NICDEF statement which creates a virtual OSA connection to the
system VSWITCH named VSW1. Think of this statement as creating a virtual Network Interface
Card (NIC) that is created and plugged in to the system VSWITCH when the user ID is logged
on.
Sharing and maintaining SLES 10 SP2 Linux under z/VM
21
The LINK statement to the CMSCLONE 192 disk enables the other user IDs to share a common
read-only 191 disk:
PROFILE RORDFLT
IPL CMS
MACHINE ESA 4
CPU 00 BASE
CPU 01
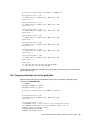
NICDEF 0600 TYPE QDIO LAN SYSTEM VSW1
SPOOL 000C 2540 READER *
SPOOL 000D 2540 PUNCH A
SPOOL 000E 1403 A
CONSOLE 009 3215 T
LINK MAINT 0190 0190 RR
LINK MAINT 019D 019D RR
LINK MAINT 019E 019E RR
LINK CMSCLONE 192 191 RR
LINK TCPMAINT 592 592 RR
A user ID LNXCLONE is created with the following directory definition. A minimal Linux image
will be installed onto the 1B0 disk so the mnt2rogld.sh script can be run from
/usr/local/sbin/. Note the privilege class B is added so FLASHCOPY can be invoked, and
the option LNKNOPAS is included so that all minidisks can be linked with no password.
USER LNXCLONE PASSWD 256M 1G BG
INCLUDE RORDFLT
OPTION APPLMON LNKNOPAS
MDISK 01B0 3390 0131 3208 DM6364 MR PASSWD PASSWD PASSWD
The user ID S10RWMNT is created. The first Linux image is installed into this ID. Refer to
Table 1-1 on page 16 to see which minidisks are for which file systems. This definition utilizes
half of a 3390-9 (5008 cylinders) for all disks. You may want to use more disk space for each
read-write Linux system or you may want to implement logical volumes on some file systems,
such as /var/, to allow for growth. Logical volumes have not been implemented in this paper,
but there is a brief discussion on the topic in the section 1.9.1, “Utilizing logical volumes” on
page 65.
Following is the directory definition for the user ID S10RWMNT:
USER S10RWMNT PASSWD 256M 1G G
INCLUDE RORDFLT
OPTION APPLMON
MDISK 01B0 3390 0001 0060 DM63C9
MDISK 01B1 3390 0061 0500 DM63C9
MDISK 01B4 3390 0561 0550 DM63C9
MDISK 01B5 3390 1111 0100 DM63C9
MDISK 01B6 3390 1211 1019 DM63C9
MDISK 01B7 3390 2230 2290 DM63C9
MDISK 01B8 3390 4520 0489 DM63C9
MR
MR
MR
MR
MR
MR
MR
PASSWD
PASSWD
PASSWD
PASSWD
PASSWD
PASSWD
PASSWD
PASSWD
PASSWD
PASSWD
PASSWD
PASSWD
PASSWD
PASSWD
PASSWD
PASSWD
PASSWD
PASSWD
PASSWD
PASSWD
PASSWD
A user ID S10RWTST is created with the following directory definition. This is where changes to
the gold image are tested.
USER S10RWTST PASSWD 256M 1G G
INCLUDE RORDFLT
OPTION APPLMON
MDISK 01B0 3390 5009 0060 DM63C9
MDISK 01B1 3390 5069 0500 DM63C9
MDISK 01B4 3390 5569 0550 DM63C9
MDISK 01B5 3390 6119 0100 DM63C9
MDISK 01B6 3390 6219 1019 DM63C9
22
MR
MR
MR
MR
MR
PASSWD
PASSWD
PASSWD
PASSWD
PASSWD
Sharing and maintaining SLES 10 SP2 Linux under z/VM
PASSWD
PASSWD
PASSWD
PASSWD
PASSWD
PASSWD
PASSWD
PASSWD
PASSWD
PASSWD
MDISK 01B7 3390 7238 2290 DM63C9 MR PASSWD PASSWD PASSWD
MDISK 01B8 3390 9528 0489 DM63C9 MR PASSWD PASSWD PASSWD
The user ID S10GOLD, is created with the following directory definition. This ID should never
logged on to, so the password is set to NOLOG. The minidisks 11Bx are the read-write gold
disks and 21Bx are the read-only gold disks. It requires the space of a complete 3390-9
because it stores two systems.
USER S10GOLD NOLOG 256M 1G G
INCLUDE IBMDFLT
* Gold disks for a read-write system
MDISK 11B0 3390 0001 0060 DM63CA MR
MDISK 11B1 3390 0061 0500 DM63CA MR
MDISK 11B4 3390 0561 0550 DM63CA MR
MDISK 11B5 3390 1111 0100 DM63CA MR
MDISK 11B6 3390 1211 1019 DM63CA MR
MDISK 11B7 3390 2230 2290 DM63CA MR
MDISK 11B8 3390 4520 0489 DM63CA MR
* Gold disks for read-only system
MDISK 21B0 3390 5009 0060 DM63CA MR
MDISK 21B1 3390 5069 0500 DM63CA MR
MDISK 21B4 3390 5569 0550 DM63CA MR
MDISK 21B5 3390 6119 0100 DM63CA MR
MDISK 21B6 3390 6219 1019 DM63CA MR
MDISK 21B7 3390 7238 2290 DM63CA MR
MDISK 21B8 3390 9528 0489 DM63CA MR
PASSWD
PASSWD
PASSWD
PASSWD
PASSWD
PASSWD
PASSWD
PASSWD
PASSWD
PASSWD
PASSWD
PASSWD
PASSWD
PASSWD
PASSWD
PASSWD
PASSWD
PASSWD
PASSWD
PASSWD
PASSWD
PASSWD
PASSWD
PASSWD
PASSWD
PASSWD
PASSWD
PASSWD
PASSWD
PASSWD
PASSWD
PASSWD
PASSWD
PASSWD
PASSWD
PASSWD
PASSWD
PASSWD
PASSWD
PASSWD
PASSWD
PASSWD
The minidisk layout is verified and the changes are brought online, either via the DIRECTXA
command, or via the appropriate “add” command if you are using a directory maintenance
product.
Allowing access to the system VSWITCH
The S10RWMNT, S10RWTST, S10ROGLD and LNXCLONE user IDs are given access to system’s
VSWITCH. The S10GOLD user ID does not need access to the VSWITCH as no Linux system
will ever be IPLed from it. The following statements are put in AUTOLOG1’s PROFILE EXEC:
'cp
'cp
'cp
'cp
set
set
set
set
vswitch
vswitch
vswitch
vswitch
vsw1
vsw1
vsw1
vsw1
grant
grant
grant
grant
s10rwmnt'
s10rwtst'
s10rogld'
lnxclone'
These commands are also run interactively from the command line for the current z/VM
session.
1.5.2 Downloading the associated tar file
The tar file associated with this paper is available at:
http://linuxvm.org/present/misc/ro-root-S10.tgz
It is downloaded to a Linux, UNIX or Windows machine and untarred. The z/VM files are
needed before the first Linux system is installed. Later, the tar file is copied to the Linux
worker system running on LNXCLONE.
The command to untar the file from a Linux or UNIX system is as follows, assuming the tar file
has been downloaded to /tmp/:
# cd /tmp
# tar xzvf ro-root-S10.tgz
README.txt
Sharing and maintaining SLES 10 SP2 Linux under z/VM
23
sbin/
sbin/mnt2rogld.sh
sbin/cloneprep.sh
sbin/boot.findself
sbin/offliner.sh
sbin/fstab.ror
sbin/boot.rootfsck.diffs
vm/
vm/CLONERO.EXEC
vm/CLONERW.EXEC
vm/MNT2GOLD.EXEC
vm/MNT2TST.EXEC
vm/PROFILE.EXEC
vm/RO2GOLD.EXEC
vm/TST2MNT.EXEC
vm/COPYMDSK.EXEC
vm/SAMPLE.PARM-S10
vm/SLES10S2.EXEC
vm/LINKED.EXEC
vm/PROFILE.XEDIT
vm/RO2GOLD2.EXEC
vm/SWAPGEN.EXEC
You should now have access to the files associated with this paper.
1.5.3 Populating CMS disks on CMSCLONE
The new CMSCLONE user ID is logged onto. The 191 and 192 disks are formatted for CMS using
the FORMAT command.
Populating the CMSCLONE 191 disk
The following files are copied to the CMSCLONE 192 disk or created on it:
CLONERO EXEC
An EXEC to clone read-only Linux systems
CLONERW EXEC
An EXEC to clone read-write Linux systems
LINKED EXEC
An EXEC to list which Linux systems are linked to which gold disks
MNT2TST EXEC
An EXEC to copy the maintenance golden image on S10RWMNT to the
test machine on S10RWTST
RO2GOLD EXEC
An EXEC to copy the read-only golden image from S10ROGLD to the
gold disk on S10GOLD
RO2GOLD2 EXEC
An EXEC to copy the read-only golden image from S10ROGLD to the
gold disk on S10GOLD2
TST2MNT EXEC
An EXEC to copy the test golden image on S10RWTST to the test
machine on S10RWMNT
Populating the CMSCLONE 192 disk
The following files are copied to the CMSCLONE 192 disk or created on it. These files will be
available to each Linux virtual machine as its 191 or A disk
24
PROFILE EXEC
An initialization file for each Linux to boot it from minidisk 1B0
PROFILE XEDIT
An XEDIT initialization file similar to that on the MAINT 191 disk
SAMPLE PARM-S10
A sample SLES 10 parameter file
SLES10S2 EXEC
The EXEC to invoke the SLES 10 SP2 installation program
Sharing and maintaining SLES 10 SP2 Linux under z/VM
SLES10S2 KERNEL
The SLES 10 SP2 kernel. This is available from the /boot/s390x/
directory of the SLES 10 SP2 install media, where it is named
vmrdr.ikr.
SLES10S2 INITRD
The SLES 10 SP2 initial RAMdisk. This is also available from the
/boot/s390x/ directory of the SLES 10 SP2 install media, where it is
named initrd.
SWAPGEN EXEC
The EXEC to create VDISK swap spaces. It is included in the tar file
for convenience. The latest copy of this EXEC is available from the
Sine Nomine Associates Web page:
http://download.sinenomine.net/swapgen/
Important: Downloading and setting up SWAPGEN can be a bit tricky. There is a “mailable”
format, but people have reported problems using this. There is also a VMARC (VM
archive) format, which is like a tar file or zip file. However, VMARC is not standard with
z/VM. To obtain and use VMARC command, see the section How to download something on
the z/VM download Web site:
http://www.vm.ibm.com/download/
The SWAPGEN EXEC is included in the tar file for convenience.
Following is a sample FTP session shown moving the files from the associated tar file. In this
example the IP address of the z/VM system is 9.60.18.218:
# ftp 9.60.18.218
Name (9.60.18.218:root): cmsclone
Password:
230 CMSCLONE logged in; working directory = CMSCLONE 191
Remote system type is z/VM.
ftp> put CLONERO.EXEC
...
ftp> put CLONERW.EXEC
...
ftp> put COPYMDSK.EXEC
...
ftp> put LINKED.EXEC
...
ftp> put MNT2TST.EXEC
...
ftp> put MNT2GOLD.EXEC
...
ftp> put RO2GOLD.EXEC
...
ftp> put RO2GOLD2.EXEC
...
ftp> put TST2MNT.EXEC
...
ftp> cd cmsclone.192
250 Working directory is CMSCLONE 192
ftp> put SAMPLE.PARM-S10
...
ftp> put SLES10S2.EXEC
...
ftp> put SWAPGEN.EXEC
Sharing and maintaining SLES 10 SP2 Linux under z/VM
25
...
ftp> put PROFILE.EXEC
...
ftp> put PROFILE.XEDIT
...
ftp> quit
1.5.4 Installing SLES 10 SP2 Linux
Linux is installed twice:
1. Onto the golden image (S10RWMNT) which will be the system that is cloned
2. Onto a worker system (LNXCLONE) which will be used for running Linux scripts
Installing SLES 10 SP2 onto S10RWMNT
This section does not supply every detail on installing Linux. For more details, see the IBM
Redbook z/VM and Linux on IBM System z The Virtualization Cookbook for SLES 10 SP2,
SG24-7493, on the Web at:
http://www.redbooks.ibm.com/abstracts/sg247493.html
The kernel and RAMdisk are copied by means of FTP to the CMSCLONE 192 disk. Do not forget
to transfer them in binary mode, with fixed-record 80 byte blocks. If you are FTPing from a
Linux or UNIX server to z/VM, this can be accomplished by the FTP subcommand bin fix
80. If you are FTPing from a Windows machine, this can be accomplished by the FTP
subcommands bin and quote site fix 80.
Following is a sample FTP session of SLES 10 SP2 kernel and RAMdisk from the installation
media to the CMSCLONE 192 disk. In this example the IP address of the z/VM system is
9.60.18.218:
# cd /nfs/sles10sp2/dvd/boot
# ftp 9.60.18.218
Name (9.60.18.218:root): cmsclone
Password:
ftp> cd cmsclone.192
ftp> bin
200 Representation type is IMAGE.
ftp> site fix 80
200 Site command was accepted.
ftp> put vmrdr.ikr sles10s2.kernel
...
ftp> put initrd sles10s2.initrd
...
ftp> quit
The S10RWMNT PARM-S10 file is configured with the correct IP and DNS information on the
CMSCLONE 192 disk.
The S10RWMNT virtual machine is logged onto. Because 256MB is not sufficient memory with
which to install SLES, the machine size is increased to 512MB by the CP command DEF STOR
512M. Then CMS is re-IPLed and the installation process is started with the SLES10S2 EXEC.
Following is an example:
==> def stor 512m
00: STORAGE = 512M
00: Storage cleared - system reset.
==> ipl cms
z/VM V5.4.0
2008-12-05 12:25
26
Sharing and maintaining SLES 10 SP2 Linux under z/VM
DMSACP723I A (191) R/O
DMSACP723I C (592) R/O
DIAG swap disk defined at virtual address 1B2 (16245 4K pages of swap space)
DIAG swap disk defined at virtual address 1B3 (16245 4K pages of swap space)
Do you want to IPL Linux from DASD 1B0? y/n
n
Now a minimal SLES 10 SP2 system is installed onto S10RWMNT. The install is started with the
SLES10S2 EXEC.
==> sles10s2
00: 0000002 FILES PURGED
00: RDR FILE 0003 SENT FROM S10RWMNT PUN WAS 0003 RECS
KEEP
00: RDR FILE 0004 SENT FROM S10RWMNT PUN WAS 0004 RECS
KEEP
00: RDR FILE 0005 SENT FROM S10RWMNT PUN WAS 0005 RECS
KEEP
00: 0000003 FILES CHANGED
00: 0000003 FILES CHANGED
Linux version 2.6.16.60-0.21-default (geeko@buildhost)
15 (SUSE Linux)) #1 SMP Tue May 6 12:41:02 UTC 2008
We are running under VM (64 bit mode)
...
090K CPY 001 A NOHOLD NO
0009 CPY 001 A NOHOLD NO
107K CPY 001 A NOHOLD NO
(gcc version 4.1.2 200701
Sharing and maintaining SLES 10 SP2 Linux under z/VM
27
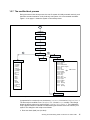
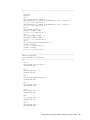
The minidisks are formatted, by first selecting and activating devices 1B0-1B8. Then 1B2 and
1B3 are deselected, so the VDISK swap spaces created by SWAPGEN EXEC are not trashed. The
remaining seven disks are formatted as shown in Figure 1-12.
Figure 1-12 Formatting seven minidisks
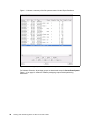
For partitioning the DASD, select the devices, mount points and file system types as shown in
the Directory, FS Type and Device columns of Table 1-1 on page 16.
28
Sharing and maintaining SLES 10 SP2 Linux under z/VM
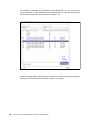
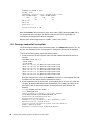
When creating a partitions on minidisks, it is extremely important to click the Fstab Options
button as shown in the upper left of Figure 1-13 and selecting Device Path in the Mount in
/etc/fstab by radio button group as shown in the lower right. The default value in SLES 10
SP1 and SP2 is Device ID which makes cloning nearly impossible because with this setting,
the volume ID is stored in the /etc/fstab file. This must be set for each of the six minidisks in
this example.
Figure 1-13 Clicking Fstab Options button and selecting Device Path for all minidisks
Sharing and maintaining SLES 10 SP2 Linux under z/VM
29
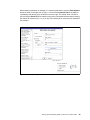
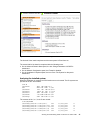
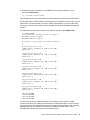
Figure 1-14 shows a summary of the file systems created via the Expert Partitioner:
Figure 1-14 Partitioning 1B0 (/dev/dasda) - 1B8 (/dev/dasdi)
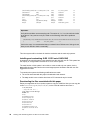
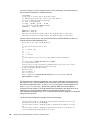
For Software Selection, all package groups are deselected except for Server Base System.
Figure 1-15 on page 31 shows the software packages groups and disk partitioning
information:
30
Sharing and maintaining SLES 10 SP2 Linux under z/VM
Figure 1-15 Software selection and Installation settings
The first half of the install completes and the new system is IPLed from 1B0.
The second half of the install is completed with the following notes.
On the Host and Domain Name panel, the box Change Hostname via DHCP is
deselected.
On the Network Configuration panel, the Firewall is disabled.
On the Installation Completed panel, the box Clone This System for Autoyast is
deselected.
Analyzing the installed system
When the installation is complete, an SSH session as root is started. The file systems are
queried via the df -h command:
# df -h
/dev/dasdb1
udev
/dev/dasda1
/dev/dasdf1
/dev/dasdi1
/dev/dasdh1
/dev/dasdg1
341M
247M
41M
69M
333M
1.6G
706M
79M
120K
13M
4.1M
20M
666M
63M
245M
247M
26M
61M
297M
839M
607M
25%
1%
34%
7%
7%
45%
10%
/
/dev
/boot
/local
/opt
/usr
/var
The contents of the /etc/fstab file are viewed:
# cat /etc/fstab
/dev/disk/by-path/ccw-0.0.01b1-part1
/dev/disk/by-path/ccw-0.0.01b0-part1
/dev/disk/by-path/ccw-0.0.01b5-part1
/dev/disk/by-path/ccw-0.0.01b8-part1
/dev/disk/by-path/ccw-0.0.01b7-part1
/
/boot
/local
/opt
/usr
ext2
ext2
ext3
ext2
ext2
acl,user_xattr
acl,user_xattr
acl,user_xattr
acl,user_xattr
acl,user_xattr
1
1
1
1
1
1
2
2
2
2
Sharing and maintaining SLES 10 SP2 Linux under z/VM
31
/dev/disk/by-path/ccw-0.0.01b6-part1 /var
/dev/dasdc1
swap
/dev/dasdd1
swap
/dev/disk/by-path/ccw-0.0.01b4-part1 swap
proc
/proc
sysfs
/sys
debugfs
/sys/kernel/debug
devpts
/dev/pts
ext3
swap
swap
swap
proc
sysfs
debugfs
devpts
acl,user_xattr
defaults
defaults
defaults
defaults
noauto
noauto
mode=0620,gid=5
1
0
0
0
0
0
0
0
2
0
0
0
0
0
0
0
Important:
Verify all the minidisks are accessed by path. The entries in /etc/fstab should look similar
to the above. If any entries are by ID, similar to the following, there will be problems
cloning:
/dev/disk/by-id/ccw-IBM.75000000030375.560c.45.0000000100000d0a0000000000000000-part1
/
ext3
acl,user_xattr
1 1
If this is the case, it is recommended that you reinstall Linux. References of this type have
been proven difficult to back out manually.
This Linux system will be the basis for both the read-write and the read-only systems.
Installing and customizing SLES 10 SP2 onto LNXCLONE
A parameter file minimal system is also installed onto the LNXCLONE user ID. This system has
the majority of a single 3390-3 minidisk at 1B0 for a root file system.
The main function of this system is to be able to create a read-only root system, via the
mnt2rogld.sh script, with both the source and target systems shutdown and their user IDs
logged off from z/VM.
To customize the system the following modifications are made.
The tar file associated with this paper is downloaded and untarred.
The vmcp module is set to load at boot time so CP commands may be issued.
Downloading the files associated with this paper
Earlier you staged the tar file on another system to copy the z/VM files. Now you can copy the
tar file ro-root-S10.tgz to /usr/local/src/ on the LNXCLONE machine and untar it.
# cd /usr/local
...Copy the tar file ...
# tar xzvf ro-root-S10.tgz
README.txt
sbin/
sbin/mnt2rogld.sh
sbin/cloneprep.sh
sbin/boot.findself
sbin/offliner.sh
sbin/fstab.dcss
sbin/fstab.ror
sbin/mnt2rogld-dcss.sh
sbin/boot.rootfsck.diffs
vm/
32
Sharing and maintaining SLES 10 SP2 Linux under z/VM
vm/CLONERO.EXEC
vm/CLONERW.EXEC
vm/MNT2GOLD.EXEC
vm/MNT2TST.EXEC
vm/PROFILE.EXEC
vm/RO2GOLD.EXEC
vm/TST2MNT.EXEC
vm/COPYMDSK.EXEC
vm/SAMPLE.PARM-S10
vm/SLES10S2.EXEC
vm/LINKED.EXEC
vm/PROFILE.XEDIT
vm/RO2GOLD2.EXEC
vm/SWAPGEN.EXEC
You should see a README file and directories vm/ whose files should have already been copied
to z/VM, and sbin/ for Linux files:
# ls sbin
boot.findself
boot.rootfsck.diffs
cloneprep.sh fstab.ror
mnt2rogld.sh
fstab.dcss
mnt2rogld-dcss.sh offliner.sh
These files will be used in the construction of the read-only root system.
Setting the cmm and vmcp module to be loaded
When the cmm module is loaded, in conjunction with configuration changes on z/VM,
significant performance gains are possible. Collaborative Memory Management and VMRM
are discussed in more detail in 1.9.3, “Enabling Collaborative Memory Management (CMM)”
on page 66.
The vmcp module allows CP commands to be issued from Linux.
The cmm and vmcp modules are added to the file /etc/sysconfig/kernel. This will cause
these modules to be loaded at boot time:
# cd /etc/sysconfig
# vi kernel
// modify one line
MODULES_LOADED_ON_BOOT="cmm vmcp"
The Linux system running on the LNXCLONE user ID should now be configured.
1.5.5 Copying Linux from S10RWMNT to S10RWTST
You should now be ready to start the mechanics of creating a read-write maintenance
system.
Shutdown the golden Linux running on S10RWMNT is shut down and the user ID is logged off so
the system can be copied.
# shutdown -h now
Broadcast message from root (pts/0) (Thu Jun 25 10:35:59 2009):
The system is going down for system halt NOW!
... (and LOGOFF from a 3270 session on S10RWTST)
The minidisks 1B0 to 1B8 are copied from the newly installed S10RWMNT to the corresponding
minidisks on S10RWTST. Linux is IPLed on S10RWTST. Then modifications are made to the Linux
Sharing and maintaining SLES 10 SP2 Linux under z/VM
33
on S10RWTST. In this fashion, there is a backup copy of Linux. If tests are not successful on the
test system, a fresh copy of Linux can quickly be rolled back from the maintenance system.
There are a number of ways to copy the disks. It is important that before copying, both the
source and target systems are shutdown and their virtual machines are logged off z/VM.
The MNT2TST EXEC is run from the CMSCLONE user ID. It tries to use FLASHCOPY to copy the
minidisks quickly. If this command is not supported or fails, it falls back to using the DDR
command. See section “MNT2TST EXEC” on page 92 for a complete listing of the source
code.
==> mnt2tst
Checking that source and target user IDs are logged off
HCPCQU045E S10RWMNT not logged on
HCPCQU045E S10RWTST not logged on
Do you want to copy R/W disks from S10RWMNT to S10RWTST? y/n
y
Copying minidisk 01B0 to 11B0 ...
00: Command complete: FLASHCOPY 01B0 0 END TO 11B0 0 END
Return value = 0
Copying minidisk 01B1 to 11B1 ...
00: Command complete: FLASHCOPY 01B1 0 END TO 11B1 0 END
Return value = 0
Copying minidisk 01B4 to 11B4 ...
00: Command complete: FLASHCOPY 01B4 0 END TO 11B4 0 END
Return value = 0
Copying minidisk 01B5 to 11B5 ...
00: Command complete: FLASHCOPY 01B5 0 END TO 11B5 0 END
Return value = 0
Copying minidisk 01B6 to 11B6 ...
00: Command complete: FLASHCOPY 01B6 0 END TO 11B6 0 END
Return value = 0
Copying minidisk 01B7 to 11B7 ...
00: Command complete: FLASHCOPY 01B7 0 END TO 11B7 0 END
Return value = 0
Copying minidisk 01B8 to 11B8 ...
00: Command complete: FLASHCOPY 01B8 0 END TO 11B8 0 END
Return value = 0
Cleaning up ...
00: 01B0 01B1 01B4 01B5 01B6 01B7 01B8 11B0 DETACHED
00: 11B1 11B4 11B5 11B6 11B7 11B8 DETACHED
1.5.6 Customizing and testing Linux on S10RWTST
Now that the fresh install has been copied to S10RWTST, log on to it. You should see a virtual
Network Interface Card (NIC) defined at virtual addresses 600-602. Via the sample PROFILE
EXEC and SWAPGEN EXEC, you should see the two VDISK swap spaces get created at virtual
addresses 1B2 and 1B3. You should then be prompted to IPL Linux from 1B0:
00: NIC 0600 is created; devices 0600-0602 defined
00: z/VM Version 5 Release 3.0, Service Level 0701 (64-bit),
34
Sharing and maintaining SLES 10 SP2 Linux under z/VM
00: built on
00: There is
00: FILES:
00: LOGON AT
z/VM V5.3.0
IBM Virtualization Technology
no logmsg data
NO RDR,
NO PRT, NO PUN
10:17:18 EDT FRIDAY 08/31/07
2007-06-19 08:41
DMSACP723I A (191) R/O
DMSACP723I C (592) R/O
DIAG swap disk defined at virtual address 1B2 (16245 4K pages of swap space)
DIAG swap disk defined at virtual address 1B3 (16245 4K pages of swap space)
Do you want to IPL Linux from DASD 1B0? y/n
y
Linux should then boot:
00: zIPL v1.5.3 interactive boot menu
00:
00: 0. default (ipl)
00:
00: 1. ipl
00: 2. failsafe
00:
00: Note: VM users please use '#cp vi vmsg <number> <kernel-parameters>'
00:
00: Please choose (default will boot in 10 seconds):
00: Booting default (ipl)...
Linux version 2.6.16.21-0.8-default (geeko@buildhost) (gcc version 4.1.0 (SUSE Linux))
#1 SMP Mon Jul 3 18:25:39 UTC 2006
We are running under VM (64 bit mode)
...
If Linux does not boot, verify that all the disks were successfully copied.
Now Linux is running on S10RWTST - the system on which maintenance is designed to be
done. The following configuration changes are recommended. Of course you may add or
delete steps, however certain steps such as adding the cmsfs package, loading the vmcp
module, and copying boot.findself are required for this solution to work:
The parameter line and menu delay are changed in /etc/zipl.conf.
The CMS file system (cmsfs) package is installed.
The cmm and vmcp modules are set to be loaded at boot time.
The system is set to halt, not reboot, when z/VM is shut down, and the default run level is
set to 3.
The script boot.findself is copied for newly cloned systems to find their IP and DNS
information.
Empty mount points are created under /opt/ for the possibility of mounting middleware
The script cloneprep.sh is copied to aid in cleanup before cloning.
Modifying zipl.conf
The parameter line is modified in /etc/zipl.conf in three ways:
The menu time-out (timeout) is reduced from 10 seconds to 3 so Linux IPLs more quickly
with no user input.
The dasd= parameter is added so there are well-known “slots” for additional disks at
addresses 1B9-1BF (i.e. /dev/dasdi - /dev/dasdp), 2B0-2BF and 320-33F. The additional
slots from 1B9-1BF can be used for adding devices for file systems (e.g. adding a minidisk
Sharing and maintaining SLES 10 SP2 Linux under z/VM
35
at 1B9 for /sbin/ and one at 1BA for /bin/). The additional slots from 2B0-2BF can be used
for adding devices for logical volumes, and the additional slots from 320-32F can be
considered reserved for future growth.
The vmpoff=LOGOFF parameter is added so that VM user IDs are logged off after Linux is
shut down.
Back up the original zipl.conf then make the following changes:
# cd /etc
# cp zipl.conf zipl.conf.orig
# vi zipl.conf
# Modified by YaST2. Last modification on Wed Aug 29 19:48:46 UTC 2007
[defaultboot]
defaultmenu = menu
:menu
target = /boot/zipl
timeout = 3
prompt = 1
1 = ipl
2 = failsafe
default = 1
###Don't change this comment - YaST2 identifier: Original name: ipl###
[ipl]
target = /boot/zipl
image = /boot/image
ramdisk = /boot/initrd,0x1000000
parameters = "dasd=1b0-1bf,2b0-2bf,320-33f root=/dev/dasdb1 TERM=dumb vmpoff=LOGOFF"
...
Important: The “dasd=...” and “vmpoff=LOGOFF” parameters must be specified as above
because the mnt2rogld.sh script will key off of these strings.
Run zipl to write the changes to /boot/:
# zipl
Using config file '/etc/zipl.conf'
Building bootmap in '/boot/zipl'
Building menu 'menu'
Adding #1: IPL section 'ipl' (default)
Adding #2: IPL section 'Failsafe'
Preparing boot device: dasda (01b0).
Done.
Adding the CMS file system package
The cmsfs RPM is added via the zypper install command. It will be needed by the
boot.findself script to obtain the correct IP address and host name from the 191 (CMSCLONE
192) disk at first boot.
# zypper install cmsfs
Restoring system sources...
Do you want to trust key id A84EDAE89C800ACA, SuSE Package Signing Key <[email protected]>,
fingerprint 79C179B2E1C820C1890F9994A84EDAE89C800ACA [y/n]: y
Import key A84EDAE89C800ACA to trusted keyring? [y/n]: y
Parsing metadata for SUSE Linux Enterprise Server 10 SP2...
36
Sharing and maintaining SLES 10 SP2 Linux under z/VM
Parsing RPM database...
Summary:
<install>
[S1:1][package]cmsfs-1.1.8-3.2.s390x
Continue? [y/n]: y
Downloading: [S1:1][package]cmsfs-1.1.8-3.2.s390x, 39.7 K(136.9 K unpacked)
Installing: [S1:1][package]cmsfs-1.1.8-3.2.s390x
Setting the cmm and vmcp module to be loaded
When the cmm module is loaded, in conjunction with configuration changes on z/VM,
significant performance gains are possible. Collaborative Memory Management and VMRM
are discussed in more detail in 1.9.3, “Enabling Collaborative Memory Management (CMM)”
on page 66:
The vmcp module allows CP commands to be issued from Linux.
The cmm and vmcp modules are added to the file /etc/sysconfig/kernel. This will cause
these modules to be loaded at boot time.
# cd /etc/sysconfig
# vi kernel
// modify one line
MODULES_LOADED_ON_BOOT="cmm vmcp"
Modifying the /etc/inittab file
Two changes are made to the /etc/inittab file. The default run level of 5 (graphical interface) is
changed to 3 (command line interface). Rather than rebooting, (shutdown -r), the system is
set to halt (shutdown -h) when the shutdown signal is trapped as a Ctrl-Alt-Del signal:
# cd /etc
# vi inittab // change shutdown -r to shutdown -h
...
# The default runlevel is defined here
id:3:initdefault:
...
# what to do when CTRL-ALT-DEL is pressed
ca::ctrlaltdel:/sbin/shutdown -h -t 4 now
...
Copying the cloneprep.sh and boot.findself scripts
The script cloneprep.sh is copied to /usr/local/sbin/ so it can be used to clean up files just
before cloning. The script boot.findself is copied to /etc/init.d/ so it can be run one time
at first boot.
The scripts are copied via the scp command. In this example, the IP address of the Linux
running on LNXCLONE is 9.60.18.225.
# cd /usr/local/sbin
# scp 9.60.18.225:/usr/local/src/sbincloneprep.sh .
The authenticity of host '9.60.18.225 (9.60.18.225)' can't be established.
RSA key fingerprint is e2:20:51:93:1b:47:25:83:86:08:3a:92:d1:24:e9:9b.
Are you sure you want to continue connecting (yes/no)? yes
Warning: Permanently added '9.60.18.225' (RSA) to the list of known hosts.
Password:
cloneprep.sh
100% 2280
2.2KB/s
00:00
# cd /etc/init.d
# scp 9.60.18.225:/usr/local/src/sbin/boot.findself .
Password:
boot.findself
100% 6307
6.2KB/s
00:00
Sharing and maintaining SLES 10 SP2 Linux under z/VM
37
The boot.findself script is set to run at boot time with the chkconfig command and verified
with chkconfig --list:
# chkconfig boot.findself on
# chkconfig --list boot.findself
boot.findself
0:off 1:off
2:off
3:off 4:off
5:off
6:off B:on
See “The boot.findself script” on page 67 for a listing of the code and a brief description of the
logic.
Creating empty mount points under /opt/
Mounting middleware binaries read-only is beyond the scope of this paper. However, if there
is a possibility that you may run WebSphere® Application Server, DB2 UDB, or MQ Series,
you may wish to create the following, or other, empty mount points for other software:
/opt/IBM/WebSphere/
/opt/mqm/
/opt/IBM/db2/
In this fashion, all cloned servers will have empty mount points for possibly mounting
software.
#
#
#
#
cd /opt
mkdir mqm IBM
cd IBM
mkdir WebSphere db2
Other modifications
These are only a few modifications to the base system. You may choose many other
modifications such as adding more RPMs, removing unnecessary RPMS, setting the
software clock correctly via NTP, etc.
Testing your system
The next step is to perform all tests that are necessary and appropriate for your environment.
The last step
Now the cloneprep.sh script can be run. The output should be similar to the following:
# cloneprep.sh
rm: cannot remove `/var/log/*.gz': No such file or directory
System should be ready for shutdown and cloning
Shutdown the test system and log off the z/VM user ID.
# shutdown -h now
...
Logoff the S10RWTST user ID. The system should now be ready to clone.
1.5.7 Copying Linux from S10RWTST to S10RWMNT
Once the test system has been modified and thoroughly tested, it can be copied back to the
maintenance system via the TST2MNT EXEC from the CMSCLONE user ID:
==> tst2mnt
Checking that source and target user IDs are logged off
HCPCQU045E S10RWTST not logged on
HCPCQU045E S10RWMNT not logged on
38
Sharing and maintaining SLES 10 SP2 Linux under z/VM
Do you want to copy R/W disks from S10RWTST to S10RWMNT? y/n
y
Copying minidisk 01B0 to 11B0 ...
00: Command complete: FLASHCOPY 01B0 0 END TO 11B0 0 END
Return value = 0
Copying minidisk 01B1 to 11B1 ...
00: Command complete: FLASHCOPY 01B1 0 END TO 11B1 0 END
Return value = 0
Copying minidisk 01B4 to 11B4 ...
00: Command complete: FLASHCOPY 01B4 0 END TO 11B4 0 END
Return value = 0
Copying minidisk 01B5 to 11B5 ...
00: Command complete: FLASHCOPY 01B5 0 END TO 11B5 0 END
Return value = 0
Copying minidisk 01B6 to 11B6 ...
00: Command complete: FLASHCOPY 01B6 0 END TO 11B6 0 END
Return value = 0
Copying minidisk 01B7 to 11B7 ...
00: Command complete: FLASHCOPY 01B7 0 END TO 11B7 0 END
Return value = 0
Copying minidisk 01B8 to 11B8 ...
00: Command complete: FLASHCOPY 01B8 0 END TO 11B8 0 END
Return value = 0
Cleaning up ...
00: 01B0 01B1 01B4 01B5 01B6 01B7 01B8 11B0 DETACHED
00: 11B1 11B4 11B5 11B6 11B7 11B8 DETACHED
The test and the maintenance systems are now the same. The next step is to create the first
“gold” read-write copy.
1.5.8 Copying read-write Linux to the gold disks
Again from CMSCLONE copy the maintenance system to the 11Bx disks on the gold system,
S10GOLD via the MNT2GOLD EXEC:
==> mnt2gold
HCPCQU045E S10RWMNT not logged on
HCPCQU045E S10GOLD not logged on
Do you want to copy R/W disks from S10RWMNT to S10GOLD? y/n
y
Copying minidisk 01B0 to 11B0 ...
00: Command complete: FLASHCOPY 01B0 0 END TO 11B0 0 END
Return value = 0
Copying minidisk 01B1 to 11B1 ...
00: HCPCMM296E Status is not as required - 01B1; an unexpected conditio
00: HCPCMM296E occurred while executing a FLASHCOPY command, code = A7.
FLASHCOPY failed, falling back to DDR ...
z/VM DASD DUMP/RESTORE PROGRAM
HCPDDR696I VOLID READ IS 0X01B1
Sharing and maintaining SLES 10 SP2 Linux under z/VM
39
HCPDDR696I VOLID READ IS 0X01B1
COPYING
0X01B1
COPYING DATA 10/12/07 AT 16.47.31 GMT FROM 0X01B1 TO 0X01B1
INPUT CYLINDER EXTENTS
OUTPUT CYLINDER EXTENTS
START
STOP
START
STOP
0
399
0
399
END OF COPY
END OF JOB
Return value = 0
Copying minidisk 01B4 to 11B4 ...
...
Note that FLASHCOPY did not succeed in every case, and the EXEC falls back to DDR. This is
not unexpected as the copying of the data from the previous EXEC had probably not
completed in the background of the disk subsystem.
Now the same golden image exists on S10RWMNT, S10RWTST and S10GOLD.
1.5.9 Cloning a read-write Linux system
You should now be ready to clone a read-write system. The CLONERW EXEC copies the 1B0, 1B1
and 1B4-1B8 minidisks from the S10GOLD system to a target user ID that must be specified.
To clone a read-write system, perform the following steps:
1. Create a new user ID LNX226 with the same size and numbered minidisks as the Linux
user IDs:
USER LNX226 PASSWD 256M 1G
INCLUDE RORDFLT
OPTION APPLMON
MDISK 01B0 3390 0001 0060
MDISK 01B1 3390 0061 0500
MDISK 01B4 3390 0561 0550
MDISK 01B5 3390 1111 0100
MDISK 01B6 3390 1211 1019
MDISK 01B7 3390 2230 2290
MDISK 01B8 3390 4520 0489
G
DM63CB
DM63CB
DM63CB
DM63CB
DM63CB
DM63CB
DM63CB
MR
MR
MR
MR
MR
MR
MR
PASSWD
PASSWD
PASSWD
PASSWD
PASSWD
PASSWD
PASSWD
PASSWD
PASSWD
PASSWD
PASSWD
PASSWD
PASSWD
PASSWD
PASSWD
PASSWD
PASSWD
PASSWD
PASSWD
PASSWD
PASSWD
Bring the changes online, either via the DIRECTXA command, or via the appropriate “add”
command if you are using a directory maintenance product.
2. Create a parameter file on the CMSCLONE 192 disk (which is the Linux user ID’s read-only
191 disk). By default CMS accesses the 192 disk as D. The S10RWMNT parameter file on
CMSCLONE’s D disk is copied as a template, and the host name and IP address are
modified:
===> copy s10rwmnt parm-s10 d lnx226 = =
===> x lnx226 parm-s10 d
ramdisk_size=65536 root=/dev/ram1 ro init=/linuxrc TERM=dumb
HostIP=129.40.179.226 Hostname=ntc226.pbm.ihost.com
Gateway=129.40.179.254 Netmask=255.255.255.0
Broadcast=129.40.179.255 Layer2=0
ReadChannel=0.0.0600 WriteChannel=0.0.0601 DataChannel=0.0.0602
Nameserver=129.40.106.1 Portname=dontcare
Install=nfs://129.40.179.200/nfs/sles10/SLES-10-CD-s390x-GMC-CD1.iso
UseVNC=1 VNCPassword=123456
InstNetDev=osa OsaInterface=qdio OsaMedium=eth Manual=0
40
Sharing and maintaining SLES 10 SP2 Linux under z/VM
3. Grant the new user ID access to the VSWITCH. The following statement is put in
AUTOLOG1’s PROFILE EXEC:
'cp set vswitch vsw1 grant lnx226'
This command is also run interactively from the command line for the current z/VM session.
By using the SLES 10 SP2 parameter file to maintain the IP address and host name, there is
a side effect. If for some reason you need to install Linux manually, or even use the install
process as a rescue system, this file will be available and the same IP/DNS information will
be used.
The read-write Linux system is cloned to the LINUX226 user ID via the CLONERW EXEC:
==> clonerw lnx226
Checking that source and target user IDs are logged off
HCPCQU045E S10GOLD not logged on
HCPCQU045E LNX226 not logged on
Do you want to copy R/W system from S10GOLD to lnx226 y/n
y
Copying minidisk 11B0 to 01B0 ...
Command complete: FLASHCOPY 11B0 0 END TO 01B0 0 END
Return value = 0
Copying minidisk 11B1 to 01B1 ...
Command complete: FLASHCOPY 11B1 0 END TO 01B1 0 END
Return value = 0
Copying minidisk 11B4 to 01B4 ...
Command complete: FLASHCOPY 11B4 0 END TO 01B4 0 END
Return value = 0
Copying minidisk 11B5 to 01B5 ...
Command complete: FLASHCOPY 11B5 0 END TO 01B5 0 END
Return value = 0
Copying minidisk 11B6 to 01B6 ...
Command complete: FLASHCOPY 11B6 0 END TO 01B6 0 END
Return value = 0
Copying minidisk 11B7 to 01B7 ...
Command complete: FLASHCOPY 11B7 0 END TO 01B7 0 END
Return value = 0
Copying minidisk 11B8 to 01B8 ...
Command complete: FLASHCOPY 11B8 0 END TO 01B8 0 END
Return value = 0
01B0-01B1
01B4-01B8
11B0-11B1
11B4-11B8
DETACHED
DETACHED
DETACHED
DETACHED
You should now have four identical systems, three of which can be IPLed: S10RWMNT,
S10RWTST and LNX226. All of these have identical IP and DNS information. For the first three
system user IDs, this is acceptable knowing that only one will be booted at a time. However,
the target systems will naturally need unique IP and DNS host name values. This is
accomplished at first boot time by the boot.findself script.
Sharing and maintaining SLES 10 SP2 Linux under z/VM
41
You can now log on to LNX226 and IPL from 1B0. At the initial logon, be sure there are no
errors related to minidisks nor VSWITCH access:
LOGON LNX226
00: NIC 0600 is created; devices 0600-0602 defined
00: z/VM Version 5 Release 4.0, Service Level 0801 (64-bit),
00: built on IBM Virtualization Technology
00: There is no logmsg data
00: FILES:
NO RDR,
NO PRT, NO PUN
00: LOGON AT 10:33:03 EDT TUESDAY 05/05/09
z/VM V5.4.0
2008-12-05 12:25
DMSACP723I A (191) R/O
DMSACP723I C (592) R/O
DIAG swap disk defined at virtual address 1B2 (16245 4K pages of swap space)
DIAG swap disk defined at virtual address 1B3 (16245 4K pages of swap space)
Choose to boot Linux from 1B0, and you should notice the modified default boot time of 3
seconds and the modified parameter line:
Do you want to IPL Linux from DASD 1B0? y/n
y
00: zIPL v1.6.3 interactive boot menu
00:
00: 0. default (ipl)
00:
00: 1. ipl
00: 2. Failsafe
00:
00: Note: VM users please use '#cp vi vmsg <number> <kernel-parameters>'
00:
00: Please choose (default will boot in 3 seconds):
00: Booting default (ipl)...
Linux version 2.6.16.60-0.21-default (geeko@buildhost) (gcc version 4.1.2 200701
15 (SUSE Linux)) #1 SMP Tue May 6 12:41:02 UTC 2008
We are running under VM (64 bit mode)
Detected 2 CPU's
Boot cpu address 0
Built 1 zonelists
Kernel command line: dasd=1b0-1bf,2b0-2bf,320-33f root=/dev/dasdb1 TERM=dumb
vmpoff=LOGOFF BOOT_IMAGE=0
...
The script /etc/init.d/boot.findself later run in the boot sequence. It accesses the 191
disk (CMSCLONE 192), read the parameter file and set the TCP/IP address and host name. It
does this by modifying the files /etc/HOSTS, /etc/hostname and the eth0 configuration file
under /etc/sysconfig/network/. Note that the gateway, DNS server and broadcast
information are not modified. The script assumes this information is the same for all Linux
virtual servers. If this information is different, you will need to modify the script
/etc/init.d/boot.findself. See 1.10.1, “The boot.findself script” on page 67 for a complete
listing of the source code.
You should see informational messages similar to the following:
...
/etc/init.d/boot.findself: changing (escaped) gpok222\.endicott\.ibm\.com to gpo
k226.endicott.ibm.com in /etc/HOSTNAME
/etc/init.d/boot.findself: changing gpok222 to gpok226 and IP address in /etc/ho
sts
/etc/init.d/boot.findself: changing (escaped) 9\.60\.18\.222 to 9.60.18.226 in /
etc/sysconfig/network/ifcfg-qeth-bus-ccw-0.0.0600
42
Sharing and maintaining SLES 10 SP2 Linux under z/VM
...
These messages show that the boot.findself script ran and modified the IP address and
host name. You should now be able to start an SSH session with the cloned system at the
updated IP address.
You can view the file systems with the df -h command:
# df -h
Filesystem
/dev/dasdb1
udev
/dev/dasda1
/dev/dasdf1
/dev/dasdi1
/dev/dasdh1
/dev/dasdg1
Size
341M
121M
41M
69M
333M
1.6G
706M
Used
79M
128K
13M
4.1M
20M
666M
61M
Avail Use% Mounted on
245M 25% /
121M
1% /dev
26M 34% /boot
61M
7% /local
297M
7% /opt
839M 45% /usr
610M
9% /var
This shows the file system layout of a cloned read-write Linux system.
1.6 Building a read-only root system
You should now have a read-write Linux system with tools to maintain copies of Linux for test,
maintenance and cloning. It is now time to tackle creating a read-only root system.
A summary of the steps are as follow:
1. “Defining a user ID for the first read-only root system”
2. “Creating a prototype read-only root Linux” on page 44
3. “Copying read-only Linux to gold disks” on page 49
4. “Cloning a read-only Linux” on page 50
1.6.1 Defining a user ID for the first read-only root system
A user ID S10ROGLD is created with the following directory definition. This is where the
read-only system will be created. Note that all minidisks are read-write. This is necessary as
the process of moving from a read-write to a read-only system requires write access to
various disks as read-write for certain periods of time.
USER S10ROGLD PASSWD 256M 1G G
INCLUDE RORDFLT
OPTION APPLMON
MDISK 01B0 3390 5009 0060 DM63C9
MDISK 01B1 3390 5069 0500 DM63C9
MDISK 01B4 3390 5569 0550 DM63C9
MDISK 01B5 3390 6119 0100 DM63C9
MDISK 01B6 3390 6219 1019 DM63C9
MDISK 01B7 3390 7238 2290 DM63C9
MDISK 01B8 3390 9528 0489 DM63C9
MR
MR
MR
MR
MR
MR
MR
PASSWD
PASSWD
PASSWD
PASSWD
PASSWD
PASSWD
PASSWD
PASSWD
PASSWD
PASSWD
PASSWD
PASSWD
PASSWD
PASSWD
PASSWD
PASSWD
PASSWD
PASSWD
PASSWD
PASSWD
PASSWD
The directory changes are brought online and the user ID is given access to system’s
VSWITCH.
Sharing and maintaining SLES 10 SP2 Linux under z/VM
43
1.6.2 Creating a prototype read-only root Linux
The script mnt2rogld.sh and some modified files were composed to help facilitate creating a
read-only root system from a conventional read-write Linux system. Understand that these
are neither supported, nor heavily tested. Again, check with your Linux distributor and/or
support company to be sure that such a system will be supported. If you implement it, test
everything well.
The global variables and functions calls are at the bottom of the script. Here are the global
variables:
sourceID="S10RWMNT"
targetID="S10ROGLD"
rorDiffs="/usr/local/sbin/boot.rootfsck.diffs"
fstabFile="/usr/local/sbin/fstab.ror"
The source user ID is S10WRMNT and the target user ID is S10ROGLD as has been described.
The global variable rorDiffs specifies the diff file shipped with the tar file that is used to
modify the /etc/init.d/boot.rootfsck script. The variable fstabFile specifies the modified
/etc/fstab file also shipped with the tar file. Because these user ID names, boot script and
file system configuration file are hard-coded into the script, all the steps in this section must
be performed identically, or the script could easily fail.
The function calls are as follow:
checkID $sourceID
checkID $targetID
linkSourceDisks
linkTargetDisks
enableSourceDisks
enableTargetDisks
copySystem
mountSourceRoot
mountTargetDisks
modifySystem
cleanUp
echo "Exiting with rc 0!"
exit 0
See 1.10.4, “The mnt2rogld.sh script” on page 73 for a complete listing of script. Here is a
high level description of the functions.
The first two function calls to checkID verify that the source and target user IDs are logged
off.
The next two function calls, linkSourceDisks and linkTargetDisks utilize vmcp to link to
the S10RWMNT and S10ROGLD minidisks in read-only and read-write mode, respectively.
The next two function calls, enableSourceDisks and enableTargetDisks, utilize the Linux
chccwdev command to enable the source and target disks.
The next function copySystem, calls copyDisk to copy all minidisks. The copyDisk function
uses the Linux dasdfmt and dd commands.
The next two function calls mountSourceRoot and mountTargetDisks mount the source and
target disks following the Linux file system hierarchy over the directories /mnt/source/
and /mnt/target/.
The function modifySystem is where some magic occurs, so it is analyzed in detail. Here is
the code:
function modifySystem()
{
44
Sharing and maintaining SLES 10 SP2 Linux under z/VM
TGT="/mnt/target"
echo "" 1
echo "Backing up and modifying /etc/init.d/boot script ..."
cp $TGT/etc/init.d/boot $TGT/etc/init.d/boot.orig
if [ "$?" != 0 ]; then exit 47; fi
cat $TGT/etc/init.d/boot.orig | \
sed -e 's:bootrc=/etc/init.d/boot.d:bootrc=/sbin/etc/init.d/boot.d:g' > \
$TGT/etc/init.d/boot
if [ "$?" != 0 ]; then exit 48; fi
echo "" 2
echo "Backing up and patching /etc/init.d/boot.rootfsck script ..."
cp $TGT/etc/init.d/boot.rootfsck $TGT/etc/init.d/boot.rootfsck.orig
if [ "$?" != 0 ]; then exit 49; fi
patch $TGT/etc/init.d/boot.rootfsck < $rorDiffs
if [ "$?" != 0 ]; then exit 50; fi
echo "" 3
echo "Backing up and copying modified /etc/fstab file ..."
cp $TGT/etc/fstab $TGT/etc/fstab.orig
if [ "$?" != 0 ]; then exit 51; fi
cp $fstabFile $TGT/etc/fstab
if [ "$?" != 0 ]; then exit 52; fi
echo "" 4
echo "Backing up and modifying /etc/zipl.conf file ..."
cp $TGT/etc/zipl.conf $TGT/etc/zipl.conf.orig
if [ "$?" != 0 ]; then exit 53; fi
cat $TGT/etc/zipl.conf.orig | \
sed -e 's/1b0-1bf/1b0(ro),1b1(ro),1b2-1b7,1b8(ro),1b9-1bf/g' > \
$TGT/etc/zipl.conf
cp $fstabFile $TGT/etc/fstab
if [ "$?" != 0 ]; then exit 54; fi
The above lines create backup files of the three files that are modified: /etc/init.d/boot,
/etc/init.d/boot.rootfsck and /etc/fstab. In 1 the first script requires only a single
change - to point to /sbin/etc/init.d/boot rather than /etc/init.d/boot: therefore a
simple sed command is used. This change is needed because the /etc/ directory is not
yet available read-write.
In 2 the /etc/init.d/boot.rootfsck, is backed up then it is modified via the patch
command and the supplied diff file. The resulting modified code is in 1.10.5, “Modified
boot.rootfsck file” on page 81.
In 3 the file /etc/fstab is backed up and a modified copy is put in its place. See 1.10.6,
“Configuration file /etc/fstab” on page 86 for the contents of that file.
Finally in 4 the parameter line in the file /etc/zipl.conf is modified so that the 1B0
(/boot/), 1B1 (root) and 1B8 (/usr/) disks get the ro parameter so the Linux kernel knows
they are read-only.
The code continues.
echo ""
echo "Copying source /etc/,
cp -a $TGT/etc $TGT/local
if [ "$?" != 0 ]; then exit
cp -a $TGT/root $TGT/local
if [ "$?" != 0 ]; then exit
cp -a $TGT/srv $TGT/local
if [ "$?" != 0 ]; then exit
/root/ and /srv/ to target /local/ ..."
54; fi
55; fi
56; fi
Sharing and maintaining SLES 10 SP2 Linux under z/VM
45
The above lines make copies of /etc/, /root/ and /srv/ to /local/. These are three of
the four directories that will be read-write in the read-only root system (the fourth directory,
/var/, is it’s own minidisk). These three directories will later be bind-mounted from
/local/ to their original slot by the modified boot.rootfsck script.
echo ""
echo "Manipulating /etc/init.d and /sbin on $TGT ..."
chroot $TGT mv /etc/init.d /sbin
chroot $TGT ln -s /sbin/init.d /etc
}
The above lines move /etc/init.d/ to /sbin/init.d and then create a symbolic link from
/etc/init.d/ back to /sbin/init.d/ so that /etc/init.d/ is available at boot time and
before the correct contents of /etc/ are bind-mounted from /local/etc/.
Finally, the function cleanup is called to unmount all mounted file systems, disable all
devices and then DETACH the minidisks.
Now it is time to run the mnt2rogld.sh script from the Linux system running on the LNXCLONE
user ID. Following is a summary of the output:
# mnt2rogld.sh
Invoking CP command: QUERY S10RWMNT
HCPCQU045E S10RWMNT not logged on
Error: non-zero CP response for command 'QUERY S10RWMNT': #45
Invoking CP command: QUERY S10ROGLD
HCPCQU045E S10ROGLD not logged on
Error: non-zero CP response for command 'QUERY S10ROGLD': #45
Linking source disks ...
Invoking CP command: link S10RWMNT 1b1 11b1 rr
...
Linking target disks ...
Invoking CP command: link S10ROGLD 1b1 21b1 mr
...
Enabling source disks ...
...
Enabling target disks ...
...
Copying root file system ...
...
Copying /boot/ ...
...
Copying minidisk swap space ...
...
Copying /local/ ...
...
Copying /var/ ...
...
Copying /usr/ ...
...
Copying /opt/ ...
...
Making source mount point ...
Mounting source root file system over /mnt/source ...
Mounting target file systems over /mnt/target ...
Making target mount points ...
Mounting memory file systems ...
46
Sharing and maintaining SLES 10 SP2 Linux under z/VM
Backing up and modifying /etc/init.d/boot script ...
Backing up and patching /etc/init.d/boot.rootfsck script ...
patching file /mnt/target/etc/init.d/boot.rootfsck
Backing up and copying modified /etc/fstab file ...
Copying /etc/fstab file
Backing up and modifying /etc/zipl.conf file ...
Running zipl in target environment ...
...
Copying source /etc/, /root/ and /srv/ to target /local/ ...
Making mountpoint for R/O RPM Database...
Manipulating /etc/init.d and /sbin on /mnt/target ...
Cleaning up ...
Setting device 0.0.21b0 offline
...
Exiting with rc 0!
Tip: If the script fails, you can immediately issue the command echo $? to get the return
code. That value should isolate the line in the script that is failing, because each exit from
the script has a unique exit value.
Also, if you run the script a second time after failing, you may get an error that a file system
is already mounted over /mnt/source/ or /mnt/target/. A helper script has been written
named offliner.sh. If the mnt2rogld.sh fails, run offliner.sh to clean up any remaining
linked disks.
The S10GOLD 21B6 disk is being linked read-only. This is the gold /var/ partition, which
contains the RPM database. The script mnt2rogld.sh alters /etc/init.d/boot.local to bindmount the /var/lib/rpm/ directory over the read-write version present on any read-only
clone. This is accomplished with the following command:
mount -n -o ro --bind /local/.var/lib/rpm /var/lib/rpm
Bind-mounting /var/lib/rpm/ on S10GOLD prevents read-only systems from falling out of line
with the gold RPM database. Otherwise, when an RPM is added to a gold disk, each
individual read-only clone would need to rebuild the database. The 21B6 disk is linked as the
0320 disk and mounted at /local/.var/. The RPM database is then bind-mounted from there
to /var/lib/rpm/.
You should now be able to logon to S10ROGLD and try the new system.
Testing the newly created system
Logon to S10ROGLD to test the newly created system. Boot Linux from 1B0. :
LOGON S10ROGLD
00: NIC 0600 is created; devices 0600-0602 defined
00: z/VM Version 5 Release 4.0, Service Level 0801 (64-bit),
Sharing and maintaining SLES 10 SP2 Linux under z/VM
47
00: built on IBM Virtualization Technology
00: There is no logmsg data
00: FILES:
NO RDR,
NO PRT, NO PUN
00: LOGON AT 13:01:24 EDT TUESDAY 05/05/09
z/VM V5.4.0
2008-12-05 12:25
DMSACP723I A (191) R/O
DMSACP723I C (592) R/O
DIAG swap disk defined at virtual address 1B2 (16245 4K pages of swap space)
DIAG swap disk defined at virtual address 1B3 (16245 4K pages of swap space)
Do you want to IPL Linux from DASD 1B0? y/n
y
00: zIPL v1.6.3 interactive boot menu
00:
00: 0. default (ipl)
00:
00: 1. ipl
00: 2. Failsafe
00:
00: Note: VM users please use '#cp vi vmsg <number> <kernel-parameters>'
00:
00: Please choose (default will boot in 3 seconds):
00: Booting default (ipl)...
Linux version 2.6.16.60-0.21-default (geeko@buildhost) (gcc version 4.1.2 200701
15 (SUSE Linux)) #1 SMP Tue May 6 12:41:02 UTC 2008
We are running under VM (64 bit mode)
Detected 2 CPU's
Boot cpu address 0
Built 1 zonelists
Note the “ro” in the parameter line - this is added by the mnt2rogld.sh script which makes the
assumption that the string vmpoff=LOGOFF exists in the parameter line:
Kernel command line: dasd=1b0(ro),1b1(ro),1b2-1b7,1b8(ro),1b9-1bf,2b0-2bf,320-33
f root=/dev/dasdb1 TERM=dumb vmpoff=LOGOFF ro BOOT_IMAGE=0
PID hash table entries: 2048 (order: 11, 65536 bytes)
Dentry cache hash table entries: 65536 (order: 7, 524288 bytes)
Inode-cache hash table entries: 32768 (order: 6, 262144 bytes)
Memory: 243456k/262144k available (4671k kernel code, 0k reserved, 2089k data, 2
12k init)
Security Framework v1.0.0 initialized
Mount-cache hash table entries: 256
...
The system should complete booting. Start an SSH session as root to the new system.
Even though it has seven read-write minidisks, it should be configured with most of the
directories linked read-only. You may choose to verify that certain disks are read-only while
others are read-write. Try the following commands:
# touch /etc/foo
# touch /var/foo
# touch /root/foo
# touch /srv/foo
# touch /tmp/foo
# touch /foo
touch: cannot touch `/foo': Read-only file system
# touch /opt/foo
touch: cannot touch `/opt/foo': Read-only file system
# touch /usr/foo
touch: cannot touch `/usr/foo': Read-only file system
48
Sharing and maintaining SLES 10 SP2 Linux under z/VM
The first five commands should succeed because those are read-write directories. The last
three commands should fail because those directories are accessed read-only. You may
choose to leave the empty foo files and verify that they remain in place across a reboot. After
that is verified you may want to delete the empty files so they don’t get cloned.
# rm /etc/foo /var/foo /root/foo /srv/foo /tmp/foo
Shutdown the read-only root system.
# shutdown -h now
Broadcast message from root (pts/0) (Sat Jun 27 07:21:44 2009):
The system is going down for system halt NOW!
The S10ROGLD user ID should be automatically logged off due to the vmpoff=LOGOFF
parameter.
1.6.3 Copying read-only Linux to gold disks
Logon to CMSCLONE and use the RO2GOLD EXEC to copy the contents to the 21Bx minidisks on
S10GOLD.
==> ro2gold
1
HCPDTV040E Device 21B7 does not exist
Checking that source and target user IDs are logged off
HCPCQU045E S10ROGLD not logged on
HCPCQU045E S10GOLD not logged on
Do you want to copy disks from S10ROGLD to S10GOLD? y/n
y
Copying minidisk 01B0 to 21B0 ...
Command complete: FLASHCOPY 01B0 0 END TO 21B0 0 END
Return value = 0
Copying minidisk 01B1 to 21B1 ...
Command complete: FLASHCOPY 01B1 0 END TO 21B1 0 END
Return value = 0
Copying minidisk 01B4 to 21B4 ...
Command complete: FLASHCOPY 01B4 0 END TO 21B4 0 END
Return value = 0
Copying minidisk 01B5 to 21B5 ...
Command complete: FLASHCOPY 01B5 0 END TO 21B5 0 END
Return value = 0
Copying minidisk 01B6 to 21B6 ...
Command complete: FLASHCOPY 01B6 0 END TO 21B6 0 END
Return value = 0
Copying minidisk 01B7 to 21B7 ...
Command complete: FLASHCOPY 01B7 0 END TO 21B7 0 END
Return value = 0
Copying minidisk 01B8 to 21B8 ...
Command complete: FLASHCOPY 01B8 0 END TO 21B8 0 END
Sharing and maintaining SLES 10 SP2 Linux under z/VM
49
Return value = 0
01B0-01B1 DETACHED
01B4-01B8 DETACHED
21B0-21B1 DETACHED
21B4-21B8 DETACHED
The modified read-only version of the gold read-write system should now be “alongside” the
read-write version on the S10GOLD disks.
1.6.4 Cloning a read-only Linux
You should now be able to clone a read-only Linux system. A user ID, LNX227, is created to
clone the system to. Only the 1B4 (swap), 1B5 (/local/) and 1B6 (/var/) minidisks are
read-write. The other disks are read-only links to the corresponding S10GOLD 21Bx minidisks.
Before creating a new user ID for a read-only system, a new user directory profile is created.
It is named S10DFLT. It includes LINK statements to the read-only disks on S10GOLD:
PROFILE S10DFLT
IPL CMS
MACHINE ESA 4
CPU 00 BASE
CPU 01
NICDEF 0600 TYPE QDIO LAN SYSTEM VSW1
SPOOL 000C 2540 READER *
SPOOL 000D 2540 PUNCH A
SPOOL 000E 1403 A
CONSOLE 009 3215 T
LINK MAINT 0190 0190 RR
LINK MAINT 019D 019D RR
LINK MAINT 019E 019E RR
LINK CMSCLONE 192 191 RR
LINK TCPMAINT 592 592 RR
* Read-only links for Linux
LINK S10GOLD 21B0 01B0 RR
LINK S10GOLD 21B1 01B1 RR
LINK S10GOLD 21B6 0320 RR
LINK S10GOLD 21B7 01B7 RR
LINK S10GOLD 21B8 01B8 RR
Having this new user directory PROFILE will make maintenance easier, as a second profile can
be used for migrating read-only systems.
A user ID, LNX227, is created to clone the system to. Note that only the 1B4 (swap), 1B5
(/local/) and 1B6 (/var/) minidisks are read-write. The other disks are read-only links to the
corresponding S10GOLD 11Bx minidisks.
USER LNX227 PASSWD 256M 1G
INCLUDE S10DFLT
OPTION APPLMON
MDISK 01B4 3390 0001 0550
MDISK 01B5 3390 0551 0100
MDISK 01B6 3390 0651 1019
G
DM63CD MR PASSWD PASSWD PASSWD
DM63CD MR PASSWD PASSWD PASSWD
DM63CD MR PASSWD PASSWD PASSWD
Create the new virtual machine. When that is completed, logoff of MAINT and logon to
CMSCLONE.
Again a parameter file must be created on the CMSCLONE 192 disk. The S10RWMNT parameter
file is copied as a template, and the host name and IP address are modified:
50
Sharing and maintaining SLES 10 SP2 Linux under z/VM
===> copy s10rwmnt parm-s10 d lnx227 = =
===> x lnx227 parm-s10 d
ramdisk_size=65536 root=/dev/ram1 ro init=/linuxrc TERM=dumb
HostIP=129.40.179.227 Hostname=ntc227.pbm.ihost.com
Gateway=129.40.179.254 Netmask=255.255.255.0
Broadcast=129.40.179.255 Layer2=0
ReadChannel=0.0.0600 WriteChannel=0.0.0601 DataChannel=0.0.0602
Nameserver=129.40.106.1 Portname=dontcare
Install=nfs://129.40.179.200/nfs/sles10/SLES-10-CD-s390x-GMC-CD1.iso
UseVNC=1 VNCPassword=123456
InstNetDev=osa OsaInterface=qdio OsaMedium=eth Manual=0
Give the new user ID access to the system VSWITCH.
You should now be ready to clone a read-only Linux system via the CLONERO EXEC:
==> clonero lnx227
Do you want to copy R/O system from S10GOLD to lnx227 y/n
y
...
00: 21B4 21B5 21B6 01B4 01B5 01B6 DETACHED
Logon to the new read-only system and boot Linux:
LOGON LNX227
00: NIC 0600 is created; devices 0600-0602 defined
00: z/VM Version 5 Release 4.0, Service Level 0801 (64-bit),
00: built on IBM Virtualization Technology
00: There is no logmsg data
00: FILES:
NO RDR,
NO PRT, NO PUN
00: LOGON AT 08:36:08 EDT SATURDAY 06/27/09
z/VM V5.4.0
2008-12-05 12:25
DMSACP723I A (191) R/O
DMSACP723I C (592) R/O
DIAG swap disk defined at virtual address 1B2 (16245 4K pages of swap space)
DIAG swap disk defined at virtual address 1B3 (16245 4K pages of swap space)
Do you want to IPL Linux from DASD 1B0? y/n
y
You should see Linux boot, the modified parameter line, and the boot.findself script setting
the IP address and hostname:
00: zIPL v1.6.3 interactive boot menu
00:
00: 0. default (ipl)
00:
00: 1. ipl
00: 2. Failsafe
00:
00: Note: VM users please use '#cp vi vmsg <number> <kernel-parameters>'
00:
00: Please choose (default will boot in 3 seconds):
00: Booting default (ipl)...
Linux version 2.6.16.60-0.21-default (geeko@buildhost) (gcc version 4.1.2 200701
15 (SUSE Linux)) #1 SMP Tue May 6 12:41:02 UTC 2008
We are running under VM (64 bit mode)
Detected 2 CPU's
Boot cpu address 0
Built 1 zonelists
Kernel command line: ro dasd=1b0(ro),1b1(ro),1b2-1b7,1b8(ro),1b9-1bf,2b0-2bf,320
-33f root=/dev/dasdb1 TERM=dumb vmpoff=LOGOFF BOOT_IMAGE=0
Sharing and maintaining SLES 10 SP2 Linux under z/VM
51
...
/etc/init.d/boot.findself: changing (escaped) gpok222\.endicott\.ibm\.com to gpo
k227.endicott.ibm.com in /etc/HOSTNAME
/etc/init.d/boot.findself: changing gpok222 to gpok227 and IP address in /etc/ho
sts
/etc/init.d/boot.findself: changing (escaped) 9\.60\.18\.222 to 9.60.18.227 in /
etc/sysconfig/network/ifcfg-qeth-bus-ccw-0.0.0600
You should be able to start an SSH session to the new IP address. The df -h command
should show file systems identical or simlar to the following:
# df -h
Filesystem
/dev/dasdb1
udev
/dev/dasda1
/dev/dasdi1
/dev/dasdh1
/dev/dasdg1
/dev/dasdag1
tmpfs
Size
341M
121M
41M
333M
1.6G
706M
706M
121M
Used
79M
136K
13M
20M
666M
64M
60M
0
Avail Use% Mounted on
245M 25% /
121M
1% /dev
26M 34% /boot
297M
7% /opt
839M 45% /usr
607M 10% /var
610M
9% /local/.var
121M
0% /tmp
1.7 Maintaining systems
In the original IBM Redpaper, the maintenance of the read-only and read-write systems was
described at a high level. These words are unchanged in section 1.7.1, “Original maintenance
methodology”, immediately following.
In this updated paper, a new section was added, 1.7.2, “A more detailed maintenance
methodology” on page 53 with more specifics on how maintenance is done at Penn State
University.
1.7.1 Original maintenance methodology
The following two aspects of maintenance are discussed:
Updating the gold disks
Updating the cloned servers
Updating the gold disks
If you need to modify the systems on the gold disks, they should probably be done in tandem;
that is, modify both the read-write and read-only systems. In between times of maintenance,
the read-write system on S10RWMNT, S10RWTST and the 11Bx disks of S10GOLD should all be
identical. Similarly, the read-only system on S10ROGLD and the 21Bx disks of S10GOLD should
be the same.
To make any change, for example to add an RPM, the following steps are recommended.
1. Copy S10RWMNT to S10RWTST with the MNT2TST EXEC.
2. IPL the read-write system on S10RWTST.
3. Make the change (add the RPM) and test.
4. When the system is completely tested, copy the system to S10RWMNT with the TST2MNT
EXEC.
5. Recreate a read-only root system from S10RWMNT to S10ROGLD via mnt2rogld.sh.
52
Sharing and maintaining SLES 10 SP2 Linux under z/VM
6. Test the read-only root system.
7. When both systems are fully tested copy them to the gold read-write disks via MNT2GOLD
and RO2GOLD.
Now the change should be reflected in any new Linux system that is cloned, be it read-write
or read-only. Of course this does not affect any of the Linux systems already in existence.
Updating the cloned servers
Performing maintenance on existing Linux servers is a little more difficult. The following
approach is just one option. This is very similar to the approach being used at Nationwide.
Assume the gold disks are now at version 2. Assume the Linux clones are still at version 1
and that the read-write directories have changed. These changes must be accounted for.
The first step in the update process should be to make a copy of each cloned server to be
updated, allowing for fallback if necessary. After the update, these disks should be preserved
for a suitable period of time.
Next, create duplicate minidisks for the read-write data. In this paper, that would mean the
minidisks 1B5 and 1B6. Temporarily put them at different addresses, for example 5B5 and 5B6.
Copy the contents of the version 2 gold disks to these new disks.
The next step is to merge the contents of the cloned server’s read-write disks (1B5->5B5,
1B6->5B6). New files that did not exist in version 1 of the gold disks are now on the new
disks. Files on the old minidisks (1B1,1B6) but not on the new version (5B1,5B6) should be
copied onto the new. Finally, review the files that are in common between the two read write
volumes, but have been updated by maintenance. These steps can be accomplished via the
rsync and diff commands. When these changes have been made, the server can use the
updated read-only root minidisks. If there is any problem, the system can be rolled back to the
previous version of gold minidisks.
1.7.2 A more detailed maintenance methodology
This methodology was implemented at Penn State University. It adds a second NOLOG user ID,
S10GOLD2, which contains a set of minidisks for another read-only golden Linux image. This
second user ID stores the next Linux system that is to be rolled out while the current system
remains stored on S10GOLD. Individual read-only Linux systems can be migrated to the new
system simply by modifying the disks they link to.
Sharing and maintaining SLES 10 SP2 Linux under z/VM
53
RO2GOLD
S10ROGLD
1Bx disks
S10GOLD
[current]
LNX227
RO clone
S10DFLT
RO2GOLD2
S10GOLD2
[new]
LNX242
RO clone
S10DFLT
LNX242
RO clone
S10DFLT2
Figure 1-16 Adding a second user ID, ROGOLD2, to store the next
Once the Linux machines are running and linked to the read-only gold disks, the gold disks
cannot be updated until those machines are either shutdown or migrated. Figure 1-16 depicts
how systems can be safely migrated. The machines shown in the lower left, LNX227 and a
new read-only Linux system, LNX242, are running under the current golden read-only disks.
When an updated Linux system is needed, a new golden image is created, tested and stored
onto S10GOLD2. A new RO2GOLD2 EXEC is now available to copy from the S10ROGLD system to
the new S10GOLD2 user ID.
After the new golden image has been tested, the read-only Linux systems can be migrated to
it, LNX242 is this example. This is done by changing the LINK statements in the directory entry
of the system being migrated. It is simply set to point to the 21Bx minidisks on S10GOLD2 rather
than S10GOLD. To make changing the link statements easier, two new directory PROFILEs are
created.
The following sections demonstrate how to set up this maintenance system:
“Preparing for the new maintenance system”
“Creating a new read-only Linux system” on page 56
“Performing maintenance to the golden image” on page 57
“Copying the updated golden image” on page 57
“Updating the directory of one read-only Linux” on page 59
“Testing the updated golden image” on page 59
Disk planning for maintenance system
Of the 4 3390-9s and one 3390-3 allocated, the last 3390-9 had only allocated 1669 cylinders
for the first read-only system, LNX227. The remaining space can be given to a second “gold”
virtual machine, S10GOLD2, and to a second read-only clone, LNX242. You may consider using
a fifth 3390-9 for S10GOLD2 to keep the gold disks separate from the “clones”.
54
Sharing and maintaining SLES 10 SP2 Linux under z/VM
DM63C9
3390-9
S10RWMNT
S10RWTST
DM63CA
3390-9
DM63CB
3390-9
S10GOLD
xxxGOLD
S10ROGLD
LNX226
11Bx, 21Bx
DM63CD
3390-9
LNX227
S10GOLD2
LNX242
DM6364
3390-3
CMSCLONE
LNXCLONE
Figure 1-17 Disk planning with four 3390-9s
Preparing for the new maintenance system
To prepare for this new methodology, perform the following steps:
1. Create a S10GOLD2 user ID with a set of 21Bx minidisks, but not 11Bx. The 11Bx disks are
not needed because a second set of read/write disks is not required.
USER S10GOLD2 NOLOG 64M 1G G
INCLUDE IBMDFLT
* Gold disks for read-only system
MDISK 21B0 3390 1670 0060 DM63CD
MDISK 21B1 3390 1730 0500 DM63CD
MDISK 21B4 3390 2230 0550 DM63CD
MDISK 21B5 3390 2780 0100 DM63CD
MDISK 21B6 3390 2880 1019 DM63CD
MDISK 21B7 3390 3899 2290 DM63CD
MDISK 21B8 3390 6189 0489 DM63CD
MR
MR
MR
MR
MR
MR
MR
PASSWD
PASSWD
PASSWD
PASSWD
PASSWD
PASSWD
PASSWD
PASSWD
PASSWD
PASSWD
PASSWD
PASSWD
PASSWD
PASSWD
PASSWD
PASSWD
PASSWD
PASSWD
PASSWD
PASSWD
PASSWD
2. Create a new user directory profile. This is based on the profile S10DFLT defined
previously. However its LINK statements point to read-only minidisks on S10GOLD2:
PROFILE S10DFLT2
IPL CMS
MACHINE ESA 4
CPU 00 BASE
CPU 01
NICDEF 0600 TYPE QDIO LAN SYSTEM VSW1
SPOOL 000C 2540 READER *
SPOOL 000D 2540 PUNCH A
SPOOL 000E 1403 A
CONSOLE 009 3215 T
LINK MAINT 0190 0190 RR
LINK MAINT 019D 019D RR
LINK MAINT 019E 019E RR
LINK CMSCLONE 192 191 RR
LINK TCPMAINT 592 592 RR
* Read-only links for Linux
LINK S10GOLD2 21B0 01B0 RR
LINK S10GOLD2 21B1 01B1 RR
LINK S10GOLD2 21B6 0320 RR
LINK S10GOLD2 21B7 01B7 RR
LINK S10GOLD2 21B8 01B8 RR
Sharing and maintaining SLES 10 SP2 Linux under z/VM
55
3. Bring the directory changes online for the new profile
There is now a second gold virtual machine, S10GOLD2, and a second user directory PROFILE,
S10DFLT2.
Creating a new read-only Linux system
Currently in the example system described by this paper, there are only two clones - a
read-write system running on LNX226 and a read-only system running on LNX227. A new
read-only system is created to demonstrate the maintenance system.
1. Logon to MAINT and create a new read-only user ID. In this example LNX242 is created from
the following directory entry:
USER LNX242 PASSWD
INCLUDE S10DFLT
OPTION APPLMON
MDISK 01B4 3390
MDISK 01B5 3390
MDISK 01B6 3390
256M 1G G
6678 550 DM63CD MR PASSWD PASSWD PASSWD
7228 100 DM63CD MR PASSWD PASSWD PASSWD
7328 1019 DM63CD MR PASSWD PASSWD PASSWD
2. Bringing the directory addition online.
3. Logoff of MAINT and logon to CMSCLONE. Create a new parameter file on the CMSCLONE 192
disk. Following is an example:
ramdisk_size=65536 root=/dev/ram1 ro init=/linuxrc TERM=dumb
HostIP=9.60.18.242 Hostname=gpok242.endicott.ibm.com
Gateway=9.60.18.129 Netmask=255.255.255.128
Broadcast=9.60.18.255 Layer2=0
ReadChannel=0.0.0600 WriteChannel=0.0.0601 DataChannel=0.0.0602
Nameserver=9.0.2.11 Portname=whatever
Install=nfs://9.60.18.188/nfs/sles10sp2/SLES-10-SP2-s390x-GMC-DVD1.iso
UseVNC=1 VNCPassword=123456
InstNetDev=osa OsaInterface=qdio OsaMedium=eth Manual=0
4. Grant permission for the new system to attach to the VSWITCH. The following line is
added to the PROFILE EXEC on the AUTOLOG 191 disk. Also, the command is run
interactively to grant the permission immediately:
'cp set vswitch vsw1 grant lnx242'
5. Clone the new read-only system with the CLONERO EXEC:
==> clonero lnx242
clonero lnx242
Do you want to copy R/O system from S10GOLD to LNX242 y/n
y
...
You might want to watch the boot messages to see that boot.findself modifies the IP
address and host name.
6. Logon to the system and start it:
LOGON LNX242
00: NIC 0600 is created; devices 0600-0602 defined
00: z/VM Version 5 Release 4.0, Service Level 0801 (64-bit),
00: built on IBM Virtualization Technology
00: There is no logmsg data
00: FILES: 0001 RDR,
NO PRT, NO PUN
00: LOGON AT 09:46:21 EDT SATURDAY 05/09/09
z/VM V5.4.0
2008-12-05 12:25
DMSACP723I A (191) R/O
DMSACP723I C (592) R/O
56
Sharing and maintaining SLES 10 SP2 Linux under z/VM
DIAG swap disk defined at virtual address 1B2 (16245 4K pages of swap space)
DIAG swap disk defined at virtual address 1B3 (16245 4K pages of swap space)
Do you want to IPL Linux from DASD 1B0? y/n
y
...
The new read-only Linux system has been created, cloned and started.
Start a CMS session on CMSCLONE. Use the LINKED EXEC to see which read-only systems are
linked to which disks:
==> linked
S10ROGLD LINKS: TEST
S10GOLD LINKS: [[GOLD 1]]
LNX227
LNX242
S10GOLD2 LINKS: GOLD 2
The output shows that the two read-only systems are linked to the S10GOLD disks. The double
brackets around GOLD 1 show that this is the latest golden image.
Performing maintenance to the golden image
To verify the maintenance system works, an example of updating the golden image is shown.
In this simple example the maintenance of the golden image performed is to add the
findutils-locate RPM. This RPM allows a fast search of the file system via the locate
command after the database is populated with the updatedb command.
1. The user ID S10RWTST is logged onto and Linux is started. In this example it runs on the IP
address 9.60.18.222.
2. The findutils-locate RPM is added via the zypper command:
# zypper install findutils-locate
Restoring system sources...
Parsing metadata for SUSE Linux Enterprise Server 10 SP2...
Parsing RPM database...
Summary:
<install>
[S1:1][package]findutils-locate-4.2.27-14.15.s390x
Continue? [y/n]: y
Downloading: [S1:1][package]findutils-locate-4.2.27-14.15.s390x
Installing: [S1:1][package]findutils-locate-4.2.27-14.15.s390x
3. The updatedb command is run to populate the locate database, which is under /var/.
# updatedb
4. The locate command is run to test the new RPM:
# locate foo | head -1
/opt/gnome/share/icons/hicolor/16x16/stock/navigation/stock_navigator-foonote-body-toggl
e.png
5. The system is shut down and the user ID is automatically logged off.
# shutdown -h now
...
Copying the updated golden image
Now the new golden image has been updated on the read-write system on S10RWTST, it is
copied to S10RWMNT and converted to a read-only system on S10ROGLD. Finally it is copied to
Sharing and maintaining SLES 10 SP2 Linux under z/VM
57
S10GOLD2 so as to not affect the other read-only systems linked to the read-only disks on
S10GOLD (LNX227 and LNX242 in this example).
1. From CMSCLONE, the read-write system is copied from S10RWTST to S10RWMNT:
==> tst2mnt
...
2. From CMSCLONE, the read-write system is copied from S10RWMNT to S10GOLD.
==> mnt2gold
...
3. From the Linux system running on LNXCLONE, the read-write system on S10RWMNT is
converted into a read-only system on S10ROGLD. It is observed that this step can be done
concurrently with the previous step since both scripts read from the S10RWMNT disks.
# mnt2rogld.sh
...
4. To populate the new set of disks on S10GOLD2, a second EXEC named RO2GOLD2 is written
(included in the associated tar file). It is almost identical to the RO2GOLD script, except that it
populates the disks on S10GOLD2. The RO2GOLD2 EXEC is run to copy the update golden
image to the new storage virtual machine, S10GOLD2:
==> ro2gold2
1
DASD 21B7 DETACHED
Do you want to copy disks from S10ROGLD to S10GOLD2? y/n
y
Copying minidisk 01B0 to 21B0 ...
Command complete: FLASHCOPY 01B0 0 END TO 21B0 0 END
Return value = 0
Copying minidisk 01B1 to 21B1 ...
Command complete: FLASHCOPY 01B1 0 END TO 21B1 0 END
Return value = 0
Copying minidisk 01B4 to 21B4 ...
Command complete: FLASHCOPY 01B4 0 END TO 21B4 0 END
Return value = 0
Copying minidisk 01B5 to 21B5 ...
Command complete: FLASHCOPY 01B5 0 END TO 21B5 0 END
Return value = 0
Copying minidisk 01B6 to 21B6 ...
Command complete: FLASHCOPY 01B6 0 END TO 21B6 0 END
Return value = 0
Copying minidisk 01B7 to 21B7 ...
Command complete: FLASHCOPY 01B7 0 END TO 21B7 0 END
Return value = 0
Copying minidisk 01B8 to 21B8 ...
Command complete: FLASHCOPY 01B8 0 END TO 21B8 0 END
Return value = 0
Cleaning up ...
01B0 01B1 01B4 01B5 01B6 01B7 01B8 21B0 DETACHED
21B1 21B4 21B5 21B6 21B7 21B8 DETACHED
Setting current Gold Disk Variable ...
58
Sharing and maintaining SLES 10 SP2 Linux under z/VM
5. Run the LINKED EXEC again to see the change:
==> linked
S10ROGLD LINKS: TEST
S10GOLD LINKS: GOLD 1
LNX227
LNX242
S10GOLD2 LINKS: [[GOLD 2]]
The two read-only Linux systems are still linked to S10GOLD, but note that the double
brackets are now around GOLD 2. This shows that S10GOLD2 contains the latest golden
image.
Now the golden image has been updated and its read-only contents copied to S10GOLD2. The
current system still exists and is running on S10GOLD.
Updating the directory of one read-only Linux
The LNX242 user ID can now be migrated to the updated golden read-only image. This is done
by using the S10DFLT2 profile which links the read-only disks on S10GOLD2. Logon to MAINT and
modify the directory entry of LNX242:
USER LNX242 PASSWD 256M
INCLUDE S10DFLT2
OPTION APPLMON
MDISK 01B4 3390 6678
MDISK 01B5 3390 7228
MDISK 01B6 3390 7328
1G G
550 DM63CD MR PASSWD PASSWD PASSWD
100 DM63CD MR PASSWD PASSWD PASSWD
1019 DM63CD MR PASSWD PASSWD PASSWD
Bring the directory change online with the appropriate command.
Testing the updated golden image
Start or return to an SSH session with LNX242. Try the locate command:
# locate foo
-bash: locate: command not found
It does not work because the system is still pointing to the gold disks on S10GOLD. In order for
the new directory entry to be used, the system must be logged off and back on again. Shut
the system down:
# shutdown -h now
Broadcast message from root (pts/0) (Sat Jun 27 11:49:08 2009):
The system is going down for system halt NOW!
The user ID should be logged off automatically. Start a 3270 session and boot Linux. When
the system comes up, start an SSH session and try the locate command:
# locate foo | head -1
locate: /var/lib/locatedb: No such file or directory
The locate command was found, however, the locate database was not. This is expected
because the command is found under /usr/ which is read-only, but the locate database is
found under /var/ which is read-write. So LNX242 has been updated to point to the new
read-only disks, however, its read-write disks are unaffected.
The locate database is updated by means of the updatedb command and now the locate
command works.
Sharing and maintaining SLES 10 SP2 Linux under z/VM
59
# updatedb
You have new mail in /var/mail/root
# locate foo | head -1
/opt/gnome/share/icons/hicolor/16x16/stock/navigation/stock_navigator-foonote-body-toggl
e.png
A second test is run on the read-write gold disk. The read-write system running on LNX226 is
shut down and the user ID is logged off. A new read-write Linux system is cloned to LNX226:
==> clonerw lnx226
...
An SSH session is started to the newly cloned LNX226 system. The locate command works
correctly:
# locate foo | head -1
/opt/gnome/share/icons/hicolor/16x16/stock/navigation/stock_navigator-foonote-body-toggl
e.png
This shows that both the /usr/ and /var/ file systems were updated with the locate
command and database, and that the new clone picked up these changes.
Observing the status of the system
The tricky part is keeping track of your system as more and more machines begin sharing the
gold disks. To assist in keeping track of gold disks, the LINKED EXEC was written and is
included in the associated tar file. Here is an example of using it:
==> linked
S10ROGLD LINKS: TEST
S10GOLD LINKS: GOLD 1
LNX227
S10GOLD2 LINKS: [[GOLD 2]]
LNX242
This shows that LNX242 is linked to S10GOLD2. The brackets around GOLD 2 indicate that this
is the most current gold disk, meaning ro2gold2 was the last script to be executed. Both
ro2gold and ro2gold2 write a variable to the file CURGOLD FILE A on the CMSCLONE A disk after
execution to keep track of maintenance progress. In addition, the CLONERO exec also uses the
CURGOLD FILE A in order to make sure the most recently updated gold disk is used when
creating new read-only Linux guests.
1.7.3 Types of software
Different software packages have different styles when implementing it in read-only
environments. The software that can run read-write on a minidisk, or has to be installed in an
entirely read-write environment is easy enough to explain. As is “pure read-only”. The hardest
to explain is the part on “tricking” read-write software to run read-only at least in part by
moving/symlinking the read-write areas to /var/ or /local/, etc. There is no cut and dry
explanation with that since the read-write bits and pieces vary from software to software.
FDRupstream it was a .pid file and some configuration files that needed to be placed
elsewhere, and the installed had to be pre-setup a little to work in the read-only environment.
Software on read-only Linux systems fall into one of four categories:
1. Pure read-only
60
Sharing and maintaining SLES 10 SP2 Linux under z/VM
Think of all the things in /usr/, /boot/, / etc. to begin with. All of this runs read-only, and any
read-write work is done in the home directory or /etc/ or /var/ etc... These software
packages work great, and no explanation is needed. Just install them on S10RWTST/MNT and
away you go.
2. Read-only, but picky and needs to be tricked...
Any software that can run almost entirely read-only, just the same as vi or bash, but due to a
couple things attempting to write somewhere like /opt/, it isn't a plug and play operation.
Innovation Data Processing’s fdrupstream is an example. It is installed back on S10RWTST/MNT
in /opt/fdrupstream/. However, when it boots it attempts to drop a .pid file, and one or two
other files as well as a log file. Luckily in the configuration, you can specify most of where you
want those to go. Choose /var/fdrupstream/. There was one last hanger on. It was
attempting to write to a file in /opt/fdrupstream still. So, on S10RWTST, I moved that file to
/var/fdrupstream/, and symlinked the file from /opt/fdrupstream/. Luckily that was the last
step, and now FDRupstream comes read-only with each new machine and all that needs to
happen is a small configuration change to a file in /var/fdrupstream/. Hence read-only, but
picky.
3. Read-write, mounted and attached
IBM Tivoli Monitor (ITM) works this way. We attach a 321 minidisk to any machine that needs
the agent, 500 cylinders. We then run a script which formats, then DDR's a “gold” install of
ITM over and installs all of the boot scripts and mounts ITM at /local/ITM/ (mainly since
/local/ is read-write and can be used easily for mount points).
4. Read-write and never going to run on a read-only machine
An example is IBM’s Omegamon for z/VM and Linux. This program attempts to install so
many places, /usr/bin/, /opt/IBM/, etc. and then later attempts to access so many files
read-write in those read-only areas, that running it read-only just isn't feasible. This is the
reason you still have 11Bx disks under S10GOLD.
1.8 Other considerations
This paper describes some miscellaneous topics such as:
“Utilizing logical volumes” on page 61
“Implementing /home/ with automount, NFS and LDAP” on page 62
“Enabling Collaborative Memory Management (CMM)” on page 63
1.8.1 Utilizing logical volumes
Using Linux Logical Volume Manager (LVM) would make a lot of sense for file systems that
are likely to grow large such as /var/ and perhaps /srv/. They were not implemented in this
paper for simplicity and due to time constraints.
If you decide to implement your solution using logical volumes, and you plan to use the
mnt2rogld.sh script, it would have to be modified accordingly.
Following is a sample function to create logical volumes on the target system that was lightly
tested. It targets device 2B0 which is linked read-write at virtual address 22B0 and the device
file is set in the variable dev22b0:
function makeLVs
{
Sharing and maintaining SLES 10 SP2 Linux under z/VM
61
echo ""
echo "Making logical volumes ..."
fdasd -a $dev22b0
pvcreate "$dev22b0"1
vgcreate rwVG "$dev22b0"1
lvcreate -L 200M -n varLV rwVG
lvcreate -L 1.2G -n srvLV rwVG
mke2fs /dev/rwVG/varLV > /dev/null
mke2fs /dev/rwVG/srvLV > /dev/null
echo ""
echo "Mounting logical volumes ..."
vgscan
vgchange -ay
mount /dev/rw_vg/srv_lv /mnt/target/srv
mount /dev/rw_vg/var_lv /mnt/target/var
}
1.8.2 Implementing /home/ with automount, NFS and LDAP
It is convenient for system administrators and developers to keep their work in their own
home directory under /home/. With tens or even hundreds of Linux systems you would
normally have tens or even hundreds of home directories. The size requirement for this file
system would vary widely from server to server.
It is easier to manage a single large /home/ directory that “follows users around” This can be
implemented with the automount service, NFS and LDAP. LDAP allows for central
authentication and authorization of users and resources. Following is a block diagram:
LDAP client
PAM, NSS
NFS client
automount service
LINUX001
LDAP
authentication
LDAP server
NFS
automounting
NFS server
AUTOMNT
LINUX002
LINUX003
/home/
file system
/var/lib/ldap
Figure 1-18 Auto-mounted /home/ block diagram
For details on how to implement this, see the IBM Redbook z/VM and Linux on IBM System z
The Virtualization Cookbook for SLES 10 SP2, SG24-7493, on the Web at:
http://www.redbooks.ibm.com/abstracts/sg247493.html
62
Sharing and maintaining SLES 10 SP2 Linux under z/VM
1.8.3 Enabling Collaborative Memory Management (CMM)
VMRM is a z/VM tool that provides functions to dynamically tune the z/VM system. Groups of
virtual machines can be defined to be part of a workload. The workloads can then be
managed by VMRM to goals that are also defined
Cooperative Memory Management (CMM1) is a facility which provides z/VM with a way to
indirectly control the amount of memory that Linux uses. This technique is known as
ballooning, and is implemented by a special driver in Linux. When VMRM determines that the
system is becoming too constrained by memory, it will direct the driver to allocate and pin
memory within Linux, which forces Linux to relinquish or page out some of the memory it had
been using. In turn, the driver informs z/VM of the pages it has pinned. Since the driver was
designed never to use these pages, z/VM knows they are now available for it to use, and so
can reclaim them, thus reducing overall system memory pressure.
On the other hand, when VMRM determines that the system is no longer under memory
pressure, it will direct the ballooning driver to reduce the number of pages it has pinned, thus
allowing Linux to expand its memory usage once more.
More details about CMM1 can be found at:
http://www.vm.ibm.com/sysman/vmrm/vmrmcmm.html
Collaborative Memory Management Assist
Collaborative Memory Management Assist (CMMA) consists of changes in hardware, z/VM
5.3, and Linux. The hardware facility includes a new instruction (EXTRACT AND SET STORAGE
ATTRIBUTES - ESSA), which can be simulated by z/VM on machines where the facility is not
available (although, due to simulation overhead, it is generally not recommended to do so).
CMMA introduces new usage and state information for each memory page, thus enabling
Linux and z/VM to employ more efficient memory management algorithms which do not
conflict with one another.
More details about CMMA can be found in the manual z/VM V5R3.0 CP Programming
Services (SC24-6084), at:
http://publibz.boulder.ibm.com/epubs/pdf/hcse5b21.pdf
In both CMM flavors, the benefit is proportional to the potential. On systems where the guests
are poorly configured, or over-sized, you will see the most benefit. There was an early study
done by a group in IBM, z/VM Large Memory - Linux on System z, available at:
http://www.ibm.com/support/techdocs/atsmastr.nsf/WebIndex/WP101151
CMMA is mentioned for completeness, but it should be noted that CMMA is no longer
supported in SLES 11. So this function may become deprecated.
Configuring CMM1
CMM1 must be enabled on both the Linux and z/VM sides for it to function. To enable it for
Linux, the cmm module must be loaded at boot time.
To enable z/VM for CMM1, perform the following steps:
1. Log on to the user ID VMRMSVM
2. Create a new or edit the existing configuration file, VMRM CONFIG A. Add two lines as
follows:
==> x vmrm config
Sharing and maintaining SLES 10 SP2 Linux under z/VM
63
ADMIN MSGUSER VMRMADMN
NOTIFY MEMORY LNX* S10* RH5*
This example will apply to z/VM user IDs whose names begin with LNX, S10 or RH5.
3. Edit the PROFILE EXEC on AUTOLOG1 so that VMRMSVM is auto-logged at IPL time. Logon to
AUTOLOG1.
4. Before pressing Enter at the VM READ prompt, type acc (noprof so that the PROFILE
EXEC is not run. Then add
LOGON AUTOLOG1
z/VM Version 5 Release 4.0, Service Level 0801 (64-bit),
built on IBM Virtualization Technology
There is no logmsg data
FILES:
NO RDR,
NO PRT,
NO PUN
LOGON AT 09:07:43 EDT SUNDAY 05/25/08
DMSIND2015W Unable to access the Y-disk. Filemode Y (19E) not accessed
==> acc (noprof
==> x profile exec
/***************************/
/* Autolog1 Profile Exec */
/***************************/
'cp xautolog tcpip'
/* start up TCPIP */
'CP XAUTOLOG VMSERVS'
'CP XAUTOLOG VMSERVU'
'CP XAUTOLOG VMSERVR'
'CP XAUTOLOG DTCVSW1'
'CP XAUTOLOG DTCVSW2'
'cp xautolog vmrmsvw'
/* start VMRM service virtual machine */
'cp set pf12 ret'
/* set the retrieve key */
...
5. Start the user ID for this IPL of z/VM:
==> xautolog vmrmsvm
Command accepted
AUTO LOGON ***
VMRMSVM USERS = 29
Ready; T=0.01/0.01 14:08:09
HCPCLS6056I XAUTOLOG information for VMRMSVM: The IPL command is verified by the
IPL command processor.
How to observe that CMM1 is working
The answer to the question: “How do I know CMM1 is working?” is not entirely obvious.
From the z/VM perspective you should see resident pages and total pages for the
CMM1-managed virtual machines drop when the system comes under constraint. For
Performance Toolkit, this would be seen in UPAGE report (FCX113).
The ballooning driver releases the pages it has pinned by using Diagnose x'10'. You can see
the diagnose 10 counts in PRIVOP report (FCX104).
Some other items of interest may be users in page wait, see USTAT (FCX114).
From within Linux, you can check the size of the pool of pages put out of play using the
following commands:
# cat /proc/sys/vm/cmm_pages
# cat /proc/sys/vm/cmm_timed_pages
64
Sharing and maintaining SLES 10 SP2 Linux under z/VM
1.9 Contents of tar file
This file ro-root-S10.tgz is a compressed tar file that contains the following files and
directories:
README.TXT
The README file
sbin/
The Linux code - see Appendix 1.10, “Linux code” on page 65. The
subdirectory is named sbin/ so you can untar it from /usr/local/ and
have the scripts in your default PATH.
vm/
The z/VM code - see Appendix 1.11, “z/VM code” on page 84
Following is a list of all the files in the tar file:
README.txt
sbin/
sbin/mnt2rogld.sh
sbin/cloneprep.sh
sbin/boot.findself
sbin/offliner.sh
sbin/fstab.ror
sbin/boot.rootfsck.diffs
vm/
vm/CLONERO.EXEC
vm/CLONERW.EXEC
vm/MNT2GOLD.EXEC
vm/MNT2TST.EXEC
vm/PROFILE.EXEC
vm/RO2GOLD.EXEC
vm/TST2MNT.EXEC
vm/COPYMDSK.EXEC
vm/SAMPLE.PARM-S10
vm/SLES10S2.EXEC
vm/LINKED.EXEC
vm/PROFILE.XEDIT
vm/RO2GOLD2.EXEC
vm/SWAPGEN.EXEC
1.10 Linux code
This section of the appendix lists the code, diff file and configuration file that will be used on
Linux.
“The boot.findself script” on page 65
“The boot.rootfsck.diffs file” on page 68
“The cloneprep script” on page 71
“The mnt2rogld.sh script” on page 71
“Modified boot.rootfsck file” on page 79
“Configuration file /etc/fstab” on page 84
1.10.1 The boot.findself script
This script is invoked once the first time a clone Linux system is booted. It does not take any
action on the user ID’s S10RWMNT, S10RWTST or S10ROGLD. Note that these names are
hard-coded in the script, so if you choose different names for the ID’s you will have to modify
the code accordingly.
Sharing and maintaining SLES 10 SP2 Linux under z/VM
65
It then enables the ID’s 191 disk which should be the CMSCLONE 192 disk and contain the
source parameter file: S10RWMNT PARM-S10 and the target parameter file where the file name is
the same as the target user ID name.
#!/bin/bash
#
# /etc/init.d/boot.findself
#
### BEGIN INIT INFO
# Provides:
boot.findself
# Required-Start:
boot.localfs
# Required-Start:
# Required-Stop:
# Default-Start:
B
# Default-Stop:
# Description:
upon first boot find/modify IP@ + hostname, gen SSH keys
### END INIT INFO
#
# This script requires two SLES 10 parameter files to exist on the user ID's
# 191 disk: (1) the file S10RWMNT PARM-S10 and (2) $userid PARM-S10 where
# $userid is the ID of the user that is running the script. It then modifies
# the IP address, Host name and fully qualified domain name in three
# configuration files that contain this info. It also regenerates SSH keys.
# The script then turns itself off via "chkconfig" so it only runs once.
#
# IBM DOES NOT WARRANT OR REPRESENT THAT THE CODE PROVIDED IS COMPLETE
# OR UP-TO-DATE. IBM DOES NOT WARRANT, REPRESENT OR IMPLY RELIABILITY,
# SERVICEABILITY OR FUNCTION OF THE CODE. IBM IS UNDER NO OBLIGATION TO
# UPDATE CONTENT NOR PROVIDE FURTHER SUPPORT.
# ALL CODE IS PROVIDED "AS IS," WITH NO WARRANTIES OR GUARANTEES WHATSOEVER.
# IBM EXPRESSLY DISCLAIMS TO THE FULLEST EXTENT PERMITTED BY LAW ALL EXPRESS,
# IMPLIED, STATUTORY AND OTHER WARRANTIES, GUARANTEES, OR REPRESENTATIONS,
# INCLUDING, WITHOUT LIMITATION, THE WARRANTIES OF MERCHANTABILITY, FITNESS FOR
# A PARTICULAR PURPOSE, AND NON-INFRINGEMENT OF PROPRIETARY AND INTELLECTUAL
# PROPERTY RIGHTS. YOU UNDERSTAND AND AGREE THAT YOU USE THESE MATERIALS,
# INFORMATION, PRODUCTS, SOFTWARE, PROGRAMS, AND SERVICES, AT YOUR OWN
# DISCRETION AND RISK AND THAT YOU WILL BE SOLELY RESPONSIBLE FOR ANY DAMAGES
# THAT MAY RESULT, INCLUDING LOSS OF DATA OR DAMAGE TO YOUR COMPUTER SYSTEM.
# IN NO EVENT WILL IBM BE LIABLE TO ANY PARTY FOR ANY DIRECT, INDIRECT,
# INCIDENTAL, SPECIAL, EXEMPLARY OR CONSEQUENTIAL DAMAGES OF ANY TYPE
# WHATSOEVER RELATED TO OR ARISING FROM USE OF THE CODE FOUND HEREIN, WITHOUT
# LIMITATION, ANY LOST PROFITS, BUSINESS INTERRUPTION, LOST SAVINGS, LOSS OF
# PROGRAMS OR OTHER DATA, EVEN IF IBM IS EXPRESSLY ADVISED OF THE POSSIBILITY
# OF SUCH DAMAGES. THIS EXCLUSION AND WAIVER OF LIABILITY APPLIES TO ALL
# CAUSES OF ACTION, WHETHER BASED ON CONTRACT, WARRANTY, TORT OR ANY OTHER
# LEGAL THEORIES.
#
#+--------------------------------------------------------------------------+
function findID()
# Get my VM user ID - don't find self on S10RWMNT, S10RWTST or S10RWGLD
#+--------------------------------------------------------------------------+
{
targetID=$(cat /proc/sysinfo | grep "VM00 Name" | awk '{print $3}')
if [ $targetID = "S10RWMNT" ] || [ $targetID = "S10RWTST" ] || \
[ $targetID = "S10ROGLD" ]; then # don't do anything on these three IDs
exit
fi
}
#+--------------------------------------------------------------------------+
function enableAdisk()
66
Sharing and maintaining SLES 10 SP2 Linux under z/VM
# Enable my 191 (A) disk
#+--------------------------------------------------------------------------+
{
chccwdev -e 191 > /dev/null 2>&1
rc=$?
if [ $rc != 0 ]; then # unable to enable 191 disk
echo "$0: Unable to enable 191, rc from chccwdev = $rc"
exit 1
fi
sleep 1# wait a sec to be sure disk is ready
Adisk=/dev/$(egrep '^0.0.0191' /proc/dasd/devices | awk '{print $7}')
}
#+--------------------------------------------------------------------------+
function findSourceIP()
# Get the source IP address and hostName
#+--------------------------------------------------------------------------+
{
sourceParm="$sourceID.$parmType"
cmsfslst -d $Adisk | grep $sourceID | grep $parmType > /dev/null
rc=$?
if [ $rc != 0 ]; then
echo "$0: $sourceParm not found on 191 minidisk. Exiting"
exit 2
fi
export local $(cmsfscat -a -d $Adisk $sourceParm)
# set global variable names escaping any dots (.) in the strings
sourceName=$(echo "$Hostname" | sed -e 's:\.:\\\.:g')
sourceHost=${Hostname%%.*} # Chop domain name off to leave host name
sourceIP=$(echo "$HostIP" | sed -e 's:\.:\\\.:g')
sourceOSA=$(echo "$ReadChannel " | sed -e 's:\.:\\\.:g')
}
#+--------------------------------------------------------------------------+
function findTargetIP()
# Get my new IP address and hostname
#+--------------------------------------------------------------------------+
{
targetParm="$targetID.$parmType"
cmsfslst -d $Adisk | grep $targetID | grep $parmType > /dev/null
rc=$?
if [ $rc != 0 ]; then
echo "$0: $targetParm not found on 191 minidisk. Exiting"
exit 3
fi
export local $(cmsfscat -a -d $Adisk $targetParm)
targetName=$Hostname
targetHost=${Hostname%%.*} # Chop domain name off to leave host name
targetIP=$HostIP
}
#+--------------------------------------------------------------------------+
function modifyIP()
# Modify IP address and host name in /etc/HOSTNAME, /etc/hosts and
# /etc/sysconfig/network/ifcfg-qeth-bus-ccw-$ReadChannel
#+--------------------------------------------------------------------------+
{
# TODO: this function should also modify, DNS, Gateway, broadcast, etc.
eth0file="/etc/sysconfig/network/ifcfg-qeth-bus-ccw-$ReadChannel"
echo ""
Sharing and maintaining SLES 10 SP2 Linux under z/VM
67
echo "$0: changing (escaped) $sourceName to $targetName in /etc/HOSTNAME"
sed --in-place -e "s/$sourceName/$targetName/g" /etc/HOSTNAME
echo "$0: changing $sourceHost to $targetHost and IP address in /etc/hosts"
sed --in-place -e "s/$sourceHost/$targetHost/g" \
-e "s/$sourceIP/$targetIP/g" /etc/hosts
echo "$0: changing (escaped) $sourceIP to $targetIP in $eth0file"
sed --in-place -e "s/$sourceIP/$targetIP/g" $eth0file
hostname $targetHost
}
#+--------------------------------------------------------------------------+
function genSSHkeys()
# Regenerate a set of SSH keys
#+--------------------------------------------------------------------------+
{
rm /etc/ssh/ssh_host_*
ssh-keygen -t rsa -N "" -q -f /etc/ssh/ssh_host_rsa_key
ssh-keygen -t dsa -N "" -q -f /etc/ssh/ssh_host_dsa_key
ssh-keygen -t rsa1 -N "" -q -f /etc/ssh/ssh_host_key
}
# main()
# global variables
sourceID="S10RWMNT"
parmType="PARM-S10"
# VM user ID where first Linux was installed
# File type of parameter file on 191 disk
# function calls
findID
enableAdisk
findSourceIP
findTargetIP
modifyIP
genSSHkeys
chkconfig boot.findself off
# run only once => turn self off
1.10.2 The boot.rootfsck.diffs file
This “diff” file is applied to modify the file /etc/init.d/boot.rootfsck:
--- boot.rootfsck.orig2009-02-10 08:02:32.000000000 -0500
+++ boot.rootfsck2009-03-12 10:18:29.000000000 -0400
@@ -3,15 +3,16 @@
# Copyright (c) 2001-2002 SuSE Linux AG, Nuernberg, Germany.
# All rights reserved.
#
-# /etc/init.d/boot.rootfsck
+# /etc/init.d/boot.readonlyroot
+# derived from /etc/init.d/boot.rootfsck (SuSE)
#
### BEGIN INIT INFO
-# Provides:
boot.rootfsck
+# Provides:
boot.readonlyroot
# Required-Start:
# Required-Stop:
# Default-Start:
B
# Default-Stop:
-# Description:
check and mount root filesystem
+# Description:
check and mount /local filesystem
### END INIT INFO
68
Sharing and maintaining SLES 10 SP2 Linux under z/VM
. /etc/rc.status
@@ -74,6 +75,9 @@
case "$1" in
start)
+ # ROR: add 1
+ echo "Read-only root: In modified $0"
+
#
# fsck may need a huge amount of memory, so make sure, it is there.
#
@@ -107,6 +111,7 @@
# if not booted via initrd, /dev is empty.
# use private devnode with proper permissions
ROOTFS_BLKDEV="/dev/shm/root"
+
rootcpio=`echo / | /bin/cpio --quiet -o -H newc`
rootmajor=0x${rootcpio:62:8}
rootminor=0x${rootcpio:70:8}
@@ -133,13 +138,16 @@
# on an umsdos root fs this mount will fail,
# so direct error messages to /dev/null.
# this seems to be ugly, but should not really be a problem.
mount -n -o remount,ro / 2> /dev/null
+
mount -n -o remount,ro / 2> /dev/null
if test $? = 0; then
if test -n "$ROOTFS_FSCK" ; then
FSCK_RETURN=$ROOTFS_FSCK
else
echo "Checking root file system..."
fsck $FSCK_PROGRESSBAR -a $FSCK_FORCE $ROOTFS_BLKDEV
+
# ROR: chg 2
+#
echo "Checking root file system..."
+#
fsck $FSCK_PROGRESSBAR -a $FSCK_FORCE $ROOTFS_BLKDEV
+
echo "Checking /local filesystem..."
+
fsck $FSCK_PROGRESSBAR -a $FSCK_FORCE /local
# A return code of 1 indicates that file system errors
# were corrected, but that the boot may proceed.
# A return code of 2 or larger indicates failure.
@@ -167,11 +175,11 @@
/etc/init.d/kbd start
fi
echo
echo "fsck failed. Please repair manually and reboot. The root"
echo "file system is currently mounted read-only. To remount it"
echo "read-write do:"
+
echo "fsck failed. Please repair manually and reboot."
+
echo "The /local file system is currently mounted read-only.
+
echo To remount it read-write do:"
echo
echo " bash# mount -n -o remount,rw /"
+
echo " bash# mount -n -o remount,rw /local"
echo
echo "Attention: Only CONTROL-D will reboot the system in this"
echo "maintanance mode. shutdown or reboot will not work."
@@ -192,16 +200,31 @@
reboot -f
fi
sync
mount -n -o remount,rw /
Sharing and maintaining SLES 10 SP2 Linux under z/VM
69
+#
+#
+
+
+
+
+
+#
+#
+
+#
+#
+
+#
+#
+
+
+
+
@@
+#
+#
+#
+
+
+
+
@@
+#
+
+
+
70
test $FSCK_RETURN -gt 0 && touch /fsck_corrected_errors
ROR: del 1, add 4
mount -n -o remount,rw /
mount -n /local
mount -n --bind /local/etc /etc
mount -n --bind /local/root /root
mount -n --bind /local/srv /srv
test $FSCK_RETURN -gt 0 && touch /fsck_corrected_errors
else
echo
echo '*** ERROR! Cannot fsck because root is not read-only!'
ROR: chg 1
echo '*** ERROR! Cannot fsck because root is not read-only!'
echo '*** ERROR! Cannot fsck because /local is not read-only!'
echo
fi
else
if test "$ROOTFS_FSCK" != "0" ; then
echo "root file system (/) is NOT being checked."
ROR: del 1, add 1
echo "root file system (/) is NOT being checked."
echo "/local file system is NOT being checked."
ROR: del 1, add 4
mount -n -o remount,rw /local
mount -n /local
mount -n --bind /local/etc /etc
mount -n --bind /local/root /root
mount -n --bind /local/srv /srv
fi
# check if root filesystem ro/rw matches fstab entry
myopt_should=$(get_options /etc/fstab first)
-209,9 +232,13 @@
WRITABLE=unknown
NEED_REMOUNT=0
have_option $myopt_should $myopt_is
if test "$NEED_REMOUNT" = "1" ; then
mount -n -o remount,$WRITABLE /
fi
if test "$NEED_REMOUNT" = "1" ; then
mount -n -o remount,$WRITABLE /
fi
mount -n /local
mount -n --bind /local/etc /etc
mount -n --bind /local/root /root
mount -n --bind /local/srv /srv
fi
# start with a clean mtab and enter root fs entry
rm -f /etc/mtab*
-219,6 +246,10 @@
;;
stop)
;;
ROR: add 3
halt|reboot)
mount -n -o remount,ro /local 2> /dev/null
;;
restart)
rc_failed 3
rc_status -v
Sharing and maintaining SLES 10 SP2 Linux under z/VM
1.10.3 The cloneprep script
This script prepares the Linux system on S10RWMNT to be cloned.
#!/bin/bash
#
# IBM DOES NOT WARRANT OR REPRESENT THAT THE CODE PROVIDED IS COMPLETE
# OR UP-TO-DATE. IBM DOES NOT WARRANT, REPRESENT OR IMPLY RELIABILITY,
# SERVICEABILITY OR FUNCTION OF THE CODE. IBM IS UNDER NO OBLIGATION TO
# UPDATE CONTENT NOR PROVIDE FURTHER SUPPORT.
# ALL CODE IS PROVIDED "AS IS," WITH NO WARRANTIES OR GUARANTEES WHATSOEVER.
# IBM EXPRESSLY DISCLAIMS TO THE FULLEST EXTENT PERMITTED BY LAW ALL EXPRESS,
# IMPLIED, STATUTORY AND OTHER WARRANTIES, GUARANTEES, OR REPRESENTATIONS,
# INCLUDING, WITHOUT LIMITATION, THE WARRANTIES OF MERCHANTABILITY, FITNESS FOR
# A PARTICULAR PURPOSE, AND NON-INFRINGEMENT OF PROPRIETARY AND INTELLECTUAL
# PROPERTY RIGHTS. YOU UNDERSTAND AND AGREE THAT YOU USE THESE MATERIALS,
# INFORMATION, PRODUCTS, SOFTWARE, PROGRAMS, AND SERVICES, AT YOUR OWN
# DISCRETION AND RISK AND THAT YOU WILL BE SOLELY RESPONSIBLE FOR ANY DAMAGES
# THAT MAY RESULT, INCLUDING LOSS OF DATA OR DAMAGE TO YOUR COMPUTER SYSTEM.
# IN NO EVENT WILL IBM BE LIABLE TO ANY PARTY FOR ANY DIRECT, INDIRECT,
# INCIDENTAL, SPECIAL, EXEMPLARY OR CONSEQUENTIAL DAMAGES OF ANY TYPE
# WHATSOEVER RELATED TO OR ARISING FROM USE OF THE CODE FOUND HEREIN, WITHOUT
# LIMITATION, ANY LOST PROFITS, BUSINESS INTERRUPTION, LOST SAVINGS, LOSS OF
# PROGRAMS OR OTHER DATA, EVEN IF IBM IS EXPRESSLY ADVISED OF THE POSSIBILITY
# OF SUCH DAMAGES. THIS EXCLUSION AND WAIVER OF LIABILITY APPLIES TO ALL
# CAUSES OF ACTION, WHETHER BASED ON CONTRACT, WARRANTY, TORT OR ANY OTHER
# LEGAL THEORIES.
#
# Script to clean up files before cloning
#+--------------------------------------------------------------------------+
function cleanFile()
# delete file, create empty file and set permission mode
# arg 1: file to delete and create
# arg 2: mode to set empty file to
#+--------------------------------------------------------------------------+
{
if [ -f $1 ]; then
rm $1
fi
touch $1
chmod $2 $1
}
# main()
# clean up certain files in /var/log
rm /var/log/YaST2/y2log-*
rm /var/log/*.gz
cleanFile /var/log/authlog 600
cleanFile /var/log/faillog 600
cleanFile /var/log/lastlog 644
cleanFile /var/log/secure 600
cleanFile /var/log/secure 600
cleanFile /root/.bash_history 600
echo "System should be ready for shutdown and cloning"
1.10.4 The mnt2rogld.sh script
This script clones from S10RWMNT to S10ROGLD.
Sharing and maintaining SLES 10 SP2 Linux under z/VM
71
#!/bin/sh
# mnt2rogld.sh - script to create a read-only root system on target user ID
# Hard-coded virtual device addresses:
# 1b0 - /boot
# 1b1 - /
# 1b2 - swap (VDISK)
# 1b3 - swap (VDISK)
# 1b4 - swap
# 1b5 - /local
# 1b6 - /var
# 1b7 - /usr
# 1b8 - /opt
#
# Source disks are linked as 11Bx
# Target disks are linked as 21Bx
#
# IBM DOES NOT WARRANT OR REPRESENT THAT THE CODE PROVIDED IS COMPLETE
# OR UP-TO-DATE. IBM DOES NOT WARRANT, REPRESENT OR IMPLY RELIABILITY,
# SERVICEABILITY OR FUNCTION OF THE CODE. IBM IS UNDER NO OBLIGATION TO
# UPDATE CONTENT NOR PROVIDE FURTHER SUPPORT.
# ALL CODE IS PROVIDED "AS IS," WITH NO WARRANTIES OR GUARANTEES WHATSOEVER.
# IBM EXPRESSLY DISCLAIMS TO THE FULLEST EXTENT PERMITTED BY LAW ALL EXPRESS,
# IMPLIED, STATUTORY AND OTHER WARRANTIES, GUARANTEES, OR REPRESENTATIONS,
# INCLUDING, WITHOUT LIMITATION, THE WARRANTIES OF MERCHANTABILITY, FITNESS FOR
# A PARTICULAR PURPOSE, AND NON-INFRINGEMENT OF PROPRIETARY AND INTELLECTUAL
# PROPERTY RIGHTS. YOU UNDERSTAND AND AGREE THAT YOU USE THESE MATERIALS,
# INFORMATION, PRODUCTS, SOFTWARE, PROGRAMS, AND SERVICES, AT YOUR OWN
# DISCRETION AND RISK AND THAT YOU WILL BE SOLELY RESPONSIBLE FOR ANY DAMAGES
# THAT MAY RESULT, INCLUDING LOSS OF DATA OR DAMAGE TO YOUR COMPUTER SYSTEM.
# IN NO EVENT WILL IBM BE LIABLE TO ANY PARTY FOR ANY DIRECT, INDIRECT,
# INCIDENTAL, SPECIAL, EXEMPLARY OR CONSEQUENTIAL DAMAGES OF ANY TYPE
# WHATSOEVER RELATED TO OR ARISING FROM USE OF THE CODE FOUND HEREIN, WITHOUT
# LIMITATION, ANY LOST PROFITS, BUSINESS INTERRUPTION, LOST SAVINGS, LOSS OF
# PROGRAMS OR OTHER DATA, EVEN IF IBM IS EXPRESSLY ADVISED OF THE POSSIBILITY
# OF SUCH DAMAGES. THIS EXCLUSION AND WAIVER OF LIABILITY APPLIES TO ALL
# CAUSES OF ACTION, WHETHER BASED ON CONTRACT, WARRANTY, TORT OR ANY OTHER
# LEGAL THEORIES.
#+--------------------------------------------------------------------------+
function CPcmd()
# Run a CP command and invoke it via the vmcp module/command
# Arg1-n: the command to issue
# Return: the command's return code
#+--------------------------------------------------------------------------+
{
echo "Invoking CP command: $@"
# parse output to get return code: awk -F# splits line at '#' with rc at end
output=$(vmcp $@ 2>&1)
if [ "X$output" != "X" ]; then # there is some output - echo it
echo "$output"
fi
retVal=0
retVal=$(echo $output | grep "Error: non-zero CP" | awk -F# '{print $2}')
return $retVal
}
#+--------------------------------------------------------------------------+
function checkID()
# Arg 1: User ID to verify
# Verify user ID exists and is logged off
72
Sharing and maintaining SLES 10 SP2 Linux under z/VM
#+--------------------------------------------------------------------------+
{
userID=$1
CPcmd QUERY $userID
rc=$?
case $rc in
0) # user ID is logged on or disconnected
echo "Error: $userID user ID must be logged off"
exit 2
;;
3) # user ID does not exist
echo "Error: $ID user ID does not exist"
exit 3
;;
45) # user ID is logged off - this is correct - fall through
;;
*) # unexpected
echo "Unexpected rc from QUERY: $rc"
echo "$targetID user ID must exist and be logged off"
exit 4
esac
}
#+--------------------------------------------------------------------------+
function linkSourceDisks()
# Link R/O the source disks 1B0 - 1B8 as 1xxx
#+--------------------------------------------------------------------------+
{
echo ""
echo "Linking source disks ..."
CPcmd link $sourceID 1b1 11b1 rr
if [ $? != 0 ]; then exit 5; fi
CPcmd link $sourceID 1b0 11b0 rr
if [ $? != 0 ]; then exit 6; fi
CPcmd link $sourceID 1b4 11b4 rr
if [ $? != 0 ]; then exit 7; fi
CPcmd link $sourceID 1b5 11b5 rr
if [ $? != 0 ]; then exit 8; fi
CPcmd link $sourceID 1b6 11b6 rr
if [ $? != 0 ]; then exit 9; fi
CPcmd link $sourceID 1b7 11b7 rr
if [ $? != 0 ]; then exit 10; fi
CPcmd link $sourceID 1b8 11b8 rr
if [ $? != 0 ]; then exit 11; fi
}
#+--------------------------------------------------------------------------+
function linkTargetDisks()
# Link R/W the target disks 2b0-2b8 as 2xxx
#+--------------------------------------------------------------------------+
{
echo ""
echo "Linking target disks ..."
CPcmd link $targetID 1b1 21b1 mr
if [ $? != 0 ]; then exit 12; fi
CPcmd link $targetID 1b0 21b0 mr
if [ $? != 0 ]; then exit 13; fi
CPcmd link $targetID 1b4 21b4 mr
if [ $? != 0 ]; then exit 14; fi
CPcmd link $targetID 1b5 21b5 mr
Sharing and maintaining SLES 10 SP2 Linux under z/VM
73
if [ $? !=
CPcmd link
if [ $? !=
CPcmd link
if [ $? !=
CPcmd link
if [ $? !=
0 ]; then
$targetID
0 ]; then
$targetID
0 ]; then
$targetID
0 ]; then
exit 15;
1b6 21b6
exit 16;
1b7 21b7
exit 17;
1b8 21b8
exit 18;
fi
mr
fi
mr
fi
mr
fi
}
#+--------------------------------------------------------------------------+
function enableSourceDisks()
# Enable the source and target disks (except swap disks x1b4)
#+--------------------------------------------------------------------------+
{
echo ""
echo "Enabling source disks ..."
chccwdev -e 11b1
if [ $? != 0 ]; then exit 19; fi
chccwdev -e 11b0
if [ $? != 0 ]; then exit 20; fi
chccwdev -e 11b4
if [ $? != 0 ]; then exit 21; fi
chccwdev -e 11b5
if [ $? != 0 ]; then exit 22; fi
chccwdev -e 11b6
if [ $? != 0 ]; then exit 23; fi
chccwdev -e 11b7
if [ $? != 0 ]; then exit 24; fi
chccwdev -e 11b8
if [ $? != 0 ]; then exit 25; fi
}
#+--------------------------------------------------------------------------+
function enableTargetDisks()
# Enable the source and target disks (except swap disks x1b4)
#+--------------------------------------------------------------------------+
{
echo ""
echo "Enabling target disks ..."
chccwdev -e 21b1
if [ $? != 0 ]; then exit 26; fi
chccwdev -e 21b0
if [ $? != 0 ]; then exit 27; fi
chccwdev -e 21b4
if [ $? != 0 ]; then exit 28; fi
chccwdev -e 21b5
if [ $? != 0 ]; then exit 29; fi
chccwdev -e 21b6
if [ $? != 0 ]; then exit 30; fi
chccwdev -e 21b7
if [ $? != 0 ]; then exit 31; fi
chccwdev -e 21b8
if [ $? != 0 ]; then exit 32; fi
}
#+--------------------------------------------------------------------------+
function copyDisk()
# Copy a disk via dasdfmt then dd
# Arg 1: Source vaddr
# Arg 2: Target vaddr
74
Sharing and maintaining SLES 10 SP2 Linux under z/VM
#+--------------------------------------------------------------------------+
{
source=$1
target=$2
echo ""
echo "copying $source to $target ..."
sDev=/dev/$(egrep ^0.0.$source /proc/dasd/devices | awk '{ print $7 }')
if [ "$?" != 0 ]; then exit 33; fi
tDev=/dev/$(egrep ^0.0.$target /proc/dasd/devices | awk '{ print $7 }')
if [ "$?" != 0 ]; then exit 34; fi
echo ""
echo "dasdfmt-ing $tDev ..."
dasdfmt -y -b 4096 -f $tDev
if [ "$?" != 0 ]; then exit 35; fi
echo ""
echo "dd-ing $sDev to $tDev ..."
dd bs=4096 if=$sDev of=$tDev
if [ "$?" != 0 ]; then exit 36; fi
echo ""
echo "disabling and re-enabling $target ..."
chccwdev -d $target
if [ $? != 0 ]; then exit 37; fi
chccwdev -e $target
if [ $? != 0 ]; then exit 38; fi
}
#+--------------------------------------------------------------------------+
function copySystem()
# Copy /mnt/source to /mnt/target
#+--------------------------------------------------------------------------+
{
echo ""
echo "Copying root file system ..."
copyDisk 11b1 21b1
echo ""
echo "Copying /boot/ ..."
copyDisk 11b0 21b0
echo ""
echo "Copying minidisk swap space ..."
copyDisk 11b4 21b4
echo ""
echo "Copying /local/ ..."
copyDisk 11b5 21b5
echo ""
echo "Copying /var/ ..."
copyDisk 11b6 21b6
echo ""
echo "Copying /usr/ ..."
copyDisk 11b7 21b7
echo ""
echo "Copying /opt/ ..."
copyDisk 11b8 21b8
}
Sharing and maintaining SLES 10 SP2 Linux under z/VM
75
#+--------------------------------------------------------------------------+
function mountSourceRoot()
# Mount disk at 11b1 over /mnt/source, then make mount points.
# Then mount disks at 11be over usr, 11bf over opt and 11b0 over boot
#+--------------------------------------------------------------------------+
{
echo ""
echo "Making source mount point ..."
if [ ! -d /mnt/source ]; then
mkdir /mnt/source
if [ "$?" != 0 ]; then exit 39; fi
fi
echo ""
echo "Mounting source root file system over /mnt/source ..."
dev11b1=/dev/$(egrep '^0.0.11b1' /proc/dasd/devices | awk '{ print $7 }')1
mount -o ro $dev11b1 /mnt/source
# if [ "$?" != 0 ]; then exit 40; fi
}
#+--------------------------------------------------------------------------+
function mountTargetDisks()
# Mount disk at 21b1 over /mnt/target, then make mount points.
# Then mount disks at 21be over usr, 21bf over opt and 21b0 over boot
#+--------------------------------------------------------------------------+
{
dev21b0=/dev/$(egrep '^0.0.21b0' /proc/dasd/devices | awk '{ print $7 }')
dev21b1=/dev/$(egrep '^0.0.21b1' /proc/dasd/devices | awk '{ print $7 }')
dev21b5=/dev/$(egrep '^0.0.21b5' /proc/dasd/devices | awk '{ print $7 }')
dev21b6=/dev/$(egrep '^0.0.21b6' /proc/dasd/devices | awk '{ print $7 }')
dev21b7=/dev/$(egrep '^0.0.21b7' /proc/dasd/devices | awk '{ print $7 }')
dev21b8=/dev/$(egrep '^0.0.21b8' /proc/dasd/devices | awk '{ print $7 }')
echo ""
echo "Mounting target file systems over /mnt/target ..."
mkdir /mnt/target
# if [ "$?" != 0 ]; then exit 41; fi
mount "$dev21b1"1 /mnt/target
if [ "$?" != 0 ]; then exit 42; fi
echo ""
echo "Making target mount points ..."
mkdir -p /mnt/target/{boot,usr,var,opt,local,sys,proc}
mount "$dev21b0"1 /mnt/target/boot
if [ "$?" != 0 ]; then exit 43; fi
mount "$dev21b5"1 /mnt/target/local
if [ "$?" != 0 ]; then exit 44; fi
mount "$dev21b6"1 /mnt/target/var
if [ "$?" != 0 ]; then exit 45; fi
mount "$dev21b7"1 /mnt/target/usr
if [ "$?" != 0 ]; then exit 46; fi
mount "$dev21b8"1 /mnt/target/opt
if [ "$?" != 0 ]; then exit 47; fi
echo ""
echo "Mounting memory file systems ..."
mount -t sysfs sysfs /mnt/target/sys
if [ "$?" != 0 ]; then exit 48; fi
mount -t proc proc /mnt/target/proc
if [ "$?" != 0 ]; then exit 49; fi
}
#+--------------------------------------------------------------------------+
76
Sharing and maintaining SLES 10 SP2 Linux under z/VM
function modifySystem()
# Arg 1: "dcss" - if converting to DCSS R/O file systems also, else null
# 1) Copy modified /etc/init.d/boot, /etc/init.d/boot.rootfsck and /etc/fstab
# 2) Copy source /etc/ and /root/ directories to target /local/
# 3) Move /etc/init.d under /sbin/ and create symlink to point back
#+--------------------------------------------------------------------------+
{
TGT="/mnt/target"
echo ""
echo "Backing up and modifying /etc/init.d/boot script ..."
cp $TGT/etc/init.d/boot $TGT/etc/init.d/boot.orig
if [ "$?" != 0 ]; then exit 50; fi
cat $TGT/etc/init.d/boot.orig | \
sed -e 's:bootrc=/etc/init.d/boot.d:bootrc=/sbin/init.d/boot.d:g' > \
$TGT/etc/init.d/boot
if [ "$?" != 0 ]; then exit 51; fi
echo ""
echo "Backing up and patching /etc/init.d/boot.rootfsck script ..."
cp $TGT/etc/init.d/boot.rootfsck $TGT/etc/init.d/boot.rootfsck.orig
if [ "$?" != 0 ]; then exit 52; fi
patch $TGT/etc/init.d/boot.rootfsck < $rorDiffs
if [ "$?" != 0 ]; then exit 53; fi
echo ""
echo "Backing up and copying modified /etc/fstab file ..."
cp $TGT/etc/fstab $TGT/etc/fstab.orig
if [ "$?" != 0 ]; then exit 54; fi
# If using DCSS read-only file systems:
# 1) Copy different fstab file
# 2) Change zipl.conf differently - add "mem=2G"
# 3) Modify /etc/sysconfig/kernel to load the dcssblk driver
# 4) Add a line to /etc/modprobe.conf.local with the dcssblk options
if [ "$1" = "DCSS" ]; then # use DCSSs not minidisks for R/O FSs
echo "Modifying system for DCSS R/O file systems"
cp $fstabDCSSfile $TGT/etc/fstab
cp $TGT/etc/sysconfig/kernel $TGT/etc/sysconfig/kernel.orig
sed -i -e 's/MODULES_LOADED_ON_BOOT="/MODULES_LOADED_ON_BOOT="dcssblk /g'\
$TGT/etc/sysconfig/kernel
if [ "$?" != 0 ]; then exit 55; fi
echo 'options dcssblk "segments=ROOTFS01,BOOTFS01,OPTFS01,USRFS01"' >>\
$TGT/etc/modprobe.conf.local
if [ "$?" != 0 ]; then exit 56; fi
else # not DCSS system - just copy new /etc/fstab file
echo "Copying /etc/fstab file"
cp $fstabFile $TGT/etc/fstab
fi
if [ "$?" != 0 ]; then exit 57; fi
echo ""
echo "Backing up and modifying /etc/zipl.conf file ..."
cp $TGT/etc/zipl.conf $TGT/etc/zipl.conf.orig
if [ "$?" != 0 ]; then exit 58; fi
if [ "$1" = "DCSS" ]; then # also add "mem=2G" to zipl.conf
cat $TGT/etc/zipl.conf.orig | \
sed -e 's/dasd=1b0-1bf/ro mem=2G dasd=1b0(ro),1b1(ro),1b2-1b7,1b8(ro),1b9-1bf/g' \
> $TGT/etc/zipl.conf
else # no DCSSs - just add "(ro)" to the R/O disks
cat $TGT/etc/zipl.conf.orig | \
Sharing and maintaining SLES 10 SP2 Linux under z/VM
77
sed -e 's/dasd=1b0-1bf/ro dasd=1b0(ro),1b1(ro),1b2-1b7,1b8(ro),1b9-1bf/g' > \
$TGT/etc/zipl.conf
fi
echo ""
echo "Running zipl in target environment ..."
chroot $TGT zipl
if [ "$?" != 0 ]; then exit 59; fi
echo ""
echo "Copying source /etc/, /root/ and /srv/ to target /local/ ..."
cp -a $TGT/etc $TGT/local
echo "mount -n -o ro --bind /local/.var/lib/rpm /var/lib/rpm" >>
$TGT/local/etc/init.d/boot.local
echo "blogger "RETURN CODE FROM boot.rorpm = $?"" >> $TGT/local/etc/init.d/boot.local
echo ""
echo "Making mountpoint for R/O RPM Database..."
mkdir $TGT/local/.var
if [ "$?" != 0 ]; then exit 60; fi
cp -a $TGT/root $TGT/local
if [ "$?" != 0 ]; then exit 61; fi
cp -a $TGT/srv $TGT/local
if [ "$?" != 0 ]; then exit 62; fi
echo ""
echo "Manipulating /etc/init.d and /sbin on $TGT ..."
chroot $TGT mv /etc/init.d /sbin
chroot $TGT ln -s /sbin/init.d /etc
}
#+--------------------------------------------------------------------------+
function cleanUp()
# Unmount source and target file systems and detach minidisks
#+--------------------------------------------------------------------------+
{
echo ""
echo "Cleaning up ..."
# clean up target disks
umount /mnt/target/opt
umount /mnt/target/var
umount /mnt/target/usr
umount /mnt/target/local
umount /mnt/target/boot
umount /mnt/target/proc
umount /mnt/target/sys
umount /mnt/target
chccwdev -d 21b0
chccwdev -d 21b1
chccwdev -d 21b4
chccwdev -d 21b5
chccwdev -d 21b6
chccwdev -d 21b7
chccwdev -d 21b8
vmcp det 21b0
vmcp det 21b1
vmcp det 21b4
vmcp det 21b5
vmcp det 21b6
vmcp det 21b7
vmcp det 21b8
78
Sharing and maintaining SLES 10 SP2 Linux under z/VM
# clean up source disks
umount /mnt/source
chccwdev -d 11b0
chccwdev -d 11b1
chccwdev -d 11b4
chccwdev -d 11b5
chccwdev -d 11b6
chccwdev -d 11b7
chccwdev -d 11b8
vmcp det 11b0
vmcp det 11b1
vmcp det 11b4
vmcp det 11b5
vmcp det 11b6
vmcp det 11b7
vmcp det 11b8
}
# main()
# global variables
sourceID="S10RWMNT"
targetID="S10ROGLD"
rorDiffs="/usr/local/sbin/boot.rootfsck.diffs"
fstabFile="/usr/local/sbin/fstab.ror"
fstabDCSSfile="/usr/local/sbin/fstab.dcss"
# process 1 valid arg - "dcss"
if [ ${#1} = 0 ]; then # no args passed in
modifyArg="No-DCSS"
elif [ "$1" = "dcss" -o "$1" = "DCSS" ]; then # using DCSS R/O FSs
echo "Using DCSSs instead of R/O minidisks"
modifyArg="DCSS"
else
echo "unrecognized arg 1: $1"
exit 63;
fi
# function calls
checkID $sourceID
checkID $targetID
linkSourceDisks
linkTargetDisks
enableSourceDisks
enableTargetDisks
copySystem
mountSourceRoot
mountTargetDisks
modifySystem $modifyArg
cleanUp
echo "Exiting with rc 0!"
1.10.5 Modified boot.rootfsck file
Only the differences to this file are shipped. The mnt2rogld.sh script applies these
differences to the startup script /etc/init.d/boot.rootfsck. The resulting script is as
follows:
#! /bin/bash
#
# Copyright (c) 2001-2002 SuSE Linux AG, Nuernberg, Germany.
# All rights reserved.
Sharing and maintaining SLES 10 SP2 Linux under z/VM
79
#
# /etc/init.d/boot.readonlyroot
# derived from /etc/init.d/boot.rootfsck (SuSE)
#
### BEGIN INIT INFO
# Provides:
boot.readonlyroot
# Required-Start:
# Required-Stop:
# Default-Start:
B
# Default-Stop:
# Description:
check and mount /local filesystem
### END INIT INFO
. /etc/rc.status
# to get max number of parallel fsck processes
. /etc/sysconfig/boot
if [ -f /etc/sysconfig/dump ]; then
. /etc/sysconfig/dump
fi
export FSCK_MAX_INST
rc_reset
#
# LKCD is active when
# - $DUMP_ACTIVE = 1
# - boot.lkcd script is active
# - disk dump is enabled ($DUMP_FLAGS)
function lkcd_active()
{
if [ -n "$DUMP_ACTIVE" ] && [ "$DUMP_ACTIVE" -eq 1 ] ; then
if /sbin/chkconfig -c boot.lkcd && \
(( "$DUMP_FLAGS" & "0x80000000" )) ; then
return 0
fi
fi
return 1
}
function get_options ()
{
local source dest fstype options rest return
while read source dest fstype options rest ; do
test "$dest" = "/" || continue
return="$options"
test "$2" = "first" && break
done < <(grep -E '^[^#[:space:]]+[[:space:]]+/[[:space:]]' $1)
echo "$return"
}
function have_option ()
{
local sl
local IFS
IFS=','
for sl in $1; do
test "$sl" = "defaults" && continue
80
Sharing and maintaining SLES 10 SP2 Linux under z/VM
# [[ $2 =~ $sl ]] || NEED_REMOUNT=1
case "$sl" in
ro) WRITABLE=ro ;;
rw) WRITABLE=rw ;;
esac
done
test "$WRITABLE" = "unknown" && WRITABLE=rw
[[ ${2} =~ $WRITABLE ]] || NEED_REMOUNT=1
}
case "$1" in
start)
# ROR: add 1
echo "Read-only root: In modified $0"
#
# fsck may need a huge amount of memory, so make sure, it is there.
#
# However, in the case of an active LKCD configuration, we need to
# recover the crash dump from the swap partition first, so we cannot
# yet activate them.
#
if ! lkcd_active ; then
echo "Activating swap-devices in /etc/fstab..."
swapon -ae &> /dev/null
rc_status -v1 -r
fi
#
# If we use a serial console, don't use the fsck progress bar
#
FSCK_PROGRESSBAR="-V"
[ -x /sbin/showconsole ] && [ "`/sbin/showconsole`" = "/dev/tty1" ] &&
FSCK_PROGRESSBAR="-C"
#
# do fsck and start sulogin, if it fails.
#
FSCK_RETURN=0
MAY_FSCK=1
# we may get ROOTFS_BLKDEV passed from initrd, skip extra actions
if [ -n "$ROOTFS_BLKDEV" ] ; then
if [ -n "$ROOTFS_REALDEV" ] ; then
ROOTFS_BLKDEV=$ROOTFS_REALDEV
fi
else
# if not booted via initrd, /dev is empty.
# use private devnode with proper permissions
ROOTFS_BLKDEV="/dev/shm/root"
rootcpio=`echo / | /bin/cpio --quiet -o -H newc`
rootmajor=0x${rootcpio:62:8}
rootminor=0x${rootcpio:70:8}
if [ $((rootmajor)) -ne 0 ] ; then
echo /bin/mknod -m600 $ROOTFS_BLKDEV b $((rootmajor)) $((rootminor))
/bin/mknod -m600 $ROOTFS_BLKDEV b $((rootmajor)) $((rootminor))
fi
MAY_FSCK=0
Sharing and maintaining SLES 10 SP2 Linux under z/VM
81
if test -n "$ROOTFS_BLKDEV" -a "$ROOTFS_BLKDEV" != "/" -a -b "$ROOTFS_BLKDEV" ;
then
MAY_FSCK=1
fi
fi
#
#
#
82
FSCK_FORCE=""
if test -f /forcefsck ; then
FSCK_FORCE="-f"
ROOTFS_FSCK=""
fi
if test "$ROOTFS_FSCK" = "0" ; then
# already checked and ok, skip the rest
MAY_FSCK=0
fi
if test ! -f /fastboot -a -z "$fastboot" -a $MAY_FSCK -eq 1 ; then
# on an umsdos root fs this mount will fail,
# so direct error messages to /dev/null.
# this seems to be ugly, but should not really be a problem.
mount -n -o remount,ro / 2> /dev/null
if test $? = 0; then
if test -n "$ROOTFS_FSCK" ; then
FSCK_RETURN=$ROOTFS_FSCK
else
# ROR: chg 2
echo "Checking root file system..."
fsck $FSCK_PROGRESSBAR -a $FSCK_FORCE $ROOTFS_BLKDEV
echo "Checking /local filesystem..."
fsck $FSCK_PROGRESSBAR -a $FSCK_FORCE /local
# A return code of 1 indicates that file system errors
# were corrected, but that the boot may proceed.
# A return code of 2 or larger indicates failure.
FSCK_RETURN=$?
fi
test $FSCK_RETURN -lt 4
rc_status -v1 -r
if test $FSCK_RETURN -gt 1 -a $FSCK_RETURN -lt 4 ; then
# if appropriate, switch bootsplash to verbose
# mode to make text messages visible.
test -f /proc/splash && echo "verbose" > /proc/splash
echo
echo "fsck succeed, but reboot is required."
echo
sleep 1
sync
reboot -f
elif test $FSCK_RETURN -gt 3; then
# if appropriate, switch bootsplash to verbose
# mode to make text messages visible.
test -f /proc/splash && echo "verbose" > /proc/splash
# Stop blogd since we reboot after sulogin
test -x /sbin/blogd && killproc -QUIT /sbin/blogd
if test -x /etc/init.d/kbd ; then
/etc/init.d/kbd start
fi
echo
echo "fsck failed. Please repair manually and reboot."
echo "The /local file system is currently mounted read-only.
echo To remount it read-write do:"
echo
Sharing and maintaining SLES 10 SP2 Linux under z/VM
echo " bash# mount -n -o remount,rw /local"
echo
echo "Attention: Only CONTROL-D will reboot the system in this"
echo "maintanance mode. shutdown or reboot will not work."
echo
PS1="(repair filesystem) # "
export PS1
/sbin/sulogin /dev/console
# if the user has mounted something rw, this should be umounted
echo "Unmounting file systems (ignore error messages)"
umount -avn
# on umsdos fs this would lead to an error message.
# so direct errors to /dev/null
mount -no remount,ro / 2> /dev/null
sync
reboot -f
#
#
#
#
#
#
#
#
#
#
#
fi
sync
ROR: del 1, add 4
mount -n -o remount,rw /
mount -n /local
mount -n --bind /local/etc /etc
mount -n --bind /local/root /root
mount -n --bind /local/srv /srv
test $FSCK_RETURN -gt 0 && touch /fsck_corrected_errors
else
echo
ROR: chg 1
echo '*** ERROR! Cannot fsck because root is not read-only!'
echo '*** ERROR! Cannot fsck because /local is not read-only!'
echo
fi
else
if test "$ROOTFS_FSCK" != "0" ; then
ROR: del 1, add 1
echo "root file system (/) is NOT being checked."
echo "/local file system is NOT being checked."
ROR: del 1, add 4
mount -n -o remount,rw /local
mount -n /local
mount -n --bind /local/etc /etc
mount -n --bind /local/root /root
mount -n --bind /local/srv /srv
fi
# check if root filesystem ro/rw matches fstab entry
myopt_should=$(get_options /etc/fstab first)
myopt_is=$(get_options /proc/mounts last)
WRITABLE=unknown
NEED_REMOUNT=0
have_option $myopt_should $myopt_is
if test "$NEED_REMOUNT" = "1" ; then
mount -n -o remount,$WRITABLE /
fi
mount -n /local
mount -n --bind /local/etc /etc
mount -n --bind /local/root /root
mount -n --bind /local/srv /srv
Sharing and maintaining SLES 10 SP2 Linux under z/VM
83
fi
# start with a clean mtab and enter root fs entry
rm -f /etc/mtab*
mount -f /
;;
stop)
;;
# ROR: add 3
halt|reboot)
mount -n -o remount,ro /local 2> /dev/null
;;
restart)
rc_failed 3
rc_status -v
;;
status)
rc_failed 4
rc_status -v
;;
*)
echo "Usage: $0 {start|stop|status|restart}"
exit 1
;;
esac
rc_exit
1.10.6 Configuration file /etc/fstab
Following is the contents of the sbin/fstab.ror file. It is copied to the read-only gold system
as /etc/fstab:
/dev/disk/by-path/ccw-0.0.01b1-part1 /
ext2
/dev/disk/by-path/ccw-0.0.01b0-part1 /boot
ext2
/dev/disk/by-path/ccw-0.0.01b5-part1 /local
ext3
/dev/disk/by-path/ccw-0.0.01b8-part1 /opt
ext2
/dev/disk/by-path/ccw-0.0.01b7-part1 /usr
ext2
/dev/disk/by-path/ccw-0.0.01b6-part1 /var
ext3
/dev/disk/by-path/ccw-0.0.01b2-part1 swap
swap
/dev/disk/by-path/ccw-0.0.01b3-part1 swap
swap
/dev/disk/by-path/ccw-0.0.01b4-part1 swap
swap
/dev/disk/by-path/ccw-0.0.0320-part1 /local/.var ext3
proc
/proc
proc
sysfs
/sys
sysfs
tmpfs
/tmp
tmpfs
debugfs
/sys/kernel/debug
debugfs
devpts
/dev/pts
devpts
ro,noatime,nodiratime
ro,noatime,nodiratime
noauto,acl,user_xattr
ro,noatime,nodiratime
ro,noatime,nodiratime
acl,user_xattr
defaults
defaults
defaults
ro,noatime,nodiratime
defaults
noauto
defaults
noauto
mode=0620,gid=5
1.11 z/VM code
This section contains EXECs and other files that will run on z/VM.
84
“COPYMDSK EXEC” on page 85
“CLONERO EXEC” on page 85
“CLONERW EXEC” on page 87
“MNT2GOLD EXEC” on page 89
“MNT2TST EXEC” on page 90
“PROFILE EXEC” on page 91
“RO2GOLD EXEC” on page 92
Sharing and maintaining SLES 10 SP2 Linux under z/VM
0
0
0
0
0
0
0
0
0
0
0
0
0
0
0
0
0
0
0
0
0
0
0
0
0
0
0
0
0
0
“RO2GOLD2 EXEC” on page 94
“TST2MNT EXEC” on page 95
“SAMPLE PARM-S10 file” on page 96
“SLES10S2 EXEC” on page 96
As these files are not supported, all of them start with the following disclaimer:
/*-----------------------------------------------------------------THE PROGRAM IS PROVIDED ON AN "AS IS" BASIS, WITHOUT WARRANTIES OR
CONDITIONS OF ANY KIND, EITHER EXPRESS OR IMPLIED INCLUDING, WITHOUT
LIMITATION, ANY WARRANTIES OR CONDITIONS OF TITLE, NON-INFRINGEMENT,
MERCHANTABILITY OR FITNESS FOR A PARTICULAR PURPOSE.
NEITHER RECIPIENT NOR ANY CONTRIBUTORS SHALL HAVE ANY LIABILITY FOR
ANY DIRECT, INDIRECT, INCIDENTAL, SPECIAL, EXEMPLARY, OR CONSEQUENTIAL
DAMAGES (INCLUDING WITHOUT LIMITATION LOST PROFITS), HOWEVER CAUSED
AND ON ANY THEORY OF LIABILITY, WHETHER IN CONTRACT, STRICT LIABILITY,
OR TORT (INCLUDING NEGLIGENCE OR OTHERWISE) ARISING IN ANY WAY OUT OF
THE USE OR DISTRIBUTION OF THE PROGRAM OR THE EXERCISE OF ANY RIGHTS
GRANTED HEREUNDER, EVEN IF ADVISED OF THE POSSIBILITY OF SUCH DAMAGES
-------------------------------------------------------------------*/
This disclaimer is not shown in each of the following sections.
1.11.1 COPYMDSK EXEC
The COPYMDSK EXEC tries to copy a file with FLASHCOPY. If that fails, it falls back to DDR.
/* COPYMDSK EXEC - copy minidisk w/FLASHCOPY, if it fails, try DDR
/* Parm 1: vaddr of source minidisk
/* Parm 2: vaddr of target minidisk
Address 'COMMAND'
Parse Arg source target .
Say
Say 'Copying minidisk' source 'to' target '...'
'CP FLASHCOPY' source '0 END' target '0 END'
If (rc \= 0) Then Do
/* Fallback to DDR
Say 'FLASHCOPY failed, falling back to DDR ...'
/* Queue up DDR commands
Queue 'SYSPRINT CONS'
/* Don't print to file
Queue 'PROMPTS OFF'
/* Don't ask 'Are you sure?'
Queue 'IN' source '3390'
/* Input minidisk
Queue 'OUT' target '3390'
/* Output minidisk
Queue 'COPY ALL'
/* Copy all contents
Queue ' '
/* Empty record ends DDR
'DDR'
retVal = rc
End
Else retVal = rc
Say 'Return value =' retVal
Return retVal
*/
*/
*/
*/
*/
*/
*/
*/
*/
*/
*/
1.11.2 CLONERO EXEC
The CLONERO EXEC clones from the S10GOLD read-only 1xxx disks to a target Linux user ID:
/* Clone read-write Linux from gold ID to target ID
Address 'COMMAND'
Parse Upper Arg target .
If (target = '') Then Do
*/
Sharing and maintaining SLES 10 SP2 Linux under z/VM
85
Say 'Target user ID is a required parameter'
Say
Say 'Syntax: CLONERO targetID'
Exit 1
End
/* Kyle Black March 26, 2009 */
/* Grab gold disk variable from file */
SAY 'Setting current Gold Disk Variable ...'
file = 'CURGOLD FILE A'
parse value stream(file,'C','OPEN READ') with ok handle
say stream(handle,'C','QUERY FORMAT')
source = LINEIN(file)
IF source == 'S10GOLD' THEN DO
Say 'USING GOLD DISK 1'
END
IF source == 'S10GOLD2' THEN DO
Say 'USING GOLD DISK 2'
END
Say 'Checking that source and target user IDs are logged off'
Call CheckLoggedOff source
Call CheckLoggedOff target
Say ' '
Say 'Do you want to copy R/O system from' source 'to' target 'y/n'
Parse Upper Pull answer .
If (answer \= 'Y') Then Exit 1
rw_addrs = '01B4 01B5 01B6'
ro_addrs = '21B4 21B5 21B6'
/* link target disks R/W */
Do a = 1 to Words(rw_addrs)
addr = Word(rw_addrs,a)
'CP LINK' target addr addr 'MR'
If (rc \= 0) Then Call CleanUp 100+a
End
/* link source disks R/O */
Do a = 1 to Words(ro_addrs)
addr = Word(ro_addrs,a)
'CP LINK' source addr addr 'RR'
If (rc \= 0) Then Call CleanUp 200+a
End
/* copy disks */
Do a = 1 to Words(ro_addrs)
source_addr = Word(ro_addrs,a)
target_addr = Word(rw_addrs,a)
'EXEC COPYMDSK' source_addr target_addr
If (rc \= 0) Then Call CleanUp 300+a
End
/* cleanup */
Call CleanUp 0
86
Sharing and maintaining SLES 10 SP2 Linux under z/VM
/*+------------------------------------------------------------------+*/
CleanUp: Procedure expose ro_addrs rw_addrs
/*| Detach all disks before exiting
|*/
/*| parm 1: Exit code
|*/
/*+------------------------------------------------------------------+*/
Parse Arg retVal
Say
Say 'Cleaning up ...'
CP DETACH ro_addrs rw_addrs
Exit retVal
/*+------------------------------------------------------------------+*/
CheckLoggedOff: Procedure
/*| Verify that a user ID is logged off
|*/
/*| parm 1: User ID to check
|*/
/*+------------------------------------------------------------------+*/
Parse arg virt_machine .
'CP QUERY' virt_machine
Select
When (rc = 0) Then Do /* user ID is logged on or disconnected */
Say "Error:" virt_machine "user ID must be logged off"
Exit 2
End
When (rc = 3) Then Do /* user ID does not exist */
Say "Error:" virt_machine "user ID does not exist"
Exit 3
End
When (rc = 45) Then /* user ID is logged off - this is correct */
Return 0
Otherwise Do /* unexpected */
Say "Error:" virt_machine "user ID must exist and be logged off"
Exit 4
End
End
1.11.3 CLONERW EXEC
The CLONERW EXEC clones from the S10GOLD read-write 21Bx disks to a target Linux user ID:
/* Clone read-write Linux from gold ID to target ID
Address 'COMMAND'
source = 'S10GOLD'
Parse Upper Arg target .
If (target = '') Then Do
Say 'Target user ID is a required parameter'
Say
Say 'Syntax: CLONERW targetID'
Exit 1
End
*/
Say 'Checking that source and target user IDs are logged off'
Call CheckLoggedOff source
Call CheckLoggedOff target
Say ' '
Say 'Do you want to copy R/W system from' source 'to' target 'y/n'
Parse Upper Pull answer .
If (answer \= 'Y') Then Exit 1
Sharing and maintaining SLES 10 SP2 Linux under z/VM
87
rw_addrs = '01B0 01B1 01B4 01B5 01B6 01B7 01B8'
ro_addrs = '11B0 11B1 11B4 11B5 11B6 11B7 11B8'
/* link target disks R/W */
Do a = 1 to Words(rw_addrs)
addr = Word(rw_addrs,a)
'CP LINK' target addr addr 'MR'
If (rc \= 0) Then Call CleanUp 100+a
End
/* link source disks R/O */
Do a = 1 to Words(ro_addrs)
addr = Word(ro_addrs,a)
'CP LINK' source addr addr 'RR'
If (rc \= 0) Then Call CleanUp 200+a
End
/* copy disks */
Do a = 1 to Words(ro_addrs)
source_addr = Word(ro_addrs,a)
target_addr = Word(rw_addrs,a)
'EXEC COPYMDSK' source_addr target_addr
If (rc \= 0) Then Call CleanUp 300+a
End
/* cleanup */
Call CleanUp 0
/*+------------------------------------------------------------------+*/
CleanUp: Procedure Expose ro_addrs rw_addrs
/*| Detach all disks before exiting
|*/
/*| parm 1: Exit code
|*/
/*+------------------------------------------------------------------+*/
Parse Arg retVal
Say
Say 'Cleaning up ...'
'CP DETACH' ro_addrs rw_addrs
Exit retVal
/*+------------------------------------------------------------------+*/
CheckLoggedOff: Procedure
/*| Verify that a user ID is logged off
|*/
/*| parm 1: User ID to check
|*/
/*+------------------------------------------------------------------+*/
Parse arg virt_machine .
'CP QUERY' virt_machine
Select
When (rc = 0) Then Do /* user ID is logged on or disconnected */
Say "Error:" virt_machine "user ID must be logged off"
Exit 2
End
When (rc = 3) Then Do /* user ID does not exist */
Say "Error:" virt_machine "user ID does not exist"
Exit 3
End
When (rc = 45) Then /* user ID is logged off - this is correct */
Return 0
Otherwise Do /* unexpected */
Say "Error:" virt_machine "user ID must exist and be logged off"
Exit 4
88
Sharing and maintaining SLES 10 SP2 Linux under z/VM
End
End
1.11.4 MNT2GOLD EXEC
The MNT2GOLD EXEC copies the S10RWMNT 1Bx read-write disks to the S10GOLD read-write 21Bx
disks:
/* Copy Linux from maintenance ID to gold ID's read-write disks */
Address 'COMMAND'
source = 'S10RWMNT'
target = 'S10GOLD'
ro_addrs = '01B0 01B1 01B4 01B5 01B6 01B7 01B8'
rw_addrs = '11B0 11B1 11B4 11B5 11B6 11B7 11B8'
Call CheckLoggedOff source
Call CheckLoggedOff target
Say 'Do you want to copy R/W disks from S10RWMNT to S10GOLD? y/n'
Parse Upper Pull answer .
If (answer \= 'Y') Then Exit 1
/* link target disks R/W */
Do a = 1 to Words(rw_addrs)
addr = Word(rw_addrs,a)
'CP LINK' target addr addr 'MR'
If (rc \= 0) Then Call CleanUp 100+a
End
/* link source disks R/O */
Do a = 1 to Words(ro_addrs)
addr = Word(ro_addrs,a)
'CP LINK' source addr addr 'RR'
If (rc \= 0) Then Call CleanUp 200+a
End
/* copy disks */
Do a = 1 to Words(ro_addrs)
source_addr = Word(ro_addrs,a)
target_addr = Word(rw_addrs,a)
'EXEC COPYMDSK' source_addr target_addr
If (rc \= 0) Then Call CleanUp 300+a
End
/* CleanUp */
Call CleanUp 0
/*+------------------------------------------------------------------+*/
CheckLoggedOff: Procedure
/*| Verify that a user ID is logged off
|*/
/*| parm 1: User ID to check
|*/
/*+------------------------------------------------------------------+*/
Parse arg virt_machine .
'CP QUERY' virt_machine
Select
When (rc = 0) Then Do /* user ID is logged on or disconnected */
Say "Error:" virt_machine "user ID must be logged off"
Exit 2
End
Sharing and maintaining SLES 10 SP2 Linux under z/VM
89
When (rc = 3) Then Do /* user ID does not exist */
Say "Error:" virt_machine "user ID does not exist"
Exit 3
End
When (rc = 45) Then /* user ID is logged off - this is correct */
Return 0
Otherwise Do /* unexpected */
Say "Error:" virt_machine "user ID must exist and be logged off"
Exit 4
End
End
/*+------------------------------------------------------------------+*/
CleanUp: Procedure Expose ro_addrs rw_addrs
/*| Detach all disks before exiting
|*/
/*| parm 1: Exit code
|*/
/*+------------------------------------------------------------------+*/
Parse Arg retVal
Say
Say 'Cleaning up ...'
Call Diag 8,'DETACH' ro_addrs rw_addrs
Exit retVal
1.11.5 MNT2TST EXEC
The MNT2TST EXEC copies the S10RWMNT read-write disks to the S10RWTST read-write disks:
/* Copy Linux from maintenance ID to test ID */
Address 'COMMAND'
source = 'S10RWMNT'
target = 'S10RWTST'
ro_addrs = '01B0 01B1 01B4 01B5 01B6 01B7 01B8'
rw_addrs = '11B0 11B1 11B4 11B5 11B6 11B7 11B8'
Say 'Checking that source and target user IDs are logged off'
Call CheckLoggedOff source
Call CheckLoggedOff target
Say ' '
Say 'Do you want to copy R/W disks from' source 'to' target'? y/n'
Parse Upper Pull answer .
If (answer \= 'Y') Then Exit 1
/* link target disks R/W */
Do a = 1 to Words(rw_addrs)
addr = Word(rw_addrs,a)
'CP LINK' target Right(addr,3) addr 'MR'
If (rc \= 0) Then Call CleanUp 100+a
End
/* link source disks R/O */
Do a = 1 to Words(ro_addrs)
addr = Word(ro_addrs,a)
'CP LINK' source addr addr 'RR'
If (rc \= 0) Then Call CleanUp 200+a
End
/* copy disks */
Do a = 1 to Words(ro_addrs)
90
Sharing and maintaining SLES 10 SP2 Linux under z/VM
source_addr = Word(ro_addrs,a)
target_addr = Word(rw_addrs,a)
'EXEC COPYMDSK' source_addr target_addr
If (rc \= 0) Then Call CleanUp 300+a
End
/* cleanup */
Call CleanUp 0
/*+------------------------------------------------------------------+*/
CheckLoggedOff: Procedure
/*| Verify that a user ID is logged off
|*/
/*| parm 1: User ID to check
|*/
/*+------------------------------------------------------------------+*/
Parse arg virt_machine .
'CP QUERY' virt_machine
Select
When (rc = 0) Then Do /* user ID is logged on or disconnected */
Say "Error:" virt_machine "user ID must be logged off"
Exit 2
End
When (rc = 3) Then Do /* user ID does not exist */
Say "Error:" virt_machine "user ID does not exist"
Exit 3
End
When (rc = 45) Then /* user ID is logged off - this is correct */
Return 0
Otherwise Do /* unexpected */
Say "Error:" virt_machine "user ID must exist and be logged off"
Exit 4
End
End
/*+------------------------------------------------------------------+*/
CleanUp: Procedure Expose ro_addrs rw_addrs
/*| Detach all disks before exiting
|*/
/*| parm 1: Exit code
|*/
/*+------------------------------------------------------------------+*/
Parse Arg retVal
Say
Say 'Cleaning up ...'
'CP DETACH' ro_addrs rw_addrs
Exit retVal
1.11.6 PROFILE EXEC
The PROFILE EXEC is a sample logon profile that will be on the Linux user ID’s 191 disk
/* PROFILE EXEC for Linux virtual servers
*/
Address 'COMMAND'
'CP SET RUN ON'
'CP SET PF11 RETRIEVE FORWARD'
'CP SET PF12 RETRIEVE'
'ACCESS 592 C'
'EXEC SWAPGEN 1B2 131072'
/* create a 64M VDISK disk swap space */
'EXEC SWAPGEN 1B3 131072'
/* create a 64M VDISK disk swap space */
'PIPE CP QUERY' Userid() '| VAR USER'
Parse Value user With id . dsc .
iplDisk = 1B0
/* /boot/ is 1B0
*/
If (dsc = 'DSC') Then
/* user is disconnected
*/
Sharing and maintaining SLES 10 SP2 Linux under z/VM
91
'CP IPL' iplDisk
Else Do
/* user is interactive -> prompt */
Say 'Do you want to IPL Linux from DASD' iplDisk'? y/n'
Parse Upper Pull answer .
If (answer = 'Y') Then
'CP IPL' iplDisk
End
Exit
1.11.7 RO2GOLD EXEC
The RO2GLD EXEC copies the disks that will become the read-only root system from S10ROGLD
to the 1xxx disks of S10GOLD:
/* Copy Linux from read-only ID to Gold ID */
'pipe cp link s10gold2 21b7 21b7 rr'
'pipe cp 10000 q links 21b7 |',
'split /,/|',
'strip|',
'strip /,/|',
'strip|',
'count lines |',
'var howmany |',
'console|',
'stem names.'
'cp det 21b7'
If (howmany > 1 ) Then Do
Say 'WARNING WARNING WARNING WARNING!'
Say 'You have Linux guests currently reading the S10GOLD'
Say 'disks. Running this script would cause problems!'
Say 'WARNING WARNING WARNING WARNING!'
Exit 1
End
/* Copy Linux from read-only ID to Gold ID */
Address 'COMMAND'
source = 'S10ROGLD'
target = 'S10GOLD'
ro_addrs = '01B0 01B1 01B4 01B5 01B6 01B7 01B8'
rw_addrs = '21B0 21B1 21B4 21B5 21B6 21B7 21B8'
Say ' '
Say 'Checking that source and target user IDs are logged off'
Call CheckLoggedOff source
Call CheckLoggedOff target
Say ' '
Say 'Do you want to copy disks from S10ROGLD to S10GOLD? y/n'
Parse Upper Pull answer .
If (answer \= 'Y') Then Exit 1
/* link target disks R/W */
Do a = 1 to Words(rw_addrs)
addr = Word(rw_addrs,a)
'CP LINK' target addr addr 'MR'
If (rc \= 0) Then Call CleanUp 100+a
End
/* link source disks R/O */
92
Sharing and maintaining SLES 10 SP2 Linux under z/VM
Do a = 1 to Words(ro_addrs)
addr = Word(ro_addrs,a)
'CP LINK' source addr addr 'RR'
If (rc \= 0) Then Call CleanUp 200+a
End
/* copy disks */
Do a = 1 to Words(ro_addrs)
source_addr = Word(ro_addrs,a)
target_addr = Word(rw_addrs,a)
'EXEC COPYMDSK' source_addr target_addr
If (rc \= 0) Then Call CleanUp 300+a
End
/* cleanup */
Call CleanUp 0
/*+------------------------------------------------------------------+*/
CheckLoggedOff: Procedure
/*| Verify that a user ID is logged off
|*/
/*| parm 1: User ID to check
|*/
/*+------------------------------------------------------------------+*/
Parse arg virt_machine .
'CP QUERY' virt_machine
Select
When (rc = 0) Then Do /* user ID is logged on or disconnected */
Say "Error:" virt_machine "user ID must be logged off"
Exit 2
End
When (rc = 3) Then Do /* user ID does not exist */
Say "Error:" virt_machine "user ID does not exist"
Exit 3
End
When (rc = 45) Then /* user ID is logged off - this is correct */
Return 0
Otherwise Do /* unexpected */
Say "Error:" virt_machine "user ID must exist and be logged off"
Exit 4
End
End
/*+------------------------------------------------------------------+*/
CleanUp: Procedure Expose ro_addrs rw_addrs
/*| Detach all disks before exiting
|*/
/*| parm 1: Exit code
|*/
/*+------------------------------------------------------------------+*/
Parse Arg retVal
Say
Say 'Cleaning up ...'
'CP DETACH' ro_addrs rw_addrs
/* Write the line S10GOLD to the file CURGOLD FILE A */
SAY 'Setting current Gold Disk Variable ...'
file = 'CURGOLD FILE A'
parse value stream(file,'C','OPEN WRITE REPLACE') with ok handle
call CHAROUT file, 'S10GOLD'
Exit retVal
Sharing and maintaining SLES 10 SP2 Linux under z/VM
93
1.11.8 RO2GOLD2 EXEC
The RO2GOLD2 EXEC is almost identical except that it copies to the 1xxx disks of S10ROGOLD2:
/* Copy Linux from read-only ID to Gold ID */
'pipe cp link s10gold2 21b7 21b7 rr'
'pipe cp 10000 q links 21b7 |',
'split /,/|',
'strip|',
'strip /,/|',
'strip|',
'count lines |',
'var howmany |',
'console|',
'stem names.'
'cp det 21b7'
If (howmany > 1 ) Then Do
Say 'WARNING WARNING WARNING WARNING!'
Say 'You have Linux guests currently reading the S10GOLD'
Say 'disks. Running this script would cause problems!'
Say 'WARNING WARNING WARNING WARNING!'
Exit 1
End
Address 'COMMAND'
Say ' '
Say 'Do you want to copy disks from S10ROGLD to S10GOLD2? y/n'
Parse Upper Pull answer .
If (answer \= 'Y') Then Exit 1
source = 'S10ROGLD'
target = 'S10GOLD2'
ro_addrs = '01B0 01B1 01B4 01B5 01B6 01B7 01B8'
rw_addrs = '21B0 21B1 21B4 21B5 21B6 21B7 21B8'
/* link target disks R/W */
Do a = 1 to Words(rw_addrs)
addr = Word(rw_addrs,a)
'CP LINK' target addr addr 'MR'
If (rc \= 0) Then Call CleanUp 100+a
End
/* link source disks R/O */
Do a = 1 to Words(ro_addrs)
addr = Word(ro_addrs,a)
'CP LINK' source addr addr 'RR'
If (rc \= 0) Then Call CleanUp 200+a
End
/* copy disks */
Do a = 1 to Words(ro_addrs)
source_addr = Word(ro_addrs,a)
target_addr = Word(rw_addrs,a)
'EXEC COPYMDSK' source_addr target_addr
If (rc \= 0) Then Call CleanUp 300+a
End
/* cleanup */
Call CleanUp 0
94
Sharing and maintaining SLES 10 SP2 Linux under z/VM
/*+------------------------------------------------------------------+*/
CleanUp: Procedure Expose ro_addrs rw_addrs
/*| Detach all disks before exiting
|*/
/*| parm 1: Exit code
|*/
/*+------------------------------------------------------------------+*/
Parse Arg retVal
Say
Say 'Cleaning up ...'
'CP DETACH' ro_addrs rw_addrs
/* Write the line S10GOLD2 to the file CURGOLD FILE A */
SAY 'Setting current Gold Disk Variable ...'
file = 'CURGOLD FILE A'
parse value stream(file,'C','OPEN WRITE REPLACE') with ok handle
call CHAROUT file, 'S10GOLD2'
Exit retVal
1.11.9 TST2MNT EXEC
The TST2MNT EXEC copies the read-write disks from S10RWTST to S10RWMNT:
/* Copy Linux from maintenance ID to test ID */
Address 'COMMAND'
source = 'S10RWTST'
target = 'S10RWMNT'
ro_addrs = '01B0 01B1 01B4 01B5 01B6 01B7 01B8'
rw_addrs = '11B0 11B1 11B4 11B5 11B6 11B7 11B8'
Say 'Checking that source and target user IDs are logged off'
Call CheckLoggedOff source
Call CheckLoggedOff target
Say ' '
Say 'Do you want to copy R/W disks from' source 'to' target'? y/n'
Parse Upper Pull answer .
If (answer \= 'Y') Then Exit 1
/* link target disks R/W */
Do a = 1 to Words(rw_addrs)
addr = Word(rw_addrs,a)
'CP LINK' target Right(addr,3) addr 'MR'
If (rc \= 0) Then Call CleanUp 100+a
End
/* link source disks R/O */
Do a = 1 to Words(ro_addrs)
addr = Word(ro_addrs,a)
'CP LINK' source addr addr 'RR'
If (rc \= 0) Then Call CleanUp 200+a
End
/* copy disks */
Do a = 1 to Words(ro_addrs)
source_addr = Word(ro_addrs,a)
target_addr = Word(rw_addrs,a)
'EXEC COPYMDSK' source_addr target_addr
If (rc \= 0) Then Call CleanUp 300+a
End
Sharing and maintaining SLES 10 SP2 Linux under z/VM
95
/* CleanUp */
Call CleanUp 0
/*+------------------------------------------------------------------+*/
CheckLoggedOff: Procedure
/*| Verify that a user ID is logged off
|*/
/*| parm 1: User ID to check
|*/
/*+------------------------------------------------------------------+*/
Parse arg virt_machine .
'CP QUERY' virt_machine
Select
When (rc = 0) Then Do /* user ID is logged on or disconnected */
Say "Error:" virt_machine "user ID must be logged off"
Exit 2
End
When (rc = 3) Then Do /* user ID does not exist */
Say "Error:" virt_machine "user ID does not exist"
Exit 3
End
When (rc = 45) Then /* user ID is logged off - this is correct */
Return 0
Otherwise Do /* unexpected */
Say "Error:" virt_machine "user ID must exist and be logged off"
Exit 4
End
End
/*+------------------------------------------------------------------+*/
CleanUp: Procedure Expose ro_addrs rw_addrs
/*| Detach all disks before exiting
|*/
/*| parm 1: Exit code
|*/
/*+------------------------------------------------------------------+*/
Parse Arg retVal
Say
Say 'Cleaning up ...'
'CP DETACH' ro_addrs rw_addrs
Exit retVal
1.11.10 SAMPLE PARM-S10 file
This file is a sample parameter file for a SLES 10 SP2 install:
ramdisk_size=65536 root=/dev/ram1 ro init=/linuxrc TERM=dumb
HostIP=n.n.n.n
Hostname=name.example.com
Gateway=n.n.n.n
Netmask=255.255.255.0
Broadcast=n.n.n.n
Layer2=0
ReadChannel=0.0.0600 WriteChannel=0.0.0601 DataChannel=0.0.0602
Nameserver=n.n.n.n
Portname=dontcare
Install=nfs://n.n.n.n/nfs/sles10/SLES-10-CD-s390x-GMC-CD1.iso
UseVNC=1 VNCPassword=123456
InstNetDev=osa OsaInterface=qdio OsaMedium=eth Manual=0
1.11.11 SLES10S2 EXEC
The SLES10S2 EXEC will punch the kernel, parameter file and RAMdisk to your reader and
invoke a SLES 10 SP2 install from there.
/* EXEC to punch SLES-10 SP2 install system to reader and IPL from it */
Address 'COMMAND'
96
Sharing and maintaining SLES 10 SP2 Linux under z/VM
'CP SPOOL PUN *'
'CP CLOSE RDR'
'CP PURGE RDR ALL'
'PUNCH SLES10S2 KERNEL * (NOHEADER'
'PUNCH' Userid() 'PARM-S10 * (NOHEADER'
'PUNCH SLES10S2 INITRD * (NOHEADER'
'CP CHANGE RDR ALL KEEP'
'CP IPL 00C CLEAR'
1.12 The team that wrote this paper
This paper was originally written at Nationwide and converted into a Redpaper at IBM in
Poughkeepsie in 2007 by the following authors:
Steve Womer is a Sr. Consulting IT Architect at Nationwide Insurance in Columbus Ohio. He
has 28 years of experience in information systems. He holds a BS degree from Ohio State
University. His areas of expertise include z/OS systems management, systems automation,
and Linux. He has written extensively about Linux on IBM System z.
Rick Troth has been working with as many VM systems as he can get his hands on since
1981. He has used Unix since 1985, starting with AIX® 1.0 (IBM RT) and Amdahl's UTS
(hosted by VM/HPO). He has worked with Linux since 1994 (the 0.99 days), both as a
development platform and eventually as his primary desktop system. Combining “open
systems” (e.g.: Unix, POSIX, and especially Linux) with the incredible versatility of virtual
machines is his career passion.
Rick got his degree in Computer Science from Texas A&M University and presently resides in
central Ohio with his wife of 21 years and their two teenagers and one recently adopted
Siberian Husky. Rick came to Ohio to work with Linux on z/VM at Nationwide Insurance. They
miss friends and family in Texas, but otherwise they find Ohio quite nice. Rick is honored to
be a Knight of VM (under the monicker Sir Santa). You can reach him by signing up to the
IBMVM discussion list (hosted by the University of Arkansas) or to the LINUX-390 discussion
list (hosted by Marist College) and hollering “Hey, Sir Santa!”. This will annoy his friends on
the list and make you unpopular, but should get his attention.
Michael MacIsaac works at IBM in Poughkeepsie NY with the z/VM team. He was way too
busy to work on the update of this paper, but found the time because this project was a lot
more fun than the day-to-day insanity at IBM. Despite being away from the office for three
days, somehow the other projects seem to have survived.
The Redpaper was updated to become a white paper in 2009 with much help from the
following author:
Kyle S. Black works at Penn State University as a systems administrator on the Enterprise
Infrastructure team. He has been working with z/OS, z/VM and z/Linux since May 27th, 2008.
Prior to which he was a UNIX and Linux Systems Administrator. In a previous life a short time
ago, Kyle graduated from Penn State with degrees in English and Philosophy. Some of his
professors may be glad to see he is published, or perhaps in this case they may just be really
confused.
Sharing and maintaining SLES 10 SP2 Linux under z/VM
97
1.12.1 Thanks
Thanks to the following people for their contributions to this project:
Lydia Parziale
International Technical Support Organization, Poughkeepsie Center
Ernie Horn
IBM Poughkeepsie
Mike Nardone, Cortez Crosby
Nationwide Insurance
Mark Post
Novell
David Boyes
Sine Nomine Associates
George Madl, Steve Shultz, Hongjie Yang
IBM Endicott
A special thanks to Carlos Ordonez of IBM Poughkeepsie, for being willing to sit through high
level architecture discussions and always asking “Why can’t that be done more simply?”
A special thanks to Jim Vincent of Nationwide for converting willy-nilly REXX code into
something a bit more reputable.
A special thanks to Brian France and Dominic Depasquale of Penn State University for
reaching out and “giving back” to make the update to this paper possible.
1.13 Feedback
Feedback or questions are welcome. Please contact mikemac at us.ibm.com
98
Sharing and maintaining SLES 10 SP2 Linux under z/VM