1
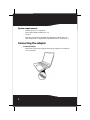
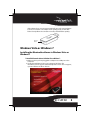
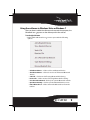
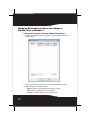
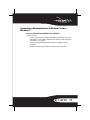
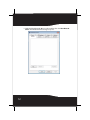
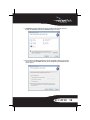
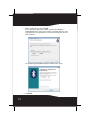
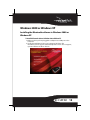
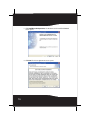
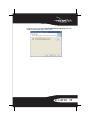
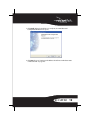
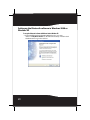
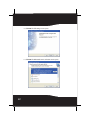
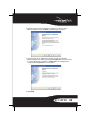
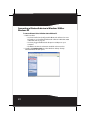
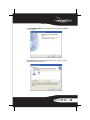
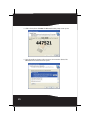
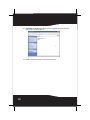
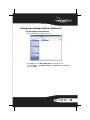
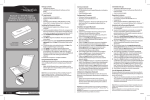
Bluetooth 2.1 EDR USB Adapter
RF-FLBTAD
User Guide
Rocketfish RF-FLBTAD Bluetooth
2.1 EDR USB Adapter
Contents
Introduction ...................................................................... 2
Connecting the adapter................................................ 4
Features............................................................................... 3
Windows Vista or Windows 7 ...................................... 5
Windows 2000 or Windows XP.................................15
Uninstalling the software ...........................................30
Troubleshooting ............................................................31
Legal notices ...................................................................31
One-year limited warranty .........................................33
Introduction
Congratulations on your purchase of a high-quality Rocketfish
product. Your RF-FLBTAD represents the state of the art in Bluetooth
adapter design and is designed for reliable and trouble-free
performance.
2
Features
• Bluetooth specification compliant
• The adapter is compatible with the following profiles:
Advanced Audio Distribution Profile (A2DP)
Audio Video Remote Control Profile (AVRCP)
Basic Imaging Profile (BIP)
Basic Printing Profile (BPP)
BNEP
Dial-Up Networking Profile (DUN)
Fax Profile (FAX)
File Transfer Profile (FTP)
Generic Audio Video Distribution Profile
(GAVDP)
Generic Access Profile (GAP)
Hardcopy Cable Replacement Profile (HCRP)
Headset/Audio Gateway Profile (HSP)
Human Interface Device Profile (HID)
Object Push Profile (OPP)
Personal Area Networking Profile (PAN)
Serial Port Profile (SPP)
Synchronize Action Profile (SYNC)
Generic Object Exchange Profile (GOEP)
Package contents
• Bluetooth 2.1 EDR USB adapter
• Installation CD
• Quick Setup Guide
RF-FLBTAD
3
System requirements
•
•
•
•
Pentium processor or equivalent
One available USB port (USB 2.0 or 1.1)
CD drive
Operating system: Microsoft Windows® 2000, Microsoft Windows® XP
with Service Pack 1 or higher, Microsoft Windows Vista®, or Windows® 7
Connecting the adapter
To connect the adapter:
• Remove the cap from the adapter, then plug the adapter into a USB port
on the computer.
4
If the adapter does not connect automatically, press the connect button
to force a connection. The adapter enters pairing mode, and the LED
flashes slowly. When the connection is made, the LED flashes quickly.
Connect
button
Windows Vista or Windows 7
Installing the Bluetooth software in Windows Vista or
Windows 7
To install the Bluetooth software in Windows Vista or Windows 7:
1 Make sure that you have plugged the adapter into a USB port on the
computer.
2 Insert the installation CD into your computer’s CD drive. The
introductory screen appears automatically. If the screen does not appear,
open the Autorun.exe file on the CD.
RF-FLBTAD
5
3 Click Install Bluetooth Adapter Driver. The Welcome to the Installshield Wizard
screen opens.
4 Click Next. The License Agreement screen opens.
6
5 Read the agreement, click I accept the terms in the license agreement, then click
Next. The Destination Folder screen opens.
6 To install the software in the default location, click Next. The Ready to
Install the Program screen opens.
Or, to install the program in a different location, click Change, type the
new location, then click Next. The Ready to Install the Program screen
opens.
RF-FLBTAD
7
7 Click Install. When the installation is complete, the InstallShield Wizard
Completed screen opens.
Note: If the “Bluetooth device not found” message appears, plug the adapter into a
USB port on the computer, then click OK.
8 Click Finish. When a message appears prompting you to restart the
computer, click Yes.
8
Using the software in Windows Vista or Windows 7
After you have installed the software and restarted the computer, the
Bluetooth icon appears on the desktop and in the task bar.
To use the right-click menu:
• Right-click the Bluetooth icon . A menu opens with the following
options:
• Add a Bluetooth Device— Click to add a new Bluetooth device.
• Show Bluetooth Devices—Click to show a list of all detected Bluetooth
devices.
• Send a File—Click to send a file using Bluetooth File Sharing.
• Receive a File—Click to receive a file using Bluetooth File Sharing.
• Join a Personal Area Network—Click to join a private Bluetooth network.
• Open Bluetooth Settings—Click to open the Bluetooth Devices screen.
• Remove Bluetooth Icon—Click to remove the Bluetooth icon from the
task bar.
RF-FLBTAD
9
Managing Bluetooth connections and settings in
Windows Vista or Windows 7
To manage Bluetooth connections and settings in Windows Vista or Windows 7:
1 Double-click the Bluetooth icon
window opens.
in the task bar. The Bluetooth Devices
2 Click a tab at the top of the window to navigate through the options.
3 Make changes, as needed, then click:
• Apply to confirm a setting without closing the window.
• OK to confirm a setting and close the window.
• Cancel to cancel the setting and close the window.
10
Connecting a Bluetooth device in Windows Vista or
Windows 7
To connect to a Bluetooth device in Windows Vista or Windows 7:
1 Make sure that:
• You have installed and configured the Bluetooth software. For more
information, see “Installing the Bluetooth software in Windows Vista
or Windows 7” on page 5.
• You have plugged the Bluetooth adapter in a USB port on your
computer.
• The Bluetooth device has batteries installed and is turned on.
RF-FLBTAD 11
2 Right-click the Bluetooth
icon on the task bar, then click Show Bluetooth
Devices. The Bluetooth Devices dialog box opens.
12
3 Click Add to search for Bluetooth devices. When a Bluetooth device is
found, the Add Bluetooth Device Wizard dialog box opens.
4 If more than one Bluetooth device is found, click the device you want to
connect to, then click Next. The Do you need a passkey to add your device?
screen opens.
RF-FLBTAD 13
5 Click a passkey option, then click Next.
If you selected an option that requires a passkey, the Windows is
exchanging passkeys screen opens. Use the connected device to enter
the passkey. For more information, see the documentation that came
with the device.
The Completing the Add Bluetooth Device Wizard screen opens.
6 Click Finish.
14
Windows 2000 or Windows XP
Installing the Bluetooth software in Windows 2000 or
Windows XP
To install the Bluetooth software in Windows 2000 or Windows XP:
1 Make sure that you have plugged the adapter into a USB port on the
computer.
2 Insert the installation CD into your computer’s CD drive. The
introductory screen appears automatically. If the screen does not appear,
open the Autorun.exe file on the CD.
RF-FLBTAD 15
3 Click Install Bluetooth Adapter Driver. The Welcome to the Installshield Wizard
screen opens.
4 Click Next. The License Agreement screen opens.
16
5 Read the agreement, click I accept the terms in the license agreement, then click
Next. The Destination Folder screen opens.
RF-FLBTAD 17
6 To install the software in the default location, click Next. The Ready to
Install the Program screen opens.
Or, to install the program in a different location, click Change, type the
new location, then click Next. The Ready to Install the Program screen
opens.
Note: If the “Bluetooth device not found” message appears, plug the adapter into a
USB port on the computer, then click OK.
18
7 Click Install. When the installation is complete, the Initial Bluetooth
Configuration Wizard screen opens.
8 Click Next, the go to “Setting up the Bluetooth software in Windows 2000
or Windows XP” on page 20.
RF-FLBTAD 19
Setting up the Bluetooth software in Windows 2000 or
Windows XP
To set up the Bluetooth software in Windows 2000 or Windows XP:
1 If the Initial Bluetooth Configuration Wizard screen is not open,
double-click My Bluetooth Places on the Windows desktop or double-click
the Bluetooth icon on the task bar.
20
2 Click to uncheck the options you do not need, then click Next. The Device
Name and Type screen opens.
3 If this is the first time you have used the software, type a name in the
Computer name box, then open the Computer type box and click Laptop or
Desktop.
RF-FLBTAD 21
4 Click Next. The following screen opens.
5 Click Next. The Bluetooth Service Selection screen opens.
22
6 Click the services that you want the computer to provide to other
Bluetooth devices, then click Next. The following screen opens.
7 If you want to set up a Bluetooth connection, make sure that the
Bluetooth device is in pairing mode, then click Next. Or if you do not want
to set up a Bluetooth connection, click Skip. After the configuration is
complete, the Congratulations screen opens.
8 Click Finish.
RF-FLBTAD 23
Connecting a Bluetooth device in Windows 2000 or
Windows XP
To connect a Bluetooth device in Windows 2000 or Windows XP:
1 Make sure that:
• You have installed and configured the Bluetooth software. For more
information, see “Installing the Bluetooth software in Windows 2000
or Windows XP” on page 15.
• You have plugged the Bluetooth adapter in a USB port on your
computer.
• The Bluetooth device has batteries installed and is turned on.
2 Double-click My Bluetooth Places on the Windows desktop. The My
Bluetooth Places window opens.
24
3 Click Add a Bluetooth Device. The Initial Bluetooth Configuration Wizard
screen opens.
4 Click Next. The Blue Device Selection screen opens. The connected
Bluetooth devices are listed.
RF-FLBTAD 25
5 Click a device, then click Next. The Bluetooth Security Setup screen opens.
6 Type the numbers shown on the screen to connect to the device. The
Bluetooth Service Selection screen opens.
26
7 Click the services you want to enable, then click Next. The Completing
Bluetooth Setup Wizard screen opens.
8 Type the name for the Bluetooth device.
9 If you want to connect another Bluetooth device, click the Create a shortcut
and restart this wizard checkbox.
RF-FLBTAD 27
10 Click Finish. The My Bluetooth Places window opens and a shortcut for the
device you connected appears.
11 Double-click the shortcut to connect to the device.
28
Getting help in Windows 2000 or Windows XP
To get help in Windows 2000 or Windows XP:
1 Open the My Bluetooth Places window.
2 Click Help, then click Bluetooth Help Topics. The help file opens.
Or, click Start, then click Help and Support. Type Bluetooth in the Search box,
then press Enter.
RF-FLBTAD 29
Uninstalling the software
Windows Vista or Windows 7
To uninstall the Bluetooth software:
1 Unplug the Bluetooth adapter.
2 Click Start, then click Control Panel. The Control Panel opens.
3 Under Programs, click Uninstall a program. The Program and Features window
opens.
4 Click WIDCOMM Bluetooth Software.
5 When a message asks you if you want to uninstall the software, click Yes.
Windows 2000 or Windows XP
To uninstall the Bluetooth software:
1
2
3
4
30
Unplug the Bluetooth adapter.
Click Start, then click Control Panel. The Control Panel opens.
Click Add or Remove Programs. The Add or Remove Programs window opens.
Click WIDCOMM Bluetooth Software, then click Remove.
Troubleshooting
If you experience problems connecting a Bluetooth device:
1 Double-click My Bluetooth Places on the Windows desktop or click the
Bluetooth
icon on the task bar. The My Bluetooth Places window opens.
2 Click Help in the menu bar at the top of the window, then click Bluetooth
Help Topics. The Bluetooth help file opens.
3 Click Bluetooth for Microsoft Windows Help, then click How to Use Bluetooth. A list
of devices and tasks appears, where you can find detailed instructions for
many types of device connections.
Legal notices
Declaration of conformity
Important Information
Bluetooth products must be installed and used in strict accordance with the manufacturer’s
instructions as described in the user documentation that comes with the product. The device
complies with the following radio frequency and safety standards.
• Federal Communications Commission (FCC) Compliance Notice
• Radio Frequency Notice
Changes or modifications to this unit not expressly approved by the party responsible for
compliance could void the user authority to operate the equipment.
This device complies with part 15 of the FCC Rules. Operation is subject to the following two
conditions: 1.This device may not cause harmful interference. 2.This device must accept any
interference received, including interference that may cause undesired operation.
The user’s manual or instruction manual for an intentional or unintentional radiator shall
caution the user that changes or modifications not expressly approved by the party responsible
for compliance could void the user’s authority to operate the equipment
Note: This equipment has been tested and found to comply with the limits for a Class B digital
device, pursuant to part 15 of the FCC Rules. These limits are designed to provide reasonable
protection against harmful interference in a residential installation. This equipment generates,
uses and can radiate radio frequency energy and, if not installed and used in accordance with
the instructions, may cause harmful interference to radio communications. However, there is no
guarantee that interference will not occur in a particular installation. If this equipment does not
cause harmful interference to radio or television reception, which can be determined by
turning the equipment off and on, the user is encouraged to try to correct the interference by
one or more of the following measures:
• (1) Reorient or relocate the receiving antenna,
• (2) Increase the separation between the equipment and receiver,
RF-FLBTAD 31
•
•
(3) Connect the equipment into an outlet on a circuit different from that to which the
receiver is connected,
(4) Consult the dealer or an experienced radio/TV technician for help.
Interference Notice
Bluetooth products are a radio device that might cause interference
with other non-Bluetooth devices (for instance, devices using
wireless LAN). 802.11b technology might cause degradation on the
performance of Bluetooth devices.
Caution:
1 To comply with FCC RF exposure compliance requirements, a separation
distance of at least 20 cm must be maintained between the antenna of
this device and all persons.
2 This Transmitter must not be co-located or operating in conjunction with
any other antenna or transmitter.
Department of Communications-Canada
Canadian Compliance Statement
This Class B Digital apparatus meets all the requirements of the Canadian Interference Causing
Equipment Regulations.
This device complies with Class B Limits of Industry of Canada. Operation is subject to the
following two conditions: 1) this device may not cause harmful interference, and 2) this device
must accept any interference received, including interference that may cause undesired
operation. This device is certified to the requirements of RSS-210 for 2.4 GHz spread spectrum
devices. The use of this device in a system operating ether partially or completely outdoors may
require the user to obtain a license for the system according to the Canadian regulations. For
further information, contact local Industry Canada office.
32
One-year limited warranty
Rocketfish Products (“Rocketfish”) warrants to you, the original purchaser of this new
RF-FLBTAD (“Product”), that the Product shall be free of defects in the original manufacture of
the material or workmanship for one (1) year from the purchase of the Product (“Warranty
Period”). This Product must be purchased from an authorized dealer of Rocketfish brand
products and packaged with this warranty statement. This warranty does not cover refurbished
Product. If you notify Rocketfish during the Warranty Period of a defect covered by this
warranty that requires service, terms of this warranty apply.
How long does the coverage last?
The Warranty Period lasts for one year (365 days), beginning on the date you purchased the
Product. The purchase date is printed on the receipt you received with the product.
What does this warranty cover?
During the Warranty Period, if the original manufacture of the material or workmanship of the
Product is determined to be defective by an authorized Rocketfish repair center or store
personnel, Rocketfish will (at its sole option): (1) repair the Product with new or rebuilt parts; or
(2) replace the Product at no charge with new or rebuilt comparable products or parts. Products
and parts replaced under this warranty become the property of Rocketfish and are not returned
to you. If service of Products and parts are required after the Warranty Period expires, you must
pay all labor and parts charges. This warranty lasts as long as you own your Rocketfish Product
during the Warranty Period. Warranty coverage terminates if you sell or otherwise transfer the
Product.
How to obtain warranty service?
If you purchased the Product at a retail store location, take your original receipt and the Product
to the store you purchased it from. Make sure that you place the Product in its original
packaging or packaging that provides the same amount of protection as the original
packaging. If you purchased the Product from an online web site, mail your original receipt and
the Product to the address listed on the web site. Make sure that you put the Product in its
original packaging or packaging that provides the same amount of protection as the original
packaging.
Where is the warranty valid?
This warranty is valid only to the original purchaser of the Product in the United States, Canada,
and Mexico.
What does the warranty not cover?
This warranty does not cover:
• Customer instruction
• Installation
• Set up adjustments
• Cosmetic damage
RF-FLBTAD 33
• Damage due to acts of God, such as lightning strikes
• Accident
• Misuse
• Abuse
• Negligence
• Commercial use
• Modification of any part of the Product, including the antenna
This warranty also does not cover:
• Damage due to incorrect operation or maintenance
• Connection to an incorrect voltage supply
• Attempted repair by anyone other than a facility authorized by Rocketfish to service the
Product
• Products sold as is or with all faults
• Consumables, such as fuses or batteries
• Products where the factory applied serial number has been altered or removed
REPAIR REPLACEMENT AS PROVIDED UNDER THIS WARRANTY IS YOUR EXCLUSIVE REMEDY.
ROCKETFISH SHALL NOT BE LIABLE FOR ANY INCIDENTAL OR CONSEQUENTIAL DAMAGES FOR
THE BREACH OF ANY EXPRESS OR IMPLIED WARRANTY ON THIS PRODUCT, INCLUDING, BUT
NOT LIMITED TO, LOST DATA, LOSS OF USE OF YOUR PRODUCT, LOST BUSINESS OR LOST
PROFITS. ROCKETFISH PRODUCTS MAKES NO OTHER EXPRESS WARRANTIES WITH RESPECT TO
THE PRODUCT, ALL EXPRESS AND IMPLIED WARRANTIES FOR THE PRODUCT, INCLUDING, BUT
NOT LIMITED TO, ANY IMPLIED WARRANTIES OF AND CONDITIONS OF MERCHANTABILITY AND
FITNESS FOR A PARTICULAR PURPOSE, ARE LIMITED IN DURATION TO THE WARRANTY PERIOD
SET FORTH ABOVE AND NO WARRANTIES, WHETHER EXPRESS OR IMPLIED, WILL APPLY AFTER
THE WARRANTY PERIOD. SOME STATES, PROVINCES AND JURISDICTIONS DO NOT ALLOW
LIMITATIONS ON HOW LONG AN IMPLIED WARRANTY LASTS, SO THE ABOVE LIMITATION MAY
NOT APPLY TO YOU. THIS WARRANTY GIVES YOU SPECIFIC LEGAL RIGHTS, AND YOU MAY ALSO
HAVE OTHER RIGHTS, WHICH VARY FROM STATE TO STATE OR PROVINCE TO PROVINCE.
Contact Rocketfish:
For customer service please call 1-800-620-2790
www.rocketfishproducts.com
Distributed by Best Buy Purchasing, LLC
7601 Penn Avenue South, Richfield, Minnesota, U.S.A. 55423-3645
© 2008 Best Buy Enterprise Services, Inc.
All rights reserved. ROCKETFISH is a trademark of Best Buy Enterprise Services, Inc. Registered in
some countries. All other products and brand names are trademarks of their respective owners.
34
RF-FLBTAD 35
36
RF-FLBTAD 37
38
RF-FLBTAD 39
www.rocketfishproducts.com
(800) 620-2790
Distributed by Best Buy Purchasing, LLC
7601 Penn Avenue South, Richfield, MN 55423-3645 USA
© 2009 Best Buy Enterprise Services, Inc.
All rights reserved. ROCKETFISH is a trademark of Best Buy Enterprise Services, Inc.
All other products and brand names are trademarks of their respective owners.
09-0734
ENGLISH