1
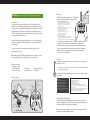
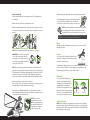
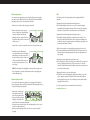
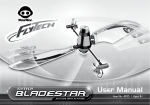
Manufactured and distributed by
© 2007 Wowwee Limited.
Product names, designations, and logos
are trademarks or registered trademarks
of Wowwee Limited. All rights reserved.
Wowwee (Asia Office)
Unit 301A-C, 92 Granville Road
T.S.T. East, Hong Kong
Wowwee (North America Office)
Wowwee Group Company
6600 Decarie, Suite 200
Montreal, Quebec
H3X 2K4, Canada
Consumer Hotline: 1-800-310-3033
Customer Service Email: [email protected]
www.wowwee.com
We recommend that you retain our
address for future reference.
Product and colors may vary.
Packaging printed in China.
This product is not suitable for children
under 3 years because of small parts choking hazard.
www.flytechonline.com
0979
This device complies with Part 15 of the FCC Rules. Operation is subject to the following
two conditions: (1) This device may not cause harmful interference, and (2) This device
must accept any interference received, including interference that may cause undesired
operation.
NOTE
This equipment has been tested and found to comply with the limits for a class B
digital device, pursuant to part 15 of the FCC rules. These limits are designed to provide
reasonable protection against harmful interference in a residential installation. This
equipment generates, uses and can radiate radio frequency energy and, if not installed
and used in accordance with the instructions, may cause harmful interference to radio
communications.
However, there is no guarantee that interference will not occur in a particular installation.
If this equipment does cause harmful interference to radio or television reception, which
can be determined by turning the equipment off and on, the user is encouraged to try
and correct the interference by one or more of the following measures:
- Reorient or relocate the receiving antenna
- Increase the separation between the equipment and receiver
- Connect the equipment into an outlet on a circuit different from that to which the receiver is connected
- Consult the dealer or experienced radio/TV technician for help
WARNING: Changes or modifications to this unit not expressly approved by the party
responsible for compliance could void the user’s authority to operate the equipment.
MADE IN CHINA.
WARNING: Inserting FlyTech Dragonfly’s legs into an AC socket will result in an electric
shock and can seriously damage your health. If the dragonfly becomes trapped in an
electrical device, turn off the power before retrieving the toy.
4031US03TOP
Please keep these instructions as they contain important information.
User Manual
Item No. 4031 | Ages 8+
Thank you for purchasing the FlyTech Dragonfly from Wowwee!
Introduction
Batteries
The FlyTech Dragonfly controller requires 6 x “AA” alkaline
batteries (not included). Install the batteries as follows:
Battery
Compartment
Attention: Important Battery Information
The world’s first radio-controlled flying insect. FlyTech™ Dragonfly is a fun RC
flyer that’s easy or challenging depending upon the skill level setting you choose
- beginner or expert. An ultra-light, dual-wing design and “high-flex”, crash-resistant
structure make the dragonfly safe to fly anywhere, even in small indoor spaces.
The FlyTech Dragonfly is an easy-to-fly aeronautical marvel that looks and sounds
like a genetic hybrid of the real thing.
Designed primarily for amazing indoor flight, you can also use FlyTech Dragonfly
outdoors. Its wings flap like a real dragonfly and it has a long flight duration on a
single recharge.
Take a few moments to look through this user manual to get your FlyTech
Dragonfly up and soaring!
Note: When using the FlyTech Dragonfly, adult supervision is required, especially
when changing the batteries, or replacing the wings and/or propeller.
• Use only fresh batteries of the required size and recommended type
• Do not mix old and new batteries, different types of batteries
[standard (Carbon-Zinc), Alkaline or rechargeable] or rechargeable batteries of different capacities
• Rechargeable batteries are only to be charged under adult supervision
• Please respect the correct polarity, (+) and (-)
• Do not try to recharge non-rechargeable batteries
• Do not throw batteries into the fire
• Replace all batteries of the same type/brand at the same time
• The supply terminals are not to be short-circuited
• Remove exhausted batteries from the toy
• Batteries should be replaced by adults
• Remove batteries if the toy is not going to be played with for some time
• The packaging should be kept since it contains important information
• Rechargeable batteries are to be removed from the controller before being charged
1.5V
1.5V
1.5V
1.5V
1.5V
1.5V
1.5V
1.5V
1.5V
1.5V
1.5V
1.5V
LR03
LR03
LR03
LR03
LR03
LR03
LR6
LR6
LR6
LR6
LR6
LR6
UM4
UM4
UM4
UM4
UM4
UM4
UM3 “AAA”
UM3 “AAA”
UM3 “AAA”
UM3 UM3
UM3
“AAA”
“AAA”
“AAA”
“AA” “AA” “AA” “AA” “AA” “AA”
1. Open the battery compartment on the controller using a Phillips screwdriver (not included) to remove the screw on the battery compartment door.
2. Insert the batteries according to the diagram. Ensure that the positive and
negative polarities match the illustrations inside the battery compartment.
3. Replace the battery compartment door and replace the screw using the
screwdriver. Do not overtighten.
Antenna
You will need to attach the antenna to the controller before you can begin using
the dragonfly. To do so:
Package contents
This package contains:
1 x FlyTech Dragonfly
1 x Pair of spare wings
1 x Controller 1 x Spare propeller
1 x Detachable antenna
1 x Tail ribbon
•Screw the antenna clockwise into the top of the controller (as illustrated in the diagram) until it
stops turning. Do not overtighten.
For optimal performance, fully extend the antenna on the controller before flying
the dragonfly.
Quick overview
FCC Note:
Antenna
Trim Dial
LED Eyes
LED Indicator
Wings
Magnetic Perch
Power Toggle
Direction Toggle
Tail rotor
Power Switch
Power Switch
ON
FlyTech Dragonfly
modification of the product.
SAFETY PRECAUTIONS!
• Never fly or follow the dragonfly into the streets
• Keep the dragonfly away from faces and eyes
• Do not launch at people or animals
• Use the controller charger included in this package
• Keep fingers away from the dragonfly’s moving joints when the power is on
• Make sure people around you are aware you are playing with the FlyTech Dragonfly
• Do not fly near walls or ceilings
• Do not fly the dragonfly near overhead cables, trees, buildings or any other obstructions
• Do not play outdoor during thunderstorms or adverse weather conditions
• Always turn your dragonfly and controller OFF when not in use
Charging FlyTech Dragonfly
Metal Perch Point
Recharge Socket
The unique antenna provided has been
authorized for use with this equipment.
Installation of any other antenna is not
authorised under FCC regulations.
The manufacturer is not responsible for any
radio or TV interference caused by unauthorised
Beginner and
Expert Mode
OFF
Controller
Before flying the FlyTech Dragonfly for the first time (or if you have depleted a
charge on the dragonfly), you will need to recharge it. A typical charge takes about
20 minutes and allows around 7 minutes of flying time.
Note: If the charge time begins to exceed 25 minutes, you should replace all the
batteries in the controller with fresh batteries.
To charge the dragonfly:
1. On the controller, push down on the magnetic perch. The cord compartment
door will open.
2. Pull the end of the cord from the compartment as shown.
5. When the dragonfly is fully charged, its eyes will stop pulsing, and turn off.
6. Carefully unplug the charging cord from the dragonfly, place
the cord back in the compartment of the controller and
then close the compartment door. Now you are ready to fly!
NOTE: When the dragonfly’s battery is running low, you will notice
his eyes will begin to dim and the sound of the motor on the
dragonfly will lower in tone and it will become less responsive.
3. Hold the dragonfly firmly by its body, and then insert the cord into the socket as
shown. Pay close attention to the orientation of the socket and the connector on
the cord.
IMPORTANT: To prevent complete depletion of the FlyTech Dragonfly’s battery when not in use, ALWAYS
RECHARGE before storing. Severe depletion may result in permanent battery failure.
Flying
When the dragonfly is fully charged and ready to fly, you can take your FlyTech
Dragonfly to the skies!
NOTE: Make sure that the dragonfly is turned off before you recharge it.
Location
IMPORTANT: Do not force the cord into the
socket – this can damage the socket. The
exposed silver contact points on the side of
the controller plug should line up with the
cut-away side of the socket.
You can operate FlyTech Dragonfly both indoors and
outdoors. The maximum recommended range for the
controller is 50 feet (15 meters).
NOTE: The controller is equipped with a sleep feature. The LED indicator will
turn off if the controller is idle for more than 1 minute. Therefore, when charging
FlyTech Dragonfly, the LED indicator light might turn off, however, the controller
will continue to charge the dragonfly. To turn the LED indicator light back on,
press the power button on the controller until the LED indicator lights up again.
4. Press the power button on the controller to turn it on.
If the connector on the cord is properly connected to the socket, the eyes on the
dragonfly will pulse slowly to indicate that it is charging.
Note that the eyes will blink rapidly if there is no signal from the controller.
When charging the dragonfly, make sure the cord from the controller is properly
connected to the socket on the dragonfly.
NOTE: You can rest the
dragonfly on the controller
while it is charging by placing
the metal perch point (on the
dragonfly) on the magnetic
perch (on the controller).
50 feet
(15 meters)
For optimal indoor flying performance, we recommend a minimum area of 16 feet
x 16 feet (5 meters x 5 meters). For outdoor flying, try to avoid windy areas and
keep the dragonfly away from rain or other harsh conditions.
Flight modes
You can operate FlyTech Dragonfly in
one of two modes: Beginner or Expert.
To familiarize yourself with the controls,
start with Beginner mode. Beginner
mode allows for more gentle turns, and
Expert mode allows for sharper and faster
turns. Once you are comfortable with the
controls, you can switch to Expert mode.
Beginner mode
Expert mode
To fly the dragonfly
NOTE: Before you launch the dragonfly, make sure the rear rotor is not spinning
(otherwise it might not fly in the desired direction). If the rotor is spinning, adjust
the trim dial on the controller until it stops. The trim dial is the circular dial around
the power button on the controller.
To operate the FlyTech Dragonfly:
1. Turn the controller on by pressing the power switch. The LED indicator will blink.
If the dragonfly steers to the left, slowly turn the trim dial in a counter-clockwise
direction. Avoid using the right (directional) stick while adjusting the trim as
your trim settings might be inaccurate.
2. Extend the antenna on the controller.
3. Turn the FlyTech Dragonfly on by setting the switch on the dragonfly to ON.
NOTE: If the controller is off when you turn on the dragonfly, the dragonfly’s eyes
will blink.
4. On the controller, push the left stick upwards
to increase speed of the wing-flapping. The
left stick (throttle) controls how high and fast
your FlyTech Dragonfly will fly.
NOTE: Push the left stick once first to arm the
dragonfly and again to start the wings flapping.
5. Launch FlyTech Dragonfly
from your hand with a
gentle horizontal motion.
The dragonfly will flutter
away from you.
NOTE: Do not throw the
dragonfly when launching.
You can also use the trim dial to make the dragonfly fly in constant circles. Turn
the trim dial clockwise to fly the dragonfly in a counter-clockwise circle; turn the
trim dial counter-clockwise to fly the dragonfly in a clockwise circle.
NOTE: Adjusting the trim can make the dragonfly’s tail rotor spin even when not
flying.
Tips and tricks
Hold parallel to the
ground to launch
Do not tilt up
Do not tilt down
6. On the controller, push the right stick (directional) to the left to turn left, or push
the stick to the right to turn right.
Use smaller movements on
the controller to make the
dragonfly turn more gradually.
To make the dragonfly turn
more quickly, push the stick
further in the desired direction.
Trimming
Use the trim dial to adjust the straight line flight of the dragonfly. If the dragonfly
naturally steers to the right, slowly turn the trim dial in a clockwise direction to
adjust the steer.
• When launching the dragonfly, hold it level
by the middle of the body and gently push it
forward as you would with a paper airplane,
while holding the left stick (throttle control)
at about half-power. If it starts to fly upwards,
release some of the power so that it stays level.
• Avoid making turns while the nose is pointed
upwards, or the dragonfly will dive-bomb.
• The tail ribbon is ideal as a training aid,
especially when in small spaces, and helps
restrict flying speed.
• When flying the dragonfly outdoors, take
note that the calmest times of the day are
usually at dawn and at dusk. If it is a bit
windy outdoors, avoid flying the dragonfly at
wind speeds higher than 4 mph (1.75 km/h).
• With more practice and expertise, it will
also be possible to make the dragonfly take
off into the air from the ground. Place the
dragonfly on a smooth and flat surface that
is long enough to allow it room to take off
(for example, a hallway).
Tip: Expert mode - To make FlyTech
Dragonfly perform a spiraling maneuver,
release the left stick and push right or
left on the right stick, depending on
the direction you want the dragonfly
to spiral.
Tip: Attaching the tail ribbon to FlyTech
Dragonfly’s tail allows for greater
maneuverability and slower flight speed.
This is beneficial in smaller flying spaces.
For more tips and tricks, visit www.flytechonline.com
To operate the FlyTech Dragonfly:
1. Turn the controller on by pressing the power switch. The LED indicator will blink.
If the dragonfly steers to the left, slowly turn the trim dial in a counter-clockwise
direction. Avoid using the right (directional) stick while adjusting the trim as
your trim settings might be inaccurate.
2. Extend the antenna on the controller.
3. Turn the FlyTech Dragonfly on by setting the switch on the dragonfly to ON.
NOTE: If the controller is off when you turn on the dragonfly, the dragonfly’s eyes
will blink.
4. On the controller, push the left stick upwards
to increase speed of the wing-flapping. The
left stick (throttle) controls how high and fast
your FlyTech Dragonfly will fly.
NOTE: Push the left stick once first to arm the
dragonfly and again to start the wings flapping.
5. Launch FlyTech Dragonfly
from your hand with a
gentle horizontal motion.
The dragonfly will flutter
away from you.
NOTE: Do not throw the
dragonfly when launching.
You can also use the trim dial to make the dragonfly fly in constant circles. Turn
the trim dial clockwise to fly the dragonfly in a counter-clockwise circle; turn the
trim dial counter-clockwise to fly the dragonfly in a clockwise circle.
NOTE: Adjusting the trim can make the dragonfly’s tail rotor spin even when not
flying.
Tips and tricks
Hold parallel to the
ground to launch
Do not tilt up
Do not tilt down
6. On the controller, push the right stick (directional) to the left to turn left, or push
the stick to the right to turn right.
Use smaller movements on
the controller to make the
dragonfly turn more gradually.
To make the dragonfly turn
more quickly, push the stick
further in the desired direction.
Trimming
Use the trim dial to adjust the straight line flight of the dragonfly. If the dragonfly
naturally steers to the right, slowly turn the trim dial in a clockwise direction to
adjust the steer.
• When launching the dragonfly, hold it level
by the middle of the body and gently push it
forward as you would with a paper airplane,
while holding the left stick (throttle control)
at about half-power. If it starts to fly upwards,
release some of the power so that it stays level.
• Avoid making turns while the nose is pointed
upwards, or the dragonfly will dive-bomb.
• The tail ribbon is ideal as a training aid,
especially when in small spaces, and helps
restrict flying speed.
• When flying the dragonfly outdoors, take
note that the calmest times of the day are
usually at dawn and at dusk. If it is a bit
windy outdoors, avoid flying the dragonfly at
wind speeds higher than 4 mph (6.5 km/h).
• With more practice and expertise, it will
also be possible to make the dragonfly take
off into the air from the ground. Place the
dragonfly on a smooth and flat surface that
is long enough to allow it room to take off
(for example, a hallway).
Tip: Expert mode - To make FlyTech
Dragonfly perform a spiraling maneuver,
release the left stick and push right or
left on the right stick, depending on
the direction you want the dragonfly
to spiral.
Tip: Attaching the tail ribbon to FlyTech
Dragonfly’s tail allows for greater
maneuverability and slower flight speed.
This is beneficial in smaller flying spaces.
For more tips and tricks, visit www.flytechonline.com
Replacing the wings
FAQ
You can replace the original wings on your dragonfly if they become damaged or
you want it to have a different look. A spare set of wings is included in the FlyTech
Dragonfly package. To replace the wings, do the following:
The following is a list of frequently asked questions regarding the FlyTech
Dragonfly.
1. Make sure the controller and the dragonfly are turned off.
2. Remove the old pair of wings. There are
two sets of wings on the dragonfly. Gently
remove the first pair of wings by first
pulling the wing rods out from the sockets.
Then, pull the wings off the hook at the end
of the body area.
Q: My dragonfly won’t fly straight when I am flying it indoors! …
A: Your problem might be due to indoor sources of air currents keeping the
dragonfly from flying straight. Try turning off fans and closing air conditioning
vents. If there are open windows, try closing them to avoid creating drafts.
Q: My dragonfly won’t fly straight when I am flying it outdoors! …
A: You might be flying the dragonfly in conditions that are too windy…Try to
find a location that is sheltered from the wind, such as between buildings or in
a walled-off courtyard. For optimal operation, avoid flying the dragonfly in wind
speeds higher than 4mph (1.75 km/h).
Repeat for the second pair of wings. Be careful not to touch any broken edges.
3. Install the new pair as illustrated, by
reversing the instructions for removing the
damaged wings. Hook the rear part of the
first pair of wings onto the hook at the end
of the body, and then slide the wing rods
into their sockets. Repeat for the second
pair of wings.
NOTE: Test the dragonfly after installing the new wings. If the dragonfly cannot
fly in a straight line, or experiences difficulty when airborne, try swapping the
new left and right wings.
Replacing the propeller
You can replace the original rotor propeller on your dragonfly if the original one
becomes damaged. A spare propeller is included in the FlyTech Dragonfly package.
To replace the damaged rotor propeller:
1. Make sure the controller and
the dragonfly are turned off
before removing the propeller.
2. Using a pair of pliers, grasp the
damaged rotor propeller and
pull it off the axle as indicated in the diagram.
3. Insert the new rotor propeller into the axle carefully, making sure it is secure. Be
careful not to damage the motor.
4. Turn the propeller manually to make sure it does not snag on the tail of the
dragonfly.
Q: The tail rotor propeller on my dragonfly keeps spinning, and I can’t stop it! …
A: You have probably turned the trim dial. The trim dial controls the rotor speed.
Adjust the trim by slowly turning the trim dial on the controller until the rotor
stops spinning.
Q: My dragonfly stops working when it gets farther away! …
A: Your dragonfly is most likely out of range for the controller. The recommended
range for controlling your dragonfly is 50 feet (15 meters) or less from the
controller. To fully take advantage of the flight control, make sure the antenna on
the controller is fully extended.
Q: My dragonfly won’t stay up, even after charging! …
A: The batteries in the controller might be getting weak, in which case, you will
need to change the batteries. The batteries in the controller will usually last
about ten flight-recharge cycles. You should always turn the controller and the
dragonfly off when not in use.
If you have questions that are not answered in this manual, refer to:
www.flytechonline.com
Replacing the wings
FAQ
You can replace the original wings on your dragonfly if they become damaged or
you want it to have a different look. A spare set of wings is included in the FlyTech
Dragonfly package. To replace the wings, do the following:
The following is a list of frequently asked questions regarding the FlyTech
Dragonfly.
1. Make sure the controller and the dragonfly are turned off.
2. Remove the old pair of wings. There are
two sets of wings on the dragonfly. Gently
remove the first pair of wings by first
pulling the wing rods out from the sockets.
Then, pull the wings off the hook at the end
of the body area.
Q: My dragonfly won’t fly straight when I am flying it indoors! …
A: Your problem might be due to indoor sources of air currents keeping the
dragonfly from flying straight. Try turning off fans and closing air conditioning
vents. If there are open windows, try closing them to avoid creating drafts.
Q: My dragonfly won’t fly straight when I am flying it outdoors! …
A: You might be flying the dragonfly in conditions that are too windy…Try to
find a location that is sheltered from the wind, such as between buildings or in
a walled-off courtyard. For optimal operation, avoid flying the dragonfly in wind
speeds higher than 4mph (6.5 km/h).
Repeat for the second pair of wings. Be careful not to touch any broken edges.
3. Install the new pair as illustrated, by
reversing the instructions for removing the
damaged wings. Hook the rear part of the
first pair of wings onto the hook at the end
of the body, and then slide the wing rods
into their sockets. Repeat for the second
pair of wings.
NOTE: Test the dragonfly after installing the new wings. If the dragonfly cannot
fly in a straight line, or experiences difficulty when airborne, try swapping the
new left and right wings.
Replacing the propeller
You can replace the original rotor propeller on your dragonfly if the original one
becomes damaged. A spare propeller is included in the FlyTech Dragonfly package.
To replace the damaged rotor propeller:
1. Make sure the controller and
the dragonfly are turned off
before removing the propeller.
2. Using a pair of pliers, grasp the
damaged rotor propeller and
pull it off the axle as indicated in the diagram.
3. Insert the new rotor propeller into the axle carefully, making sure it is secure. Be
careful not to damage the motor.
4. Turn the propeller manually to make sure it does not snag on the tail of the
dragonfly.
Q: The tail rotor propeller on my dragonfly keeps spinning, and I can’t stop it! …
A: You have probably turned the trim dial. The trim dial controls the rotor speed.
Adjust the trim by slowly turning the trim dial on the controller until the rotor
stops spinning.
Q: My dragonfly stops working when it gets farther away! …
A: Your dragonfly is most likely out of range for the controller. The recommended
range for controlling your dragonfly is 50 feet (15 meters) or less from the
controller. To fully take advantage of the flight control, make sure the antenna on
the controller is fully extended.
Q: My dragonfly won’t stay up, even after charging! …
A: The batteries in the controller might be getting weak, in which case, you will
need to change the batteries. The batteries in the controller will usually last
about ten flight-recharge cycles. You should always turn the controller and the
dragonfly off when not in use.
If you have questions that are not answered in this manual, refer to:
www.flytechonline.com
Manufactured and distributed by
© 2007 Wowwee Limited.
Product names, designations, and logos
are trademarks or registered trademarks
of Wowwee Limited. All rights reserved.
Wowwee (Asia Office)
Unit 301A-C, 92 Granville Road
T.S.T. East, Hong Kong
Wowwee (North America Office)
Wowwee Group Company
6600 Decarie, Suite 200
Montreal, Quebec
H3X 2K4, Canada
Consumer Hotline: 1-800-310-3033
Customer Service Email: [email protected]
www.wowwee.com
We recommend that you retain our
address for future reference.
Product and colors may vary.
Packaging printed in China.
This product is not suitable for children
under 3 years because of small parts choking hazard.
www.flytechonline.com
0979
This device complies with Part 15 of the FCC Rules. Operation is subject to the following
two conditions: (1) This device may not cause harmful interference, and (2) This device
must accept any interference received, including interference that may cause undesired
operation.
NOTE
This equipment has been tested and found to comply with the limits for a class B
digital device, pursuant to part 15 of the FCC rules. These limits are designed to provide
reasonable protection against harmful interference in a residential installation. This
equipment generates, uses and can radiate radio frequency energy and, if not installed
and used in accordance with the instructions, may cause harmful interference to radio
communications.
However, there is no guarantee that interference will not occur in a particular installation.
If this equipment does cause harmful interference to radio or television reception, which
can be determined by turning the equipment off and on, the user is encouraged to try
and correct the interference by one or more of the following measures:
- Reorient or relocate the receiving antenna
- Increase the separation between the equipment and receiver
- Connect the equipment into an outlet on a circuit different from that to which the receiver is connected
- Consult the dealer or experienced radio/TV technician for help
WARNING: Changes or modifications to this unit not expressly approved by the party
responsible for compliance could void the user’s authority to operate the equipment.
MADE IN CHINA.
WARNING: Inserting FlyTech Dragonfly’s legs into an AC socket will result in an electric
shock and can seriously damage your health. If the dragonfly becomes trapped in an
electrical device, turn off the power before retrieving the toy.
4031US03TOP
Please keep these instructions as they contain important information.
User Manual
Item No. 4031 | Ages 8+