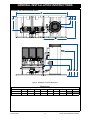
1
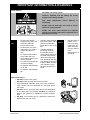
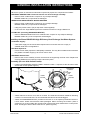
RINNAI DD HEX250
High Efficiency Heat Exchange Water Heater
OWNERS GUIDE AND
INSTALLATION INSTRUCTIONS
APPLICABLE TO THE FOLLOWING SYSTEMS:
D D 1 H E X 2 50F 200E N
D D 1 H E X 2 50F 200IN
D D 1 H E X 2 50F 200 E L
D D 1 H E X 2 50F 200IL
D D 2 H E X 2 50F 200 E N
D D 2 H E X 2 50F 200IN
D D 2 H E X 2 50F 200 E L
D D 2 H E X 2 50F 200IL
D D 3H E X 250F 200 E N
D D 3H E X 250F 200IN
D D 3 H E X 2 5 0 F 200 E L
D D 3H E X 250F 200IL
Important Notice for Installers
Please leave these instructions with the end user after commissioning of the system and alert the end user of the
content in the sections “Warnings” and “Preventative Maintenance”.
This product is NOT suitable as a pool or spa heater.
This appliance shall be installed in accordance with:
WARNING
• Manufacturer’s Installation Instructions
• Current AS/NZS 3000, AS/NZS 3500 & AS/NZS 5601
• Local Regulations and Municipal Building Codes
This appliance must be installed, serviced and removed by an
Authorised Person.
The Australian
Gas Association
AGA Lic 6330
For HD Gas
Boosters
N100378
AS3498 Lic 60084
AGA For HEX250
AS3498 Lic W208
SAI Global
Quality
ISO 9001
Part No. 15401045 Issue 1
NOTE
TABLE OF CONTENTS
IMPORTANT INFORMATION & WARNINGS ........................................................................ 2
Scald Hazards ................................................................................................................................... 3
HD200 Heat Source .......................................................................................................................... 3
Horizontal Obstructions ..................................................................................................................... 4
Multiple Installations of External Models ........................................................................................... 4
Safety Devices .................................................................................................................................. 4
Expansion Control Valve (ECV) - if fitted .......................................................................................... 4
Servicing and Repair ......................................................................................................................... 4
Water Quality .................................................................................................................................... 5
SPECIFICATIONS .................................................................................................................. 6
DDHEX250 High Efficiency Heat Exchange Hot Water System Specifications ................................ 6
Selection of DDHEX250 High Efficiency Heat Exchange Hot Water Systems .................................. 7
GENERAL INSTALLATION INSTRUCTIONS ....................................................................... 8
DDHEX250 High Efficiency Heat Exchange Hot Water Systems Principle of Operation: ................. 8
Temperature Control: ........................................................................................................................ 9
Location ........................................................................................................................................... 11
Warranty .......................................................................................................................................... 11
Receiving the Rinnai DDHEX250 Hot Water System: .................................................................... 11
DDHEX250 VENTED TANK: Tank with internal coil heat exchange assembly ......................... 12
MANIFOLDED HD200 INFINITY WATER HEATERS ............................................................... 12
FITTING KIT: (Including DD250HEXHWTSTAT) ...................................................................... 12
Installing the Rinnai DDHEX250 High Efficiency Heat Exchange Hot Water System: .................... 12
Cold Water Supply: .................................................................................................................... 12
Hot Water Pipework: .................................................................................................................. 12
DDHEX250 Vented Tank: .......................................................................................................... 12
Assembly (for non skid mounted units): .......................................................................................... 12
Assembly (for skid mounted units): ................................................................................................. 17
General Requirements (All Systems): ............................................................................................. 18
Return Pump: ............................................................................................................................. 18
Gas Supply: ............................................................................................................................... 18
Flueing and clearance requirements for HD200i: ...................................................................... 18
DDHEX250 Hot Water Thermostat and Electrics: ..................................................................... 18
Filling Instructions: .......................................................................................................................... 19
Starting instructions: ........................................................................................................................ 19
Preventative Maintenance: ........................................................................................................ 20
HD200 Heat Source: ....................................................................................................................... 20
INFINITY HD Fault Codes: .............................................................................................................. 22
Ring Main Pump: ............................................................................................................................. 22
Service: ........................................................................................................................................... 22
Fault Finding During Normal Operation: ......................................................................................... 23
TROUBLE SHOOTING ......................................................................................................... 23
Rinnai Australia
1
Owners Guide & Installation Instructions
IMPORTANT INFORMATION & WARNINGS
Safety and Regulatory Information
The Rinnai DDHEX250 High Efficiency Heat Exchange hot water system is Watermark Certified as a
heat exchange water heater with an external energy source.
The external energy sources referred to in this manual are specific Rinnai continuous flow water
heater models. These water heaters have stand alone Watermark certificate number W208 and AGA
Gas Certificate number 6330.
This appliance must be installed correctly by an authorised person and must conform to local
regulations.
The installation must also comply with the instructions supplied by Rinnai. Please keep this instruction
booklet in a safe place for future reference.
This appliance is not intended for use by persons (including children) with reduced physical, sensory
or mental capabilities, or lack of experience and knowledge, unless they have been given supervision
or instruction concerning use of the appliance by a person responsible for their safety.
For external applications any power leads from the water heater or system components MUST BE
plugged into a weatherproof electrical outlet. If the power supply cord of the system is damaged, it
MUST BE replaced by an authorised person in order to avoid a hazard, using genuine replacement
parts available from Rinnai. Take care of not to touch the power plugs with wet hands.
Notice to Victorian Consumers
This appliance must be installed by a person licensed with the Plumbing Industry Commission.
Only a licensed person will have insurance protecting their workmanship.
So make sure you use a licensed person to install this appliance and ask for your Compliance
Certificate.
For Further information contact the Plumbing Industry Commission on 1800 015 129.
WARNINGS
Installation and service only by an authorised person.
•
•
•
•
•
•
DO NOT operate this appliance before reading the manufacture instructions.
DO NOT remove covers while power is on.
DO NOT place articles on or against this appliance.
DO NOT operate with panels, covers or guards removed from this appliance.
DO NOT enclose this appliance.
DO NOT store chemicals or flammable materials near this appliance.
Rinnai Australia
2
Owners Guide & Installation Instructions
IMPORTANT INFORMATION & WARNINGS
Scald Hazards
Hot Water can cause scalds.
Children, disabled, and the elderly are at the
highest risk of being scalded.
Feel water
showering.
temperature
before
bathing
or
Scalds from hot water taps can result in severe
injuries to young children.
Scalds can occur when children are exposed
directly to hot water when they are placed into a
bath which is too hot.
• Do stay with children
DO
•
•
•
•
•
• Consider child-resistant
whenever they are in the
bathroom (Take the
phone off the hook).
Do take them out of the
bathroom if you need to •
answer the phone or
door.
Do test the temperature
of the water with your
elbow before placing your
child in the bath.
Do make sure that the tap
is turned off tightly.
Do install a child proof tap
cover OR
Do install a child resistant
tap.
• DO NOT leave a
taps or tap covers, which
DON’T
prevent a small hand
being able to turn on the
tap.
Consider installing
tempering valves or
thermostatic mixing
valves which reduce the
hot water temperature
delivered to taps. Your
local plumbing authority
may already require that
these be fitted. Contact
your installer or local
plumbing authority if in
doubt.
toddler in the
care of another
small child. The
older child may
not have set the
water
temperature to a
safe level.
HD200 Heat Source
• DO NOT touch the flue outlet.
• DO NOT insert any objects into the flue outlet.
• Keep flammable materials, spray cans, fuel containers,
trees, shrubs and pool chemicals etc. well clear of the
flue outlet.
• DO NOT use the gas types other than those designated
HOT!
on the data plate. For example, DO NOT use Propane/
Butane gas mixtures on appliances marked Propane
Gas.
• DO NOT use Propane gas on appliances marked as
Natural Gas and vice versa.
Rinnai Australia
3
Owners Guide & Installation Instructions
IMPORTANT INFORMATION & WARNINGS
For detailed instructions on clearances refer to AS/NZS 5601 Fig. 6.2 and for all flueing requirements
refer to separate flue instruction booklet supplied with the flue components.
Horizontal Obstructions
AS/NZS 5601 ‘Gas Installations’ stipulates a minimum
horizontal clearance of 500 mm between a building
structure and obstruction facing the terminal. For Rinnai
external continuous flow water heaters such a building
structure must ‘obstruct’ the full front cover height of the
appliance, or extend vertically above and below the front
cover. There must be no partial obstructions to the front
cover of the appliance or any other parts of the appliance
casing. This will avoid the appliance failing to operate
under windy conditions.
500mm
Multiple Installations of External Models
Dimension above does not apply when multiple Rinnai
external water heaters of the same model are installed on
the same vertical face with flue terminals at the same
height. Under these conditions appliances can abut each
other as shown. The total gas consumption of all
appliances applies when determining other clearances.
Safety Devices
The water heating system is supplied with various safety devices including temperature sensors,
overheat sensors and switches. These devices must not be tampered with or removed. The water
heating system must not be operated unless each of these devices is fitted and is in good working
order.
• DO NOT tamper with or remove safety devices.
WARNING
• DO NOT operate the water heater unless all safety devices are fitted and in
good working order.
• DO NOT block or seal Vent / Overflow Outlet.
Expansion Control Valve (ECV) - if fitted
Operate the easing lever on the expansion control valve once every six months. It is very important
you raise and lower the lever gently.
It is normal and desirable that this valve allows a small quantity of water to be discharged during the
heating cycle. If it discharges more than a bucket of water during a 24 hour period or discharges
continuously there may be another problem.
If the valve leaks continuously, try easing the valve gear for a few seconds. This may dislodge any
foreign matter and alleviate the problem. If this does not alleviate the problem contact Rinnai.
Operate the easing gear regularly to remove any lime deposits and to verify that it is not blocked.
Servicing and Repair
Our servicing network personnel are fully trained and equipped to give the best on your Rinnai
appliance. If your appliance needs service, ring Rinnai the contact number is on the back of this
booklet.
The expansion control valve must be checked for performance or replaced by an authorised person
at intervals not exceeding 5 years or more frequently in areas where the water is classified as scaling
water (see 'Water Quality').
If the electric conduit, power supply cord or plug to hot water system is damaged, they must be
replaced by an authorised person in order to avoid a hazard. The power supply cord and plug must
be replaced by a genuine replacement part available from Rinnai.
Rinnai Australia
4
Owners Guide & Installation Instructions
IMPORTANT INFORMATION & WARNINGS
Water Quality
Rinnai Warranty applies to water heaters connected to a water supply where the water chemistry and
impurity levels DO NOT exceed the limits specified in Table - Water Characteristics below.
Refer to separate product warranty booklet for more details.
TABLE - WATER CHARACTERISTICS
Rinnai water
heater system
type
Total
Dissolved
Solids
(TDS)
mg/Litre
or ppm
Saturation
Index
(Langelier)
Hardness (as
CaCO3)
mg/Litre
or ppm
pH
Dissolved
CO2
mg/Litre
or ppm
Chlorides
mg/Litre
or ppm
Demand Duo
Systems
600
200
+0.4 to -1.0
@ 65°C
5.5
to
9.5
18
300
Manifold Pack
Systems
Not
Applicable
200
+0.4 to -1.0
@ 65°C
5.5
to
9.5
18
Not
Applicable
Rinnai Australia
5
Owners Guide & Installation Instructions
SPECIFICATIONS
DDHEX250 High Efficiency Heat Exchange Hot Water System Specifications
DD1HEX250F200EN
DD2HEX250F200EN
DD3HEX250F200EN
Models
DD1HEX250F200IN
DD1HEX250F200EL
DD1HEX250F200IL
DD2HEX250F200IN
DD2HEX250F200EL
DD2HEX250F200IL
DD3HEX250F200IN
DD3HEX250F200EL
DD3HEX250F200IL
Maximum rated capacity
(L/Min).
20
32
45
Rated continuous heat
output (kW)
45
90
135
Pressure drop at maximum
rate (kPa)
35
80
130
Fitting Kit - Part Numbers: DDHEXHW1FITTING KIT
DDHEXHW23FITTING KIT
Temperature rise across
coil at maximum output
15°C to 60°C
Maximum static and
dynamic coil working
pressures
850 kPa
Minimum static and
dynamic coil working
pressures
30 kPa
Electrical power supply
240 Volts, 50 Hz - 10 Amp GPO
Power consumption at
maximum rated capacity
600 W
870 W
970 W
Number of HD200 units
1
2
3
Primary Pump
DDMSP303
DDMSP504
Pressure Drop at 10
L/Min. (kPa)
12
Temperature set point on
HD200
85°C
Coil cold inlet connection
32 mm
Coil hot inlet connection
32 mm
Tank vent connection
50 mm
Primary Circuit Vented Tank
inlet connection
32 mm
Primary Circuit Vented Tank
outlet connection
32 mm
Primary Circuit make-up
connection
20 mm
Total storage capacity
(Litres)
218
Empty weight (Kg)
88
Total filled weight (Kg)
306
Domestic hot water
capacity coil volume (litres)
14.5
Vented Tank thread type
Rp: Internal Parallel
Rinnai Australia
6
Owners Guide & Installation Instructions
SPECIFICATIONS
Selection of DDHEX250 High Efficiency Heat Exchange Hot Water Systems
First Hour
Hot Water
Delivery
Litres
15-60°C
820
20
720
1560
32
1440
2300
45
2100
3120
65
2820
4600
90
4200
6910
136
6300
9200
181
8340
11500
226
10440
1x
1x
1x
1x
1x
1x
1x
1x
1x
1x
1x
1x
2x
2x
2x
2x
2x
2x
2x
2x
3x
3x
3x
3x
4x
4x
4x
4x
5x
5x
5x
5x
Full Load Gas Load
MJ/hour
kW
Capacity
Selection
Systems
HEX250
Vented
Tanks
HD250
Gas Hot
Water
Units
DD1HEX250F200EN
DD1HEX250F200IN
DD1HEX250F200EL
DD1HEX250F200IL
DD2HEX250F200EN
DD2HEX250F200IN
DD2HEX250F200EL
DD2HEX250F200IL
DD3HEX250F200EN
DD3HEX250F200IN
DD3HEX250F200EL
DD3HEX250F200IL
DD2HEX250F200EN
DD2HEX250F200IN
DD2HEX250F200EL
DD2HEX250F200IL
DD3HEX250F200EN
DD3HEX250F200IN
DD3HEX250F200EL
DD3HEX250F200IL
DD3HEX250F200EN
DD3HEX250F200IN
DD3HEX250F200EL
DD3HEX250F200IL
DD3HEX250F200EN
DD3HEX250F200IN
DD3HEX250F200EL
DD3HEX250F200IL
DD3HEX250F200EN
DD3HEX250F200IN
DD3HEX250F200EL
DD3HEX250F200IL
1
1
45
200
1
2
90
400
1
3
135
600
2
4
180
800
2
6
270
1200
3
9
405
1800
4
12
540
2400
5
15
675
3000
Peak Flow Recovery System
Rate (10 Rate Litres/ Number
hour
min peak)
Litres/min
• When multiple Vented Tanks are installed they must be equal length plumbed
(see below diagram) to ensure pipework is balanced.
=B
=B
D
=D
Potable
Hot Out
=A
=C
=C
B
(Valves not included)
C
Potable
Cold In
=A
=B
A
=C
NOTE
=D
Figure 1 - Maximum of 3 x HD Hot Water Units per tank
Rinnai Australia
7
Owners Guide & Installation Instructions
GENERAL INSTALLATION INSTRUCTIONS
These instructions apply to the Rinnai DDHEX250 High Efficiency Heat Exchange Hot Water System.
Rinnai DDHEX250 High Efficiency Heat Exchange hot water system must only be installed,
commissioned, serviced and removed by an authorised person in accordance with these instructions,
AS/NZS 5601, AS 3000 & AS/NZS 3500.4 and local regulations.
Rinnai DDHEX250 High Efficiency Heat Exchange hot water systems are not suitable or approved as
a pool heater.
Read these instructions carefully before proceeding with the installation.
The Rinnai specified heat sources (Rinnai HD200 series continuous flow water heaters) must be
installed and commissioned in accordance with the relevant section of the operation and installation
manual supplied with these appliances.
DDHEX250 High Efficiency Heat Exchange Hot Water Systems Principle of Operation:
The DDHEX250 Vented Tank is certified to AS/NZS 3498 as a heat exchange water heater with
external energy sources. It consists of three main components:
1. DDHEX250 - 250 Litre heat exchange Vented Tank. (Refer
A
in Figure 1).
2. Fitting Kit - Kit includes Primary Circulating Pump, Thermostat and all connections. (Refer
Figure 2).
B
in
3. Manifolded HD200 Gas Continuous flow water heaters (1, 2 or 3), Internal or External NG or
LPG. (Refer C in Figure 2).
The DDHEX250 Vented Tank is designed to separate potable hot water from the primary heat source
by locating a set of heat exchange coils inside an open vented storage tank. This keeps any
contaminants in the potable water separated from the external heat source, while maintaining high
efficiency and long life.
Potable cold water enters the coil set where it flows to the bottom of the tank, it is then heated as it
rises through the coils.
Primary water fills the tank itself. It is pumped from the base of the tank to an external heat source and
returned to the top of the tank in a counterflow heat exchange design. The primary pump is switched
by a thermostat that measures the outlet temperature of the coil set, energising the primary pump
when the coil outlet temperature is below the desired temperature.
Primary water levels are maintained in the tank by an internal float valve that admits make up water
as required under normal conditions etc.
When an external heating circuit is present, any thermal energy used in this process will result in a
lower performance for potable water flowing through the coils.
Fitting Kit - Kits included = primary circulating pump, thermostat and all connections.
When an external heating circuit is used in conjunction with the DDHEX250 High Efficiency Heat
Exchange Hot Water system, expansion of the water in the heating circuit must be allowed for to
prevent water overflow from the DDHEX250 Vented Tank. Contact Rinnai Commercial for further
information.
WARNING
Rinnai Australia
• Other external heat sources can be used to heat the primary water, subject to
approval from Rinnai. Operating and over-temperature control of any external
heat source will be part of any approval.
8
Owners Guide & Installation Instructions
HOT
B
GENERAL INSTALLATION INSTRUCTIONS
For detailed assembly please refer to figure 6
GAS
Top of HD200(s) must
be below the top of the
DDHEX250 Tank and
primary heating circuit
pipe-work MUST BE
below 1500mm from the
base of the DDHEX250
tank.
= Valves not suppled
C
COLD
SUPPLY
RETURN
B
A
700 mm
Minimum Ceiling
Clearance
Figure 2 - DDHEX250 System Principle of Operation
Temperature Control:
A temperature sensor is fitted to the thermowell located in the “Tee” piece of the potable Hot Outlet.
This sensor detects potable water temperature under flow and no flow conditions. This sensor
provides a signal to the thermostat mounted on the DDHEX250 tank. The Thermostat then either
shuts off the pump in the primary (heating) circuit when the temperature reaches the set point or restarts the pump if the temperature falls below set point and differential.
Rinnai Australia
9
Owners Guide & Installation Instructions
GENERAL INSTALLATION INSTRUCTIONS
In order to meet the requirements of AS 3498 in respect of Legionella control it is required that the set
point be set at 60°C or above. The DDHEX250HWTSTAT will be factory set to 60°C.
• Hot water temperature at outlet of sanitary fixtures must comply with the
relevant states and territories minimum 50°C requirements. Local regulations
and/or the requirements of AS/NZS 3500.4 must be considered regarding the
temperature limitations of the hot water supplied to areas primarily used for
the purpose of personal hygiene. The temperature of hot water to these areas
may required to be limited to 50°C or less. Refer to Figure 3.
WARNING
M
F
N
Kitchen
Laundry
I
G
Cold
Supply
J
K
I
L
E
J
C
B
I
H
D
I
N
A
(Components not supplied)
Bathroom
Ensuite
Figure 3 - Hot water plumbing system example to AS/NZS 3500.4, with temperature limiting device (TLD)
A
- DDHEX250 Tank
H
- Temperature Limiting Device (TLD)
B
- Rinnai HD200 Heat Sources
I
- Non Return Valve(s)
C
- Heating Circuit (Hot)
J
- Isolation Valve
D
- Heating Circuit (Return)
K
- PLV (if fitted)
E
- Potable Cold Water (In)
L
- ECV (if fitted)
F
- DDHEX250 Top Up Water
M
- Float Valve
G
- Potable Hot Water (Out)
N
- Isolation Valve - Pump - Isolation Valve
• Valves with pressure ratings other than specified are unsuitable and MUST
NOT be used.
NOTE
Rinnai Australia
• It may be a requirement that the hot and cold water supply pressures to a
Temperature Limiting Device (TLD) are similar. If this is the case, a cold water
Pressure Limiting Valve (PLV) with the same pressure rating as the PLV for
the hot water is required for the TLD as shown.
10
Owners Guide & Installation Instructions
GENERAL INSTALLATION INSTRUCTIONS
Location
•
Ensure reasonable access for installation, servicing and removal. All valves, controls and pumps
etc must be easily accessible. Allow a minimum of 700 mm clearance above the DDHEX250
tank for inspection and maintenance.
•
Rinnai DDHEX250 tanks and any free standing frames must be mounted on a solid level base,
capable of supporting the weight of the appliance when full of water. Ensure components are not
allowed to stand in water. In wet areas it is recommended to place spacers under the tank.
•
All Rinnai DDHEX250 Heat Exchange Hot Water Systems have an ingress protection rating of
IPX4 making them suitable for internal or external installation.
•
It is recommended that the water heater is installed at ground or floor level within a plant room. It
must be installed in a vertically upright position. The water heater must be accessible without the
use of a ladder or scaffold.
•
The DDHEX250 vented tank must not be installed in confined or roof spaces.
•
Ensure all valves, covers, enclosures and thermostats have sufficient clearances and are
accessible for service and removal.
•
The information on the data plate must also be readable.
•
The water heater must be installed in freestanding mode on a level and stable base.
•
The top of the water heater(s) must sit below the top of the DDHEX250 vented tanks and the
primary heating circuit pipework MUST BE below 1500 mm from the base of the DDHEX250 tank.
For external installations, the water heater should be mounted on a concrete base at least 50
mm thick. Where property damage can occur as a result of water leakage, the water heater must
be installed with a safe tray (overflow tray) and drain in accordance with AS/NZS 3500.4. Ensure
the water heater does not stand on wet surfaces.
•
The Grundfos primary pump is IP54 rated and includes a pump cover in the fitting kit. The
potable cold water inlet, heating circuit inlet/outlet and make-up water connections are to the left
when viewing from the front. Potable hot water outlet and vent fitting are on the right hand side of
tank when viewing from the front.
Ensure the following services are available:
•
Gas
•
Water
•
Electricity (240V 10 Amp) *
•
Waste water
(* Note: Some non standard installations or skid packs may require 3 phase or more than 10 Amp).
The heat sources (Rinnai HD Series water heaters) must be located in accordance with the operation/
installation manual supplied with these appliances. Particular care must be taken with the location of
flue terminals.
Rinnai INFINITY and HD hot water units are fan assisted appliances and require clearances as per
AS/NZS 5601, Figure 6.2.
Warranty
** Warranty terms and conditions are detailed in the separate product warranty booklet.
Receiving the Rinnai DDHEX250 Hot Water System:
•
This unit can be supplied as individual components or pre-assembled on a skid. All systems,
skids and components should have the wrapping carefully removed and checked for any
transport damage.
DO NOT install if any systems/components which are damaged.
Rinnai Australia
11
Owners Guide & Installation Instructions
GENERAL INSTALLATION INSTRUCTIONS
Where the system is delivered as individual components prepare the components as follows:
DDHEX250 VENTED TANK: Tank with internal coil heat exchange assembly
•
Remove outer cardboard box. Inspect for any transport damage.
DO NOT install if any components are damaged.
MANIFOLDED HD200 INFINITY WATER HEATERS
•
Remove outer cardboard box. Inspect for any transport damage.
DO NOT install if any components are damaged.
•
HD(s) are preset to 85°C (as per dip switch sheet supplied).
•
In the case of a single HD200 system the manifold consists of a single HD200 unit.
FITTING KIT: (Including DD250HEXHWTSTAT)
•
Remove DD250HEXHWTSTAT from cardboard box. Inspect for any transport damage.
DO NOT install if any of the components are damaged.
Installing the Rinnai DDHEX250 High Efficiency Heat Exchange Hot Water System:
Cold Water Supply:
•
Cold water supply line should include required valves as shown above to comply to
AS/NZS 3500 and local regulations.
Hot Water Pipework:
•
Ensure all hot water pipework is adequately insulated. The only Non insulated lines should be
the potable cold water supply up to the non return valve.
DDHEX250 Vented Tank:
•
Remove the lid and carefully remove the electrical tie supporting the float valve. Replace lid
ensuring EPDM seal is properly located. Latch lid in place.
Assembly (for non skid mounted units):
•
Position the DDHEX250 VENTED TANK in desired location. If required, fit feet to base of tank
and fix tank to floor (Refer Figure 4).
Alternate Feet
Locations
Overflow
Vent
Potable
Cold Inlet
Potable
Hot Outlet
Figure 4 - DDHEX250 Vented Tank Feet Fitment
•
Attach drain line to 50 mm vent, and run to drain. The outlet should remain visible for detecting
overflow. To reduce heat loss it is recommended that this line should be lagged.
•
Attach the DD250HEXHWTSTAT provided to the tank or to an adjacent permanent structure.
Leave sensor sheath and electrical cable packaged. When mounting the location (Tank or
otherwise) you must consider the routing length of the pump power feed and the control power
feed. The length of both of these cable is 2 m. (Refer Figure 5).
Rinnai Australia
12
Owners Guide & Installation Instructions
GENERAL INSTALLATION INSTRUCTIONS
B
A
C
D
Figure 5 - Fitting DD250HEXHWTSTAT to Tank
Rinnai Australia
A
- DD250HEX250HWTSTAT
B
- DDHEX250 Vented Tank
C
- Tek Screws
D
- Power Feed to Primary Pump
13
Owners Guide & Installation Instructions
Pipe by installer
Rinnai Australia
21201039
14
19801023
17201046
11006716
32201719
32201722
19801023
21401001
21201015
17201046
21401001
21201039
21201015
32201717
DDMSP504
11006719
17201042
21201015
32201719
17201046
Heating Circuit
Hot Water Inlet
(MP Hot Outlet)
32201719
19801023
21201023
21201039
20801027
19801023
Potable Water
Cold Inlet
Heating Circuit
Return Outlet
32201719
Heating Circuit
Hot Water Inlet
(MP Cold Inlet)
Test Point
Hot Outlet
Potable Water
19001021
17201046
Potable Water
Cold Inlet
Heating Circuit
Hot Water Inlet
Makeup Water
Cold Inlet
Potable Water
Hot Outlet
10204721
11006716
17201046
20801023
32201719
19801006
HORIZONTAL POSITION!
TO BE INSTALLED IN THE
19001021
19801006
32201717
20801027
GENERAL INSTALLATION INSTRUCTIONS
17201046
10204720
32201719
21201023
19001021
19801006
12001718
19801023
21201023
32201722
11006719
17201046
11006719
21201015
Figure 6 - DDHEXHW23 Fitting Kit - Exploded Assembly Diagram
Owners Guide & Installation Instructions
GENERAL INSTALLATION INSTRUCTIONS
•
Identify where manifolded HD200’s are to be mounted to suit primary circuit requirements.
HD(s) supplied with DDHEX250 tanks are preset to 85°C. If the HD(s) has been supplied
separate to the DDHEX250 tank ensure the set point temperature is 85°C if not, change as per
supplied dip switch settings. This can occur at commissioning stage.
•
A useful nominal height for the top of the HD200 is 1500 mm from floor level. This may change
depending on desired position of flue terminal. It may be higher in trafficable areas or to reduce
vertical flue length, for example:
•
Figure 6 provides exploded assembly for all connections supplied.
•
Connect primary water manifold to 32 mm primary circuit inlet on tank.
•
Mount primary circuit pump in a suitable location for connection to tank and manifold pack.
Install isolating ball valves on suction and supply side. Mount pump on absorption isolators and
fix pump cover. (Supplied in fitting kit).
•
Join inlet of primary circuit pump to 32 mm primary circuit outlet on tank providing a tee and
install drain valve. Pipe drain valve to drain.
•
Join outlet of primary circuit pump to inlet to HD200 manifold.
•
Fit cover so that pump is protected from rain. Ensure power cable enters pump from below and
that it is not a track for water to enter pump.
•
Fit an isolating valve, PLV expansion valve (as required) and then a non return valve to the
potable water supply and provide a tee for the return flow from the building hot water. Connect
the building return to the potable water supply line using another isolating valve.
•
Connect this potable water supply line to the 32 mm potable cold water inlet fitting on the tank,
and using a tee extend the potable water line to the make-up water fitting above the potable
cold inlet.
•
Connect the supplied hot water outlet to the 32 mm hot outlet fitting on the tank.
•
Using the potable hot water outlet assembly supplied connect to the 32mm potable hot water
outlet fitting on the tank.
• Hot water temperature at outlet of sanitary fixtures must comply with the
relevant states and territories minimum 50°C requirements.
WARNING
• Local regulations and/or the requirements of AS/NZS 3500.4 must be
considered regarding the temperature limitations of the hot water supplied to
areas primarily used for the purpose of personal hygiene. The temperature of
hot water to these areas may be limited to 50°C or less.
• Additional temperature limiting/control devices will be required to achieve
this. Refer to Figure 3.
•
Attach the potable hot water outlet line supplied to the potable hot water outlet assembly and
then connect this line to the building hot water supply.
•
System is now plumbed to the building.
•
Run power supply to Manifold Pack GPOs and connect to relevant terminals.
•
Plug HD200s into GPOs. DO NOT TURN ‘ON’.
•
Plug DD250HEXHWTSTAT into GPO on Manifold Pack. DO NOT TURN ‘ON’.
•
Plug Primary Pump into GPO located on DD250HEXHWTSTAT.
•
Insert temperature sensor in thermowell located in the “Tee” piece of the potable hot water
outlet. Ensure the sensor is inserted all the way to the end of the thermowell then fix in place by
applying silicone in and around the thermowell. (Refer Figure 7).
Rinnai Australia
15
Owners Guide & Installation Instructions
GENERAL INSTALLATION INSTRUCTIONS
Seal the probe in
place with silicon
as shown
Ensure that the probe
is in contact with the
end of the drywell !
Figure 7 - Apply Silicon around Drywell
WARNING
•
• The thermostat probe must be fixed securely in place to avoid it from
becoming dislodged.
Connect primary (heating) circuit pump to GPO mounted on DDHEXHWTSTAT assembly.
DO NOT TURN ON.
Rinnai Australia
16
Owners Guide & Installation Instructions
GENERAL INSTALLATION INSTRUCTIONS
Assembly (for skid mounted units):
C
I
G D B
B
H F E A
Figure 8 - DDHEX250 Complete Skid System
Model
A
B
C
1 HD
2, 3 HD’s
1750
1750
1200
1200
1200
2525
Rinnai Australia
Dimensions
D
E
600
600
17
1330
1370
F
G
H
I
1010
1010
415
415
625
800
Owners Guide & Installation Instructions
GENERAL INSTALLATION INSTRUCTIONS
General Requirements (All Systems):
Return Pump:
•
A secondary or building return pump must be installed in conjunction with the Rinnai HEX250
High Efficiency Heat Exchange system. Pumps should be sized for minimal temperature loss
around the ring-main. Pumps must have a isolation valve on the discharge.
•
Return line from building loop is connected to a tee on the cold water supply pipe down stream
of the cold water non return valve.
Gas Supply:
Refer to the operational/installation manual supplied with the HD200 appliance for full details. Some
key points are:
•
Check gas type of Rinnai HD200 units matches gas type available (LPG or NG) on job site.
•
Gas inlet connection is located on the top pipe on a manifold pack or RHS connection on a
single HD200.
•
Appropriate gas isolation valves to be fitted. Manifold pack includes a gas isolation valve for
each unit.
•
Ensure gas pipe sizing is adequate to deliver the required volume / pressure. Pipe size used on
inlet fitting is no indication of pipe size required.
•
Refer to pipe sizing chart in Appendix "F" AS/NZS 5601 for appropriate sized gas pipe to be
used to ensure adequate gas supply.
•
Gas meter / LPG cylinder & regulator must also be of a suitable size outlet and pressure rating
to ensure sufficient gas supply to the gas installation.
•
Purge gas pipe to ensure removal of debris etc prior to final connection.
•
Check for gas escapes using suitable methods as listed in Appendix "E" AS/NZS 5601.
Flueing and clearance requirements for HD200i:
For detailed instructions on clearances refer to AS/NZS 5601 Figure 6.2 and flueing requirements for
HD200i units (where necessary) refer to the flue instructions packed separately with the flueing
components.
DDHEX250 Hot Water Thermostat and Electrics:
•
Each HD200 requires a GPO.
•
DD250HEXHWTSTAT requires a GPO.
•
Ring main pumps require a GPO.
•
Skid packages may include GPO’s, reducing number of GPO’s required in plant room.
NOTE
Rinnai Australia
• The Primary pump is powered and switched by the GPO located on the
thermostat housing.
18
Owners Guide & Installation Instructions
GENERAL INSTALLATION INSTRUCTIONS
Filling Instructions:
It may be necessary to un-tie the float valve prior to filling.
When the primary water circuit is ready to be charged, open
the cold water line which will supply potable cold water to the
coils and to the make-up float valve fitting. Open the primary
water circuit to the HD200 units for both flow and return. Water
will begin to fill the tank via the float valve until the factory
adjusted level is achieved (approximately 40 mm below the
vent fitting). (Refer Figure 9). System will fill slowly to correct
volume. Operate primary pump for several minutes and check
air is bled from pump.
Fill range with-in
~ 40mm of overflow
Open potable hot water isolating valve to building supply to
allow coils to fill, then close.
Figure 9 - DDHEX250 Tank fill level
Starting instructions:
1. Check all relevant valves, water and gas, are opened on the primary circuit and ensure no
blockages or restrictions are present.
2. Check all relevant branch outlets are closed on the ring main flow and return circuit.
3. Switch power to GPOs, and switch ‘ON’ GPOs to power both the DD250HEXHWTSTAT and
HD200 units.
4. Check 60°C set point on the DD250HEXHWTSTAT (thermostat is factory pre-set to 60°C) and
adjust if necessary.
5. Primary circuit will be activated and HD200 units will fire as the primary circuit pump starts.
6. You may need to bleed the pump of air, to do this:
a). Disconnect power to pump and close the isolating
valve on the discharge side of the pump.
A
E
b). Open the isolating valve in the suction pipe
completely before starting the pump.
c). Remove the filling plug A .
B is the pump drain plug. See Figure 10.
d). Fill the pump housing and the suction pipe
completely with liquid until a steady stream of liquid
runs out of the filling hole.
e). Fit and tighten the filling plug
A
B
E
.
f). Slowly open the discharge isolating valve while the
pump is running. This ensures venting and pressure
build-up during start-up.
Figure 10 - High Efficiency Heat Exchange Water System
Primary Circulating Pump
(DDMSP504 / DDMSP303)
Rinnai Australia
19
Owners Guide & Installation Instructions
GENERAL INSTALLATION INSTRUCTIONS
7. As the system is filled from cold a small quantity of water may drain from the overflow as the
system comes up to operating temperature.
8. Once the primary circuit is commissioned open flow to the building hot water supply, and open
the isolating valve on the return circuit.
9. Open an outlet load and observe system for 30 minutes to ensure system is functioning
satisfactorily.
10.Check gas supply pressure whist operating.
11. Clear strainers on HD200 cold inlets.
Preventative Maintenance:
All items:
•
Inspect for damage, corrosion, water leaks or power failure.
Tank:
•
Ensure that tank is not leaking.
•
Ensure that vent outlet and vent connections are not blocked and allow water/steam to be
safely vented through to the drain network.
•
Ensure lid is securely fastened and sealed and lid retention clips are in good working order.
•
Check operating water level fully covers coil assembly but provides 40 mm distance to vent.
Adjust float valve if required. Check float valve operation.
Primary circuit circulation pump:
• Long primary pipe runs may require larger pump or larger pipe diameter.
NOTE
•
Pump operates when activated by DD250HEXHWTSTAT, as indicated by green light on
thermostat.
•
Pumps are installed in a weather resistant casing for protection against water ingress. Wet
pump electrics may cause failure. Water can run along power lead so keep the lead looping
under the pump and curving upwards toward the electrical box.
•
Ensure shaft is horizontal. DO NOT aim shaft upwards or downwards.
•
Bleed pump of air (refer Figure 10 page 19 for starting instructions).
•
Ensure pump direction of flow arrow is towards HD200(s).
•
If shaft is spinning but there is no flow: Check ball valves and any non return valve for correct
installation and operation.
HD200 Heat Source:
•
Ensure that filter at water inlet is clean. Note that this is an 'O' ring seal and does not need to
be excessively tightened. Just make sure 'O' ring is engaged inside machined surface in brass
housing. Isolate circulating water supply before removing filter for cleaning and inspection.
Ensure water in storage cylinder is not excessively hot before removing HD200 inlet filter.
•
Ensure all HD200's are operating. These units are not staged. Ensure power is available to
HD200, if it is not operating check GPO.
•
Many new jobs or ones where the gas supply has been modified need to purge the gas supply
lines as they are full of air. Purge should be carried in accordance with AS/NZS 5601, Appendix
'D'.
•
All new HD200 models: when operating the number displayed should be 85°C.
•
All new HD200 models will display a fault number if one has occurred. Refer to a full list of fault
codes. (Refer to page 22).
Rinnai Australia
20
Owners Guide & Installation Instructions
GENERAL INSTALLATION INSTRUCTIONS
•
In jobs that operate for long hours and/or in dusty or smoky environments the combustion air
fan may become dirty. This may be indicated by fault 10. Contact Rinnai Service.
•
Internal heaters may operate for a short period of time and then stop. This can be caused by
the flueing not being pushed together properly and exhaust gases are re-entering the inlet air.
Push the flue together to remedy this. Also inspect flue terminal for any cause to divert exhaust
air back into the inlet air. Ensure flue is terminated correctly in accordance with AS/NZS 5601.
OFF ON
1
For Internal (FFU) models only
2
3
4
SW1
Have you used only Rinnai FFU flueing components?
5
6
21
2
Rinnai Australia
SW2
1
If flue length exceeds 2m, connect a condensate drain pipe in accordance with the FFU flueing instructions.
7
If flue length exceeds 1.5m, dip-switch 1 of SW1 is to be switched to the 'OFF' position as shown.
Owners Guide & Installation Instructions
GENERAL INSTALLATION INSTRUCTIONS
Your Rinnai HD200 Series Continuous Flow Water Heaters have a self diagnostic capability. If a fault
occurs, an Error Code will flash on the Digital Monitor.
INFINITY HD Fault Codes:
ERROR
-
03
FAULT
REMEDY
Inlet water filter needs to be cleaned. Service
Noticeable reduction in water flow.
call.
Power interruption during Bath fill
(Water will not flow on power
Turn off all hot water taps. Press ON/OFF twice.
reinstatement).
10
Air intake or flue blocked.
11
No ignition / No gas supply.
12
Flame Failure / Low gas flow.
14
16
25
Remaining Flame Safety Device.
Service Call.
Over Temperature Warning.
Service Call.
Condensate Pipe Blockage
Check for blockage on condensate drain path.
32
Outgoing Water Temperature
Sensor Faulty.
Heat Exchanger Outlet Sensor
Faulty.
Combustion Air Temperature
Sensor Faulty.
33
34
Service Call.
Check gas is turned on at water heater and gas
meter or cylinder.
Check gas is turned on at water heater and gas
meter or cylinder.
Check that nothing is obstructing flue outlet.
Turn on gas supply to water heater.
Service Call.
Service Call.
Service Call.
52
61
Gas Modulating Valve Faulty.
Service Call.
Combustion Fan Failure.
Service Call.
65
Water Flow Control Faulty
(Does not stop flow properly).
Service Call.
Micro-processor Failure.
Service Call.
Line calcification
Service Call.
71 & 72
LC
In all cases, you may be able to clear the Error Code simply by turning the hot water tap OFF, then ON again. If this does
not clear the Error Code, try pushing the On/Off button OFF, then ON again. If the Error Code still remains, contact Rinnai
for advice.
Ring Main Pump:
•
These are used for circulating water around the building. They are normally left on or may have a
time clock to switch it OFF at night when the building is not in use.
•
These pumps need to develop sufficient head to deliver the designed flow rate.
•
They must have a non return valve.
•
Swing non return valves must be horizontal or upward as they rely on gravity to close the valve.
Upward direction may cause noise issues as valve opens and shuts.
•
Spring isolation valves can be located on any plane but may contribute excessive back pressure
and restrict the pump flow rate.
•
Return water should only be slightly cooler than water leaving the tank. If the temperature drop
around the circuit is too high it may indicate excessive heat loss due to poor insulation, the ring
main pump flow rate is not high enough or indicates a design fault or a blockage in the pipe work
(or poor pipe work insulation). Investigate insulation, valves and operation of pump.
Service:
Rinnai recommend that all commercial water heater installations have a service arrangement. Annual
services are recommended at a minimum. Refer to the back cover for contact information.
Rinnai Australia
22
Owners Guide & Installation Instructions
TROUBLE SHOOTING
Fault Finding During Normal Operation:
FAULT
Delivery Temperature not
hot enough
No or insufficient water
flow from coil heat
exchanger
POSSIBLE CAUSES
REMEDY
No electrical or gas supplies to the
heat source
Check and turn ON the power and gas
supplies.
Insufficient gas
Check gas supply, availability & pressure.
DDHEX250HWTSTAT not providing
power to heating circuit circulating
pump
Check DDHEX250HWTSTAT.
Temperature sensor in coil outlet
removed or shot circuited
Check temperature sensor correctly
located and providing signal to
DDHEX250HWTSTAT.
DDHEX250HWTSTAT set point
incorrectly set
Check set point is 60°C.
HD200 dip switches incorrectly set
Check heating circuit is operating with
HD200 output at 85°C. Arrange for a
service person to check and rectify.
Excessive load on system
Check maximum demand does not exceed
rated capacity.
Fouled heating surfaces
External fouling of coil can be determined
by inspection. Internal fouling may occur if
water quality does not meet Warranty
specifications. **
Inadequate heating circuit Re
circulating pump performance
Check all valves fully open. check float
valve operation.
Water level in tank too low
Check make-up line is open. check float
valve operation.
Tempering valve or thermostatic
mixing valve malfunctioning - not a
Rinnai DDHEX250 operating fault
Arrange for a service person to check and
rectify. This work must be performed by
persons permitted by law to do so.
No ring main flow
Check re circulating pump operating.
Other
Arrange for a service person to check and
rectify. This work must be performed by
persons permitted by law to do so.
The mains cold supply to DDHEX250
coil heat exchanger isolated or
restricted
Check position of mains cold supply or ring
main to DDHEX250 tank connections.
IMPORTANT: DO NOT alter the position of
any other valves in the system.
Blockage in coil heat exchanger
Check flow upstream of coil and if
adequate arrange for a service person to
check and rectify. This work must be
performed by persons permitted by law to
do so.
Leak in coil heat exchanger
Check for flow at tank vent. If there is no
flow then coils are not leaking. If there is
flow arrange for a service person to check
and rectify. This work must be performed
by persons permitted by law to do so.
Other
Arrange for a service person to check and
rectify. This work must be performed by
persons permitted by law to do so.
** Warranty terms and conditions are detailed in the separate product warranty booklet.
Rinnai Australia
23
Owners Guide & Installation Instructions
TROUBLE SHOOTING
FAULT
POSSIBLE CAUSES
REMEDY
Delivery temperature too
hot
Tempering valve or thermostatic
mixing valve malfunctioning - not a
Rinnai DDHEX250 operating fault
Arrange for a service person to check and
rectify. This work must be performed by
persons permitted by law to do so.
Water flowing to drain from
tank
Float valve failed OPEN
Check operating of float valve and replace
if damaged.
Make-up water flowing
continuously
Leak in tank and/or heating circuit
Check for water on floor and identify
source.
Steam issuing from lid of
tank
Lid not fitted properly
Check fitting and latched down correctly.
Seal missing
Check EPDM seal in place between lid
and base of tank.
Other
Arrange for a service person to check and
rectify. This work must be performed by
persons permitted by law to do so.
** Warranty terms and conditions are detailed in the separate product warranty booklet.
Rinnai Australia
24
Owners Guide & Installation Instructions
CONTACT INFORMATION
Internet: www.rinnai.com.au E-mail: [email protected]
ABN 74 005 138 769
Head Office
National Help Lines
10-11 Walker Street,
Braeside, Victoria 3195
P.O. Box 460
Tel: (03) 9271 6625
Fax: (03) 9271 6622
Spare Parts & Technical Info
Tel: 1300 555 545*
Fax: 1300 300 141*
*Cost of a local call Higher from mobile or public phones.
Rinnai has a Service and Spare Parts network with personnel who are fully trained
and equipped to give the best service on your Rinnai appliance. If your appliance
requires a service, please call National Call Centre. Rinnai recommends that this
appliance be serviced every 3 years.
25
BARCODE
123 45678 90123 4
Rinnai DDHEX250 System OIM - 1609009R - Issue1 - 29/05/12
Part No. 15401045 Issue 1
Australia Pty. Ltd.