1
MODEL
FO-IS115N
FACSIMILE
OPERATION MANUAL
This equipment complies with the requirements of Directive 1999/5/EC
Dieses Gerät entspricht den Anforderungen der EU-Richtlinie 1999/5/EG.
Cet appareil est conforme aux exigences de la directive 1999/5/CE.
Quest’apparecchio è conforme ai requisiti delle direttiva 1999/5/CE.
Este aparato satisface las exigencias de las Directiva 1999/5/CE.
Este equipamento obedece às exigências da directiva 1999/5/CE.
Denna utrustning uppfyller kraven enligt direktiv 1999/5/EC.
Dette produktet oppfyller kravene i direktiv 1999/5/EC.
Tämä laite täyttää direktiivi 1999/5/EY.
Dette udstyr overholder kravene i direktiv 1999/5/EF.
Dit apparaat voldoet aan de eisen van de richtlijn 1999/5/EG.
Η συσκευή αυτή ανταποκρίνεται στις απαιτήσεις των οδηγια 1999/5/ΕK.
To urządzenie spełnia wymagania dyrektywy 1999/5/EC.
Toto zařízení je v souladu s požadavky směrnice rady 1999/5/EC.
Tento prístroj je v súlade s požiadavkami smernice rady 1999/5/EC.
Ta oprema je v skladu z zahtevami Direktive 1999/5/EC.
Ez a berendezés megfelel az 1999/5/EK Irányelvnek
Seade vastab direktiivi 1999/5/EÜ nõuetele.
Ši ierice atbilst tehniskam prasibam pec 1999/5/EC direktivas.
Šis prietaisas atitinka direktyvos 1999/5/EC reikalavimus.
Acest echipament este în conformitate cu cerinţele impuse prin Directiva 1999/5/EC.
Това оборудване отговаря на изискванията на Директива 1999/5/EО.
Bu ürün 1999/5 EC Direktiflerine uygundur.
This is a facsimile product operating in analogue public switched telephone networks which follow the ES203021
Standard.
Dies ist ein Faxprodukt für den Betrieb in analogen Telefonnetzen, die den ES203021-Standard verwenden.
Ce télécopieur fonctionne sur les réseaux téléphoniques publiques commutés et analogiques qui respectent la
norme ES203021.
Questo apparecchio facsmile funziona sulle reti telefoniche commutate pubbliche che seguono lo standard
ES203021.
Se trata de un aparato telefax que funciona en redes telefónicas analógicas que cumplan las normas
ES203021.
Este é um aparelho de fax, que funciona nas redes telefónicas analógicas públicas comutadas, que adoptaram
a norma ES203021.
Denna faxapparat fungerar i analoga allmänna telefonnät vilka följer ES203021 standarden.
Dette er et telefaks-produkt som fungerer i analoge offentlige telefonnett som svarer til ES203021-standard.
Tämä telekopiotuote toimii analogisessa puhelinverkossa, joka noudattaa ES203021 standardia.
Dette fax-apparat, som kan betjenes på analoge offentlige telefonnet, som følger standarden ES203021.
Dit is een faxproduct dat werkt op het analoge openbaar geschakelde netwerk volgens de ES203021-standaard.
Αυτή είναι µια συσκευή φαξ που λειτουργεί σύµφωνα µε τα αναλογικά δηµόσια τηλεφωνικά δίκτυα µεταγωγής
που ακολουθούν το Πρότυπο ES203021.
To urządzenie pracuje w publicznej sieci telefonicznej zgodnie ze standartami ES203021.
Tento fax je kompatibilní s analogovými verejnými komutovanými telefonními sítemi, které splnují standard
ES203021.
Toto je telefaxové zariadenie, ktoré je urcené na používanie v verejnej telefónnej sieti, pre ktorú platí norma
ES203021.
Tisti telefaks deluje v analognih javnih telefonskih omrežjih, usklajenih s standardom ES203021.
Ez a fax termék a ES203021 szabványnak megfelelo analóg nyilvános kapcsolt telefonhálózatokban
muködtetheto.
Faksiseade töötab analoogtelefoni kommutaatorvõrkudes, mis vastavad ES203021 standardile.
Šī telefaksa ierīce var strādāt publiski komutējamos analogajos telefonu tīklos, kas atbilst standartam
ES203021.
Tai faksimilinis aparatas, veikiantis analoginiuose šiuolaikiškuose telefonų tinkluose, atitinkančiuose ES203021
standartą.
Acesta este un fax care operează în reţelele telefonice analogice comutate publice care respectă standardul
ES203021.
Това е факсова машина, която работи по аналоговите публични комутируеми телефонни мрежи,
следващи стандарта ES203021.
Bu faks makinesi analog telefon sisteminde çalışmak üzere ES203021 standartlarına uygundur.
The Declaration of Conformity can be viewed at the following URL address.
Die Konformitätserklärung kann unter folgender URL-Adresse eingesehen werden.
Vous pouvez consulter la Déclaration de conformité sur Internet à l’adresse ci-dessous.
La Dichiarazione di conformità può essere consultata all‘indirizzo URL riportato di seguito.
El documento de Declaración de conformidad puede consultarse en la siguiente dirección URL.
A Declaração de Conformidade pode ser visualizada no seguinte endereço URL.
Överensstämmelsedeklarationen finns att läsa på följande URL-adress.
Samsvarserklæringen ("Declaration of Conformity") finner du på følgende URL-adresse.
Yhdenmukaisuusvakuutus on nähtävissä seuraavassa URL-osoitteessa.
Overensstemmelseserklæringen kan ses på følgende URL-adresse.
De Verklaring van Overeenstemming kan worden nagelezen op het volgende URL-adres.
Προβολή της ∆ήλωσης Συµµόρφωσης µπορεί να γίνει στην ακόλουθη διεύθυνση URL.
Deklaracja Zgodności jest dostępna pod adresem.
Prohlášení o shodě je k dispozici k prohlédnutí na následující adrese URL.
Vyhlásenie o zhode nájdete na nasledujúcej adrese URL.
Deklaracija o skladnosti se lahko najde na tistem URL naslovu.
A Megfelelosségi nyilatkozat megtekinthetik az alábbi URL címen.
Ühilduvusdeklaratsiooni on võimalik lugeda järgmisel URL-aadressil.
Atbilstības deklarāciju var aplūkot šajā tīmekĻa adresē.
Suderinamumo deklaraciją galite peržiūrėti šiuo URL adresu.
Declaraţia de conformitate poate fi vizualizată la următoarea adresă URL.
Декларацията за съвместимост можете да видите на следния URL адрес.
Bu uyumluluk raporunu aşağıdaki internet adresinde görebilirsiniz.
http://www.sharp.de/doc/FO-IS115N.pdf
Authorized representative responsible for the European Union Community Market
Autorisierter Vertreter für den Gemeinschaftsmarkt der Europäischen Union
Mandataire responsable du marché communautaire de l’Union Européenne
Rappresentante autorizzato responsabile per il mercato comunitario dell’Unione Europea
Mandatario responsable del mercado comunitario de la Unión Europea
Representante responsável autorizado pelo Mercado da Comunidade da União Europeia
Auktoriserad representant som ansvarar för EU-marknaden
Godkjent markedsrepresentant i Den Europeiske Union (EU)
Euroopan unionin yhteismarkkina-alueesta vastaava valtuutettu edustaja
Autoriseret repræsentant, ansvarlig for det indre marked i den Europæiske Union
Bevoegd vertegenwoordiger verantwoordelijk voor de communautaire markt van de Europese Unie
Υπεύθυνος εξουσιοδοτηµένος αντιπρόσωπος για την Κοινοτική Αγορά της Ευρωπαϊκής Ένωσης
Autoryzowany przedstawiciel odpowiedzialny za rynek Unii Europejskiej
Oprávnéný zástupce zodpovědný za trh EU
Oprávnený zástupca zodpovedný za trh Spoločenstva Európskej únie
Pooblaščeni predstavnik, odgovoren za skupni trg Evropske unije
Az Európai Unió közösségi piacával kapcsolatban illetékes megbízott képviselő
Volitatud esindaja, kes vastutab Euroopa Ühenduse turu eest
Pilnvarotais pārstāvis, kas ir atbildīgs par Eiropas Savienības kopējo tirgu
Įgaliotasis atstovas, atsakingas už Europos Sąjungos bendrijos rinką
Reprezentantul autorizat pentru Uniunea Europeană
Упълномощен представител, отговарящ за Общия пазар на EC
Avrupa Birliği Pazarından sorumlu yetkili temsilci
SHARP ELECTRONICS (Europe) GmbH
Sonninstraße 3, D-20097 Hamburg
Datalight is a registered trademark of Datalight, Inc.
FlashFXTM is a trademark of Datalight, Inc.
Copyright 1993 - 2004 Datalight, Inc. All Rights Reserved.
U.S. Patent Office 5.860.082/6.260.156
Table of Contents
Table of Contents
Table of Contents
1
Introduction
3
Specifications . . . . . . . . . . . . . . . . . . . . . . . . . . . . . . . . . . . . . . . . . . . 3
A Look at the Operation Panel
1. Installation
8
12
Unpacking Checklist . . . . . . . . . . . . . . . . . . . . . . . . . . . . . . . . . . . . . 12
Basic Setup. . . . . . . . . . . . . . . . . . . . . . . . . . . . . . . . . . . . . . . . . . . . 13
Installing the Toner Cartridge and Drum Cartridge . . . . . . . . . . . . . . 17
Loading Printing Paper . . . . . . . . . . . . . . . . . . . . . . . . . . . . . . . . . . . 22
Entering Your Name and Fax Number . . . . . . . . . . . . . . . . . . . . . . . 23
Setting the Date and Time . . . . . . . . . . . . . . . . . . . . . . . . . . . . . . . . 24
Setting the Reception Mode . . . . . . . . . . . . . . . . . . . . . . . . . . . . . . . 26
Volume Adjustment. . . . . . . . . . . . . . . . . . . . . . . . . . . . . . . . . . . . . . 26
2. Network Scanning
28
Setting up Network Scanning . . . . . . . . . . . . . . . . . . . . . . . . . . . . . . 28
Storing E-mail Addresses . . . . . . . . . . . . . . . . . . . . . . . . . . . . . . . . . 36
Scan to E-mail Transmission . . . . . . . . . . . . . . . . . . . . . . . . . . . . . . 41
Network Settings. . . . . . . . . . . . . . . . . . . . . . . . . . . . . . . . . . . . . . . . 45
Scan to Folder. . . . . . . . . . . . . . . . . . . . . . . . . . . . . . . . . . . . . . . . . . 47
3. Sending Faxes
51
Transmittable Documents . . . . . . . . . . . . . . . . . . . . . . . . . . . . . . . . . 51
Loading the Document . . . . . . . . . . . . . . . . . . . . . . . . . . . . . . . . . . . 52
Adjusting the Resolution and Contrast . . . . . . . . . . . . . . . . . . . . . . . 54
Sending a Fax by Normal (Manual) Dialling . . . . . . . . . . . . . . . . . . . 56
Sending a Fax by Automatic Dialling . . . . . . . . . . . . . . . . . . . . . . . . 59
4. Receiving Faxes
68
Using AUTO Mode . . . . . . . . . . . . . . . . . . . . . . . . . . . . . . . . . . . . . . 68
Using MANUAL Mode . . . . . . . . . . . . . . . . . . . . . . . . . . . . . . . . . . . . 69
Reception to Memory . . . . . . . . . . . . . . . . . . . . . . . . . . . . . . . . . . . . 70
1
Table of Contents
5. Printing
71
Installing the Printer Driver . . . . . . . . . . . . . . . . . . . . . . . . . . . . . . . . 71
Printing a Document From an Application . . . . . . . . . . . . . . . . . . . . 73
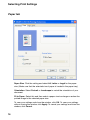
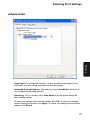
Selecting Print Settings . . . . . . . . . . . . . . . . . . . . . . . . . . . . . . . . . . . 74
6. Making Copies
78
7. Special Functions
80
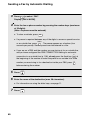
Broadcasting . . . . . . . . . . . . . . . . . . . . . . . . . . . . . . . . . . . . . . . . . . . 80
Blocking Unwanted Faxes . . . . . . . . . . . . . . . . . . . . . . . . . . . . . . . . 85
Duplex Scanning. . . . . . . . . . . . . . . . . . . . . . . . . . . . . . . . . . . . . . . . 87
Print Hold . . . . . . . . . . . . . . . . . . . . . . . . . . . . . . . . . . . . . . . . . . . . . 88
Receiving Faxes to E-mail/Folder . . . . . . . . . . . . . . . . . . . . . . . . . . . 92
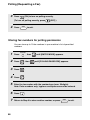
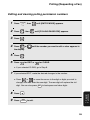
Polling (Requesting a Fax) . . . . . . . . . . . . . . . . . . . . . . . . . . . . . . . . 95
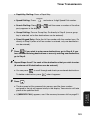
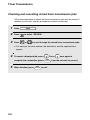
Timer Transmission . . . . . . . . . . . . . . . . . . . . . . . . . . . . . . . . . . . . 100
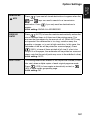
8. Option Settings
103
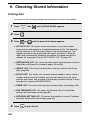
9. Checking Stored Information
108
Transaction Report . . . . . . . . . . . . . . . . . . . . . . . . . . . . . . . . . . . . . 110
10. Maintenance
111
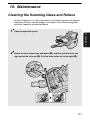
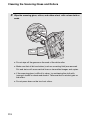
Cleaning the Scanning Glass and Rollers . . . . . . . . . . . . . . . . . . . 111
Cleaning the Paper Feed Roller . . . . . . . . . . . . . . . . . . . . . . . . . . . 114
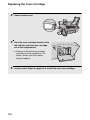
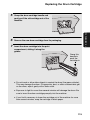
Replacing the Toner Cartridge . . . . . . . . . . . . . . . . . . . . . . . . . . . . 115
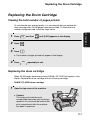
Replacing the Drum Cartridge . . . . . . . . . . . . . . . . . . . . . . . . . . . . 117
11. Troubleshooting
121
Problems and Solutions . . . . . . . . . . . . . . . . . . . . . . . . . . . . . . . . . 121
Messages and Signals . . . . . . . . . . . . . . . . . . . . . . . . . . . . . . . . . . 126
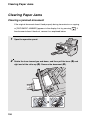
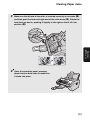
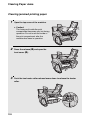
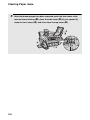
Clearing Paper Jams . . . . . . . . . . . . . . . . . . . . . . . . . . . . . . . . . . . 130
Index
2
135
Introduction
Specifications
Print specifications
Toner cartridge yield*
(continuous printing,
5% page coverage,
A4 paper)
Initial starter cartridge (included with machine):
Approx. 1500 pages
Replacement cartridge (FO-25DC):
Approx. 3000 pages
Drum cartridge yield*
(continuous printing,
5% page coverage,
A4 paper)
Initial starter cartridge (included with machine):
20,000 pages (average)
Replacement cartridge (FO-25DR):
20,000 pages (average)
Paper tray capacity
Approx. 220 sheets (80 g/m2 A4-size copier paper at
room temperature; maximum stack height should not be
higher than the line on the tray)
Recommended paper weight: 80 g/m2
Printer type
Laser
Print resolution
600 × 600 dpi (dots per inch)
Effective printing width
202 mm max.
PC print speed**
11 ppm (pages per minute) max.
*The yields may vary depending on coverage and operating conditions.
**Measured based on A4-size continuous printing (3rd through 14th page), excluding warm-up
time.
Fax specifications
Memory capacity*
Approximately 600 average pages
Modem speed
33,600 bps with auto fallback to lower speeds.
Transmission time*
Approx. 3 seconds
Compatibility
ITU-T (CCITT) Super G3, G3 mode
Compression scheme
MR, MH, MMR
Applicable telephone line
Analog public switched telephone network (ES203021) /
PBX
3
Reception modes
AUTO, MANUAL
Scanning Resolution
Horizontal: 8 lines/mm
Vertical:
Standard: 3.85 lines/mm
Fine /Halftone: 7.7 lines/mm
Super fine: 15.4 lines/mm
Halftone (grayscale)
64 levels
Contrast control
Automatic/Dark selectable
*Based on Sharp Standard Chart at standard resolution, excluding time for protocol signals (i.e.,
ITU-T phase C time only).
Network and general specifications
Automatic document
feeder
A4: 30 sheets max. (80 g/m2 paper)
Input document size
Automatic feeding:
Width: 148 to 216 mm
Length: 140 to 297 mm
Manual feeding:
Width: 70 to 216 mm
Length: 140 to 356 mm
Effective scanning width
208 mm max.
Storable transmission
destinations
Rapid Keys: 36
Speed Dial numbers: 114
Telephone function
Yes (cannot be used if power fails)
Copy function
Single/Multi/Sort (up to 99 copies per page)
Network interface
10 Base-T, 100 Base-TX
Network frame type
IEEE802.2/IEEE802.3 Ethernet II
Network protocol
TCP/IP
Scan to E-mail
Yes
Scan to Network Folder
Yes
File formats
TIFF (G4), PDF (G4)
4
Supported operating
systems (printer driver)
Windows® 2000, XP, Server 2003, Vista
Display
LCD display, 20 digits x 2 lines
Power requirements
220 - 230 V AC, 50 Hz
Noise emission
Less than 70 dBA (measured according to EN ISO
7779)
Power consumption
Standby: 8.5 W when not connected to a network
9.0 W when connected to a network
Maximum: 750 W
Operating temperature
10 - 30°C
Humidity
20 - 85% RH
Dimensions
(without attachments)
Width: 426 mm
Depth: 410 mm
Height: 208 mm
Weight
(with attachments)
Approx. 7.1 kg
As a part of our policy of continuous improvement, SHARP reserves the right to make design and
specification changes for product improvement without prior notice. The performance
specification figures indicated are nominal values of production units. There may be some
deviations from these values in individual units.
Important: This machine is not designed for use on a line which has call waiting, call
forwarding, or certain other special services offered by your telephone company (errors
may occur during transmission and reception of faxes).
This machine is not compatible with digital telephone systems.
5
Important safety information
Do not disassemble this machine or attempt any procedures not described in this
manual. Refer all servicing to qualified service personnel.
Do not install or use the machine near water, or when you are wet. For example, do not
use the machine near a bath tub, wash bowl, kitchen sink or laundry tub, in a wet
basement, or near a swimming pool. Do not spill any liquids on the machine.
Unplug the machine from the power outlet and telephone socket and consult a
qualified service representative if any of the following situations occur:
- Liquid has been spilled into the machine or the machine has been
exposed to rain or water.
- The machine produces odors, smoke, or unusual noises.
- The power cord is frayed or damaged.
- The machine has been dropped or the housing damaged.
Do not allow anything to rest on the power cord, and do not install the machine where
people may walk on the power cord.
This machine must only be connected to a 220 - 230 V, 50 Hz, earthed outlet.
Connecting it to any other kind of outlet will damage the machine.
Never insert objects of any kind into slots or openings on the machine. This could
create a risk of fire or electric shock. If an object falls into the machine that you cannot
remove, unplug the machine and consult a qualified service representative.
Do not place this machine on an unstable cart, stand or table. The machine could be
seriously damaged if it falls.
Never install telephone wiring during a lightning storm.
Never install telephone sockets in wet locations unless the socket is specifically
designed for wet locations.
Never touch bare telephone wires or terminals unless the telephone line has been
disconnected at the network interface.
Use caution when installing or modifying telephone lines.
Avoid using a telephone (other than a cordless type) during an electrical storm. There
may be a remote risk of electric shock from lightning.
Do not use a telephone to report a gas leak in the vicinity of the leak.
The power outlet must be installed near the equipment and must be easily accessible.
The machine does not have a power on/off switch, so the power is turned on and off by
simply plugging in or unplugging the power cord.
6
Trademark information
• Microsoft, Windows and Internet Explorer are trademarks of Microsoft
Corporation in the U.S.A. and other countries.
• Acrobat and Adobe are trademarks of Adobe Systems Incorporated.
• This product includes software developed by Computing Services at
Carnegie Mellon University (http://www.cmu.edu/computing/). Copyright (c)
1998 - 2003. Carnegie Mellon University. All rights reserved.
• All other company names and product names appearing in this manual are
the trademarks of their respective owners.
7
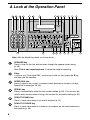
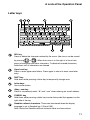
A Look at the Operation Panel
A Look at the Operation Panel
1
2
3
15
4
5
6
9
8
7
16
17
18
10
19
11
20
12
21
13
14
22
23
Note: Affix the Rapid Key labels as shown above.
8
1
SPEAKER key
Press to listen to the line and fax tones through the speaker when faxing
(p. 56).
Note: This is not a speakerphone. It cannot be used for speaking.
2
R key
If you are on a Flash-type PBX, use this key to dial out (first press the R key
and then dial the number).
3
SPEED DIAL key
Press to select a fax, e-mail, or network folder destination stored in a 3-digit
Speed Dial number (pp. 36, 64).
4
REDIAL key
Press to automatically redial the last number dialled (p. 66). This can also be
used to enter a pause when storing a fax number for automatic dialling (p. 60).
5
SCAN TO E-MAIL key
Press to send a document to an e-mail recipient (p. 41).
6
SCAN TO FOLDER key
Press to send a document to a folder on a computer on the same network as
the machine (p. 49).
A Look at the Operation Panel
7
Display
This displays messages and prompts to help you operate the machine.
8
FAX TO MAIL/FOLDER key
Press to set up the Fax to Mail function, which automatically forwards
received faxes to an e-mail address (p. 92).
9
LINE IN USE light
This lights up when the machine is using the phone line to send or receive a
fax.
10
TIMER key
Press to store a fax transmission to be automatically performed at a specified
time (p. 100).
11
RECEPTION key
Press to select the reception mode (AUTO or MANUAL) for receiving faxes.
The selected mode will appear in the display (p. 26).
12
FUNCTION key
Press this key followed by the arrow keys to select special functions and
settings.
13
COPY/HELP key
When a document is in the feeder, press to make a copy (p. 78). At any other
time, press to print the Help List.
14
STOP key
Press to cancel an operation before it is completed.
15
Number keys
Use these keys to dial fax numbers, and enter numbers when storing
transmission destinations.
16
Rapid Keys / letter keys
A fax number, e-mail address, or network folder can be stored in each of these
keys for one-touch selection (attach the Rapid Key labels). When entering
text, the keys are used as letter keys.
17
BROADCAST key
Press to send to multiple fax or e-mail destinations (p. 80).
18
INFO key
Press to check various types of machine information.
19
DUPLEX key
Use to scan two-sided documents for transmission and copying (p. 87).
9
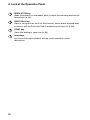
A Look at the Operation Panel
20
RESOLUTION key
When a document is in the feeder, press to adjust the scanning resolution for
transmission (p. 54).
21
PRINT HOLD key
Press to set up and use the Print Hold function, which retains received faxes
in memory until the Print Hold Code is entered to print them out (p. 88).
22
START key
Press after dialling to send a fax (p. 56).
23
Arrow keys
Use to scroll through and select settings, and to search for stored
destinations.
10
7
A Look at the Operation Panel
Letter keys
1
2 3
4
5
6
7
16 17
1
DEL key
Press to delete the character marked by the cursor (the cursor can be moved
by pressing
or
). When the cursor is to the right of a line of text,
press to backspace and clear characters. To delete all entered characters,
hold down until all characters are cleared.
2
Caps Lock key
Press to enter upper case letters. Press again to return to lower case letter
entry.
3
SHIFT key
Hold down while pressing a letter key to temporarily change case.
4
Letter keys
Use to enter letters.
5
@key, .com key
Press to conveniently enter “@” and “.com” when entering an e-mail address.
6
SYMBOL key
Hold down while pressing a letter key to enter the symbol that appears on the
right side of the key.
7
Swedish national characters: These can be entered when the display
language is set to Swedish (pp. 103 and 105).
Note: Attach the Swedish national character label as shown above.
11
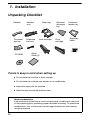
Unpacking Checklist
1. Installation
Unpacking Checklist
Handset
Document
exit tray
CD-ROM
Telephone
line cord
Received
document
tray
Paper tray
Handset
cord
Toner cartridge
Drum
cartridge
Document
feeder tray
Rapid Key
labels
Setup
Guide (3)
Points to keep in mind when setting up
♦ Do not place the machine in direct sunlight.
♦ Do not place the machine near heaters or air conditioners.
♦ Keep dust away from the machine.
♦ Keep the area around the machine clear.
About condensation
If the machine is moved from a cold to a warm place, condensation may form
on the scanning glass, preventing proper document scanning. To remove the
condensation, turn on the power and wait approximately two hours before
using the machine.
12
Basic Setup
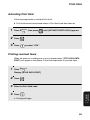
Connecting the handset
Attaching the trays
Attach the paper tray.
Attach the document feeder tray and the received document tray.
Insert the trays
at an angle and
rotate back
13
1. Installation
Basic Setup
Basic Setup
Attach the document exit tray.
After inserting
the tray, flip out
the extension
Connecting the power cord
Plug the power cord into a 220 - 230 V, 50 Hz, earthed AC outlet.
♦ Do not plug the power cord into any other kind of outlet. This will damage
the machine.
♦ The power outlet must be installed near the equipment and must be easily
accessible.
♦ Whenever you unplug the power cord, wait at least 5 seconds before
plugging it back in.
♦ When disconnecting the machine, unplug the telephone line cord before
unplugging the power cord.
♦ If your area experiences a high incidence of lightning or power surges, it is
recommended that you install surge protectors for the power and telephone
lines. Surge protectors can be purchased from your dealer or at most
telephone specialty stores.
14
Connecting the telephone line cord
Insert one end of the line cord into the socket on the back of the machine
marked TEL. LINE. Insert the other end into a wall telephone socket.
If the machine is connected to a PBX, configure the “FLASH SELECT” and
“PBX CONNECTION” settings as explained on pp. 103, 104, and 106.
To change the language used in the display, reports, and lists, change the
“LANGUAGE SELECTION” setting as explained on pp. 103 and 105.
Affixing the Rapid Key labels
Affix each strip of Rapid Key labels above each row of letter keys as shown in
the panel illustration on page 8.
15
1. Installation
Basic Setup
Basic Setup
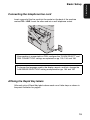
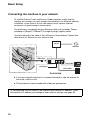
Connecting the machine to your network
To use the Scan to E-mail and Scan to Folder functions, and to use the
machine as a printer, you must connect the machine to an Ethernet network.
In addition, to use Scan to E-mail, the network must have an Internet
connection. A typical setup is shown below.
The machine is connected using an Ethernet cable (not included). Please
purchase a 10Base-T/100Base-TX straight-through (regular) cable.
Connect one end of the cable to the LAN port on the machine. Connect the
other end to a LAN port on your switch or hub.
Router
Internet
LAN cable
LAN cable
LAN ports
LAN cable
Switch/Hub
♦ If you are uncertain which port to connect the cable to, see the manual for
the router, switch or hub.
♦ The connections can be made with all devices powered on.
To communicate on your network, the machine must have an IP address. To set
the machine’s IP address and configure other network settings, see page 28.
16
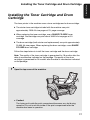
Installing the Toner Cartridge and Drum
Cartridge
The laser printer in the machine uses a toner cartridge and a drum cartridge.
♦ The starter toner cartridge included with the machine can print
approximately 1500 A4-size pages at 5% page coverage.
♦ When replacing the toner cartridge, use a SHARP FO-25DC toner
cartridge. One cartridge can print about 3000 A4-size pages at 5%
coverage.
♦ The drum cartridge (both starter and replacement) can print approximately
20,000 A4-size pages. When replacing the drum cartridge, use a SHARP
FO-25DR drum cartridge.
Follow the steps below to install the toner cartridge and the drum cartridge.
Note: The quality of the toner cartridge is guaranteed for 18 months after the
date of manufacture indicated on the package. The quality of the drum
cartridge is guaranteed for 24 months after the date of manufacture indicated
on the package.
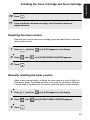
1
Open the top cover of the machine.
• Caution!
The fusing unit inside the print compartment becomes very hot during
operation. Do not touch the inside of the print compartment after the
machine has been in operation.
17
1. Installation
Installing the Toner Cartridge and Drum Cartridge
Installing the Toner Cartridge and Drum Cartridge
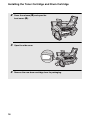
2
Press the release (➊) and open the
front cover (➋).
2
1
18
3
Open the side cover.
4
Remove the new drum cartridge from its packaging.
5
Insert the drum cartridge into the print
compartment, sliding it along the
guides.
Grasp this
handle to
push the
cartridge in
• Do not touch or allow other objects to contact the drum (the green cylinder).
This may damage the drum. If fingerprints, dust, or other contaminants get
on the drum, wipe it gently with a clean cloth.
• Exposure to light for more than several minutes will damage the drum. Be
sure to insert the drum cartridge promptly into the machine.
• If you find it necessary to leave the cartridge out of the machine for more
than several minutes, wrap the cartridge in black paper.
6
Remove the new toner cartridge from
its packaging. Shake the cartridge side
to side four or five times to distribute
the toner evenly within the cartridge.
19
1. Installation
Installing the Toner Cartridge and Drum Cartridge
Installing the Toner Cartridge and Drum Cartridge
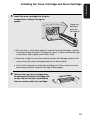
7
Grasp the cartridge handle and insert
the toner cartridge into the print
compartment, sliding it along the
guides.
• Make sure the cartridge “clicks” into
place.
• Do not touch the roller in the toner
cartridge.
Grasp this handle to
insert the cartridge
8
Close the side cover (➊), the front
cover (➋), and the top cover (➌).
3
• When closing the side cover, press on
the dots to make sure the cover is
completely closed. Otherwise, light may
enter the print compartment and
damage the drum.
1
2
• The display will show:
[TONER EXCHANGED?] /
[1 = NEW, 2 = OLD]
9
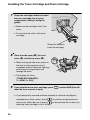
If you installed a new toner cartridge, press
reset the toner counter to zero).
to select NEW (this will
• If you temporarily removed and then replaced an old toner cartridge for
maintenance or other reason, press
to continue using the previous
toner count. (Note: Be sure to press
or the machine will not alert you
when the toner cartridge is out of toner.)
20
10
Press
11
If you installed a new drum cartridge, reset the drum counter as
explained below.
START
.
Resetting the drum counter
Each time you install a new drum cartridge, follow the steps below to reset the
drum counter to zero.
1
Press
2
Press
3
Press
and then
INFO
, then
START
until [LIFE] appears in the display.
until [CLEAR DRUM COUNTER] appears.
.
Manually resetting the toner counter
When a new toner cartridge is installed, the toner counter is reset in Step 9 on
the previous page. The procedure below is normally not necessary; however,
it can be used in the event that you need to reset the toner counter manually.
1
Press
2
Press
3
Press
and then
INFO
, then
START
until [LIFE] appears in the display.
until [CLEAR TONER COUNTER] appears.
.
21
1. Installation
Installing the Toner Cartridge and Drum Cartridge
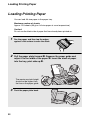
Loading Printing Paper
Loading Printing Paper
You can load A4-size paper in the paper tray.
Maximum number of sheets:
Approx. 220 sheets (80 g/m2 A4-size paper at room temperature)
Caution!
Do not use the blank side of paper that has already been printed on.
1
Fan the paper, and then tap the edges
against a flat surface to even the stack.
2
Pull the paper plate forward ➊. Squeeze the paper guide and
adjust it to the width of the paper ➋. Insert the stack of paper
into the tray, print side up ➌.
3
2
The maximum stack height
should not be higher than
the line on the paper guide
3
22
Push the paper plate back.
1
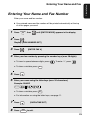
Entering Your Name and Fax Number
Enter your name and fax number.
♦ Your entered name and fax number will be printed automatically at the top
of all fax pages you send.
1
Press
2
Press
FUNCTION
, then
until [ENTRY MODE] appears in the display.
.
Display: [OWN NUMBER SET]
3
Press
4
Enter your fax number by pressing the number keys (max. 20 digits).
.
[ENTER FAX #]
• To insert a space between digits, press
• To clear a mistake, press
DEL
. To enter “+”, press
.
5
Press
6
Enter your name using the letter keys (max. 24 characters).
Example: SHARP
START
.
Caps Lock
• To clear a mistake, press
DEL
• For information on using the letter keys, see page 11.
7
Press
8
Press
START
.
STOP
[DATE&TIME SET]
to exit.
23
1. Installation
Entering Your Name and Fax
Setting the Date and Time
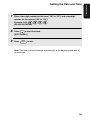
Setting the Date and Time
Set the date and time as explained below.
♦ The date and time will be printed automatically at the top of all fax pages
you send. The date and time also appear in the display.
FUNCTION
1
Press
2
Press
, then
3
Press
.
, then
until [ENTRY MODE] appears.
until [DATE & TIME SET] appears.
• The currently set date appears (example): [DATE 08-15-2008]
4
Enter a two-digit number for the day (“01” to “31”).
Example: the 5th
[DATE 05-15-2008]
• To correct a mistake, press
to move the cursor back to the mistake
and enter the correct number.
5
Enter a two-digit number for the month (“01” for January, “02” for
February, “12” for December, etc.).
Example: January
[DATE 05-01-2008]
6
Enter the year (four digits).
Example: 2008
• The currently set time appears (example): [TIME 13:19]
24
7
Enter a two-digit number for the hour (“00” to “23”) and a two-digit
number for the minute (“00” to “59”).
Example: 9:25
[05-JAN SAT 09:25]
8
Press
to start the clock.
[ANTI JUNK #]
9
Press
START
STOP
to exit.
Note: The time setting will change automatically at the beginning and end of
summertime.
25
1. Installation
Setting the Date and Time
Setting the Reception Mode
Setting the Reception Mode
The machine has two modes for receiving incoming faxes:
AUTO mode:
Select this mode when you only want to receive faxes on the line connected to
the machine. The machine will automatically answer all calls on 1 ring and
begin fax reception.
MANUAL mode:
Select this mode when you want to receive both phone calls and faxes on the
line connected to the fax machine. All calls, including faxes, must be
answered by picking up the fax machine's handset.
To set the reception mode, press
the display (“AUTO” or “MANU”).
RECEPTION
until the desired mode appears in
For more information on receiving faxes, see Chapter 4.
Volume Adjustment
You can adjust the volume of the speaker and ringer using the up and down
arrow keys.
Speaker volume
1
Press
2
Press
SPEAKER
.
or
to select HIGH, MIDDLE, or LOW.
• To turn off the speaker, press
26
SPEAKER
again.
Ringer
1
Press
(Make sure
the feeder.)
or
SPEAKER
to select HIGH, MIDDLE, LOW or OFF.
has not been pressed and a document is not loaded in
• The ringer will ring once at the selected level.
2
If you selected “OFF OK ?” to turn off the ringer, press
START
.
27
1. Installation
Volume Adjustment
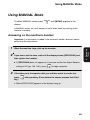
Setting up Network Scanning
2. Network Scanning
Setting up Network Scanning
Introduction
The network scanning feature lets you scan a document and directly send the
image file to an e-mail recipient (Scan to E-mail), or to a folder on a computer
on your network (Scan to Folder).
♦ The scanned file can be in TIFF or PDF format.
♦ Scan to E-mail saves you the trouble of scanning a document into a
computer and sending the scanned file using an e-mail program. The
scanned document is automatically sent as an attachment to an e-mail
message.
Note: The Scan to E-mail function is not compatible with mail servers that require
security protection (SSL).
To use network scanning, the machine must be connected to an Ethernet
network as explained on page 16.
IP address
The machine requires an IP address to in order to communicate on your
network and the Internet.
If your network is set up to automatically assign IP addresses, you do not
need to do anything; the machine will automatically receive an IP address
when it is connected.
If your network requires that a static (permanent) IP address be assigned to
the machine, see Network Settings on page 45 to enter the IP address and
related information.
28
Setting up Network Scanning
Checking your IP address and the connection
1
Press
2
Press
, then
INFO
2. Network
Scanning
To check the machine’s IP address and verify that the machine is able to
communicate on the network, follow these steps.
until [NETWORK INFORMATION] appears.
.
• If the machine has automatically received an IP address and is able to
communicate, [IP ADDRESS/DHCP: ON] will appear on the top line of the
display, followed by the IP address on the bottom line. To show the
machine’s host name, press
.
• If a static IP address has been entered in the machine and the machine is
able to communicate, [IP ADDRESS/DHCP: OFF] will appear on the top
line of the display, followed by the IP address on the bottom line. To show
the machine’s host name, press
.
• If the machine was unable to receive an IP address automatically, or if the
router locked up after the machine received an IP address,
[IP ADDRESS/DHCP: FAIL] / [192.168. 1 .201] will appear. “192.168. 1
.201“ is an IP address that is assigned to the machine for diagnostic
purposes when connection fails (it cannot be used for regular
communication).
• If [NOW CONNECTING / CHECK LATER] appears, press
STOP
to exit.
This message will appear if a cable is not connected or the machine has
not yet established communication on the network. Make sure a cable is
correctly connected, wait briefly, and then repeat the procedure again.
29
Setting up Network Scanning
If the machine is unable to communicate...
♦ Check the Ethernet cable. Are the connections secure? Are you using
straight-through (not crossover) cable for 10Base-T/100Base-TX?
♦ There may be a problem in the router or other device to which the machine
is connected. Try removing and then restoring the power to the router (see
the manual for the router).
♦ If [IP ADDRESS/DHCP: FAIL] appears, remove and then reinsert the
Ethernet cable plug, and then check the IP address again. If the same
message appears, check the device that acts as the DHCP server on your
network (try removing and restoring the power). If your router is your DHCP
server, make sure that DHCP is enabled in the router settings. If your
network does not have a DHCP server, set a static IP address as explained
on page 45.
♦ If a static IP address has been set, make sure that the network settings
(page 45) are correct .
30
Setting up Network Scanning
Before the Scan to E-mail function can be used, you must configure the e-mail
settings.
The e-mail settings specify your outgoing (SMTP) mail server, as well as your
sender name, sender address, and other information that appears in the email to which scanned image files are attached.
♦ The e-mail settings are configured in the machine’s Web page. The
machine’s Web page can be accessed from any computer on the same
network as the machine.
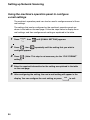
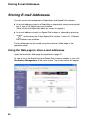
Accessing the machine’s Web page
To access the Web page, you will need to know the machine’s host name or
IP address (usually it is most convenient to use the host name).
To check the machine’s host name or IP address, follow the procedure in
Checking your IP address and the connection (page 29), or print the Network
Settings List (page 108).
Type in the host name or IP address of the machine in the address bar of your
computer’s Web browser. The machine’s Web page will appear.
♦ For the Web browser, it is recommended that you use Internet Explorer 6.0
or higher.
Note: If the Web page is used while the machine is in operation, machine
operation may become unstable.
If password protection has been enabled for the Web page...
If your administrator has enabled password protection for the Web page, you
will need to enter the user name and password to open the Web page.
Regular users enter “user” in User Name and the user password in
Password. (If you do not know the user password, ask your administrator.)
The administrator enters “admin” in User Name and the administrator
password in Password.
31
2. Network
Scanning
E-mail settings
Setting up Network Scanning
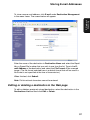
To open the Web page, enter the IP
address or host name of the machine
in your browser’s address bar.
Click E-mail Setup to open the
e-mail settings.
Configuring the e-mail settings in the Web page
Select E-mail Setup in the menu frame of the Web page to open the E-mail
Setup screen.
Under SMTP Setup, enter the host name or IP address of your SMTP server
in SMTP Server.
32
Setting up Network Scanning
For the Port Number, “25” is normally entered.
2. Network
Scanning
Under Authentication Option, select No authentication if your SMTP
server does not require authentication.
If your SMTP server requires SMTP authentication, select SMTP
Authentication and enter your User Name and Password.
If your mail service requires POP before SMTP authentication, select POP
before SMTP and enter the host name or IP address of your POP server in
POP Server. Enter the Port Number, your User Name, and Password.
Under E-mail Settings, enter the Sender Name that you wish to have appear
on e-mail sent from the machine, and the sender E-mail Address.
Note: The E-mail Address must be entered. This must be a valid e-mail
address. Responses to e-mail sent from the machine and any undelivered
mail reports will be sent to this address. It is normally convenient to use the email address of the administrator of the machine or other person in charge of
machine communication.
Enter an E-mail Subject and E-mail Message, and select the File Format
used for the scanned image.
♦ The Sender Name, E-mail Subject, E-mail Message, and File Format
that you enter in this screen are default settings. These settings will be
used if the sender does not specify this information at the time of
transmission.
♦ For further information on the settings in this screen, click Help in the menu
frame.
33
Setting up Network Scanning
Using the machine’s operation panel to configure
e-mail settings
The machine’s operation panel can also be used to configure several of the email settings.
The settings that can be configured on the machine’s operation panel are
shown in the table on the next page. Follow the steps below to display the email settings, and then configure each setting as explained in the table.
1
Press
2
Press
FUNCTION
, then
, then
until [E-MAIL SETTING] appears.
repeatedly until the setting that you wish to
configure appears.
3
Press
. (Note: This step is not necessary for the “FILE FORMAT”
setting.)
4
Enter the required information for the setting as explained in the table
on the next page.
5
After configuring the setting, the next e-mail setting will appear in the
display. You can configure the next setting, or press
34
STOP
to exit.
Setting up Network Scanning
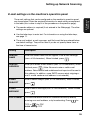
The e-mail settings that can be configured on the machine’s operation panel
are shown below. Enter the required information for each setting as explained
in the table (this is done in step 4 of the procedure on the previous page).
♦ The sender address is required (if not entered in the Web page). The other
settings are optional.
♦ Use the letter keys to enter text. For information on using the letter keys,
see page 11.
♦ The e-mail subject, e-mail message, and file format that are entered below
are default settings. They will be used if you do not specify these items at
the time of transmission.
Setting
Description
SENDER
NAME
Enter the sender name that will appear in the e-mail message
SENDER
ADDRESS
Enter your sender e-mail address (max. of 128 characters). When
(max. of 50 characters). When finished, press
finished, press
START
START
.
. (Note: Be sure to enter a valid e-mail
address. Return e-mail and undelivered mail reports will be sent to
this address. In addition, some SMTP servers reject outgoing email if a valid sender e-mail address is not entered.)
E-MAIL
SUBJECT
Enter a default subject (max. of 128 characters). When finished,
E-MAIL
MESSAGE
Enter a default message (max. of 256 characters). When finished,
FILE FORMAT
This sets the default format for scanned files sent by directly
press
press
START
START
.
.
entering an e-mail address, or by broadcasting. Press
for
TIFF or
for PDF.
Initial setting: TIFF
35
2. Network
Scanning
E-mail settings on the machine’s operation panel
Storing E-mail Addresses
Storing E-mail Addresses
You can store e-mail addresses in Rapid Keys and Speed Dial numbers.
♦ An e-mail address stored in a Rapid Key is selected by simply pressing that
key. A total of 36 Rapid Keys are available.
(Note: Attach the Rapid Key labels as shown on page 8.)
♦ An e-mail address stored in a Speed Dial number is selected by pressing
SPEED DIAL
and entering the 3-digit Speed Dial number. A total of 114 Speed
Dial numbers are available.
E-mail addresses can be stored using the machine’s Web page or the
operation panel.
Using the Web page to store e-mail addresses
Open the machine’s Web page as explained on page 31.
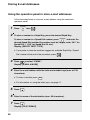
To view a list of the Rapid Keys and Speed Dial numbers already in use, click
Destination Management in the menu frame. The screen below will appear.
36
Storing E-mail Addresses
2. Network
Scanning
To store a new e-mail address, click E-mail under Destination Management
in the menu frame. The screen below will appear.
Enter the name of the destination in Destination Name and select the Rapid
Key or Speed Dial number that you wish to use from the list. Type in the Email Address of the destination and select the File Format of the scanned
image. (The file format selected here is a default format that will be used if a
file format is not specified at the time of transmission.)
When finished, click Submit.
Note: Polish national characters cannot be entered.
Editing or deleting a destination in the Web page
To edit or delete a previously stored destination, select the destination in the
Destinations List and then click Edit or Delete.
37
Storing E-mail Addresses
Using the operation panel to store e-mail addresses
Follow the steps below to store an e-mail address using the machine’s
operation panel.
FUNCTION
1
Press
2
To store a number in a Rapid Key, press the desired Rapid Key.
then
.
SPEED DIAL
To store a number in a Speed Dial number, press
and enter the
desired Speed Dial number (the number must be 3 digits: enter “001” for
Speed Dial 1, “010” for Speed Dial 10, etc.).
Display: [SELECT DEST. TYPE]
• If you prefer to have the machine suggest an available Rapid Key / Speed
Dial number at the end of the procedure, press
.
3
Press
to select “E-MAIL”.
Display: [E-MAIL # MODE]
4
Enter the e-mail address with the letter and number keys (max. of 128
characters).
• To clear a mistake, press
DEL
.
• For information on using the letter keys, see page 11.
38
5
Press
6
Enter the name of the destination (max. 20 characters).
7
Press
.
Display: [FILE FORMAT]
START
START
.
Storing E-mail Addresses
Select the default file format that will be used for scanned images if the
user does not specify a format at the time of transmission. Press
to select TIFF, or
9
to select PDF.
If you selected a Rapid Key or Speed Dial number in Step 2, the display
will briefly show [STORED], and then [NEW NUMBER]. Go to Step 10.
If you did not select a Rapid Key or Speed Dial number in Step 2, the
display will show the next available Rapid Key or Speed Dial number. If
that number is acceptable, press
START
and go to Step 10. If not, press
SPEED DIAL
the desired Rapid Key, or press
and enter the desired 3-digit
Speed Dial number, and go to Step 10.
10
Return to Step 2 to store another e-mail address, or press
STOP
to
exit.
Editing and clearing stored destinations
To make changes to a previously stored destination, or clear a destination,
follow these steps:
FUNCTION
1
Press
2
Select the destination that you wish to edit or delete using one of the
methods below:
then
.
• Rapid Key: If the destination is stored in a Rapid Key, press the Rapid Key.
• Speed Dial: If the destination is stored in a Speed Dial number, press
SPEED DIAL
and enter the 3-digit Speed Dial number with the number keys
(enter “001” for Speed Dial 1, “010” for Speed Dial 10, etc.).
39
2. Network
Scanning
8
Storing E-mail Addresses
• Search: Press
and press
or
until the destination appears in the display
.
Display: [1=EDIT, 2=CLEAR]
3
Press
for “EDIT” or
• If you pressed
4
for “CLEAR”.
for “CLEAR”, press
START
and go to Step 9.
If you selected “EDIT”, make the desired changes to the e-mail address.
• Press
or
to move the cursor to the character(s) you wish to
change, and then press the appropriate letter or number key. The new
character will replace the old character. You can also press
backspace and clear characters.
DEL
to
• If you do not wish to change the address, go directly to Step 5.
5
Press
6
Make the desired changes to the name.
START
.
• If you do not wish to change the name, go directly to Step 7.
7
Press
.
Display: [FILE FORMAT]
8
Select the default file format that will be used for scanned images if the
START
user does not specify a format at the time of transmission. Press
to select TIFF, or
9
Return to Step 2 to edit or clear another destination, or press
exit.
40
to select PDF.
STOP
. to
Scan to E-mail Transmission
Scan to E-mail Transmission
2. Network
Scanning
Follow the steps below to send a scanned document or image to an e-mail
recipient.
♦ The document will be sent as a file attachment to an e-mail message.
♦ You can specify the recipient by directly entering an e-mail address, or by
selecting an address that has been stored as explained in the previous
section.
1
Adjust the document guides to the
width of your document.
2
Insert the document face down in the
document feeder. The top edge of the
document should enter the feeder first.
• SEND READY will appear in the
display.
• Up to 30 A4-size sheets can be placed
in the feeder at once.
• For more information on loading the document, see page 52.
• If desired, press
RESOLUTION
to set the resolution and contrast (see p. 54).
(The default resolution for Scan to E-mail is FINE.)
41
Scan to E-mail Transmission
3
Enter the destination e-mail address using one of the following
methods:
• Press
SCAN TO E-MAIL
, and enter the address with the letter and number
keys (p. 11). When finished, press
START
.
• If the address has been stored in a Rapid Key, press the Rapid Key.
• If the address has been stored in a Speed Dial number, press
SPEED DIAL
and
enter the Speed Dial number.
• To search for a stored address, press
SCAN TO E-MAIL
stored fax numbers from the search), press
address appears, and press
START
or
(this eliminates
until the name or
.
Note: If [CHECK E-MAIL SETTING] appears, your SMTP server or sender
address has not been entered in the e-mail settings (p. 31).
4
If you need to select or change any of the e-mail options, press
and
go to Step 5 below. (Note that settings selected here are temporary. To
make permanent changes, see p. 31.)
If you do not wish to change the e-mail options, go directly to Step 7.
5
Press
(
or
until the desired option appears, and press
is not necessary for the FILE FORMAT setting). Change the option
as explained below (use the letter keys to enter text and
text; p. 11).
DEL
to delete
• E-MAIL SUBJECT: Enter a subject (max. 128 characters). When finished,
press
START
.
• E-MAIL MESSAGE: Enter a message (max. 256 characters). When
finished, press
42
START
.
Scan to E-mail Transmission
for
TIFF or
for PDF. (Make sure the recipient has an image viewer that
can show images in the selected format.)
• FILE NAME: To use an automatically generated file name for the scanned
file, press
(AUTO). To assign a custom name, press
(CUSTOM),
enter the desired name with the letter keys (max. 40 characters), and press
START
6
.
When you have finished configuring the e-mail options, press
or
until the display shows [PRESS START TO SCAN].
7
Press
START
to begin transmission.
Note: The recipient may have security settings in their e-mail program or virus
protection software that prevent the file attachment from being received or
opened. In this case, ask the recipient to try changing the settings.
43
2. Network
Scanning
• FILE FORMAT: Select the format of the scanned image file. Press
Scan to E-mail Transmission
Error messages
If transmission is not successful because the machine is unable to connect to
your mail server, one of the following error messages will appear.
[CONNECTION ERROR]
This appears when communication does not take place correctly on your local
network, usually due to a problem with the cable connections. Make sure that
the cable ends are securely inserted in the LAN ports. Make sure that the
correct cable is being used and that the cable is good. Make sure that your
router or hub is powered on.
[SERVER ERROR]
This appears when the machine cannot connect to your mail server or there is
no response from the mail server. Make sure the SMTP server setting is
correct (p. 31). If you have configured “POP before SMTP” settings in the Web
page, make sure these settings are correct.
[SERVER NOT FOUND] / [SMTP]
This appears when an incorrect host name is entered for your SMTP server.
Check the SMTP server setting (p. 31).
[SERVER NOT FOUND] / [DHCP]
This appears when the machine is unable to automatically obtain an IP
address. Restart your router or other device that acts as your DHCP server.
[SERVER ERROR] / [SMTP-AUTH]
This appears when your SMTP server requires SMTP authentication and the
SMTP authentication user name or password entered in the machine’s Web
page is not correct (p. 33).
[CABLE DISCONNECTED]
This may appear below any of the above messages. Check the same items as
in [CONNECTION ERROR] above.
If an undelivered mail report is sent to inform you that your e-mail
message was not successfully delivered, the report will be sent to the
sender address entered in the e-mail settings (page 31).
44
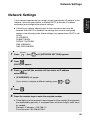
Network Settings
If your network requires that you assign a static (permanent) IP address to the
machine, follow the steps below to disable DHCP (automatic IP address
assigment) and configure the network settings.
♦ Consult your network administrator for the information that must be
entered. After DHCP is disabled, the settings that must be configured
appear in the following order (these settings only appear when DHCP is set
to NO):
IP ADDRESS
SUBNET MASK
DEFAULT GATEWAY
DNS (PRIMARY)
DNS (SECONDARY)
1
Press
2
Press
FUNCTION
, then
until [NETWORK SETTING] appears.
.
[DHCP] will appear.
3
Press
for NO (the machine will not obtain an IP address
automatically).
• [IP ADDRESS] will appear.
(If you wish to configure a different setting, press
4
Press
5
Press the number keys to enter the required number.
or
.)
.
• Three digits must be entered in each segment of the number (the segments
are separated by periods). If a segment does not have 3 digits, enter zeros
as needed.
Example: IP address = 192.168.1.2
You must enter: 192.168.001.002
45
2. Network
Scanning
Network Settings
Network Settings
• If you make a mistake, press
to move the cursor to the mistake and
enter the correct number.
6
When finished entering the number, press
7
The next setting will appear in the display. Repeat Steps 4 through 6 to
configure the next setting, or press
STOP
START
.
to exit.
Initializing the network settings
If you need to return the network settings to their initial state, follow the steps
below.
♦ Initializing the settings enables DHCP and clears the IP address and
related settings.
46
FUNCTION
1
Press
2
Press
3
Press
.
Display: [INITIALIZE SETTINGS] / [IF OK, PRESS START]
4
Press
, then
, then
START
START
.
until [NETWORK SETTING] appears.
until [INITIALIZE SETTINGS] appears.
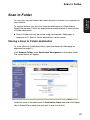
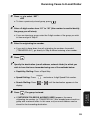
Scan to Folder
You can also scan and send a document directly to a folder on a computer on
your network.
To use this feature, you must first store the destination in a Rapid Key or
Speed Dial number. Follow the appropriate procedure below to store a Scan
to Folder destination.
♦ Scan to Folder can only be stored using the machine’s Web page. A
maximum of 12 Scan to Folder destinations can be stored.
Storing a Scan to Folder destination
To store a Scan to Folder destination, open the machine’s Web page as
explained on page 31.
Click Network Folder under Destination Management in the menu frame.
The screen below will appear.
Enter the name of the destination in Destination Name and select the Rapid
Key or Speed Dial number that you wish to use from the list.
47
2. Network
Scanning
Scan to Folder
Scan to Folder
Type in the Folder Path (the name or IP address of the computer on which
the folder is located, followed by the path to the folder). For example, to
specify the “NetworkScanDocs” folder in the “Product Planning” folder on
“ComputerA”, type in the following:
\\ComputerA\Product Planning\NetworkScanDocs
Note: The folder must be set as a folder that is shared on the network in the
folder properties.
Enter the User Name and Password required to access the computer. If your
network environment requires that you enter the domain name with the user
name, enter the User Name in the format DomainName\UserName.
Select the File Format of the scanned image. (The file format selected here is
a default format that will be used if a file format is not specified at the time of
transmission.)
When finished, click Submit.
48
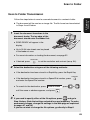
Scan to Folder
Scan to Folder Transmission
♦ The document will be sent as an image file. The file format can be selected
in Steps 4 and 5 below.
1
Insert the document face down in the
document feeder. The top edge of the
document should enter the feeder first.
• SEND READY will appear in the
display.
• Up to 30 A4-size sheets can be placed
in the feeder at once.
• For more information on loading the document, see page 52.
• If desired, press
2
RESOLUTION
to set the resolution and contrast (see p. 54).
Select the destination using one of the following methods:
• If the destination has been stored in a Rapid Key, press the Rapid Key.
• If the destination has been stored in a Speed Dial number, press
SPEED DIAL
and enter the Speed Dial number.
• To search for the destination, press
SCAN TO FOLDER
until the name or address appears, and press
3
START
, press
or
.
If you need to specify either of the file options, press
and go to
Step 4 below. (Note that settings selected here are temporary. To make
permanent changes, change the settings in the Web page as explained
on pages 47 and 48.)
If you do not wish to change the file options, go directly to Step 6.
49
2. Network
Scanning
Follow the steps below to send a scanned document to a network folder.
Scan to Folder
4
Press
or
until the desired option appears, and then make a
selection for the option as explained below.
• FILE FORMAT: Select the format of the scanned image file. Press
TIFF or
for
for PDF.
• FILE NAME: To use an automatically generated file name for the scanned
file, press
(AUTO). To assign a custom name, press
(CUSTOM),
enter the desired name with the letter keys (max. 40 characters), and press
START
5
.
When you have finished configuring the file options, press
until the display shows [PRESS START TO SCAN].
6
50
Press
START
to begin transmission.
or
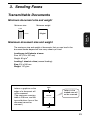
Transmittable Documents
3. Sending Faxes
Transmittable Documents
Minimum document size and weight
Minimum size
Minimum weight
70 mm
52 g/m²
3. Sending
Faxes
140 mm
Maximum document size and weight
The maximum size and weight of documents that you can load in the
document feeder depend on how many sheets you load.
Loading up to 30 sheets at once:
Size: A4 (210 x 297 mm)
Weight: 80 g/m2
Loading 1 sheet at a time (manual feeding):
Size: 216 x 356 mm
Weight: 157 g/m2
4 mm
Letters or graphics on the
edges of a document will
not be scanned.
(The maximum scanning
width is 208 mm, and the
top and bottom 4 mm of the
document cannot be
scanned.)
208 mm
Letters in the
shaded area will
not be scanned.
4 mm
51
Loading the Document
Other restrictions
♦ The scanner cannot recognise yellow, greenish yellow, or light blue ink.
♦ Ink, glue, and correcting fluid on documents must be dry before they pass
through the document feeder.
♦ All clips, staples, and pins must be removed from documents before loading
in the feeder. If these are not removed, they may damage the machine.
♦ Documents which are patched, taped, torn, smaller than the minimum size,
carbon backed, easily smudged, or have a slick coated surface should be
photocopied, and the copy loaded in the feeder.
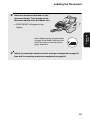
Loading the Document
Up to 30 A4-size sheets can be placed in the feeder at once. The sheets will
automatically feed into the machine starting from the bottom sheet.
♦ If you need to send or copy more than the maximum number of sheets,
place the additional sheets gently and carefully in the feeder just before the
last sheet is scanned. Do not try to force the sheets in, as this may cause
double-feeding or jamming.
♦ For large or thick sheets that must be loaded one at a time, insert each
sheet into the feeder as the previous sheet is being scanned. Insert gently
to prevent double-feeding.
1
52
Adjust the document guides to the
width of your document.
Loading the Document
2
Insert the document face down in the
document feeder. The top edge of the
document should enter the feeder first.
• SEND READY will appear in the
3. Sending
Faxes
display.
Note: When inserting a large number
of pages in the feeder, slant the front
end of the stack so that the bottom
pages enter first.
3
Adjust the resolution and/or contrast settings as explained on page 54,
then dial the receiving machine as explained on page 56.
53
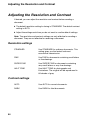
Adjusting the Resolution and Contrast
Adjusting the Resolution and Contrast
If desired, you can adjust the resolution and contrast before sending a
document.
♦ The default resolution setting for faxing is STANDARD. The default contrast
setting is AUTO.
♦ Adjust the settings each time you do not want to use the default settings.
Note: The resolution and contrast settings are only effective for sending a
document. They are not effective for receiving a document.
Resolution settings
STANDARD
Use STANDARD for ordinary documents. This
setting gives you the fastest and most
economical transmission.
FINE
Use FINE for documents containing small letters
or fine drawings.
SUPER FINE
Use SUPER FINE for documents containing
very small letters or very fine drawings.
HALF TONE
Use HALF TONE for photographs and
illustrations. The original will be reproduced in
64 shades of gray.
Contrast settings
54
AUTO
Use AUTO for normal documents.
DARK
Use DARK for faint documents.
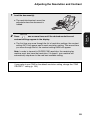
Adjusting the Resolution and Contrast
1
Load the document(s).
• The resolution/contrast cannot be
adjusted unless the document is
loaded.
RESOLUTION
3. Sending
Faxes
2
Press
one or more times until the desired resolution and
contrast settings appear in the display.
• The first time you move through the list of resolution settings, the contrast
setting AUTO will appear next to each resolution setting. The second time
you move through the list, the contrast setting DARK will appear.
Note: In order to transmit in SUPER FINE resolution, the receiving fax
machine must also have that resolution. If it doesn’t, your machine will
automatically step down to the next best available setting.
If you prefer to use FINE for the default resolution setting, change the “FINE
PRIORITY” setting (p. 103).
55
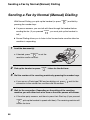
Sending a Fax by Normal (Manual) Dialling
Sending a Fax by Normal (Manual) Dialling
With Normal Dialing, you pick up the handset (or press
SPEAKER
) and dial by
pressing the number keys.
♦ If a person answers, you can talk with them through the handset before
sending the fax. (If you pressed
SPEAKER
, you must pick up the handset to
talk.)
♦ Normal Dialing allows you to listen to the line and make sure the other fax
machine is responding.
1
Load the document(s).
• If desired, press
RESOLUTION
to set the
resolution and/or contrast.
2
Pick up the handset or press
3
Dial the number of the receiving machine by pressing the number keys.
SPEAKER
. Listen for the dial tone.
• If you are on a Flash-type PBX and are dialing out, press
R
, wait for the
connection to the outside line, and then dial the number.
4
Wait for the connection. Depending on the setting of the receiving
machine, you will either hear a fax tone or the other person will answer.
• If the other party answers, ask them to press their Start key (if you pressed
SPEAKER
, pick up the handset to speak with them). The receiving machine will
issue a fax tone.
56
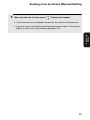
Sending a Fax by Normal (Manual) Dialling
When you hear the fax tone, press
START
. Replace the handset.
• If the transmission is completed successfully, the machine will beep once.
• If an error occurs, the machine will beep three times and print a Transaction
Report to inform you of the problem (see page 110).
3. Sending
Faxes
5
57
Sending a Fax by Normal (Manual) Dialling
Page counter for Normal (manual) Dialling
When automatic dialling is used, a slash and the total number of pages is
automatically added to each page number on transmitted fax pages (for
example, "P. 1/5", "P.2/5", etc.). This allows the recipient to check for missing
pages.
If you wish to use this feature with Normal Dialling, you must set the total
number of pages manually. Follow the steps below.
1
Load the document(s).
2
Press
3
Press
FUNCTION
, then
until [PAGE COUNTER] appears in the display.
.
Display: [ENTER # (01 - 99)]
4
Enter the total number of pages (“01” to “99”) with the numeric keys.
Example: 5 pages
RESOLUTION
5
If desired, press
6
Follow Steps 2 to 5 of the Normal Dialling procedure to send the fax.
to set the resolution and/or contrast.
• To cancel a batch number entry, remove the document from the feeder or
press
STOP
.
• If the number of pages actually transmitted is not the same as the batch
number entered, an alarm will sound and [PAGE COUNT ERROR] will
appear in the display. “PAGE E.” will also appear in the NOTE column of the
Transaction Report if printed.
58
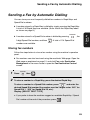
Sending a Fax by Automatic Dialling
Sending a Fax by Automatic Dialling
You can store your most frequently dialled fax numbers in Rapid Keys and
Speed Dial numbers.
♦ A number stored in a Rapid Key is dialled by simply pressing the Rapid Key.
♦ A number stored in a Speed Dial number is dialled by pressing
3-digit Speed Dial number, and then
numbers are available.
START
SPEED DIAL
, the
. A total of 114 Speed Dial
Storing fax numbers
Follow the steps below to store a fax number using the machine’s operation
panel.
♦ Fax numbers can also be stored using the machine’s Web page. Open the
Web page as explained on page 31, and click Fax under Destination
Management in the menu frame to open the Fax Destination Control
screen.
FUNCTION
1
Press
2
To store a number in a Rapid Key, press the desired Rapid Key.
then
.
SPEED DIAL
To store a number in a Speed Dial number, press
and enter the
desired Speed Dial number (the number must be 3 digits: enter “001” for
Speed Dial 1, “010” for Speed Dial 10, etc.).
Display: [SELECT DEST. TYPE]
• If you prefer to have the machine suggest an available Rapid Key / Speed
Dial number at the end of the procedure, press
.
59
3. Sending
Faxes
A total of 36 Rapid Keys are available. (Note: Attach the Rapid Key labels
as shown on page 8.)
Sending a Fax by Automatic Dialling
3
Press
to select “FAX”.
Display: [FAX # MODE]
4
Enter the fax or phone number by pressing the number keys (maximum
of 32 digits).
(Note: A space cannot be entered.)
• To clear a mistake, press
DEL
.
• If a pause is required between any of the digits to access a special service
REDIAL
or an outside line, press
. The pause appears as a hyphen (four
seconds per pause). Several pauses can be entered in a row.
• If you are on a PBX and the number you are storing is for an outside line,
and you have configured the PBX CONNECTION setting for automatic
R
connection to an outside line (p. 106), do not press the flash key ( ) at
the beginning of the number or enter the prefix for an outside line. If the
number you are storing is for a destination inside your PBX, press
before entering the number.
5
Press
6
Enter the name of the destination (max. 20 characters).
START
.
• For information on using the letter keys, see page 11.
7
60
Press
START
.
R
Sending a Fax by Automatic Dialling
8
If you selected a Rapid Key or Speed Dial number in Step 2, the display
will briefly show [STORED], and then [NEW NUMBER]. Go to Step 9.
If you did not select a Rapid Key or Speed Dial number in Step 2, the
display will show the next available Rapid Key or Speed Dial number. If
that number is acceptable, press
START
and go to Step 9. If not, press the
SPEED DIAL
9
and enter the desired 3-digit Speed
Return to Step 2 to store another number, or press
STOP
3. Sending
Faxes
desired Rapid Key, or press
Dial number, and go to Step 9.
to exit.
61
Sending a Fax by Automatic Dialling
Editing and clearing auto-dial numbers
To make changes to a previously stored auto-dial number, or clear a number,
follow these steps:
FUNCTION
1
Press
2
Select the number that you wish to edit or delete using one of the
methods below:
then
.
• Rapid Key: If the number is stored in a Rapid Key, press the Rapid Key.
• Speed Dial: If the number is stored in a Speed Dial number, press
SPEED DIAL
and enter the 3-digit Speed Dial number with the number keys (enter “001”
for Speed Dial 1, “010” for Speed Dial 10, etc.).
• Search: Press
or
until the name or number of the destination
appears in the display and press
.
Display: [1=EDIT, 2=CLEAR]
3
Press
for “EDIT” or
for “CLEAR”.
• If you selected “CLEAR”, go to Step 7.
4
If you selected “EDIT”, make the desired changes to the number.
• Press
or
to move the cursor to the digit or digits you wish to
change, and then enter the new digit. The new digit will replace the old
digit. You can also press
DEL
to backspace and clear digits.
• If you do not wish to change the number, go directly to Step 5.
5
62
Press
START
.
Sending a Fax by Automatic Dialling
6
Make the desired changes to the name.
• Press
or
to move the cursor to the letter or letters you wish to
change, and then press the appropriate letter key. The new letter will
replace the old letter. You can also press
letters.
DEL
to backspace and clear
7
Press
8
Return to Step 2 to edit or clear another number, or press
START
3. Sending
Faxes
• If you do not wish to change the name, go directly to Step 7.
.
STOP
to exit.
63
Sending a Fax by Automatic Dialling
Using an auto-dial number to send a fax
1
Load the document(s).
• If desired, press
RESOLUTION
to set the
resolution and/or contrast.
2
Select the fax number using one of the methods below:
• Rapid Key Dialling: If the number is stored in a Rapid Key, press the
Rapid Key.
• Speed Dialling: If the number is stored in a Speed Dial number, press
SPEED DIAL
and enter the Speed Dial number with the number keys (the
number must be 3 digits: enter “001” for Speed Dial 1, “010” for Speed Dial
10, etc.). Make sure the correct destination appears in the display (if not,
press
STOP
), and then press
• Search Dialling: Press
START
or
.
until the name or number of the other
party appears in the display, and press
3
START
.
Scanning, dialling, and transmission will take place automatically.
• To cancel transmission, press
STOP
.
• If the transmission is completed successfully, the machine will beep once.
• If an error occurs, the machine will beep three times and print a Transaction
Report to inform you of the problem (see page 110).
64
Sending a Fax by Automatic Dialling
Making a voice call with an auto-dial number
Rapid Key Dialing: Lift the handset and press the Rapid Key.
SPEED DIAL
Search Dialing: Press
or
3. Sending
Faxes
Speed Dialing: Lift the handset, press
, and enter the Speed Dial
number with the number keys (the number must be 3 digits: enter “001” for
Speed Dial 1, “010” for Speed Dial 10, etc.).
until the name or number of the other
party appears, and lift the handset.
(You can also lift the handset first, search for the number, and then press
START
.)
Sending a fax by Direct Keypad Dialling
Use this method to dial a full fax number without using the handset.
1
Load the document(s).
• If desired, press
RESOLUTION
to set the
resolution and/or contrast.
2
Enter the number of the receiving machine with the number keys.
• If a pause is required between any of the digits to access a special service
REDIAL
or an outside line, press
. The pause appears as a hyphen (four
seconds per pause). Several pauses can be entered in a row.
• If you are on a PBX and are dialing a number inside your PBX, and you
have configured the PBX CONNECTION setting for automatic connection
to an outside line (p. 106), press
R
before entering the number.
65
Sending a Fax by Automatic Dialling
3
Check the display. If the number shown is correct, press
• If the number is not correct, press
STOP
START
.
to clear the incorrect digits, and
then re-enter the correct digit(s).
Using the REDIAL key
To redial the last number dialled on the machine, press
REDIAL
will be automatically activated. To fax a document, press
the fax tone after the other machine answers.
START
. The speaker
when you hear
Automatic redialling
If you use auto dialling (including Direct Keypad Dialling) to send a fax and the
line is busy, the machine will automatically make three redial attempts at
intervals of five minutes.
During this time, [RECALLING] will appear in the display, followed by the
attempt number.
♦ To clear the message and stop automatic redialling, press
STOP
. If there
are multiple fax numbers being automatically redialled, only the number
that was attempted first will appear in the display. To cancel automatic
redialling of a different number, see Checking and cancelling stored fax
jobs on page 67.
Under certain conditions, automatic redialling may stop before three redialling
attempts are made.
66
Sending a Fax by Automatic Dialling
Checking and cancelling stored fax jobs
If you use automatic dialling (including Direct Keypad Dialling) to send a fax
while the machine is busy with another job, the fax job will be stored in the
machine’s memory and performed after all previously stored jobs are finished.
To check what fax jobs are waiting in memory to be performed, or to cancel a
job, follow the steps below.
3. Sending
Faxes
♦ Timer transmission jobs can also be checked and canceled using this
procedure.
1
Press
2
Make sure that [TX JOBS] appears in the display and press
3
Press
.
INFO
or
.
to scroll through the stored fax jobs.
• The top line of the display shows the memory number assigned to the job
and the time the job was stored. The bottom line alternately shows the
destination and the status of the job.
• [NO DATA] will appear if no jobs are currently stored in memory.
4
To cancel a job, display the job and press
START
[IF CLEAR, PRESS START] will appear. Press
5
Press
STOP
.
START
again to clear the job.
to exit.
67
Using AUTO Mode
4. Receiving Faxes
Using AUTO Mode
To select AUTO mode, press
RECEPTION
until [AUTO] appears in the display.
In AUTO mode, the machine automatically answers all calls on 1 ring and
receives incoming faxes.
♦ If you pick up the handset before the machine answers, you can talk to the
other party and receive a fax as explained in Using MANUAL Mode below.
To change the number of rings on which the machine answers calls, change
the “NUMBER OF RINGS” setting (pp. 103 and 104).
The machine automatically reduces received faxes as needed to fit the paper.
If you prefer to have all faxes printed at full size, change the “RECEIVE
RATIO” setting (pp. 103 and 107).
Important:
Do not let more than 100 sheets collect in the received document tray. Too
many sheets in the tray will cause paper jams.
68
Using MANUAL Mode
Using MANUAL Mode
To select MANUAL mode, press
display.
RECEPTION
until [MANU] appears in the
In MANUAL mode, you must answer all calls (even faxes) by picking up the
machine’s handset.
Answering on the machine’s handset
1
When the machine rings, pick up the handset.
2
If you hear a soft fax tone, wait until the display shows [RECEIVING] and
then replace the handset.
♦ If [RECEIVING] does not appear (or if you have set the Fax Signal Receive
setting to NO (pp. 103, 104)), press
3
START
to begin reception.
If the other party first speaks with you and then wants to send a fax,
press
key.)
START
after speaking. (Press before the sender presses their Start
• When [RECEIVING] appears in the display, hang up.
69
4. Receiving
Faxes
Important: If a document is loaded in the machine’s feeder, remove it before
performing the steps below.
Reception to Memory
Reception to Memory
Incoming faxes will be received to memory when printing is not possible, such
as when the machine runs out of paper, the print cartridge needs
replacement, or the paper jams.
When you have received a fax in memory, [FAX RX IN MEMORY] will appear
in the display, alternating with a message that indicates the problem.
When you resolve the problem, the stored faxes will automatically print out.
♦ If you received faxes to memory because the machine ran out of paper, be
sure to add paper that is the same size as the paper previously used, or the
fax print-out size will not match the size of the printing paper.
70
5. Printing
Installing the Printer Driver
Installing the Printer Driver
The machine can be used as a network printer.
♦ To use the machine as a network printer, it must be connected to your
network as explained on page 16, and it must be assigned an IP address
as explained on page 28.
The printer driver must be installed on each computer that will use the
machine as a printer. Follow the steps below to install the printer driver.
1
Insert the CD-ROM that accompanied the machine into your computer’s
CD-ROM drive.
2
In the initial screen that appears, click “Install Printer Driver”.
• If the initial screen does not automatically appear, run “Launch.exe” on the
CD-ROM. (Open “My Computer”, double-click your CD-ROM drive, and
double-click “Launch.exe”.)
5. Printing
• To select the language that will be used in the printer driver, click the
“Language Options” button.
3
Follow the instructions in the windows that appear to install the printer
driver.
• If multiple FO-IS115N machines are connected to your network, the printer
driver can only be installed for one machine at a time. (When the list of
detected machines appears during the installation, only one of the
machines can be selected.) If you wish to install the printer driver for all
connected machines, repeat the installation procedure for each machine.
(When repeating the installation, the SHARP FO-IS115N Setup
Maintenance program will appear after you click “Install Printer Driver” in
Step 2. Select Modify to repeat the installation.)
71
Installing the Printer Driver
Removing the printer driver
To remove the installed printer driver, simply delete the icon of the printer from
the printers window (right-click the printer icon and select Delete).
If printer drivers are installed for multiple FO-IS115N machines, all printer
drivers can be removed at once using the CD-ROM that accompanied the
machine. Insert the CD-ROM into your computer’s CD-ROM drive, select
Install Printer Driver, and then select Remove in the FO-IS115N Setup
Maintenance screen that appears.
72
Printing a Document From an Application
Printing a Document From an Application
1
When you are ready to print a document from an application on your
computer, select “Print” from the File menu.
• The Print dialog box appears.
2
Make sure that “SHARP FO-IS115N” is selected as the printer.
3
If you need to select the paper size or adjust any of the other print
settings, click Properties, Setup, or Printer in the Print dialog box (the
name of the button varies depending on the application).
• The Printing Preferences window appears. Adjust the settings as desired
4
Select the print range and adjust any other settings as desired in the
Print dialog box.
5
When you are ready to begin printing, click “Print” or “OK” in the Print
dialog box.
5. Printing
(see pages 75 to 77) and then click OK.
Note: When you adjust the print settings as explained above in Step 3, your
changes will only remain in effect while you are using the application. To make
permanent changes, see page 74.
73
Selecting Print Settings
Selecting Print Settings
The print settings are selected in the Printing Preferences.
♦ To make temporary changes to the print settings, open the Printing
Preferences from an application as explained in Step 3 on page 73. The
settings will remain in effect only while the application is running.
♦ To make permanent changes to the print settings, open the Printing
Preferences from the Printers and Faxes folder (the Printers folder in
Windows® 2000) as explained below:
Windows® Vista: Click the Start button, click Hardware and Sound, and
click Printers. Right-click the SHARP FO-IS115N icon and select Printing
Preferences.
Windows® XP / Server 2003: Click the start button, click Control Panel,
click Printers and Other Hardware, and then click Printers and Faxes. In
the Printers and Faxes window, click on the SHARP FO-IS115N icon and
select Printing Preferences from the File menu.
Windows® 2000: Click the Start button, point to Settings, and select
Printers. In the Printers window, click on the SHARP FO-IS115N icon and
select Printing Preferences from the File menu.
74
Selecting Print Settings
5. Printing
Page Layout tab
N-up: This is used to print multiple reduced-size images on one sheet of
paper. Click the setting and select the desired number of images.
Print Quality: This determines the clarity of the printed image. Click the
setting and select the desired quality (a higher setting produces a clearer
image).
Watermark: This is used to print a watermark (a faint background image) on
each sheet of output. Click the setting and select the desired watermark. To
edit the selected watermark, click Edit Watermark.
To save your settings and close the window, click OK. To save your settings
without closing the window, click Apply. To cancel your settings and close the
window, click Cancel.
75
Selecting Print Settings
Paper tab
Paper Size: Click the setting and select A4, Letter or Legal for the paper
size. (Make sure that the selected size of paper is loaded in the paper tray.)
Orientation: Select Portrait or Landscape to match the orientation of your
document.
Fit to Paper: Select this and then select a paper size to enlarge or reduce the
printed image to the selected paper size.
To save your settings and close the window, click OK. To save your settings
without closing the window, click Apply. To cancel your settings and close the
window, click Cancel.
76
Selecting Print Settings
5. Printing
Advanced tab
Copy Count: To change the number of copies printed of each page of your
document, click this setting and enter the desired number.
Advanced Printing Features: Normally this is set to Enabled to allow you to
use the advanced printing features.
Halftoning: This is normally set to Auto Select to let the printer select the
best halftone setting.
To save your settings and close the window, click OK. To save your settings
without closing the window, click Apply. To cancel your settings and close the
window, click Cancel.
77
6. Making Copies
The machine can be used as a convenience copier. Follow the steps below to
make copies.
Sorting copies
The machine is initially set to not sort copies. If you wish to have copies
sorted as shown below, change the “SORT COPY” setting to YES (pp. 103
and 107).
A
B C
Not sorted (MULTI COPY)
Sorted (SORT COPY)
A
B C
A
Originals
B C
A
A
B
B
C
C
Example: Two copies
each of three originals
1
Load the document(s). (Maximum of 30 A4 sheets.)
• If desired, press
2
RESOLUTION
to set the resolution and/or contrast.
Select the following copy settings as needed:
• Enlarge/reduce: Press
or
to select 100%, 125%, 135%, 200%,
70%, 88% or 94%.
Default setting: 100%.
• Number of copies per original: Enter a number from 1 to 99.
Default setting: 1
Example: Press
3
78
for two copies
When you are ready to begin copying, press
COPY/HELP
.
If [MEMORY FULL] appears...
If you place many originals in the feeder, the memory may become full before
all pages can be scanned (the display will show [MEMORY FULL]). If this
happens, only the pages that were scanned will be copied and the remaining
pages will automatically feed out. Repeat the copy procedure for the
remaining pages, including the page that was being scanned when the
memory became full.
6. Making
Copies
Note: It may not be possible to make a copy of an original if a high resolution
setting is used and/or the original contains so much detailed content that the
memory becomes full before scanning finishes.
79
Broadcasting
7. Special Functions
Broadcasting
You can send the same document to as many as 50 fax or e-mail destinations
in just one operation.
♦ The destinations must be all fax or all e-mail. It is not possible to mix fax
and e-mail destinations.
♦ Only destinations stored in Rapid Keys and Speed Dial numbers can be
selected. (It is not possible to enter a full fax number or e-mail address.)
1
Load the document(s).
• If desired, press
RESOLUTION
to set the resolution and/or contrast.
2
Press
3
Press
to broadcast to FAX destinations, or
MAIL destinations.
4
Select a destination using one of the following methods:
B'CAST
.
to broadcast to E-
• Press a Rapid Key.
• Press
• Press
80
SPEED DIAL
or
and enter a 3-digit Speed Dial number.
until the desired destination appears in the display.
5
Press
6
Repeat Steps 4 and 5 for each of the other desired destinations
(maximum of 50).
to enter the destination.
Broadcasting
• You can press
to scroll through and check your entered destinations.
To delete a destination, press
7
DEL
when it appears.
When you have finished selecting destinations, press
START
.
• If you are broadcasting to fax destinations, transmission will begin.
• If you are broadcasting to e-mail destinations, you can press
to select
e-mail options (see Steps 4 to 6 on page 42). When you are ready to begin
transmission, press
START
.
• For fax, a Transaction Report is automatically printed out after
Broadcasting is completed. If any destinations in the "NOTE" column of the
report are marked "BUSY" or have a communication error code, you will
need to send the document to those destinations again.
If the memory becomes full...
If the memory becomes full during scanning, [MEMORY FULL] will appear in
the display.
♦ Press
START
♦ To cancel the entire transmission, press
STOP
7. Special
Functions
to send the pages which have been stored up to that point in
memory (the remaining pages will automatically feed out). After
transmission, the memory will be cleared and you can send the remaining
pages. You will also need to send the page which was being scanned when
the memory filled up.
.
81
Broadcasting
Broadcasting using a Group Key
If the destinations to which you want to broadcast have all been stored in one
Group Key (see Storing destinations in Group Keys which follows), you can
perform the broadcast operation using the following simplified procedure:
1 Load the document(s).
• If desired, press
RESOLUTION
to set the resolution and/or contrast.
2 Press the Group key.
• If the group is a fax group, transmission will begin.
• If the group is an e-mail group, you can press
to select e-mail options
(see Steps 4 to 6 on page 42). When you are ready to begin transmission,
press
START
.
Storing destinations in Group Keys
Follow the steps below to store a group of destinations in a Group Key.
♦ Any Rapid Key not already in use can be used as a Group Key. A key
cannot be simultaneously programmed as both a Group Key and a Rapid
Key.
♦ Up to 50 fax or e-mail destinations can be stored in one Group Key.
♦ The destinations must be all fax or all e-mail. It is not possible to mix fax
and e-mail destinations.
♦ Only Rapid Key and Speed Dial numbers can be stored in a Group Key. Full
numbers cannot be stored.
82
Broadcasting
FUNCTION
1
Press
2
Press
, then
3
Press
(SET) to store a group. (Press
4
Press the Rapid Key that you want to use as a Group Key. (If you are
clearing a Group Key, press the Group key that you want to clear and go
to Step 8.)
, then
until [ENTRY MODE] appears.
until [GROUP ENTRY] appears.
(CLEAR) to clear a group.)
• If [ALREADY STORED] or [RAPID # STORED] appears, the key has
already been programmed. Clear the key or try another Rapid Key.
5
Select a destination using one of the following methods:
• Press a Rapid Key.
• Press
SPEED DIAL
and enter a 3-digit Speed Dial number.
or
until the desired destination appears in the display.
6
Press
7
Repeat Steps 5 and 6 for each of the other desired destinations
(maximum of 50).
to enter the destination.
• You can press
to scroll through and check your entered destinations.
To delete a destination, press
DEL
when it appears.
83
7. Special
Functions
• Press
Broadcasting
84
8
When you have finished entering the destinations, press
9
Press
STOP
to exit.
START
.
Blocking Unwanted Faxes
Blocking Unwanted Faxes
The Anti Junk Fax function blocks reception of faxes from fax numbers that
you specify.
To use this function, enter the fax numbers that you want to block. Up to five
numbers can be entered.
FUNCTION
1
Press
2
Press
, then
3
Press
.
4
Press
.
5
Enter the fax number with the number keys (max. 20 digits).
Note: Enter numbers only; hyphens and spaces cannot be entered.
6
Press
7
Return to Step 4 to store another number, or press
START
, then
until [ENTRY MODE] appears.
until [ANTI JUNK #] appears.
.
STOP
to exit.
♦ When a fax is blocked, a transaction report (page 110) will print to inform
7. Special
Functions
you (unless “TRANSACTION LIST” on page 104 is set to “NEVER
PRINT”).
85
Blocking Unwanted Faxes
Editing and clearing Anti Junk numbers
FUNCTION
1
Press
2
Press
, then
3
Press
.
4
Press
or
, then
until [ENTRY MODE] appears.
until [ANTI JUNK #] appears.
until the number you want to edit or clear appears in
the display.
5
Press
.
6
Press
for EDIT or
for CLEAR.
• If you selected CLEAR, go to Step 8.
7
If you selected EDIT, make the desired changes to the number.
• Press
or
to move the cursor to the digit or digits you wish to
change, and then enter the new digit. The new digit will replace the old
digit. You can also press
86
8
Press
9
Press
START
.
STOP
to exit.
DEL
to backspace and clear digits.
Duplex Scanning
Duplex Scanning
Duplex Scanning is convenient for transmitting or copying two-sided
documents. When this function is selected, you simply feed all pages of the
document through the machine once, turn the stack of pages over, and feed
the stack through again. The machine will automatically sort the pages into
the correct order (front of 1st page, back of 1st page, front of 2nd page, back
of 2nd page, etc.).
♦ Note that any blank sides must be included when scanning the pages (if
the number of pages is not equal each time the machine scans the stack,
an error will result).
1 Load the documents. Make sure the pages are placed front-side down,
with the first page on the bottom.
• If desired, press
2 Press
DUPLEX
RESOLUTION
and then
START
to set the resolution and/or contrast.
.
3 Perform all steps of the desired copy or transmission operation.
4 When all pages of the document have been scanned, turn the stack over
(do not change the page order) and load the stack again.
START
.
7. Special
Functions
5 Press
87
Print Hold
Print Hold
To prevent others from viewing or taking your received faxes, use the Print
Hold function. When this function is activated, received faxes are held in
memory without being printed. To print the faxes, a preset Print Hold code
must be entered.
Setting the Print Hold code
The Print Hold code is used to print received faxes. Follow the steps below to
set the Print Hold code.
♦ The Print Hold code can be any number from 5 to 8 digits in length.
1
Press
2
Press
3
Enter a Print Hold code (5 to 8 digits).
4
Press
PRINT HOLD
, then
until [PRINT HOLD CODE SET] appears.
.
START
.
• The machine will print the Print Hold code for your records.
88
Print Hold
Activating Print Hold
Follow the steps below to activate Print Hold.
♦ Print Hold cannot be activated unless a Print Hold code has been set.
1
Press
2
Press
3
Press
PRINT HOLD
, then press
until [ACTIVATE PRINT HOLD] appears.
.
to select “YES”.
Printing received faxes
When the memory is holding one or more received faxes, [PRT. HOLD DATA
EXIST] will appear in the display. Follow the steps below to print the faxes.
1
Press
PRINT HOLD
.
Display: [HOLD DATA PRINT]
2
Press
3
Enter the Print Hold code.
3
Press
.
.
7. Special
Functions
START
• Printing will begin.
89
Print Hold
Deactivating Print Hold
To deactivate Print Hold, follow the steps below.
♦ Print Hold cannot be deactivated while received faxes are held in memory.
(while [PRT. HOLD DATA EXIST] ) appears in the display). First print the
received faxes and then deactivate Print Hold.
90
1
Press
2
Press
3
Press
to select “NO”.
Display: [ENTER PASSCODE]
3
Enter the Print Hold code.
4
Press
5
Press
PRINT HOLD
, then press
.
START
.
STOP
to exit.
until [ACTIVATE PRINT HOLD] appears.
Print Hold
Clearing the Print Hold code
To clear the Print Hold code, follow the steps below.
♦ Print Hold must be deactivated (see page 90) before you can clear the Print
Hold code.
1
Press
2
Press
3
Enter the Print Hold code.
4
Press
PRINT HOLD
, then
until [PRT. HOLD CODE CLEAR] appears.
.
START
.
• The display will briefly show [PRT. HOLD CODE CLEAR] / [CLEARED].
• If the wrong code is entered, [WRONG PASSCODE] will appear. Go back
to Step 3. (If the wrong code is entered 3 times in a row, you will return to
the standby display.)
Press
STOP
to exit.
7. Special
Functions
5
91
Receiving Faxes to E-mail/Folder
Receiving Faxes to E-mail/Folder
If you have connected the machine to a network, you can have incoming faxes
from specified fax numbers (or all fax numbers) automatically converted to email and forwarded to designated e-mail recipients, or converted to image
files and forwarded to a network folder.
♦ This provides a convenient means of forwarding received faxes to someone
who is out of the office.
♦ This function can be used to send copies of all received faxes to an
administrator or network folder for centralized document storage.
Storing (or clearing) groups of originating fax numbers and
forwarding e-mail addresses
To use the Fax to E-mail/Folder function, you must first store one or more
groups of originating fax numbers and forwarding destinations (e-mail
address, network folder).
♦ One originating fax number and one forwarding destination can be stored in
each group. When a fax is received, the machine will check each stored
group, and if the originating number of the received fax matches the
originating fax number in one of the groups, the machine will forward the fax
to the forwarding destination in that group.
♦ You can also omit entry of an originating fax number in a group and have
faxes from all originating fax numbers forwarded to the forwarding
destination.
♦ Up to 30 groups can be stored.
♦ If the same originating fax number (or “TRANSFER ALL”) is stored in two or
more different groups, a network folder can only be specified as the
forwarding destination in one group; the forwarding destination of the other
group(s) must be an e-mail address.
92
1
Press
2
Press
FAX TO MAIL/FOLDER
.
until [FORWARDING ADDRESS] appears.
Receiving Faxes to E-mail/Folder
3
Press
to select “SET”.
• To clear a previously stored group, press
4
.
Enter a 2-digit number from “01” to “30” (this number is used to identify
the group you will store).
• If you are clearing a group, enter the 2-digit number of the group you wish
to clear and go to Step 8
5
Enter the originating fax number.
• If you wish to have faxes from all originating fax numbers forwarded
(“TRANSFER ALL”), go directly to Step 6 without entering a fax number.
6
Press
7
Specify the destination (e-mail address, network folder) to which you
wish to have the faxes forwarded using one of the methods below:
START
.
• Rapid Key Dialling: Press a Rapid Key.
• Speed Dialling: Press
• Search Dialling: Press
SPEED DIAL
and enter a 3-digit Speed Dial number.
or
until the destination appears in the
display.
Press
START
. The group is stored.
• If [NETWORK FOLDER IS ALREADY USED] appears, the same
originating fax number (or “TRANSFER ALL”) has already been stored in a
group with a network folder. In this case, only an e-mail address can be
stored for the forwarding destination.
93
7. Special
Functions
8
Receiving Faxes to E-mail/Folder
Activating (and deactivating) Fax to E-mail/Folder
After you have stored one or more Fax to E-mail/Folder groups, follow the
steps below to activate the Fax to E-mail/Folder function.
1
Press FAX TO MAIL/FOLDER .
Display: [ACT. FAX TO MAIL/FLDR]
2
Press
to select “ON”.
• To deactivate the function, press
3
Press
STOP
to select “OFF”.
to exit.
Printing forwarded faxes
The machine is initially set to print received faxes that are forwarded. If you
prefer that the machine only print forwarded faxes when a forwarding error
occurs, follow the steps below.
1
Press
2
Press
3
To have all forwarded faxes printed, press
(“ALWAYS PRINT”).
To have forwarded faxes printed only when a forwarding error occurs,
press
4
94
Press
FAX TO MAIL/FOLDER
.
until [PRINT RECEIVED FAX] appears.
to select “PRINT ERROR ONLY”.
STOP
to exit.
Polling (Requesting a Fax)
Polling (Requesting a Fax)
Polling allows you to call another fax machine and have it send a document
(previously loaded in its feeder or in memory) to your machine without
assistance from the operator of the other machine.
Note: Polling is useful when you want the receiving fax machine, not the
transmitting fax machine, to bear the cost of the call.
♦ To use the polling function, the other machine must be capable of being
polled. Before polling, make sure the other machine is set up to receive
your polling request.
Enabling the polling key
To use Polling, you must first set “POLLING” to “YES” and select a Rapid Key
for use as the polling key in the Option Settings as explained on pages 103
and 105.
Using polling to request fax transmission
1
Dial the fax machine that you wish to poll using one of the following
methods:
• Enter the full number using the numeric keys.
• Press
SPEED DIAL
and enter a 3-digit Speed Dial number.
• Pick up the handset (or press
SPEAKER
) and dial the full number or press a
Rapid Key. Wait for the fax answerback tone.
• Press
or
until the name (or number) of the other party appears
2
7. Special
Functions
in the display.
Press the Rapid Key that you specified as the polling key in the Option
Settings.
• If you used the handset, replace it when POLLING appears in the display.
Reception will begin.
95
Polling (Requesting a Fax)
Being polled (Memory polling)
To let another fax machine poll your machine, you must first scan the
document into memory using the following procedure. Transmission will take
place when the other fax machine calls your machine and activates polling.
You can choose whether to allow polling only once, or an unlimited number of
times.
♦ If you allow polling only once, the document will be automatically cleared
from memory after polling. If you allow polling an unlimited number of times,
the document will remain in memory until you clear it as explained on page
97.
1
Load the document.
• If desired, press
FUNCTION
RESOLUTION
to set the resolution and/or contrast.
2
Press
3
Press
4
Press
to select SET.
Display: [1=ONCE, 2=REPEAT]
5
Press
to allow polling only once, or
unlimited number of times.
6
Press
, then
until [MEMORY POLLED] appears.
.
START
to allow polling an
.
• The document is scanned into memory.
7
96
Set the reception mode to AUTO (press
the display).
RECEPTION
until “AUTO” appears in
Polling (Requesting a Fax)
Clearing a memory polling document
To clear a memory polling document from memory, follow the steps below.
1
Press
2
Press
3
Press
4
Press
5
Press
FUNCTION
, then
until [MEMORY POLLED] appears.
.
to select CLEAR.
START
to clear the document.
STOP
to return to the date and time display.
Polling security
Polling Security allows you to prevent unauthorized polling of your machine.
When this function is turned on, polling will only be allowed when the fax
number of the polling machine has been entered in your machine's list of
permitted fax numbers (called "passcode numbers"). The number of the
polling machine must also be correctly programmed in that machine for
identification.
1
Press
2
Press
FUNCTION
, then
, then
7. Special
Functions
To use Polling Security, follow the steps below to turn the function on, and
then enter permitted numbers as explained on the following page.
until [ENTRY MODE] appears.
until [POLLING SECURITY] appears.
97
Polling (Requesting a Fax)
3
Press
(ON) to turn on polling security.
(To turn off polling security, press
4
Press
STOP
(OFF).)
to exit.
Storing fax numbers for polling permission
You can store up to 10 fax numbers in your machine's list of permitted
numbers.
98
FUNCTION
1
Press
2
Press
, then
3
Press
.
4
Press
.
5
Enter the fax number with the number keys (max. 20 digits).
Note: Enter numbers only; hyphens and spaces cannot be entered.
6
Press
7
Return to Step 4 to store another number, or press
START
, then
until [ENTRY MODE] appears.
until [POLLING PASSCODE] appears.
.
STOP
to exit.
Polling (Requesting a Fax)
Editing and clearing polling permission numbers
FUNCTION
1
Press
2
Press
, then
3
Press
.
4
Press
or
, then
until [ENTRY MODE] appears.
until [POLLING PASSCODE] appears.
until the number you want to edit or clear appears in
the display.
5
Press
.
6
Press
for EDIT or
for CLEAR.
• If you selected CLEAR, go to Step 8.
7
If you selected EDIT, make the desired changes to the number.
• Press
or
to move the cursor to the digit or digits you wish to
change, and then enter the new digit. The new digit will replace the old
digit. You can also press
Press
9
Press
START
to backspace and clear digits.
.
STOP
7. Special
Functions
8
DEL
to exit.
99
Timer Transmission
Timer Transmission
The Timer function allows you to store a fax transmission job to be performed
automatically at a time you specify. The time can be specified up to 24 hours
in advance.
♦ You can use this function to take advantage of lower off-peak rates without
having to be there when the transmission is performed.
♦ Up to 15 timer jobs can be stored at once.
♦ Multiple destinations can be entered if all are stored in Rapid Keys or
Speed Dial numbers. A Group Key can also be used (once a Group Key is
used, no further destinations can be entered).
♦ A destination can be specified by entering a full fax number with the
number keys, however, in this case only one destination can be entered.
1
Load the document(s).
• If desired, press
RESOLUTION
to set the resolution and/or contrast.
2
Press
3
Press
4
Enter the time at which the fax is to be transmitted.
TIMER
.
to select “SET”.
• Enter a two-digit number for the hour ("00" to "23") and a two-digit number
for the minute ("00" to "59").
Example: 9:25
5
Press
6
Enter the fax number using one of the methods below:
100
START
.
Timer Transmission
• Rapid Key Dialling: Press a Rapid Key.
• Speed Dialling: Press
SPEED DIAL
• Search Dialling: Press
and enter a 3-digit Speed Dial number.
or
until the name or number of the other
party appears in the display.
• Group Dialling: Press a Group Key. Go directly to Step 9 (once a group
key is selected, no further destinations can be entered).
• Direct Keypad Entry: Enter the full fax number with the number keys. Go
directly to Step 9 (when a full fax number is entered, only one destination
can be entered).
7
Press
. If you wish to enter more destinations, go to Step 8. If you
have finished entering destinations or are only entering one destination,
go to Step 9.
Repeat Steps 6 and 7 for each of the destinations that you wish to enter.
(A maximum of 50 destinations can be entered.)
• You can press
to scroll through and check your entered destinations.
To delete a destination, press
9
Press
START
DEL
when it appears.
.
• The document will be scanned into memory and the timer number
assigned to the job will appear briefly in the display. Transmission will take
place at the specified time.
• If [MEMORY FULL] appears, see If the memory becomes full on page 81.
101
7. Special
Functions
8
Timer Transmission
Checking and cancelling stored timer transmission jobs
Follow the steps below to check the timer transmission jobs that are stored. If
needed, you can also use this procedure to cancel a stored job.
1
Press
2
Press
to select “REVIEW”.
3
Press
or
.
TIMER
to scroll through the stored timer transmission jobs.
• For each job, the timer number, the destination, and the specified time
appear.
4
To cancel a displayed job, press
complete the cancelation (press
5
102
When finished, press
STOP
START
. Press
STOP
to exit.
START
once again to
if you do not wish to cancel ).
8. Option
Settings
Option Settings
8. Option Settings
The option settings allow you to customize the operation of the machine to
better suit your needs.
The option settings have been initially configured at the factory. To change a
setting, follow the steps below to display the setting, and then enter a new
selection for the setting as explained in the table that follows.
1
Press
2
Press
FUNCTION
, then
, then
until [OPTION SETTING] appears.
repeatedly until the desired setting appears.
• The option settings are described in the table below and on the following
pages.
3
Enter a selection for the setting by pressing the number keys as
explained in the table.
4
After entering a selection, the subsequent option setting will appear in
the display. To exit the settings, press
STOP
.
Option Settings
Make a selection for the displayed setting as explained below.
This is done in step 3 of the above procedure.
Setting
Description
FINE PRIORITY This is used to change the default resolution for faxing from
STANDARD to FINE. Press
(YES) to select FINE, or
(NO) to select STANDARD.
Initial setting: NO (STANDARD)
103
Option Settings
NUMBER OF
RINGS
This sets the number of rings on which the machine answers calls
when the reception mode is set to AUTO. Enter any number from
1 to 5.
Initial setting: 1 ring.
TRANSACTION This sets the condition for printing transaction reports (see page
LIST
110). Press a number key as follows:
(ALWAYS PRINT): Print after every fax transmission,
reception and error.
(ERROR/MEMORY): Print only after an error or memory
operation.
(SEND ONLY): Print after every fax transmission.
(ERROR ONLY): Print only when an error occurs.
(NEVER PRINT): Never print.
Initial setting: ERROR ONLY
FLASH
SELECT
This setting is used when the machine is connected to a PBX and
the PBX uses the “Flash” method to connect to an outside line.
Press
(SHORT TIME) if your PBX line is a normal line, or
(LONG TIME) if your PBX is a high-speed line.
Note: This setting is normally only used in Germany. In other
countries, you can try changing the setting if you encounter
difficulty with the default setting.
Initial setting: SHORT TIME
FAX SIGNAL
RX
If you hear a soft fax tone after the machine rings and you answer
on the machine’s handset, the machine will automatically begin
reception. If desired, you can turn automatic reception off. Press
(YES) to turn on the the automatic reception function, or
(NO) to turn off the function. If you select NO, you must start
START
reception manually by pressing
on the machine each time
you hear a soft fax tone after answering a call.
Initial setting: YES
104
8. Option
Settings
Option Settings
POLLING
If you wish to use a Rapid Key as a polling key, press
(YES),
press the Rapid Key that you wish to use (any Rapid Key not
already in use), and then press
START
.
If you do not wish to use the polling function, press
(NO).
Note: When a Rapid Key is used as the polling key, it cannot be
used for Rapid Key Dialling.
Initial setting: NO
AUTO PRINT
OUT
Press
(YES) to have the machine automatically print an
Activity Report once every 40 send/receive operations. (The
report can still be printed manually at any time.) Press
to turn off Auto Print Out.
Initial setting: NO
ECM MODE
(NO)
Press
(YES) to have any distortions in a transmission due to
noise on the telephone line automatically corrected before printout at the receiving end. This is only effective when the other
machine has ECM as well. Press
(NO) to turn off ECM
mode. (When there is considerable noise on the line, you may find
that ECM slows transmission. Turning off ECM mode may
increase transmission speed.)
Initial setting: YES
LANGUAGE
SELECTION
This sets the language that appears in the display, reports, and
lists. Press
for English,
for Swedish or
for Polish.
A beep will sound and the display will change to the selected
language.
Initial setting: ENGLISH
105
Option Settings
PBX
CONNECTION
If you are on a PBX, use this setting to set up automatic
connection to an outside line when dialing by automatic dialing.
SPEAKER
(When this is done, unless you press the
key before dialing
to dial manually, you will always automatically connect to an
outside line when you dial on the machine; there will be no need to
press the flash key (
R
) or dial a prefix in order to dial out.)
1. Press
(YES) to enable the PBX connection setting. (
(NO) should be selected if you are not on a PBX.)
2. Press
(FLASH) if you connect to an outside line by
R
pressing a flash key (
on the machine). Press
(ID) if you
connect to an outside line by dialing a particular number (a prefix
or ID number).
3. If you selected ID in step 2, enter the number that you dial to
connect to an outside line (maximum of 3 digits) and then press
START
DIAL TONE
DETECTION
.
Press
(YES) to have the machine verify the presence of a
dial tone on the line before automatic dialling. Press
(NO) to
turn this function off.
Note: If you select YES and find that the machine is unable to dial,
change the setting to NO.
Initial setting: NO
KEY TONE
Press
(ON) to have the machine sound a beep each time a
key is pressed on the operation panel (this confirms that the key
has been correctly pressed). Press
beep sound.
Initial setting: ON
106
(OFF) to turn off the
8. Option
Settings
Option Settings
SEARCH BY
Press
if you want all stored destinations to appear when the
KEY
and
keys are used to search for a transmission
destination. Press
if you only want fax destinations to
appear.
Initial setting: SHOW ALL ADDRESSES
RECEIVE
RATIO
Press
(AUTO) to have the machine automatically reduce the
size of received faxes to fit the size of the printing paper. This
ensures that the edges of a fax are not cut off. (Note: AUTO may
not operate if the received fax is too long, contains many fine
graphics or images, or is sent at high resolution. In this case, the
remainder of the fax will be printed on a second page.) Press
(100%) to have all faxes printed at full size (if a fax is too
long to fit on the paper, the remainder will be printed on a second
sheet; note that the cut-off point may occur in the middle of a line).
Initial setting: AUTO
SORT COPY
This setting determines whether or not copies are collated (sorted
into sets) when multiple copies of each original page are made.
Press
(YES) to have copies automatically sorted, or
(NO) to have copies grouped by page.
Initial setting: NO
107
9. Checking Stored Information
Printing lists
You can print lists showing settings and information stored in the machine.
1
Press
2
Press
3
Press
FUNCTION
, then
until [LISTING MODE] appears.
.
or
until the desired list below appears.
• ACTIVITY LIST: This report shows information on your most recent
transmissions and receptions (combined maximum of 40). The headings
are the same as in the Transaction Report (see the next section). The
logged transactions are erased after the report is printed. To have the
report print automatically whenever the number of logged transactions
reaches 40, see page 103 and “AUTO PRINT OUT” on page 105.
• DESTINATION LIST: This shows the destinations that have been stored in
Rapid Key and Speed Dial numbers (pages 36 and 59).
• GROUP LIST: This shows the destinations that are stored in the Group
Keys (page 82).
• SETUP LIST: This shows your currently entered sender’s name, sender’s
number, and anti-junk fax number, your current selections for the option
settings, print setup, and a sample of the header printed at the top of every
fax page you transmit (HEADER PRINT).
• TIMER LIST: This shows the timer jobs that have been stored (page 100).
• FAX TRANSFER LIST: This shows the Receive Fax to E-mail/Folder
settings that have been stored (page 92).
• NETWORK SETTING LIST: This shows the machine’s current IP address
and other network/Internet settings (page 45).
4
108
Press
START
to print the list.
Checking how many Entry mode items have been stored
1
Press
2
Press
3
Press
, then
INFO
9. Checking
Information
To quickly check how many Rapid Keys, Speed Dial numbers, Group Keys,
polling codes, and anti-junk numbers have been stored, follow the steps
below. The information will appear in the display.
until [ENTRY] appears.
.
or
to scroll through the items.
• The number stored of each item appears followed by a slash and the total
number available. For example,
[RAPID&GROUP 15/36]/[(RAPID: 13 /GROUP: 2)]
indicates that 15 Rapid and Group Keys out of a total of 36 have been
stored. The second line shows how many of these are Rapid Keys and how
many are Group Keys.
4
Press
STOP
to exit.
109
Transaction Report
Transaction Report
This report is printed out automatically after a fax is sent or received to allow
you to check the result. The machine is initially set to print out the report only
when an error occurs.
♦ The Transaction Report cannot be printed manually. To change the
condition for automatically printing out Transaction Reports, see page 104
and “TRANSACTION LIST” on page 104.
Headings in the Transaction Report
110
SENDER/
RECEIVER
The name or fax number of the other machine.
START
Starting time.
TX/RX
TIME
Total time taken for transmission/reception.
PAGES
Number of pages.
NOTE
One of the following notes will appear under NOTE to
indicate whether the fax was successful, and if not, why it
failed.
OK - Transmission/reception was successful.
P.FAIL - A power failure prevented the transaction.
JAM - The printing paper or document jammed.
BUSY - The fax was not sent because the line was busy.
COM.E-X - (Where “X” is a number.) A communication error
occurred. See page 121.
CANCEL - The fax was canceled because the STOP key
was pressed, no document was in the feeder, or the other
machine requested a function that your machine does not
have.
PAGE E. - A page count error occurred (see page 58).
Cleaning the Scanning Glass and Rollers
10. Maintenance
Cleaning the Scanning Glass and Rollers
Any dirt, fingerprints, or other small debris on the scanning glass will degrade
the quality of faxes, scanned images, and copies. Clean the scanning glass
and roller frequently as explained below.
Open the operation panel.
2
Rotate the lever toward you and down (➊), and then pull the lever and
10. Maintenance
1
right end of the roller up (➋). Pull the white roller out to the right (➌).
3
1
2
111
Cleaning the Scanning Glass and Rollers
3
Wipe the scanning glass, rollers, and rubber sheet with a clean cloth or
swab.
• Do not wipe off the grease on the ends of the white roller.
• Make sure that all dirt and stains (such as correcting fluid) are removed.
Dirt and stains will cause vertical lines on transmitted images and copies.
• If the scanning glass is difficult to clean, try moistening the cloth with
isopropyl alcohol or denatured alcohol. Take care that no alcohol gets on
the rollers.
• Do not press down on the two front rollers.
112
Cleaning the Scanning Glass and Rollers
4
Replace the white roller, inserting the left end first (➊). Push the lever
and right end of the roller down (➋). Rotate the lever back up and in,
pushing it slightly to the right so that it fits into position (➌).
10. Maintenance
1
2
5
3
Close the operation panel, pressing down firmly on both sides to make
sure it clicks into place.
Cleaning the housing
Wipe the external parts and surface of the machine with a dry cloth.
Caution!
♦ Do not use benzene or thinner. These solvents may damage or discolor the
machine.
113
Cleaning the Paper Feed Roller
Cleaning the Paper Feed Roller
Clean the paper feed roller regularly to remove dust and debris.
♦ A dirty paper feed roller will cause misfeeds and other paper feeding
problems.
1
Remove the paper tray.
2
Pull the paper plate forward and clean the paper feed roller with a clean
cloth.
Clean this roller
3
114
Push the paper plate back down and
replace the paper tray.
Replacing the Toner Cartridge
Replacing the Toner Cartridge
When the toner cartridge nears empty (about 200 pages can still be printed),
TONER NEAR EMPTY will appear in the display. When the toner cartridge is
empty, TONER EMPTY will appear in the display.
♦ When TONER EMPTY appears, printing will not be possible.
10. Maintenance
Replace the toner cartridge with the following cartridge:
SHARP FO-25DC toner cartridge
1
Open the top cover of the machine.
• Caution!
The fusing unit inside the print
compartment becomes very hot during
operation. Do not touch the inside of
the print compartment after the
machine has been in operation.
2
Press the release (➊) and open the
front cover (➋).
2
1
115
Replacing the Toner Cartridge
3
Open the side cover.
4
Push the toner cartridge handle to the
left and then pull the toner cartridge
out of the compartment.
• Dispose of the old toner cartridge
according to local regulations. If in
doubt, contact your local waste
disposal agency.
5
116
Continue from Step 6 on page 19 to install the new toner cartridge.
Replacing the Drum Cartridge
Replacing the Drum Cartridge
Viewing the total number of pages printed
1
Press
2
Press
3
Press
and then
INFO
10. Maintenance
To maintain the best printing quality, it is recommend that you replace the
drum cartridge after 20,000 pages have been printed. To check the total
number of pages printed, follow the steps below.
until [LIFE] appears in the display.
.
START
.
• The number of pages printed will appear in the display.
4
Press
STOP
repeatedly to exit.
Replacing the drum cartridge
When 20,000 pages have been printed, DRUM LIFE OVER will appear in the
display. Replace the drum cartridge with the following cartridge:
SHARP FO-25DR drum cartridge
1
Open the top cover of the machine.
• Caution!
The fusing unit inside the print
compartment becomes very hot during
operation. Do not touch the inside of the
print compartment after the machine
has been in operation.
117
Replacing the Drum Cartridge
2
Press the release (➊) and open the
front cover (➋).
2
1
3
Open the side cover.
4
Push the toner cartridge handle to the
left and then pull the toner cartridge
out of the compartment.
• Place the toner cartridge on a sheet of
paper on a level surface.
• Do not touch the roller in the toner
cartridge.
118
5
Grasp the drum cartridge handle and
gently pull the old cartridge out of the
machine.
6
Remove the new drum cartridge from its packaging.
7
Insert the drum cartridge into the print
compartment, sliding it along the
guides.
10. Maintenance
Replacing the Drum Cartridge
Grasp this
handle to
push the
cartridge in
• Do not touch or allow other objects to contact the drum (the green cylinder).
This may damage the drum. If fingerprints, dust, or other contaminants get
on the drum, wipe it gently with a clean cloth.
• Exposure to light for more than several minutes will damage the drum. Be
sure to insert the drum cartridge promptly into the machine.
• If you find it necessary to leave the cartridge out of the machine for more
than several minutes, wrap the cartridge in black paper.
119
Replacing the Drum Cartridge
8
Replace the toner cartridge and close the side cover, inner cover, and
top cover (Steps 7 and 8 on page 20).
When the display shows [TONER EXCHANGED?] / [1 = NEW, 2 = OLD],
START
press
for “OLD” and then
(Steps 9 and 10 on pages 20 and
21) .
When finished, reset the drum cartridge counter as explained on page
21.
120
11. Troubleshooting
Problems and Solutions
Problems and Solutions
If you have any problems with the machine, refer to the following
troubleshooting guide.
♦ For network connection problems, see page 30.
Line error
Problem
A line error occurs when your machine cannot
communicate correctly with the other fax machine. The
error is usually due to a problem on the phone line.
STOP
Press
to clear the LINE ERROR message and
then try the transaction again. If the error persists,
check the following:
• Check the connection. The cord from the TEL. LINE
socket to the wall socket should be no longer than two
meters.
• Make sure there are no modem devices sharing the
same telephone line.
• Check with the other party to make sure their fax
machine is functioning properly.
• Have your telephone line checked for line noise.
• Try connecting the machine to a different telephone
line.
• If the problem still occurs, your machine may need
service.
121
11. Troubleshooting
LINE ERROR appears in
the display.
Solution
Problems and Solutions
Dialling and fax transmission problems
Problem
No dial tone when you
pick up the handset or
press
SPEAKER
.
Solution
• Make sure the handset cord is connected to the
correct jack. See Connecting the handset on page 13.
• Make sure that the telephone line is properly
connected to both the TEL. LINE socket and the wall
socket (see page 15).
• Make sure that the telephone line is good.
Dialling is not possible.
• Make sure the power cord is properly plugged into a
power outlet.
• Make sure that the telephone line is properly
connected to both the TEL. LINE socket and the wall
socket (see page 15).
The power is on, but no
transmission takes place.
• Make sure that the receiving machine has paper.
• If the receiving machine is in manual mode with no
attendant, reception will not be possible.
• Check the display for error messages.
SPEAKER
• Pick up the handset or press
and check for a
dial tone. Dial the receiving machine manually and
make sure that it is responding (you should hear a fax
tone).
Nothing is printed at the
receiving end.
• Make sure that the document for transmission is
placed face down in the feeder.
A distorted image is
received at the other end.
• Noise on the telephone line may cause distortion. Try
sending the document again.
• Make a copy of the document on your machine. If the
copy is also distorted, your machine may need
service.
122
Problems and Solutions
Fax reception problems
Solution
The machine doesn't
receive documents
automatically.
• Make sure that the reception mode is set to AUTO.
The paper comes out
blank when you receive a
fax.
• Make sure that the document is loaded properly in the
feeder of the transmitting machine. Make a copy or
print a report to confirm the printing ability of your
machine.
The received document is
faint.
• Ask the other party to resend the document using a
higher contrast setting.
• If other printed output is also faint, the toner cartridge
may need replacement (see page 115).
Received images are
distorted.
• Noise on the telephone line may cause distortion.
Have the other party try sending the document again.
• Make a copy or print a report on your machine. If the
copy or report is also distorted, your machine may
need service.
When a fax is received,
the size of the printed
document image does not
match the size of the
paper.
• Make sure that an appropriate reception ratio setting
has been selected (see page 107).
No reception occurs when
polling is attempted.
• Make sure the transmitting machine is in automatic
reception mode.
• If the transmitting machine has polling security, make
sure that your fax number has been entered both in
your machine (see page 23) and in the transmitting
machine.
123
11. Troubleshooting
Problem
Problems and Solutions
Copying problems
Problem
Solution
The quality of copies is
poor and/or dark vertical
lines appear.
• Any dirt or material on the scanning glass will cause
spots to appear on copies and transmitted faxes.
Clean the scanning glass as explained on page 111.
The paper comes out
blank when you make a
copy.
• Make sure the original is placed face down in the
feeder.
The size of the printed
document image does not
match the size of the
paper.
• Make sure an appropriate enlarge/reduce setting is
selected (see page 78).
A copy is faint.
• Adjust the contrast setting (see page 54).
• If other printed output is also faint, the toner cartridge
may need replacement (see page 115).
124
Problems and Solutions
General problems
Problem
Nothing appears in the
display.
Solution
• Make sure the power cord is properly plugged into a
power outlet.
The machine does not
respond when you press
any of its keys.
• If a beep sound is not made when you press the keys,
unplug the power cord, wait at least 5 seconds, and
then plug it in again.
Automatic document
feeding does not work .
• Check the size and weight of the document (see page
51).
Printed output is faint.
• The toner cartridge may need replacement (see page
115).
Dots appear at regular
• The drum cartridge may be damaged. Replace the
intervals on printed output.
drum cartridge (see page 117).
Characters or parts of the
image are missing from
printed output.
• Remove the drum cartridge as explained on page 117
and wipe the surface of the drum (the green cylinder)
with a dry cotton swab. If print quality does not
improve after wiping with a dry cotton swab, you can
try moistening the swab with isopropyl alcohol or
ethanol. However, do not moisten the swab with
isopropyl alcohol or ethanol unless absolutely
necessary, as this may cause stains or smears to
appear on the first pages printed after cleaning (the
stains may never completely disappear).
125
11. Troubleshooting
• Connect another electrical appliance to the outlet to
see if it has power.
Messages and Signals
Messages and Signals
Display messages
ADD PAPER &/
PRESS START KEY
Check the printing paper. If the tray is empty, add paper
START
and then press
. If there is paper in the tray, make
sure it is inserted correctly (take out the stack, align the
edges evenly, and then reinsert it in the tray) and then
press
CONNECTION ERROR
START
.
A Scan to E-mail transmission was not successful
because of a communication problem on your local
network. This is usually due to a problem with the cable
connections. Make sure that the cable ends are
securely inserted in the LAN ports. Make sure that the
correct cable is being used and that the cable is good.
Make sure that your router or hub is powered on.
CHECK E-MAIL SETTING Scan to E-mail transmission is not possible because the
SMTP server or the sender address has not been
specified in the e-mail settings (see page 31).
COVER OPEN
The top, front, or side cover is open. Make sure each
cover is completely closed (press down on the corners
to make sure each cover is completely latched).
DOCUMENT JAMMED
The original document is jammed. See page 130 to
clear the jam. Document jams will occur if you load
more than 30 sheets at once or load documents that are
too thick (see page 51). The document may also jam if
the receiving machine doesn’t respond properly when
you attempt to send a fax.
DRUM LIFE OVER
This appears when the drum cartridge needs
replacement.
126
Messages and Signals
FAX RX IN MEMORY
A fax has been received in memory because the toner
cartridge needs replacement, you have run out of
printing paper, or the paper is jammed. Another
message will alternate with this message to indicate the
problem. The fax will print out automatically when the
problem is fixed.
HEATER HIGH /
HEATER LOW /
LASER ERROR
If this message appears, unplug the power cord and
then plug it back in. If the message still appears, call for
service.
LINE ERROR
Transmission or reception was not successful. Press
STOP
M: xx%
This shows the percentage of the machine’s memory
currently in use.
M#xxx
This appears while a document is being scanned and
indicates the memory number assigned to the job (the
number appears in “xxx”). This number appears when
you check or cancel a job with the
INFO
key (page 67).
MEMORY FULL
If faxes have been received to memory because printing
is not possible, resolve the problem so that printing can
continue (see Reception to Memory on page 70).
If faxes are being held in memory because the Print
Hold function has been activated, print the faxes as
explained on page 89.
If you are attempting to broadcast or transmit from
memory, see If the memory becomes full on page 81.
If you are copying, see If MEMORY FULL appears on
page 79.
OUT OF PAPER /
PRINT CANCELED
Printing was canceled because the tray is out of paper.
Press any key to clear the message, add paper, and
repeat the print job.
PAPER JAMMED
The printing paper is jammed. See page 132.
PRT. HOLD DATA EXIST
A received fax is being held in memory because the
Print Hold function has been activated. Enter your Print
Hold code to print the fax (see page 89).
127
11. Troubleshooting
to clear the message and then try again. If the
error persists, see Line error on page 121.
Messages and Signals
RCVD FAX TRANSFER
This appears when the Fax to E-mail/Folder function is
activated (page 92).
RECALLING
This appears if you attempt to send a fax by auto dialling
and the line is busy or the receiving fax machine does
not answer. Your machine will automatically reattempt
the call. (See Automatic redialling on page 66.)
SERVER ERROR
A Scan to E-mail transmission was not successful
because the machine could not connect to your mail
server or there was no response from the mail server.
Make sure the SMTP server setting is correct (p. 31). If
you have configured “POP before SMTP” settings in the
Web page, make sure these settings are correct. If
[CABLE DISCONNECTED] appears on the bottom line,
see “CONNECTION ERROR” on page 126.
SERVER ERROR/
SMTP-AUTH
A Scan to E-mail transmission was not successful
because your SMTP server requires SMTP
authentication and the SMTP authentication user name
or password entered in the machine’s Web page is not
correct (p. 33).
SERVER NOT FOUND/
CABLE DISCONNECTED
See “CONNECTION ERROR” on page 126.
SERVER NOT FOUND/
DHCP
A Scan to E-mail transmission was not successful
because the machine was unable to automatically
obtain an IP address. Restart your router or other device
that acts as your DHCP server.
SERVER NOT FOUND/
SMTP
A Scan to E-mail transmission was not successful
because an incorrect host name is entered for your
SMTP server. Check the SMTP server setting (p. 31).
THERMISTOR ERROR
If this message appears, unplug the power cord and
then plug it back in. If the message still appears, call for
service.
128
Messages and Signals
TONER EMPTY
The toner cartridge must be replaced. Printing is not
possible until the toner cartridge is replaced.
TONER NEAR EMPTY
The toner cartridge is almost out of toner (approximately
200 pages can be printed).
TX MEMORY FULL
The transmission memory is full. Wait until previously
stored transmission jobs have been completed before
setting up a new job. To check the jobs that are waiting
for transmission, see page 67.
Continuous tone
3 seconds
Indicates the end of transmission,
reception, or copying.
Intermittent tone
(3 beeps)
5 seconds
(1 second on, 1
second off)
Indicates incomplete transmission,
reception, or copying.
11. Troubleshooting
Audible signals
129
Clearing Paper Jams
Clearing Paper Jams
Clearing a jammed document
If the original document doesn’t feed properly during transmission or copying,
or [DOCUMENT JAMMED] appears in the display, first try pressing
the document doesn't feed out, remove it as explained below.
1
2
. If
Open the operation panel.
Rotate the lever toward you and down, and then pull the lever (➊) and
right end of the roller up (➋). Remove the document (➌).
3
1
1
130
START
2
Clearing Paper Jams
3
Make sure the left end of the roller is inserted correctly in its holder (➊),
and then push the lever and right end of the roller down (➋). Rotate the
lever back up and in, pushing it slightly to the right so that it fits into
position (➌).
2
4
11. Troubleshooting
1
3
Close the operation panel, pressing
down firmly on both sides to make sure
it clicks into place.
131
Clearing Paper Jams
Clearing jammed printing paper
1
Open the top cover of the machine.
• Caution!
The fusing unit inside the print
compartment becomes very hot during
operation. Do not touch the inside of
the print compartment after the
machine has been in operation.
2
Press the release (➊) and open the
front cover (➋).
2
1
3
132
Push the two heater roller release levers down to release the heater
roller.
Clearing Paper Jams
4
If the jammed paper is protruding from
the front of the machine, gently pull it
out. Take care not to tear the paper or
leave any torn pieces of paper in the
print compartment.
• If this clears the jam, go to Step 6.
• If you are unable to clear the jam in this
way, go to Step 5.
• Take care not to touch or allow other
5
If the jammed page cannot be pulled out directly, open the side cover
and rotate the white knob in the direction shown to feed out the jammed
paper.
133
11. Troubleshooting
objects to contact the drum (the green
cylinder). This may damage the drum.
Clearing Paper Jams
6
After the jammed paper has been removed, push the two heater roller
release levers back up (➊), close the side cover (➋) (if you opened it),
close the front cover (➌), and then close the top cover (➍).
4
2
1
3
134
Index
Index
A
E-mail subject, 42
Activity List, 108
Anti Junk Fax, 85
Audible signals, 129
Auto Print Out (of Activity Report), 105
AUTO reception mode, 26, 68
Auto-dial numbers
Storing, 59
Using, 64
F
Fax Signal Receive, 104
Fax to E-mail/Folder, 92
File format, 43
Fine Priority setting, 103
Flash Select setting, 104
G
B
Batch page numbering, 58
C
Contrast, 54
Copies, 78
D
Date, setting, 24
Destination List, 108
Dial tone detection, 106
Dialing
Normal, 56
Dialling
Automatic redialling, 66
Display messages, 126
Document feeder, 52
Document guides, 41, 52
Document restrictions, 52
Document, maximum scanning size, 51
Drum cartridge
Installing, 17
Replacing, 117
Duplex Scan, 87
E
ECM mode (Error Correction Mode),
105
E-mail message, 42
E-mail options, 42
E-mail settings, 31, 35
Group Keys, storing, 82
Group keys, using, 82
Group List, 108
H
Halftone setting, 54
Housing, cleaning, 113
I
IP address, 29, 45
J
Jams, clearing, 130
K
Key Tone setting, 106
L
Language setting, 105
Line error, 121
Loading printing paper, 22
Loading the document, 52
M
MANUAL reception mode, 26, 69
Memory full, 127
Memory, substitute reception to, 70
N
Network
135
Index
Checking connection, 29
Problems, 30
Network Setting List, 108
Network settings, configuring, 45
Network settings, initializing, 46
Normal dialling, 56
Number of Rings setting, 104
P
Page numbering, batch, 58
Paper feed roller, cleaning, 114
Paper jams, clearing, 130
Paper, loading, 22
Polling, 95
Power cord, 14
Print Hold, 88
Print settings, 74
Printer driver, installing, 71
Printing, 71
Printing from an application, 73
R
Rapid Key, using for e-mail, 42
Receive Fax to E-mail List, 108
Receive Ratio setting, 107
Reception mode
AUTO, 26, 68
MANUAL, 26, 69
Redialling, 66
Redialling, automatic, 66
Resolution, 54
136
Ringer volume, 27
S
Scan to Folder, 47
Scanning glass, cleaning, 111
Searching for stored e-mail address, 42
Sender’s name and number, entering,
23
Setup List, 108
Sort Copy, 107
Speaker volume, 26
Speed Dial number, using for e-mail, 42
T
TEL. LINE socket, 15
Telephone line cord, 15
Time, setting, 24
Timer transmission, 100
Toner cartridge
Installing, 17
Replacing, 115
Transaction Report, 110
Setting print condition, 104
V
Voice calls, 65
W
Web page in machine, 31
A. Information on Disposal for Users (private households)
1. In the European Union
Attention: If you want to dispose of this equipment, please do not use the ordinary dust bin!
Used electrical and electronic equipment must be treated separately and in accordance with
legislation that requires proper treatment, recovery and recycling of used electrical and
electronic equipment.
Following the implementation by member states, private households within the EU states may
return their used electrical and electronic equipment to designated collection facilities free of
charge*. In some countries* your local retailer may also take back your old product free of
charge if you purchase a similar new one.
*) Please contact your local authority for further details.
If your used electrical or electronic equipment has batteries or accumulators, please dispose of
these separately beforehand according to local requirements.
By disposing of this product correctly you will help ensure that the waste undergoes the
necessary treatment, recovery and recycling and thus prevent potential negative effects on the
environment and human health which could otherwise arise due to inappropriate waste handling.
2. In other Countries outside the EU
If you wish to discard this product, please contact your local authorities and ask for the correct
method of disposal.
For Switzerland: Used electrical or electronic equipment can be returned free of charge to the
dealer, even if you don’t purchase a new product. Further collection facilities are listed on the
homepage of www.swico.ch or www.sens.ch.
B. Information on Disposal for Business Users.
1. In the European Union
If the product is used for business purposes and you want to discard it:
Please contact your SHARP dealer who will inform you about the take-back of the product. You
might be charged for the costs arising from take-back and recycling. Small products (and small
amounts) might be taken back by your local collection facilities.
For Spain: Please contact the established collection system or your local authority for take
back of your used products.
2. In other Countries outside the EU
If you wish to discard of this product, please contact your local authorities and ask for the
correct method of disposal.
Attention: Your product is marked with this symbol. It means that used electrical
and electronic products should not be mixed with general household waste. There
is a separate collection system for these products.
A. Entsorgungsinformationen für Benutzer aus Privathaushalten
1. In der Europäischen Union
Achtung: Werfen Sie dieses Gerät zur Entsorgung bitte nicht in den normalen Hausmüll!
Gemäß einer neuen EU-Richtlinie, die die ordnungsgemäße Rücknahme, Behandlung und
Verwertung von gebrauchten Elektro- und Elektronikgeräten vorschreibt, müssen elektrische
und elektronische Altgeräte getrennt entsorgt werden.
Nach der Einführung der Richtlinie in den EU-Mitgliedstaaten können Privathaushalte ihre
gebrauchten Elektro- und Elektronikgeräte nun kostenlos an ausgewiesenen
Rücknahmestellen abgeben*. In einigen Ländern* können Sie Altgeräte u.U. auch kostenlos
bei Ihrem Fachhändler abgeben, wenn Sie ein vergleichbares neues Gerät kaufen.
*) Weitere Einzelheiten erhalten Sie von Ihrer Gemeindeverwaltung.
Wenn Ihre gebrauchten Elektro- und Elektronikgeräte Batterien oder Akkus enthalten, sollten
diese vorher entnommen und gemäß örtlich geltenden Regelungen getrennt entsorgt werden.
Durch die ordnungsgemäße Entsorgung tragen Sie dazu bei, dass Altgeräte angemessen
gesammelt, behandelt und verwendet werden. Dies verhindert mögliche schädliche
Auswirkungen auf Umwelt und Gesundheit durch eine unsachgemäße Entsorgung.
2. In anderen Ländern außerhalb der EU
Bitte erkundigen Sie sich bei Ihrer Gemeindeverwaltung nach dem ordnungsgemäßen
Verfahren zur Entsorgung dieses Geräts.
Für die Schweiz: Gebrauchte Elektro- und Elektronikgeräte können kostenlos beim Händler
abgegeben werden, auch wenn Sie kein neues Produkt kaufen. Weitere Rücknahmesysteme
finden Sie auf der Homepage von www.swico.ch oder www.sens.ch.
B. Entsorgungsinformationen für gewerbliche Nutzer
1. In der Europäischen Union
Wenn Sie dieses Produkt für gewerbliche Zwecke genutzt haben und nun entsorgen möchten:
Bitte wenden Sie sich an Ihren SHARP Fachhändler, der Sie über die Rücknahme des
Produkts informieren kann. Möglicherweise müssen Sie die Kosten für die Rücknahme und
Verwertung tragen. Kleine Produkte (und kleine Mengen) können möglicherweise bei Ihrer
örtlichen Rücknahmestelle abgegeben werden.
Für Spanien: Bitte wenden Sie sich an das vorhandene Rücknahmesystem oder Ihre
Gemeindeverwaltung, wenn Sie Fragen zur Rücknahme Ihrer Altgeräte haben.
2. In anderen Ländern außerhalb der EU
Bitte erkundigen Sie sich bei Ihrer Gemeindeverwaltung nach dem ordnungsgemäßen
Verfahren zur Entsorgung dieses Geräts.
Achtung: Ihr Produkt trägt dieses Symbol. Es besagt, dass Elektro- und
Elektronikgeräte nicht mit dem Haushaltsmüll entsorgt, sondern einem
getrennten Rücknahmesystem zugeführt werden sollten.
A. Informations sur la mise au rebut à l'intention des utilisateurs
privés (ménages)
1. Au sein de l'Union européenne
Attention :si vous souhaitez mettre cet appareil au rebut, ne le jetez pas dans une poubelle ordinaire!
Les appareils électriques et électroniques usagés doivent être traités séparément et conformément aux
lois en vigueur en matière de traitement, de récupération et de recyclage adéquats de ces appareils.
Suite à la mise en oeuvre de ces dispositions dans les Etats membres, les ménages résidant au
sein de l'Union européenne peuvent désormais ramener gratuitement* leurs appareils électriques
et électroniques usagés sur des sites de collecte désignés. Dans certains pays*, votre détaillant
reprendra également gratuitement votre ancien produit si vous achetez un produit neuf similaire.
*) Veuillez contacter votre administration locale pour plus de renseignements.
Si votre appareil électrique ou électronique usagé comporte des piles ou des accumulateurs, veuillez
les mettre séparément et préalablement au rebut conformément à la législation locale en vigueur.
En veillant à la mise au rebut correcte de ce produit, vous contribuerez à assurer le traitement, la
récupération et le recyclage nécessaires de ces déchets, et préviendrez ainsi les effets néfastes
potentiels de leur mauvaise gestion sur l'environnement et la santé humaine.
2. Pays hors de l'Union européenne
Si vous souhaitez mettre ce produit au rebut, veuillez contacter votre administration locale qui
vous renseignera sur la méthode d'élimination correcte de cet appareil.
Suisse : les équipements électriques ou électroniques usagés peuvent être ramenés gratuitement
au détaillant, même si vous n'achetez pas un nouvel appareil. Pour obtenir la liste des autres sites
de collecte, veuillez vous reporter à la page d'accueil du site www.swico.ch ou www.sens.ch.
B. Informations sur la mise au rebut à l'intention des entreprises
1. Au sein de l'Union européenne
Si ce produit est utilisé dans le cadre des activités de votre entreprise et que vous souhaitiez le
mettre au rebut :
Veuillez contacter votre revendeur SHARP qui vous informera des conditions de reprise du
produit. Les frais de reprise et de recyclage pourront vous être facturés. Les produits de petite
taille (et en petites quantités) pourront être repris par vos organisations de collecte locales.
Espagne : veuillez contacter l'organisation de collecte existante ou votre administration locale
pour les modalités de reprise de vos produits usagés.
2. Pays hors de l'Union européenne
Si vous souhaitez mettre ce produit au rebut, veuillez contacter votre administration locale qui
vous renseignera sur la méthode d'élimination correcte de cet appareil.
Attention : votre produit comporte ce symbole. Il signifie que les produits
électriques et électroniques usagés ne doivent pas être mélangés avec les
déchets ménagers généraux. Un système de collecte séparé est prévu pour
ces produits.
A. Informazioni sullo smaltimento per gli utenti (privati)
1. Nell'Unione europea
Attenzione: Per smaltire il presente dispositivo, non utilizzare il normale bidone della spazzatura!
Le apparecchiature elettriche ed elettroniche usate devono essere gestite a parte e in
conformità alla legislazione che richiede il trattamento, il recupero e il riciclaggio adeguato dei
suddetti prodotti.
In seguito alle disposizioni attuate dagli Stati membri, i privati residenti nella UE possono
consegnare gratuitamente le apparecchiature elettriche ed elettroniche usate a centri di
raccolta designati*.
In alcuni paesi*, anche il rivenditore locale può ritirare gratuitamente il vecchio prodotto se
l'utente acquista un altro nuovo di tipologia simile. *) Per maggiori informazioni si prega di
contattare l'autorità locale competente.
Se le apparecchiature elettriche o elettroniche usate hanno batterie o accumulatori, l'utente
dovrà smaltirli a parte preventivamente in conformità alle disposizioni locali.
Lo smaltimento corretto del presente prodotto contribuirà a garantire che i rifiuti siano sottoposti
al trattamento, al recupero e al riciclaggio necessari prevenendone il potenziale impatto negativo
sull'ambiente e sulla salute umana, che potrebbe derivare da un'inadeguata gestione dei rifiuti.
2. In paesi che non fanno parte dell'UE
Se si desidera eliminare il presente prodotto, contattare le autorità locali e informarsi sul
metodo di smaltimento corretto.
Per la Svizzera: Le apparecchiature elettriche o elettroniche usate possono essere restituite
gratuitamente al rivenditore, anche se non si acquista un prodotto nuovo. Altri centri di raccolta
sono elencati sulle homepage di www.swico.ch o di www.sens.ch.
B. Informazioni sullo smaltimento per gli utenti commerciali
1. Nell'Unione europea
Se il prodotto è impiegato a scopi commerciali, procedere come segue per eliminarlo.
Contattare il proprio rivenditore SHARP che fornirà informazioni circa il ritiro del prodotto.
Potrebbero essere addebitate le spese di ritiro e riciclaggio. Prodotti piccoli (e quantitativi
ridotti) potranno essere ritirati anche dai centri di raccolta locali.
Per la Spagna: Contattare il sistema di raccolta ufficiale o l'ente locale preposto al ritiro dei
prodotti usati.
2. In paesi che non fanno parte dell'UE
Se si desidera eliminare il presente prodotto, contattare le autorità locali e informarsi sul
metodo di smaltimento corretto.
Attenzione: Il dispositivo è contrassegnato da questo simbolo, che segnala di non
smaltire le apparecchiature elettriche ed elettroniche insieme ai normali rifiuti
domestici. Per tali prodotti è previsto un sistema di raccolta a parte.
A. Información sobre eliminación para usuarios particulares
1. En la Unión Europea
Atención: si quiere desechar este equipo, ¡por favor no utilice el cubo de la basura habitual!
Los equipos eléctricos y electrónicos usados deberían tratarse por separado de acuerdo con
la legislación que requiere un tratamiento, una recuperación y un reciclaje adecuados de los
equipos eléctricos y electrónicos usados.
Tras la puesta en práctica por parte de los estados miembros, los hogares de particulares
dentro de los estados de la Unión Europea pueden devolver sus equipos eléctricos y
electrónicos a los centros de recogida designados sin coste alguno *. En algunos países* es
posible que también su vendedor local se lleve su viejo producto sin coste alguno si Ud. compra
uno nuevo similar.
*) Por favor, póngase en contacto con su autoridad local para obtener más detalles.
Si sus equipos eléctricos o electrónicos usados tienen pilas o acumuladores, por favor
deséchelos por separado con antelación según los requisitos locales.
Al desechar este producto correctamente, ayudará a asegurar que los residuos reciban el
tratamiento, la recuperación y el reciclaje necesarios, previniendo de esta forma posibles
efectos negativos en el medio ambiente y la salud humana que de otra forma podrían producirse
debido a una manipulación de residuos inapropiada.
2. En otros países fuera de la Unión Europea
Si desea desechar este producto, por favor póngase en contacto con las autoridades locales y
pregunte por el método de eliminación correcto.
Para Suiza: Los equipos eléctricos o electrónicos pueden devolverse al vendedor sin coste
alguno, incluso si no compra ningún nuevo producto. Se puede encontrar una lista de otros
centros de recogida en la página principal de www.swico.ch o www.sens.ch.
B. Información sobre Eliminación para empresas usuarias
1. En la Unión Europea
Si el producto se utiliza en una empresa y quiere desecharlo:
Por favor póngase en contacto con su distribuidor SHARP, quien le informará sobre la
recogida del producto. Puede ser que le cobren los costes de recogida y reciclaje. Puede ser
que los productos de tamaño pequeño (y las cantidades pequeñas) sean recogidos por sus
centros de recogida locales.
Para España: por favor, póngase en contacto con el sistema de recogida establecido o con las
autoridades locales para la recogida de los productos usados.
2. En otros países fuera de la Unión Europea
Si desea desechar este producto, por favor póngase en contacto con sus autoridades locales
y pregunte por el método de eliminación correcto.
Atención: su producto está marcado con este símbolo. Significa que los
productos eléctricos y electrónicos usados no deberían mezclarse con los
residuos domésticos generales. Existe un sistema de recogida independiente
para estos productos.
A. Informações sobre a Eliminação de Produtos para os
Utilizadores (particulares)
1. Na União Europeia
Atenção: Se quiser eliminar este equipamento, não o deve fazer juntamente com o lixo
doméstico comum!
O equipamento eléctrico e electrónico deve ser tratado separadamente e ao abrigo da
legislação aplicável que obriga a um tratamento, recuperação e reciclagem adequados de
equipamentos eléctricos e electrónicos usados.
Após a implementação desta legislação por parte dos Estados-membros, todos os cidadãos
residentes na União Europeia poderão entregar o seu equipamento eléctrico e electrónico
usado em estações de recolha específicas a título gratuito*. Em alguns países* o seu
revendedor local também pode recolher o seu equipamento usado a título gratuito na compra
de um novo equipamento.
*) Contacte as entidades locais para mais informações.
Se o seu equipamento eléctrico e electrónico usado funcionar a pilhas ou baterias, deverá
eliminá-las em separado, conforme a legislação local, e antes de entregar o seu equipamento.
Ao eliminar este produto correctamente estará a contribuir para que o lixo seja submetido aos
processos de tratamento, recuperação e reciclagem adequados. Desta forma é possível evitar os
efeitos nocivos que o tratamento inadequado do lixo poderia provocar no ambiente e na saúde.
2. Em outros Países fora da UE
Se quiser eliminar este produto, contacte as entidades locais e informe-se sobre o método
correcto para proceder à sua eliminação.
Na Suíça: O equipamento eléctrico e electrónico é aceite, a título gratuito, em qualquer
revendedor, mesmo que não tenha adquirido um novo produto. Poderá encontrar uma lista das
estações de recolha destes equipamentos na página da Web www.swicho.ch ou www.sens.ch.
B. Informações sobre a Eliminação de Produtos para Utilizadores-Empresas.
1. Na União Europeia
Se o produto for usado para fins comerciais e quiser eliminá-lo:
Contacte o seu revendedor SHARP que irá informá-lo sobre a melhor forma de eliminar o
produto. Poderá ter de pagar as despesas resultantes da recolha e reciclagem do produto.
Alguns produtos mais pequenos (e em pequenas quantidades) poderão ser recolhidos pelas
estações locais.
Na Espanha: Contacte o sistema de recolhas público ou as entidades locais para mais
informações sobre a recolha de produtos usados.
2. Em outros Países fora da UE
Se quiser eliminar este produto, contacte as entidades locais e informe-se sobre o método
correcto para proceder à sua eliminação.
Atenção: O seu produto está identificado com este símbolo. Significa que os
produtos eléctricos e electrónicos não devem ser misturados com o lixo
doméstico comum. Existe um sistema de recolhas específico para estes
produtos.
A. Information om återvinning av elektrisk utrustning för hushåll
1. EU-länder
OBS! Kasta inte denna produkt i soporna!
Förbrukad elektrisk utrustning måste hanteras i enlighet med gällande miljölagstiftning och
återvinningsföreskrifter.
I enlighet med gällande EU-regler ska hushåll ha möjlighet att lämna in elektrisk utrustning till
återvinningsstationer utan kostnad.* I vissa länder* kan det även hända att man gratis kan
lämna in gamla produkter till återförsäljaren när man köper en ny liknande enhet.
* Kontakta kommunen för vidare information.
Om utrustningen innehåller batterier eller ackumulatorer ska dessa först avlägsnas och
hanteras separat i enlighet med gällande miljöföreskrifter.
Genom att hantera produkten i enlighet med dessa föreskrifter kommer den att tas om hand
och återvinnas på tillämpligt sätt, vilket förhindrar potentiella negativa hälso- och miljöeffekter.
2. Länder utanför EU
Kontakta de lokala myndigheterna och ta reda på gällande sorterings- och
återvinningsföreskrifter om du behöver göra dig av med denna produkt.
B) Information om återvinning för företag
1. EU-länder
Gör så här om produkten ska kasseras:
Kontakta SHARPs återförsäljare för information om hur man går till väga för att lämna tillbaka
produkten. Det kan hända att en avgift för transport och återvinning tillkommer. Mindre
skrymmande produkter (om det rör sig om ett fåtal) kan eventuellt återlämnas till lokala
återvinningsstationer.
2. Länder utanför EU
Kontakta de lokala myndigheterna och ta reda på gällande sorterings-och
återvinningsföreskrifter om du behöver göra dig av med denna produkt.
OBS! Produkten är märkt med symbolen ovan. Denna symbol indikerar att
elektroniska produkter inte ska kastas i det vanliga hushållsavfallet eftersom
det finns ett separat avfallshanteringssystem för dem.
A. Informasjon om gjenvinning og gjenbruk for brukere (private
husholdninger)
1. I EU - land
Obs: Hvis du ønsker og gjenvinne dette apparatet, bør du ikke kaste dette i en alminnelig
søppelkasse.
Brukt elektrisk og elektronisk utstyr skal behandles i overensstemmelse med lov om korrekt
behandling og gjenbruk av elektrisk og elektronisk utstyr.
Som følge av EU-medlemslandenes implementering av denne lov, har private husstander i EU
rett til og sende inn elektrisk og elektronisk utstyr på angitte gjenvinningsstasjoner. I noen
land* er det muligens gratis og levere inn det brukte produktet hos den lokale forhandler hvis
du kjøper et tilsvarende produkt.
*) Kontakt de lokale myndigheter hvis du ønsker ytterligere informasjon.
Hvis ditt brukte elektriske eller elektroniske utstyr inneholder batterier eller akkumulatorer, skal
disse håndteres separat i henhold til gjeldende miljøforskrifter før du levere inn utstyret.
Ved å håndtere produktet i henhold til disse forskrifter, vil du være med på og sikre at vårt avfall
behandles og gjenbrukes riktig. Dermed utsettes verken miljøet eller vår helse for overlast som
følge av uhensiktsmessige avfallshåndteringer.
2. I land utenfor EU
Hvis du ønsker og kvitte deg med dette produktet, bes du kontakte de lokale myndigheter og
spørre dem om hvordan produktet gjenvinnes korrekt.
B. Informasjon om gjenvinning og gjenbruk for virksomheter.
1. Innenfor EU
Hvis dette produktet brukes i forbindelse med virksomhetens drift, og du ønsker å kvitte deg
med det:
Kontakt din SHARP-forhandler som vil fortelle deg hvordan produktet kan innleveres. Du vil
muligens måtte betale for omkostningene i forbindelse med innlevering og gjenbruk. Små
produkter (i små mengder) kan muligens leveres på din lokale gjenvinningsstasjon.
2. I land utenfor EU
Hvis du ønsker og kvitte deg med dette produktet, bes du kontakte de lokale myndigheter og
spørre dem om hvordan produktet gjenvinnes korrekt.
Obs: Produktet vil ha dette symbolet. Det betyr at det er snakk om elektrisk
eller elektronisk utstyr som ikke bør blandes med alminnelige
husholdningsavfall. Det finnes et separat gjennbrukssystem til slike
produkter.
A. Hävitysohjeet käyttäjille (yksityiset kotitaloudet)
1. Euroopan unionissa
Huomio: Jos haluat hävittää tämän laitteen, älä käytä tavallista jätesäiliötä.
Käytetyt sähkö- ja elektroniikkalaitteet pitää hävittää erikseen noudattaen lainsäädäntöä, joka
takaa käytettyjen sähkö- ja elektroniikkalaitteiden oikean käsittelyn, keräämisen ja
kierrättämisen.
Jäsenvaltioiden täytäntöönpanoa seuraten yksityiset kotitaloudet EU:n jäsenvaltioissa voivat
palauttaa käytetyt sähkö- ja elektroniikkalaitteet määrättyihin keräyspaikkoihin ilmaiseksi*.
Joissakin maissa* paikalliset vähittäismyyjät voivat myös ottaa vastaan vanhan tuotteen
ilmaiseksi, jos asiakas ostaa vastaavan uuden tuotteen.
*) Pyydä lisätietoja paikallisviranomaisilta.
Jos käytetyissä sähkö- tai elektroniikkalaitteissa käytetään paristoja tai akkuja, hävitä nämä
tuotteet etukäteen erikseen paikallisten säädösten mukaisesti.
Hävittämällä tuotteen asiamukaisesti, autat varmistamaan, että jätteet käsitellään, kerätään ja
kierrätetään asianmukaisella tavalla. Näin vältytään haitallisilta ympäristö- ja
terveysvaikutuksilta, joita saattaa olla seuraamuksena jätteen epäasianmukaisesta
käsittelystä.
2. Muissa maissa EU:n ulkopuolella
Jos haluat hävittää tuotteen, ota yhteys paikallisiin viranomaisiin ja pyydä ohjeita tuotteen
asianmukaiseen hävittämiseen.
B. Hävitysohjeet yrityskäyttäjille.
1. Euroopan unionissa
Jos tuotetta on käytetty yrityskäytössä, ja haluat hävittää sen,
ota yhteys SHARP-jälleenmyyjään, joka antaa sinulle lisäohjeita tai ottaa tuotteen vastaan.
Sinulta saatetaan veloittaa tuotteen vastaanottamisesta ja kierrätyksestä johtuvat
kustannukset. Paikalliset keräyspisteet saattavat ottaa vastaan pienet tuotteet (ja pienet
määrät).
2. Muissa maissa EU:n ulkopuolella
Jos haluat hävittää tuotteen, ota yhteys paikallisiin viranomaisiin ja pyydä ohjeita tuotteen
asianmukaiseen hävittämiseen.
Huomio: Tuote on merkitty tällä symbolilla. Tämä tarkoittaa, että käytettyjä
sähkö- ja elektroniikkalaitteita ei saa sekoittaa kotitalouden yleisjätteiden
kanssa. Näille tuotteille on olemassa erillinen keräysjärjestelmä.
A. Oplysninger om kassering og genbrug for brugere (private
husholdninger)
1. Inden for EU
Obs: Hvis du ønsker at kassere dette apparat, bør du ikke komme det i din almindelige
skraldespand.
Brugt elektrisk og elektronisk udstyr skal behandles særskilt og i overensstemmelse med
loven om korrekt behandling og genbrug af brugt elektrisk og elektronisk udstyr.
Som følge af EU-medlemslandenes implementering af denne lov, har private husstande i EU
ret til gratis*, at aflevere deres brugte elektriske og elektroniske udstyr på angivne
genbrugspladser. I nogle lande* er det muligvis gratis, at indlevere det brugte produkt hos den
lokale forhandler, hvis du køber et tilsvarende nyt produkt.
*) Kontakt de lokale myndigheder hvis du ønsker yderligere oplysninger.
Hvis dit brugte elektriske eller elektroniske udstyr indeholder batterier eller akkumulatorer,
bedes du skille dig af med dem, i overensstemmelse med den lokale lovgivning, før du
indleverer udstyret.
Ved at kassere dette apparat korrekt, vil du være med til at sikre, at vores affald behandles og
genbruges rigtigt. Derved udsættes hverken miljøet eller vores helbred for overlast som følge af
uhensigtsmæssig affaldshåndtering.
2. I lande uden for EU
Hvis du ønsker at skille dig af med dette produkt, bedes du kontakte de lokale myndigheder og
spørge dem om, hvorledes produktet kasseres korrekt.
B. Oplysninger om kassering og genbrug for virksomheder.
1. Inden for EU
Hvis dette produkt bruges i forbindelse med virksomhedsdrift, og du ønsker at skille dig af med
det:
Du bedes kontakte din SHARP-forhandler, som vil fortælle dig hvordan produktet kan
indleveres. Du vil muligvis skulle betale for omkostningerne i forbindelse med indlevering og
genbrug. Små produkter (i små mængder) kan muligvis afleveres på den lokale
genbrugsplads.
2. I lande uden for EU
Hvis du ønsker at skille dig af med dette produkt, bedes du kontakte de lokale myndigheder og
spørge dem, hvordledes produktet kasseres korrekt.
Obs: Produktet vil have dette symbol. Det betyder at der er tale om elektrisk
eller elektronisk udstyr som ikke bør blandes med det almindelige
husholdnings-affald. Der findes et særskilt genbrugssystem til sådanne
produkter.
A. Informatie over afvalverwijdering voor gebruikers (particuliere
huishoudens)
1. In de Europese Unie
Let op: Deze apparatuur niet samen met het normale huisafval weggooien!
Afgedankte elektrische en elektronische apparatuur moet gescheiden worden ingezameld
conform de wetgeving inzake de verantwoorde verwerking, terugwinning en recycling van
afgedankte elektrische en elektronische apparatuur.
Na de invoering van de wet door de lidstaten mogen particuliere huishoudens in de lidstaten van
de Europese Unie hun afgedankte elektrische en elektronische apparatuur kosteloos* naar
hiertoe aangewezen inzamelingsinrichtingen brengen*. In sommige landen* kunt u bij de
aanschaf van een nieuw apparaat het oude product kosteloos bij uw lokale distributeur inleveren.
*) Neem contact op met de plaatselijke autoriteiten voor verdere informatie.
Als uw elektrische of elektronische apparatuur batterijen of accumulatoren bevat dan moet u
deze afzonderlijk conform de plaatselijke voorschriften weggooien.
Door dit product op een verantwoorde manier weg te gooien, zorgt u ervoor dat het afval de
juiste verwerking, terugwinning en recycling ondergaat en potentiële negatieve effecten op het
milieu en de menselijke gezondheid worden voorkomen die anders zouden ontstaan door het
verkeerd verwerken van het afval.
2. In andere landen buiten de Europese Unie
Als u dit product wilt weggooien, neem dan contact op met de plaatselijke autoriteiten voor
informatie omtrent de juiste verwijderingsprocedure.
Voor Zwitserland: U kunt afgedankte elektrische en elektronische apparatuur kosteloos bij de
distributeur inleveren, zelfs als u geen nieuw product koopt. Aanvullende
inzamelingsinrichtingen zijn vermeld op de startpagina van www.swico.ch or www.sens.ch.
B. Informatie over afvalverwijdering voor bedrijven.
1. In de Europese Unie
Als u het product voor zakelijke doeleinden heeft gebruikt en als u dit wilt weggooien:
Neem contact op met uw SHARP distributeur die u inlichtingen verschaft over de terugname
van het product. Het kan zijn dat u een afvalverwijderingsbijdrage voor de terugname en
recycling moet betalen. Kleine producten (en kleine hoeveelheden) kunnen door de lokale
inzamelingsinrichtingen worden verwerkt.
Voor Spanje: Neem contact op met de inzamelingsinrichting of de lokale autoriteiten voor de
terugname van uw afgedankte producten.
2. In andere landen buiten de Europese Unie
Als u dit product wilt weggooien, neem dan contact op met de plaatselijke autoriteiten voor
informatie omtrent de juiste verwijderingsprocedure.
Let op: Uw product is van dit merkteken voorzien. Dit betekent dat afgedankte
elektrische en elektronische apparatuur niet samen met het normale
huisafval mogen worden weggegooid. Er bestaat een afzonderlijk
inzamelingssysteem voor deze producten.
A. Πληροφορίες σχετικά µε την απόρριψη εξοπλισµού (οικιακή χρήση)
1. Στην Ευρωπαϊκή Ένωση
Προσοχή: Αν επιθυµείτε να απορρίψετε τον εξοπλισµό αυτό, µην χρησιµοποιείτε τον
συνηθισµένο κάδο απορριµµάτων!
Η επεξεργασία του χρησιµοποιηµένου ηλεκτρικού και ηλεκτρονικού εξοπλισµού πρέπει να γίνεται
ξεχωριστά και σε συµφωνία µε τη νοµοθεσία που απαιτεί την κατάλληλη επεξεργασία,
αποκατάσταση και ανακύκλωση του χρησιµοποιηµένου ηλεκτρικού και ηλεκτρονικού εξοπλισµού.
Έπειτα από σχετική εφαρµογή σε χώρες-µέλη, ο χρησιµοποιηµένος ηλεκτρικός και
ηλεκτρονικός εξοπλισµός του κάθε σπιτιού εντός της ΕΕ µπορεί να επιστραφεί χωρίς χρέωση*
σε προκαθορισµένες εγκαταστάσεις περισυλλογής. Σε ορισµένες χώρες* είναι δυνατόν να
επιστρέψετε το παλιό σας προϊόν στον τοπικό σας προµηθευτή χωρίς χρέωση, αν αγοράσετε
ένα παρόµοιο καινούργιο προϊόν.
*) Για περισσότερες πληροφορίες, επικοινωνήστε µε το φορέα της περιοχής σας.
Αν ο χρησιµοποιηµένος ηλεκτρικός ή ηλεκτρονικός σας εξοπλισµός έχει µπαταρίες ή
συσσωρευτές, απορρίψτε αυτά πρώτα ξεχωριστά, σύµφωνα µε τις τοπικές απαιτήσεις.
Η σωστή απόρριψη του προϊόντος αυτού θα σας βοηθήσει να βεβαιωθείτε ότι τα απορρίµµατα
υφίστανται την απαραίτητη επεξεργασία, αποκατάσταση και ανακύκλωση, αποτρέποντας έτσι
πιθανές αρνητικές συνέπειες για το περιβάλλον και την ανθρώπινη υγεία, οι οποίες διαφορετικά
θα µπορούσαν να προκύψουν λόγω της ακατάλληλης επεξεργασίας απορριµµάτων.
2. Σε άλλες χώρες εκτός της ΕΕ
Αν επιθυµείτε να απορρίψετε το συγκεκριµένο προϊόν, επικοινωνήστε µε τους τοπικούς σας
φορείς και ζητήστε πληροφορίες για τη σωστή µέθοδο απόρριψης.
B. Πληροφορίες σχετικά µε την απόρριψη εξοπλισµού για
χρήστες σε επιχειρήσεις.
1. Στην Ευρωπαϊκή Ένωση
Αν το προϊόν χρησιµοποιείται σε επιχειρήσεις και επιθυµείτε να το απορρίψετε:
Επικοινωνήστε µε τον προµηθευτή SHARP, ο οποίος θα σας πληροφορήσει σχετικά µε την
επιστροφή του προϊόντος. Ενδέχεται να χρεωθείτε για το κόστος της επιστροφής και της
ανακύκλωσης. Προϊόντα µικρού µεγέθους (και σε µικρές ποσότητες) ενδέχεται να µπορούν να
επιστραφούν από τις τοπικές σας υπηρεσίες περισυλλογής.
2. Σε άλλες χώρες εκτός της ΕΕ
Αν επιθυµείτε να απορρίψετε το συγκεκριµένο προϊόν, επικοινωνήστε µε τους τοπικούς σας
φορείς και ζητήστε πληροφορίες για τη σωστή µέθοδο απόρριψης.
Προσοχή: Το προϊόν σας έχει σήµανση µε αυτό το σύµβολο. Αυτό σηµαίνει
ότι τα χρησιµοποιηµένα ηλεκτρικά και ηλεκτρονικά προϊόντα δεν θα πρέπει
να αναµιγνύονται µε γενικά οικιακά απορρίµµατα. Υπάρχει ξεχωριστό
σύστηµα περισυλλογής για τα συγκεκριµένα προϊόντα.
A. Informacje dla użytkowników (prywatne gospodarstwa
domowe) dotyczące usuwania odpadów
1. W krajach Unii Europejskiej
Uwaga: Jeśli chcą Państwo usunąć to urządzenie, prosimy nie używać zwykłych pojemników
na śmieci!
Zużyty sprzęt elektryczny i elektroniczny należy usuwać oddzielnie, zgodnie z wymogami
prawa dotyczącymi odpowiedniego przetwarzania, odzysku i recyklingu zużytego sprzętu
elektrycznego i elektronicznego.
Po wdrożeniu przepisów unijnych w Państwach Członkowskich prywatne gospodarstwa
domowe na terenie krajów UE mogą bezpłatnie* zwracać zużyty sprzęt elektryczny i
elektroniczny do wyznaczonych punktów zbiórki odpadów. W niektórych krajach* można
bezpłatnie zwrócić stary produkt do lokalnych punktów sprzedaży detalicznej pod
warunkiem, że zakupią Państwo podobny nowy produkt.
*) W celu uzyskania dalszych informacji na ten temat należy skontaktować się z lokalnymi władzami.
Jeśli zużyty sprzęt elektryczny i elektroniczny jest wyposażony w baterie lub akumulatory,
należy je usunąć oddzielnie, zgodnie z wymogami lokalnych przepisów.
Jeśli ten produkt zostanie usunięty we właściwy sposób, pomogą Państwo zapewnić, że
odpady zostaną poddane przetworzeniu, odzyskowi i recyklingowi, a tym samym zapobiec
potencjalnym negatywnym skutkom dla środowiska naturalnego i zdrowia ludzkiego, które w
przeciwnym razie mogłyby mieć miejsce na skutek niewłaściwej obróbki odpadów.
2. Kraje pozaunijne
Jeśli chcą Państwo pozbyć się produktu, należy skontaktować się z władzami lokalnymi i
uzyskać informacje na temat prawidłowej metody usunięcia produktu.
B. Informacje dla użytkowników biznesowych dotyczące
usuwania odpadów.
1. W krajach Unii Europejskiej
W przypadku gdy produkt używany jest do celów handlowych i zamierzają go Państwo usunąć:
Należy skontaktować się z dealerem firmy SHARP, który poinformuje o możliwości zwrotu
wyrobu. Być może będą Państwo musieli ponieść koszty zwrotu i recyklingu produktu.
Produkty niewielkich rozmiarów (i w małych ilościach) można zwrócić do lokalnych punktów
zbiórki odpadów.
2. Kraje pozaunijne
Jeśli chcą Państwo usunąć ten produkt, należy skontaktować się z władzami lokalnymi i
uzyskać informacje na temat prawidłowej metody jego usunięcia.
Uwaga: Państwa produkt oznaczony jest tym symbolem. Oznacza to, że
zużytego sprzętu elektrycznego i elektronicznego nie należy łączyć z
odpadami z gospodarstw domowych. Dla tego typu produktów istnieje
odrębny system zbiórki odpadów.
A. Informace o likvidaci pro uživatele (domácnosti)
1. V zemích Evropské unie
Upozornění: Toto zařízení nelikvidujte v běžných odpadkových koších!
Použité elektrické a elektronické vybavení je třeba likvidovat samostatně a v souladu s
legislativou, která vyžaduje řádnou likvidaci, obnovení a recyklaci použitého elektrického a
elektronického vybavení.
Na základě dohody členských států mohou domácnosti v zemích Evropské unie vracet použité
elektrické a elektronické vybavení v určených sběrnách zdarma*.
V některých zemích* od vás může místní prodejce odebrat zdarma použitý výrobek, pokud
zakoupíte nový podobný.
*) Další podrobnosti vám sdělí orgány místní správy.
Pokud použité elektrické nebo elektronické vybavení obsahuje baterie nebo akumulátory,
zlikvidujte je předem samostatně v souladu s místními vyhláškami.
Řádnou likvidací tohoto výrobku pomáháte zajistit, že bude odpad vhodným způsobem
zlikvidován, obnoven a recyklován a zabráníte tak možnému poškození životního prostředí a
zdraví obyvatel, ke kterému by mohlo dojít v případě nesprávné likvidace.
2. V ostatních zemích mimo Evropskou unii
Chcete-li tento výrobek zlikvidovat, obrate se na místní správní orgány, které vás seznámí s
vhodnou metodou likvidace.
B. Informace o likvidaci pro podnikatelské subjekty.
1. V zemích Evropské unie
Chcete-li zlikvidovat výrobek, který je používán pro podnikatelské účely:
Obrate se na prodejce SHARP, který vás informuje o odebrání výrobku. Odebrání a recyklace
mohou být zpoplatněny. Malé výrobky (a malá množství) mohou odebírat místní sběrny odpadu.
2. V ostatních zemích mimo Evropskou unii
Chcete-li tento výrobek zlikvidovat, obrate se na místní správní orgány, které vás seznámí s
vhodnou metodou likvidace.
Upozornění: Váš výrobek je označen tímto symbolem. Znamená to, že je
zakázáno likvidovat použitý elektrický nebo elektronický výrobek s běžným
domácím odpadem. Pro tyto výrobky je k dispozici samostatný sběrný systém.
A. Informácie o likvidácii pre používateov (domácnosti)
1. V Európskej únii
Pozor: Ak chcete zlikvidova toto zariadenie, nepoužívajte bežný kôš na odpadky!
Použité elektrické a elektronické zariadenia musia by spracované oddelene a poda platných
zákonov, ktoré vyžadujú správne zaobchádzanie, obnovu a recyklovanie použitých elektrických
a elektronických zariadení.
Poda implementácie v jednotlivých členských štátoch môžu domácnosti v štátoch EÚ vráti
použité elektrické a elektronické zariadenia na určené zberné miesta bez poplatkov*.
V niektorých štátoch* môžu vaše staré výrobky zdarma odobra tiež miestni maloobchodní
predajcovia, ak si zakúpite podobný nový výrobok.
*) Ďalšie podrobnosti sa dozviete od vašich miestnych orgánov.
Ak sa vo vašich použitých elektrických alebo elektronických zariadeniach nachádzajú batérie,
zlikvidujte ich samostatne vopred, poda miestnych požiadaviek.
Správnou likvidáciou tohto výrobku pomôžete pri zabezpečení toho, aby odpad prešiel
potrebnou úpravou, obnovou a recykláciou a takto sa predchádzalo možným negatívnym
vplyvom na životné prostredie a zdravie osôb, ku ktorým by inak mohlo dochádza v dôsledku
nevhodného zaobchádzania s odpadom.
2. V ostatných štátoch mimo EÚ
Ak si želáte znehodnoti tento výrobok, obráte sa na vaše miestne orgány a informujte sa o
správnej metóde likvidácie.
B. Informácie o likvidácii pre komerčných používateov.
1. V Európskej únii
Ak sa výrobok používa na komerčné účely a chcete ho znehodnoti:
Obráte sa na vášho predajcu SHARP, ktorý vás informuje o spätnom odobratí výrobku. Môžu
vám by účtované náklady vyplývajúce zo spätného odobratia a recyklácie. Malé výrobky (a malé
množstvá) môžu spätne odobra vaše lokálne zberné miesta.
2. V ostatných štátoch mimo EÚ
Ak si želáte znehodnoti tento výrobok, obráte sa na vaše miestne orgány a informujte sa o
správnej metóde likvidácie.
Pozor: Výrobok je označený týmto symbolom. Znamená to, že použité
elektrické a elektronické výrobky by sa nemali mieša s bežným domovým
odpadom. Pre tieto výrobky existuje samostatný zberný systém.
A. Informacije o odlaganju za uporabnike (zasebna gospodinjstva)
1. V Evropski uniji
Pozor: Te opreme ne zavrzite v običajen koš za smeti!
Rabljeno električno in elektronsko opremo je treba obravnavati ločeno in v skladu z
zakonodajo, ki zahteva ustrezno ravnanje, predelavo in reciklažo rabljene električne in
elektronske opreme.
Skladno z izvajanjem te zakonodaje lahko zasebna gospodinjstva v državah članicah EU
rabljeno električno in elektronsko opremo brezplačno vrnejo na temu namenjena zbirna
mesta*. V nekaterih državah* lokalni dobavitelj pri nakupu podobnega novega izdelka
brezplačno prevzame tudi vašega starega.
*) Za več informacij se obrnite na ustrezne organe lokalne oblasti.
Če so v rabljeni električni oziroma elektronski opremi baterije ali akumulatorji, le-te predhodno
zavrzite v skladu z lokalnimi predpisi.
Z ustreznim odlogom tega izdelka boste poskrbeli, da bodo odpadki deležni ustreznega
ravnanja, predelave in reciklaže ter tako pomagali preprečiti morebitne negativne učinke na
okolje in zdravje ljudi, do katerih bi sicer zaradi neustreznega ravnanja z odpadki lahko prišlo.
2. V državah zunaj EU
Če želite ta izdelek zavreči, se obrnite na ustrezne organe lokalne skupnosti in povprašajte po
ustreznem načinu odstranitve.
Švica: Rabljeno električno oziroma elektronsko opremo lahko brezplačno vrnete prodajalcu
tudi če niste kupili novega izdelka. Ostala zbirna mesta so navedena na spletni strani
www.swico.ch ali www.sens.ch.
B. Informacije o odlaganju za poslovne uporabnike
1. V Evropski uniji
Če je izdelek namenjen poslovni uporabi in ga želite zavreči:
Obrnite se na prodajalca izdelkov SHARP, ki vam bo razložil postopek vračila izdelka. Morda
boste morali za stroške vračila in reciklaže plakati. Manjše izdelke (in manjše količine le-teh)
bodo morda prevzela temu namenjena lokalna zbirna mesta.
Španija: Za vračilo rabljenih izdelkov se poslužite uveljavljenega sistema zbiranja odpadkov.
2. V državah zunaj EU
Če želite ta izdelek zavreči, se obrnite na ustrezne organe lokalne skupnosti in povprašajte po
ustreznem načinu odstranitve.
Pozor: Vaš izdelek je označen s tem simbolom. Ta opozarja, da rabljene
električne in elektronske opreme ne smemo zavreči skupaj z drugimi
gospodinjskimi odpadki. Tem izdelkom je namenjen poseben sistem odlaganja.
A. Hulladék-elhelyezési tájékoztató felhasználók részére (magán
háztartások)
1. Az Európai Unióban
Figyelem: Ha a készüléket ki akarja selejtezni, kérjük, ne a közönséges szemeteskukát
használja!
A használt elektromos és elektronikus berendezéseket külön, és a használt elektromos és
elektronikus berendezések szabályszerű kezeléséről, visszanyeréséről és újrahasznosításáról
rendelkező jogszabályokkal összhangban kell kezelni.
A tagállamok általi végrehajtást követően az EU államokon belül a magán háztartások használt
elektromos és elektronikai berendezéseiket díjmentesen juttathatják vissza a kijelölt
gyűjtőlétesítményekbe*. Egyes országokban* a helyi kiskereskedés is díjmentesen visszaveheti
Öntől a régi terméket, ha hasonló új terméket vásárol.
*) A további részletekről, kérjük, érdeklődjön az önkormányzatnál.
Ha használt elektromos vagy elektronikus berendezésében elemek vagy akkumulátorok vannak,
kérjük, előzetesen ezeket selejtezze ki a helyi előírásoknak megfelelően.
A termék szabályszerű kiselejtezésével Ön segít biztosítani azt, hogy a hulladék keresztülmenjen
a szükséges kezelésen, visszanyerési és újrahasznosítási eljáráson, ezáltal közreműködik a
lehetséges káros környezeti és humán egészségi hatások megelőzésében, amelyek ellenkező
esetben a helytelen hulladékkezelés következtében előállhatnának.
2. Az EU-n kívüli egyéb országokban
Ha a terméket ki szeretné selejtezni, kérjük, forduljon az önkormányzathoz, és érdeklődjön a
helyes hulladék-elhelyezési módszerről.
B. Hulladék-elhelyezési tájékoztató vállalati felhasználók részére.
1. Az Európai Unióban
Ha a terméket üzleti célokra használta, és ki kívánja selejtezni:
Kérjük, forduljon a SHARP kereskedéshez, ahol tájékoztatják Önt a termék visszavételéről.
Lehetséges, hogy a visszavételből és újrahasznosításból eredő költségeket felszámítják.
Előfordulhat, hogy a helyi hulladékbegyűjtő létesítmény átveszi a kisebb termékeket (és kis
mennyiségeket).
2. Az EU-n kívüli egyéb országokban
Ha a terméket ki szeretné selejtezni, kérjük, forduljon az önkormányzathoz, és érdeklődjön a
helyes hulladék-elhelyezési módszerről.
Figyelem: A terméket ezzel a jelöléssel látták el. Ez azt jelenti, hogy a használt
elektromos és elektronikus termékeket nem szabad az általános háztartási
hulladékkal keverni. Ezekhez a termékekhez külön hulladékgyűjtő rendszer
üzemel.
A. Kasutajainfo seadmete äraviskamise kohta (eramajapidamistele)
1. Euroopa Liidus
Tähelepanu: kui soovite seadmest vabaneda, palun ärge visake seda tavalisse prügikasti!
Kasutatud elektri- ja elektronseadmeid tuleb käidelda eraldi ja vastavalt õigusaktidele, mis
nõuavad elektri- ja elektronseadmete õiget käitlust, taaskasutust ja ringlussevõttu.
Pärast õigusaktide rakendamist liikmesriikides võivad ELi eramajapidamised tagastada oma
kasutatud elektri- ja elektronseadmed tasuta selleks määratud kogumispunktidesse*.
Mõnedes riikides* võib kohalik jaemüüja vana toote tasuta tagasi võtta ka siis, kui ostate
sarnase uue toote.
*) Palun võtke täpsustamiseks ühendust oma kohaliku asutusega.
Kui teie kasutatud elektri- või elektronseadmel on patareid või akud, palun vabanege neist
eelnevalt vastavalt kohalikele nõuetele.
Selle toote korrektse kõrvaldamisega aitate tagada jäätmete nõuetekohase käitluse,
taaskasutuse ja ringlussevõtu ning seega vältida võimalikke kahjulikke mõjusid keskkonnale ja
inimeste tervisele, mida jäätmete vale käitlus vastasel juhul kaasa võiks tuua.
2. Muudes riikides väljaspool ELi
Kui soovite sellest tootest vabaneda, võtke palun ühendust kohalike asutustega ja selgitage
välja õige kõrvaldamisviis.
B. Info seadmete äraviskamise kohta äriklientidele.
1. Euroopa Liidus
Kui toodet kasutatakse ärilistel eesmärkidel ja te soovite sellest vabaneda:
palun võtke ühendust SHARPi toodete vahendajaga, kes teavitab teid toote
tagastamisvõimalustest. Võimalik, et teil tuleb tasuda toote tagastamise ja ringlussevõtuga
kaasnevad kulud. Väikesemõõdulisi tooteid (ja väikeses koguses) võidakse vastu võtta ka teie
kohalikus kogumispunktis.
2. Muudes riikides väljaspool ELi
Kui soovite sellest tootest vabaneda, palun võtke ühendust kohalike asutustega ja selgitage
välja õige kõrvaldamisviis.
Tähelepanu: Teie toode on tähistatud selle sümboliga. See tähendab, et
kasutatud elektri- ja elektronseadmeid ei tohiks ära visata koos tavaliste
olmejäätmetega. Nende toodete jaoks on eraldi kogumissüsteem.
A. Informācija lietotājiem par izmešanu (privātās mājsaimniecības)
1. Eiropas Savienībā
Uzmanību! Ja vēlaties izmest šo ierīci, lūdzu, neizmantojiet šim nolūkam parasto atkritumu
konteineri!
Lietotas elektriskās un elektroniskās ierīces ir jāapstrādā atsevišķi un saskaņā ar
likumdošanas aktiem, kas nosaka lietotu elektrisku un elektronisku ierīču īpašu apstrādi,
pārstrādi un atkārtotu izmantošanu.
Pēc noteikumu ieviešanas, ES dalībvalstu privātās mājsaimniecības var nodot savas lietotās
elektriskās un elektroniskās ierīces speciāli tam paredzētos savākšanas punktos bez
maksas*. Dažās valstīs* arī vietējais izplatītājs var pieņemt atpakaļ nolietotās ierīces bez
maksas, ja jūs iegādāties tai līdzīgu jaunu ierīci.
*) Lūdzu, sazinieties ar savu vietējo kompetento institūciju detalizētākas informācijas
saņemšanai.
Ja jūsu lietotai elektriskai vai elektroniskai ierīcei ir baterijas vai akumulatori, lūdzu, izmetiet
tos atsevišķi jau iepriekš, saskaņā ar spēkā esošajiem vietējiem noteikumiem.
Pareizi utilizējot šo ierīci, jūs palīdzēsiet nodrošināt pareizu atkritumu apstrādi, pārstrādi un
atkārtotu izmantošanu, un tādējādi novērsīsiet iespējamo negatīvo ietekmi uz vidi un cilvēku
veselību, ko izraisītu nepareiza atkritumu apsaimniekošana.
2. Citās valstīs ārpus ES
Ja vēlaties izmest šo izstrādājumu, lūdzu, sazinieties ar vietējo kompetento institūciju, lai
noskaidrotu pareizo izmešanas metodi.
B. Informācija par izmešanu (korporatīviem lietotājiem).
1. Eiropas Savienībā
Ja produktu izmanto korporatīviem mērķiem, un jūs vēlaties to izmest:
Lūdzu, sazinieties ar vietējo SHARP izplatītāju, kurš jūs informēs par izstrādājuma atpakaļ
pieņemšanas kārtību. Jums var nākties apmaksāt izdevumus, kas radušies, par izstrādājumu
pieņemšanu un pārstrādi. Iespējams, ka nelielus izstrādājumus (un nelielā apjomā) var nodot
vietējā savākšanas punktā.
2. Citās valstīs ārpus ES
Ja vēlaties šo izstrādājumu izmest, lūdzu, sazinieties ar vietējo kompetento institūciju, lai
noskaidrotu pareizo izmešanas metodi.
Uzmanību! Uz jūsu ierīces redzams šāds simbols. Tas nozīmē, ka lietotas
elektriskas un elektroniskas ierīces nedrīkst jaukt kopā ar pārējiem
atkritumiem. Šīm ierīcēm pastāv atsevišķa savākšanas sistēma.
A. Informacija vartotojams apie gaminių išmetimą (privatiems
namų ūkiams)
1. Europos Sąjungoje
Dėmesio: Šios įrangos negalima mesti į įprastinius šiukšlių konteinerius!
Naudota elektrinė ir elektroninė įranga turi būti apdorojama atskirai, laikantis teisės aktų, kurie
reikalauja tinkamai apdoroti, panaudoti ir perdirbti elektrinę ir elektroninę įrangą.
Po atitinkamų teisės aktų įgyvendinimo valstybėse narėse privatūs ES šalių ūkiai gali
nemokamai grąžinti naudotą elektrinę arba elektroninę įrangą paskirtosioms surinkimo
įmonėms*. Kai kuriose šalyse* vietiniai mažmenininkai taip pat gali nemokamai priimti iš jūsų
seną gaminį, jei perkate panašų naują.
*) Jei reikia daugiau informacijos, kreipkitės į vietos institucijas.
Jei jūsų naudotoje elektrinėje ar elektroninėje įrangoje yra baterijų ar akumuliatorių, prieš tai
utilizuokite juos atskirai, laikydamiesi šalyje galiojančių reikalavimų.
Tinkamai išmesdami gaminį padėsite užtikrinti, kad atliekos būtų reikiamai apdorojamos,
panaudojamos ir perdirbamos saugant aplinką ir žmonių sveikatą nuo neigiamo poveikio, kuris
kiltų netinkamai elgiantis su atliekomis.
2. Ne ES šalyse
Jei norite išmesti šį gaminį, kreipkitės į vietos institucijas ir prašykite nurodyti tinkamą išmetimo
būdą.
B. Informacija apie gaminių išmetimą verslo vartotojams.
1. Europos Sąjungoje
Jei norite išmesti gaminį, naudotą verslo tikslais:
Kreipkitės į savo SHARP atstovą, kuris informuos jus apie gaminio grąžinimą. Jums gali tekti
padengti išlaidas, susijusias su produkto grąžinimu ir perdirbimu. Nedidelius gaminius
(nedidelius jų kiekius) gali priimti vietinė surinkimo įmonė.
2. Ne ES šalyse
Jei norite išmesti šį gaminį, kreipkitės į vietos institucijas ir prašykite nurodyti tinkamą išmetimo
būdą.
Dėmesio: Jūsų gaminys pažymėtas šiuo simboliu. Tai reiškia, kad naudotų
elektrinių ir elektroninių gaminių negalima išmesti į įprastinių buitinių atliekų
konteinerius. Tokiems gaminiams taikoma atskira surinkimo sistema.
A. Informaþii pentru utilizatorii casnici
1. În Uniunea Europeanã
Atenþie: Dacã doriþi sã aruncaþi acest echipament, vã rugãm sã nu folosiþi recipientul de gunoi
uzual!
Echipamentele electrice ºi electronice uzate trebuie eliminate separat, în conformitate cu
legislaþia în vigoare care impune tratarea, valorificarea ºi reciclarea corespunzãtoare a
acestora.
În urma implementãrii legislaþiei de cãtre statele membre UE, utilizatorii casnici din acestea
pot preda gratuit* echipamentele electronice ºi electrice uzate la centrele de colectare
autorizate. În anumite þãri* magazinele locale preiau gratuit produsul uzat la achiziþionarea
unui alt produs similar.
*) Pentru informaþii suplimentare vã rugãm contactaþi autoritatea localã.
Dacã echipamentele dumneavoastrã electrice ºi electronice uzate au baterii sau acumulatori,
acestea/aceºtia trebuie eliminate/eliminaþi separat în conformitate cu reglementãrile locale.
Eliminând acest produs în mod corect contribuiþi la tratarea, valorificarea ºi reciclarea
corespunzãtoare a deºeurilor, prevenind astfel efectele negative asupra sãnãtãþii umane ºi a
mediului care pot apãrea în urma managementului necorespunzãtor al deºeurilor.
2. În alte þãri din afara Uniunii Europene
Dacã doriþi sã aruncaþi acest produs, vã rugãm contactaþi autoritatea localã pentru a afla care
este metoda corectã de eliminare.
B. Informaþii pentru utilizatorii profesionali
1. În Uniunea Europeanã
Dacã produsul este de uz profesional ºi doriþi sã îl aruncaþi:
Vã rugãm contactaþi distribuitorul SHARP care vã va furniza informaþii privind preluarea
produsului. Este posibil sã vi se cearã sã acoperiþi cheltuielile ocazionate de preluare ºi
reciclare. Produsele de mici dimensiuni (ºi cantitãþile mici) pot fi preluate de centrele de
colectare locale.
2. În alte þãri din afara Uniunii Europene
Dacã doriþi sã aruncaþi acest produs, vã rugãm contactaþi autoritatea localã pentru a afla care
este metoda corectã de eliminare.
Atenþie: Produsul dumneavoastrã este marcat cu acest simbol care indicã cã
produsele electrice ºi electronice uzate nu trebuie aruncate împreunã cu
deºeurile casnice. Pentru aceste produse existã un sistem separat de
colectare.
A. À˝ÂÓÏ˙Í˚Ê˛ ÙÍ ÊÙ‰ËûÏÔ˛˝¯ÚÓ ÙÍ ÎÓÚϯ¬ÊÚ¯ÔÊ
(¸ÍÁÚ˝Ê Ó˙ÍˆÊ˝ÁÚËÍ)
1. Õ ›ËÏÓίıÁˆÊ˛ Áû√Ù
Õ˝Ê˙Í˝Ê¯: œˆÓ ≈¯Ôͯگ Í ÊÙ‰ËûÏÔÊÚ¯ ÚÓËÍ Ó¬ÓÏÈËÍ˝¯, ˙ÓÔ˛ ˝¯ ÊÙÎÓÔÙËÍıÚ¯ Ӭʈ˝Ó˯˝ÊÚ¯
ˆÓ˝Ú¯ı˝¯ÏÊ ÙÍ Á˙¯Ú!
ŒÎÓÚϯ¬˛ËÍ˝ÊÚ¯ ¯Ô¯ˆÚÏʸ¯ÁˆÊ ÈÏ¯Ê Ê ¯Ô¯ˆÚÏÓ˝˝Ó Ó¬ÓÏÈËÍ˝¯ ÚÏ˛¬ËÍ Í Á¯ ÚϯÚÊÏÍÚ ÓÚ¯Ô˝Ó
Ê Ë ÁûÓÚ˯ÚÁÚËʯ ÁûÁ ÙÍˆÓ˝ÓÍÚ¯ÔÁÚËÓÚÓ, ˆÓ¯ÚÓ ÊÙÊÁˆËÍ ÎÏÍËÊÔ˝Í ÎϯÏͬÓÚˆÍ, ϯ˘¯˝¯ÏÍ˚Ê˛ Ê
ϯ˚ʈÔÊÏÍ˝¯ ˝Í ÈÎÓÚϯ¬˛ËÍ˝ÊÚ¯ ¯Ô¯ˆÚÏʸ¯ÁˆÊ ÈÏ¯Ê Ê ¯Ô¯ˆÚÏÓ˝˝Ó Ó¬ÓÏÈËÍ˝¯.
ÃÔ¯ Ëû˯≈Í˝¯ÚÓ ÓÚ ÁÚÏÍ˝ÊÚ¯-¸Ô¯˝ˆÊ, ¸ÍÁÚ˝ÊÚ¯ Ó˙ÍˆÊ˝ÁÚËÍ ˝Í Ú¯ÏÊÚÓÏÊ˛ÚÍ ˝Í
›ËÏÓίıÁˆÊ˛ Áû√Ù ˙Ó˘ÍÚ Í ËûÏ˝ÍÚ ÈÎÓÚϯ¬˛ËÍ˝ÊÚ¯ ¯Ô¯ˆÚÏÓÈÏ¯Ê Ê ¯Ô¯ˆÚÏÓ˝˝Ó Ó¬ÓÏÈËÍ˝¯
˝Í ÓÎϯ¯Ô¯˝ÊÚ¯ ÙÍ ÚÓËÍ ˙¯ÁÚÍ ¬¯ÙÎÔÍÚ˝Ó*. Õ ˝˛ˆÓÊ ÁÚÏÍ˝Ê* ˙¯ÁÚ˝Ê˛Ú ÚûÏ˘Ó˯˚, ÓÚ ˆÓ˘ÓÚÓ ÁÚ¯
Ù͈ÈÎÊÔÊ Ó¬ÓÏÈËÍ˝¯ÚÓ, ˙Ó≈¯ Í ËÙ¯˙¯ ¬¯ÙÎÔÍÚ˝Ó ÁÚÍÏÊ˛ Èϯ, ÍˆÓ ˆÈÎÊÚ¯ ÎÓÓ¬¯˝ ˝ÓË.
*) flÓÔ˛ ÁËûÏ≈¯Ú¯ Á¯ Á ˙¯ÁÚ˝ÊÚ¯ ËÔÍÁÚÊ ÙÍ ÎÓ˯¸¯ ÎÓÏÓ¬˝ÓÁÚÊ.
œˆÓ ¯Ô¯ˆÚÏÓÈϯÊÚ¯ ÊÔÊ ¯Ô¯ˆÚÏÓ˝˝ÓÚÓ Ó¬ÓÏÈËÍ˝¯ Ê˙ÍÚ ¬ÍÚ¯ÏÊÊ ÊÔÊ ÍˆÈ˙ÈÔÍÚÓÏÊ,
˙ÓÔ˛ ÎϯËÍÏÊÚ¯Ô˝Ó ˘Ê ÊÙ‰ËûÏÔ¯Ú¯ ÓÚ¯Ô˝Ó Ë ÁûÓÚ˯ÚÁÚËʯ Á ˙¯ÁÚ˝ÊÚ¯ ÊÙÊÁˆËÍ˝Ê˛.
à ÎÏÍËÊÔ˝ÓÚÓ ÊÙ‰ËûÏÔ˛˝¯ ˝Í ÚÓËÍ ÊÙ¯Ôʯ Õʯ ˘ÍÏÍ˝ÚÊÏÍÚ¯, ¸¯ ÓÚÎÍû˚ÊÚ¯ Û¯ Îϯ˙Ê˝ÍÚ
˝¯Ó¬‰ÓÊ˙ÍÚÍ ÎϯÏͬÓÚˆÍ, ϯ˘¯˝¯ÏÍ˚Ê˛ Ê Ï¯˚ʈÔÊÏÍ˝¯ Ê ÎÓ ÚÓÙÊ ˝Í¸Ê˝ ÎϯÓÚËÏÍÚ˛ËÍÚ¯
ÎÓÚ¯˝˚ÊÍÔ˝ÊÚ¯ ÓÚÏÊ˚ÍÚ¯Ô˝Ê ËûÙ¯ıÁÚËÊ˛ ËûÏ‰È ÓˆÓÔ˝ÍÚÍ ÁÏ¯Í Ê ¸Ó˯̈ÓÚÓ ÙÏÍ˯, ˆÓÊÚÓ
¬Ê‰Í ËûÙ˝Êˆ˝ÍÔÊ Ê˝Í¸¯ Ë Ï¯ÙÈÔÚÍÚ ˝Í ˝¯ÎÏÍËÊÔ˝ÓÚÓ ÚϯÚÊÏÍ˝¯ ˝Í ÓÚÎÍû˚ÊÚ¯.
2. Õ ÏÈ˘Ê ÁÚÏÍ˝Ê ÊÙËû˝ ›Ã
œˆÓ ≈¯Ôͯگ Í ÊÙ‰ËûÏÔÊÚ¯ ÚÓËÍ ÊÙ¯Ôʯ, ˙ÓÔ˛ ÁËûÏ≈¯Ú¯ Á¯ Á ˙¯ÁÚ˝ÊÚ¯ ËÔÍÁÚÊ Ê ÎÓÎÊÚÍıÚ¯
ˆÍˆûË ¯ ÎÏÍËÊÔ˝Ê˛Ú ˝Í¸Ê˝ ˝Í ÊÙ‰ËûÏÔ˛˝¯.
ŸÍ “˯ı˚ÍÏÊ˛: ŒÎÓÚϯ¬˛ËÍ˝ÊÚ¯ ¯Ô¯ˆÚÏÓÈÏ¯Ê Ê ¯Ô¯ˆÚÏÓ˝˝Ó Ó¬ÓÏÈËÍ˝¯ ˙Ó˘ÍÚ Í Á¯ ËûÏ˝ÍÚ
¬¯ÙÎÔÍÚ˝Ó Ë ˙͢ÍÙÊ˝Í, ÓÚ ˆÓıÚÓ ÁÍ Ù͈Èί˝Ê, ÓÏÊ Ê Í ˝¯ Ù͈ÈÎÊÚ¯ ˝ÓËÓ ÊÙ¯Ôʯ. ”Û¯ ¯ÎÍ
ÙÍ ÓÚÎÍû˚Ê ÁÍ ÊÙ¬ÏÓ¯˝Ê ˝Í ÂÊÏ˙¯˝ÍÚÍ ÁÚÏÍ˝Ê˚Í ˝Í www.swico.ch ÊÔÊ www.sens.ch.
B. À˝ÂÓÏ˙Í˚Ê˛ ÙÍ ÊÙ‰ËûÏÔ˛˝¯ÚÓ ÙÍ ¬ÊÙ˝¯Á ÎÓÚϯ¬ÊÚ¯ÔÊ.
1. Õ ›ËÏÓίıÁˆÊ˛ Áû√Ù
œˆÓ ÊÙ¯ÔʯÚÓ Á¯ ÊÙÎÓÔÙËÍ ÙÍ ¬ÊÙ˝¯Á ˚¯ÔÊ Ê ≈¯Ôͯگ Í ˘Ó ÊÙ‰ËûÏÔÊÚ¯:
flÓÔ˛ ÁËûÏ≈¯Ú¯ Á¯ Á ÕÍÌÊ˛ ÚûÏ˘Ó˯˚ ˝Í SHARP, ˆÓıÚÓ Û¯ ÕÊ Ê˝ÂÓÏ˙ÊÏÍ ÙÍ Ó¬ÏÍÚ˝ÓÚÓ
ÎÓÔȸÍËÍ˝¯ ˝Í ÊÙ¯ÔʯÚÓ. ∆Ê ÚÏ˛¬ËÍÔÓ Í ÕÊ Ú͈ÁÈËÍÚ ÙÍ ÏÍÙ‰ÓÊÚ¯, ËûÙ˝ÊˆËÍÛÊ ÓÚ
Ó¬ÏÍÚ˝ÓÚÓ ÎÓÔȸÍËÍ˝¯ Ê Ï¯˚ʈÔÊÏÍ˝¯ÚÓ. flÍÔˆÊÚ¯ ÊÙ¯ÔÊ˛ (Ê ˙ÍÔˆÊÚ¯ ˆÓÔʸ¯ÁÚËÍ) ¬Ê
ÚÏ˛¬ËÍÔÓ Í Á¯ ÎÓÔȸÍËÍÚ Ó¬ÏÍÚ˝Ó ÓÚ ˙¯ÁÚ˝ÊÚ¯ ¯ÎÍ ÙÍ ÓÚÎÍû˚Ê.
ŸÍ ÀÁÎÍ˝Ê˛: flÓÔ˛ ÁËûÏ≈¯Ú¯ Á¯ Á ÈÁÚÍ˝Ó˯˝ÍÚÍ ÁÊÁÚ¯˙Í ÙÍ Áû¬ÊÏÍ˝¯ ÊÔÊ Á ˙¯ÁÚ˝ÊÚ¯ ËÔÍÁÚÊ ÙÍ
Ó¬ÏÍÚ˝Ó ÎÓÔȸÍËÍ˝¯ ˝Í ÈÎÓÚϯ¬˛ËÍ˝ÊÚ¯ ÊÙ¯ÔÊ˛.
2. Õ ÏÈ˘Ê ÁÚÏÍ˝Ê ÊÙËû˝ ›Ã
œˆÓ ≈¯Ôͯگ Í ÊÙ‰ËûÏÔÊÚ¯ ÚÓËÍ ÊÙ¯Ôʯ, ˙ÓÔ˛ ÁËûÏ≈¯Ú¯ Á¯ Á ˙¯ÁÚ˝ÊÚ¯ ËÔÍÁÚÊ Ê ÎÓÎÊÚÍıÚ¯
ÙÍ ÎÏÍËÊÔ˝Ê˛ ˝Í¸Ê˝ ˝Í ÊÙ‰ËûÏÔ˛˝¯.
Õ˝Ê˙Í˝Ê¯: ‚Í ÕÍ̯ÚÓ ÊÙ¯Ôʯ Ê˙Í ˙ÍψÊÏÍ˝ ÚÓÙÊ ÁÊ˙ËÓÔ. ◊ÓËÍ ÓÙ˝Í¸ÍËÍ, ¸¯
ÈÎÓÚϯ¬˛ËÍ˝ÊÚ¯ ¯Ô¯ˆÚÏʸ¯ÁˆÊ Ê ¯Ô¯ˆÚÏÓ˝˝Ê ÊÙ¯ÔÊ˛ ˝¯ ÚÏ˛¬ËÍ Í Á¯ Á˙¯ÁËÍÚ Á
Ó¬ÛÊÚ¯ ¬ÊÚÓËÊ ÓÚÎÍû˚Ê. ÃûÛ¯ÁÚËÈËÍ ÓÚ¯Ô˝Í ÁÊÁÚ¯˙Í ÙÍ Áû¬ÊÏÍ˝¯ ˝Í Ú¯ÙÊ
ÊÙ¯ÔÊ˛.
Beim Anschalten dieses Gerätes an Datenverabeitungsanlagen ist sicherzustellen, daß die
Gesamtanlage den jeweiligen technischen Vorschriften entspricht.
Caution
This product contains a low power laser device. To ensure
continued safety do not remove any cover or attempt to gain
access to the inside of the product.
Refer all servicing to qualified personnel.
VAROITUS! LAITTEEN KÄYTTÄMINEN MUULLA
KUIN TÄSSÄ KÄYTTÖOHJEESSA MAINITULLA
TAVALLA SAATTAA ALTISTAA KÄYTTÄJÄN
TURVALLISUUSLUOKAN 1 YLITTÄVÄLLE
NÄKYMÄTTÖMÄLLE LASERSÄTEILYLLE.
VARNING - OM APPARATEN ANVÄNDS PÅ ANNAT
SÄTT ÄN I DENNA BRUKSANVISNING
SPECIFICERATS. KAN ANVÄNDAREN UTSÄTTAS
FÖR OSYNLIG LASERSTRÄLNING, SOM
ÖVERSKRIDER GRÄNSEN FÖR LASERKLASS 1.
CLASS 1
LASER PRODUCT
LUOKAN 1 LASERLAITE
KLASS 1 LASERAPPARAT
This product complies with IEC60825-1:2001
OUTPUT POWER
LASER WAVE - LENGTH
PULSE-TIMES
: 0.15 mW ± 0.01mW
: 770 - 795 nm
: 12.00 µs/7 mm
SHARP ELECTRONICS (EUROPE) GMBH
Zweigniederlassung Österreich
Handelskai 342, 1020 Wien, Austria
Telefon: +43 (0) 1 72719-0
Oddział w Polsce
ul. Puławska 469 02-844 Warszawa
tel +48 22 545 81 00
faks +48 22 545 81 01
www.sharp.pl
Infolinia 0-801-601-609
(koszt połączenia: impuls/minuta)
SHARP ELECTRONICS (NORDIC) AB
Box 14098 Gustavslundsvägen 12
S-167 14 Bromma, Sweden
Phone: (08) 634 3600
SHARP CORPORATION
Ver. 1.0