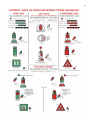
1
1
2
3
Table of Contents
I.
II.
III.
IV.
V.
VI.
Introduction………. Page 5
Dealer/Customer responsibilities
Safety……….Page 5
Regulations
Equipment
Passenger safety
Rules of the road
Hazardous conditions
Alcohol
Carbon monoxide
Fire
Flooding
Controls……….Page 7
Ignition
Shift/Throttle
Steering
Instruments
Switches
Trim Tabs
Systems……….Page 12
Fresh Water
Sea Water
Head/ Waste
AC/Heat
Fuel/Oil
Electrical
Eco-Sound Exhaust System
After Market Accessories
Operation and Performance……….Page 30
Loading
Fueling
Starting
Service and Care
Winterization, Storage, Mooring
Propeller
Service and Care……….Page 31
Fiberglass/Gelcoat
Marine Growth
Plexiglass
Stainless steel/Aluminum
Canvas
Upholstery: Vinyl, Fabric
Corrosion Protection – Zinc Anodes
Winterization, Storage, Mooring
4
VII.
Miscellaneous
Trouble Shooting Chart……….Page 35
Important Data For Identifying Your Boat……….Page 36
Specifications……….Page 38
Nautical Terms……….Page 40 through Page 49
Basic Seamanship……….Page 50
Accident Form……….Page 55 & Page 56
Rules of Seamanship……….Page 58
Navigational and Lateral Aids……….Page 62 & Page 63
Maintenance Log
Float Plan
Waterline Dimensions
Electrical Drawings
ILLUSTRATIONS
1. Helm Station……….Page 8
2. Warning Placard……….Page 10
3. Trim Tab Operation……….Page 11
4. Marine Sanitation Installation……….Page 13
5. Seacock & Raw Water Strainer……….Page 14
6. Water Systems……….Page 15
7. Battery Switch Drawing……….Page 18
8. Battery Switch Panel Drawing……….Page 19
9. Battery Switch Panel Photograph……….Page 21
10. Helm Constant Power Photograph……….Page 21
11. Eco Sound Exhaust Auto Cad Drawings……….Page 22
12. Eco Sound No Load Warnings……….Page 23
13. Eco Sound Sling Locations……….Page 24
14. Eco Sound Photographs……….Page 25
15. Steering Installation, Lower Station……….Page 27
16. Steering Installation, Upper Station……….Page 28
17. Plastic & Trash Warning Placard……….Page 52
18. Oil Discharge Warning Placard……….Page 53
19. Warning Placards……….Page 54
20. Accident Report Form……….Page 55 & 56
21. Waterline Dimensions……….Page 57
22. Navigational Aids Chart……….Page 62
23. Lateral Aids As See Entering From Seaward……….Page 63
24. Fuel Log……….Page 54 & Page 65
25. Maintenance Log……….Page 66 & Page 67
26. Float Plan Format……….Page 68
27. Main Wiring Harness……….(Pull-out rear pages)
5
Introduction
Congratulations! You are now the proud owner of a new Pro-Line 33 Express fishing boat.
Welcome to the proud family of satisfied Pro-Line owners. Every expedition lets you enjoy the
outstanding features designed into every boat we construct. Your new Pro-Line is more than just
a boat; it's a lifestyle.
Pro-Line’s commitment to the needs and wishes of the professional sport fisherman has resulted
in a superior fishing craft, providing you with comfort, performance, security and fish-ability.
All of our boats comply with U.S. Coast Guard (USCG) safety regulations. They are designed
and crafted in accordance with the National Marine Manufacturers Association (NMMA),
American Boat and Yacht Council (ABYC) standards, and the optional Common European
directive (CE),
This manual (to be kept onboard your Pro-Line) is designed to provide you with information
necessary for safe, efficient operation and care of your new Pro-Line. To maximize your
enjoyment and safety, take the time now to carefully review the documentation in your owner’s
pack and this manual, and really get to know your boat.
Dealer’s Duties
Your dealer's responsibilities include but are not limited to:
* Pre-delivery verification of proper rigging and operation.
* Providing adequate orientation in general operation of your Pro-Line. This includes an explanation of
specific safety considerations regarding the use of systems and components.
An explanation of owner’s packet literature and warranty registration cards for all separately
warranted equipment and accessories.
* Explaining local and out of area service procedures during and out of warranty periods.
Customer Responsibilities
*Be proficient in boat handling and safety. - THIS MANUAL IS NOT INTENDED TO PROVIDE
COMPLETE TRAINING ON ALL ASPECTS OF GENERAL BOAT OPERATION.
* Read and understand the limited warranty.
* Read all literature and instructions and use and maintain all equipment as directed.
* Examine the boat at time of delivery to ensure that all systems function normally.
* Learn about and operate boat in accordance with local, state and federal laws, regulations and
registration forms.
* The owner is legally responsible for all liabilities of operation – secure insurance protection.
Safety
Your Pro-Line boat has been constructed with safety in mind, however the ultimate safety of you and your
passengers is in your hands. Plan your trips carefully. Insure ample fuel supply and reserve. Tell someone where
you are going and when you expect to return. Keep current charts onboard. Read and observe USCG
boating safety circulars.
Regulations
The USCG is the authority of all the waterways. State local authorities enforce boating regulations. You are
subject to marine traffic laws and "Rules of the Road" on federal and state waterways, and must submit to
boarding if requested by proper authority. There are many publications available from the Coast Guard
concerning regulations and more. For additional information call the boating safety hot line at 1(800) 368-5647.
6
Equipment
USCG regulations require the following equipment while operating your boat:
* Fire extinguisher
* Personal Flotation Device (PFD) for each occupant
* One throw-able PFD
* Sound signal device
* Navigational lights if operated at night
* Sight signal (flare- night, orange flag- day) when in coastal waters or Great Lakes.
* Anchor and sufficient line
In addition, here is a list of suggested equipment you should have aboard your Pro-Line:
* First aid kit and blankets
* Sea anchor with line
* Mooring lines and fenders
* Bailing device
* Combination oar / boat hook
* Tool kit and lubricant
* Spare prop, nut & washer
* Spare fasteners, hose clamps, plugs
* Spare fuses and bulbs
* Binoculars or telescope
* Local charts and compass
* Water proof flashlight
* 2 way radio (with proper license) * EPIRB (emergency beacon)
* Floating key chain & spare keys * Navigation device
* Emergency food and water
* Waterproof matches or lighter.
Passenger Safety
You are responsible for the safety and conduct of your passengers, make sure that:
* You instruct passengers on proper use and location of PFD’s. Children and non-swimmers should
wear one at all times.
* When underway each passenger is in a safe location, and knows to keep the boat balanced.
* At least one other person knows how to operate the boat in case of emergency.
* They are aware of dangers of the prop, and the possibility of sudden maneuvers and jolts.
* To turn the engine off and remove key when swimmers are near the propellers or when using the
dive platform.
* All keep away from lines under stress should they break and recoil.
Rules of the Road
Know and use the rules of the road, the information here is only a brief overview. For detailed information contact
the USCG.
Audible warning signals:
* One short horn blast: starboard course change.
* Two short horn blasts: port course change.
* Three short horn blasts: astern operation.
* Five horn blasts: doubt about previous signal, or danger.
* A single five-second blast every minute for fog operation
When overtaking give-way vessel announces intention with horn blast(s) and waits for same response then
completes maneuver.
When approaching head-on, both boats give way after giving appropriate horn blast (Preferably starboard).
When crossing, a vessel converging from the starboard has right of way, the port vessel gives way (both
acknowledge with one short horn blast).
Know and observe navigational buoys and markers.
Give way to craft under sail.
7
Hazardous Conditions
Keep track of weather developments and avoid hazardous conditions, when forced to operate your Pro-line in
storm conditions:
* Wear Pfd’s
* Stow loose gear and equipment.
* Place heavy items as low as possible.
* Head for the easiest to reach safe location.
* Reduce speed. If the boat leaves the water, you're moving too fast.
* If power fails, rig a sea anchor off the bow (an empty ice chest in a pinch).
* Stay with boat if it capsizes, unless it is burning out of control.
Alcohol
Never operate a boat while under the influence of drugs or alcohol. Doing so is a Federal
offense. Don't drink and drive. If you have been drinking have someone drive who has not been drinking.
Carbon Monoxide
Be aware of and avoid conditions that can cause carbon monoxide poisoning (see USCG boating safety circular
77). Sources of carbon monoxide include any gas or diesel engine, any flame such as a charcoal grill, stove or
heater. Carbon monoxide can accumulate to deadly levels in enclosed spaces. Always ventilate occupied areas of
vessel with fresh clean air.
Fire
Be aware of and avoid conditions that lead to accidental fire. Guard against and watch for fuel spills and leaks.
Inspect wiring for damage or exposure that could lead to short circuits or arcing. Make sure those who smoke are
vigilant. Smoking is an ignition source that can start a fire. Don't allow smoking while fueling. Keep a USCG
approved fire extinguisher aboard at all times. Inspect the fire extinguisher regularly. Learn how to properly use
it and instruct other how to use it. Use water to fight fire as a last resort and then only after making arrangements
to abandon the boat if a fire should get out of control.
If a fire is burning out of control and you must abandon the boat keep the following in mind:
* Abandon the boat into the wind to minimize burn risk from floating fuel.
* Wear a PFD unless you must swim under burning fuel.
* If swimming under burning fuel throw a PFD outside of the burning area and swim under it.
Flooding
Be aware of the conditions that can cause your boat to flood with water and avoid them.
Possible causes of flooding include damage to hull or thru-hull fitting, waves washing into the boat, and waterentering cockpit due to improper loading. If you allow water to enter the boat faster than the bilge pump can
expel it, the boat will become flooded and may capsize or sink.
Controls
Ignition
The ignition switch has three positions; off, on, and start. To start the engine, attach the safety lanyard, turn the
key clockwise against the spring pressure to the start position. As soon as the engine starts release clockwise
pressure allowing the spring tension to return the switch to the on position. If the engine fails to start in 5 seconds
of cranking allow the starter to cool off for 10 seconds and then repeat this procedure. For detailed instructions
see the engine manual located in the Important Papers Pack.
Safety Shut Down
The Safety shut down switch shuts off the engine in case the operator is thrown from the boat or incapacitated. To
ensure proper functions always attach the lanyard securely to the operator.
8
Shift/Throttle
Your Pro-Line can be ordered with several different shift and throttle systems. Refer to the owner's packet to find
the manual pertaining to your particular installation. Separate throttles control the speed of each motor. Push the
levers ahead for full throttle; pull fully back for idle. Throttle back to idle before shifting into or out of gear.
Avoid over speeding the motors. The shift levers each have three positions, forward, neutral, and reverse. To
shift into forward push all shift levers fully ahead as one unit, pull all the way back for reverse. When starting the
engines, centralize the levers to the detent for neutral. The shift levers are equipped with a neutral safety switch to
prevent the motor from starting in gear. The shift levers can be operated independently for precise maneuvering
(do so at slow speed only). Refer to the engine manuals in your owner’s packet for more specific information.
Figure 1 - Helm Station
Steering
Your Pro-Line is equipped with a self-contained hydraulic steering system. The helm is a manually operated
hydraulic pump. When the steering wheel is turned the helm pumps fluid into one side of the cylinder and
evacuates fluid from the opposite side of the steering cylinder. This will extend or retract the steering rod, causing
the boat to turn. Periodically check the fluid level and fill if necessary. If the system needs fluid, refer to steering
manual in the important papers packet. After every 24 hours of operation check all nuts, caps, and hose fittings
for signs of leaking fluid and tighten if necessary. Check that the hoses are not chafing, or kinking on sharp
corners. Also check that hose ends are not damaged or distorted by the clamps. If your steering does not operate
properly, check the fluid level first, then look for leaking hoses or fittings and finally for air in the system. Read
STEERING INSTRUCTIONS located in the important papers packet. Notify your dealer immediately if any
problems occur with the steering system.
Instruments
Your Pro-Line instrumentation will vary according to the engine models that your boat has. Therefore the
following descriptions are general. For more specific questions that you may have, or for detailed information,
contact your dealer.
Fuel Gauge
Differences in temperature, humidity, speed and trim can affect fuel use and possibly the accuracy of this gauge. It
is important to verify the fuel flow in gallons per hour for your boat and make note of your gauge position with
respect to time for different RPM settings. No gauge can give 100% accuracy. If you notice unusually high or low
fuel consumption, investigate further to see if the engine is using more fuel than normal. Then check to see if
tank gauge has failed. Consult your dealer if there is any question about how much fuel is on board. You should
keep records of fuel you use on the pages marked “Fuel Log” in the back of this manual.
9
Water Temperature
The water temperature gauge indicates the internal water temperature of your engine. Your engine is equipped
with a thermostat to quickly bring the engine up to its optimum operating temperature range. Read the engine
manual for exact readings. Your engines are equipped with an audio alarm system indicating an over-heat
condition. If the gauge or alarm indicates an over heat condition, immediately shut the engine off. Then you
must close the seacock and open the water strainers to inspect for obstructions such as aquatic vegetation or mud.
After finding the source of the over heating, restart engine and confirm that the over heat problem has been solved
by monitoring the temperature gauges and listening for the audio alarm. The Eco Sound by pass tubes will allow
exhaust gases to escape by way of the 2” through hull fittings when the boat is not on plane. These fittings are
located above the water line and all the way aft on both of the hull sides. There will be no water flowing out of
these fittings, so it is important to monitor the gauge to determine if the cooling water is flowing freely through
the engine once again.
Oil Pressure
The oil pressure gauge should be checked immediately when starting the engine. The pressure range is available
in the engine manual. Your engines are equipped with an audio alarm system indicating a low oil pressure
condition. Follow the procedures recommended in the engine manual and if low oil pressure exists consult your
dealer.
Volt Meter
The voltmeter indicates battery voltage. A normal reading is between 12 to 15.5 volts.
Never leave port if the battery condition is not correct. You may not be able to restart your engines with batteries
that are not properly charged. Notify your dealer immediately if the gauge readings are not correct. Check battery
voltage prior to starting and again after the engine is running at idle to insure a properly working charging system.
Tachometer
The tachometer indicates the revolutions per minute (RPM) of your engine. Do not operate the engine beyond the
limits stated in your engine manual. Abnormally low tachometer readings (for a given throttle setting) indicate a
loss of engine performance. Check the prop first. A reading higher than normal indicates a ventilating or
cavitating propeller or propeller damage. Notify your dealer before operating your boat under these conditions.
Rudder Indicator
There is a sender installed on the starboard side aft that sends information to a gauge at the helm. This will
display the rudder position when the ignition is turned ON.
Speedometer
The speedometer indicates the speed of your boat in Miles per hour (MPH).
The gauge operates by sensing water impact pressure from the pitot tube mounted on the transom. If the gauge
fails to give a reading, check for a blocked or loose pickup.
Options
See your dealer for the options list for this model boat. Options installed at the factory will have operating and
maintenance instructions located in the important papers packet.
Switches
Windlass
Refer to the windlass manual for operation of the windlass. A 30 Amp breaker located next to the windlass switch
mounted on the console protects the Windlass.
Lights
For operation at night, your Pro-Line is equipped with navigation and anchor lights to indicate your position to
other boaters. While running after dark the navigation lights are required to be on and visible to other boaters.
Visually verify operation and lack of obstructions. Lights are also provided for the cockpit, bait-well, helm and
cabin.
10
Bilge Pump
Your Pro-Line is equipped with an automatic bilge pump system with a manual override. The pump is located at
the aft end of the bilge at the keel. The pump is mounted as low as possible. If the pump runs for a long time it
may mean that water is entering the bilge faster than the pump can expel it. Investigate and correct the cause
immediately. The automatic float switch is wired directly to the battery selector switch through a circuit breaker
located on the battery switch panel. Read page 17 for more information about the battery switch panel. Keep the
bilge area clean and free from debris that could block the bilge pump ports. The helm switch overrides normal
automatic operation on the primary pump. Circuit breakers are located at the helm. Keep the battery charged that
powers the bilge pumps. If the battery is discharged and flooding occurs, the boat could sink causing damage and
possible loss of life or property.
Blower
Operating the blowers prior to starting the engine is a procedure that must be followed. Always operate the
blower for a minimum of four minutes and check bilge for fumes before starting the engine. Operate the blower
whenever the engine is running, the boat is stopped or when you are running at low speeds. At planing speed air
will be forced into the bilge and will ventilate the engine compartment without running the blowers.
WARNING
Gasoline Vapors Can Explode
Before starting the engine check the
bilge and engine compartments for
gasoline or vapors. Operate blower
four minutes prior to starting engine.
Run blowers below cruising speeds.
Figure 2 - Fuel Warning Placard
Breaker Switches
Circuit breakers or fuses protect the wiring on your Pro-Line. Breakers are located next to the switches or on the
main breaker panel. If a device stops working immediately check to see if the circuit breaker is tripped or the fuse
is blown. A tripped breaker will protrude from its set position, indicating that the circuit has been overloaded.
Turn off the device(s) on the circuit then reset the breaker by pushing in once. If the breaker does not reset or if it
resets and then pops out again after the device is turned back on, then a short circuit exists or your device may be
damaged, overloaded or faulty. Correct the problem and then reset the breaker. If the breaker continues to pop
and you are certain the device, switch and wiring are in good repair; either the breaker is too small for the load or
it is faulty. Reduce the load or replace the breaker. Have this work done by your dealer or a certified marine
electrician.
Shaft Alignment
Aligning the engine with the propeller shaft is critical for smooth operation of your Pro-Line. The shafts are
properly aligned at the factory, but may change slightly after the boat is in use. Have your dealer heck the
alignment after delivery or after an extended lay-up. A slight misalignment can result in a loss of power, a
vibration or wear in the bearings. Your dealer should check the alignment occasionally, particularly if there is a
vibration, drumming sound or a loss of RPM.
11
Shaft Seal Inspection
Your 33 Express propeller shafts will have dripless packing as a standard feature. Water is supplied to the seals
by providing cool raw water under pressure from each engine raw water pump. A crossover system provides for
water to be supplied to a seal even if one engine is not running. As the name implies, there will be no water
dripping as in a standard packing seal. Inspecting these seals should be part of your regular maintenance
schedule.
BENNETT TRIM TABS
Figure 3 - Trim Tab Operation
Trim Tab Operation
The optional trim tabs operate independently up or down to correct for differing conditions of wind or load.
Indicators show the relative position of the tabs in relation to the hull. For specific information refer to owners
packet. Before the boat is underway depress the bottom half of both switches until the tabs are fully elevated
(bow up position) while underway and in open water clear of other boaters, depress the top half of the switches in
half second bursts to achieve the desired degree of trim.
To correct a starboard list give the top half of the port switch a series of bursts until the list is corrected. To avoid
over trim, allow a few seconds between bursts to allow the boat to respond (if you over trim simply give the over
trimmed tab a burst or two in the opposite direction).
To trim the bow down push the top half of both rockers switch in half -second bursts.
Warning: Trim tabs can cause a dramatic change in the attitude and heading of your
boat. Adjust them only when in open water and clear of any obstructions.
Adjustments are to be made in small increments only.
Systems
Fresh Water System
The fresh water pump on your Pro-Line supplies water on demand when a drop in water pressure activates the
pressure switch. The manual switch located at the helm energizes the pump. A dockside fitting is provided. The
12
plumbing is not designed for sustained high pressure. Do not leave the dock side water hooked up or switch on
while the boat is unattended or flooding and pump damage may result. Do not run the pump dry. A fresh water
tank supplies the sink and the shower. The tank and pump are accessible for maintenance or repair.
Warning: Operate the fresh water pump only when there is water in the tank. Running the system without
water may cause damage to the pump and will cause it to overheat. The pump will not automatically turn off
when the tank is empty. If the breaker switch is left on when the tank is empty, the pump will run and overheat.
Initial System Startup
1. Fill the tank approximately ½ to ¾ full. The tank has a capacity of 40 gallons.
2. Turn the FRESH WATER PUMP switch on.
3. Open each cold-water faucet, beginning with the faucet furthest from the water tank to let air escape.
Close the faucet when the water flow becomes steady and leave it close.
4. Open a hot water faucet to fill the water heater and allow air to escape from the line. Close the faucet.
5. Open each hot water faucet beginning with the faucet furthest from the water heater and allow the air
to escape. Close the faucet when the water flow becomes steady and leave it closed.
6. The pump will run until the system is pressurized and then shut off.
7. Fill the tank to its capacity.
Sea Water System
The bait-well switch controls a pump mounted on a seacock in the bilge. An overflow tube is provided that is
inserted into the drain to allow circulation to keep bait alive. The wash down pump is mounted just above the
bilge pump in the bilge. The pump is equipped with a pressure switch. Turn the main switch off if the pump is not
going to be used soon. Raw water is taken in by the thru-hull fitting with a seacock. A strainer on the pump filters
the raw water. The filter must be cleaned as needed to avoid pump damage. Seacocks on all below water line
fittings should be closed when not in use.
Fuel
The fuel tank on your Pro-Line is made of heavy gauge aluminum with internal baffling to minimize sloshing.
The tank is vented overboard. Inspect the vent for obstructions regularly. Deck plate access ports are placed over
the hose connections and the sending unit. Inspect the hose connections on a regular basis. Check for an odor of
fuel in the bilge. Check to see if any fuel is in the bilge. Water separating fuel filter units are located in the
engine room, usually on the engine. The spin on cartridges should be changed at least seasonally, more often
depending on use and conditions.
WARNING!! Avoid serious injury or death from fire or explosion resulting from leaking
fuel. You must inspect the fuel system for leaks at least once a year.
WARNING
LEAKING FUEL IS A FIRE &
EXPLOSION HAZARD. INSPECT
SYSTEM REGULARLY. EXAMINE FUEL
SYSTEM FOR LEAKS OR CORROSION AT
LEAST ANNUALLY.
13
14
Typical Seacock and Raw Water
Strainer
Figure 5 - Seacock and Strainer
Your boat will have seacocks to shut off openings below the waterline in emergencies or when removing various
components for repair. A seacock is open when its handle is in line with the hose as shown above. Seacocks are
normally near the units they serve. Close all seacocks when the boat will be unattended for extended periods.
The seacock will have a sea strainer to protect the system it serves from clogging. It will provide an easy way to
remove occasional debris by opening the top to remove and clean the basket. Periodic inspection and removal of
any debris is essential regular maintenance for effective operation of the unit it serves. The frequency of these
inspections will vary depending on the amount of use and the local conditions.
To clean a sea strainer, start by shutting the seacock OFF. Then, and only then should you remove the wing nut
and cover, lift out the strainer basket and remove all debris. Reinstall the basket and cover. Tighten the wing
nut securely and OPEN the seacock.
Note: Periodic inspections and removal of debris is essential.
Note: Operate and lubricate seacocks frequently to keep them in good operating condition.
15
Note: Close all of the seacocks on your boat when it is unattended for long periods of time.
16
17
18
19
20
21
Alternating Current Electrical System
The alternating current electrical system that meets or exceeds the national standards set by the U.S. Coast Guard
and the National Marine Manufacturers Association. This system operates at the standard 30 Amp, 120 volt, 60cycle shore power system or the optional onboard generator. Schematic drawings of the AC electrical system for
your boat are located at the rear of this manual.
The main electrical panel is located in the cabin area has main AC breakers
that turn you entire AC system on and off.
This allows you to check for
proper voltage and polarity immediately after a shore power connection has
been made at your dock, but before you activate the individual circuits.
To protect your air conditioning system, the main panel has an additional
set of breaker switches dedicated to it.
The generator is designed to
provide adequate power to run the air conditioner.
More complete
information about the air conditioner and the generator is provided by the
manufacturers and are located in the Important Papers Pack.
Caution:
Your generator’s fuel supply is taken from the main
tank. In order to protect you from running out of fuel to power
you main engines while you are operating the generator, the fuel
pick-up for the generator is five inches shorter than the main
engine fuel pick-ups. This is designed to allow the generator to
run out of fuel without allowing the main engines to run out of
fuel at the same time.
Caution: Your generator operator’s manual tells you on page four
to close the seacock for the cooling water supply to your
generator if it will not start immediately.
If the seacock is
not closed and the fuel supply has stopped, you will ingest water
into the engine and cause major damage to it. Remember this if
your generator suddenly stops. Check the fuel gauge and if a low
fuel condition does exist, head to port and the nearest fuel
supply!
Transfer Switch
The AC/DC panel has a transfer switch. You can use this switch to supply
power to either of the two load groups. Load Group One receives power from
the generator.
If you are using the generator, you can use the transfer
switch to operate alternating current equipment in both load groups. It is
important to monitor the load current gauges tom ensure that the total load
does not exceed 30 Amps.
Caution:
Exceeding 30 Amps on one power cord will cause the
main AC breaker to trip. Always monitor line current meters when
engaging each system to ensure amperage draw does not exceed 30
Amps. If the main circuit breaker trips, Immediately shut down
all circuits that have been operating and reset the main circuit
breaker. . Monitor line current meters to ensure amperage draw
does not exceed 30 Amps as you re-power each circuit.
22
Electrical
Direct Current
12-volt direct current provides electrical power for all lighting, pumps, electronics, and DC devices. A main
breaker panel is located in the cabin. Battery selector switches on the panel are for battery isolation, parallel
operation and disconnect. The main helm terminal panel is accessed through the hatch above the helm footrest.
Caution: To avoid possible alternator or battery damage on twin-engine installations, ensure that the optional
dual battery switches are never left so both engines are connected together (never leaves a switch on 'both'). The
preferred switch position is port engine to port battery, starboard to starboard, etc.
The battery switch panel is located in the cabin behind the second step of
the entrance ladder.
Figure 9 - Battery Switch Panel
After-market Accessories: Your Pro-Line’s electrical system was designed for factory tested and approved
dealer installed optional accessories. Pro-Line makes no recommendations to the suitability of accessories that are
not listed in the Pro-Line sales literature. Any unapproved modifications or additions to the standard or optional
system are done at the owner’s risk and void the warranty. Unapproved modifications could cause risk of fire or
failure of the electrical system
Figure 10 - Helm Terminal Panel
23
24
Warning
Please Take Notice
No Load Surface
The Eco Sound Exhaust System has been installed as an
integral part of this boat and hull.
This system is a new feature beginning with the ProLine
2001 models and most marinas may not be familiar with the
installation.
This system has an external cover that takes the shape of
the transom and the aft keel at the bottom of the boat.
The following pages describe how the system works and
exactly what benefits are realized.
This cover is a NO LOAD SURFACE and should never be
used as a support when the boat is being blocked for winter
storage or maintenance.
It will be the responsibility of the owner of this boat to notify
the servicing dealer that the Eco Sound Chamber will not be
used as a support when the boat is removed from the water
and placed in storage on dry land.
25
26
27
Eco-Sound Exhaust System
Idle Speed: At start up and at idle speed the exhaust is accelerated through the low speed pipes at the port and
starboard thru hull fittings located above the water line and aft on the hull sides. This acceleration pushes the
exhaust out and away from the cockpit of the boat, dramatically reducing the smoke, smell and soot that would
otherwise collect around the cockpit.
Trolling Speed: When you are fishing at trolling speeds, the exhaust accelerates out the low speed bypass
pipes. This keeps the exhaust smoke away from the cockpit, providing a more pleasant fishing and boating
experience.
Planing Speeds: At planing speeds the chamber goes into a vacuum mode, vacuuming the exhaust gases from
the chamber. This action will lower the backpressure and provide more horsepower at the propeller for better
boat and engine performance. You will see the exhaust gases on the surface of the wake well behind the boat, and
again provides you with a more pleasant boating experience.
Backing Down: The Eco-Sound System will dramatically increase back down speed while the low speed bypass pipes redirect choking fumes and smoke away from the aft deck and cockpit. The system becomes a real
fishing tool during back-down operations. The thrust of the exhaust creates additional lift as the vessel passes
over the exhaust that is forced downward. This thrust helps to counteract the downward pull of the propellers.
How the System Works
The exhaust system of the 33 Express Pro-Line developed by Eco Sound, Inc. represents the cutting edge of
current exhaust technology. The Exhaust & Performance System (EPS) 1000 is an exhaust exit point for diesel
and gas marine vessel applications. The patented design creates a partial vacuum that pulls the exhaust from the
system, redirecting it away from the influence of the station wagon effect. The system reduces backpressure
resulting in a more efficient, cleaner running engine. The EPS 1000 does this while dramatically quieting exhaust
noise.
Eco Sound’s EPS 1000 is a chamber located at the stern of the vessel. The EPS chamber is actually a part of the
boat. A male mold insert is placed into the female hull mold (1) whereby a recess is formed (2) at the stern of the
boat on its centerline. An insert is installed completing the hull (3). This process provides optimal hull integrity.
At rest the EPS chamber is mostly full of water, at the same level as the waterline. When the engines are started
the exhaust exits through unobstructed 2” diameter marine exhaust hose (see drawing). There are no mufflers or
baffles in the EPS 1000. The baffles of a conventional muffler can cause unnecessary vibrations and noise.
Baffles also restrict the exhaust, inhibiting the engine’s ability to breathe freely, resulting in unnecessary
backpressure. As the exhaust enters into the EPS chamber it decelerates as it passes from the small containment
area of the tubing to the large containment area of the EPS chamber. It is this deceleration process and the water
in the chamber that makes the system so quiet. Because the EPS chamber is mostly filled with water at low speed
and idle, the exhaust entering the chamber begins to fill this containment area. Inside the chamber there are lowspeed by-pass pipes, one for each engine. These by-pass pipes carry the exhaust from inside the chamber to the
port and starboard sides of the vessel by way of the thru-hull fittings located above the waterline (5). These bypass pipes are designed to accelerate the smoke, soot and fumes of the engine’s exhaust four to five times faster
that the main engine exhaust. The result is that the exhaust is shot past the influence of the “station wagon”
effect. This keeps the fumes, smoke and soot away from the cockpit and transom, making the Pro-Line 33
Express cleaner after your day of boating and fishing.
Once the vessel reaches between five and six knots, the chamber empties of water. At the bottom of the chamber
there is a square opening (6). Forward of this opening is a wedge (7). As water passes over this wedge a venturi
is created, generating a great deal of negative pressure. This reduces the backpressure of the engine’s exhaust
system creating a cleaner, more efficient burn in the engine cylinders while reducing smoke and soot. The result
is better fuel economy and higher boat speeds.
The Eco Sound EPS 1000 exhaust system in your 33 Express Pro-Line heightens the boating experience for you
and your guests on board.
28
29
30
THIS SHEET IS BLANK (PAGE 29)
INSERT BOAT PERFORMANCE INFORMATION
SHEET HERE.
DONZI WILL DO THIS IN
EACH BOOK. PRINT THIS BLANK SHEET AND
PLACE IT IN THE MANUAL.
Operation and Performance
Loading
The Yacht Certification Plates installed at the helm of your Pro-Line indicates that this vessel has met all of the
requirements of the National Marine Manufacturers Association. The load capacity ratings are computed using
USCG formulas. For operation in rough and adverse conditions reduce the boats load to permit safe operation.
The performance of any boat is a function of the amount of load carried. Heavy loads reduce performance.
Depending upon conditions and what engine/hull combination you have selected, your boat may not be able to
stay on plane when loaded to its maximum rated capacity.
31
When loading your Pro-line always:
* Maintain a balance both port to starboard and bow to stern.
* Keep heavy items as low as possible.
* When boarding, step (never jump) into the boat one person at a time.
* Pass all gear from the dock to someone in the boat. Do not carry gear while boarding.
* Never allow passengers to ride with feet hanging over the side of the boat.
* Do not allow passengers to sit or stand on top of the stern, or gunwales.
Fueling
Due to the explosive nature of gasoline certain precautions must be observed when fueling.
Before Fueling* Secure the boat to the dock with adequate moorings.
* Turn off engine and any equipment having brush type (spark producing) contacts.
* Close cabin doors and hatches so fumes don't enter the cabin area.
* Disembark all persons not necessary for the fueling operation.
* Prohibit all smoking and open flame on board and nearby.
* Have a fire extinguisher close by.
While Fueling* Keep nozzle in contact with fill opening to minimize chance of sparks.
* Do not leave hose unattended when pumping fuel.
* Do not spill fuel. Notify the dock-master immediately if fuel is spilled.
* Do not over-fill; filling a tank until fuel is vented is dangerous. Allow room for expansion.
After Fueling* Close fill opening.
* Wipe up any spilled fuel. Dispose of rags on shore.
* Open cabin’s door and ventilate the boat
* Check for fumes in bilge, continue to ventilate and run blower if vapors are present.
Starting
Before Starting Engine:
Warning: Gasoline vapors can explode resulting in injury or death. Before starting the engine, check the engine
compartment bilge for gasoline or vapors. Operate the blower for four minutes and verify blower operation.
* Ventilate all enclosed spaces.
* Visually inspect the bilge for raw fuel and smell for vapors.
* Visually make sure propeller is clear of obstructions or swimmers.
* Lock the helm seats to face straightforward.
* Attach safety lanyard.
Starting Engine:
•
Start the engine in accordance with the instructions provided in your engine manual.
After Starting Engine:
After your engine starts observe these basic rules to ensure that the engine is functioning properly:
* Check oil pressure gauge immediately.
* Verify engine cooling water circulation.
32
* Monitor the water temperature gauge to make sure the engine is warming properly.
* Check for fuel, oil and water leaks in the engine room. Shut down and correct if found.
* Follow the break-in procedures for your engine.
* Run the blower when the boat is operating below cruising speed.
Propellers
When your Pro-Line was ordered, the factory installed engines and propellers have been performance tested to
provide the best all-round performance for operation at sea level.
In some situations, it may be desirable to re-prop your Pro-Line to enhance desired performance needs.
For instance:
* Propping for higher altitudes
* Propping for heavier loads
* Propping for improved acceleration
* Propping for improved cruising range or speed
When re-propping insure that you do not over-rev the engine at top speed. Engine damage could result.
Operating your engine with a damaged prop will decrease top speed, increase fuel consumption and may
introduce undesirable handling characteristics. The vibration caused by running a damaged prop could cause
costly damage to your reduction gear, shaft seals, propeller shaft, strut and cutless bearing.
Service and Care
To enjoy trouble free use of your Pro-Line follow the recommended procedures and instructions relating to the
service and care of your boat. Failure to follow these recommended maintenance practices will result in shorter
life of your equipment and may void your warranty.
Much of the installed equipment on your Pro-Line is separately warranted, follow the care instructions found in
your owner’s packet to keep these warranties in force.
Your engine manual contains service information relating to your particular engine installation. Follow the
provided recommendations for trouble free service, and to preserve your warranty.
Fiberglass and Gel Coat
The gel-coated fiberglass on your Pro-Line provides a smooth surface that is easy to clean and maintain. Regular
cleaning and waxing will preserve the finish on your boat for many years to come.
Use a mild detergent and plenty of fresh clean water to swab down the exposed gelcoat of your boat. Don't use
harsh cleaners containing ammonia, chlorine or abrasives. Do not use acetone or any reducing solvents. Stubborn
stains can be removed with alcohol or kerosene provided they are washed off immediately and completely with
mild detergent and water. Wax all gel coated surfaces a minimum of twice a year. Wax more often if the boat is
stored in the sun. If due to neglect the surface takes on a dull appearance that is not restorable by waxing, hand
buff with a rubbing compound, then wax. Your Pro-Line dealer can provide advice and the necessary products to
complete the job.
Caution: When power buffing use care not to leave swirl marks or "burn" the surface. You may want to leave
power buffing to a professional. The gel coat on your Pro-Line is approximately 25 mils thick. Minor scratches
and deep stains that do not penetrate the gel coat can be lightly wet sanded with 600 grit, buffed and waxed to
remove. If a deep gouge to the surface occurs that goes all the way through the gel coat into the fiberglass it must
be repaired promptly to avoid further damage. Your dealer is best equipped to handle this repair and achieve good
bonding and color match. There are many different gel coat repair kits on the market for this use, however results
obtained may not be satisfactory. For damage to fiberglass that goes deeper than 1/16 inch see your Pro-Line
dealer.
Marine Growth
Marine growth is a problem with unpainted hull bottoms. Consult your Pro-Line dealer about an anti-fouling
finish for the portions of the hull below the water line. Consult your dealer to determine the conditions under
which your boat will be moored. Establish a program for periodic inspections of the boat’s bottom according to
33
these conditions.
Windows and Hatches
To clean acrylic, rinse with fresh water to remove as much grime as possible. Use your bare hand with lots of
water so you can feel any grit and avoid grinding it in to the surface as you dislodge it. When all material that may
cause damage is gone, use a soft clean cloth with a non-abrasive mild detergent and clean fresh water. Rinse and
blot dry with a clean dry chamois.
Grease and adhesives may be removed with kerosene, hexane or white gas (not gas you burn in your boat, car or
lawnmower).Never use solvents like acetone, silicone spray, benzene, carbon tetrachloride, dry cleaning fluid,
lacquer or paint thinner, or any chlorinated solvent, on acrylic. They will dissolve the material.
Stainless Steel and Aluminum
Stainless steel is used on bow rail and deck fittings on your Pro-Line. Stainless is corrosion resistant but not
corrosion proof. If used in contact with sulfides, chloride salts, or rusting metals, stainless will show rust spots,
discolor or corrode. The grain structure of stainless, when modified by welding processes has increased
susceptibility to micro- corrosion (invisible to the unaided eye) and embrittelment. Proper care will preserve the
weld strength and beauty of your stainless:
* Always clean with soap and water. Most glass cleaners work. Clean frequently.
* Always protect with a wax, especially around welds to guard against micro-corrosion, cracking and rust
spots.
* Always remove rust spots as they appear with brass, silver or chrome cleaner.
* Never use coarse abrasives like sandpaper or steel wool, as these can cause rusting and corrosion.
* Never clean with acids or bleaches.
* Never permit contact with iron, steel or other metals that can cause rust or corrosion.
Canvas
Cleaning: Brush the canvas with a soft bristle brush and hose down at regular intervals to remove bird droppings,
dust and dirt particles. It may be washed with a mild solution of natural soap in lukewarm water (less than 100
degrees Fahrenheit). DO NOT USE DETERGENTS.
For more stubborn stains soak the canvas in a solution of four ounces of a non-chlorine bleach and natural soap
mixed with one gallon of warm water for about 20 minutes. Rinse with cold water.
Note: If the water repellent is lost due to cleaning, apply a water-repellent treatment as necessary.
The canvas may be washed in an automatic washing machine set on 'cold' using 2 cups non-chlorine bleach 1-cup
natural soap. DO NOT DRY IN A DRYER, LINE DRY ONLY TO PREVENT SHRINKING. If water won't
bead on dry surface, re-treat with water repellent.
Storage: Do not fold or store any canvas while wet. All canvas should be rolled or folded when dry and kept in a
clean dry location.
Zinc Anodes
Sacrificial zinc anodes, installed on the boat’s transom protect underwater boat hardware. Zinc is used to protect
metal that is exposed to saltwater. The salt water causes a galvanic action that decomposes metals. You are
responsible for inspecting the anodes periodically and replacing them if the anode erodes 50% or more. Without
the proper amount of zinc, corrosion will occur to metal parts under water. Damage resulting from electrolytic
corrosion is not covered by the warranty.
Corrosion Protection
If you moor your Pro-Line in the water for extended periods, check the anti-corrosion anodes often. Your boat
has sacrificial zinc anodes to prevent damage caused by corrosion. Maintain these zinc anodes and monitor their
condition on a regular schedule. They are located inside the EPS chamber above the hull drain plug.
There is a green bonding wire connecting all immersed metal parts in a bonding system that, among other things,
helps to prevent galvanic corrosion.
Your shore power installation includes a Professional Mariner Zinc Saver II mounted between the shore power
inlet and the AC panel green wire buss. There is no directional flow. It will stop galvanic current in both
directions. Galvanic current is low voltage direct stray current that is stopped by the Zinc Saver II in both
34
directions. This will keep your zinc protecting only your boat instead of the dock and nearby boats. It will also
keep your valuable boat metal from protecting the dock and other boats after your zinc is gone. Again, you must
maintain the zinc plates and monitor their condition on a regular schedule
Upholstery
Vinyl
An occasional wipe down with mild soap and water is required on all interior and exterior vinyl in order to remain
in good condition for many years. We do not recommend the use of any special cleaners, sealers or treatments for
interior or exterior vinyl. Refer to the brochure that is included in you important papers package.
Fabric
For all fabrics use dry cleaning fluid only.
Teak Cabin Floor
Your Pro-Line cabin floor is treated with “Teak Wonder”, which is a silicone sealant that protects the beautiful
teak wood. The wood should be treated at least twice per year with “Teak Wonder Cleaner” to remove dirt and
gray color. Your dealer should repair scratches and damage. A light scratch can be removed using sandpaper
(120 grit) and treated with “Teak Wonder Cleaner”. Use caution. A finer grit paper will turn the wood
white. Using fine furniture oil will work if the recommended cleaner is not available.
Winterization and Storage
When cold weather has arrived or if you will be placing your boat in storage for a period of time, we suggest
using the following guidelines to prepare it for storage. If you live in an area that does not require seasonal
storage, we recommend a thorough inspection once a year.
Remove the bilge drain plug immediately after taking the boat out of the water. After washing, raise the bow to
allow as much water as possible to drain while performing other storage preparations. Store the plug in a plastic
bag so that it will not get lost. If you are placing the boat in dry storage, scrape any barnacles and other growth off
the hull. Scrub the hull and deck thoroughly. Inspect the underwater gear and propellers for excessive wear or
damage. Check whether the bottom needs repainting.
Note: Clean the hull right after the boat is hauled out of the water. Marine growth and scum will be easier to
remove while they are still wet.
Wash the deck and cockpit. Clean all metal surfaces, and apply a coat of rust inhibitor. Clean the indoor/outdoor
carpet. Clean the canvas and prepare for storage.
Take the appropriate measures to control humidity inside your boat when it is stored. Your dealer can recommend
the best method for you area. If your boat is shrink-wrapped for storage, it should be vented to allow
condensation to escape.
Note: Refer to the engine operation and maintenance manual for detailed instructions on storing and
winterization procedures. Have your dealer or an authorized marine service dealer winterize the engines.
Note: In regions where temperatures fall below freezing, all water in the engine must be removed or replaced
with a marine antifreeze solution before winter storage. Failure to do so will seriously damage the engine. Mix
antifreeze according to label directions for the lowest expected temperature. Use non-toxic antifreeze to prevent
damage to the environment. Freeze damage is not covered by the warranty.
Fuel System
Fill the fuel tank completely to reduce condensation. Add a gasoline stabilizer solution to the fuel before storage.
Follow the stabilizer manufacturer’s recommended procedure.
Batteries
Remove the battery. Check water level and store in a cool, dry place protected from freezing temperatures. Clean
the outside of the battery case, terminals and battery clamps with a solution of baking soda and water. Do not
allow baking soda solution to enter the cells. Lightly sand the battery posts and clamps with fine grit emery cloth
and apply a light coat of petroleum jelly to cover the end of the battery cables.
Note: A monthly recharge or continuous trickle charge should then be applied to the battery.
35
Generator
Refer to the generator operation and maintenance manual for detailed instructions on storing and winterization.
Have your Pro-Line dealer or an authorized marine service dealer winterize the generator’s engine. In regions
where temperatures fall below freezing, all water in the generator engine must be removed or replaced with a
marine antifreeze solution before winter storage. Failure to do so will seriously damage the engine. Freeze
damage is not covered by the warranty.
Fresh Water System
Winterize the fresh water system if you expect freezing temperatures during storage. The water system can be
completely drained and left dry or non-toxic antifreeze can be added to the system. If you intend to leave the
system dry, completely drain the entire fresh water system including tanks. Run the pump one or two minutes to
make sure tanks and lines are empty. Disconnect intake hoses from the pump. Start the pump and run it until all
the water is ejected. Reconnect the hoses, close the drains and let the faucets stay open. These water pumps can
be operated dry for a short time only without damaging them. Check the pump manual in the Owner’s Packet
for details.
If you intend to winterize the system with antifreeze, determine the capacity of the water tank. Fill the tank with a
solution of fresh water and antifreeze. Use the amount of antifreeze recommended by the manufacturer. Starting
with the faucet furthest from the pump, operate the pump until the antifreeze solution flows from the faucet. Be
sure to open the hot water faucets so that the water heater fills with antifreeze solution. When colored water flows
from each faucet, close it and leave it closed. Repeat these steps for the icemaker. Antifreeze remaining in the
lines protects the system through the winter. Turn off the pump breaker.
Raw Water System
Water must be drained from the raw water system to prevent damage to the seacocks and water lines. Close the
seacock and disconnect the hose. Place this hose in a gallon of antifreeze mixed in accordance with the
manufacturer’s recommendations. Attach a hose to the raw water discharge connection and return the solution to
the container. Turn on the raw water system pump and when the antifreeze flows through the system, shut it off.
Reconnect the hose to the through hull fitting and when the boat is removed from the water, open the seacock.
Do not open the seacock while the boat is in the water.
Waste System
Prepare the MSD for storage with non-toxic antifreeze as recommended by the manufacturer. Empty the holding
tank completely and flush the lines and tank thoroughly with fresh water to remove wastes. Pour one gallon of
fresh water and antifreeze solution into the tank through the MSD. When colored water flows from the pump
discharge, stop the pump. Leave antifreeze in the line to protect the system through the winter. Turn off the
pump breaker.
Live-well
Remove the standpipe to drain all of the water from the live well. Run the live-well pump long enough to ensure
that the pump is running dry. Remove the live-well inlet hose and drain.
Trouble Shooting Chart
PROBLEM:
POSSIBLE CAUSE:
Poor speed or fuel economy:
*Wrong propeller for load or conditions.
*Incorrect drive trim angle
*Load is to far forward or to heavy, or boat has taken on water.
*Marine growth on hull.
*Line or anchor dragging.
*Fuel is stale or partially blocked, the engine is worn, out of tune or underpowered .
36
*Air intake or exhaust is partially blocked.
Engine cranks but will not start:
*Out of fuel or filter is clogged.
*Water in fuel.
*Engine problem. Read the engine manual supplied.
*Safety shut down switch lanyard not installed.
Engine will not crank:
*Drive is in gear. Check gearshift handle for neutral location.
*Battery is weak or terminals corroded or loose.
*Engine damage.
*Check ignition breakers
Engine runs but boat won’t go:
*Throttle release is engaged and the boat is not in gear.
*Disconnected shift linkage.
*Shifter cable is corroded
*Damaged propeller.
*Entangled in lines or weeds or the anchor is down.
Prop cavitates:
*Weeds or debris on propellers.
*Propeller blades damaged from debris
*Bow is heavy due to water in forward areas from hull damage.
*Incorrect drive trim angle
Excessive vibration:
*Engines need to be realigned.
*Propeller blades are damaged.
*Foreign materials are wrapped around the propeller, shaft or strut.
*Propeller shafts or struts are bent or damaged.
*Hull is damaged.
Boat won't turn when helm turns:
*Read Sea Star information & troubleshooting manual that is supplied.
*Steering unit needs fluid or has trapped air.
*The steering cylinder is not attached to the rudder tiller arms.
Steering is stiff or helm will not turn:
*Mechanical lock holding the rudder or its components in place.
*Incorrect steering fluid is in the system. Read the Sea Star information manual.
*In-line filter clogged with debris
Warning:
Electrical problems
(See wiring diagram)
Handling problems like:
Porpoises
Runs wet
Hard ride
Lists
Over banked in turn
Catches in turns
*Working on or dismantling steering system components MUST
be carried out by a qualified marine mechanic only.
*Corroded wires, terminals, or plugs.
*Broken, loose or short circuited wires.
*Circuit breaker tripped.
*Defective switch, device or breaker.
*Overloaded circuit.
*Damaged hull (rocker), trim tabs up, stern heavy.
*Bow heavy, trim tabs down, overloaded for conditions.
*Incorrect drive trim angle
*Stern heavy, going to fast for conditions.
*Loaded to one side, trim tabs set wrong, fuel tanks uneven.
*Strong wind conditions
*Improperly located load, throttle advanced too far.
*Damaged hull (hook), stern heavy, trim tabs down.
*Incorrect drive trim angle
Fitting Out After Storage
•
•
•
•
•
•
Check entire fuel system for loose fittings, leaks and damage.
Clean battery terminals; install battery(s), and coat terminals with a deoxidizing agent.
Check all through hull fittings and hoses for obstructions, leaks, tightness and condition.
Test navigation, anchor and other lights for operation.
Check wiring, terminal blocks and plugs for loose connections and corrosion.
Verify switch and equipment operation.
37
•
•
•
•
Check the condition of anchor lines, anchor and rode.
Install the hull’s drain plug and clean out any debris from bilge and cockpit.
Remove antifreeze, hook-up open water lines and flush the water system.
Close all seacocks for launching, then open and check for leaks.
Important Data For Identifying Your Boat
•
Owners Name _____________________Address _____________________________________
•
Hull Identification Number ______________ Vessel’s Name ____________________________
•
Hull colors____________________________________________________________________
•
State Registration Number _______________________________________________________
•
Home Port____________________________________________________________________
•
Dealers Name & Phone Number __________________________________________________
•
Servicing Dealer’s Name & Phone Number__________________________________________
•
Warranty Registration Date_______________________________________________________
•
Radio Call Letters______________________________________________________________
•
Radio Model Number & Serial Number_____________________________________________
•
Ignition Key Numbers ______________Port _____________Starboard ______________Center
•
Key Numbers _______Cabin _______Glove Box ______Miscellaneous ___________________
•
Batteries _________ Number ______________________Model & Size ___________________
•
Engine Make, Model & Horsepower: ______________________________________________
•
Engine S/N: __________________Port _________________Starboard
•
Prop: Diameter: _______” Pitch: _______” Number of Blades _______ Material________
FREEZE BAN INFORMATION SHEET
FREEZE BAN INHIBITS FOULING AND CORROSION
FREEZE BAN PREVENTS ALGAE GROWTH
FREEZE BAN HELPS TO LUBRICATE PUMPS AND VALVES
THROUGHOUT THE ENTIRE SYSTEM
38
THE MINIMUM AMOUNT NEEDED FOR YOUR 33 EXPRESS IS FOUR GALLONS
DIRECTIONS FOR WINTERIZING:
1. Prepare your system.
a. Turn off fresh water supply to the boat.
b. Drain the system by turning on water taps and letting them flow until your fresh water
supply is exhausted.
c. Remove water from the toilet bowl.
d. Be sure to empty the holding tank and close the seacocks.
e. Close all taps.
f. If you have a water purifier installed in your system, remove the filter.
g. Drain the water heater.
2. Pour the amount of full strength antifreeze needed for your system directly in the fresh water
tank. DO NOT DILUTE WITH WATER.
3. Starting with the faucet nearest to the tank, turn on each faucet and allow it to run until pure
antifreeze appears. Allow one cup of antifreeze to run into each sink before turning off the
faucets.
4. Flush the toilet until pure antifreeze appears.
5. Be sure that all faucets and drains are closed.
6. CHECK FOR LEAKS.
DIRECTIONS FOR DE-WINTERIZING:
1. Open all taps and run fresh water through your system for five to ten minutes until all color
disappears.
2. Use baking soda capsules to help neutralize odor and taste associated with potable water
storage.
FREEZE BAN INFORMATION: 1-800-334-2004
FREEZE BAN ONLINE INFORMATION: http://www.camco-mfg-online.com
Specifications:
Length Overall………………………..
33’ 0”
(10.1 m)
Beam…………………………………...
12’ 6”
(3.81 m)
Draft (Hull)…………………………..
41”
(1.04 m)
39
Fuel Capacity…………………………
300 gallons
(1,135.5 liters)
Fresh Water Capacity………………..
40 Gallons
(151.4 liters)
Weight (approximately)……………..
14,500 lbs.
(6,577 kg)
Cockpit Area………………………….
115 sq ft
(10.7 sq m)
Cockpit Depth………………………...
25”
(.64 m)
Max HP……………………………… .
840 HP
(851.76 kw)
Cabin Head Room……………………
6’ 3”
(1.91 m)
Baitwell Capacity…………………… .
35 gallons
(132.5 liters)
Fish Box Capacity…………………... .
74.8 gallons
(283.12 liters)
Sleeping Capacity…………………….
4 persons
40
41
BOATING TERMINOLOGY
Abaft
Toward the stern.
Abeam
Amidships, at a right angle to the keel.
Aboard
On, in or into a boat.
ABYC
American Boat and Yacht Council, Inc., the organization that sets voluntary
safety and construction standards for small craft in the USA.
Adrift
Without motive power and without anchor or mooring.
Afloat
On the water.
Aft
Describing the after section of a vessel or things to the rear of amidships and
near the stern.
Aground
Touching the bottom.
Amidships
In the Center, the center portion of a vessel.
Anchor
A forging or casting shaped to grip the sea bottom and, by means of a cable or
rope, hold a boat in a desired position.
Anchorage
A customary, suitable and (usually) designated harbor area in which vessels
may anchor.
Astern
Toward the stern. An object that is aft of a boat is said to be astern of the
boat.
Athwart
Across.
Aweigh
Off the bottom, said of an anchor.
Aye
Yes, while aboard a boat or ship, means “I understand.”
Bail (Bale)
To remove water from a boat by pump or bailer.
Ballast
Heavy material such as iron, lead or stone placed in the bottom of the vessel.
42
Beacon
A post or buoy placed over a shoal or bank to warn vessels. Also a signal
mark on land.
Beam
Imaginary line amidships at right angles to the keel of the vessel.
vessel’s width amidships.
Bearing
The direction or point of the compass in which an object is seen.
Belay
To make fast to a cleat or belaying pin. To cancel an order.
Below
Beneath or under the deck. One goes below when going down into the cabin.
Bend
To fasten by means of a bend or knot.
Berth
A position, as a place to sleep or in which a vessel may be made fast. A
margin of safety, as “a wide berth.”
Bilge
The lower internal part of a boat’s hull.
Bollard
A strong post for holding lines fast.
Bow
The forward part or front of the boat.
Breakers
Waves cresting as they reach shallow water, as at or on a beach.
Breakwater
A structure, usually stone or concrete, built to create a harbor or improve an
existing one.
Bulkhead
Vertical partition in a boat.
Burdened
Former term for the vessel which must stay clear of vessels with the right of
Vessel
way.
Caulking or
Calking
Forcing filler material into the seams of the planks in a boat’s deck or sides
to make them watertight.
Camber
The arch of a deck sloping downward from the center toward the sides.
Capsize
To turn over.
Also
43
Carburetor or
Backfire Flame
Arrestor
Required equipment on all motorboats except outboards and diesels.
Reduces the chance of a fire caused by backfires in an internal combustion
engine.
Cardinal Points The four main points of a compass; north, east, south and west.
Ceiling
The inside lining of the hull.
Certificate
Government paper, such as a boat’s license.
Chart
A map of a body of water that contains piloting information.
Chine
The intersection of sides and bottom of a boat.
Cleat
A piece of wood or metal with projecting ends to which lines are made fast.
Clinker
A method of planking in which the lower edge of each strake overlaps the
upper edge of the strake next below. (Also called a lapstrake).
Coaming
A raised edge, as around part or all of a cockpit, that prevents seawater from
entering the boat.
Coast Guard
The federal marine law enforcement and rescue agency in the U.S.
Cockpit
A well or sunken space in the afterdeck of a small boat for the use of the
helmsman and crew.
Companionway A hatch or entrance from deck to cabin.
Compass
The instrument which shows the heading of a vessel.
Cowls
Hooded openings used for ventilation.
Cradle
A frame used to support a vessel on land.
Current
The movement of the water in a horizontal direction.
Deadrise
The rise of the bottom of a midships frame from the keel to the bilge.
Deck
Any permanent covering over a compartment.
44
Deep-six
To discard or throw overboard.
Depth Sounder
An electronic depth finding instrument measuring the time a sound wave
takes to go from the vessel to the bottom and return, then displaying the result
in feet, fathoms or meters.
Dinghy
A small open boat.
Displacement
Hull
Type of hull that plows through the water even when more power is added.
Dock
An enclosed or nearly enclosed water area. All the port installations. A place
where vessels can moor, as a pier, wharf or floating dock.
Documented
Vessel
A vessel registered with the U.S. Coast Guard.
Dolphin
A small group of piles in the water generally used for mooring or as a channel
marker.
Draft
The depth of the vessel below the water line measured vertically to the lowest
part of the hull.
Dunnage
Mats and pieces of wood or other loose materials placed under or among
goods carried as cargo in the hold of a ship to keep them dry and to prevent
motion and chafing. Cushioning used in a shipping container to protect
fragile articles against shock and breakage. Baggage or personal effects.
Ebb
An outgoing tide.
Estuary
An inlet or arm of the sea.
Fathom
Six feet.
Fenders
Objects placed along the side of the boat to protect the hull from being
damaged.
Flare
The outward spread of the boat’s sides from the waterline to the rail at the
bow. Also, a pyrotechnic signaling device that can indicate distress.
45
Fore
Used to distinguish the forward part of a boat or things forward of amidships.
It is the opposite of aft or after.
Forward
Toward the bow.
Frame
Ribs of the hull extending from the keel to the highest continuous deck.
Freeboard
The vertical distance measured on a boat’s side from the waterline to the
gunwale.
Galley
The kitchen area of a boat.
Gimbals
Swivels used to keep equipment level.
Give-Way
Vessel
The vessel which must stay clear of vessels which have the right-of-way.
Grab Rail
A convenient grip on a cabin top or along a companion ladder.
Gunwale
The upper edge of a boat’s side. (pronounced gunnel).
Harbor
A safe anchorage protected from most storms. It may be natural or man made
with breakwaters and jetties. A place for docking and loading.
Hatch
An opening in a boat’s deck for persons or cargo to go below.
Head
A marine toilet.
Headway
The forward motion of a vessel through the water.
Helm
The wheel or tiller by which a vessel is steered.
Holding Tank
Storage tank for sewage so that it will not be pumped overboard.
Hull
The body of a boat.
Hypothermia
A physical condition where the body loses heat faster than it can produce it.
Inboard
More toward the center of a vessel. Inside. An engine fitted inside the boat.
46
Inland Rules
Rules of the road that apply to vessel operation in harbors and certain rivers,
lakes and inland waterways.
Intracoastal
(ICWs) Bays, rivers and canals along the coasts (such as Atlantic and Gulf
Waterways
of Mexico coasts). They are connected so that vessels may travel without
going into the open sea.
Jetty
A structure, usually masonry, that is projecting out from the shore. A jetty
may protect a harbor entrance.
Keel
The permanently positioned fore and aft backbone member of a boat’s hull.
Knot
To bend a line. A unit of speed equal to one nautical MPH (6076.1 feet).
Launch
(1) To put a vessel into the water.
(2) A small open powerboat mainly used for transportation between a
vessel and the shore.
Lee
The side opposite to that from which the wind blows.
Leeward
Situated on the side turned away from the wind. Opposite of windward.
Leeway
The amount a boat is carried sideways by the wind’s force or current.
Limber Holes
Drainage holes in the bilge timbers of a vessel allowing water to run to a low
point in the bilge for pumping out.
List
(1) Continuous leaning to one side often caused by an imbalance in
Stowage or a leak into one compartment
(2) A light list is a printed listing of aids to navigation in geographical
order or inclining of a vessel toward the side.
The length overall. The maximum length of a vessel’s hull excluding
projecting spars or rudder.
LOA
Locker
A storage place or a closet.
Log
A record or diary of a vessel’s journey.
Lubber’s line
A mark or permanent line on a compass that shows the course of the boat.
47
Making Way
Making progress through the water.
Marina
A place, essentially a dock area where small recreational craft are kept. It is
usually where floats or piers as well as service facilities are available.
MAYDAY
A radio distress call from the French m’aidez (help me). In Morse Code it is
an SOS.
Mooring
Commonly the anchor chain, buoy, pennant, etc., by which a boat is
permanently anchored in one location.
Motor
A source of mechanical power.
Motorboat
Any watercraft 65 feet or less in length propelled by machinery, whether or
not such machinery is the principal source of propulsion.
Navigation
The art of conducting a ship from port to port.
Nautical Mile
It is 6076.12 feet or 1852 meters. It is an international standard. A
geographical mile is the length of one minute of latitude at the equator is
6087.20 feet.
Nun Buoy
A conical, red buoy bearing an even number and marking the starboard side
of a channel from seaward.
Oar
A wooden instrument with a flat blade at one end used for propelling a boat.
Outboard
(1) A propulsion unit for boats attached at the transom. It includes the
motor drive shaft and propeller.
(2) Outside or away from the vessel’s hull. It is the opposite of inboard.
Outdrive
A propulsion system for boats that is attached to the transom. It includes the
motor, drive shaft and propeller.
A propulsion system for boats that is attached to the transom. It includes the
motor, drive shaft and propeller.
Outdrive
Overall Length
The extreme length of a vessel, excluding spars or rigging fittings. (LOA).
Painter
A line attached to the bow of a boat used to secure the boat to a dock.
48
Pier
A structure, usually wood or masonry, extending into the water used as a
landing place for boats and ships.
Pile
A vertical wooden or concrete pole driven into the bottom. It may be a
support for a pier or floats. It is also used for mooring.
Piling
A structure of piles.
Pitch
(1)
Planing Hull
Type of hull that is shaped to lift out of the water at high speed and ride on
the water’s surface.
Port
The left side of a boat when facing the bow. Also a destination or harbor.
Privileged
Vessel
Former term for the vessel with the right-of-way.
Propeller
Wheel or screw mechanism that pushes water to propel the boat.
Rigging
The general term for all lines of a vessel.
Roll
The sideward motion of a boat caused by wind or waves.
Rules of
the Road
The nautical traffic rules for preventing collisions on the water.
Scope
The length of the anchor line or chain. A 6:1 scope means that the length of
the line from the boat to the anchor is six times the depth of the water.
Scupper
A hole allowing water to run off the deck.
Sea Anchor
A floating canvas cone held open by wire rings with an opening in the smaller
end and a rope bridle at the larger end attached to a line leading to the vessel.
It is used in storm conditions to:
(1) keep the bow of the boat to the wind
(2) slow the downwind drift of the boat
Seacock
A thru-hull valve used to shut off plumbing or drain pipes between the
vessel’s interior and the sea.
The up and down movement as the bow and stern rise and fall due to
wave action.
49
Slip
(1)
(2)
A berth for a boat between two piers or floats.
The percentage difference between the theoretical and the actual
distance that a propeller advances when running in the water under
a load.
Sole
The cabin or cockpit floor.
Spar Buoy
A channel marker that looks like a tall, slender pole.
Stand On
Vessel
The vessel with the right-of-way.
Starboard
The right side of a boat when you are facing the bow.
Stern
The after end or back of the boat.
Stow
To store items neatly and securely.
Strake
Planks running fore and aft on the outside of a vessel.
Taffrail
The rail around a boat’s stern.
Tide
The alternate rise and fall of waters caused by the gravitational attraction of
the moon or sun.
Topsides
(1)
(2)
Transom
The transverse planking which forms the after end of a small, square-ended
boat. Outboard motors are usually attached to the transom.
Trim
To arrange weights in a vessel in such a manner as to obtain desired draft at
the bow and stern.
Trimaran
A boat with three hulls that has the center hull the largest.
Unbend
To cast off or untie.
Underway
Vessel in motion that is not moored, at anchor or aground.
The sides of a vessel above the waterline.
On deck as opposed to below deck.
50
USPS
United States Power Squadron is a private membership organization that
specializes in boating education and good boating practices.
Vessel
Every kind of watercraft, other than a seaplane on the water, that is capable of
being used as a means of transportation on the water.
VHF Radio
A Very High Frequency electronic communications and direction finding
system.
Wake
Moving waves created by vessel motion. Track or path that a boat leaves
behind it when moving across the water.
Wash
The loose or broken water left behind a vessel as it moves along. It is the
surging action of waves.
Waterline
The intersection of a vessel’s hull and the water’s surface. It is the line
separating the bottom paint and the topsides.
Way
Movement of a vessel through the water. Technically it is underway when
not at anchor, aground or made fast to the shore. The common usage is
interpreted as progress through the water. Headway when it is going forward
and sternway when it is going backwards.
Well
An area at the rear of the boat where the motor may be located.
Wharf
A structure parallel to the shore for docking vessels.
Wheel
(1) The steering wheel.
(2) The propeller.
Whistle Signal
A standard communication signal between boats to indicate change of course,
danger or other situations.
Windward
Situated on the side closest to the wind. It is the opposite of leeward.
Yaw
To swing or steer off course as when running with a quartering sea.
51
Basic Seamanship
Boating Laws and Regulations
You are responsible with complying with federal and state boating laws and regulations. Sometimes local
agencies also have jurisdiction. The U.S. Coast Guard, the authority of the waterway, enforces federal marine
traffic laws for both federal and state waterways. Local authorities enforce state boating regulations. You must
stop if signaled to do so by enforcement officers and allow them to board your vessel if they ask to do so.
Some states and localities have specific local regulations on speed and noise. It is your responsibility to be
knowledgeable about these laws and comply with them. Ignorance is not an excuse! Check with your dealer of
consult with the local Marine Patrol or local Coast Guard office about any local requirements.
Registration
Federal and state laws require that every boat equipped with propulsion machinery of any type be registered in the
state in which it is principally used. In a few jurisdictions, the Coast Guard retains registration authority.
Registration numbers and validation stickers must be displayed on the boat according to regulations and the
registration certificate must be carried on board when the boat is in use. Some states require additional
registration when an out of state boat is used within their boundaries. Your dealer will either supply registration
forms or tell you where they may be obtained.
Insurance
In most states, the boat owner is legally responsible for damages or injuries he or she causes, even if someone else
is operating the boat at the time of the accident. Common sense dictates that you carry adequate personal liability
and property damage insurance, just as you would on an automobile. You should also protect your investment by
insuring the boat against physical damage or theft.
Insurance Information
Record Name of Your Company Insurance Here _________________________Agent’s Name _______________
Record Policy Number Here ___________________________Telephone Number _________________________
Accident Reporting
After an accident, the operator of the boat is responsible for filing a report with the appropriate authorities.
Reports are generally necessary for accidents involving loss of life, injury, or damage over $500. Ask your
insurance agent for more information. A blank accident form is located on the rear page of this manual.
If you see a distress signal, you must assume it is a real emergency and render assistance immediately. Law
obligates the person in charge of a boat to provide assistance to any individual in danger at sea. However, you
should not put your crew or passengers in a dangerous situation that exceeds your capabilities or those of your
boat. The 1971 Boating Safety Act grants protection to a “Good Samaritan” boater offering good faith assistance,
and absolves a boater from any civil liability arising from assistance given.
Discharge of Oil
The federal Water Pollution Control Act prohibits the discharge of oil or oily waste into or upon the navigable
waters of the United States or the waters of the contiguous zone if such discharge causes a film or sheen upon or a
discoloration of the surface of the water or causes sludge or an emulsion beneath the surface of the water.
Violators are subject to a penalty of $25,000.
Disposal of Plastics & Other Garbage
Plastic refuse dumped in the water can kill fish and marine wildlife and can foul boat propellers and cooling water
intakes. Other forms of waterborne garbage can litter our beaches and make people sick. United States Coast
Guard regulations prohibit the dumping of plastic refuse or other garbage mixed with plastic into the water
anywhere, and restricts the dumping of other forms of garbage within specified distances from shore.
52
MARPOL Treaty (Marine Pollution)
Boats 26 feet or longer must display a sign stating the disposal regulations of the Federal Water Pollution Control
Act. The United States Coast Guard has issued these regulations to implement Annex V of the International
Convention for the Prevention of Pollution from ships. They apply to all U.S. boats wherever they operate, except
waters under the exclusive jurisdiction of a State. The regulations require U.S. boaters to affix one or more
USCG Trash Dumping Restrictions placards to any boat 26 feet or more in length. The placard warns against the
discharge of plastic and other forms of garbage within the navigable waters of the United States and specifies
discharge restrictions beyond the territorial sea. The territorial sea usually ends three nautical miles from the
seashore. In addition, the placard must contain the warning that a person who violates these requirements is liable
to civil penalties (a $25,000 fine), and criminal penalties (imprisonment). The Placard must also note that state
and local regulations may further restrict the disposal of garbage. Operators shall install one or more placards in a
prominent location and in sufficient numbers so crew and passengers can read them. These locations might
include embarkation points, food service areas, galleys, garbage handling spaces and common deck spaces
frequented by crew and passengers. We recommend that these placards be installed on all boats regardless of
lengthy. The placards may be purchased from local marinas, boat dealerships and marine equipment suppliers. A
special placard is a available for boats operating on the Great Lakes.
Important: It is illegal to discharge waste from a marine sanitary device or toilet into the water in most areas. It
is your responsibility to be aware of and follow all local laws concerning waste discharge. Consult with the Coast
Guard, local marina or your dealer for additional information.
Copies of these two placards are displayed on the following two pages.
53
54
55
56
57
58
59
Rules of Seamanship
U.S. Coast Guard is responsible for enforcing the marine traffic laws known as the “Navigational Rules,
International-Inland.” These rules may be obtained from the United States Coast Guard Headquarters by calling
(202) 512-1800 or faxing your request to (202) 512-2250.
Many pamphlets prepared by the U.S. Coast Guard are available. They explain signal lights, buoys, safety,
international and inland regulations and other information that goes beyond the scope of this manual. U.S. Coast
Guard pamphlet number 123, called “Aids To Navigation”, explains the significance of various lights and buoys.
Because of proposed alterations to buoys and markers, contact the U.S. Coast Guard to stay informed of any
changes. Other pamphlets, including the “Boating Safety Training Manual” and “Federal Requirements For
Recreational Boats,” are also available from the U.S. Coast Guard Headquarters.
Right-of-Way
In general boats with less maneuverability have the right-of-way over more agile craft. You must stay out of the
way of the following vessels:
• A vessel that is not under command or has run aground. These vessels have no maneuverability.
• A vessel that is restricted in its maneuverability. These vessels are doing work which limits their
maneuverability such as surveying, dredging, laying pipe and cable or servicing navigational markers
are other such examples.
• A vessel engaged in fishing. These vessels include boats fishing with lines, trawls or nets, but do not
included boats with trolling lines.
• Sailboats that are under sail. Sailboats have the right-of-way over powerboats. However, if a sailboat
is using a propeller to move forward, it is considered a powerboat even if its sail are up.
Meeting Head-On
When two boats meet head-on, neither boat has the right-of-way. Both vessels should decrease their speed and
pass port to port. However, if both boats are on the left side of a channel, each vessel should sound two short
horn blasts and pass starboard to starboard.
Crossing Situations
In a crossing situation the boat on the right from the 12 - 4 o’clock position has the right-of-way. It must hold its
course and speed. The boat without right-of way must keep clear and pass to the right-of-way vessels stern.
Overtaking
The boat overtaking the one ahead must yield the right-of-way to the boat being passed. The overtaking boat must
make any necessary adjustments to keep out of its path. The boat being passed should hold its course and speed.
The General Prudential Rule
The general prudential rule regarding the right-of-way is that if a collision appears unavoidable, neither boat has
the right-of-way. As prescribed in the rules of the road both boats must act to avoid a collision.
Night Running
Boats operating between sunset and sunrise, or in conditions of reduced visibility, must use navigational lights.
Nighttime operation can be dangerous, especially during bad weather or fog. All of the rules of the road apply at
night, but it is best to slow down and stay clear of all boats no matter who has the right-of-way.
To see more easily at night, avoid bright lights when possible. It is helpful to have a passenger keep watch for
other boats, water hazards and navigational aids.
To determine the size, speed and direction of other vessels at night, you should use the running lights. A green
light indicates the starboard side and a red light indicates the port side. Generally, if you see a green light, you
will have the right-of-way. If you see a red light, give way to the other vessel.
60
Whistle Signals
Out on the water, whistle signals are commonly used. Although using a whistle signal is not necessary every time
a boat is nearby, operators must signal their intentions when necessary to avoid potentially consfusing or
hazardous situations. Use whistle blasts early enough to be noticed and understood by other boaters.
It is customary for the privileged boat to signal first and the yielding boat to return the same signal to
acknowledge that she understands and will comply. Use the danger signal, five or more short and rapid blasts, if
the intent is not clear. A short blast is one or two seconds in length and a long blast has duration of four to six
seconds. The meaning of various whistle blasts is covered previously in “Rules of the Road”.
Noise
Local regulations may establish maximum noise limits. Be a good boating neighbor. Sounds can carry a long
distance of the water, especially at night. Loud conversations and music can disturb others as can excessive
engine noise. Do not remove or bypass mufflers. Check with local authorities regarding any noise restrictions.
Wake
You are responsible for any damage or injury caused by your boat’s wake. Observe warnings in no wake speed
zones. While underway, always keep the safety of other boats and people in mind.
Recommended Reading
Read the boating literature published by your state boating agency and the United States Coast Guard. There are
many good boating publications that have information about boating, clubs and other activities in your area.
The National Marine Manufacturers Association has a number of booklets that list sources for safety, cruising and
local waterway information. Each booklet covers a different region of the United States, (North Central, South
Central, Northeastern, Southeastern and Western). Ask for single copies of you region and write to:
• Sources of Waterways Information
National Marine Manufacturers Association
401 North Michigan Avenue
Chicago, Illinois 6061
Contacts
Education programs are sponsored by publications and organizations such as the U.S. Power Squadron, U.S.
Coast Guard Auxiliary and The American Red Cross. See your deal about special courses available in the area.
For detailed information contact:
• American Red Cross
See your local telephone directory
• Boat U.S. Foundation for boating Safety Hotline
1-(800) 336-BOAT
1-(800) 245-BOAT in Virginia
• Coast Guard Boating Safety Hotline
1-(800) 368-5647
• United States Coast Guard Auxiliary
See your local telephone directory
• United States Coast Guard Headquarters
(202) 512-1800
(202) 512-2250 Fax
• United States Power Squadron
P.O. Box 30423
Raleigh, North Carolina 27617
61
Navigational Aids
Aids to navigation, called ATONS, help you to travel safely on the water. They help you get from one place to
another and are most helpful if you have a nautical chart. Navigational aids are pictured on the following two
pages.
Important
Never tie your vessel to an ATON. It is illegal because it blocks the ATON from the view of other boaters.
Decreased visibility can contribute to a serious accident that may result in property damage, personal injury and
even death. There are two ATON systems. The system used on federal waters is known as the International
Association of Lighthouse Authorities System B, called IALA-B. The Coast Guard maintains this system. The
second system is the Uniform State Water Waterway Marking System known as USWMS. State authorities
maintain this system.
International Association of Lighthouse Authorities System B (IALA-B)
This system uses four types of ATONS. Discussed here are the two most common markers; lateral markers and
safe water markers. Other federal markers include special markers and isolated danger markers.
Lateral Markers
Lateral markers show the sides of navigable channels. They consist of lighted can buoys (nun buoys) and
daymarks. Each has a number and is either red or green. The numbers on green markers are odd and the numbers
on red markers are even. Buoys are red or green floating ATONS. If lighted, they have either red or green lights.
Unlighted green buoys, called cans, look like cylinders. Unlighted red nun buoys have cone shaped tops with
their points cut off. Don’t pass too close to a buoy. You may foul the propeller in its chain.
Note: Buoys are anchored floating objects and may not always be exactly in the same position.
Daymarks are red or green boards with numbers. They are on posts or groups of [pilings tied together and are
called dolphins. Daymarks and their supports are daybeacons. Daybeacons may or may not have lights. If a red
or green daybeacon has a light, it is the same color as the marker, red or green. Red daymarks are triangular and
have even numbers. Green daymarks are square and have odd numbers.
Red, Right, Returning is a basic rule to help you in using lateral markers. When you are returning from seaward,
keep the red markers on the starboard or right side when you pass them. Keep the green markers to the port side
when you pass them.
Returning from seaward is clear if you have been on the ocean. You are returning to port. By agreement, going
upstream on a navigational river is returning from seaward. The outlet ends of the Great Lakes are also the
seaward ends. Traveling from a large body of water to a smaller one is considered returning from seaward.
Safe Water Markers
Safe water markers have vertical red and white stripes and mark the center of navigable channels and fairways.
Safe water markers included both lighted and unlighted buoys and daymarks. If a marker is lighted, the light is
white and flashes the letter “A” in Morse code.
Preferred Channel markers have horizontal red and green bands. If lighted, the color of the light is the same as the
top of the band. They show the preferred channel for you to use at a junction point. Be sure to notice the color of
the top band, and treat is as any other marker you would of the color. If the band is red and you are returning from
seaward, keep the marker to the right.
Most lights on markers flash on and off. Others such as lights on aids with no lateral significance are fixed and
they stay on all night. ATON lights flash in regular patterns. For example, they may flash every three seconds, or
in groups such as two flashes and a pause. There are a number of flashing patterns, which help you identify the
light at night. To identify a light, note its color and pattern or timing of flashes, and compare it to your chart to
find its location.
62
Uniform States Waterway Marking System
There are three kinds of markers in this system; Regulatory, Informational and Lateral.
Regulatory Markers
Regulatory markers in this system are either signs or buoys. Signs are square with orange borders. Regulatory
buoys are white and shaped like cylinders. They have horizontal orange bands near their tops and just above the
water’s surface. An orange circle on a marker means a controlled area. A message such as “No Wake, Idle
Speed, No Skiing, or 5 MPH” may appear on the marker. An orange diamond means danger. If the diamond has
an orange cross inside it, don’t enter the area. The reason you should stay out, such as “Swim Area”, may be
printed in black on the marker.
Informational Markers
Informational markers are white signs with orange borders. They give information such as direction, distance and
location.
Lateral Markers
Lateral markers in the Uniform State Waterway Marking System (USWNS) are either numbered red or black
buoys. Black buoys may have green reflectors or lights. They are the equivalent of green buoys in the IALA-B
system. Red buoys may have red reflectors or lights. They are the same as red buoys in the IALA-B system. Red
and black buoys are usually found in pairs and you should always pass between them.
A Special Sign
In Florida you may see a special sign: “Caution, Manatee Area”. When you see this sign, slow down to idle
speed. Manatees are an endangered species and are large, passive, and slow moving mammals. Many manatees
are seriously injured or killed each year by boat propellers.
Navigational Aids
The following two pages contain information concerning whistle signals, storms
warnings, bridge signals and buoy descriptions.
63
64
65
Pro-Line 33 Express Fuel Log
Date
Hour Meter
Fuel Used
Range
RPM
MPH
GPH
66
`
Pro-Line 33 Express Fuel Log
Date
Hour Meter
Fuel Used
Range
RPM
MPH
GPH
67
`
Pro-Line 33 Express Maintenance Log
Date
Hour Meter
Service or Repairs Performed
68
Pro-Line 33 Express Maintenance Log
Date
Hour Meter
Service or Repairs Performed
69
FLOAT PLAN
Make copies of this page and fill out the information before you go boating. Leave the completed copy with a
reliable person that can be depended upon to notify the Coast Guard or another rescue organization, should you
not return as scheduled. DO NOT FILE THIS PLAN WITH THE U.S. COAST GUARD.
Name ___________________________________Telephone number__________________________________
Description of the boat:
Model____________Color______________Trim__________________________
Registration Number_________________________Length____________Name_________________________
Additional Information ________________________________________Cell Phone Number______________
Persons Aboard:
Name
Age
Address
Telephone Number
_________________________________________________________________________________________
__________________________________________________________________________________________
__________________________________________________________________________________________
__________________________________________________________________________________________
__________________________________________________________________________________________
Engine Information:
Number of Engines ______Manufacturer ____________Horsepower ____________
Fuel Capacity ________Gallons
PFD’s ________Flares _______Mirror ______Smoke Signals________
Raft or Dinghy _____Paddles _____Food _____Water _____Food _____Sea Anchor _____EPIRB_________
Navigation Equipment:
Compass ______Loran ______GPS ______Radar ______VHF Radio____________
Destination________________________________________________________________________________
Estimate Time of Arrival _______________________ Estimate Time of Return _________________________
Year & Make of Your Automobile ______________________ License Plate Number ____________________
Where is the Automobile Parked? ______________________________________________________________
IF THIS VESSEL HAS NOT RETURNED BY THE ESTIMATED TIME OF RETURN, PLEASE CALL:
U.S. COAST GUARD AT TELEPHONE NUMBER: (______) ______ - ________
LOCAL MARINE AUTHORITY AT TELEPHONE NUMBER: (______) ______ - ________