1
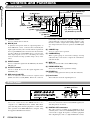
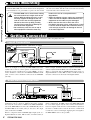
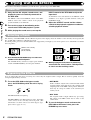
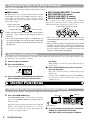
OPERATION MANUAL
Introduction
Thank you for selecting the ZOOM RFX-2000 (hereafter simply called the "RFX-2000"). The
RFX-2000 is a sophisticated digital reverb and multi-effect processor with the following features
and functions.
• Versatile effects and high-quality reverb
The RFX-2000 comes with a full complement of 48 preset effects (8 effects x 6 banks). The
reverb effects alone allow 121 different settings. The convincing sound stage created by the
RFX-2000 far surpasses anything else available in this class.
• 100 patch memory for immediate use
Up to 100 patches (effect settings) can be stored in the internal memory. Calling up any patch is
quick and easy.
• Supplied editing software
The RFX-2000 is supplied with nifty software that lets you manage and edit patches on a
computer. (Versions for Windows 95/98 and Macintosh are included.) Besides patch editing and
management, the software also provides access to eight additional effects including a 31-band
graphic equalizer and a 20-tap delay effect.
• Digital output
The S/PDIF output (with optical and coaxial connectors) allows connection to consumer
equipment with digital input (digital multitrack recorder, MD recorder, DAT recorder or
similar), keeping the signal in the digital domain.
• MIC IN jack
The dedicated microphone jack on the front panel comes in handy for creating vocal effects
without having to make cumbersome connections in the rear. Controlling the VOCODER effect
is a snap thanks to this feature.
• Built-in tap input
Time-based parameters such as delay time can be entered directly, using the tap input feature.
This makes it easy for example to match the delay time to the tempo of a song.
• MIDI based control
Functions such as patch switching, real-time parameter control, and storing of patch data on
external equipment can be performed via a MIDI link.
Please take the time to read this manual carefully so as to get the most out of your RFX-2000 and to
ensure optimum performance and reliability. Retain this manual, the warranty card and all other
documentation for future reference.
* Windows 95 and Windows 98 are registered trademarks of Microsoft Corporation.
* Macintosh is a registered trademark of Apple Computer Inc.
Contents
Controls and Functions • • • • • • • • • • • • • • • • • 2
Front Panel • • • • • • • • • • • • • • • • • • • • • • • • • • • 2
Rear Panel • • • • • • • • • • • • • • • • • • • • • • • • • • • • 2
Rack Mounting • • • • • • • • • • • • • • • • • • • • • • • • • • 4
Getting Connected • • • • • • • • • • • • • • • • • • • • • • 4
Trying Out the Effects • • • • • • • • • • • • • • • • • • • 6
Editing a Patch • • • • • • • • • • • • • • • • • • • • • • • • • • 7
Useful Functions • • • • • • • • • • • • • • • • • • • • • • • • • 8
Using the MIDI Control Function • • • • • 10
Returning the RFX-2000
to the Factory Default Settings • • • • • • • • •
RFX-2000 Effects • • • • • • • • • • • • • • • • • • • • • •
Supplied Software • • • • • • • • • • • • • • • • • • • • • •
Troubleshooting • • • • • • • • • • • • • • • • • • • • • • • •
Specifications • • • • • • • • • • • • • • • • • • • • • • • • • •
MIDI Implimentation Chart • • • • • • • • • • • • •
Safety Precautions/Usage Precautions • • • • •
13
14
24
24
25
26
27
Controls and Functions
Front Panel
Controls and Functions
(1) POWER switch
(10) STORE key
(12) VALUE UP/DOWN keys
(11) Level meter
(13) BANK key
(2) MIC IN jack
(3) INPUT control
(4) OUTPUT control
(5) MIX control and LED
(6) CANCEL key
(7) COMPARE key
(8) MIDI key
(9) PARM CHECK key
(1) POWER switch
Serves to turn the unit on and off.
(2) MIC IN jack
A dynamic microphone with an output impedance of
about 600 ohms can be connected here. Normally the
input signal from this jack is mixed with the signal from
the rear-panel INPUT jacks and sent to the internal effect
circuitry. When the VOCODER effect is selected, the
mike input signal serves for controlling the sound
character and the envelope (volume change curve) of the
effect.
(3) INPUT control
Serves to adjust the signal from the INPUT jacks and the
MIC IN jack.
(4) OUTPUT control
Serves to adjust the level of the signal supplied at the
OUTPUT jacks.
(5) MIX control and LED
Serves to adjust the balance between original sound
(DRY) and effect sound (WET). When the control is
(14) Display
(15) TAP key and LED
(16) BYPASS key and LED
turned fully counterclockwise, only the original sound is
output. When the control is turned fully clockwise, only
the effect sound is output. If the mixing balance setting
was changed since the last store operation, the LED lights
up.
(6) CANCEL key
Serves to cancel a store operation.
(7) COMPARE key
When a patch (group of stored effect settings) is being
edited, this key can be used to compare the sound before
and after the edit.
(8) MIDI key
This key is used to make various MIDI settings.
(9) PARM CHECK key
Serves for checking effect parameter settings.
(10) STORE key
Used for storing patches in memory and other functions.
(11) Level meter
These indicators show the signal input level.
Rear Panel
(2) BYPASS jack
(1) MIDI connectors
(1) MIDI connectors
Serves for connection to the MIDI interface of a
computer or to a MIDI keyboard or similar. This allows
patch switching from external equipment or control of the
entire operation of the RFX-2000 from a computer, using
the supplied editor/librarian software.
2
ZOOM RFX-2000
(2) BYPASS jack
Serves for connection of the foot switch FS01 (option) for
switching effects on and off.
(3) DIGITAL OUT connectors
The same signal as available at the OUTPUT jacks is
carried by these connectors in S/PDIF digital format. This
can be used to supply the signal to consumer equipment
with a digital input, such as a digital multitrack recorder,
Controls and Functions
Front Panel
Controls and Functions
(17) BANK LEDs
(19) REV CHARACTER (EDIT 1) control and LED
(20) REV TIME (EDIT 2) control and LED
(22) REV EQ HIGH (EDIT 4) control and LED
(18) EFFECT TYPE selector and LED
(21) REV EQ LOW (EDIT 3) control and LED
(12) VALUE UP/DOWN keys
Serve for switching patches and changing parameter
values. Holding down one key while pressing the other
results in a fast change.
(17) BANK LEDs
These indicators show which bank is currently selected.
When the EXTRA bank (only selectable with the
supplied software) is selected, all six LEDs are lit.
(13) BANK key
Serves to select the effect bank (group of effects arranged
by general type).
(18) EFFECT TYPE selector and LED
Serves to choose an effect from the currently selected
bank. If the setting was changed since the last store
operation, the LED lights up.
(14) Display
Shows various information such as patch numbers and
parameter values.
(15) TAP key and LED
This key serves for tap input of time-based parameters
such as delay time and rate. When an effect where tap
input can be used is selected, the LED flashes with a
frequency that indicates the current setting. When an
effect where tap input cannot be used is selected, the LED
is out.
(19) REV CHARACTER (EDIT 1) control and LED
(20) REV TIME (EDIT 2) control and LED
(21) REV EQ LOW (EDIT 3) control and LED
(22) REV EQ HIGH (EDIT 4) control and LED
These controls allow the user to adjust effect parameters
to a desired value. Which parameters can be adjusted
depends on the currently selected effect. If a setting was
changed since the last store operation, the respective LED
lights up.
(16) BYPASS key and LED
Serves to set the unit to the bypass condition where only
the original sound is output. In this condition, the LED is
lit.
Rear Panel
(3) DIGITAL OUT connectors
(4) OUTPUT jacks (5) INPUT jacks
(6) POWER (AC adapter) connector
MD recorder, or DAT recorder. The optical and coaxial
output connectors can be used at the same time. The
OUTPUT control is not active in this case.
(4) OUTPUT jacks
Connect these jacks to the recorder or playback system.
(5) INPUT jacks
Connect a line-level source, such as an instrument or CD
player to these jacks. If a plug is inserted only in the
L/MONO jack, the signal from this plug will be supplied
to both channels.
(6) POWER (AC adapter) connector
The supplied AC adapter is to be connected here for
powering the unit.
ZOOM RFX-2000
3
Rack Mounting
The RFX-2000 is compatible with international 19-inch rack
standards (EIA, DIN). Because the unit has been designed for
rack installation, it is preferable to operate the unit in this
Rack Mounting/Getting Connected
• The RFX-2000 uses a metal frame, making
the unit heavier than it might seem at first
Caution
glance. While installing the unit in a rack,
carefully support the weight of the unit
until all screws are securely tightened.
Otherwise the unit may drop, possibly
causing injury to persons or damage to
itself or to other equipment.
• Do not directly stack the unit on top of
other equipment. Otherwise heat may
way, rather than simply placing it on a table or similar. Align
the four screw holes with the rack screw holes and securely
fasten the unit to the rack with screws.
lead to a fire risk or cause performance
degradation.
• Before installation, always unplug any connecting
cables and the AC adapter cable. Otherwise the
equipment or the cables may be damaged.
• Make sure that the rack in which the unit is
installed is placed on a firm, solid surface, so that
it cannot shake or topple over. Otherwise there is
a risk of injury to persons or damage to the unit
or to other equipment.
Getting Connected
This section shows how to connect the RFX-2000 to the sound source and to the playback system.
Insert Connection
Rhythm machine, synthesizer, or similar
R
L
Guitar effect
INPUT
FS01
FS01
INPUT
L/MONO
Guitar
R
OUTPUT
L R
BYPASS
FS01
Microphone
RFX-2000
MIC IN
This is an example for inserting the RFX-2000 between the
sound source such as a microphone or instrument and a
playback system or multi-track recorder (MTR). A stereo
source should be connected to the INPUT L/MONO and R
jacks. A mono source should be connected to the L/MONO
jack only.
Mixer or
amplifier/speaker
In this example, the balance between original sound and effect
sound is adjusted with the MIX control of the RFX- 2000.
When a component with an S/PDIF digital input (such as a
digital multitrack recorder, MD recorder, or DAT recorder) is
used, the connection can be made in the digital domain.
Send/Return Connection
RETURN
L
FS01
R
SEND
FS01
INPUT
L/MONO
L
OUTPUT
R
BYPASS
FS01
RFX-2000
This is an example for connecting the RFX-2000 to the
send/return jacks of a mixer or multi-track recorder. Connect
the send jack of the mixer or MTR to the INPUT L/MONO
jack of the RFX-2000, and connect the OUTPUT L/R jacks of
the RFX-2000 to the return jacks (or the stereo line input
jacks) of the mixer or MTR.
When a component with an S/PDIF digital input (such as a
digital multitrack recorder, MD recorder, or DAT recorder) is
4
ZOOM RFX-2000
Mixer or MTR
used, the connection can be made in the digital domain.
In this configuration, the MIX control of the RFX-2000 should
be set so that it outputs only the effect sound, and the balance
between original sound and effect sound should be adjusted at
the mixer or multi-track recorder. If the mixer or multi-track
recorder has a stereo send output, supplying the send signal to
the RFX-2000 in stereo is also possible.
Rack Mounting
Rack Mounting/Getting Connected
* Rack mount screws are not
supplied with the unit.
Getting Connected
Using the VOCODER Effect
MD player or sampler or similar
with recorded voice
INPUT
L/MONO
Synthesizer
R
OUTPUT
R
L
Microphone
RFX-2000
MIC IN
This is a connection example for using the VOCODER effect
from the SFX bank. Connect a dynamic microphone to the
front-panel MIC IN jack on the RFX-2000. Connect a
synthesizer or other instrument to the rear-panel INPUT
L/MONO jack. You can then use the mike to vary the
Keyboard amplifiers
envelope (volume change curve) and the sound character of
the VOCODER effect.
If nothing is connected to the MIC IN jack, the signal supplied
to the INPUT L/MONO jack is controlled by the signal
supplied to the INPUT R jack.
Controlling the RFX-2000 Effects from a Computer
Sound source
module
Computer
MIDI IN
INPUT
L
R
L
OUTPUT
R
MIDI
OUT
MIDI interface
MIDI IN
The supplied software can be used to edit the patches of the
RFX-2000, switch the patches in conjunction with other
sequencer software, and to control patch switching and make
parameter changes. To enable these functions, make
connections as shown above.
MIDI IN
MIDI OUT
RFX-2000
Playback system
Note: For information on software installation, please
refer to the separate sheet. For information on
how to use the software, please refer to the
documentation included on the CD-ROM.
ZOOM RFX-2000
5
Trying Out the Effects
This section is intended to familiarize you with the basic operation steps of the RFX-2000.
Power UP
1.
INPUT control of the RFX-2000 to adjust the
input level.
Verify that the AC adapter, sound source, and
playback system are correctly connected to
the RFX-2000.
The INPUT control and OUTPUT control of the RFX2000 as well as the volume control of the playback
system should be set to minimum.
Trying Out the Effects
2.
Turn on the system in the following order:
sound source RFX-2000 playback system.
3.
While playing the sound source, turn up the
To minimize noise and distortion, the INPUT control
should be set as high as possible without causing the
CLIP LED to light.
4.
Adjust the OUTPUT control and the volume
control of the playback equipment to obtain a
suitable playback volume.
Selecting a Patch
The memory of the RFX-2000 contains 100 stored patches. The display shows the number of the currently selected patch (01,
02,...99, 00). This condition is called the play mode.
To switch patches, proceed as described below. We suggest that you simply try out various patches to see what kind of sound the
unit can produce.
Number of the currently
selected patch
(01, 02,...99, 00)
CLIP
-6dB
-12dB
-24dB
-36dB
-48dB
PARM CHECK
1.
EDITED
Use the VALUE UP/DOWN keys to select the
number of the desired patch.
The VALUE UP key switches to higher patch numbers
and the VALUE DOWN key to lower patch numbers.
2.
While playing the instrument or producing
sound from the sound source, switch patches
to check out the resulting sound.
Bypassing the Effects
You can temporarily turn effect processing off, so that only the original sound is output. This is useful to quickly check the
change brought about by an effect.
1.
• WET MUTE
In this condition, only the effect sound is muted and the
original sound is output. The level of the original sound
output depends on the MIX control position. Therefore
there may be a drop in volume or the sound may be
entirely cut off.
To set the RFX-2000 to the bypass mode,
press the BYPASS key while the unit is in play
mode.
BYPASS
BYPASS
• DRY THRU
The original sound is output without any processing.
The setting of the MIX control has no effect on the
volume level.
The BYPASS indicator lights up.
The RFX-2000 has two different bypass states, depending
on the effect in the currently selected patch. (For
information on which effects use which bypass type,
please refer to pages 14 - 23.)
6
ZOOM RFX-2000
2.
To cancel the bypass mode and return the
RFX-2000 to the normal state, press the
BYPASS key once more.
Editing a Patch
A patch called up from memory can be edited using the front-panel controls. You can for example select different effects and
adjust effect intensity and other parameters.
If any parameter is changed from the stored condition, the new
parameter value is shown on the display for about 2 seconds,
and the EDITED mark (.) at the right edge of the display
Parameter
changed
LED lights
appears. This indicates that the current patch has been edited.
Because the LED of the control knob that was used to adjust
the value also lights, it is easy to see which parameter has been
edited.
Note:
When the effect is changed, the LEDs of all control knobs
except the MIX control light up.
EDITED mark (.) shown
EDITED
Selecting an Effect
Editing a Patch
The effect determines the type of sound processing that is performed. To select an effect, use the BANK key and EFFECT TYPE
selector.
EFFECT TYPE selector
BANK key
The BANK key serves to select the effect bank (group of
effects arranged by general type). Which banks are available
depends on the current BANK position.
• Left side BANK selected
Pressing the BANK key cycles through the following banks:
REVERB DELAY EFFECTS REVERB etc.
This selector serves to choose the effect. As shown below,
effects can be chosen from two banks, depending on the
setting currently selected with the BANK key.
REVERB or SFX bank selected
Bank switching
REVERB
DELAY
EFFECTS
BANK
DELAY or RE-MIX bank selected
BANK key
• Right side BANK selected
Pressing the BANK key cycles through the following banks:
SFX RE-MIX MIXDOWN SFX etc.
Bank switching
SFX
RE-MIX
EFFECTS or MIXDOWN bank selected
MIXDOWN
BANK key
• When a changed bank is returned to the original setting,
the respective BANK LED flashes for 1 second.
Note:
For patches where the EXTRA bank is selected, all six
BANK LEDs light up.
• When the EFFECT TYPE selector is moved, the display
shows the effect number (1 - 8 in the normal banks) for
about 2 seconds.
• When the effect number is changed from the last stored
condition, the LED of the EFFECT TYPE selector lights
up. When the setting is returned to the original effect, the
LED goes out.
• When calling up a patch, the LED of the bank where the
patch is stored lights up.
ZOOM RFX-2000
7
Changing the Value of an Effect Parameter
Each effect of the RFX-2000 consists of certain effect parameters which determine the intensity and tone character of the effect.
Effect parameters can be adjusted with the following edit controls.
MIX control
The MIX control serves to adjust the balance between original
sound (DRY) and effect sound (WET). When the control is
turned fully counterclockwise, only the original sound is
output. When the control is turned fully clockwise, only the
effect sound is output.
Lights up when mixing
balance was changed
Original sound only
REV CHARACTER (EDIT 1) control
REV TIME (EDIT 2) control
REV EQ LOW (EDIT 3) control
REV EQ HIGH (EDIT 4) control
These controls serve to edit parameters of the currently
selected effect. (For information on which parameters can be
edited for which effect, please refer to pages 14 - 23.)
Lights up when parameter was edited
Effect sound only
Editing a Patch /Useful Functions
• When the MIX control is moved, the mixing balance
setting (0 - 99) is shown on the display for about 2
seconds.
• When the mixing balance setting is changed from the
last stored condition, the LED of the MIX control lights
up. When the setting is returned to the original value, the
LED goes out.
• When any of the above controls is moved, the
corresponding parameter value is shown for 2 seconds
on the display.
• When a parameter setting is changed from the last stored
condition, the LED of the respective control lights up.
When the setting is returned to the original value, the LED
goes out. When the effect is switched, the LEDs of all
controls except the MIX control light up.
Storing an Edited Patch
If an edited patch is not stored in memory, the edited contents will be lost when another patch is selected. When wishing to keep
the edited patch, store it in memory as follows.
1.
2.
Select the patch and edit it.
the patch.
Press the STORE key.
When wishing to use the same patch number, this step is
not necessary.
The patch number on the display flashes.
STORE
4.
The patch is stored in memory and the flashing of the
display stops.
If you press the CANCEL key instead of the STORE key,
the operation is aborted and the unit reverts to the
condition of step 1.
STORE key
3.
Press the STORE key once more to execute
the store operation.
Use the VALUE UP/DOWN keys to select the
patch number in which you want to store
Useful Functions
The RFX-2000 offers various handy functions for editing patches.
Checking the parameter value (parameter check)
You can also check a parameter value without moving its associated front-panel control.
1.
Press the PARM CHECK key.
Effect number
LED flashes
The PARM CHECK mark (.) in the center of the display
appears and the EFFECT TYPE selector LED flashes for
about 2 seconds.
PARM CHECK
PARM CHECK mark (.)
This indicates that the effect setting is being checked. The
number of the currently selected effect (1 - 8) is shown
for about 2 seconds on the display. The display then
reverts to the original condition.
8
ZOOM RFX-2000
PARM CHECK key
2.
To check another parameter, press the PARM
CHECK key again before the display
indication reverts to the previous condition.
With each push of the PARM CHECK key, the parameter
to be checked is advanced successively.
REV CHARACTER
Parameter adjusted with REV CHARACTER (EDIT 1)
control
PARM CHECK
REV TIME
Parameter adjusted with REV TIME (EDIT 2) control
PARM CHECK
Useful Functions
REV EQ LOW
Parameter adjusted with REV EQ LOW (EDIT 3) control
PARM CHECK
Comparing the Sound Before and After Edit (Compare Function)
This function allows you to compare the currently edited sound to the sound before editing.
1.
Press the COMPARE key.
The currently edited patch is temporarily returned to the
condition before editing. The indication "CP" and the
patch number flash alternately on the display, and the
"EDITED" mark is out.
COMPARE key
COMPARE
Shown
alternately
2.
To return to editing, press the COMPARE key
once more (or press the CANCEL key).
• If desired, you can check the original value of each
parameter by pressing the PARM CHECK key while the
unit is in the compare mode.
• Moving any of the controls in compare mode has no
effect.
Setting Parameters With the Tap Key (Tap Input)
The RFX-2000 allows input of time-based parameters by tapping the TAP key at the desired intervals. For example, the flanger
modulation speed or delay time can be easily matched to the tempo of a song in this way.
1.
Select a patch for which tap input is possible.
Whether tap input is possible or not depends on the effect
selected for that patch (see pages 14 - 23). When a patch
for which tap input is possible is selected, the TAP LED
flashes.
TAP
2.
3.
The parameter changed by tap input will revert to the
original setting when the patch is switched. If wishing to
retain the change, you should therefore store the patch.
• The parameter which can be set by tap input is preset
(see pages 14 - 23).
• The maximum interval that can be measured by the tap
input function is 2 seconds.
Hit the TAP key several times in the desired
interval.
• If the tap input interval is outside the setting range for
that parameter, it will be corrected to an acceptable
value.
The delay time or rate is set according to the tap interval
and the tap beat parameter set for the respective patch
(see page 12).
• If a parameter was set by tap input and is then changed
by moving the control knob for that parameter, the
control knob setting will override the tap input.
If desired, store the patch.
ZOOM RFX-2000
9
Using the MIDI Control Function
The RFX-2000 can accept commands via a MIDI link for patch switching, parameter control, and transfer of memory contents to
an external MIDI device. This section describes the general steps for using MIDI based functions.
Setting the MIDI Channel
Set the MIDI channel for communication with the RFX-2000 as follows.
1.
function is disabled.
In play mode, press the MIDI key once.
The indication "CH" and the currently selected MIDI
channel are shown alternately on the display.
MIDI
Press once
Shown
alternately
3.
MIDI key
2.
Press the CANCEL key to return to the play
mode.
CANCEL
Use the VALUE UP/DOWN keys to select a
MIDI channel between 1 and 16. When the
display shows "--", the MIDI send/receive
CANCEL key
Selecting Patches Via MIDI
To switch the patch of the RFX-2000, a program change message must be sent from a MIDI keyboard or sequencer or similar
device to the RFX-2000.
1.
Using the MIDI Control Function
Connect the MIDI OUT connector of the
external MIDI device to the MIDI IN connector
on the RFX-2000.
RFX-2000
Program
patch number change number
The MIDI channel setting at the RFX-2000 must match
the MIDI send channel setting at the external device.
2.
Send a program change message from the
external MIDI device to the RFX-2000.
In the factory default condition, the RFX-2000 patch
numbers correspond to the following program change
numbers.
01
02
0
1
99
0.0
98
99
0.0
127
• When the patch is switched at the RFX-2000, a
corresponding program change message appears at the
MIDI OUT connector.
Storing Program Change Numbers in the Learn Table
Sometimes it may be desirable to assign specific program change numbers to the patch numbers of the RFX-2000. (For example
to call up patch number 1 of the RFX-2000 when the tone associated with program change 100 of a synthesizer is selected.) In
such a case, you can use the so-called learn table in the memory of the RFX-2000 to change the program change number assigned
to the patch number.
1.
In play mode, select the patch to which you
want to assign a program change number and
press the MIDI key two times.
3.
It is also possible to assign multiple program change
numbers to the same patch number.
The indication "PC" and the indication "--" are shown
alternately on the display.
Press twice
MIDI
Shown
alternately
MIDI key
2.
Send a program change message from the
MIDI device connected to the MIDI IN
connector of the RFX-2000.
When wishing to assign a separate program
change number to this patch, repeat step 2.
4.
When the setting is complete, press the
CANCEL key to return to the play mode.
CANCEL
CANCEL key
If necessary, repeat steps 1 - 4 for other patch numbers
and program change numbers.
• The program change numbers 100 - 127 are shown on
the display as "0.0" - "2.7".
The display indication "--" changes to the received
program change number. This program change number is
now assigned to the currently selected patch.
10
ZOOM RFX-2000
• The changed learn table information is retained also
when the unit is turned off. (For information on how to
return the learn table to the factory default setting, see
page 13.)
Changing Effect Parameters Via MIDI
The effect parameters of the RFX-2000 can be changed using MIDI control change messages sent from an external MIDI device
(MIDI keyboard or sequencer or similar). This is useful to change parameters from a separate location.
1.
Connect the MIDI OUT connector of the
external MIDI device to the MIDI IN connector
on the RFX-2000.
(For information on setting the MIDI channel, see page 10.)
2.
The MIDI channel setting at the RFX-2000 must match
the MIDI send channel setting at the external device.
Effect parameter
EFFECT TYPE
REV CHARACTER(EDIT1)
REV TIME(EDIT2)
REV EQ LOW(EDIT3)
REV EQ HIGH(EDIT4)
MIX
BYPASS
TAP
Control change
number
86
84
85
87
88
8
Send a control change message from the
external MIDI device to the RFX-2000.
The effect parameters of the RFX-2000 correspond to the
following control change numbers.
Acceptable
receive value
Acceptable
send value
80, 91
0 - 47
0 - 10
0 - 127
0 - 127
0 - 127
0 - 127
0 - 63 = bypass off
64 - 127 = bypass on
80
64
64 - 127
• When a key or control on the front panel is operated, the
above control change message is sent.
0 - 47
0 - 10
0 - 127
0 - 127
0 - 127
0 - 127
0 = bypass off / 127 = bypass on
Output 127 followed immediately by 0
• Changing a parameter with a control change message has
the same effect as editing the parameter with the frontpanel controls. If required, save the changed patch.
Storing Panel Operations on a Sequencer
Using the MIDI Control Function
Operation functions of the front-panel controls of the RFX-2000 can be stored as control change messages on a MIDI sequencer
for later playback. This is convenient for example to play a sound source module on the sequencer and simultaneously adjust the
RFX-2000 in real time.
1.
Connect the MIDI OUT connector of the
external MIDI device to the MIDI IN connector
on the RFX-2000, and connect the MIDI OUT
connector on the RFX-2000 to the MIDI IN
connector of the external MIDI device.
• The MIDI channel setting at the RFX-2000 must match
the MIDI send channel for the sequencer track on which
the operation should be recorded. (For information on
setting the MIDI channel, see page 10.)
the start of the sequencer track which calls the patch to
be used as operation start point.
2.
3.
Start the MIDI sequencer and start recording.
Operate the control knobs on the front-panel
of the RFX-2000.
The control knob operation is recorded as control change
information on the MIDI sequencer track.
4.
• Verify that MIDI echo (MIDI thru) at the sequencer is set
to OFF.
Stop recording at the MIDI sequencer and
play back the track from the beginning.
Parameters will change according to the operations
carried out in step 3.
• It will be useful to record a program change message at
Tap Input Using the MIDI Clock
Instead of using the TAP key, it is also possible to use an external MIDI device (such as a MIDI sequencer or rhythm machine) to
supply a MIDI clock for setting the delay time or rate that matches the clock tempo.
1.
• When wishing to perform tempo input with the TAP key,
set MIDI clock receive = OFF.
2.
Press
4 times
In play mode, press the MIDI key four times.
The indication "CL" and the indication "on" (MIDI clock
receive ON) or "oF" (MIDI clock receive OFF) are
MIDI
Shown
alternately
MIDI key
4.
Select a patch at the RFX-2000 for which tap
input can be used.
• For information on which parameters allow tap input,
please refer to pages 14 - 23.)
3.
shown alternately on the display.
Connect the MIDI OUT connector of the
external MIDI device to the MIDI IN connector
on the RFX-2000.
Use the VALUE UP/DOWN keys to set the
setting to "on".
Tap input via the MIDI clock is now possible. This
setting applies to all patches.
5.
Press the CANCEL key to return to the play
mode.
You can now use the MIDI clock tap input feature. This
setting applies to all patches.
ZOOM RFX-2000
11
6.
Supply the MIDI clock from the external MIDI
device.
The delay time or rate is set according to the tempo of the
supplied MIDI clock and the tap beat parameter set for
the respective patch see below).
7.
If desired, store the patch.
The parameter changed by MIDI clock tap input will
revert to the original setting when the patch is switched.
If wishing to retain the change, you should therefore store
the patch.
• When the patch was stored and the same patch is then
called up again, it suffices to supply the MIDI clock to
automatically adjust delay time or rate according to the
clock tempo.
• If a parameter was set by MIDI clock tap input and is
then changed by moving the control knob for that
parameter, the control knob setting will override the MIDI
clock tap input.
• The RFX-2000 counts 24 MIDI clock pulses as one
interval, using 1-ms units. The maximum interval that can
be measured is 2 seconds.
Tap Beat Setting
The tap beat is a parameter that determines the length of the reference beat used for setting the delay time or rate when using the
tap input feature. For example, if the tap beat is set to "4" (quarter note), the length of one beat of the MIDI clock (24 clock
signals) or the interval in which the TAP key is hit will be taken as the delay time or rate. When the tap beat setting is "8" (eighth
note), the setting will be one half.
1.
In play mode, select a patch for which tap
input is possible.
oF
• The tap beat setting is made individually for each patch.
32
16
t8
16.
8
t4
8.
2.
Press the MIDI key five times.
The indication "bt" and the number showing the tap beat
note length setting are shown alternately on the display.
Using the MIDI Control Function
Press
5 times
4.
Shown
alternately
MIDI
Press the CANCEL key.
The RFX-2000 returns to the play mode. When wishing
to store the tap beat setting for the patch, perform the
store operation.
MIDI key
3.
For this patch, MIDI clock input is not used. The interval in which
the TAP key is hit is taken directly as delay time or rate
parameter.
Thirty-second note
4
Quarter note
Sixteenth note
4.
Dotted quarter note
Eighth triplet note
2
Half note
Dotted sixteenth note
01
Whole note
Eighth note
02
Two whole notes
Quarter triplet note
04
Four whole notes
Dotted eighth note
Use the VALUE UP/DOWN keys to set the note
length.
NOTE:
The tap beat setting will take effect the next time tap input is
performed or the tempo is set by MIDI clock input.
Data Transfer (Send)
The patch information and learn table information stored internally in the RFX-2000 can be output via the MIDI link. This can be
used for example to exchange settings between two RFX-2000 units, or to store the data on a MIDI sequencer. The data can then
be reloaded into the RFX-2000 whenever required.
1.
When using two RFX-2000 units, connect the
MIDI OUT connector on the first RFX-2000 to
the MIDI IN connector of the second RFX2000, and connect the MIDI OUT connector on
the second RFX-2000 to the MIDI IN
connector on the first RFX-2000. The MIDI
channel must be set to a matching setting.
MIDI IN
the MIDI IN connector of the MIDI sequencer.
2.
The indication "dt" and the indication "AL" are shown
alternately on the display.
3.
RFX-2000
MIDI OUT
4.
RFX-2000
Connection example for two RFX-2000 units
When using a MIDI sequencer or other MIDI device,
connect the MIDI OUT connector on the RFX-2000 to
12
ZOOM RFX-2000
Use the VALUE UP/DOWN keys to select the
type of data to be sent.
• AL
All patch data in memory and learn table
• Current patch number
Current patch data only (if editing, data currently being
edited)
MIDI OUT
MIDI IN
Press the MIDI key of the sending RFX-2000
three times.
To execute the data transfer, press the STORE
key.
The sending RFX-2000 starts to transmit the data. (The
data are received automatically by the receiving RFX2000. No special steps are necessary.) During the
transfer, the indication "dt" flashes on the display of the
sending RFX- 2000 and the indication "dr" on the display
of the receiving RFX-2000.
When the transfer is completed, the units automatically
revert to play mode.
• When "AL" was selected for sending
All patch data and learn table data in the memory of the
receiving RFX-2000 are overwritten.
• When "current patch number" was selected
for sending
The currently edited patch data are overwritten.
Perform store as necessary.
5.
To record data on an external MIDI sequencer
or other MIDI device, set the device to the
recording mode and press the STORE key.
When the transfer is complete, stop recording at the
external MIDI device and perform any necessary steps
for storing the data on the device.
• When wishing to abort the data send process, press the
CANCEL key instead of the STORE key in step 4.
Note:
The RFX-2000 sends several system exclusive data in
succession. If a MIDI data recorder is used which stops
recording after receiving one set of system exclusive
data, the data of the RFX-2000 may not be stored
correctly.
Data Transfer (Receive)
This section describes how to load patch data and learn table data stored on an external MIDI device back into the RFX-2000.
1.
Connect the MIDI OUT connector of the
external MIDI device (sequencer etc.) to the
MIDI IN connector on the RFX-2000.
2.
Perform playback at the external MIDI device.
• Playback at the external MIDI device must be performed
at the same tempo as recording. If the tempo is faster,
the RFX-2000 may not receive the data properly.
3.
Using the MIDI Control Function/Returning the RFX-2000 to the Factory Default Settings
• When "AL" was selected for sending
All patch data and learn table data in the memory of the
receiving RFX-2000 are overwritten. The indication
"dr" flashes on the display while data are being
received.
• When "current patch number" was selected
for sending
The currently edited patch data are overwritten.
Perform store as necessary.
• When sending data to or loading data from an external
MIDI device, the RFX-2000 and the device must be set
to the same MIDI channel. Otherwise data will be
disregarded by the RFX-2000 also if playback is
performed on the external MIDI device.
After data have been loaded into the RFX2000, stop playback at the external MIDI
device.
Returning the RFX-2000 to the Factory Default Settings
You can return the entire RFX-2000 or individual patches to the factory default condition.(Recall) This is useful if an original
patch was overwritten by mistake or when wishing to return the entire unit to the original state.
Note:
When the recall function is carried out, data stored in memory by the user will be lost. Make sure that these data are no
longer needed before carrying out this function.
1.
• 01 - 99, 00
Only the selected patch data are returned to the factory
default condition.
• PC
Only the learn table is initialized (returned to the
factory default condition).
Turn on the power to the RFX-2000 while
keeping the STORE key depressed.
The indication "FA" is shown while the STORE key is
held down.
POWER
STORE
STORE
3.
POWER switch STORE key
STORE key release
When you release the STORE key, "AL" flashes on the display.
2.
Use the VALUE UP/DOWN keys to select the
recall contents.
• AL
Return all patch data and the learn table to the factory
default condition.
To carry out the recall operation, press the
STORE key once more.
• When AL or PC was selected in step 2
Recall is carried out and the unit reverts to the play
mode.
• When a specific patch number was selected in
step 2
The unit stays in the recall mode, and recall is carried
out subsequently for any specified patch numbers.
To stop the recall operation, press the CANCEL key.
ZOOM RFX-2000
13
RFX-2000 Effects
This section lists all the effects and parameters available in the RFX-2000. For effects from the EXTRA bank (which can be
called up only from a computer), only the parameters that can be adjusted with the front-panel controls of the RFX-2000 are
described.
Effects suitable for a send/return connection (p. 4) are marked with this symbol.
Effects for which tap input (p. 9) can be used are marked with this symbol.
The parameter that can be set by tap input is marked with a "TAP" indication besides the name.
BYPASS indicates the operation of the unit in bypass mode (p. 6). This can be either WET MUTE (effect
sound only is muted) or DRY THRU (original sound is passed through unprocessed).
REVERB Bank
This bank contains only reverb effects. The parameters REV CHARACTER, REV TIME, REV EQ LOW, and REV EQ HIGH
adjusted with the respective controls are common to all of these effects. For each effect, there are 11 character settings selected
with the REV CHARACTER control, producing a different tone and style.
1 HALL
These effects simulate the reverb in various types of medium to large size buildings.
2 ROOM
3 PLATE
These effects simulate the reverb in various types of interior spaces, ranging from
small rooms to large clubs.
These effects simulate the so-called "plate reverb" sound (as produced by a pickup
mounted to a large, free-hanging iron plate).
4 VOCAL
Reverb effects best suited for vocals and narration.
5 AMBIENCE
These effects lend a natural sounding ambience to the sound source which is suitable
S/R
not only for single instruments but also for stereo music sources.
RFX-2000 Effects
6 PERCUSS
7 ENSEMBLE
These effects are best for ensemble sections such as strings or brass.
8 POWER
These effects add a feeling of power and energy to sound sources.
Control knob
REV CHARACTER
REV TIME
REV EQ LOW
REV EQ HIGH
Parameter
Character
Reverb Time
EQ Low
EQ High
Adjusts EQ Low
boost/cut.
Adjusts EQ High
boost/cut.
-12 - +12
-12 - +12
Adjusts the reverb
time.
1 - 11
Setting range
1 - 30
S/R
S/R
S/R
(PERCUSSION) These reverb effects are most suitable for drums and percussion.
Description Selects the reverb
character (see table).
S/R
S/R
S/R
S/R
TAP
BYPASS
WET
MUTE
Reverb Character Table
1. HALL
2. ROOM
1 Large Hall ••••••••••••• Simulates a large concert hall.
2 Bright Hall •••••••••••• Simulates a medium-size hall with
1 Tile Chamber ••••••• Simulates the acoustics of a tiled room.
2 Warm Room •••••••• Simulates the acoustics of a room with
warm sound character.
strong, bright reverb.
3 Recital Hall •••••••••• Simulates a small hall.
4 Municipal ••••••••••••• Simulates a fairly large municipal style
5 Wood Hall
••••••••••••
6 Cathedral ••••••••••••
7 Medconcert •••••••••
8 Strings Hall ••••••••••
9 Castle Hall •••••••••••
10 Small Hall ••••••••••••
11 Gymnasium
•••••••••
hall.
Simulates a medium-size hall with
predominantly wooden interior.
Simulates a large cathedral.
Simulates a medium-size concert hall.
Simulates a concert hall designed for
classical music.
Simulates a medieval castle.
Simulates a small hall with warm sound
character.
Simulates a gymnasium.
3 Big Wooden ••••••••• Simulates the acoustics of a fairly large
room made of wood.
4 Meeting Room ••••• Simulates the acoustics of a conference
room.
5 Large Club ••••••••••• Simulates the acoustics of a large club
with strong reverb.
6 GtrSpace ••••••••••••• Reverb with a pronounced midrange.
7 Strings Room •••••• Reverb emphasizing the low range and
midrange.
8 Small Chamber •••• Reverb which makes the spoken voice
stand out clearly.
9 Glass Room ••••••••• Reverb with lean low end.
10 Rehearsal Space•••• Simulates a rehearsal room with strong
11 Garage
14
ZOOM RFX-2000
••••••••••••••••
reverb.
Simulates the reverb character of a
garage.
3. PLATE
6. PERCUSSION
1 Large Plate
••••••••••
2 Bright Plate
•••••••••
3 Dark Plate •••••••••••
4 Clear Plate •••••••••••
5 Short Plate ••••••••••
6 Slap Plate ••••••••••••
7 Lo-Pass Plate ••••••
8 Hi-Pass Plate •••••••
9 Rich Plate ••••••••••••
10 Endless Plate ••••••
11 Tunnel •••••••••••••••••
Simulates the reverb produced by a large
plate.
Bright plate reverb suitable for
percussion.
Plate reverb with a feeling of depth.
Transparent plate reverb suitable for
vocals.
Plate reverb with short reverb time.
Reverb with a long pre-delay.
Plate reverb acting on the low
frequencies.
Plate reverb acting on the high
frequencies.
Dense, rich-sounding plate reverb.
Smooth plate reverb with long duration.
Simulates the reverb as heard in a tunnel.
1
2
3
4
5
6 Reggae Drums
••••
7 Rock Kit/2
•••••••••••
8 MalletPerc
•••••••••••
9 Slap
•••••••••••••••••••••
10 Afro Drums ••••••••••
11 Bells ••••••••••••••••••••
4. VOCAL
Reverb suitable for rock drum.
Light ambience for percussion.
Reverb for jazz drums.
Slightly deep effect for tom-toms.
Creates optimum ambience for shakers
and similar percussion instruments.
Midrange-centered effect for reggae
drums.
Allows adding reverb to snares or
cymbals without affecting the low range.
Mallet type percussion can be enhanced
with this effect.
Reverb with short pre-delay,
emphasizing the low frequencies.
Reverb suitable for Afro type drums.
High range effect suitable for bells.
7. ENSEMBLE
1 Female Rock ••••••• Reverb suitable for female rock singers.
2 Male Ballad ••••••••• Reverb suitable for ballads sung by male
vocalists.
3 Chorus •••••••••••••••• Reverb suitable for chorus music.
4 Female Folk ••••••••• Natural sounding reverb great for female
5 Hi Male Rock
6 Narration
Rock Kit/1 •••••••••••
LatinPerc •••••••••••••
Jazz Drums •••••••••
Tom •••••••••••••••••••••
Shaker •••••••••••••••••
•••••••
•••••••••••••
9 Enhancer •••••••••••••
10 LushVerb •••••••••••••
11 EchoVerb •••••••••••••
4
5
6
7
Winds ••••••••••••••••••
Synth/1 ••••••••••••••••
Solo Strings •••••••••
Jazz Organ ••••••••••
8 Chorus ••••••••••••••••
9 Solo Winds ••••••••••
10 Church Organ ••••••
11 Synth/2
••••••••••••••••
solos.
Reverb suitable for woodwinds.
Reverb suitable for synthesizer.
Reverb suitable for solo strings.
Light reverb for highlighting organ
sound.
Wide reverb for chorus groups.
Subdued reverb great for wind
instrument solos.
Reverb for adding a spacious feeling to
organ music.
Great reverb sound for synthesizer.
RFX-2000 Effects
7 Chanting ••••••••••••••
8 Slapback •••••••••••••
vocals.
Reverb suitable for fairly high-pitched
male vocals.
Reverb suitable for emphasizing
narration.
Reverb suitable for chanting.
Emphasizes vocals without changing
other characteristics.
Reverb with emphasized high end.
Wide simulated space suitable for vocals.
Reverb with long pre-delay.
1 Strings ••••••••••••••••• Reverb suitable for strings.
2 Brass ••••••••••••••••••• Reverb suitable for brass ensembles.
3 Piano ••••••••••••••••••• Warm, extended reverb great for piano
8. POWER
5. AMBIENCE
1 Rock Mix ••••••••••••• Reverb for rock type music sources.
2 Jazz Band •••••••••••• Reverb for jazz band type music sources.
3 Reggae Mix ••••••••• Reverb with a strong wet feeling, for
4 Keyboard •••••••••••••
5 Hip Hop •••••••••••••••
6 Film Score •••••••••••
7 Electronic Mix •••••
8 New Age ••••••••••••••
9 Strings Quartet
10 Choral Mix
••••
•••••••••••
11 Percussion Mix ••••
reggae and related genres.
Great ambience for keyboard playing.
Ambience for rap and hip hop type
music.
Ambience for film music.
Spatial effect suitable for synthesizer.
Ambience suitable for MIDI sound
sources.
Warm, midrange centered ambience for
strings.
Rich ambience for chorus and vocal
ensembles.
Ambience suitable for percussion
ensembles.
1 Kick/1
2 Kick/2
••••••••••••••••••
••••••••••••••••••
3 Snare/1 ••••••••••••••••
4 Snare/2 ••••••••••••••••
5 Toms/1 •••••••••••••••••
6 Toms/2 •••••••••••••••••
7 Hand Perc ••••••••••••
8 DistGtr/1•••••••••••••••
9 DistGtr/2•••••••••••••••
10 Vocal/1 •••••••••••••••••
11 Vocal/2 •••••••••••••••••
Stresses the body impact of bass drums.
Increases the perceived size of the bass
drum image.
Stresses the body sound of snare drums.
Adds a bright reverb sound to snare
drums.
Suitable for low toms and floor-standing
toms.
Emphasizes the midrange sound of tomtoms.
Suitable for hand percussion.
Suitable for distortion guitar sound with
strong box character.
Suitable for distortion guitar sound with
bright character.
Increases the power impact of vocals.
Suitable for ballad type vocals.
ZOOM RFX-2000
15
DELAY bank
Contains single delay effects and combined effects that allow use of delay and another effect. The combined effects marked
with a "+" are made up of two effects connected in series. The combined effects marked with a "/" use two effects in parallel in
the left and right channel.
1 ST DLY
(STEREO DELAY) Stereo delay with a delay time of max. 1486 ms.
Control knob
EDIT 1
EDIT 2
Parameter
High Damp
Time[x 100] [TAP]
Description Adjusts the amount of
treble attenuation in
the high range.
Setting range
1 - 11
2 MN DLY
EDIT 3
Adjusts the delay time
in 100-ms units.
0 - 14
Adjusts the delay time
in 1-ms units.
Feedback
Adjusts the amount of
feedback. Negative
values result in crossfeedback.
TAP
TAP
ON
EDIT 1
EDIT 2
High Damp
Time[x 100] [TAP]
EDIT 3
Description Adjusts the amount of Adjusts the delay time
treble attenuation in the in 100-ms units
high range.
1 - 11
0 - 29
Setting range
Time[x 1]
EDIT 1
Parameter
Depth
Description Adjusts the panning
depth.
RFX-2000 Effects
1 - 11
Setting range
EDIT 2
Rate
[TAP]
Adjusts the panning
cycle.
1 - 50
EDIT 4
[TAP]
Adjusts the delay time
in 1-ms units.
Feedback
Adjusts the amount of
feedback.
TAP
TAP
ON
0 - 99
EDIT 3
EDIT 4
Feedback
Adjusts the amount of
feedback.
TAP
TAP
ON
Control knob
EDIT 1
EDIT 2
EDIT 3
EDIT 4
Beat
BPM[x 10] [TAP]
BPM[x 1] [TAP]
Feedback
Adjusts the BPM value
in 10-beat steps
(setting range: 41 250).
Adjusts the BPM value
in 1-beat steps.
4 - 25
0-9
1 - 11
BYPASS
WET
MUTE
0 - 30
Parameter
Setting range
WET
MUTE
S/R
Time[x 10]
Adjusts the delay time
in 10-ms units (max.
990 ms).
1 - 99
BYPASS
0 - 30
(RHYTHMIC DELAY ) This is a mono delay for which the delay time can be set in BPM
and notes. If MIDI clock receive is set to "on", this effect always receives the MIDI
clock.
Description Selects the note
corresponding to the
delay time (see below).
WET
MUTE
S/R
(AUTO PANNING DELAY ) Monaural delay with auto-panning.
Control knob
BYPASS
-15 - 15
(MONO DELAY ) Monaural delay with a delay time of max. 2972 ms.
Control knob
4 RHYTHM
EDIT 4
[TAP]
0 - 99
Parameter
3 PAN DLY
Time[x 1]
S/R
Adjusts the amount of
feedback.
TAP
TAP
ON
S/R
BYPASS
WET
MUTE
0 - 30
Beat
1: Thirty-second note
6: Eighth note
5 CHO+DLY
2: Sixteenth triplet note 3: Sixteenth note
4:Eighth triplet note 5: Dotted sixteenth note
7: Quarter triplet note 8: Dotted eighth note 9:Quarter note
10:Dotted quarter note 11:Half note
This is an in-series combination of chorus and delay.
Control knob
EDIT 1
EDIT 2
EDIT 3
EDIT 4
Parameter
Chorus Mix
Chorus Depth
Delay Time[x 10]
Delay Feedback
Adjusts the delay time
in 10-ms units
(75:743ms).
Adjusts the amount of
delay feedback.
Description Adjusts the chorus mix
ratio.
1 - 11
Setting range
6 DLY+FLG
Control knob
Parameter
Setting range
Adjusts the chorus
modulation depth.
1 - 30
1 - 75
TAP
EDIT 1
EDIT 2
Flanger Feedback Flanger Rate
1 - 11
ZOOM RFX-2000
[TAP]
Adjusts the flanger
fluctuation cycle.
1 - 50
0 - 30
S/R
EDIT 3
EDIT 4
Delay Time[x 10]
Delay Feedback
Adjusts the delay time
in 10-ms units
(75:743ms).
Adjusts the amount of
delay feedback.
1 - 75
BYPASS
WET
MUTE
This is an in-series combination of delay and flanger.
Description Adjusts the amount of
flanger feedback.
16
S/R
0 - 30
TAP
TAP
ON
BYPASS
WET
MUTE
7 DLY+REV
This is an in-series combination of delay and reverb.
S/R
Control knob
EDIT 1
EDIT 2
EDIT 3
EDIT 4
Parameter
Reverb Mix
Reverb Time
Delay Time[x 10]
Delay Feedback
Adjusts the delay time
in 10-ms units
(75:743ms).
Adjusts the amount of
delay feedback.
Description Adjusts the reverb mix
ratio.
Setting range
8 DLY/REV
1 - 11
Adjusts the reverb
duration.
1 - 30
1 - 75
0 - 30
Control knob
EDIT 1
EDIT 2
EDIT 3
EDIT 4
Reverb Mix
Reverb Time
Delay Time[x 10]
Delay Feedback
Adjusts the delay time
in 10-ms units
(75:743ms).
Adjusts the amount of
delay feedback.
Description Adjusts the reverb mix
ratio.
1 - 11
Adjusts the reverb
duration.
1 - 30
1 - 75
BYPASS
WET
MUTE
This is a parallel combination of delay and reverb. The left channel carries the delay
effect and the right channel the reverb effect.
Parameter
Setting range
TAP
TAP
S/R
BYPASS
WET
MUTE
0 - 30
EFFECTS Bank
Contains single modulation effects and combined effects that allow simultaneous use of two effects. The combined effects
marked with a "+" are made up of two effects connected in series. The combined effects marked with a "/" use two effects in
parallel in the left and right channel.
1 PITCH
Stereo pitch shifter which adds a pitch-shifted component to the original sound.
S/R
Control knob
EDIT 1
EDIT 2
EDIT 3
EDIT 4
Parameter
Tone
Pitch
Fine
Shift
Description Adjusts the tone.
2 CHORUS
1 - 11
Performs fine
adjustment of pitch.
0 - 24
-10 - +10
Adjusts the direction of
pitch shift (up or down).
dn, UP
S/R
Control knob
EDIT 1
EDIT 2
EDIT 3
EDIT 4
Parameter
Tone
Depth
Rate
Pre Delay
Setting range
3 FLANGER
1 - 11
Adjusts the depth of
the effect.
1 - 30
Adjusts the modulation
cycle.
1 - 50
Stereo flanger with a wide range.
S/R
EDIT 1
EDIT 2
EDIT 3
EDIT 4
Feedback
Depth
Rate [TAP]
Manual
Adjusts the modulation
cycle.
Adjusts the filter effect
bandwidth.
Description Adjusts the amount of
feedback.
1 - 11
Adjusts the depth of
the effect.
0 - 30
1 - 50
1 - 30
TAP
ON
EDIT 1
EDIT 2
EDIT 3
EDIT 4
Parameter
Stage
Depth
Rate [TAP]
Feedback
1 - 11
1 - 30
BYPASS
WET
MUTE
S/R
Control knob
Setting range
TAP
Phaser with pronounced fluctuation.
Description Selects the number of
Adjusts the depth of
phaser stages and the the effect.
phase.
1 - 5: 4, 6, 8, 10 (normal
phase) 6 - 11: 4, 6, 8, 10,
12, 16 (opposite phase)
BYPASS
WET
MUTE
1 - 30
Parameter
4 PHASER
TAP
Adjusts the predelay
time.
Control knob
Setting range
WET
MUTE
A stereo chorus with three voices per channel.
Description Adjusts the tone.
BYPASS
RFX-2000 Effects
Setting range
Adjusts the pitch shift
amount in semitones.
TAP
Adjusts the modulation
cycle.
Adjusts the amount of
feedback.
TAP
TAP
ON
1 - 50
BYPASS
WET
MUTE
0 - 30
ZOOM RFX-2000
17
5 TRM-PAN
Effect ranging from tremolo to auto-panpot.
Control knob
EDIT 1
EDIT 2
EDIT 3
EDIT 4
Parameter
Width
Depth
Rate [TAP]
Clip
Adjusts the autoDescription Turning the control
counterclockwise gives panning depth.
tremolo. Turning it
clockwise gives autopanning with a wider
spread.
1 - 11
Setting range
6 CHO+REV
1 - 10
Adjusts the modulation
cycle.
1 - 50
Adjusts the LFO
waveform clip pattern
that controls the
modulation.
TAP
BYPASS
WET
MUTE
TAP
ON
0 - 10
This is an in-series combination of chorus and reverb.
S/R
Control knob
EDIT 1
EDIT 2
EDIT 3
EDIT 4
Parameter
Reverb Mix
Reverb Time
Chorus Depth
Chorus Mix
Description Adjusts the reverb mix
ratio.
1 - 11
Setting range
7 FLG+REV
Adjusts the reverb
duration.
1 - 30
Adjusts the chorus
depth.
1 - 30
TAP
BYPASS
Adjusts the chorus mix
ratio.
WET
MUTE
0 - 99
This is an in-series combination of flanger and reverb.
S/R
Parameters are the same as for "8 FLG/REV".
This is a parallel combination of flanger and reverb. The left channel carries the flanger effect and
the right channel the reverb effect.
8 FLG/REV
Control knob
EDIT 1
EDIT 2
Parameter
Reverb Mix
Reverb Time
Description Adjusts the reverb mix
ratio.
Adjusts the reverb
duration.
EDIT 3
EDIT 4
Flanger Rate [TAP] Flanger Feedback
Adjusts the flanger
fluctuation cycle.
Adjusts the flanger
feedback.
TAP
S/R
BYPASS
TAP
WET
MUTE
ON
1 - 11
Setting range
1 - 30
1 - 50
0 - 30
RFX-2000 Effects
SFX Bank
This bank contains special effects such as a Vocoder and ring modulator.
This effect lets you use a mike connected to the MIC IN jack to control the signal from a synthesizer
supplied to the INPUT L jack.
1 VOCODER
Control knob
EDIT 1
EDIT 2
EDIT 3
EDIT 4
Parameter
Band/Attack
Chorus Mix
Distortion
Sens
Description Adjusts the number of Adjusts the chorus mix Adjusts the distortion.
Vocoder bands and the ratio.
response speed.
1 - 5: 18 bands, 6 - 11:
10 bands (lower values
mean faster response)
Setting range
1 - 11
2 RING-MOD
0 - 10
Adjusts the Vocoder
sensitivity.
WET
MUTE
1 - 30
Control knob
EDIT 1
EDIT 2
EDIT 3
EDIT 4
Parameter
Delay Mode
Frequency
EQ Low
EQ High
Setting range
3 TIME TRIP
1 - 11
Adjusts the modulation Adjusts the EQ Low
frequency.
cut/boost amount.
1 - 50
-12 - 12
TAP
Adjusts the EQ High
cut/boost amount.
WET
MUTE
This effect varies the delay time according to the intensity of the input signal.
EDIT 1
EDIT 2
EDIT 3
EDIT 4
Parameter
Depth
Sensitivity
Feedback
Feedback Polarity
Description Adjusts the delay time
change range.
1 - 11
ZOOM RFX-2000
Adjusts the delay time
change sensitivity.
1 - 50
Adjusts the amount of
feedback.
0 - 30
BYPASS
-12 - 12
Control knob
Setting range
BYPASS
This is a ring modulator with short delay.
Description Switches the delay
effect.
18
0 - 10
TAP
Adjusts the feedback
polarity. -1: reverse
phase, 1: normal phase
-1, 1
S/R
TAP
BYPASS
WET
MUTE
4 PIT-DLY
This is an effect with a pitch shifter integrated in the feedback loop.
S/R
Control knob
EDIT 1
EDIT 2
EDIT 3
EDIT 4
Parameter
Feedback
Delay TIME[x 10]
Pitch
Pitch Goal
Description Adjusts the amount of
feedback.
Adjusts the delay time
in 10-ms units
(75:743ms).
Adjusts the pitch shift
value. At the maximum
setting (30), the shift
amount is equal to the
Pitch Goal setting.
1 - 75
0 - 30
1 - 11
Setting range
5 ROTARY
TAP
Adjusts the pitch shift
amount in semitones.
BYPASS
WET
MUTE
-12 - 12
Simulates a rotary speaker where the speaker is turned by mechanical means.
Control knob
EDIT 1
EDIT 2
EDIT 3
EDIT 4
Parameter
Drive
Speed 1
Speed 2 [TAP]
Speed Select
Description Adjusts the distortion.
Adjusts the speed 1.
1 - 11
Setting range
6 DIMENSION
1 - 50
Adjusts the speed 2.
Switches between
speed 1 (S1) and speed
2 (S2).
1 - 50
S1, S2
TAP
ON
(DIMENSION REVERB) These effects control the spatial expansiveness of the sound.
Control knob
EDIT 1
EDIT 2
EDIT 3
EDIT 4
Parameter
Character
Reverb Time
EQ Low
EQ High
Description Adjusts the character.
(See table)
Adjusts the reverb
duration.
1 - 11
Setting range
TAP
1 - 30
Adjusts the EQ Low
cut/boost amount.
WET
MUTE
S/R
TAP
Adjusts the EQ High
cut/boost amount.
-12 - 12
BYPASS
BYPASS
WET
MUTE
-12 - 12
DIMENSION character table
1 Super Wide
••••••••••
••••••••
3 LeftRight
•••••••••••••
4 RightLeft
•••••••••••••
5 Big Delay
•••••••••••••
7 GATE REV
6 MonoStereo
••••••••
7 StereoMids
••••••••••
8 Huge Bass
9 Ping-Pong
•••••••••••
•••••••••••
10 Bass/Treble •••••••••
11 Millennium •••••••••••
Changes the sound localization from
mono to stereo.
Adds a wide, expansive feeling to the
midrange.
Creates an expansive low end.
Reverb bouncing back and forth between
left and right.
Adds reverb to the low and high range.
Creates a vast reverb space.
(GATE REVERB) Special effect where the reverb is briskly cut by a gate.
S/R
Control knob
EDIT 1
EDIT 2
EDIT 3
EDIT 4
Parameter
Threshold
Reverb Time
EQ Low
EQ High
Description Adjusts the gate
sensitivity.
Setting range
8 RVS REV
1 - 11
Adjusts the reverb
duration.
1 - 30
Adjusts the EQ Low
cut/boost amount.
-12 - 12
Adjusts the EQ High
cut/boost amount.
S/R
Control knob
EDIT 1
EDIT 2
EDIT 3
EDIT 4
Threshold
Reverb Time
EQ Low
EQ High
1 - 11
1 - 30
Adjusts the EQ Low
cut/boost amount.
-12 - 12
BYPASS
WET
MUTE
-12 - 12
Parameter
Setting range
TAP
(REVERSE REVERB) This achieves a similar effect as a tape run in reverse.
Adjusts the reverb
Description Adjusts the sensitivity
of the effect, that is the duration.
level from which the
reverb is applied.
RFX-2000 Effects
2 StereoMono
Emphasizes the stereo spread of music
sources.
Changes the sound localization from
stereo to mono.
Changes the sound localization from left
to right.
Changes the sound localization from right
to left.
Effect with long pre-delay for creating a
wide space.
Adjusts the EQ High
cut/boost amount.
TAP
BYPASS
WET
MUTE
-12 - 12
ZOOM RFX-2000
19
RE-MIX Bank
This bank contains mainly effects for processing stereo sources in various ways. Lo-Fi purposely degrades sound quality for
special effect. The ISOLATOR separates the signal into three bands whose level can be adjusted separately. The bank is useful
for example for 2-track mixing or DJ work.
1 Lo-Fi EFX
This is a special effect that can be used to purposely degrade sound quality.
Control knob
EDIT 1
EDIT 2
EDIT 3
EDIT 4
Parameter
Character
Color
Distortion
Tone
Description Gradually changes the
filter character.
Setting range
1 - 11
2 ISOLATOR
Control knob
Parameter
1 - 10
1 - 10
Adjusts the tone.
EDIT 2
EDIT 3
EDIT 4
Character
Low Mix
Mid Mix
High Mix
Adjusts the low-range
mix ratio.
Adjusts the midrange
mix ratio.
0 - 99
0 - 99
BYPASS
WET
MUTE
0 - 99
(COMB FILTER ) This effect processes the input source sound with a comb filter.
EDIT 1
EDIT 2
EDIT 3
EDIT 4
Parameter
Response
Range
Frequency
Feedback
Adjusts the Frequency
Description Adjusts the response
speed for changing the parameter adjustment
Frequency parameter. range.
1 - 11
Setting range
RFX-2000 Effects
4 STEP CRY
Adjusts the comb filter
frequency.
1 - 40
1 - 30
WET
MUTE
This is effect uses filters to lend a distinct, stair-like character to the sound.
EDIT 1
EDIT 2
EDIT 3
EDIT 4
Wave Balance
Depth
Step Rate [TAP]
Resonance
Description Smaller values result in Adjusts the depth of
a stronger CRY effect, the effect.
and higher values in a
stronger STEP effect.
5 RESONANCE
BYPASS
0 - 30
Parameter
Setting range
TAP
Adjusts the amount of
feedback.
Control knob
1 - 11
Adjusts the stair
frequency.
Adjusts the effect
strength.
TAP
TAP
ON
1 - 30
1 - 50
BYPASS
WET
MUTE
1 - 10
This is a filter effect with a resonance component.
Control knob
EDIT 1
EDIT 2
EDIT 3
EDIT 4
Parameter
Resonance
Sensitivity
LFO Rate [TAP]
LFO Depth
Description Adjusts the resonance.
6 LPF
TAP
Adjusts the high-range
mix ratio.
Control knob
Setting range
WET
MUTE
1 - 20
EDIT 1
1 - 11
3 COMB
Adjusts the distortion.
BYPASS
This effect divides the signal into three bands, with control of the mix ratio.
Description Adjusts the crossover
frequency.
Setting range
Adjusts the color.
TAP
1 - 11
Adjusts the filter
Adjusts the LFO cycle.
sensitivity in relation to
the input signal.
1 - 30
1 - 50
Adjusts the LFO
change range.
TAP
TAP
ON
BYPASS
WET
MUTE
0 - 30
( LOW PASS FILTER ) This is a filter which lets only low-frequency signal components through.
"6 LPF" , "7 BPF" , "8 HPF" use the same parameters
7 BPF
(BAND PASS FILTER) This is a filter which lets only mid-frequency signal components through.
"6 LPF" , "7 BPF" , "8 HPF" use the same parameters
8 HPF
(HIGH PASS FILTER ) This is a filter which lets only high-frequency signal components through.
Control knob
EDIT 1
EDIT 2
EDIT 3
EDIT 4
Parameter
Resonance
Frequency
LFO Rate [TAP]
LFO Depth
Description Adjusts the resonance
Setting range
20
1 - 11
ZOOM RFX-2000
Adjusts the cutoff
frequency.
1 - 30
Adjusts the LFO cycle.
1 - 50
Adjusts the LFO
change range.
0 - 30
TAP
TAP
ON
BYPASS
WET
MUTE
MIXDOWN Bank
The effects in this bank serve to tailor the overall mood of a song when performing mixdown (mixing multiple tracks onto two
final stereo tracks) or mastering (fine-tuning the sound and level of a final 2-track mix).
For optimum results, the effects in this bank should be used with the MIX control set to 99, so
that only the effect sound (WET) is output.
1 FINAL
(FINAL MASTER) This is an in-series combination of a 4-band equalizer and 3-band compressor.
Control knob
EDIT 1
EDIT 2
EDIT 3
EDIT 4
Parameter
Character
Low MIX
Mid MIX
High MIX
Adjusts the mid-range
level to -<infinite> or
-24.5 to 0 dB (in 0.5-dB
steps) 50: 0 dB
Adjusts the high-range
level to -<infinite> or
-24.5 to 0 dB (in 0.5-dB
steps) 50: 0 dB
0 - 50
0 - 50
Description Selects the
compression and EQ
character.
Setting range
1 - 11
2 POWER
Adjusts the low-range
level to -<infinite> or
-24.5 to 0 dB (in 0.5dB steps) 50: 0 dB
0 - 50
EDIT 1
EDIT 2
EDIT 3
EDIT 4
Parameter
Reverb Character
Reverb Time
Reverb Mix
Intensity
Description Selects various reverb
character settings with
different reverb times.
1 - 11
3 WIDE
Adjusts the reverb
duration.
1 - 30
Adjusts the reverb mix
ratio.
DRY
THRU
TAP
Adjusts the bass
emphasis.
0 - 99
BYPASS
DRY
THRU
0 - 15
(WIDE IMAGE) Mixdown effect which stresses the left/right stereo spread.
Control knob
EDIT 1
EDIT 2
EDIT 3
EDIT 4
Parameter
Reverb Character
Reverb Time
Reverb Mix
Intensity
1 - 11
Setting range
4 BOOST
Adjusts the reverb
duration.
1 - 30
Adjusts the reverb mix
ratio.
0 - 99
TAP
Adjusts the left/right
spread.
BYPASS
DRY
THRU
RFX-2000 Effects
Description Selects various reverb
character settings with
different reverb times.
0 - 15
(BOOST EQ) Mixdown effect which gives the sound a tight low end and snappy high end.
Control knob
EDIT 1
EDIT 2
EDIT 3
EDIT 4
Parameter
Reverb Character
Reverb Time
Reverb Mix
Intensity
Description Selects various reverb
character settings with
different reverb times.
1 - 11
Setting range
5 VOCAL
Adjusts the reverb
duration.
1 - 30
Adjusts the reverb mix
ratio.
0 - 99
TAP
Adjusts the lowrange/high-range
volume.
BYPASS
DRY
THRU
0 - 15
(VOCAL PRESENCE) This mixdown effect brings out suppleness and warmth in vocals.
Control knob
EDIT 1
EDIT 2
EDIT 3
EDIT 4
Parameter
Reverb Character
Reverb Time
Reverb Mix
Intensity
Description Selects various reverb
character settings with
different reverb times.
Setting range
6 COMP•LIM
1 - 11
Adjusts the reverb
duration.
1 - 30
Adjusts the reverb mix
ratio.
0 - 99
TAP
Adjusts the band for
enhancing clarity and
stressing the richness
of vocals.
BYPASS
DRY
THRU
0 - 15
This effect serves for keeping signal levels within a certain range. The compressor raises the level of
signals below a certain threshold and reduces the level of strong signals. The limiter only reduces the
level of strong signals.
Control knob
EDIT 1
EDIT 2
EDIT 3
EDIT 4
Parameter
Character
Threshold
EQ Low
EQ High
Description Selects the effect type Adjusts the sensitivity
and adjusts the release for the compressor/
time.
limiter action.
1 - 6: Compressor
7 - 11: Limiter (higher
values result in longer
release time)
Setting range
BYPASS
(POWER BOOST) Mixdown effect which emphasizes the bass and gives the sound a powerful punch.
Control knob
Setting range
TAP
1 - 11
1 - 16
Adjusts EQ Low
boost/cut.
Adjusts EQ High
boost/cut.
-12 - +12
-12 - +12
TAP
BYPASS
DRY
THRU
ZOOM RFX-2000
21
7 MIC SIM
(MIC SIMULATOR ) Simulates the characteristics of a high-quality condenser microphone while using
an economical dynamic microphone.
Control knob
EDIT 1
EDIT 2
EDIT 3
EDIT 4
Parameter
Character
Threshold
EQ Low
EQ High
Description Selects the microphone Adjusts the limiter
character and the
threshold.
degree of
enhancement.
1 - 6: For vocals
7 - 11: For instruments
(larger values result in
stronger enhancement)
1 - 11
Setting range
8 CABI SIM
1 - 16
Adjusts EQ Low
boost/cut.
BYPASS
Adjusts EQ High
boost/cut.
DRY
THRU
-12 - +12
-12 - +12
(CABINET SIMULATOR) Adds the sound character of an amplifier speaker cabinet to the sound of an
electric guitar.
Control knob
EDIT 1
EDIT 2
EDIT 3
EDIT 4
Parameter
Character
Presence
EQ Low
EQ High
Adjusts the ultra-high
Description Selects the amplifier
character and the
range.
degree of cabinet
sound.
1 - 6: COMBO
7 - 11: STACK (higher
values result in stronger
cabinet sound)
Setting range
TAP
1 - 11
1 - 16
Adjusts EQ Low
boost/cut.
TAP
BYPASS
Adjusts EQ High
boost/cut.
DRY
THRU
-12 - +12
-12 - +12
EXTRA Bank
RFX-2000 Effects
The effects in the EXTRA bank cannot be called up in the same way as the other effects. To select an effect from the EXTRA
bank, you must initially use a computer running the supplied software. When an effect has been selected, storing the patch
containing that effect in memory will allow you to later call it up also without using the software. The effects from the EXTRA
bank have many parameters, but in this manual, only the parameters that can be adjusted with the front-panel controls of the
RFX-2000 are described. Using the supplied software, all parameters can be adjusted.
When checking the effect number while an effect from the EXTRA bank is selected, the effect number is shown with a
preceding "E", such as "E1, "E2, etc.
When using effects for which the bypass mode is DRY THRU, the MIX control should be set to 99,
so that only the effect sound (WET) is output. This will produce optimum results.
(31 BAND GRAPHIC EQ) This effect is a combination of a 31-band graphic equalizer and a 3-band
overall equalizer.
Control knob
EDIT 1
EDIT 2
EDIT 3
EDIT 4
Parameter
Input Attenuate
Total EQ Mid
Total EQ Low
Total EQ High
Description Adjusts attenuation
before the signal passes
through the equalizer.
1 (-10 dB) to 11 (0 dB)
Setting range
1 - 11
Provides midrange
compensation in 1-dB
steps.
-12 - +12
Provides low-range
compensation in 1-dB
steps.
TAP
Provides high-range
compensation in 1-dB
steps.
-12 - +12
BYPASS
DRY
THRU
-12 - +12
(5 BAND PARAMETRIC EQ ) This is a 5-band parametric equalizer.
Control knob
EDIT 1
EDIT 2
EDIT 3
EDIT 4
Parameter
Input Attenuate
EQ Mid
EQ Low
EQ High
Description Adjusts attenuation before Provides midrange
the signal passes through compensation in 1-dB
the equalizer.
steps.
1 (-10 dB) to 11 (0 dB)
Setting range
22
1 - 11
ZOOM RFX-2000
-12 - +12
Provides low-range
compensation in 1-dB
steps.
-12 - +12
Provides high-range
compensation in 1-dB
steps.
-12 - +12
TAP
BYPASS
DRY
THRU
(20 TAP DELAY ) This is a 20-tap delay.
S/R
The parameters for "20 TAP DELAY" are the same as "10 TAP DELAY" below.
(10 TAP DELAY) This is a 10-tap delay.
Control knob
EDIT 1
Parameter
Tone
Description Adjusts the tone.
Setting range
1 - 11
EDIT 2
S/R
EDIT 3
Feedback Time [x 100] FeedbackTime[x 1]
Adjusts the feedback
delay time in 100-ms
units (setting range 1 1486 ms)
0 - 14
Adjusts the feedback
delay time in 1-ms
units.
0 - 99
EDIT 4
Feedback
TAP
Adjusts the feedback
amount.
WET
MUTE
0 - 30
( MULTI EFX) This is a multi-effect which allows simultaneous use of chorus or flanger,
delay, and reverb.
Control knob
EDIT 1
EDIT 2
EDIT 3
EDIT 4
Parameter
Connection
Modulation Mix
Delay Mix
Reverb Mix
Description Selects the connection
method for the three
modules. For details,
please refer to the
documentation of the
supplied software.
Setting range
1 - 11
Adjusts the chorus or
flanger mix ratio.
Adjusts the delay mix
ratio.
S/R
TAP
WET
MUTE
0 - 99
0 - 99
0 - 99
S/R
Control knob
EDIT 1
EDIT 2
EDIT 3
EDIT 4
Parameter
Input Attenuate
EQ Mid
EQ Low
EQ High
1 - 11
Provides midrange
compensation in 1-dB
steps.
-12 - +12
Provides low-range
compensation in 1-dB
steps.
-12 - +12
TAP
Provides high-range
compensation in 1-dB
steps.
WET
MUTE
-12 - +12
(CUSTOM REVERB ) This is a reverb effect that allows the user to make detailed settings at the
computer.
Control knob
EDIT 1
EDIT 2
EDIT 3
EDIT 4
Parameter
High Ratio
Reverb Time
EQ Low
EQ High
Description Adjusts the high-range
attenuation.
Setting range
1 - 11
Adjusts the reverb
duration.
1 - 30
Provides low-range
compensation in 1-dB
steps.
-12 - +12
BYPASS
RFX-2000 Effects
Setting range
BYPASS
Adjusts the reverb mix
ratio.
(EARLY REFLECTION) This effect creates early reflections.
Description Adjusts attenuation
before the signal
passes through the
equalizer.
1 (-10 dB) to 11 (0 dB)
BYPASS
TAP
Provides high-range
compensation in 1-dB
steps.
S/R
BYPASS
WET
MUTE
-12 - +12
(CUSTOM FINAL MASTER) This is an in-series combination of a 4-band equalizer and 3-band
compressor.
Control knob
EDIT 1
EDIT 2
EDIT 3
EDIT 4
Parameter
Input Attenuate
Low Mix
Mid Mix
High Mix
Adjusts the low-range
level to -∞ or -24.5 to 0
dB (in 0.5-dB steps)
50: 0 dB
Adjusts the mid-range
level to -∞ or -24.5 to 0
dB (in 0.5-dB steps)
50: 0 dB
Adjusts the high-range
level to -∞ or -24.5 to 0
dB (in 0.5-dB steps)
50: 0 dB
0 - 50
0 - 50
0 - 50
Description Adjusts attenuation
before the signal
passes through the
equalizer.
Setting range
1 - 11
TAP
BYPASS
DRY
THRU
ZOOM RFX-2000
23
Supplied Software
The RFX-2000 comes with a CD-ROM that contains software
for editing patches on a personal computer. (The disc contains
versions for Windows 95/98 and Macintosh.) The software
comprises the following functions.
(1) Patch librarian
Serves to manage patch information of the RFX-2000 on
the computer. Information about all patches of the RFX2000 is sent to the computer via a MIDI link and can be
stored on the hard disk as a project file. Within a project, the
order of patches can be changed, and information stored as
project files can be loaded back into the RFX-2000. In
effect, this increases the memory capacity of the RFX-2000
to an unlimited size.
(2) Visual editor
Using sliders and other graphical elements appearing on the
computer screen, patches contained in project files can be
edited. Because the edited contents are sent immediately to
the RFX-2000 via the MIDI link, the aural effect of any
editing operation can be checked immediately. Edited
patches can be stored on the computer and can also be sent
to the RFX-2000 via the MIDI link.
(3) EXTRA bank
Using this software gives access to effects from the EXTRA
bank that cannot be selected in the same way as the other
effects at the unit. These effects comprise a custom reverb
with extensive control over many parameters, a 31-band
equalizer, a 20-tap delay effect, etc. The additional effects
further increase the application scope for the RFX-2000. By
storing a patch containing an effect from the EXTRA bank
in the memory of the RFX-2000, the effect can then be
called up like other patches, and some major parameters of
the effect can be edited with the controls of the RFX-2000.
• For information on software installation, please
refer to the separate sheet. For information on
how to use the software, please refer to the
documentation included on the CD-ROM.
• The latest version of the software can be
downloaded from the Zoom web site.
URL: http://www.zoom.co.jp
Troubleshooting
Symptom
Supplied Software / Troubleshooting
No sound or very low
volume
Input sound breaks up
or is distorted
Check
Remedy
• Is supplied AC adapter connected correctly?
Follow the instructions in "Getting Connected".
• Is another kind of AC adapter connected?
Use only the supplied AC adapter.
• Is sound source connected correctly to
INPUT jacks and are OUTPUT jacks
connected correctly to playback system?
Follow the instructions in "Getting Connected".
• Are all shielded cables used for the
connection okay?
Try replacing the shielded cables.
• Are the connected sound source and
playback system operating normally? Is the
volume set to a proper position?
Check all components and set the volume to a
suitable position.
• Are INPUT and OUTPUT controls of RFX2000 set to a proper position?
Adjust the controls as described in the section
"Trying Out the Effects".
• Is a microphone connected to the rearpanel INPUT jack?
Connect the microphone to the front-panel MIC
IN jack.
• Is unit in bypass mode and is MIX control
fully turned to the WET position?
Turn MIX control towards DRY.
• Is EDIT control knob 1 - 4 set to a position
where sound is cut off?
Turn EDIT control knob 1 - 4 clockwise.
• Is input signal level too high?
Adjust INPUT control so that CLIP LED does
not light at signal peaks.
• Is RFX-2000 set to bypass mode?
Cancel the bypass mode.
• Is incorrect foot switch connected?
Use only ZOOM FS01.
No effect sound
24
ZOOM RFX-2000
Specifications
• Number of preset programs 616 (8 effects x 7 banks x 11
characters)
• Digital audio Interface
Coaxial output
Optical output
(S/PDIF)
• Program memory
Total
100
716 programs
• Sampling frequency
44.1 kHz
• A/D converter
• D/A converter
20 bit, 64 times oversampling
20 bit, 128 times oversampling
• DSP
Zoom original ZFX-2 (24-bit signal
processing)
• Power requirements
• Dimensions
Reference input level:
standard monaural phone jack x 2
10 kilohms (MONO), 20 kilohms
(STEREO)
-10 dBm to +4 dBm
• Microphone input:
Input impedance:
Reference input level:
standard monaural phone jack x 1
20 kilohms
-56 dBm
• Outputs
L, R:
Output impedance:
Reference output level:
standard monaural phone jack x 2
500 ohms
-10 dBm to +4 dBm
• Control connectors
• Rear Inputs
L/MONO, R:
Input impedance:
MIDI IN
MIDI OUT
MIDI THRU
BYPASS(FS01)
Applied AC adapter 12 V AC
(AD-0008)
482 (W) x 44 (H) x 115 (D) mm
• Weight
1.5 kg
* 0 dBm = 0.775 Vrms
* Design and specifications subject to change without notice.
Specifications
ZOOM RFX-2000
25
MIDI Implimentation Chart
MIDI Implimentation Chart
[EFFECTOR
]
Date : 20 Sep, 1999
Model RFX-2000
MIDI Implimentation Chart
Version :1.00
+---------------------+--------------------+--------------------+---------------------+
|
|
Transmitted
|
Recognized
|
Remarks
|
|
Function ...
|
|
|
|
+---------------------+--------------------+--------------------+---------------------+
|Basic
Default
| 1-16 OFF
| 1-16,OFF
| Memorized
|
|Channel Changed
| 1-16 OFF
| 1-16,OFF
| See Note1
|
+---------------------+--------------------+--------------------+---------------------+
|
Default
| 3
| 3
|
|
|Mode
Messages
| x
| x
|
|
|
Altered
| ****************** |
|
|
+---------------------+--------------------+--------------------+---------------------+
|Note
| x
| x
|
|
|Number | True voice | ****************** | x
|
|
+---------------------|--------------------|--------------------|---------------------|
|Velocity Note ON
| x
| x
|
|
|
Note OFF
| x
| x
|
|
+---------------------+--------------------+--------------------+---------------------+
|After
Key's
| x
| x
|
|
|Touch
Ch's
| x
| x
|
|
+---------------------+--------------------+--------------------+---------------------+
|Pitch Bend
| x
| x
|
|
+---------------------+--------------------+--------------------+---------------------+
|
|
|
|
|
|
| 86
| 86
| Effect Type
|
|Control
| 84
| 84
|
Edit1
|
|
| 85
| 85
|
Edit2
|
|
| 87
| 87
|
Edit3
|
|Change
| 88
| 88
|
Edit4
|
|
| 8
| 8
|
Mix
|
|
| 80
| 80,91
| Bypass
|
|
| 64
| 64
| Tap
|
|
|
|
|
|
+---------------------+--------------------+--------------------+---------------------+
|Prog
| o 0-99
| o
|
|
|Change | True #
| ****************** |
|
|
+---------------------+--------------------+--------------------+---------------------+
|System Exclusive
| o
| o
|
|
+---------------------+--------------------+--------------------+---------------------+
|System | Song Pos
| x
| x
|
|
|
| Song Sel
| x
| x
|
|
|Common | Tune
| x
| x
|
|
+---------------------+--------------------+--------------------+---------------------+
|System
| Clock
| x
| o
|
|
|Real Time | Commands | x
| x
|
|
+---------------------+--------------------+--------------------+---------------------+
|Aux
| Local ON/OFF | x
| x
|
|
|
| All Notes OFF| x
| x
|
|
|Mes- | Active Sense | x
| x
|
|
|sages | Reset
| x
| x
|
|
+---------------------+--------------------+--------------------+---------------------+
|Notes
| 1. Transmit channel and Recognized channel is same.
|
|
|
|
|
|
|
|
|
|
+---------------------+---------------------------------------------------------------+
Mode 1 : OMNI ON, POLY
Mode 2 : OMNI ON, MONO
o : Yes
Mode 3 : OMNI OFF, POLY
Mode 4 : OMNI OFF, MONO
x : No
* The MIDI implementation is included on the supplied CD-ROM.
26
ZOOM RFX-2000
Safety Precautions/Usage Precautions
Safety Precautions
In this manual, symbols are used to highlight warnings and
cautions for you to read so that accidents can be prevented.
The meanings of these symbols are as follows:
This symbol indicates explanations about
extremely dangerous matters. If users ignore
Warning
this symbol and handle the device the wrong
way, serious injury or death could result.
Caution
This symbol indicates explanations about
dangerous matters. If users ignore this
symbol and handle the device the wrong
way, bodily injury and damage to the
equipment could result.
Please observe the following safety tips and precautions to
ensure hazard-free use of the RFX-2000.
Warning
Caution
Caution
Caution
• Power requirements
The RFX-2000 is powered by the supplied AC adapter .
To prevent malfunction and safety hazards, Do not use
any other kind of AC adapter.
When using the RFX-2000 in an area with a different
line voltage, please consult your local ZOOM
distributor about acquiring a proper AC adapter.
• Environment
Avoid using your RFX-2000 in environments where it
will be exposed to:
• Extreme temperature
• High humidity or moisture
• Excessive dust or sand
• Excessive vibration or shock
Caution
• Alterations
Never open the case of the RFX-2000 or attempt to
modify the product in any way since this can result in
damage to the unit.
Usage Precautions
• Electrical interference
The RFX-2000 has been designed to minimize radio
frequency emissions and is highly resistant to external
interference. However, if placed very close to equipment
such as TV sets or radio receivers, reception interference
may occur. If you encounter problems, move the RFX-2000
further away from the affected equipment.
Whatever the type of digital control device, the RFX-2000
included, electromagnetic damage can cause
malfunctioning, and can corrupt or destroy data. Since this
is an ever-present danger, thorough care should be taken to
minimize the risk of damage.
• Cleaning
Use a soft, dry cloth to clean the RFX-2000. If necessary,
slightly moisten the cloth. Do not use abrasive cleanser,
wax, or solvents (such as paint thinner or cleaning alcohol),
since these may dull the finish or damage the surface.
Please keep this manual in a convenient place for future
reference.
• Handling
The RFX-2000 is a precision instrument. Do not exert
undue pressure on the unit.
Also take care not to drop the unit, and do not subject it
to shock or excessive pressure.
Safety Precautions/Usage Precautions
• Connecting cables and input and output
jacks
You should always turn off the power to the RFX-2000
and all other equipment before connecting or
disconnecting any cables. Also make sure to disconnect
all cables and the AC adapter before moving the RFX2000.
ZOOM RFX-2000
27
ZOOM CORPORATION
NOAH Bldg., 2-10-2, Miyanishi-cho, Fuchu-shi, Tokyo 183-0022, Japan
PHONE: +81-42-369-7116 FAX: +81-42-369-7115
Printed in Japan RFX-2000-5000