1
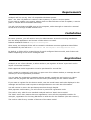
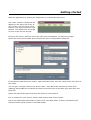
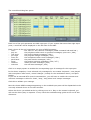
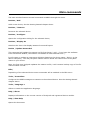
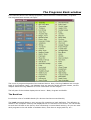
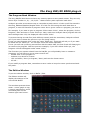
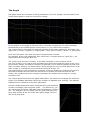
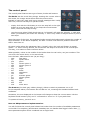
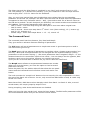
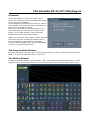
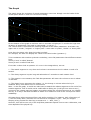
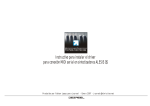
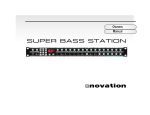
UniSynth version 1.0
Overview
UniSynth is a stand-alone application managing MIDI hardware devices.
It is developed and distributed by Midimetric® , a one-man startup business located in France.
UniSynth currently supports the following hardware:
–
–
Korg DW-8000 / EX-8000
Yamaha DX21 / DX27 / DX27S / DX100
It will soon also supports (in alphabetical order):
–
–
–
–
–
–
Korg DW-6000 ( second quarter 2009 )
Motu Midi Mixer 7s ( second quarter 2009 )
Novation DrumStation ( second quarter 2009 )
Oberheim Matrix 6 / 6R / 1000 ( second quarter 2009 )
Waldorf µQ / µQ Omega ( third quarter 2009 )
Yamaha 'A' samplers A3000, A4000, A5000 ( third quarter 2009 )
On the other hand, I won't add support for:
– devices that are sold with a decent editor from the manufacturer (like Clavia),
– devices for which no midi implementation has never been published,
– devices that does not support single-handled parameters (like Korg Poly800 II),
– device that already have a complete hardware interface (like the Supernova II with its 51
knobs and 136 switches !).
For up to date information on supported devices, ideas, request and pricing, please visit the
site www.midimetric.com
History
UniSynth is not the first application to propose MIDI management, there has been some other
products on the market ( MidiQuest, SoundDiver, etc... ) and a lot of one device dedicated
freeware applications.
After trying most of them, i found they where complicated, uninspiring, expensive and
sometime not working at all...
UniSynth is developed to be a modern, affordable and lightweight application, easy to
understand and operate. Not only does it closely dialogs with your MIDI equipment, it also
brings features not available on the equipment.
I hope UniSynth will bring a new shine on your MIDI hardware, making it fun and inspiring.
Requirements
UniSynth will run on any .Net 3.5 compatible Windows system.
Note : the .Net 3.5 platform is native in later systems, or part or services packs.
If you need to update your system, please check on Microsoft site to find an update, a service
pack or a stand-alone download-able setup.
You will need at least one MIDI port on the computer, either through an internal or external
sound card or through a MIDI interface box.
Installation
On some systems, you will need to have the Administrator access level during installation.
Run the Setup application and choose a folder where to install.
Default installation folder is Program Files\UniSynth.
After setup, an UniSynth folder will be created in Windows common application data folder.
On Windows XP, this will be in C:\Documents and Settings\All Users\Application Data.
By default, a folder will be created there for each configured device model, with further subfolders depending of the device managed data.
Registration
UniSynth is not a free software, it takes weeks to put together all these 'sysex bits' and to
layout a functional interface.
Each supported model registration must be purchased for a small fee.
Until a model is registered, each time you open one of its edition window, a message box will
remind you of the registration procedure.
You can pass the registration message without actually registering and continue in 'demo
mode' but the program will wait one minute before presenting you the edition window.
If you want to register for this device model, note the model name and code displayed in the
message and send an email request to [email protected] with this information.
You will receive in return the purchase procedure through PayPal.
After payment confirmation, you will receive by email the registration code.
This code is only valid for one installed UniSynth and one 'base' device model.
The 'base' notion here means that one registration covers all the compatible models: for
example, registration for the Korg DW-8000 is valid also for the EX-8000 (the rack version).
The code is valid for any number of devices of the same model.
Getting started
Start the application by clicking the UniSynth icon in Windows start menu.
The 'main' window of UniSynth will
appear on the upper left corner of
your screen. You can move it and
resize it, this will be saved for next
session. The default size is enough
for one or two devices though.
First you will need to add one device for each piece of hardware you want to manage.
Select the menu Devices/Add, this will open the device configuration dialog box.
First select the specific device model : open the brand node, then the range node, then click on
the model.
You can give a unique name to this device. Note : this affects the instrument name when
updating Sonars INS file and allows the have several devices of the same type with their own
patch list.
Select the input and output midi ports the device is connected to.
If it is relevant for your device, select a Midi channel and a unit number.
Leave the default base data folder or select your own base folder. A folder named after the
selected model will be created in this base folder.
Now click the Test button. A request is sent to the selected output port and a response is
awaited in the input port. If there is a response and the response type matches the selected
model, the text 'OK' is displayed next the button.
If the text displayed is 'Failed', check that the device is powered on and check your midi
connections. Either there was no response or the response does not match the selected model.
If you select the Generic model, an Universal Identity Request message is sent. If there is a
response, the manufacturer name of the connected device will be displayed next to the Test
button. Note that not all devices respond to this message... The Waldorf µQ does for instance,
not the Alesis Ion or the Novation SuperNova II from my set. If there is no response, the test
displayed is 'Not tested'. That means the program cannot tell for sure if the settings you have
selected are right or wrong.
After the test, click OK to keep this setting. The newly added device will be listed in the main
window.
If you have an other device like a master keyboard you want to use during edition, you have
to select the MIDI transmission of input ports.
To do this, select the menu Tools / Controllers.
The controllers dialog box opens.
Each line of the grid represents one Midi input port. If your system has more than eight input
ports, a scroll bar will be displayed on the left side of the table.
Each column of the grid represents one type of MIDI message:
– note :
the 'note on' and 'note off' messages ( MIDI command h80 and h90 )
– poly a.t.
the polyphonic after touch or pressure messages, quite rare ( hA0 )
– cont chge
the control change messages ( hB0 )
– pro chge
the program change messages ( hC0 )
– mono a.t.
the monophonic after touch messages ( hD0 )
– pitch bend
the pitch bender messages ( hE0 )
– sysex
the system exclusive messages ( hF0 / hF7 )
– common
mainly the MTC messages ( hF0 )
– real time
the real time messages ( hF0 )
Click in an empty square to enable the corresponding type of message for this input port.
In the above snapshot, i have selected only messages for one master keyboard : note played
with monophonic after touch, control changes (mostly for the modulation wheel ) and pitch
bender.
If you use an external MTC control command box, you will have to enable the common and
real time messages to allow for 'start', 'stop', 'song select' and 'tempo' messages.
Click OK to validate your settings.
Now the chosen MIDI messages appearing on the enabled input ports will be dispatched to the
currently selected device in the main window.
Select the device you added earlier by clicking once on it. Play on the master keyboard, you
will ear the device play in response. If not, check the troubleshooting guide at the end of this
document.
Main commands
The main window features several commands available through the menu.
Devices / Add
Adds a new device, See the Getting Started chapter above.
Devices / Remove
Removes the selected device.
Devices / Configure
Opens the configuration dialog for the selected device,
Devices / Display As
Switches the device list display between Icons and Report
Device / Update Sonars def
This command will update the master.ins file from Sonar ( well... if you have this software
from Cakewalk & Roland, information is available at www.cakewalk.com ).
It will create or update an instrument definition based on the device name ( DW #1 in the
above examples ). This way the patch names listed in Sonar will reflect the current patch
names in your device.
Note: the first time UniSynth updates the master.ins file, it will create a backup copy of the file
named master.ins.bak .
Edit /
Depending of the selected device some commands will be enabled in the Edit menu.
Tools / Controllers
Configures the MIDI messages to transmit to the selected device. See the Getting Started
chapter above.
Tools / Language >
Allows to switch the application language.
Help / About
Displays information on the current version of UniSynth and registered device models.
Help / View Help
Opens this document
empty page
The Programs Bank window
If the selected device can manage programs, select the menu command Edit / Programs.
The Programs Bank window will open:
The count of programs depends of the selected device. Here, the Korg DW8000 has a single
bank of 64 programs. Note : the DW8000 does not natively handle program names, see the
chapter about the Korg DW8000 for more information on this subject.
The left part of the window displays three boxes : Bank, Program and Buffer.
The Bank box
It will show a list of available banks (for devices that have several banks).
The Load command allows to open a sysex file containing a bank definition. The definition is
loaded in the computer memory and displayed but is is not sent to the device. You can decide
to send the full bank to the device, thus overwriting it current bank memory. Or you can send
each program to the edit buffer to audition them, save them a single path file, etc...
The Save command allows to create a sysex file containing the bank definition currently in the
computer memory.
The Request command will ask the device to send its definition to the computer. During the
MIDI transfers, a progress bar is displayed. Note that program numbers will appear in blue
when UniSynth is sure that display is synchronized with the device. Red numbers like above
means UniSynth does not know if it really is what the device has in memory.
The Send command will transmit the full bank to the device. In most cases, this will overwrite
the content of its memory without further confirmation.
Tip : The first time you open the window for your device, you should request its banks and
save them on the computer hard drive.
UniSynth will automatically save the current banks data to its data folder. It will create in the
folder <device>\Patches\Banks a file named after the device name followed by 'current'
followed by the bank number. This way, the next time you open the Programs Bank window,
UniSynth will display the last data worked on.
The Program box
It allows to manage programs one by one. To use a command from the Program Box, a single
item must be selected in the list. The commands will work on this program.
The commands Load / Save and Request are similar to the commands of the Bank box.
The Send button is labeled '> Buffer' because the program is not sent to a memory location in
the device. Instead, it is sent to the Edit Buffer : a temporary location that does not overwrite
any memory location. The name of the last sent program will appear at the bottom of the Edit
Buffer box. You can also double-click on a listed program to send it to the Edit Buffer.
The Buffer box
It allows to manage single programs without affecting the memory of the device.
The Load commands open a sysex file and directly sends the data to the Edit Buffer.
The > Prog command will 'send' the content of the Edit Buffer to the selected memory
location. In fact, it will ask the device to write this temporary data to a permanent location.
The Edit button will open the Program Edition windows. This window is specific to each device
model, so it is covered in the device dedicated chapters.
Common operations how-to
To copy a program from one location to another:
– select the program to copy
– click on '> Buffer'
– select the program to replace
– click on '> Prog'
To browse through a bank file without changing the device memory:
– click on 'Bank' / 'Load' and load the desired file.
– Double click on the program to audition
To insert a program of an other bank in the current bank (except for the DW8000):
– click on 'Bank' / 'Load' and load the desired file.
– Double click on the program to insert (it is copied in the Edit Buffer)
– click on 'Bank' / 'Request' to get the current bank
– select the program to replace
– click on '> Prog' to copy the Edit Buffer to this location
Note : this technique does not work if the device clears it edit buffer when the current bank is
requested (like for the DW8000). For this device, you have to save each program you like into
a 'single' file. After you have picked-up one or more programs, request the current bank and
load the chosen programs from files directly into the current bank.
empty page
The Korg DW/EX 8000 plug-in
The Program Bank Window
The Korg DW/EX 8000 does not have any memory space to store patch names. They are only
known by a number 11,12,...,18,21,22... Static memory was expensive back then!
UniSynth provides a convenient way to remember a patch name: it looks up all files stored in
the Korg_DW8000\Patches\Singles folder. If it find one file having the same data than a
program, it uses the filename as program name. So to give a name to a program, just save it.
For example, if you want to give to program 32 the name 'Violin', select the program, click on
Program / Save and save it under Violin.syx. Now, each time UniSynth has a program with the
same settings than #32, the displayed name will be 'Violin'.
To prevent having several files (with different names) with the same data, UniSynth will ask
you if you want to delete the previous .syx file during saving.
If now you save Program #32 under the name 'Fiddle.syx', UniSynth will ask you if you want
to delete the file 'Violin.syx'. You can also cancel the whole operation.
If ever you still end up having several files with the same data, the first found will always give
its name to the program. With the previous example, if you don't delete Violin.syx, the
Program #32 will still appear under name 'Violin'.
The first time you request a bank from the DW/EX, you will probably have no names to
programs. You will have to give a name to each one:
– double-click on the program 11
– audition it to decide of a name
– click on Buffer / Save (or Program / Save) and use the chosen name
– 63 left...
If you modify a program data, remember to save it also to keep the name synchronized with
the patch.
The Edition Window
To pen the edition window, click on Buffer / Edit.
The Edition window will
display the settings of the
current Edit Buffer.
This windows presents three
areas : a time graph on top,
a control panel below, and a
command panel on the
bottom right-hand corner.
The Graph
The graph shows the evolution of sound parameters over time. Simply turn the knobs of the
control panel below to view the curves move along.
On the bottom of the graph a real time scale in seconds is displayed. The scale will adjust
automatically to the audible portion of the sound (i.e. the yellow VCA envelope).
The vertical scale is fixed and the meaning depends of the drawn parameter. As a basic rule,
upper side is 'louder', 'brighter' or 'higher pitch'. Lower side is 'quitter', 'darker' or 'lower pitch'.
Lines have the same color than the text of the parameter involved.
For example, all the VCF parameters with a blue text ( envelope amount, cutoff, EG. ) are
represented with the bright blue line.
The yellow curve show the 'VCA EG', or the Amp envelope in more modern words.
The sum of OSC 1 level, OSC 2 level and Noise level gives the maximum height of the curve.
In the above sample, the attack is almost null and the curve is almost instantly at peak level.
Then a medium decay of 15 (which takes 1.8 sec) brings the curve to break point level of 28.
Then a slope of 21 bring the curve to sustain level of 8 at time 3.3".
The dotted portion of the line shows the sustain. It has no duration by itself but the curve is
extended to always show at least one half-second of sustain for both VCA and VCF EG.
Finally, the rounded end of the envelope represents the release time to bring the overall
volume to zero.
The vertical purple lines show the digital delay effect. The effect level changes the initial line
height. The feedback parameter affects the number of repeated lines (echoes). The distance
between lines is related to to the time parameter.
All time related parameters where computed from real measures
of audio recordings (this was quite a task...). So effectively, you
can synchronize envelope, LFO start time and frequency, echoes,
etc... For example, you can easily have the pitch LFO (dark red
saw) start exactly at the end of the auto-bend (bright red line)
like in this snap shot:
The control panel
The control panel features two type of items, knobs and buttons.
The knobs are the round shiny things, showing the current value in
the center. An orange arrow shows also the current value.
Instead of using the 'grab' and 'move around' paradigm that i really
don't like, there is two ways to operate knobs:
–
simply click with the left button to turn one step left or the right
button to turn one step right. If you keep the mouse button
down, the knob will keep turning.
–
use the mouse wheel. Each wheel step up (or forward) will raise the value by 1, each step
down (or backward) will lower the value by 1. This is very useful to adjust values by one or
two steps.
Note that most of the time, the graduated scale around the knobs exactly shows the number of
steps available. In the above snapshot, the OSC 1 octave knob has four positions while the
OSC 1 wave has 16.
On some knobs where the parameter has a 'central' value, the knob will feature a central
detent : i.e. when turning around, the movement will stop for a second on the central spot.
This way, it is easier to reach common values.
When possible, values in the middle of the knobs show the real value, not just numbers. This
is true for the octave knob, or the wave knob.
Pour the later, abbreviations are (as per Korg):
– saw
saw wave
– sqr
square wave
– pno
piano
– ep1
electric piano 1
– ep2
electric piano 2
– hrp
harp
– org
organ
– brs
brass
– sax
saxophone
– viol
violin
– gtr
acoustic guitar
– fuz
electric guitar
– bss
bass
– dig
digital
– bell
bell
– sine
sinus wave
The buttons (the dark gray rubbery things), allows to switch a parameter on or off.
In the snapshot above, the buttons O1 and O2 are 'on', meaning the Autobend affects both
oscillators.
Sometime, the text displayed on the button will change to show the current state. Like the
keyboard mode buttons 'poly' and '1' will switch to 'mono' or '2' if you push them.
To operate a button, just click on it.
Note on DW parameters implementation:
You will find that the control panel shows less knobs than the number of available parameters
on the DW. For simplicity (and because nowadays we can handle data 'bigger' than 6 bits ;) ),
some parameters pairs where combined into a single knob.
The delay time and the delay factor is combined in one 'time' knob ranging from 0 to 127.
The 'VCF polarity' (0-1) and the 'EG intensity' (0-31) are combined in one 'envelope amount
knob ranging from -31 to 31. Same for the Autobend.
Also, you may have noticed that some knobs show more values than the corresponding
parameter on the DW. For example: the OSC 2 Interval knob has 8 steps where the parameter
is supposed to have only 5 allowed values... Well, i just tried to send 'out of bound' values to
the DW and it worked ! So with UniSynth you effectively can create sounds not accessible from
the DW8000. The extended parameters and values are:
– OSC 1 octave : one more step brings the base pitch 5 semi-tone above original max.
– OSC 2 octave : same
– OSC 2 interval : three more step above 7th chord : zero (does nothing), 12 (1 octave up)
and 32 ( 2½ octaves up !)
– bender range : three more steps above +- 12 : 13, 14 and 15.
The Command Panel
The command panel has three buttons, Init, Rand and Morph.
They give access to advance features affecting all parameters.
The Init button will set all parameters to a simple saw sound. A good start point to build a
new sound from ground up.
The Rand button will set almost all parameters to random values. Creates great sounds if you
are lucky ! Note that some parameters are not changed like the keyboard settings (having
portamento on all sounds is boring...). Also some parameters have 'weighted' ranges : i.e. the
autobend start level is most often equal to low values... but not always. On the opposite, OSC
levels are rarely set to low values, because you wouldn't ear much.
Tip:If you ear no sounds after a random set, try first to raise the cutoff level.
The Morph button allows to set parameters between two sounds.
When you click the button, you have the option to load a second
patch from the disk.
Select the patch file, the window title will then show the two patch
names and the Command Panel will show a new knob and a new
button.
The knob controls the 'morph level' between the two sounds, the value expressed in % show
the part of the Patch #2 in the mix. At 0%, only sound from Edit Buffer is used, at 100% only
sound #2 is used.
Note that at 50%, OSC Wave values abruptly switch from Patch 1 to Patch 2. Also, to avoid
sound stutter, the morph jumps by steps of 10%.
During morphing, other knobs and buttons are disabled.
When you have the right morph level, press the Done button. The Edit buffer parameter will be
set to the obtained values and you can resume normal edition.
The Yamaha DX 21/27/100 plug-in
Foreword
All the manufacturers use time length values
where low values give short envelopes and higher
values give long envelopes.
On the opposite, Yamaha uses a notion of rate for
its DX range: low values give slow envelopes and
high values give fast envelopes.
If like me, this notion do not seem natural, you
can modify this in the Preferences dialog of the
plug-in. In the Main window, select the menu
Edit/Preferences to access this setting.
When you select the 'Time Length' option, all rates
values are inverted. Turning the attack knob to
the left toward zero gives shorter envelopes.
At zero (shortest attack time), the DX will display
a rate of 31 (fastest attack time).
The Program Bank Window
Only the User Bank is shown. Since to access the presets you have to load them into the User
Bank, it is easier to load them from a sysex file.
The Edition Window
To open the edition window, click on Buffer / Edit. This windows presents three areas : a time
graph on top, a control panel below, and a command panel on the bottom right-hand corner.
The Graph
The graph shows the evolution of sound parameters over time. Simply turn the knobs of the
control panel below to view the curves move along.
1
2
3
4
On the bottom of the graph a real time scale in seconds is displayed. To render the huge time
variation of parameters, the scale is exponential ( 1,4,9,16...).
The vertical scale is fixed and the meaning depends of the drawn parameter. As a basic rule,
upper side is 'louder', 'brighter' or 'higher pitch'. Lower side is 'quitter', 'darker' or 'lower pitch'.
Lines have the same color than the knobs involved.
For example, the blue line display the values of the blue knobs (operator 1).
To be consistent with modern synthesis vocabulary, some DX parameters have different names
here :
'Decay 1 level' is called 'Sustain'
'Decay 2 rate' is called 'Fade Out'
If we take a closer look at operator 1s' curve in the image above, we see:
1 : The attack segment is very short and volume is at maximum level in about 1 tenth of a
second.
2 : The decay segment is quite long and takes about 7 seconds to reach sustain level.
3 : The sustain is not constant, the Fade Out parameter will lower the volume to zero in about
75 seconds.
4 : The dotted curve represent the release: i.e. the change in volume when the key is
released. Here, level falls to zero in one second.
Note : in the DX graph, it would not make sens to attach the release segment to the end of the
sustain segment. First it would not be visible after a fading out (it will go from zero to zero ),
in second, the release part can happen everywhere along the envelope as soon as you release
the key. It is why it has been decided to attach it to maximum level of the envelope for better
readability.
All times shown where measured from real audio recording. For instance, with a frequency of
1, the LFO really take 5 minutes and 10 seconds to complete a cycle... Can you imagine
keeping a key pressed for that long to measure it ?... Well, I did ;).
However, this will be true only if the KeyFollow parameter Speed is set to zero. Otherwise, real
time depends of the played key.
The control panel
For directions on control panel usage, please see the chapter about the DW-8000 module.
Notes pertaining to DX21/27/100
Differences:
The snapshot of the control panel shown earlier is for the DX21.
The DX27 and DX100 don't have the following controls:
– Chorus button
– Pedal volume knob
– The Pitch Envelope section
Operator activation / deactivation:
To activate or deactivate an operator, you can click on the colored boxes showing operator
numbers. The box and the curve are shown in gray when the operator is inactive.
Vocabulary:
I have changed parameters names to use more generic names more in use nowadays.
– The Decay 2 which interact during sustain phase is called 'Fadeout'
– The Keyboard Scaling / Level is called Key follow / Damp
– The Keyboard Scaling / Rate is called Key follow / Speed
– The Amplitude Modulation Enable of each parameter appears as buttons labeled 1 to 4 in
the LFO section
– The Foot Volume Range of the DX21 is called PEDAL / Volume.
Troubleshooting
My controller has no effect on the selected device:
1 – Check if the device can produce sounds by itself ? If it does, go to step 3.
2 - Check the volume button of the device and the volume level of your amplification system.
And don't forget to check that the audio jack on the back of the device is not plugged in a foot
switch plug... that happens ;).
3 - Check that the MIDI cord is correctly connected from your midi controller to the computer
4 – If the played device does not have an 'omni mode' enabled (where it is supposed to
respond to messages on all MIDI channels), check that the controller sends messages on the
right channel.
5 – Check the device user manual to see if some global settings can filter out incoming MIDI
messages (that should not be the case if it passed the test in the 'Device Configuration'
dialog).
6 – Check if the controller action can really affect the device.
For example: if you try to play the instruments of a drum kit by actioning the keys of a
keyboard, remember that not all keys are supposed to play something, try the C keys on the
lower end.
Second example: if you try to play a sampler sound, maybe the sample is not assigned to the
full range of the keyboard or to the full velocity range...
7 – If all fails, please try to trace down what is really sent by your controller. This can be
achieved with some tools like MidiOx. ( www.midiox.com )
When click Buffer / > Prog, the patch is not saved in the device:
1 – Most devices have a switch or a global parameter to enable/disable writing. On the DW8000 it is the little switch on the back labeled 'write enable' next to the midi input port. It
should be pushed toward the port to allow writing.