1
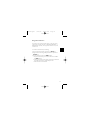
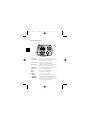
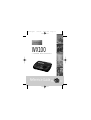
wx100.qxd
7/26/00
11:47 AM
Page ii
WX100
7 CHANNEL WEATHER RADIO
Reference Guide
wx100.qxd
7/26/00
11:47 AM
Page iii
Precautions
Before you read anything else,
please observe the following:
Uniden DOES NOT represent this unit to be waterproof. To
reduce the risk of fire or electrical shock, DO NOT expose
this unit to rain or moisture.
Changes or modifications to this product not expressly
approved by Uniden, or operation of this product in any way
other than as detailed by this Reference Guide, could void
your authority to operate this product.
The installation, possession, or use of this radio in a motor
vehicle may be prohibited, regulated, or require a permit in
certain states, cities, and/or local jurisdiction. Your local
law enforcement officials should be able to provide this
information regarding the laws in your community.
wx100.qxd
7/26/00
11:47 AM
Page iv
TABLE OF CONTENTS
Introduction
Introduction . . . . . . . . . . . . . . . . . . . . . . . . . . . . 1
About Your Radio . . . . . . . . . . . . . . . . . . 1
About Weather Alert . . . . . . . . . . . . . . . . 2
About FIPS Codes . . . . . . . . . . . . . . . . . . 3
Obtaining Your Area’s FIPS Code(s) . . . . . 4
Taking Proper Care of Your Radio . . . . . . 5
Unpacking . . . . . . . . . . . . . . . . . . . . . . 5
Getting Started. . . . . . . . . . . . . . . . . . . . . . . . . . . 6
Installing the Battery . . . . . . . . . . . . . . . 6
Mounting on the Wall . . . . . . . . . . . . . . . 7
Using External Devices . . . . . . . . . . . . . . 8
Controls & Functions . . . . . . . . . . . . . . 9
Initial Setting . . . . . . . . . . . . . . . . . . . . . . . . . . 10
Clock Setting . . . . . . . . . . . . . . . . . . . . 10
Weather Channel Setting . . . . . . . . . . . . 12
FIPS Code Setting . . . . . . . . . . . . . . . . . 13
Alert Type Setting . . . . . . . . . . . . . . . . . 14
Alarm Time Setting . . . . . . . . . . . . . . . . 15
Backlight Setting . . . . . . . . . . . . . . . . . 16
Operation . . . . . . . . . . . . . . . . . . . . . . . . . . . . . 17
Using the Radio . . . . . . . . . . . . . . . . . . 17
Helpful Hints . . . . . . . . . . . . . . . . . . . . 19
User Shortcut Keys . . . . . . . . . . . . . . . . 19
Testing the Weather Alert Radio . . . . . . . 22
Testing the Alert Siren and Indicators . . . 23
Troubleshooting. . . . . . . . . . . . . . . . . . . . . . . . . 24
Technical Specifications . . . . . . . . . . . . . . . . . . . 25
One-Year Extended Warranty . . . . . . . . . . . . . . . 26
Getting
Started
Initial Settings
Operation
Troubleshooting
Specifications
wx100.qxd
7/26/00
11:47 AM
Page 1
INTRODUCTION
About Your Radio
Traditional weather radios receive NOAA’s weather broadcast (usually within a
50-mile radius) then sound an alarm of any emergency code which was
transmitted along with the broadcast. This means that people who live outside
an affected area are often alerted even when their area is not affected, causing
many of them to ignore potentially real weather warnings that can save lives.
In 1994, the National Oceanic and Atmospheric Administration (NOAA) began
broadcasting coded signals called FIPS (Federal Information Processing
System) codes along with their standard weather broadcasts from stations in
your area. These codes identify an emergency and the specific geographic area
(such as a county) affected by the emergency. The WX100 was developed with
the S.A.M.E. (Specific Area Message Encoding) technology. This allows your
radio to receive, interpret, and display the information about the codes so you
can determine if the emergency might affect your area. Only S.A.M.E.
compatible weather radios are able to take advantage of this new technology.
Each FIPS code identifies a specific geographic area (defined by the National
Weather Service), so your radio sounds an alert only when a weather
emergency is declared in those locations. This helps you more efficiently track
the weather conditions in and around your area.
Your new radio is equipped with the following features:
■ PLL Control 7 Preprogrammed Weather Channels
■ Programmable Weather Alert with S.A.M.E. Technology
■ Liquid Crystal Display for Alert Description
■ Alert Type Indicators
■ Broadcast Volume Control
■ Alarm Clock
■ Backlight Display
■ External Antenna Connector
■ External Speaker Connector
■ External Alert System Terminals
1
wx100.qxd
7/26/00
11:47 AM
Page 2
About Weather Alert
When the WX100 receives a weather alert:
• It sounds an alert siren.
• A description of the alert appears.
• An indicator on the front of the radio lights.
If the radio receives more than one weather alert at the same
time, it displays information about each alert.
The alert descriptions your radio can display are based on a list of specific
weather alert types published by the NWS. For a list of all the alert descriptions
that your radio can display, see NWS Weather Alert Event Code Descriptions on
Page 20 - 21.
Caution: The NWS uses sophisticated weather models to determine an alert’s
effective time. However, the end of an alert does not necessarily
mean that the related weather emergency is over.
2
wx100.qxd
7/26/00
11:47 AM
Page 3
About FIPS Codes
For the purpose of broadcasting weather information, the NWS has divided the
United States into regions by state and county (or parish, where applicable)
then assigned a 6-digit FIPS code to identify each county or parish. For
example, the code for Tarrant County, Texas, is 048439.
The first digit in a FIPS code identifies
the county subdivision, the next two
digits identify the state, and the last
three digits identify the county or
parish.
Most FIPS codes begin with 0, which means that FIPS code
represents an entire county. The NWS, however, eventually
plans to subdivide some large counties. When that happens,
each subdivision will be assigned a digit from 1-9, resulting
in codes such as 148439, 248439, and so on.
Your radio can receive all S.A.M.E. alert signals broadcasted within about a
50-mile radius of where you installed it. To receive S.A.M.E. alerts and
broadcasts about weather occurring only in particular counties within that
area, you can program up to 20 FIPS codes into the radio’s memory. For
example, this lets you avoid hearing an alert that applies to an area within a
50-mile radius but not necessarily to your county or parish.
3
wx100.qxd
7/26/00
11:47 AM
Page 4
Obtaining Your Area’s FIPS Code(s)
To obtain the FIPS code for the location where you installed your radio,
contact the NWS toll free at 1-888-NWR-SAME (1-888-697-7263).
Visit their website: http://www.nws.noaa.gov/nwr/indexnw.htm
If you call the NWS, follow the instructions you hear.
If you are close to a county or parish line, you might want to
obtain the codes for the nearby counties or parishes.
Hint: Since you can program up to 20 FIPS codes into the radio’s memory,
you might want to obtain the codes for other local areas (as long as
those areas are within a 50 mile radius of your local NWS broadcast
station). That way, you can program those codes into the radio and
receive broadcasts covering those locations, too.
4
wx100.qxd
7/26/00
11:47 AM
Page 5
Taking Proper Care of Your Radio
■
■
■
Do not use the radio in high-moisture environments such as the kitchen
or bathroom.
Avoid placing the unit in direct sunlight, near heating elements,
or vents.
Do not plug the radio into an outlet controlled by a wall switch as
prolonged periods without power causes the clock to reset.
Unpacking
Carefully check the contents against this list:
■
■
■
■
WX Radio WX100 with built-in telescopic antenna
AC Adapter (Model AD-100W)
Wall Mount Adaptor with Screws
This Reference Guide and other printed material
☞
☞
☞
5
If any items are missing or damaged, contact the Uniden Parts
Department at (800) 554-3988. Hours are from 7:00a.m. to
5:00p.m. Monday through Friday, Central Time. We may also be
reached at www.uniden.com.
Complete and mail your Registration Form immediately.
Read this Reference Guide thoroughly before operating
the radio.
wx100.qxd
7/26/00
11:47 AM
Page 6
GETTING STARTED
Installing the Battery
Before using your WX100 for the first time, be sure to install a 9V Alkaline
battery (not included). It provides backup power when the AC power fails or is
temporarily disconnected. Typical backup power will last for up to 8 hours if
the radio is in standby and the batteries are fresh. If the radio is on and you
are listening to the broadcast, the backup power will only last for about
an hour.
1.
Make sure the volume control is set to off.
2.
Open the battery compartment cover
on the bottom of the WX100, and snap
the battery onto the battery terminals.
3.
Put the battery into the compartment,
and replace the cover.
Replace the battery with a new one whenever “BATT LOW”
appears on the LCD with alert beeps.
Use only the type of battery specified, 9V Alkaline Battery
(6LR61).
6
wx100.qxd
7/26/00
11:47 AM
Page 7
Mounting on the Wall
The WX100 can be mounted on a wall using the wall mount adapter.
7
1.
Insert two mounting screws into the
wall with their appropriate anchoring
device 3 inches apart. Allow about 2/16
of an inch between the wall and
screwheads for mounting the WX100.
2.
Snap the wall mount adapter into the notches on the bottom of the radio.
3.
Insert the small plug of the AC adapter cord into the jack on the back of the
radio marked USE AD-100W ONLY.
4.
Plug the AC adapter into any standard 120V AC wall outlet. Do not plug into
an outlet controlled by a switch. It could cause clock reset.
5.
Place the cord inside the molded channel cord holder.
6.
Align the mounting slots on the adapter with the screws on the wall. Push in
and down until the WX100 is firmly seated.
7.
Extend the antenna to it full height.
wx100.qxd
7/26/00
11:47 AM
Page 8
Using External Devices
If you choose to use an external speaker, antenna, or alert system, use the
external jacks on the back of the radio (ie: EXT SP jack, EXT ANT jack, or
ALERT terminals respectively). You may purchase these devices at any local
electronics store.
To connect the external devices, do the following:
1) Plug an optional external speaker (16-ohm) into the EXT SP jack.
2) Plug an external antenna using an RCA pin connector or adapter into the
EXT ANT jack.
3) Plug the external alert system into the ALERT terminals.
a. To open the terminal holes, press in on the two buttons in the middle of
the ALERT terminals.
b. Insert the two leads into the holes observing correct polarity of the external
device. Make sure the leads are stripped to expose the wire.
c. Release the buttons to secure the leads.
8
wx100.qxd
7/26/00
11:47 AM
Page 9
Controls & Functions
1
2
3
4
5
12
6
7 8 9 10 11
9
1. LCD Display
Displays time, channel, frequency, and functions.
2. Green Indicator
Indicates that a Statement type of alert broadcast is in
effect. Refer to the alert table for details.
3. Yellow Indicator
Indicates that a Watch type of alert broadcast is in
effect. Refer to the alert table for details.
4. Red Indicator
Indicates that a Warning type of alert broadcast is in
effect. Refer to the alert table for details.
5. select Key
Press to select the data of the Menu Mode into memory.
6. Numeric Keys
Press for time and FIPS Code entries.
7. ▲ Key
Steps up the data in Menu Mode.
8. ▼ Key
Steps down the data in Menu Mode.
9. menu Key
Press to switch the Menu Mode.
10. alert Key
Displays the S.A.M.E. message information.
11. weather Key
Selects Broadcast ON/OFF in Weather Radio mode.
12. volume/off
Turn clockwise to increase the volume or turn on the
Weather Radio. Turn counterclockwise to decrease the
volume or turn off the Weather Radio.
wx100.qxd
7/26/00
11:47 AM
Page 10
INITIAL SETTINGS
There are six menu options that you must set up prior to proper operation.
To do this, press menu key. Toggle ▲/▼ keys to change the six menu
options.
1. TIME
: Refers to Clock Setting.
2. CHANNEL
: Refers to Weather Channel Setting
3. FIPS
: Refers to FIPS Code Setting
4. ALT TYPE
: Refers to the Alert Type Setting
5. ALARM
: Refers to the Alarm Time Setting.
6. LIGHT
: Refers to Backlight Setting.
To exit menu mode, press menu repeatedly until WX100 displays.
Each of these options are described in more detail following this introduction.
Clock Setting
When you first apply power or if there is a power outage, you must set the
current time on the display. Otherwise, the display continues to flash 12:00 AM.
To set the current time:
1.
Press menu.
2.
Press ▲/▼ until TIME appears
on display.
3.
Press select.
4.
When power is initially applied,
the display flashes 12:00 AM .
10
wx100.qxd
11
7/26/00
11:47 AM
5.
Then enter the time directly by
pressing the numeric keys.
OR
Enter the time by pressing the
▲/▼ keys. To scroll more quickly
(in 15 minute increments), press
and hold ▲/▼ keys more than 5
seconds.
6.
Press alert to select the desired
setting, either a.m. or p.m.
7.
Press select to complete the
entry. The display goes back to the
Menu mode.
Page 11
wx100.qxd
7/26/00
11:47 AM
Page 12
Weather Channel Setting
Your radio is preprogrammed with the seven NOAA weather broadcast
frequencies (Channel 1-7). Depending on your location, you may be able to
receive more than one channel with clear reception.
CH No.
1
2
3
4
5
6
7
Frequency (MHz)
162.550
162.400
162.475
162.425
162.450
162.500
162.525
The first time you use your radio, Channel 1 (162.550 MHz) is automatically
set as your weather channel. Depending on your location, you may be able to
receive this channel.
To check or change channels, perform the following steps.
1.
2.
3.
4.
5.
6.
7.
8.
Turn volume/off control clockwise until it clicks. WX100 appears in
the display.
Press weather.
Adjust the volume control to a comfortable listening level. You may hear the
weather broadcast on the initially selected channel. If not or if you wish to
select another channel, continue on. Otherwise stop here. Your channel
is set.
Press menu.
Press ▲/▼ keys until CHANNEL appears.
Press select.
Press ▲/▼ key to scroll through the list of channels, or press the number
key to select the desired channel. The channel number and corresponding
frequency appear alternately in the display. If you receive more than one
channel, select the one that has the clearest audio.
Press select again to complete the entry.
During operation, when the channel information is flashing
on the display, you can change the channel using the ▲/▼
key. Then press select to complete the entry.
12
wx100.qxd
7/26/00
11:47 AM
Page 13
FIPS Code Setting
The 6-digit Federal Information Processing System (FIPS) code established by
the National Weather Service (NWS) identifies geographic areas in the United
States. Programming FIPS code is necessary to receive S.A.M.E. alerts about
weather occurring in a particular area.
To set FIPS codes:
1. Press menu and toggle ▲/▼ until FIPS appears in the display.
2. Press select.
3. Press ▲/▼ to select ANY FIPS , SINGLE , or MULTIPLE .
• If you select ANY FIPS , press select. This completes the entry.
The display returns to menu mode.
• If you select SINGLE ,
a) Press select . Then enter the FIPS code that you want to be
monitoring.
b) Press select and the display returns to menu mode.
• If you select MULTIPLE ,
a) Press select. FIPS 01 and the associated FIPS code alternately
appear if entered previously. If no associated FIPS codes appear, none
were previously entered in that location.
b) Press select again and the digits of FIPS code start flashing,
indicating that the code is ready to be edited or entered. A blank
display appears if there were no previous FIPS codes entered.
c) Press the numeric keys to enter the code and press select again
d) Repeat the above steps in any or all memory locations using the
▲/▼ to select another location.
e) To exit this mode, press menu key until FIPS appears.
13
Option Description:
ANY FIPS
When this option is selected, your radio receives the alert
signals of any FIPS codes whether you have programmed
them or not.
SINGLE
When this option is selected, your radio only receives the alert
signals corresponding to the FIPS code that you enter.
MULTIPLE When this option is selected, your radio receives the alert
signals corresponding to the FIPS code that you program in
any of the 20 memory locations.
wx100.qxd
7/26/00
11:47 AM
Page 14
Alert Type Setting
You can change the Alert Type to one of two options.
VOICE: WX100 sounds an alert for about 8 seconds, then automatically turns
on the weather (voice) broadcast for 5 minutes. Then the voice
broadcast is turned off and returns to standby mode.
TONE:
WX100 sounds an alert continuously for 15 minutes until any key
is pressed.
No broadcast will be heard until you disable the tone and turn the
broadcast on.
The WX100 automatically selects the TONE Alert Type the first time you turn it
on. To change the Alert Type setting, see the following steps.
1.
Press menu key and toggle
▲/▼ keys until ALT TYPE
appears in the display. Then press
select key.
2.
Press ▲/▼ key to choose
TONE or VOICE .
3.
Press select again.
14
wx100.qxd
7/26/00
11:47 AM
Page 15
Alarm Time Setting
As an additional feature, the WX100 has an audible alarm clock.
Before setting this feature, set the clock to the current time. (See page 10)
15
1.
Press menu key and toggle ▲/▼
keys until ALARM appears. Press
select key for setting the Alarm
Time and ▲/▼ keys to change the
Alarm Time Setting on or off. If you
do not want to set the Alarm Time,
select Alarm off. The display goes
back to the menu mode.
2.
If you select ON;
enter the alarm time directly by pressing the numeric keys.
OR
enter the time by pressing the ▲/▼ keys. To scroll more quickly (in 15
minute increments), press and hold ▲/▼ more than 5 sec.
3.
Press alert to select the desired setting, either a.m. or p.m.
4.
Press select to complete the entry.
5.
The alarm icon ( ) appears.
6.
To exit the menu mode, press
menu key.
wx100.qxd
7/26/00
11:47 AM
Page 16
Backlight Setting
The initial setting for the display backlight is CONSTANT , which means the
backlight stays on continuously. You can change this setting to SAVE
or OFF .
In SAVE , the backlight stays on for 10 seconds and then switches to off. Then
when any key is pressed, backlight stays on for 10 seconds and then switches
off. In OFF , the backlight is turned off.
1.
Press menu key and toggle
▲/▼ key until the LIGHT
appears in the display. And press
select key for the Backlight
Settings.
2.
Press ▲/▼ key to select
CONSTANT , SAVE , or OFF
and then press select key.
3.
To exit the menu mode, press
menu.
16
wx100.qxd
7/26/00
11:47 AM
Page 17
OPERATION
Using the Radio
Your radio functions as a severe weather warning radio. This is especially
useful when your area is expecting severe weather conditions any time of day.
It emits a loud siren whenever your local NOAA weather station broadcasts a
severe weather emergency tone. You have the option of listening to the weather
broadcast or not. Even though you may not be listening to the broadcast, the
radio still responds to the emergency tones from the local weather station.
To turn on the weather alert radio:
1.
Turn the volume/off control clockwise until it clicks. WX100, CH No. and
frequency appear in the display respectively.
2.
Press weather until you hear the weather broadcast.
OR
If you do not want to listen to the weather broadcast, press weather again.
The receiver is actually still on but the audio is muted.
3.
Make sure you adjust your volume control to a comfortable listening level.
If you have set the Alert Type to VOICE , the volume level of the voice
broadcast, when it comes on, will be set correctly.
The volume control only adjusts the audio of the
broadcast, not the siren volume.
4.
17
If the Alert Type icon ( ) or ( ) is not present, press and hold alert to
turn on the audible weather alert. The selected Alert Type icon appears.
When the emergency tone is broadcasted, the siren sounds and the external
Alert terminals are activated. If you press and hold alert again, the Alert
Type icon disappears. When the emergency tone is broadcasted, the siren
and the external Alert terminals are disabled. The message and the
corresponding indicator will still appear.
wx100.qxd
7/26/00
11:47 AM
Page 18
When the WX100 receives the S.A.M.E.
message, the EVENT message and
expiration time appear in the display.
The corresponding indicator of the
S.A.M.E. message turns on, and the
corresponding siren tone sounds.
You can choose between the S.A.M.E.
message information with the
keys ▲/▼.
If you press the alert key, the current
time and the number of S.A.M.E.
messages displays alternately every
second.
Messages are deleted if the volume/off control is
turned off.
Depending on the Alert Type setting
you selected, will determine the Alert
Type icon on the display. If you
selected the TONE Alert Type alert,
the following icon will be displayed.
If you selected the Voice Alert Type
alert, the following icon will be
displayed.
18
wx100.qxd
7/26/00
11:47 AM
Page 19
5.
To silence the siren, press any key.
6.
To turn off the radio, turn the volume/off control counterclockwise until
it clicks. Your radio will continue to function as an Alarm Clock. The
selected settings remain for the next time the radio is turned on.
Helpful Hints
If you programmed more than one FIPS code, make sure the menu option is
set to MULTIPLE or ANY FIPS mode.
Otherwise, the radio will only receive broadcasts for the FIPS code you entered
in the SINGLE mode.
User Shortcut Keys
The following are few shortcut keys to allow you to change options without
going back to the menu mode.
• Select key – press and hold the select key to toggle the Alarm clock on and
off. The alarm icon appears when the alarm clock is on. This functions
whether the volume/off control is either set to on or off.
• Weather key – Press and hold the weather key to toggle between the tone
or voice Alert type. The corresponding icon appears. This functions only when
the volume/off control is set to on.
• Alert key – Press and hold the alert key to toggle the audible weather alert
mode on or off. When the audible weather alert mode is on, the siren and the
external alert terminals are enabled. The Alert Type indicator appears in
display. When the audible weather alert mode is off, the siren and the external
alert terminals are disabled. The Alert Type indicator does not appear in
display, but the messages and corresponding indicator appear when an
emergency code is received.
When using either the weather or alert shortcut keys while
the display is flashing, you can change to another channel
by pressing ▲/▼ key and then press select to complete
the entry.
19
wx100.qxd
7/26/00
11:47 AM
Page 20
The following is a list of Event codes transmitted by the National Weather
Service. When a specific Event code is received, this chart indicates the displays
as they alternately appear on the display with the corresponding Alert Type
indicator, and the Alert Type tone of the siren.
Event Codes
Event
Code
AVW
AVA
BZW
CDW
CDA
CEM
CFW
CFA
EAN
EAT
EVI
FRW
FFS
FFW
FFA
FLS
FLW
FLA
HMW
HMA
HWW
HWA
HLS
HUW
HUA
IEW
LEW
Display 1
AVALANCH
AVALANCH
BLIZZARD
CIVIL
CIVIL
CIVIL
COASTAL
COASTAL
EMERGENC
EMERGENC
EVACUATE
FIRE
FLASH
FLASH
FLASH
FLOOD
FLOOD
FLOOD
HAZARD
HAZARD
HIGH
HIGH
HURRICAN
HURRICAN
HURRICAN
IMMEDIAT
LAW
Display 2
Display 3
DANGER
DANGER
EMERGENC TUNE TV
FLOOD
FLOOD
ACTION
ACTION
TERMINAT
IMMEDIAT
FLOOD
FLOOD
FLOOD
MATERIAL
MATERIAL
WIND
WIND
EVACUATE
ENFORCE
LED
Alert Siren
Red
Yellow
Red
Red
Yellow
Red
Red
Yellow
Red
Red
Red
Red
Green
Red
Yellow
Green
Red
Yellow
Red
Yellow
Red
Yellow
Green
Red
Yellow
Red
Red
Warning Siren
Watch Siren
Warning Siren
Warning Siren
Watch Siren
Warning Siren
Warning Siren
Watch Siren
Warning Siren
Warning Siren
Warning Siren
Warning Siren
Statement Siren
Warning Siren
Watch Siren
Statement Siren
Warning Siren
Watch Siren
Warning Siren
Watch Siren
Warning Siren
Watch Siren
Statement Siren
Warning Siren
Watch Siren
Warning Siren
Warning Siren
20
wx100.qxd
Event
Code
LAE
NHW
NIC
NPT
DMO
RHW
RHA
RWT
RMT
SVR
SVW
SVA
SVS
SPW
SMW
SPS
TOR
TOW
TOA
TSW
TSA
VOW
VOA
WSW
WSA
??E
??A
??W
??S
21
7/26/00
Display 1
LOCAL
NATIONAL
NATIONAL
NATIONAL
DEMO
RADIOLOG
RADIOLOG
WEEKLY
MONTHLY
SEVERE
SEVERE
SEVERE
SEVERE
SHELTER
SPECIAL
SPECIAL
TORNADO
TORNADO
TORNADO
TSUNAMI
TSUNAMI
VOLCANO
VOLCANO
WINTER
WINTER
UNKNOWN
UNKNOWN
UNKNOWN
UNKNOWN
11:47 AM
Page 21
Display 2
Display 3
AREA
HAZARD
INFO
PERIODIC
MESSAGE
HAZARD
HAZARD
TEST
TEST
THUNDER
THUNDER
THUNDER
WEATHER
IN-PLACE
MARINE
WEATHER
EMERGENC Red
Red
CENTER
Red
TEST
Green
Red
Yellow
Red
Red
Yellow
Green
Red
Red
Green
Red
Red
Yellow
Red
Yellow
Red
Yellow
Red
Yellow
Red
Yellow
Red
Green
STORM
STORM
TUNE TV
TUNE TV
TUNE TV
TUNE TV
LED
Alert Siren
Warning Siren
Warning Siren
Warning Siren
Statement Siren
None
Warning Siren
Watch Siren
Statement Siren
Statement Siren
Warning Siren
Warning Siren
Watch Siren
Statement Siren
Warning Siren
Warning Siren
Statement Siren
Warning Siren
Warning Siren
Watch Siren
Warning Siren
Watch Siren
Warning Siren
Watch Siren
Warning Siren
Watch Siren
Warning Siren
Watch Siren
Warning Siren
Statement Siren
wx100.qxd
7/26/00
11:47 AM
Page 22
Testing the Weather Alert Radio
Your local NOAA weather station regularly schedules testing periods.
Contact them to find out the exact date and time to test your siren.
Testing your radio is very important because an emergency alert broadcast
might not trigger your radio alert tone, even if it receives the audio broadcast
clearly. If you are in a fringe area, you might be able to receive the alert tone
in one part of your house but not another. Make sure you test it in the location
you want to leave it.
The Alert indicators on the radio do not turn on during a
test broadcast. Only the statement siren sounds and the
message displays.
22
wx100.qxd
7/26/00
11:47 AM
Page 23
Testing the Alert Siren and Indicators
To test and recognize the difference between the types of alert sirens and the
alarm clock tone, perform the following steps:
1.
Turn the volume/off control clockwise until it clicks. WX100 appears in
the display.
2.
Press and hold 1 until you hear the alarm clock tones. ALARM appears
on the display.
3.
Press and hold 2 until you hear the Statement Alert siren. ALERt appears
on the display and the Statement indicator turns on.
4.
Press and hold 3 until you hear the Watch Alert siren. ALERt appears on
the display and the Watch indicator turns on.
5.
Press and hold 4 until you hear the Warning Alert siren. ALERt appears on
the display and the Warning indicator turns on.
The samples of the test only last for a few seconds.
You may need to test each siren several times to be sure
you recognize the different sirens and tones.
Repeat steps 2 through 5 as needed.
Make sure you can hear the siren in all areas that you would need to. If not,
optional accessories can be purchased to ensure that you are alerted for
emergency broadcasts. See your dealer or local electronics store for accessories.
If you have an external alert system connected to the ALERT
terminals, it turns on during the Alert Siren and Indicators
test. (Steps 3-5)
23
wx100.qxd
7/26/00
11:47 AM
Page 24
TROUBLESHOOTING
If your WX100 radio is not performing properly, try the following steps. If you
are still unable to resolve the problem, contact your place of purchase or call
customer service at (800) 297-1023.
Problem
■
■
WX100 won’t power up.
Poor reception.
Solution
■
Check the connections at both ends of the AC
Adapter.
■
Turn on the wall switch of your room. You could
be using an outlet controlled by the wall switch.
■
Move the AC Adapter to another wall outlet.
■
Check antenna connection.
■
Move the antenna.
■
Relocate the radio.
■
You may be in a fringe area. This could require
an optional multi-band antenna. Check with
your dealer or local electronics store.
24
wx100.qxd
7/26/00
11:47 AM
Page 25
TECHNICAL SPECIFICATIONS
Frequency Coverage (MHz): Channel 1:
Channel 2:
Channel 3:
Channel 4:
Channel 5:
Channel 6:
Channel 7:
Receiving Sensitivity
(at 12 dB SINAD):
FIPS Decode Sensitivity @Dev. ±4.5 kHz
Deviation/90 % Success Rate:
Signal & Noise Ratio:
Channel Selectivity:
Audio Output Power (Maximum):
Power Requirements:
Battery Back-up:
ALERT terminal output
(w/3.9 K ohm load):
Antenna:
Dimensions:
Weight:
162.550
162.400
162.475
162.425
162.450
162.500
162.525
0.35 µV
0.4 µV
40 dB
60 dB
300 mW
Use AD-100W (adapter included)
with 120 V AC (±10%) 60 Hz
One 9-Volt Alkaline Battery
(not included)
2.4 V DC
Telescopic Rod Antenna (built-in)
180 (W) x 130.5 (D) x 45 (H) mm
350 g without AC ADAPTER and
9 V Battery
Specifications are typical; individual units might vary.
Specifications are subject to change and improvement without notice.
25
wx100.qxd
7/26/00
11:47 AM
Page 26
ONE-YEAR EXTENDED WARRANTY
Important: Evidence of original purchase is required for warranty service.
WARRANTOR: UNIDEN AMERICA CORPORATION (“Uniden”)
ELEMENTS OF WARRANTY : Uniden warrants, for one year, to
the original retail owner, this Uniden Product to be free from
defects in materials and craftsmanship with only the limitations or
exclusions set out below.
WARRANTY DURATION : This warranty to the original user shall
terminate and be of no further effect one year after the date of
original retail sale. The warranty is invalid if the Product is (A)
damaged or not maintained as reasonable or necessary, (B)
modified, altered, or used as part of any conversion kits,
subassemblies, or any configurations not sold by Uniden, (C)
improperly installed, (D) serviced or repaired by someone other
than an authorized Uniden service center for a defect or
malfunction covered by this warranty, (E) used in any conjunction
with equipment or parts or as part of any system not manufactured
by Uniden, or (F) installed or programmed by anyone other than
as detailed by the owner’s manual for this product.
STATEMENT OF REMEDY : In the event that the product does
not conform to this warranty at any time while this warranty is in
effect, warrantor will either, at its option, repair or replace the
defective unit and return it to you without charge for parts,
service, or any other cost (except shipping and handling) incurred
by warrantor or its representatives in connection with the
performance of this warranty. Warrantor, at its option, may replace
the unit with a new or refurbished unit. THE LIMITED WARRANTY
SET FORTH ABOVE IS THE SOLE AND ENTIRE WARRANTY
PERTAINING TO THE PRODUCT AND IS IN LIEU OF AND
EXCLUDES ALL OTHER WARRANTIES OF ANY NATURE
WHATSOEVER, WHETHER EXPRESS, IMPLIED OR ARISING BY
OPERATION OF LAW, INCLUDING, BUT NOT LIMITED TO ANY
IMPLIED WARRANTIES OF MERCHANTABILITY OR FITNESS FOR
26
wx100.qxd
7/26/00
11:47 AM
Page 27
A PARTICULAR PURPOSE. THIS WARRANTY DOES NOT COVER
OR PROVIDE FOR THE REIMBURSEMENT OR PAYMENT OF
INCIDENTAL OR CONSEQUENTIAL DAMAGES. Some states do not
allow this exclusion or limitation of incidental or consequential
damages so the above limitation or exclusion may not apply to
you.
LEGAL REMEDIES: This warranty gives you specific legal rights,
and you may also have other rights which vary from state to state.
This warranty is void outside the United States of America.
PROCEDURE FOR OBTAINING PERFORMANCE OF
WARRANTY: If, after following the instructions in the reference
guide you are certain that the Product is defective, pack the
Product carefully (preferably in its original packaging). The
Product should include all parts and accessories originally
packaged with the Product. Include evidence of original purchase
and a note describing the defect that has caused you to return it.
The Product should be shipped freight prepaid, by traceable
means, to warrantor at:
Uniden America Corporation
Parts and Service Division
4700 Amon Carter Blvd
Fort Worth, TX 76155
(800) 554-3988, 7 a.m. to 5 p.m., Central Time, Monday
through Friday
27
wx100.qxd
7/26/00
11:47 AM
Page 28
MEMO
28
wx100.qxd
7/26/00
11:47 AM
Page i
THANK YOU
FOR PURCHASING THIS UNIDEN PRODUCT!
© 2000 Uniden America Corporation
UBZZ01900ZZ
All rights reserved • Printed in China
Covered under one or more of the following U.S. patents:
4,597,104
5,448,256
5,598,430
4,627,100
5,530,296
5,600,223
5,438,688
5,548,832
5,642,424