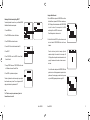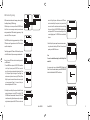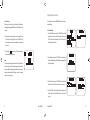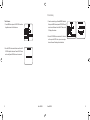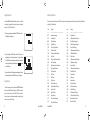
1
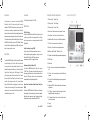
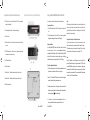
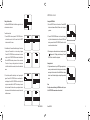
Manufactured, distributed or sold by Giant International Ltd.,
official licensee for this product. MOTOROLA and the Stylized
M Logo are trademarks or registered trademarks of Motorola
Trademark Holdings, LLC. And are used under license. All other
trademarks are the property of their respective owners.
©2013 Motorola Mobility LLC. All rights reserved.
Model: MWR839
Please contact customer service at 800-638-5119 or e-mail us
at [email protected] for questions, comments, warranty,
support or service related to this product.
www.motorola.com
3A81WV8K0000A
MWR839_US_UG_041813_v9
Weather Alert Radio
User Guide
Table of Contents
Important Safety Instructions
Important Safety Instruction ................................................ 2
1. Read and understand all safety and operating instructions before the
radio is operated.
10. Do not install near any heat sources such as radiators, heat registers,
stoves, or other apparatus (including amplifiers) that produce heat.
2. Retain Instruction: The operating instructions should be retained for
future reference.
11. Do not place the radio on an unstable cart, stand, bracket or table.
The radio may fall, causing serious physical injury and damage to
the radio.
Introduction & How It Works ............................................... 3
Accessories & Main Features ............................................. 3
Location of Controls ......................................................... 4-5
Description of Controls and Functions ............................. 4-5
3. Heed Warnings: All warnings on the appliance and operating instructions
should be followed.
Using the Motorola Weather Alert Radio .......................... 6-7
AM/FM radio & Aux In ...................................................... 8-9
Selecting the Weather Band Channel ................................. 9
4. Follow all operations and use instructions.
Setting up RBDS CT .................................................... 10-11
5. Only use attachments / accessories specified by the manufacturer.
Listening to Weather Broadcast ........................................ 12
SAME Location Programming ...................................... 13-14
6. Use only a dry cloth for cleaning the exterior of the radio.
Advanced Programming .................................................... 15
Adding New Weather Alert Event Codes ......................16-17
7. Ventilation: this radio should be situated so that its location or position
does not interfere with its proper ventilation. For example, the radio
should not be used on a bed, sofa, rug or other soft surfaces that may
block the ventilation openings. It should not be placed in a built-in
situation like a cabinet that may reduce airflow through the ventilation
openings. Also keep 10cm space on the back of the radio.
Setting the Siren Volume ............................................. 18-19
Setting the Siren Mode ...................................................... 20
Setting the Alarm Clock ................................................ 21-23
Setting Backlight and Contrast ..................................... 24-25
To Erase Memory .............................................................. 26
System Version ................................................................. 27
Alert Description Table ................................................. 28-29
14. Power sources: The radio should be operated only from the type of
power source indicated on the marking label. If you are not sure of
the type of power supply to your home, consult your radio dealer or
power company.
9. Do not expose this product to splashing or dripping water. Objects
containing liquid, such as vases or drinking glasses, should not be
placed on top of this product.
Warranty ....................................................................... 31-33
FCC Compliance Information ............................................ 33
Glossary ............................................................................ 34
13. Do not plug the AC lead into the AC outlet if the outlet is still wet.
Make sure that the outlet is dry before and after use.
8. Water and moisture: the appliance should not be used near water. Do
not use near a bathtub, washbowl, laundry tub, kitchen sink, wet
basement, swimming pool, etc.
Setting Sleep Timer ........................................................... 27
1
12. Do not attempt to service the receiver yourself. Removing the cover
may expose you to dangerous voltage, and will void the warranty.
Model: MWR839
Model: MWR839
2
Introduction
Accessories
Congratulations on your purchase of your Motorola MWR839
Weather Alert Radio. This product complies with the exacting
standards for CEA-2009A Public Alert devices, and will provide you with
the information you need for your greatest safety from the effects of
weather and other external hazards. It receives digitally encoded civil and
weather emergency alert messages and has a receiver that tunes to the
24/7 broadcasts issued by the National Weather Service. Your Motorola
MWR839 Weather Alert Radio receives all 7 NOAA Weather Channels
and uses Specific Area Message Encoding (SAME) to identify specific
areas, like a county or portion of a state.
1 AC Power Adaptor (Included) – 6V DC 400mA
How It Works
Your Motorola MWR839 Weather Alert Radio displays NOAA weather
alert text messages on the LCD screen. When an alert is received,
the alert sounds and the radio automatically switches to the voice
broadcast. Messages are identified by one of three color-coded LED
lights as follows: “Advisory” (yellow), “Watch” (orange) or “Warning”
(red). Emergency weather bulletins include alerts about: Tornados,
Hurricanes, Floods, Winter/Tropical/Dust Storm and other severe
weathers. Other emergencies include: Fire, Iceberg, Telephone
Outage, Dam Watch and other civil emergencies. You can store up to
25 locations for your radio to respond to. There are advanced optional
settings which you can use, such as “Defeat Siren” and “Add Alerts” to
customize the response of your radio.
3
Description of Controls and Functions
Locations of Controls (TOP)
1. LED Indicator Light – “Warning” (Red)
2. LED Indicator Light – “Watch” (Orange),
Main Features
3. LED Indicator Light – “Advisory” (Yellow)
NOAA Alert Function
Your Motorola MWR839 Weather Alert Radio will automatically sound
an alert tone siren and flash the corresponding LED color indicator
when it receives a weather or civil emergency broadcast from NOAA
(Weather Band).
Specific Area Message Encoding (SAME)
Allows you to store up to 25 different location codes into memory.
Each code identifies a specific geographic area, typically a county as
defined by NOAA. Setting the SAME location helps reduce
unnecessary alerts outside of your geographic location.
Alphanumeric Liquid Crystal Display (LCD)
Your Motorola MWR839 Weather Alert Radio has a graphic
(128*64 Pixels) LCD module with excellent display quality and a
wide viewing angle. Weather and other alert information will scroll
across the LCD display. In addition, it has dimmer and contrast
control adjustment for viewing the display in the dark.
External Device Compatible and Radio Broadcast Data System
(RBDS)
Your Motorola MWR839 Weather Alert Radio has a built-in external
alert output jack for other accessories (e.g. hearing / visually impaired,
flashing light, indoor / outdoor siren / alarm). You can also set the date,
weekday and time manually or automatically by RBDS CT set.
Model: MWR839
4. Snooze Button – Silences wake-up alarm for a period of 5 minutes.
5. Preset Stations – Saves 5 sets of your favorite radio stations.
6. Weather Band Button – Press to listen to NOAA weather broadcast.
7. CT Button – Press to synchronize a clock in the receiver.
8. Menu Button – Press and hold to enter programmable menus.
9. Band Button – Select “AM radio”, “FM radio” or “Aux In”.
10. Tune Down – Use to scroll down through menu options while programming.
11. ON/OFF Button
12. Select Button
13. Vol Up – Use to turn volume up and to scroll forward through menu
lists.
14. Vol Down – Use to turn volume down and to scroll back through
menu lists.
15. Tune Up – Use to scroll back through previous menu options while
programming.
16. Weather Alert ON/OFF – Switch to put the weather / hazard receiver
into alert mode.
17. LCD Display – Displays time and alert messages. Also used to
display different options when programming.
18. 21” Integrated Telescopic Antenna – Fully extend the antenna and
orient it for best reception.
19. Speaker
Model: MWR839
4
Description of Controls and Functions (con.)
Locations of Controls-cont. (Rear, Side & Bottom)
20. DC Power Jack – Connect AC Adapter or 6V DC from car cigarette
adapter (not included).
Using the Motorola MWR839 Weather Alert Radio
Your radio can operate with batteries (not included) or electricity.
Connecting the Power
1. Plug the AC adapter cord into the 6V DC input jack on the back of the
unit.
21. Stereo Headphone Socket – Allows private listening.
2. Plug the adapter into the wall outlet. The Vdc and plug indicator
will appear on the upper left corner of the LCD display.
22. Aux In Socket
23. External Alert Jack – Provides contact closure to activate external
devices.
25. AM Antenna Terminal
Battery Installation
Your Motorola MWR839 Weather Alert Radio uses 4 AA batteries
for back-up power. It can run on non-rechargeable alkaline, or
rechargeable Nickel Cadmium (Ni-Cad) or Nickel Metal Hybrid (NiMH)
batteries. When the radio is operating on battery power, the battery
indicator will appear on the upper left corner of the LCD display.
26. Ground Terminal
To Install or Replace the Batteries:
24. WX/FM Antenna Jack – Permits use of an optional extended range
base antenna or a mobile antenna.
1. Turn the unit upside down. Locate the battery compartment door tab,
press down on the door tab and lift the cover up to open.
27. Alarm Switch 1 – Enables and disables alarm 1 clock function.
Note:
When removing the batteries, locate the innermost battery and look for
the minus (-) sign located on the battery. Press down on the minus (-)
sign and the battery will be tilted out of the compartment. The rest of the
batteries can be removed easily.
Getting better Reception with External Antennas
If you have weak reception on your radio in remote areas, you may
improve your reception by using external antennas. Connect the external
FM/ weather antenna in the terminal shown in figure 24 in the pull chart.
Connect the external AM antenna as shown in figure 25, 26.
Note:
Both the FM/weather and the AM antenna are not included. For the
external FM/weather antenna, a third party antenna (ANT 100 or other
external FM/Weather antenna) can be connected for superior range
and reception. As for the AM loop antenna, you need to buy an AM loop
antenna from an electronic store. The recommended AM loop antennas
include C. Crane F5 External AM Antenna.
2. Insert 4 x “AA” size/UM-3/LR14 batteries. Be sure to follow the polarity
28. Alarm Switch 2 – Enables and disables alarm 2 clock function.
markings. Replace the battery compartment cover.
29. Battery Compartment
3. Reduced power, distortion, a “stuttering” sound are all signs that the
batteries may need replacing. The batteries should be replaced when
the battery indicator
flashes in the display.
4. If the radio is to be stored for an extended period of time, it is
recommended that the batteries are removed from the radio.
5
Model: MWR839
Model: MWR839
6
AM/FM Radio and Aux In
Listening to AM/FM Radio
1. Press the ON/OFF button to turn the radio on. Press the BAND
button to select between AM radio, FM radio or Aux In settings as
you desire.
Setting the Time and Date
Your Motorola MWR839 Weather Alert Radio is equipped with a date
and time clock as a clock radio.
To set the time and date:
1. Press the MENU button and press the TUNE DOWN button to
scroll down the menu list to the Clock menu. Press the SELECT
button to enter the Clock menu.
2. Press the TUNE UP/DOWN buttons to tune the radio frequency
until you find the desired radio station. To search a AM/FM radio
stations, press and hold the TUNE UP/DOWN, and the radio will
scan until a radio station is found.
2. Select Manual, then Time and Date will be displayed. To set the time
of day, select Time and the hour / minute setting will appear.
Press the VOL UP/DOWN button to move between hour / minute
settings. Use the TUNE UP/DOWN button to select the desired time.
Press the SELECT button when you have set the time as desired.
The radio will save your settings and return to the main menu
at the Clock and after a few seconds, will return to the default radio
screen.
3. When listening to a radio broadcast in stereo, a headphone symbol
“ ” will appear on the LCD display above the frequency. Press the
SELECT button to switch to Mono (auto) mode.
Listening to Aux In
4. To play external device such as your MP3/CD player using the radio,
connect your audio device into the Auxiliary input socket to allow an
audio signal to be fed into the unit. Press the BAND button to choose
the Aux In mode. The radio will play the audio input from your external
device.
3. To set the date, select Date and the day / month / year setting will
appear. Press the VOL UP/DOWN button to move between the
month/day/year. Use the TUNE UP/DOWN to select the day, month
and year as desired. Press the SELECT button when you have set
the date as desired. The radio will save your settings and return to
the main menu at the Clock and after a few seconds, will return to the
default radio screen.
7
Note:
To adjust volume when listening to AM/FM radio or Aux In, press
the VOL UP/DOWN to increase/reduce the sound level.
Model: MWR839
Model: MWR839
8
Presetting AM/FM Stations
You may store up to 5 station presets for each FM/AM band. Using the
preset buttons saves your time when searching your favorite stations.
1. Press the ON/OFF button to turn the radio function on, then tune to
your desired station.
2. Press and hold the required PRESET button (1 to 5) for 2 seconds
until there is a beep sound, and the display shows “PRESET 1”. The
station will be stored using the chosen preset number. Repeat this
procedure for the remaining presets as you wish
3. Preset memories which have already been stored may be overwritten
by following the above procedure if required.
Recalling a Preset AM/FM Station
1. Press the ON/OFF button to turn the radio function on.
2. Select the desired waveband by pressing the BAND button.
3. Momentarily press the required PRESET button (1 to 5) to tune your
radio to the station stored in preset memory.
9
Selecting the Weather Band Channel
Setting up RBDS CT
To receive alerts, you must first select the correct weather channel.
NOAA broadcasts on the weather band on seven channels in
25kHz increments, between the frequencies of 162.400MHz and
162.550MHz.
Radio Broadcast Data System, or RBDS: Your Motorola MWR839
Weather Alert Radio, through the RBDS technology, is able to digitally
display text information on the LCD screen. This digital information
includes name of the station, alternative station frequencies, song title,
track/artist info, and program genre that is received with your FM radio
broadcast (such as Rock, Pop, Country, News, etc.).
To identify the appropriate channel for your area, visit the NOAA
website at: http://www.nws.noaa.gov/nwr/indexnw.htm or select by
listening to the channels and select the appropriate one with good
reception in your area.
The table on the NOAA website includes the correct weather band
frequency for your area, the SAME code and the location of the
broadcast tower. Look for the state in which you live and then search
the list for your county. Use the frequency listed for your county
when programming the weather band channel.
WEATHER BAND CHANNELS and frequecies
Channel
1
2
3
4
5
6
7
Frequency (MHz)
162.400
162.425
162.450
162.475
162.500
162.525
162.550
CT (Clock Time) is normally contained in the RBDS data, and you can
set the date, weekday and time manually by the RBDS data that is
transmitted to your Motorola MWR839 Weather Alert Radio by following
the instructions below:
Setting CT Manually
1. Tune to a FM station transmitting RBDS data (The LCD display will
show R.B.D.S.) then press the CT button. The
symbol will start
flashing on the LCD. This indicates that the clock time is being pulled
from the selected radio station’s RBDS data. The clock time of the
radio will set up automatically according to the RBDS data received.
2. When the action is completed,
will appear on the LCD display
indicating the radio time is RBDS clock time. The radio clock time will
be valid for seventy two hours each time the radio time is synchronized
with RBDS CT.
Note: Please be aware that some RBDS radio stations may not have
current information (date/time) so be sure to use an independent source
(watch/clock...) to verify that the date and time pulled by the radio’s CT
feature is in fact current.
Model: MWR839
Model: MWR839
10
Listening to Weather Broadcast
1. Press the MENU button and press the TUNE DOWN to scroll down
to Weather Channel, and press the SELECT button to enter the menu.
The LCD display will show the channel number. Press TUNE UP/DOWN
to select the channel that corresponds with the NOAA
website listing. Press the SELECT button to save the
Channel Setting and return to the main menu list.
Maintaining Clock Time Automatically Using RBDS CT
To automatically maintain the correct time on your Motorola MWR839
Weather Alert Radio without manual operation:
1. Press the MENU button.
2. Press TUNE DOWN to scroll down to the Clock menu.
2. Switch the Weather Alert ON/OFF to put the weather receiver into
alert mode. Press the WEATHER BAND button to hear the voice
broadcast.
3. Press TUNE DOWN to scroll down to Automatic.
4. Press the VOL UP button to turn the Automatic function ON.
Place the radio where it gets the best reception. Adjust the
orientation and length of the antenna for the best reception. The
LCD display willshow the specified weather channel number in the
upper right handcorner when the weather / hazard receiver is in
alert mode.
5. Press SELECT.
6. Press TUNE DOWN to scroll and SELECT to choose Station 1,
Station 2 or Station 3.
7. Press any PRESET station or use TUNE UP/DOWN to set the radio
to a FM station as the source of the radio CT data.
To turn off the weather channel press the WEATHER BAND button
again.Your radio can be further programmed to respond to alerts in
specific areas. To custom program your radio for alerts in your area
only, see the SAME programming instructions on page 11-12.
8. Press ON/OFF to put the radio in standby mode.
The radio will synchronize the clock time according to your settings of
these three stations every two hours. The icon will appear on the LCD
display when the radio clock is synchronized with CT.
Note:
The CT function can only be operated manually, when the
Automatic feature is turned off.
11
Model: MWR839
Model: MWR839
12
SAME Location Programming
NOAA transmits coded weather and civil emergency alerts using Specific
Area Message Encoding (SAME technology).
SAME enables you to customize your Motorola MWR839 Weather
Alert Radio to receive messages relevant to your area, therefore
reducing unwanted alerts. SAME is activated by programming a 6 digit
code – called a FIPS code – into your radio.
and exit to Single County menu. More than one set of FIPS codes
can be stored under Single County mode, but only one set of code
can work at a time. The codes that are stored will show in the Single
County menu list. Press the TUNE UP/DOWN to highlight the stored
code, and press SELECT button to overwrite an existing code. When
a code is highlighted, press VOL UP/DOWN button to enable/disable
the code.
The MWR839 is capable of being programmed with up to 25 different
FIPS location codes. To program the radio with the FIPS code for your
area, follow the steps below.
3. Under Multiple County mode, repeat the same instruction as above to
set up, edit or enable / disable your FIPS codes. To leave the current
operation, press the MENU button once.
To identify the appropriate FIPS codes or NOAA channels for your area,
visit the NOAA website at: http://www.nws.noaa.gov/nwr/indexnw.htm
Note:
If no code is enabled before leaving, the default County Code
mode is ALL.
Be sure to have your FIPS codes on hand to avoid being timed out of
your MENU selection.
1. Press the MENU button and press the TUNE DOWN to scroll down
to the County Code, and press the SELECT button to enter the
menu. Be sure to have your codes on hand and ready to input. Then
ALL, Multiple and Single will be displayed. Choose Single if you
want to receive only alerts sent to one county (or FIPS code). Choose
Multiple if you want to receive alerts from more than one county that
you have programmed. Choose ALL to receive all alerts your
station sends regardless of the FIPS codes.
Your are now ready to use your Motorola MWR839 Weather Alert
Radio. To listen to the weather channel, press the WEATHER BAND
button while the Weather Alert ON/OFF is switched on.
2. Select Single to enter the Single County menu. Select New Code and
enter a six digit sequence to set up the FIPS code. Use the TUNE
UP/DOWN to select the desired number. Then use the VOL UP button
to select the second digit. Repeat this sequence until you have set all
six digits as desired, and press the SELECT button to save the code
13
Model: MWR839
Model: MWR839
14
Advanced Programming
Setting the Alert Mode
Your Motorola MWR839 Weather Alert Radio has 2 programmable Alert
Modes and responds to an alert broadcast in one of two ways.
Adding New Weather Alert Event Codes
Motorola MWR839 Weather Alert Radio provides the ability to add
up to 5 additional event codes. This feature allows you to update
your radio in the event that NOAA changes or adds events codes in the
future. The alerts you add must have the same exact 3 letter code used
by NOAA for your radio to respond properly.
1. Voice Mode – An alert tone sounds for 10 seconds, and the weather
(voice) broadcast automatically turns on for 10 minutes. The alert
description and duration appear.
To Add New Weather Alert Event Codes
1. Press the MENU button, and press the TUNE DOWN to scroll down
through the main menu list to the ADD Alerts menu.
2. Siren Mode – An alert tone sounds for 4 minutes, and the alert description
and duration appear. To silence the alert sooner, press the SNOOZE,
WEATHER, or ON/OFF button.
2. Press the SELECT button to enter the ADD Alerts menu then New
Alert menu will appear on the display. Press the SELECT button.
Use the TUNE UP/DOWN to assign the 3 letter code. For
example: The 3 letter for Tornado Warning is “TOR”. Once you
have selected the first letter, use the vol+ key to scroll over to the
next letter. Press the TUNE DOWN button to assign the second
letter and follow the same sequence above to set the third letter.
To Set the Alert Mode:
1. Press the MENU button and press TUNE DOWN to scroll down to
Alert Mode, and press the SELECT button to enter the menu. The
LCD display will show Voice Alert Mode or Siren Alert Mode.
3. Upon completion of the 3 letter code, you must assign a warning
level to the new alert. Press the TUNE UP/DOWN to select one of
the following 3 levels: WARNING, WATCH or ADVISORY.
2. Press the TUNE UP/DOWN to choose between Voice and Siren
Alert Mode. Then press the SELECT button to save the alert mode
setting and exit to the main menu.
4. Upon completion of the warning level, press the SELECT button to
create the message that will accompany the warning. You can insert
a 20 character letter/number text string. Use the TUNE UP/DOWN to
assign a letter or number to each of the 20 spaces. Press the VOL
UP/DOWN to advance or retreat within the text string.
Note:
When an alert is received, the colored LED warning light indicators
will light up in both of the Alert Modes.
15
Model: MWR839
Model: MWR839
16
Setting the siren volume
To Review Weather Alert Messages
Your Motorola MWR839 Weather Alert Radio will store up to 20 alert
messages in its memory. Alerts are removed automatically when the
time for the event expired. If all stored alerts are active, it will replace
the oldest active alert upon exceeding the memory limit. Press the
TUNE UP/DOWN to view stored alerts when the LCD display is not
under the main menu operation.
Your Motorola MWR839 Weather Alert Radio has 4 adjustable levels
for the siren volume when an alert is received.
To Set the Siren Volume:
1. Press the MENU button and press the TUNE DOWN to scroll down
through the main menu list to the Siren Level menu.
2. Press the SELECT button to enter the Siren Level menu, then press
the VOL DOWN/UP to select the desired volume setting between
Low, Middle and High. With each setting the radio will sound a sample
of the appropriate siren volume.
3. Press the SELECT button to save the Siren Level setting and exit to
the main menu list.
17
Model: MWR839
Model: MWR839
18
Setting the siren mode
Siren test
You can easily test the siren of your Motorola MWR839 Weather Alert
Radio.
Your Motorola MWR839 Weather Alert Radio allows you to block the siren
from sounding on some warnings that are not relevant to your area. For
example, a flood warning that may be issued in your county may not
affect your location. You may not want the siren to sound for a flood
warning alert.
Note: Some alerts, such as Tornado Warning, are not blockable.
To Test the Siren:
1. Press the MENU button and press the TUNE DOWN to scroll down
through the main menu list to the Siren Test menu.
To Set the Siren Mode:
1. Press the MENU button and press the TUNE DOWN to scroll down
through the main menu list to the Defeat Siren menu.
2. Press the TUNE UP/DOWN to test the siren. The radio will sound a
sample of the siren of each warning level.
2. Press the SELECT button to enter the Defeat Siren menu. The words
ADMINISTRATIVE MESSAGE will scroll across the bottom of the
LCD display. This is the first alert on the list of alerts that NOAA can
broadcast. You have the option to disable the siren to block this alert
or enable to receive it. Use the VOL UP/DOWN to make your selection.
3. Choose Stop and press the SELECT button and exit to the Siren Test
menu. Press the MENU button once to exit to the main menu list.
3. After setting the Defeat Siren for this alert, use the TUNE UP/DOWN
to scroll through the list of alerts, following the same sequence to set
the Siren Mode for each alert desired.
Upon selecting the Defeat Siren for the desired alerts, press the SELECT
button to save and exit to the Defeat Siren prompt of the main menu list.
19
Model: MWR839
Model: MWR839
20
Setting the Alarm Clock
Your Motorola MWR839 Weather Alert Radio has two wakeup alarms as
well as a snooze button to provide maximum control over your alarm
clock. The default alarm sound can be radio or buzzer for both Alarm 1/
Alarm 2.
4. Select Station under Alarm 1 menu list, and press the TUNE UP/DOWN
to adjust the desired radio frequency for the Alarm 1 station. Press
the VOL DOWN/UP to adjust the volume forAlarm 1 station.
To Set Alarm 1 or Alarm 2:
1. Press the MENU button, and press the SELECT button to enter the
Alarm 1 menu. (Press the TUNE DOWN once to select Alarm 2.)
5. Select Buzzer Level under Alarm 1 menu list, and press the VOL UP/DOWN
to set up the buzzer volume for Alarm 1.
Repeat the instructions as above for Alarm 2.
Note:
The source of alarm is according to the Alarm Switch settings.
2. Choose Time and press the SELECT button, and the hour setting will
begin flashing. Use the TUNE UP/DOWN to set the hour as desired.
Note: the AM/PM setting is affected by the hours setting. Press the
VOL UP to the minutes setting. The minutes will begin flashing. Use
the TUNE UP/DOWN to set the minutes as desired.
Turning the Alarm Clock On/Off
Your Motorola MWR839 Weather Alert Radio is equipped with 2
alarms. To set the alarm time, refer to the To Set Alarm 1 or Alarm 2.
To activate the alarms, push Alarm 1 Switch to “
“ to set Alarm 1
as radio alarm. Push the switch to the “
“ to set Alarm 1 as buzzer
alarm. Push the switch to “Off” to disable the alarm.
3. Choose Day of the week and press the SELECT button, and set up
the recurrence of the alarm. Press VOL UP/DOWN over a day of the
week to enable/disable the Day of the week setting. When the alarm
is set as desired, press the SELECT button to save the settings and
exit to the Alarm 1 menu list.
21
Follow the same instructions as above for operating Alarm 2.
Model: MWR839
Model: MWR839
22
Setting Backlight and Contrast
The backlight for your Motorola MWR839 Weather Alert Radio has an
adjustable setting.
Snooze Function
When an alarm is functioning, the unit will alarm for 60 minutes unless stopped by pressing the SNOOZE button, ON/OFF button or Alarm
switches.
To Set the Backlight:
1. Press the MENU button and press the TUNE DOWN to scroll down
through the main menu list to the Back Light menu. Then press the
SELECT button to enter the Back Light menu. The LCD display will
show Brightness and Save Time.
1. When an alarm is sounding, the alarm icon on the upper left corner
of the LCD display will be highlighted. Press the SNOOZE button
while an alarm is sounding, and the sounding alarm will be silenced
for 5 minutes.
2. The Snooze icon “
” will appear on the LCD display when a sounding
alarm is silenced by Snooze function.
2. Select Brightness, and press VOL UP/DOWN to set up between the
4 levels of backlight brightness: Off, little brightness, average brightness
and highest brightness.
Note:
When an earphone is plugged into the radio, the sound of alarm buzzer
and the sound of alert siren will become beeping sound instead through
the speaker. When hearing a beeping sound through the radio speaker,
please be mindful and check the LCD display to ensure if it’s a sounding
alarm or if it’s an alert message.
3. Select Save Time, and press VOL UP/DOWN to adjust the backlight
duration time from 10 sec to 90 sec with an interval of 2 seconds
4. Press the SELECT button to save the Back Light setting and exit to
the Back Light menu. Press the MENU button once to exit to main
menu list.
23
Model: MWR839
Model: MWR839
24
To Erase Memory
1. To erase the stored setting in your Motorola MWR839 Weather Alert
Radio, press the MENU button and press the TUNE DOWN to scroll
down to the Load Default menu. Press the SELECT button, and the
LCD display will show as below:
To Set the Contrast:
1. Press the MENU button and press the TUNE DOWN to scroll down
through the main menu list to the Contrast menu.
2. Press the VOL UP/DOWN button to choose Yes or No. Choose Yes
and then press the SELECT button, and your stored setting in
the radio will be erased. The setting will reset to default value.
2. Press the SELECT button to enter the Contrast menu. Press the VOL
UP/DOWN to adjust the Contrast level. Press the SELECT button to
save the setting. Press the MENU button to exit to main menu list.
25
Model: MWR839
Model: MWR839
26
Setting Sleep Timer
Alert Description Table
Your Motorola MWR839 Weather Alert Radio can be set to turn off after
a preset time has elapsed. The sleep timer function can be adjusted
between 15, 30, 45, 60, 90 and 120 min.
The table below lists the alerts broadcast by NOAA. Your radio has been factory programmed with the following alerts. Some NOAA alerts are
unblockable. *(UB)=Unblockable
Code
Message
Code
Message
1. When using your radio, press and hold the ON/OFF button until the
LCD display show the following:
———
—————————————————————
———
—————————————————————
ADR
Administrative message
AVA
Avalanche Watch
AVW
Avalanche Watch
BHW
(UB) Biological Hazard Warning
BWW
Boil Water Warning
CAE
Child Abduction Emergency
BZW
Blizzard Warning
CEM
(UB) Civil Emergency Message
CDW
(UB) Civil Danger Warning
CFW
Coastal Flood Warning
CFA
Costal Flood Watch
CWW
(UB) Contaminated Water Warning
2. Continue holding the ON/OFF button and the Sleep Timer will
automatically start switching between the 6 settings. Release
the ON/OFF button when the setting switches to the time desired to
set as the preset sleep time. The sleeper icon “
” will appear
onthe LCD display.
CHW
(UB) Chemical Hazard Warning
DBW
(UB) Dam Break Warning
DBA
Dam Watch
DMO
Practice / Demo
DEW
(UB) Contagious Disease Warning
EAN
(UB) Emergency Action Notification
DSW
Dust Storm Warning
EQW
(UB) Earthquake Warning
EAT
(UB) Emergency Action Termination
EVA
Evacuation Watch
EVI
(UB) Immediate Evacuation
FCW
(UB) Food Contamination Warning
3. Your radio will switch off after the preset time has elapsed. To cancel
sleep timer, simply press the ON/OFF button to turn off your radio.
FFA
Flash Flood Watch
Flash Flood Warning
FFS
Flash Flood FFW
FLS
FLA
Flood Watch
Fire Warning
System Version
FLW
Flood Warning
FRW
FZW
FSW
Flash Freeze Warning
HLS
Hurricane Statement
To find out the system version of your Motorola MWR839 Weather Alert
Radio, press the MENU button and then press SELECT to scroll down
to the end of main menu list. Press the SELECT button to enter the
System Version menu, and the number and date of your radio’s system
version will show on the LCD display.
HMW
(UB) Hazardous Mat. Warning
HUW
(UB) Hurricane Warning
HUA
Hurricane Watch
HWW
High Wind Warning
HWA
High Wind Watch
IFW
(UB) Industrial Fire Warning
IBW
Iceberg Warning
LEW
(UB) Law Enforcement Warning
LAE
(UB) Local Area Emergency
NIC
National Information Center
LSW
(UB) Land Slide Warning
NPT
National Periodic Test
27
Model: MWR839
Model: MWR839
Flood Statement
Freeze Warning
28
29
Code
Message
Code
Message
———
—————————————————————
———
—————————————————————
NAT
National Audible Test
NUW
(UB) Nuclear Plant Warning
NMN
Network Notification Message
RMT
Required Monthly Test
NST
National Silent Test
RWT
Required Weekly Test
POS
Power Outage Advisory
SMW
Special Marine Warning
RHW
(UB) Radiological Hazard Warning
SPW
(UB) Shelter In-Place Warning
SPS
Special Weather Statement
SVR
Severe Thunderstorm Warning
SVA
Severe Thunderstorm Watch
TOA
Tornado Watch
SVS
Severe Weather Statement TOA
TOR
(UB) Tornado Warning
TOE
911 Telephone Outage
TRW
(UB) Tropical Storm Warning
TRA
Tropical Storm Watch
TSW
(UB) Tsunami Warning
TSA
(UB) Tsunami Watch
TXF
Transmitter Carrier On
TXB
Transmitter Backup On
TXP
Transmitter Primary On
TXO
Transmitter Carrier Off
WFA
Wild Fire Watch
VOW
(UB) Volcano Warning
**A
Unrecognized Watch
WSA
**E
Winter Storm Watch
**S
Unrecognized Statement
Unrecognized Emergency
***
Unrecognized Message
**W
(UB) Unrecognized Warning
WFW
(UB)Wild Fire Warning
10D
10 Day Sentry
WSW
Winter Storm Warning
Model: MWR839
Model: MWR839
30
Weather Radio Warranty
What Other Limitations Are There?
Consumer Products and Accessories Limited Warranty (“Warranty”)
ANY IMPLIED WARRANTIES, INCLUDING WITHOUT LIMITATION
T H E I M P L I E D WA R R A N T I E S O F M E R C H A N TA B I L I T Y A N D
FITNESS FOR A PARTICULAR PURPOSE, SHALL BE LIMITED
TO THE DURATION OF THIS LIMITED WARRANTY, OTHERWISE
T H E R E PA I R O R R E P L A C E M E N T P R O V I D E D U N D E R T H I S
EXPRESS LIMITED WARRANTY IS THE EXCLUSIVE REMEDY
OF THE CONSUMER, AND IS PROVIDED IN LIEU OF ALL OTHER
WARRANTIES, EXPRESS OF IMPLIED. IN NO EVENT SHALL
M O TO R O L A O R G I A N T I N T E R N AT I O N A L LT D . B E L I A B L E ,
WHETHER IN CONTRACT OR TORT (INCLUDING NEGLIGENCE)
FOR DAMAGES IN EXCESS OF THE PURCHASE PRICE OF THE
PRODUCT OR ACCESSORY, OR FOR ANY INDIRECT, INCIDENTAL,
SPECIAL OR CONSEQUENTIAL DAMAGES OF ANY KIND, OR
LOSS OF REVENUE OR PROFITS, LOSS OF BUSINESS, LOSS OF
INFORMATION OR OTHER FINANCIAL LOSS ARISING OUT OF OR
IN CONNECTION WITH THE ABILITY OR INABILITY TO USE THE
PRODUCTS OR ACCESSORIES TO THE FULL EXTENT THESE
DAMAGES MAY BE DISCLAIMED BY LAW.
Thank you for purchasing this Motorola branded product manufactured
under license by Giant International Limited, 3495 Piedmont Rd., Bldg. 10,
Ste 920, Atlanta, Georgia 30305. (“GIANT INTL. LTD”)
What Does this Warranty Cover?
Subject to the exclusions contained below, GIANT INTERNATIONAL
LTD. warrants that this Motorola branded product (“Product”) or
certified accessory (“Accessory”) sold for use with this product that it
manufactured to be free from defects in materials and workmanship
under normal consumer usage for the period outlined below. This
Warranty is your exclusive warranty and is not transferable.
Who is covered?
This Warranty extends only to the first consumer purchaser, and is not
transferable.
What will GIANT INTERNATIONAL LTD. do?
GIANT INTERNATIONAL LTD. or its authorized distributor at its
option and within a commercially reasonable time, will at no charge
repair or replace any Products or Accessories that does not conform
to this Warranty. We may use functionally equivalent reconditioned/
refurbished/ pre-owned or new Products, Accessories or parts.
31
Products Covered
Consumer Products
Length of Coverage
One ( 1) year from the date of the
products original purchase by the
first consumer purchaser of the
product.
Consumer Accessories
Ninety (90) days from the date of
the accessories original purchase
by the first consumer purchaser of
the product.
Consumer Products and
Accessories that are Repaired
or Replaced
The balance of the original
warranty or for ninety (90) days
from the date returned to the
consumer, whichever is longer.
Exclusions
Normal Wear and Tear. Periodic maintenance, repair and replacement
of parts due to normal wear and tear are excluded from coverage.
Batteries. Only batteries whose fully charged capacity falls below
80% of their rated capacity and batteries that leak are covered by this
Warranty.
Abuse & Misuse. Defects or damage that result from: (a) improper
operation, storage, misuse or abuse, accident or neglect, such
as physical damage (cracks, scratches, etc.) to the surface of the
product resulting from misuse; (b) contact with liquid, water, rain,
extreme humidity or heavy perspiration, sand, dirt or the like, extreme
heat, or food; (c) use of the Products or Accessories for commercial
purposes or subjecting the Product or Accessory to abnormal usage or
conditions; or (d) other acts which are not the fault of MOTOROLA or
GIANT INTERNATIONAL LTD., are excluded from coverage.
Use of Non-Motorola branded Products and Accessories. Defects
or damage that result from the use of Non-Motorola branded or
certified Products or Accessories or other peripheral equipment are
excluded from coverage.
Unauthorized Service or Modification. Defects or damages resulting
from service, testing, adjustment, installation, maintenance, alteration,
or modification in any way by someone other than MOTOROLA,
GIANT INTERNATIONAL LTD. or its authorized service centers, are
excluded from coverage.
Some jurisdictions do not allow the limitation or exclusion of incidental
or consequential damages, or limitation on the length of an implied
warranty, so the above limitations or exclusions may not apply to you.
This Warranty gives you specific legal rights, and you may also have
other rights that vary from one jurisdiction to another.
Altered Products. Products or Accessories with (a) serial numbers or
date tags that have been removed, altered or obliterated; (b) broken
seals or that show evidence of tampering; (c) mismatched board serial
numbers; or (d) nonconforming or non-Motorola branded housings, or
parts, are excluded from coverage.
Communication Services. Defects, damages, or the failure of
Products or Accessories due to any communication service or signal
you may subscribe to or use with the Products or Accessories is
excluded from coverage.
Model: MWR839
Model: MWR839
32
How to Obtain Warranty Service or Other Information?
To obtain service or information, please call:
USA and Canada: 1-800-638-5119, [email protected]
You will receive instructions on how to ship the Products or Accessories
at your expense and risk, to a GIANT INTERNATIONAL LTD. Authorized
Repair Center.
To obtain service, you must include: (a) the Product or Accessory; (b)
the original proof of purchase (receipt) which includes the date, place
and seller of the Product; (c) if a warranty card was included in your
box, a completed warranty card showing the serial number of the
Product; (d) a written description of the problem; and, most importantly;
(e) your address and telephone number.
FCC COMPLIANCE INFORMATION:
MOTOROLA Weather Alert Radio
Model: MWR839
Glossary
AM/FM
Band
This device complies with part 15 of the FCC Rules. Operation is subject
to the following two conditions:
This device may not cause harmful interference.
This device must accept any interference received including interference
that may cause undesired operation.
dB
FCC
FIPS
kHz
LCD
LED
NOAA
NWR/ SAME
NWS
Ohm
SAME
WX Channels
33
Model: MWR839
Model: MWR839
Amplitude Modulated / Frequency Modulated.
A specific range of wavelengths or frequencies where radio stations are located. The AM band is 520-1710 kHz, the FM band is
87.5-108.0 MHz.
Decibel. A unit used to express relative difference in power or intensity. Federal Communications Commission
Agency charged with regulating interstate and international communications by radio, television, wire, satellite and cable.
www.fcc.gov
Federal Information Processing System.
Kilohertz. A unit of frequency equal to 1000 hertz.
Liquid Crystal Display.
Light Emitting Diode.
National Oceanic and Atmospheric Administration.
Environmental data services, and provides a reference library for students, teachers, and researchers. www.noaa.gov
National Weather Radio / Specific Area Message Encoding.
National Weather Service.
Current weather conditions, forecasts, warnings, and weather safety. Offers maps, radar and satellite images, numerical models,
and educational resources. www.nws.noaa.gov
A unit of electrical resistance equal to that of a conductor in which a current of one ampere is produced by a potential of one volt
across its terminals.
Specific Area Message Encoding.
Weather channels.
34