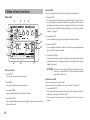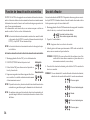
1
Owner’s Manual Manuel d'utilisation Bedienungsanleitung Manual de usuario Precautions Location Using the unit in the following locations can result in a malfunction: •In direct sunlight •Locations of extreme temperature or humidity •Excessively dusty or dirty locations •Locations of excessive vibration •Close to magnetic fields Power supply Please connect the designated AC adapter to an AC outlet of the correct voltage. Do not connect it to an AC outlet of voltage other than that for which your unit is intended. Interference with other electrical devices Radios and televisions placed nearby may experience reception interference. Operate this unit at a suitable distance from radios and televisions. Handling To avoid breakage, do not apply excessive force to the switches or controls. Care If the exterior becomes dirty, wipe it with a clean, dry cloth. Do not use liquid cleaners such as benzene or thinner, or cleaning compounds or flammable polishes. Keep this manual After reading this manual, please keep it for later reference. Keeping foreign matter out of your equipment Never set any container with liquid in it near this equipment. If liquid gets into the equipment, it could cause a breakdown, fire, or electrical shock. Be careful not to let metal objects get into the equipment. If something does slip into the equipment, unplug the AC adapter from the wall outlet. Then contact your nearest VOX dealer or the store where the equipment was purchased. * All product names and company names are the trademarks or registered trademarks of their respective owners. 2 THE FCC REGULATION WARNING (for USA) NOTE: This equipment has been tested and found to comply with the limits for a Class B digital device, pursuant to Part 15 of the FCC Rules. These limits are designed to provide reasonable protection against harmful interference in a residential installation. This equipment generates, uses, and can radiate radio frequency energy and, if not installed and used in accordance with the instructions, may cause harmful interference to radio communications. However, there is no guarantee that interference will not occur in a particular installation. If this equipment does cause harmful interference to radio or television reception, which can be determined by turning the equipment off and on, the user is encouraged to try to correct the interference by one or more of the following measures: • Reorient or relocate the receiving antenna. • Increase the separation between the equipment and receiver. • Connect the equipment into an outlet on a circuit different from that to which the receiver is connected. • Consult the dealer or an experienced radio/TV technician for help. If items such as cables are included with this equipment, you must use those included items. Unauthorized changes or modification to this system can void the user’s authority to operate this equipment. Notice regarding disposal (EU only) When this “crossed-out wheeled bin” symbol is displayed on the product, owner’s manual, battery, or battery package, it signifies that when you wish to dispose of this product, manual, package or battery you must do so in an approved manner. Do not discard this product, manual, package or battery along with ordinary household waste. Disposing in the correct manner will prevent harm to human health and potential damage to the environment. Since the correct method of disposal will depend on the applicable laws and regulations in your locality, please contact your local administrative body for details. If the battery contains heavy metals in excess of the regulated amount, a chemical symbol is displayed below the “crossed-out wheeled bin” symbol on the battery or battery package. IMPORTANT NOTICE TO CONSUMERS This product has been manufactured according to strict specifications and voltage requirements that are applicable in the country in which it is intended that this product should be used. If you have purchased this product via the internet, through mail order, and/or via a telephone sale, you must verify that this product is intended to be used in the country in which you reside. WARNING: Use of this product in any country other than that for which it is intended could be dangerous and could invalidate the manufacturer’s or distributor’s warranty. Please also retain your receipt as proof of purchase otherwise your product may be disqualified from the manufacturer’s or distributor’s warranty. Contents Introduction Introduction----------------------------------------------- 3 Welcome aboard! Welcome aboard!---------------------------------------------------- 3 Main features---------------------------------------------------------- 3 Thanks for choosing the VOX MINI3 G2. To ensure a long and troublefree relationship with your new amp, please read this manual carefully, use the amp as directed and keep the manual for future reference. We hope you enjoy the great sound of the VOX MINI3 G2! Setup-------------------------------------------------------- 4 Installing Batteries--------------------------------------------------- 4 Parts and their function------------------------------ 5 Top Panel--------------------------------------------------------------- 5 Rear Panel------------------------------------------------------------- 6 Auto Power Off Function----------------------------- 7 Using the Tuner------------------------------------------ 7 Amp Models and Effects----------------------------- 8 AMP model------------------------------------------------------------ 8 Effects------------------------------------------------------------------- 8 Troubleshooting----------------------------------------- 9 Specifications-------------------------------------------10 Main features • Sounds distilled from the VOX Valvetronix series are compressed in a compact body. • This portable amplifier is powered by six AA-size alkaline batteries or by the included AC adapter, enabling you to play anywhere. • In addition to four high-quality, all-time favorite effects, the amplifier features four delay and reverb effects that simulate acoustic reverb. The amplifier also features a user-friendly interface, enabling you to adjust the tone via a single knob. • The TAP button enables you to easily set the delay time in sync with the tempo. • The built-in tuner function enables you to tune a guitar connected to the INPUT jack. • Inputs include an AUX IN jack, for connecting an external audio device (CD, MP3 player, etc.), and a MIC IN jack, to where you can connect a microphone. You can play along with recorded music or accompany your vocals on guitar. You can also adjust the send level from the MIC IN jack to the Delay/ Reverb effects by using the dedicated SEND knob. • VOX original Bassilator technology to create a solid Bass tone. 3 Setup This section describes the basic setup of your amplifier. NOTE: This manual also describes safety precautions and functions. Be sure to read the entire manual. Installing Batteries Remove the battery compartment cover that’s located on the bottom of the unit by pulling the ribbon. Insert six AA-size alkaline batteries as shown in the figure. 1.Set the VOLUME knob and TRIM knob to the minimum level. 2.Install batteries in the amplifier. Alternatively, you can connect the included AC adapter to the DC12V jack on the rear panel, then plug the adapter into an AC outlet. 3.Plug your guitar into the INPUT jack on the top panel. If you also plan to use a CD or MP3 player or a microphone, connect the player to the AUX IN jack, or the microphone to the MIC IN jack on the top panel. 4.Press and hold down the power button until the power LED lights up and the power turns on. NOTE:When turning off the power, press and hold down the power button until the power LED turns off. 5.Slowly raise the VOLUME Knob to the desired level. When using a microphone, you can adjust its volume with the TRIM Knob. 4 NOTE:Batteries are not included. You will need to purchase them separately. Never use any type of battery other than alkaline batteries. NOTE: Be sure to install batteries in the correct orientation. Replacing the Batteries Replace the batteries when the power LED becomes dim. NOTE: If the battery level becomes low, noise may be generated. NOTE: Depleted batteries must be removed from the MINI3 G2 immediately. If you leave them in, malfunctions such as battery leakage may occur. You should also remove the batteries if you’re not going to be using the MINI3 G2 for an extended period of time. AMP section This section enables you to adjust various amplifier settings. Parts and their function Top Panel 5 6 7 5.AMP selector This selector enables you to choose an amp model. The gain circuit, tone control characteristics, and circuit layout will be set automatically in accordance with the selected amp model. For more information on each amp model, please refer to “AMP model” on page 8. 8 1 12 2 13 3 14 4 9 10 11 INPUT Section 1.INPUT jack This is where you plug in your guitar. 2.MIC IN jack Connect a microphone here. 3.TRIM knob This knob enables you to adjust the volume level of the microphone input. 4.SEND knob This knob enables you to adjust the volume that is sent from the microphone input to the delay/reverb effect. 6.GAIN knob This knob enables you to adjust the pre amp gain for the selected amp model. 7. TONE knob This knob enables you to adjust the tonal color. The tone will be changed automatically in accordance with the selected amp model. 8. VOLUME knob This knob enables you to adjust the volume that is output from the pre amp to the power amp. With this setting you can change the power amp distortion. NOTE: The power amp distortion can also be changed with the GAIN knob. The distortion will be eliminated depending on the setting. EFFECTS section Here is where you can adjust the settings for the effects. For additional details on each effect, refer to “Effects” on page 8. 9. EFFECTS knob This knob enables you to choose the compressor/modulation effect and set the intensity of the effect. To bypass the effects, rotate the knob all the way to the left. 5 10. DELAY/REVERB knob This knob enables you to select a delay/reverb-type effect and set the intensity of the effect. To bypass the effects, rotate the knob all the way to the left. To apply an effect (selected via this knob) to the microphone input, use the SEND knob to set the intensity of the effect. To turn off the delay/reverb effect applied to the guitar input, set the knob to the minimum position of the “swoosh” of the corresponding effect type. 11. TAP button, LED/TUNER LED This button enables you to set the time of the Delay and Reverb effects. Tap this button twice to set the time. The duration between two taps will be used as the time value. The TAP LED will flash in sync with the time. 14. PHONES jack Use this jack if you’re plugging directly in to a mixer, recording device, or if you’re using headphones. The output signal from this jack is taken before the power amp, and the character of the guitar amp cabinet is applied to it. NOTE: Connecting headphones to this jack will mute the internal speaker. NOTE: Be sure to make a stereo connection at the PHONES jack. Rear Panel 1 HINT: To set the time to exactly match the tempo of a song, press the TAP button several times along with the song. When you hold down the TAP switch for one second or more, all effects will be bypassed, and the tuner function will turn on. For details, refer to the “Using the Tuner” section (page 7). Power/AUX IN/PHONES Section 12. Power button, LED Pressing and holding down this button enables you to turn the power on or off. The power LED will light up when the power is turned on. 13. AUX IN jack Connect an external audio device to this jack. This enables you to conveniently connect an audio player and play your guitar along with the player’s output. 6 1.DC 12V jack Connect this jack to the included AC adapter. NOTE: The AC adapter should only be used with the main unit. Do not use the adapter with other devices since doing so may cause a malfunction. Auto Power Off Function The VOX MINI3 G2 is equipped with an Auto Power Off function. The Auto Power Off function automatically turns the power off when there has been no user input for about 1 hour. When the power is turned off, it’s not restored even if a knob or selector is used. Turn on the power again. NOTE: The Auto Power Off function will be in effect when signal is input only to the AUX IN jack or when the input volume to the INPUT jack and MIC IN jack is too low. NOTE: The Auto Power Off function is set to on as the factory default. Setting the Auto Power Off function to enable or disable 1.Press and hold down the TAP button and turn on the Enable power. 2.The TAP/TUNER LED will indicate the current setting. 3.Press the TAP button to switch between the enable and Disable disable setting. 4.Wait a few seconds without using any of the buttons or controls. The unit will automatically switch to normal operation. NOTE: The Auto Power Off function enable and disable setting will be saved even when the power is turned off. NOTE: If you change a setting for the Auto Power Off function, the time setting of the delay/reverb effect will be reset to the factory default. Using the Tuner The MINI3 G2's tuner function lets you tune a guitar that’s connected to the INPUT jack. The tuner detects the pitch of the input sound, then indicates the discrepancy from the standard pitch of E. 1.Press and hold down the TAP button for more than one second. All effects will be bypassed, and the tuner function will turn on. All effects are bypassed. (No valid signal is being input.) 2.Play the open 6th string. NOTE: Be careful not to touch any other strings. 3. Tune the guitar so that only the center green LED lights up, as shown on the right. HINT: The MINI3 G2 recognizes the pitch of E in any octave. This is useful if you want to tune to harmonics or tune other musical instruments, such as a bass guitar. 4. To exit the tuner function, press the TAP button. The effect bypass will be canceled. The pitch is sharp. HINT: Once you tune the 6th string using the tuner function, tune the other strings in reference to the 6th string. The pitch is slightly sharp. In tune. The pitch is slightly flat. The pitch is flat. 7 Amp Models and Effects This section describes characteristics of each amp model and effect. AMP model BTQ CLEAN This models the clean channel of a high-quality amp that was produced only on special order, and was known as the overdrive special. With a beautifully rounded low range, a sharp midrange attack, and a sweet treble register, this is ideal for single coil pickups. BLACK 2x12 This models a black-faced 2x12" combo amp that has become an indispensible item for country and blues players. Its tight and clean sound provides deep piano-like bass tones, and will deliver the classic Chicago blues tone particularly when used with single coil pickups. UK '80S This models a UK-manufactured 100W single-channel head with master volume made in 1983. Turn the GAIN control all the way up to get that thick, snarling hard rock and heavy metal sound that dominated the 80’s. UK '90S This models the high-gain channel of a modern 100W amp. While individual notes are clearly defined, it delivers a monster sound that’s quite aggressive and arrogant. CALI METAL This models the modern high-gain channel from a wild beast of a highgain amp. Its deep and loose low-end, sparkling highs, and monstrous gain are ideal for guitars tuned as low as possible, or for metal acts wielding seven-string guitars. TWEED 4x10 This models a 4x10" combo amp from 1959 that was originally designed for bass guitar. Its smooth and crisp overdrive sound will respond sensitively to your picking dynamics and to the volume of your guitar. US HIGAIN This models the overdrive channel of a snakeskin-covered 100W amp head made in 1991. With an open low-end and a compressed mid/high range, its powerful and heavy sound delivers a forceful tone that will not break down even with the most extreme gain settings. AC15 This models channel 2 of the VOX AC15 (1x12", 15W), which was manufactured in 1962 and was a big hit for its compact cabinet, power, and great tone – along with then-popular British bands. LINE This model features two-band tone controls that create a pure clean tone with no distortion. Use the GAIN knob to adjust the volume level for the low range, and the TONE knob for the high range. AC30TB This models an AC30 amp with the “top boost” circuit that was included as standard starting with units produced in 1964. It delivers a smooth and refined top end, majestically deep overdrive, and a rich and brilliant clean sound. Effects UK '70S This models the high treble channel of a hand-wired amp head made in England during the early 60’s. Raising the volume of this 50W output amp all the way produces the crunch that will forever be the sound of rock ‘n’ roll. 8 EFFECTS Knob: Compressor/Modulation COMP This models a compressor that features a clean, percussive, and mellow sustain. Suitable for pop or funk rhythms. Use the knob to adjust the amount of sustain. CHORUS This models a standard analog chorus that adds a rich spaciousness to the sound. Use the knob to adjust the modulation speed. FLANGER This models an analog flanger that creates a sound with a peculiar swooshing effect like a jet engine. Use the knob to adjust the modulation speed. TREM This models a typical tremolo built into a standard U.S. combo amp that changes the volume up and down cyclically. Use the knob to adjust the tremolo speed. DELAY/REVERB Knob: A.DLY This models an analog delay that uses a bucket brigade device (BBD). The sound quality is low fidelity, but its warm sound is popular among musicians. Use the knob to adjust the mix amount of the delay sound. Set the delay time with the TAP button. The maximum delay time is 1.25 seconds. T. ECHO This models a popular analog tape echo. Tape echo was originally created by using a playback head, and the delay time was adjusted by modifying the motor speed. The knob and button functionality is the same as that for the A.DLY model. SPRING This models a spring reverb inside a guitar amp. Use the knob to adjust the mix amount of the reverb sound. Use the TAP button to set the reverb time. ROOM This is a standard room reverb that contains a lot of initial reflection. The knob and button functionality are the same as the SPRING model. Troubleshooting The power does not turn on even when the power button is pressed and held down. • Have you installed batteries? Is the polarity correct? Or, is the AC adapter cord connected to the rear panel of the amp correctly? • Is the AC adapter plugged into an AC outlet? • Is the AC outlet switched on and working? • Is the AC adapter damaged? There’s no sound coming from the amp • Is your guitar turned up? • Are both ends of your guitar cable plugged into where they should be? • Is your guitar cable working? • Are the top panel VOLUME and GAIN knobs turned up? • Do you have headphones or anything else plugged into the amp’s top panel PHONES jack? If “yes,” unplug! The amp doesn’t seem very loud • Is your guitar turned up? • Is the top panel VOLUME or GAIN knob turned down low? • Are the batteries discharged? There’s no sound heard from the PHONES jack when you use it. • Check that the top panel VOLUME knob isn’t turned all the way down. 9 • Make sure sound is coming from the amp. You’ll need to unplug your headphones or cable from the PHONES jack to do this, since plugging something into this jack automatically mutes the amp’s speakers. If there’s still no sound from the amp, go to “There’s no sound coming from the amp.” If you do hear sound, check the headphones or cable you are hooking up to this jack. The effects cannot be applied to the sound. • Is the tuner function turned on? If the tuner function is turned on, the effects will be bypassed. Press the TAP button to cancel the bypass. Specifications Number of amp types: 11 Number of effects: 8 Tuner range: E1–E6 (41.2 Hz–1318.5 Hz) Input/output jacks: INPUT, MIC IN, AUX IN, PHONES Power amp output: Maximum approx. 3 W RMS @ 4 ohms Speaker: 5 inch 4 ohms • Is the EFFECTS or DELAY/REVERB knob set to OFF or to a lower value? Adjust the EFFECTS and DELAY/REVERB knob. Signal processing A/D conversion: 24-bit D/A conversion: 24-bit • If the effects cannot be applied to the MIC signal, the SEND knob might be set to a lower value. Adjust the SEND knob. Power supply: Six AA/LR6 alkaline batteries or the included AC adapter Battery life: 12 hours Current consumption: 150 mA Dimensions (W x D x H): 262 x 174 x 223 mm 10.31 x 6.85 x 8.78 inches The sound from a microphone connected to the MIC IN jack is not being output. Weigh: 3 kg/6.61 lbs. (not including battery) Included items: AC adapter (DC 12V • Make sure that the microphone is connected properly. * Appearance and specifications of this product are subject to change without notice. The sound of a device connected to the AUX IN jack is not being output. • Make sure that the external device is connected properly. • The volume control on the external device might be set too low. • The microphone switch could be set to off. • The TRIM knob could be set too low. 10 ), strap For more information on Vox products, please visit our website at www.voxamps.com. Précautions Emplacement L’utilisation de cet instrument dans les endroits suivants peut en entraîner le mauvais fonctionnement. • En plein soleil • Endroits très chauds ou très humides • Endroits sales ou fort poussiéreux • Endroits soumis à de fortes vibrations • A proximité de champs magnétiques Alimentation Branchez l’adaptateur secteur mentionné à une prise secteur de tension appropriée. Evitez de brancher l’adaptateur à une prise de courant dont la tension ne correspond pas à celle pour laquelle l’appareil est conçu. Interférences avec d’autres appareils électriques Les postes de radio et de télévision situés à proximité peuvent par conséquent souffrir d’interférences à la réception. Veuillez dès lors faire fonctionner cet appareil à une distance raisonnable de postes de radio et de télévision. Maniement Pour éviter de les endommager, manipulez les commandes et les boutons de cet instrument avec soin. Entretien Lorsque l’instrument se salit, nettoyez-le avec un chiffon propre et sec. Ne vous servez pas d’agents de nettoyage liquides tels que du benzène ou du diluant, voire des produits inflammables. Conservez ce manuel Après avoir lu ce manuel, veuillez le conserver soigneusement pour toute référence ultérieure. Evitez toute intrusion d’objets ou de liquide Ne placez jamais de récipient contenant du liquide près de l’instrument. Si le liquide se renverse ou coule, il risque de provoquer des dommages, un courtcircuit ou une électrocution. Veillez à ne pas laisser tomber des objets métalliques dans le boîtier (trombones, par ex.). Si cela se produit, débranchez l’alimentation de la prise de courant et contactez votre revendeur VOX le plus proche ou la surface où vous avez acheté l’instrument. * Tous les noms de produits et de sociétés sont des marques commerciales ou déposées de leur détenteur respectif. Note concernant les dispositions (Seulement EU) Quand un symbole avec une poubelle barrée d’une croix apparait sur le produit, le mode d’emploi, les piles ou le pack de piles, cela signifie que ce produit, manuel ou piles doit être déposé chez un représentant compétent, et non pas dans une poubelle ou toute autre déchetterie conventionnelle. Disposer de cette manière, de prévenir les dommages pour la santé humaine et les dommages potentiels pour l’environnement. La bonne méthode d’élimination dépendra des lois et règlements applicables dans votre localité, s’il vous plaît, contactez votre organisme administratif pour plus de détails. Si la pile contient des métaux lourds au-delà du seuil réglementé, un symbole chimique est affiché en dessous du symbole de la poubelle barrée d’une croix sur la pile ou le pack de piles. REMARQUE IMPORTANTE POUR LES CLIENTS Ce produit a été fabriqué suivant des spécifications sévères et des besoins en tension applicables dans le pays où ce produit doit être utilisé. Si vous avez acheté ce produit via l’internet, par vente par correspondance ou/et vente par téléphone, vous devez vérifier que ce produit est bien utilisable dans le pays où vous résidez. ATTENTION: L’utilisation de ce produit dans un pays autre que celui pour lequel il a été conçu peut être dangereuse et annulera la garantie du fabricant ou du distributeur. Conservez bien votre récépissé qui est la preuve de votre achat, faute de quoi votre produit ne risque de ne plus être couvert par la garantie du fabricant ou du distributeur. 11 Sommaire Introduction---------------------------------------------------------12 Bienvenue à bord!--------------------------------------------------------- 12 Caractéristiques principales-------------------------------------------- 12 Préparation----------------------------------------------------------13 Installation des piles------------------------------------------------------ 13 Parties et leurs fonctions--------------------------------------14 Face avant------------------------------------------------------------------- 14 Face arrière----------------------------------------------------------------- 15 Fonction de coupure automatique d’alimentation----16 Utiliser l’accordeur-----------------------------------------------16 Modèles d’amplis et d’effets---------------------------------- 17 Modèles d’amplis---------------------------------------------------------- 17 Effets-------------------------------------------------------------------------- 17 Dépannage----------------------------------------------------------18 Fiche technique---------------------------------------------------19 Introduction Bienvenue à bord! Merci d’avoir choisi un MINI3 G2 VOX. Pour tirer un plaisir maximum de votre nouvel ampli pendant de nombreuses années et l’utiliser correctement, veuillez lire entièrement ce manuel et respecter ses consignes. Conservez-le pour toute référence ultérieure. Nous espérons que vous apprécierez le son extraordinaire du VOX MINI3 G2! Caractéristiques principales • Cet ampli de format compact incorpore les sons de la gamme Valvetronix de VOX. • Cet amplificateur nomade fonctionne sur six piles alcalines de type “AA” ou sur adaptateur (fourni d’ailleurs), vous permettant de jouer où bon vous semble. • En plus de quatre effets populaires de qualité exceptionnelle, l’amplificateur propose quatre effets de delay et de réverbération restituant divers types d’acoustique. L’interface utilisateur simple et accessible vous permet de modifier le son avec une seule commande. • Le bouton TAP permet de synchroniser le temps de retard avec le tempo. • L’accordeur interne permet d’accorder la guitare branchée à la prise INPUT. • La section d’entrée propose, entre autres, une prise AUX IN pour une source audio externe (lecteur CD, MP3 etc.) et une prise MIC IN pouvant accueillir un microphone. Ainsi, vous pouvez vous faire accompagner par votre musique favorite ou chanter tout en jouant de la guitare. Vous pouvez également régler le niveau de départ du signal MIC IN aux effets Delay/Reverb avec la commande dédiée SEND. • Technologie “Bassilator” originale de VOX garantissant un solide son de basse. 12 Préparation Cette section décrit une installation de base exploitant l’amplificateur. ATTENTION: Ce manuel indique également les précautions à prendre et donne des conseils de sécurité. Veillez à lire entièrement ce manuel. Installation des piles Retirez le couvercle du compartiment sur la face inférieure de l’unité en tirant sur le ruban. Insérez six piles alcalines de type “AA” de la manière illustrée. Veillez à loger chaque pile en respectant la polarité. 1. Réglez la commande VOLUME et la commande TRIM au niveau minimum. 2. Installez les piles dans l’amplificateur. Alternativement, vous pouvez relier l’adaptateur secteur fourni à la prise DC12V en face arrière et l’autre extrémité à une prise de courant. ATTENTION: Les piles ne sont pas fournies. Il faut donc les acquérir séparément. Utilisez uniquement des piles alcalines. 3. Branchez votre guitare à la prise INPUT en face avant. Si vous comptez utiliser un lecteur CD ou MP3, voire un microphone, reliez le lecteur à la prise AUX IN ou le microphone à la prise MIC IN en face avant. Remplacement des piles Remplacez les piles quand la luminosité du diode d’alimentation faiblit. 4. Maintenez l’interrupteur d’alimentation enfoncé jusqu’à ce que la diode d’alimentation s’éteigne et que l’ampli soit sous tension. ATTENTION: Pour mettre l’ampli hors tension, maintenez son interrupteur d’alimentation enfoncé jusqu’à ce que la diode d’alimentation s’éteigne. ATTENTION: Veillez à orienter correctement les piles. ATTENTION: L’ampli peut générer du bruit lorsque la tension des piles baisse. ATTENTION: Ne tardez jamais à retirer des piles usées du MINI3 G2. Elles pourraient en effet se mettre à couler et ainsi endommager l’unité. Retirez également les piles si vous n’avez pas l’intention d’utiliser le MINI3 G2 pendant un période prolongée. 5. Réglez le volume avec la commande VOLUME. Quand vous utilisez un microphone, vous pouvez régler son volume avec la commande TRIM. 13 Parties et leurs fonctions Section AMP Cette section permet d’effectuer divers réglages liés à l’amplificateur. Face avant 5 6 7 8 1 12 2 13 3 14 4 9 10 11 Section d’entrée 1. Prise INPUT C’est ici que vous branchez votre guitare. 2. Prise MIC IN Vous pouvez brancher un micro à cette prise. 3. Commande TRIM Cette commande règle le niveau d’entrée du micro. 4. Commande SEND Cette commande détermine le niveau de départ du signal du micro aux effets delay/réverbération. 14 5. Sélecteur AMP Ce sélecteur permet de sélectionner un modèle d’ampli. Le circuit de gain, les caractéristiques de contrôle du timbre et l’agencement des circuits sont automatiquement réglés en fonction du modèle d’ampli sélectionné. Pour en savoir plus sur les différents modèles d’amplis, voyez la section “Modèles d’amplis” à la page 17. 6. Commande GAIN Cette commande règle le gain du préampli du modèle sélectionné. 7. Commande TONE Cette commande détermine le timbre. Le timbre change automatiquement selon le modèle d’ampli sélectionné. 8. Commande VOLUME Cette commande règle le niveau du signal produit par le préampli et transmis à l’ampli de puissance. Ce réglage permet donc de modifier la distorsion de l’ampli de puissance. ATTENTION: Vous pouvez aussi changer la distorsion de l’ampli de puissance avec la commande GAIN. Cette commande permet de supprimer la distorsion. Section des effets Cette section permet de régler les effets. Pour en savoir plus sur les effets, voyez la section “Effets” à la page 17. 9. Commande EFFECTS Cette commande permet de sélectionner le type de compresseur/d’effet de modulation et de régler l’intensité de l’effet. Pour contourner les effets, tournez la commande à bout de course vers la gauche. 10. Commande DELAY/REVERB Cette commande permet de sélectionner un type d’effet Delay/Reverb et de régler l’intensité de l’effet. Pour contourner les effets, tournez la commande à bout de course vers la gauche. Si vous voulez appliquer un effet sélectionné avec cette commande au signal du micro, utilisez la commande SEND pour régler l’intensité de l’effet. Pour couper l’effet de delay/réverbération appliqué au signal de guitare, réglez la commande sur la position minimum de «balayage» du type d’effet correspondant. 11. Bouton et diode TAP/ diode TUNER Ce bouton permet de régler le temps de retard de l’effet Delay et le temps de réverbération de l’effet Reverb. Tapez deux fois sur ce bouton pour régler la durée voulue. L’intervalle entre les deux frappes détermine le temps de retard/réverbération. Le diode clignote selon le rythme sélectionné. 14. Prise PHONES Cette prise permet de relier directement l’ampli à l’entrée d’une console, d’un enregistreur, etc. Vous pouvez aussi y brancher un casque d’écoute. Le signal présent à cette prise est aussi traité par le modèle d’enceinte (et donc “coloré”). REMARQUE: La connexion d’un casque à cette prise désactive le haut-parleur interne. REMARQUE: Veillez à établir une connexion stéréo à la prise PHONES. Face arrière 1 ASTUCE:Pour que les effets adoptent le tempo du morceau, vous devez appuyer plusieurs fois sur le bouton TAP en respectant la mesure. Pour activer l’accordeur, maintenez le commutateur TAP enfoncé durant plus d’une seconde. Tous les effets sont contournés. Pour en savoir davantage, voyez la section “Utiliser l’accordeur” à la page 16. Section alimentation/AUX IN/PHONES 12. Interrupteur d’alimentation, diode Maintenez cet interrupteur enfoncé pour mettre l’ampli sous tension et hors tension. La diode d’alimentation s’allume quand l’ampli est mis sous tension. 1. Prise DC 12V Branchez ici l’adaptateur fourni. ATTENTION: L’adaptateur secteur est uniquement destiné à alimenter cet ampli. Ne l’utilisez jamais pour alimenter d’autres appareils car cela pourrait causer un dysfonctionnement. 13. Prise AUX IN Cette prise permet de brancher une source audio externe. Servez-vous en pour une lecteur CD ou MP3 que vous utilisez comme accompagnement pour votre guitare. 15 Fonction de coupure automatique d’alimentation L’ampli VOX MINI3 G2 comporte une fonction de coupure automatique d’alimentation. Cette fonction coupe automatiquement l’alimentation de l’ampli quand aucune manipulation n’est effectuée pendant environ 1 heure. Une fois que l’alimentation a été coupée par cette fonction de coupure automatique, manipuler une commande ou un sélecteur ne permet pas de remettre l’ampli sous tension. Vous devez donc mettre à nouveau l’ampli sous tension. ATTENTION: La fonction de coupure automatique d’alimentation est activée quand l’ampli reçoit uniquement un signal via sa prise AUX IN ou quand le niveau du signal reçu via la prise INPUT et MIC IN est trop faible. ATTENTION: La fonction de coupure automatique d’alimentation a été activée à la sortie d’usine. Réglage de la fonction de coupure automatique d’alimentation 1. Maintenez le bouton TAP enfoncé tout en mettant l’ampli sous tension. 2. La diode TAP/TUNER indique le réglage actif. 3. Appuyez sur le bouton TAP pour activé et désactivé alternativement la fonction de coupure automatique d’alimentation. activé 4. Attendez quelques secondes sans manipuler aucun bouton ni commande. L’ampli passe alors en mode de fonctionnement normal. désactivé ATTENTION: Le réglage de la fonction de coupure automatique d’alimentation est mémorisé et conservé même quand vous mettez l’ampli hors tension. ATTENTION: Si vous modifiez le réglage de la fonction de coupure automatique d’alimentation, le réglage temporel de l’effet Delay/de réverbération est initialisé. 16 Utiliser l’accordeur L’accordeur interne du MINI3 G2 permet d’accorder la guitare branchée à la prise INPUT. L’accordeur détecte la hauteur du signal d’entrée et indique la différence entre cette hauteur et la hauteur de référence E (mi). 1. Maintenez le bouton TAP enfoncé plus d’une seconde. Tous les effets sont contournés et l’accordeur est activé. Tous les effets sont contournés. (Pas de signal d’entrée exploitable.) 2. Pincez la 6ème corde à vide. ATTENTION: Veillez à ne pas toucher d’autres cordes. 3. Accordez la corde de sorte à allumer le diode vert central uniquement (voyez à droite). ASTUCE: Le MINI3 G2 reconnaît la note E (mi) dans n’importe quelle octave. C’est pratique pour accorder l’instrument avec les harmoniques ou pour accorder d’autres instruments comme une guitare basse. 4. Appuyez sur le bouton TAP pour quitter le mode d’accordeur. Le contournement des effets est annulé. Trop haut. ASTUCE: Quand vous avez accordé la 6ème corde avec l’accordeur, accordez les autres cordes en vous référant à la 6ème corde. Légèrement trop haut. Juste. Légèrement trop bas. Trop bas. Modèles d’amplis et d’effets Cette section décrit les caractéristiques des modèles d’amplis et d’effets. Modèles d’amplis BTQ CLEAN Modélisation du canal clean d’un ampli hors pair fabriqué uniquement sur commande et connu pour son extraordinaire saturation. Les graves sont pleins et ronds à souhait, la réponse dans le médium est rapide et précise et les aigus sont tout simplement brillants. Il est idéal pour guitare équipée de micros à simple bobinage. BLACK 2x12 Modélisation d’un combo à face noire 2x12”, devenu incontournable pour les musiciens country et blues. Ses superbes sons clean offrent des graves profonds aux accents de piano. Il délivre aussi ce son classique Chicago Blues – notamment avec une guitare dotée de micros à simple bobinage. TWEED 4x10 Modélisation d’un combo 4x10” datant de 1959 et conçu à l’origine pour guitare basse. Sa distorsion veloutée et précise réagit avec sensibilité à la dynamique du pincement des cordes et au volume de la guitare. AC15 Modélisation du canal 2 du VOX AC15 (1x12”, 15W) fabriqué en 1962 qui, à l’instar des groupes britanniques de l’époque, a remporté un vif succès grâce à une enceinte compacte délivrant un son superbe et puissant. AC30TB Modélisation d’un ampli AC30 avec le circuit “Top Boost” inclus d’office à partir de 1964. Elle délivre un aigu doux et raffiné, une distorsion d’une majestueuse profondeur et un son clair riche et brillant. UK '70S Modélisation du canal haut aigu d’une tête britannique fabriquée à la main au début des années 1960. En poussant à fond le volume de cet ampli de 50W, vous obtenez le crunch caractéristique du son rock’n roll. UK '80S Modélisation d’une tête britannique de 100W à un seul canal avec volume master, fabriquée en 1983. Tournez la commande à fond à droite pour obtenir ce son hard rock et heavy metal rugissant qui a dominé les années 80. UK '90S Modélisation du canal à gain élevé d’un ampli moderne de 100W. En dépit de la définition cristalline des notes, ce modèle délivre un son monstrueux d’une agressivité et d’une arrogance indéniables. CALI METAL Modélisation du canal à gain élevé d’un ampli “high gain” sauvage. Son grave profond, son aigu pétillant et son gain monstrueux sont parfaits pour les guitares accordées aussi bas que possible ou pour guitaristes metal jouant sur sept cordes. US HIGAIN Ce modèle est basé sur le canal “Overdrive” d’une tête de 100W à lampes recouverte d’une peau de serpent. Avec un grave ouvert et un médium/aigu comprimé, il délivre des sons puissants et lourds qui passent à travers tout, même avec des réglages de gain extrêmes. LINE Ce modèle dispose de commandes de tonalité à deux bandes générant un son clair sans distorsion. Utilisez la commande GAIN pour régler le niveau du grave et la commande TONE pour régler le niveau de l’aigu. Effets Commande EFFECTS: Compresseur/effet de modulation COMP Ce modèle simule un compresseur affichant un sustain clair, défini et doux. Il est idéal pour des rythmes pop ou funk. Utilisez la commande pour régler le sustain. CHORUS Ce modèle de chorus analogique confère richesse et ampleur au son. Utilisez la commande pour régler la vitesse de modulation. 17 FLANGER Ce modèle de flanger analogique crée un son ayant un effet particulier évoquant le bruit d’un moteur à réaction. Utilisez la commande pour régler la vitesse de modulation. TREM Ce modèle de trémolo typique intégré dans un ampli combo américain change le volume de façon cyclique. Utilisez la commande pour régler la vitesse du trémolo. Commande DELAY/REVERB: Delay/réverbération A.DLY Modélisation d’un delay analogique utilisant un dispositif en cascade comme circuit de retard. La qualité sonore est médiocre mais la chaleur du son est très populaire auprès des musiciens. Utilisez la commande pour régler le niveau du signal retardé dans le mixage. Réglez le temps de retard avec le bouton TAP. La durée maximum du delay est de 1,25 secondes. T. ECHO Modélisation d’un écho à bande analogique populaire. A l’origine, l’écho était produit par la tête de lecture d’un enregistreur et le temps de retard était réglé en modifiant la vitesse du moteur. La fonction de la commande et du bouton est la même que pour le modèle “A.DLY”. SPRING Cet effet modélise la réverbération à ressort de certains amplis de guitare. Utilisez la commande pour régler le niveau du signal de réverbération dans le mixage. Réglez le temps de réverbération avec le bouton TAP. ROOM Réverbération typique de pièce contenant de nombreuses réflexions primaires. La fonction de la commande et du bouton est la même que pour le modèle “SPRING”. 18 Dépannage L’ampli ne se met pas sous tension même quand vous maintenez son interrupteur d’alimentation enfoncé. • Avez-vous installé des piles? La polarité est-elle correcte? Avez-vous branché le cordon de l’adaptateur à la prise ad hoc en face arrière? • L’adaptateur secteur est-il branché à une prise de courant? • La prise de courant fonctionne-t-elle? • Peut-être l’adaptateur est-il endommagé. L’ampli ne produit aucun son • Le volume de la guitare est-il sur un niveau suffisant? • Les deux extrémités du câble de guitare sont-elles branchées où il faut? • Le câble de guitare est-il en bon état? • Avez-vous augmenté le réglage des commandes VOLUME et GAIN? • Avez-vous branché un casque ou un autre câble à la prise PHONES en face arrière? Si c’est “oui”, débranchez-le! L’ampli est à peine audible • Le volume de la guitare est-il sur un niveau suffisant? • Avez-vous réglé la commande VOLUME ou GAIN sur une valeur plutôt basse? • Les piles sont-elles plates? Aucun signal n’est présent à la prise PHONES. • Vérifiez que la commande VOLUME en face avant n’est pas réglée au minimum. Fiche technique • Assurez-vous que l’ampli reçoit bien un signal. Il faut pour cela débrancher temporairement le casque ou le câble branché à la prise PHONES. Sans cela, en effet, le hautparleur est désactivé. Si vous n’entendez toujours rien, voyez “L’ampli ne produit aucun son”. En revanche, si vous entendez quelque chose, vérifiez votre casque ou l’état du câble utilisé. Nombre d’amplis: 11 Nombre d’effets: 8 Les effets ne peuvent pas être appliqués au son. Plage de détection (onde sinus): E1 à E6 (41,2 Hz à 1318,5 Hz) • L’accordeur est-il activé? Si l’accordeur est activé, les effets sont contournés. Appuyez sur le bouton TAP pour annuler le contournement des effets. Entrées/sorties: INPUT, MIC IN, AUX IN, PHONES Puissance de l’ampli: Maximum d’environ 3 W RMS @ 4 ohms • La commande EFFECTS ou DELAY/REVERB est-elle réglée sur OFF ou sur une valeur très basse? Corrigez le réglage des commandes EFFECTS et DELAY/REVERB. Haut-parleur: 5”, 4Ω Traitement du signal Conversion A/N: 24 bits Conversion N/A: 24 bits • Si les effets ne peuvent pas être appliqués au signal MIC, la commande SEND a peut-être un réglage trop bas. Ajustez la commande SEND. Alimentation: Six piles de type “AA/LR6” alcalines ou adaptateur secteur fourni Le dispositif branché à la prise AUX IN est inaudible. Autonomie des piles: 12 heures • Vérifiez si le dispositif est correctement branché. • Le réglage de volume du dispositif externe est peut-être trop bas. Le signal du micro branché à la prise MIC IN est inaudible. • Vérifiez si le micro est correctement branché. • Le commutateur du micro est peut-être coupé. • La commande TRIM a peut-être un réglage trop bas. Consommation électrique: 150mA Dimensions (L x P x H): 262 x 174 x 223mm Poids: 3 kg (piles non comprises) Accessoires fournis: adaptateur secteur (DC 12V ), sangle * L’apparence et les caractéristiques de ce produit sont susceptibles d’être modifiées sans préavis. Visitiez notre site web sous www.voxamps.com pour en savoir plus sur les produits Vox. 19 Vorsichtsmaßnahmen Aufstellungsort Vermeiden Sie das Aufstellen des Geräts an Orten, an denen • es direkter Sonneneinstrahlung ausgesetzt ist; • hohe Feuchtigkeit oder Extremtemperaturen auftreten können; • Staub oder Schmutz in großen Mengen vorhanden sind; • das Gerät Erschütterungen ausgesetzt sein kann. • in der Nähe eines Magnetfeldes. Stromversorgung Schließen Sie das optionale Netzteil nur an eine geeignete Steckdose an. Verbinden Sie es niemals mit einer Steckdose einer anderen Spannung. Störeinflüsse auf andere Elektrogeräte Dieser kann bei in der Nähe aufgestellten Rund-funkempfängern oder Fernsehgeräten Empfangsstörungen hervorrufen. Betreiben Sie solche Geräte nur in einem geeigneten Abstand von diesem Erzeugnis. Bedienung Vermeiden Sie bei der Bedienung von Schaltern und Reglern unangemessenen Kraftaufwand. Reinigung Bei auftretender Verschmutzung können Sie das Gehäuse mit einem trockenen, sauberen Tuch abwischen. Verwenden Sie keinerlei Flüssigreiniger wie beispielsweise Reinigungsbenzin, Verdünnungs- oder Spülmittel. Verwenden Sie niemals brennbare Reiniger. Bedienungsanleitung Bewahren Sie diese Bedienungsanleitung gut auf, falls Sie sie später noch einmal benötigen. Flüssigkeiten und Fremdkörper Stellen Sie niemals Behältnisse mit Flüssigkeiten in der Nähe des Geräts auf. Wenn Flüssigkeit in das Gerät gelangt, können Beschädigung des Geräts, Feuer oder ein elektrischer Schlag die Folge sein. Beachten Sie, daß keinerlei Fremdkörper in das Gerät gelangen. Sollte ein Fremdkörper in das Gerät gelangt sein, so trennen Sie es sofort vom Netz. Wenden Sie sich dann an Ihren VOX-Fachhändler. * Alle Produkt- und Firmennamen sind Warenzeichen oder eingetragene Warenzeichen der betreffenden Eigentümer. 20 Hinweis zur Entsorgung (Nur EU) Wenn Sie das Symbol mit der „durchgekreuzten Mülltonne“ auf Ihrem Produkt, der dazugehörigen Bedienungsanleitung, der Batterie oder dem Batteriefach sehen, müssen Sie das Produkt in der vorgeschriebenen Art und Weise entsorgen. Dies bedeutet, dass dieses Produkt mit elektrischen und elektronischen Komponenten nicht mit dem normalen Hausmüll entsorgt werden darf. Für Produkte dieser Art existiert ein separates, gesetzlich festgelegtes Entsorgungssystem. Gebrauchte elektrische und elektronische Geräte müssen separat entsorgt werden, um ein umweltgerechtes Recycling sicherzustellen. Diese Produkte müssen bei benannten Sammelstellen abgegeben werden. Die Entsorgung ist für den Endverbraucher kostenfrei! Bitte erkundigen sie sich bei ihrer zuständigen Behörde, wo sie diese Produkte zur fachgerechten Entsorgung abgeben können. Falls ihr Produkt mit Batterien oder Akkumulatoren ausgerüstet ist, müssen sie diese vor Abgabe des Produktes entfernen und separat entsorgen (siehe oben). Die Abgabe dieses Produktes bei einer zuständigen Stelle hilft ihnen, dass das Produkt umweltgerecht entsorgt wird. Damit leisten sie persönlich einen nicht unerheblichen Beitrag zum Schutz der Umwelt und der menschlichen Gesundheit vor möglichen negativen Effekten durch unsachgemäße Entsorgung von Müll. Batterien oder Akkus, die Schadstoffe enthalten, sind auch mit dem Symbol einer durchgekreuzten Mülltonne gekennzeichnet. In der Nähe zum Mülltonnensymbol befindet sich die chemische Bezeichnung des Schadstoffes. Cd oder NiCd steht für Cadmium, Pb für Blei und Hg für Quecksilber. WICHTIGER HINWEIS FÜR KUNDEN Dieses Produkt wurde unter strenger Beachtung von Spezifikationen und Spannungsanforderungen hergestellt, die im Bestimmungsland gelten. Wenn Sie dieses Produkt über das Internet, per Postversand und/oder mit telefonischer Bestellung gekauft haben, müssen Sie bestätigen, dass dieses Produkt für Ihr Wohngebiet ausgelegt ist. WARNUNG: Verwendung dieses Produkts in einem anderen Land als dem, für das es bestimmt ist, verwendet wird, kann gefährlich sein und die Garantie des Herstellers oder Importeurs hinfällig lassen werden. Bitte bewahren Sie diese Quittung als Kaufbeleg auf, da andernfalls das Produkt von der Garantie des Herstellers oder Importeurs ausgeschlossen werden kann. Inhalt Einleitung-------------------------------------------------21 Willkommen an Bord!---------------------------------------- 21 Die wichtigsten Merkmale---------------------------------- 21 Vorbereitung---------------------------------------------22 Einlegen der Batterien--------------------------------------- 22 Teile und Funktionen---------------------------------23 Bedienoberfläche--------------------------------------------- 23 Rückseite------------------------------------------------------- 24 Energiesparfunktion----------------------------------25 Verwendung der Stimmfunktion-----------------25 Verstärkermodelle und Effekte-------------------26 Verstärkermodelle-------------------------------------------- 26 Effekte----------------------------------------------------------- 26 Fehlersuche----------------------------------------------27 Technische Daten--------------------------------------28 Einleitung Willkommen an Bord! Vielen, aber herzlichen Dank für Ihre Entscheidung zu einem MINI3 G2 von VOX. Um über Jahre hinweg Freude an Ihrem neuen Amp zu haben und ihn richtig zu bedienen, müssen Sie sich diese Bedienungsanleitung vollständig durchlesen und an einem Ort aufbewahren, wo man sie bei Bedarf auch wieder findet. Wir hoffen, Ihnen gefällt der Sound des VOX MINI3 G2! Die wichtigsten Merkmale • Die Sounds der VOX Valvetronix Serie destilliert und verpackt in einem kompakten Gehäuse. • Dieser reisefreudige Verstärker kann mit sechs „AA“-Alkalibatterien oder über das beiliegende Netzteil gespeist werden. • Zusätzlich zu 4 ebenso hochwertigen wie begehrten Effekten bietet dieser Verstärker 4 Delay- und Reverb-Effekte für Akustiksimulationen. Die Bedienung dieses Verstärkers ist vorbildlich: Die Klangfarbe kann mit nur einem Regler geändert werden. • Mit dem TAP-Taste kann die Delay-Verzögerungszeit perfekt zum SongTempo synchronisiert werden. • Der eingebaute Tuner erlaubt das Stimmen des Signals, das an der INPUTBuchse anliegt. • Eingangsseitig stehen eine AUX IN-Buchse für externe Signalquellen (CD-, MP3-Spieler usw.) und eine MIC IN-Buchse für ein Mikrofon zur Verfügung. So können Sie sich von Ihrer Lieblingsmusik begleiten lassen oder zu Ihrem Gitarrenspiel singen. Der Hinwegpegel des an der MIC IN-Buchse anliegenden Signals zum Delay/Reverb-Effekt kann mit dem SEND-Regler separat eingestellt werden. • Original VOX Bassilator-Technologie für ein solides Bass-Fundament. 21 Vorbereitung Hier wird erklärt, wie man den Verstärker aufstellt. ANMERKUNG: Diese Bedienungsanleitung enthält auch Sicherheitshinweise und Vorsichtsmaßnahmen. Bitte lesen Sie sich die gesamte Anleitung durch. Einlegen der Batterien Entfernen Sie die Batteriefachblende an der Geräteunterseite, indem Sie an dem Band ziehen. Lege 6 Alkalibatterien des Typs „AA“ ein (siehe die Abbildung). Beachten Sie beim Einlegen die Polarität. 1. Drehen Sie den VOLUME-Regler und den TRIM-Regler komplett herunter. 2. Legen Sie Batterien in den Verstärker ein. Sie können aber auch das eine Ende des Netzteils an die DC12V-Buchse auf der Verstärkerrückseite und das andere Ende an eine geeignete Steckdose anschließen. 3. Verbinden Sie die Gitarre mit der INPUT-Buchse auf der Oberseite. Wenn Sie auch einen CD- oder MP3-Player bzw. ein Mikrofon verwenden möchten, müssen Sie ihn/es an die AUX IN- bzw. MIC IN-Buchse auf der Rückseite anschließen. 4. Halten Sie den Einschaltknopf solange gedrückt, bis die Power-LED aufleuchtet und das Gerät eingeschaltet ist. ANMERKUNG: Halten Sie beim Ausschalten den Einschaltknopf solange gedrückt, bis die Power-LED erlischt. 5. Stellen Sie mit dem VOLUME-Regler die gewünschte Lautstärke ein. Wenn Sie ein Mikrofon verwenden, können Sie dessen Lautstärke mit dem TRIM-Regler einstellen. 22 ANMERKUNG: Batterien liegen nicht bei und müssen daher separat gekauft werden. Verwenden Sie ausschließlich Alkalibatterien. ANMERKUNG: Achten Sie beim Einlegen der Batterien auf die richtige Polarität. Auswechseln der Batterien Legen Sie neue Batterien ein, wenn die Power-LED schwächer leuchtet. ANMERKUNG: Bei einer geringen Batteriespannung tritt eventuell Rauschen auf. ANMERKUNG: Erschöpfte Batterien müssen so schnell wie möglich aus dem MINI3 G2 entfernt werden, weil sie sonst eventuell auslaufen und Schäden verursachen. Entfernen Sie die Batterien außerdem, wenn Sie den MINI3 G2 längere Zeit nicht verwenden möchten. Teile und Funktionen AMP-Sektion Hier können mehrere Verstärkerfunktionen eingestellt werden. Bedienoberfläche 5 6 7 5. AMP-Regler Hiermit kann ein Verstärkermodell gewählt werden. Bei Anwahl eines anderen Modells werden GAIN, TONE und der Signalweg automatisch wie auf dem simulierten Original eingestellt. Alles Weitere hierzu finden Sie unter „Verstärkermodelle“ auf Seite 26. 8 1 12 2 13 3 14 4 9 10 11 6. GAIN-Regler Hiermit kann die Pegelanhebung vor dem gewählten Verstärkermodell eingestellt werden. 7. TONE-Regler Hiermit kann die Klangfarbe geändert werden. Das Verhalten dieses Regler richtet sich entscheidend nach dem gewählten Verstärkermodell. 8. VOLUME-Regler Schalter zur Einstellung des vom Vorverstärker an die Endstufe weitergeleiteten Signalpegels. Hiermit können Sie die Endstufenverzerrung ändern. ANMERKUNG: Sie können die Endstufenverzerrung auch mit dem GAIN-Regler ändern. Je nach Einstellung wird keine Verzerrung hörbar sein. Eingangssektion Effektsektion 1. INPUT-Buchse Hier müssen Sie Ihre Gitarre anschließen. Hier können mehrere Effektparameter eingestellt werden. Alles Weitere zu den Effekten finden Sie unter „Effekte“ auf Seite 26. 2. MIC IN-Buchse Schließen Sie hier ein Mikrofon an. 9. EFFECTS-Regler Hiermit wählen Sie den Kompressor/Modulationseffekt und stellen dessen Intensität ein. Um die Effekte zu umgehen, drehen Sie den Regler komplett gegen den Uhrzeigersinn. 3. TRIM-Regler Hiermit kann der Pegel des Mikrofoneingangs eingestellt werden. 4. SEND-Regler Hiermit stellen Sie den Delay/Reverb-Effektanteil für das Mikrofonsignal ein. 23 10. DELAY/REVERB-Regler Mit diesem Regler können Sie den gewünschten Delay/Reverb-Effekttyp wählen und den Effektanteil einstellen. Wenn Sie keine Effekte benötigen, müssen Sie den Regler ganz nach links drehen. Wenn der mit diesem Regler gewählte Effekt auch das Mikrofonsignal bearbeiten soll, müssen Sie mit dem SEND-Regler dessen Effektanteil einstellen. Wenn das Gitarrensignal nicht mit Delay/Reverb bearbeitet werden soll, drehen Sie den Regler auf die minimale Position des entsprechenden Effekts. 11. TAP-Taste und LED/TUNER LED Mit diesem Taste kann die Verzögerungszeit des DELAY-Effekts bzw. die Halldauer des REVERB-Effekts eingestellt werden. Drücken Sie diesen Taste mindestens zwei Mal. Das Zeitintervall zwischen den Betätigungen wird als Zeitwert eingestellt. Die LED blinkt jeweils im eingestellten Tempo. 14. PHONES-Buchse Diese Buchse kann direkt mit dem Eingang eines Mischpults, Recorders usw. verbunden werden. Außerdem kann man hier einen Kopfhörer anschließen. Das hier anliegende Signal wird vor der Endstufe abgezweigt und vom Boxenmodell „gefärbt“. ANMERKUNG: Wenn Sie hier einen Kopfhörer anschließen, wird der interne Lautsprecher ausgeschaltet. ANMERKUNG: An die PHONES-Buchse muss ein Stereostecker angeschlossen werden. Bei Verwendung eines Monosteckers hören Sie nichts. Rückseite 1 TIPP: Um dafür zu sorgen, dass die Effekte im Song-Tempo pulsieren, müssen Sie den TAP-Taste wiederholt im richtigen Takt drücken. Um die Stimmfunktion zu aktivieren, müssen Sie den TAP-Taster mindestens eine Sekunde lang gedrückt halten. Dann werden alle Effekte umgangen. Alles Weitere hierzu finden Sie unter „Verwendung der Stimmfunktion“ auf Seite 25. Power/AUX IN/PHONES-Sektion 12. Einschaltknopf, Power-LED Indem Sie diesen Knopf gedrückt halten, schalten Sie das Gerät ein oder aus. Die leuchtende Power-LED zeigt an, dass das Gerät eingeschaltet ist. 13.AUX IN-Buchse Hier kann eine externe Signalquelle angeschlossen werden. Somit können Sie sich beim Spielen von einer CD oder einem MP3-Titel begleiten lassen. 24 1. DC 12V-Buchse An diese Buchse muss das beiliegende Netzteil angeschlossen werden. ANMERKUNG: Das Netzgerät dürfen Sie nur mit diesem Gerät verwenden. Verwenden Sie das Netzgerät niemals mit anderen Geräten, da diese sonst beschädigt werden könnten. Energiesparfunktion Der VOX MINI3 G2 ist mit einer Energiesparfunktion ausgestattet. Diese schaltet das Gerät automatisch aus, sobald es länger als eine Stunde nicht benutzt worden ist. Ist das Gerät abgeschaltet, können Sie es nicht durch Drehen an einem Regler oder Wahlschalter wieder einschalten. Schalten Sie es mit dem Einschaltknopf ein. ANMERKUNG: Die Energiesparfunktion ist allerdings aktiviert, wenn ein Signal nur an der AUX IN-Buchse anliegt oder wenn der Eingangspegel an der INPUT- und MIC IN_Buchse zu gering ist. ANMERKUNG: Die Energiesparfunktion ist werksseitig aktiviert. Die Energiesparfunktion aktivieren oder deaktivieren 1. Halten Sie die TAP-Taste gedrückt und schalten Sie das Gerät ein. Aktivieren 2. Die TAP/TUNER-LED zeigt die aktuellen Einstellungen an. 3. Drücken Sie die TAP-Taste, um die Funktion zu aktivieren Deaktivieren oder deaktivieren. 4. Warten Sie einige Sekunden, ohne irgendwelche Tasten oder Regler zu bedienen. ANMERKUNG: Die gewählten Einstellungen der Energiesparfunktion werden beim Ausschalten gespeichert. ANMERKUNG: Wenn Sie Änderungen an den Einstellungen der Energiesparfunktion vornehmen, werden die Einstellungen zur Dauer der Delay/Reverb-Effekte auf die Werkseinstellungen zurückgesetzt. Verwendung der Stimmfunktion Der Tuner des MINI3 G2 erlaubt das Stimmen des Signals, das an der INPUTBuchse anliegt. Die Stimmfunktion ermittelt die Tonhöhe des empfangenen Signals und zeigt dann die Abweichung im Verhältnis zum „E“ an. 1. Halten Sie den TAP-Taste mindestens 1 Sekunde lang gedrückt. Alle Effekte werden umgangen und die Stimmfunktion wird aktiviert. Alle Effekte werden umgangen. (Es liegt kein Eingangssignal an.) 2. Schlagen Sie die offene 6. Saite an. ANMERKUNG: Schlagen Sie immer nur eine Saite an. 3. Stimmen Sie die Gitarre so, dass die grüne LED in der Mitte leuchtet (siehe rechts). TIPP: Der MINI3 G2 erkennt nur die Note „E“ – allerdings in allen Oktaven. Das ist z.B. praktisch, wenn Sie sich beim Stimmen an den Flageoletts orientieren oder z.B. einen Bass stimmen möchten. 4. Drücken Sie den TAP-Taste, um die Stimmfunktion auszuschalten. Die Effekte werden jetzt wieder aktiviert. TIPP: Nach dem Tonhöhenabgleich der 6. Saite mit Hilfe des Tuners können Sie die übrigen Saiten im Verhältnis zur 6. Saite stimmen. Zu hoch. Etwas zu hoch. Richtig gestimmt. Etwas zu tief. Zu tief. 25 Verstärkermodelle und Effekte In diesem Kapitel werden die Verstärkermodelle und Effekttypen vorgestellt. Verstärkermodelle BTQ CLEAN Das Modell des „Clean“-Kanals eines hochkarätigen Boutique-Verstärkers, der nur auf Bestellung gebaut und liebevoll „Overdrive Special“ genannt wurde. Der Bass ist voll und rund, die Ansprache im Mittenbereich schnell und exakt und die Höhen sind einfach brillant. Singlecoils stehen auf so etwas. BLACK 2x12 Dies ist ein Modell eines „Blackface“-2x12”-Combos, ohne den sich kein Countryoder Blues-Gitarrist auf die Straße traut. Sein „tighter“ und „cleaner“ Sound umfasst tiefe klavierähnliche Töne. Andererseits liefert er bei Verwendung einer Singlecoil-Gitarre auch den amtlichen Chicago-Blues-Sound. TWEED 4x10 Dieses Modell beruht auf einem 1959er 4x10”-Combo, der ursprünglich für Bassgitarre gedacht war. Die runde und zugleich knusprige Übersteuerung reagiert sehr akkurat auf Ihre Spielweise und eventuelle Pegelunterschiede Ihrer Gitarre. AC15 Dieses Modell beruht auf Kanal 2 des VOX AC15 (1x12”, 15W), der 1962 erschien und dank seiner kompakten Maße und seines exzellenten Sounds zu einem Hit bei den angesagten britischen Bands wurde. AC30TB Dieses Modell beruht auf einem AC30 mit „Top Boost“-Schaltung, die ab 1964 serienmäßig eingebaut wurde. Daher die samtweichen und feinen Höhen, die fast majestätisch tiefe Übersteuerung und der glasklare „Clean“-Sound. UK '70S Dieses Modell beruht auf dem „High Treble“-Kanal eines handverlöteten Verstärkertops, der in den frühen 1960ern in England gebaut wurde. Wenn man den Pegel dieses 50W starken Amps komplett anhebt, meldet sich jener „Crunch“ zu Wort, der bis in alle Ewigkeit als amtlicher Rock-Sound gelten wird. 26 UK '80S Das Modell eines 1983 erschienenen einkanaligen 100W-Tops mit MASTER VOLUME-Regler. Drehen Sie den GAIN-Regler voll auf, um jenen fetten, knurrigen Hard Rock- und Heavy Metal-Sound der ‘80er zu neuem Glanz zu verhelfen. UK '90S Dieses Modell beruht auf dem „Modern High-Gain“-Kanal eines neuzeitlichen 100W-Verstärkers. Einzelnoten haben zwar eine vorbildliche Definition, aber der Sound ist monströs, aggressiv und sogar richtig arrogant. CALI METAL Dieses Modell beruht auf dem „Modern High-Gain“-Kanal eines wilden und nachgerade brutalen Verstärkers. Der tiefe, offene Bass, die perlenden Höhen und die brachiale Pegelanhebung eignen sich perfekt für ganz tief gestimmte und siebensaitige Gitarren. US HIGAIN Dieses Modell beruht auf dem „Overdrive“-Kanal eines 1991 vorgestellten 100W-Vollröhrentops im Schlangenhaut-Look. Mit dem offenen Bass und den komprimierten Mitten/Höhen brettert dieser Heavy-Sound, was das Zeug hält, lässt sich aber selbst von hohen GAIN-Werten nicht einschüchtern. LINE Dieses Modell bietet eine 2-Band-Klangregelung und erzeugt einen „cleanen“ Sound (d.h. ohne Verzerrung). Mit dem GAIN-Regler kann der Bassanteil eingestellt werden und mit dem TONE-Regler der Höhenanteil. Effekte EFFECTS-Regler Kompressor/Modulation COMP Dieses Kompressormodell erzeugt ein „cleanes“, perkussives und rundes Sustain. Es eignet sich vor allem für Pop- und Funk-Rhythmen. Die Sustain-Dauer kann mit dem Regler eingestellt werden. CHORUS Dieses Modell simuliert einen warmen und breiten analogen Chorus-Effekt. Die Modulationsgeschwindigkeit kann mit dem Regler eingestellt werden. FLANGER Dieses Modell simuliert einen analogen Flanger-Effekt mit jenem typischen Düsenjägerwuusch. Die Modulationsgeschwindigkeit kann mit dem Regler eingestellt werden. Fehlersuche Das Gerät schaltet sich nicht ein, selbst wenn ich den Einschaltknopf längere Zeit gedrückt halte. TREM Simulation der Tremolo-Schaltung in einem begehrten amerikanischen Combo. Dieser Effekt moduliert die Lautstärke. Die Tremologeschwindigkeit kann mit dem Regler geändert werden. • Haben Sie Batterien eingelegt? Stimmt die Polarität? Haben Sie das Netzteil mit dem betreffenden Anschluss auf der Rückseite verbunden? DELAY/REVERB-Regler • Funktioniert jene Steckdose denn auch? A.DLY Dieses Modell beruht auf einem Analog-Delay mit Eimerkettenschaltung („BBD“). Die Klangqualität ist zwar alles Andere als top, aber eben das erzeugt die Wärme, auf die Gitarristen so stehen. Mit dem Regler kann die Mischung zwischen Direkt- und Delay-Signal eingestellt werden. Die Verzögerungszeit muss mit dem TAP-Taste eingestellt werden. Die maximale Delaydauer beträgt 1,25 Sekunden. T. ECHO Dieses Modell beruht auf einem legendären Bandecho. Das Original enthielt eine Endlosbandschleife und einen Wiedergabekopf. Die Verzögerungszeit konnte durch Variieren der Bandlaufgeschwindigkeit eingestellt werden. Der Regler und Taste haben dieselbe Funktion wie beim „A.DLY“-Modell. SPRING Dieses Modell simuliert den Federhall bestimmter Gitarrenverstärker. Mit dem Regler kann die Mischung zwischen Direkt- und Hallsignal eingestellt werden. Die Halldauer kann mit dem TAP-Taste eingestellt werden. ROOM Simulation eines stark reflektierenden Zimmers. Der Regler und Taste haben dieselbe Funktion wie beim „SPRING“-Modell. • Haben Sie das Netzteil an eine geeignete Steckdose angeschlossen? • Ist das Netzteil eventuell beschädigt? Der Verstärker gibt keinen Laut von sich. • Haben Sie die Lautstärke der Gitarre ordnungsgemäß eingestellt? • Befinden sich beide Enden des Gitarrenkabels dort, wo sie hingehören? • Ist das Gitarrenkabel defekt? • Wie haben Sie denn den VOLUME- und GAIN-Regler eingestellt? • Haben Sie einen Kopfhörer oder ein anderes Kabel an die PHONES-Buchse auf der Rückseite angeschlossen? Wenn „ja“, müssen Sie jene Verbindung lösen. Der Verstärker ist eigentlich erschreckend leise. • Haben Sie die Lautstärke der Gitarre ordnungsgemäß eingestellt? • Haben Sie den VOLUME- oder GAIN-Regler relativ niedrig eingestellt? • Prüfen Sie, ob die Batterien entladen sind. Die PHONES-Buchse gibt kein Signal aus. • Der VOLUME-Regler im Bedienfeld darf sich nicht in der Mindestposition befinden. 27 • Überprüfen Sie, ob der Verstärker überhaupt ein Signal empfängt. Lösen Sie die Kabelverbindung mit der PHONES-Buchse vorübergehend. Sonst wird der Lautsprecher nämlich stummgeschaltet. Wenn Sie jetzt immer noch nichts hören, siehe dann „Der Verstärker gibt keinen Laut von sich“. Hören Sie hingegen wohl etwas, dann müssen Sie den Kopfhörer oder den Zustand des verwendeten Kabels überprüfen. Die Effekte scheinen nicht zu funktionieren. • Haben Sie die Stimmfunktion aktiviert? Solange die Stimmfunktion aktiv ist, werden die Effekte umgangen. Drücken Sie den TAP-Taste, um die Effekte wieder zu hören. Technische Daten Anzahl der Verstärkertypen: 11 Anzahl der Effekte: 8 Bereich (Sinuswelle): E1–E6 (41,2 Hz–1318,5 Hz) Ein-/Ausgänge: INPUT, MIC IN, AUX IN, PHONES Ausgangsleistung der Endstufe: Max. ±3W RMS @ 4 Ω Lautsprecher: 5” 4 Ω Signalverarbeitung A/D-Wandlung: 24 bit D/A-Wandlung: 24 bit Stromversorgung: Sechs „AA/LR6“-Alkalibatterie oder beiliegendes Netzteil Lebensdauer der Batterien: 12 Stunden Leistungsaufnahme: 150 mA • Überprüfen Sie die Verbindung des externen Geräts. Abmessungen (B x T x H): 262 x 174 x 223 mm • Vielleicht ist der Ausgangspegel des externen Geräts relativ niedrig. Gewicht: 3 kg (ohne Batterien) Das Signal des an die MIC IN-Buchse angeschlossenen Mikrofons ist unhörbar. Lieferumfang: Netzteil (DC 12V • Haben Sie den EFFECTS- oder DELAY/REVERB-Regler auf „OFF“ oder einen sehr kleinen Wert gestellt? Erhöhen Sie die Einstellung des EFFECTS- oder DELAY/REVERB-Reglers. • Wenn das an MIC anliegende Signal trocken ausgegeben wird, haben Sie den SEND-Regler wahrscheinlich auf den Mindestwert gestellt. Stellen Sie den SEND-Regler anders ein. Das Signal der an die AUX IN-Buchse angeschlossenen Signalquelle ist unhörbar. • Überprüfen Sie die Verbindung des Mikrofons. • Vielleicht ist das Mikrofon ausgeschaltet. • Wahrscheinlich muss die Einstellung des TRIM-Reglers erhöht werden. 28 ), Gurt * Anderungen der technischen Daten und des Designs ohne vorherige Ankündigung vorbehalten. Weitere Infos über Vox-Produkte findest du im Internet unter www. voxamps.com. Precauciones Ubicación El uso de la unidad en las siguientes ubicaciones puede dar como resultado un mal funcionamiento: •Expuesto a la luz directa del sol •Zonas de extremada temperatura o humedad •Zonas con exceso de suciedad o polvo •Zonas con excesiva vibración •Cercano a campos magnéticos Fuente de alimentación Por favor, conecte el adaptador de corriente designado a una toma de corriente con el voltaje adecuado. No lo conecte a una toma de corriente con voltaje diferente al indicado. Nota respecto a residuos y deshechos (solo UE) Cuando aparezca el símbolo del cubo de basura tachado sobre un producto, su manual de usuario, la batería, o el embalaje de cualquiera de éstos, significa que cuando quiere tire dichos artículos a la basura, ha de hacerlo en acuerdo con la normativa vigente de la Unión Europea. No debe verter dichos artículos junto con la basura de casa. Verter este producto de manera adecuada ayudará a evitar daños a su salud pública y posibles daños al medioambiente. Cada país tiene una normativa específica acerca de cómo verter productos potencialmente tóxicos, por tanto le rogamos que se ponga en contacto con su oficina o ministerio de medioambiente para más detalles. Si la batería contiene metales pesados por encima del límite permitido, habrá un símbolo de un material químico, debajo del símbolo del cubo de basura tachado. Cuidado NOTA IMPORTANTE PARA EL CONSUMIDOR Este producto ha sido fabricado de acuerdo a estrictas especificaciones y requerimientos de voltaje aplicables en el país para el cual está destinado. Si ha comprado este producto por internet, a través de correo, y/o venta telefónica, debe usted verificar que el uso de este producto está destinado al país en el cual reside. AVISO: El uso de este producto en un país distinto al cual está destinado podría resultar peligroso y podría invalidar la garantía del fabricante o distribuidor. Por favor guarde su recibo como prueba de compra ya que de otro modo el producto puede verse privado de la garantía del fabricante o distribuidor. Guarde este manual * Todos los nombres de productos y compañías son marcas comerciales o marcas registradas de sus respectivos propietarios. Interferencias con otros aparatos Las radios y televisores situados cerca pueden experimentar interferencias en la recepción. Opere este dispositivo a una distancia prudencial de radios y televisores. Manejo Para evitar una rotura, no aplique excesiva fuerza a los conmutadores o controles. Si exterior se ensucia, límpiese con un trapo seco. No use líquidos limpiadores como disolvente, ni compuestos inflamables. Después de leer este manual, guárdelo para futuras consultas. Mantenga los elementos externos alejados del equipo Nunca coloque ningún recipiente con líquido cerca de este equipo, podría causar un cortocircuito, fuero o descarga eléctrica. Cuide de que no caiga ningún objeto metálico dentro del equipo. 29 Contenido Introducción----------------------------------------------------30 ¡Bienvenido a bordo!------------------------------------------------------- 30 Características generales------------------------------------------------ 30 Configuración--------------------------------------------------31 Instalación de las pilas---------------------------------------------------- 31 Partes y sus funciones-------------------------------------32 Panel superior--------------------------------------------------------------- 32 Panel posterior-------------------------------------------------------------- 33 Función de desactivación automática----------------34 Uso del afinador-----------------------------------------------34 Modelos de amplificador y efectos---------------------35 Modelo AMP----------------------------------------------------------------- 35 Efectos------------------------------------------------------------------------- 35 Solución de problemas-------------------------------------36 Especificaciones----------------------------------------------37 Introducción ¡Bienvenido a bordo! Gracias por elegir MINI3 G2 de VOX. Para garantizar una relación duradera y sin complicaciones con su nuevo amplificador, lea detenidamente este manual, utilice el amplificador siguiendo las indicaciones y conserve el manual como referencia futura. ¡Esperamos que disfrute del estupendo sonido del MINI3 G2 de VOX! Características generales • Los sonidos extraídos de la serie VOX Valvetronix se comprimen en un equipo compacto. • Este amplificador portátil está alimentado por seis pilas alcalinas AA o por el adaptador de CA incluido, lo que le permite tocar en cualquier parte. • Además de cuatro efectos clásicos y de gran calidad, el amplificador presenta cuatro efectos de reverberación y retardo que simulan la reverberación acústica. El amplificador también incluye una interfaz intuitiva, lo que le permite ajustar el tono mediante un único mando. • El botón TAP le permite ajustar con facilidad el tiempo de retardo en sincronización con el tempo. • La función de afinador integrada le permite afinar una guitarra conectada al jack INPUT. • ILas entradas incluyen un jack AUX IN para conectar un dispositivo de audio externo (reproductor de CD, MP3, etc.), y un jack MIC IN en el que puede conectar un micrófono. Puede tocar junto con música grabada o acompañar voces con la guitarra. También puede ajustar el nivel de envío desde el jack MIC IN para los efectos de retardo/reverberación utilizando el mando SEND específico. • Tecnología Bassilator original de VOX para crear un tono de graves sólido. 30 Configuración En esta sección se describe la configuración básica de su amplificador. NOTA: En este manual también se describen funciones y precauciones de seguridad. Asegúrese de leer todo el manual. Instalación de las pilas Retire la tapa del compartimento de las pilas, que está ubicado en la parte inferior de la unidad, tirando de la cinta. Inserte seis pilas alcalinas AA tal como se muestra en la figura. 1. Ajuste el mando VOLUME y el mando TRIM en el nivel mínimo. 2. Coloque las pilas en el amplificador. También puede conectar el adaptador de CA incluido al jack DC 12V en el panel posterior y, a continuación, enchufar el adaptador en una toma de CA. 3. Enchufe la guitarra en el jack INPUT del panel superior. Si tiene previsto utilizar un reproductor de CD o MP3 o un micrófono, conecte el reproductor al jack AUX IN o el micrófono al jack MIC IN del panel superior. 4. Mantenga pulsado el botón de alimentación hasta que se encienda el LED de alimentación y se active la alimentación. NOTA: Para desactivar la alimentación, mantenga pulsado el botón de alimentación hasta que el LED de alimentación se apague. 5. Suba gradualmente el mando VOLUME hasta el nivel deseado. Si utiliza un micrófono, puede ajustar su volumen con el mando TRIM. NOTA: Las pilas no están incluidas. Deberá comprarlas por separado. Nunca utilice pilas que no sean alcalinas. NOTA: Asegúrese de colocar las pilas con la orientación correcta. Sustitución de las pilas Sustituya las pilas cuando el LED de alimentación se oscurezca. NOTA: Si se agotan las pilas, pueden producirse interferencias en el sonido. NOTA: Las pilas agotadas deben extraerse inmediatamente del MINI3 G2. Si la deja puestas, se pueden producir fallos de funcionamiento, como la fuga de una pila. También debe extraer las pilas si no va a utilizar el MINI3 G2 durante un periodo prolongado. 31 Partes y sus funciones Sección AMP Esta sección le permite definir diversos ajustes del amplificador. Panel superior 5 6 7 8 1 12 2 13 3 14 4 9 10 11 Sección INPUT 1. Jack INPUT Aquí se enchufa la guitarra. 2. Jack MIC IN Conecte un micrófono aquí. 3. Mando TRIM Este mando le permite ajustar el nivel de volumen de la entrada de micrófono. 4. Mando SEND Este mando le permite ajustar el volumen que se envía desde la entrada de micrófono al efecto de retardo/reverberación. 32 5. Selector AMP Este selector le permite elegir un modelo de amplificador. El circuito de ganancia, las características de control de tono y la distribución del circuito se ajustarán automáticamente en función del modelo de amplificador seleccionado. Para obtener más información sobre cada modelo de amplificador, consulte “Modelo AMP” en la página 35. 6. Mando GAIN Este mando le permite ajustar la ganancia del preamplificador para el modelo de amplificador seleccionado. 7. Mando TONE Este mando le permite ajustar el color tonal. El tono cambiará automáticamente en función del modelo de amplificador seleccionado. 8. Mando VOLUME Este mando le permite ajustar el volumen que se emite desde el preamplificador al amplificador de potencia. Con este ajuste puede cambiar la distorsión del amplificador de potencia. NOTA: La distorsión del amplificador de potencia también se puede cambiar con el mando GAIN. La distorsión se eliminará en función del ajuste. Sección EFFECTS Aquí puede ajustar los parámetros de los efectos. Para ver más detalles sobre cada efecto, consulte “Efectos” en la página 35. 9. Mando EFFECTS Este mando le permite elegir el efecto de compresor/modulación y ajustar la intensidad del efecto. Para omitir los efectos, gire el mando al máximo hacia la izquierda. 10. Mando DELAY/REVERB Este mando le permite seleccionar un efecto de tipo retardo/reverberación y ajustar la intensidad del efecto. Para omitir los efectos, gire el mando al máximo hacia la izquierda. Para aplicar un efecto (seleccionado con este mando) a la entrada de micrófono, utilice el mando SEND para ajustar la intensidad del efecto. Para desactivar el efecto de retardo/reverberación aplicado a la entrada de guitarra, ajuste el mando en la posición mínima del “swoosh” del tipo de efecto correspondiente. 14. Jack PHONES Utilice este jack si se conecta directamente a un mezclador, un dispositivo de grabación o si utiliza auriculares. La señal de salida de este jack se admite antes que el amplificador de potencia, y se le aplica el carácter del recinto acústico de amplificador de la guitarra. 11. Botón TAP, LED/TUNER LED Este botón le permite ajustar el tiempo de los efectos de retardo y reverberación. Toque este botón dos veces para ajustar el tiempo. El intervalo entre los dos toques se utilizará como el valor de tiempo. El LED parpadeará en sincronización con el tiempo. Panel posterior NOTA: Al conectar auriculares a este jack, se silenciará el altavoz interno. NOTA: Asegúrese de realizar una conexión estéreo en el jack PHONES. 1 CONSEJO: Para ajustar el tiempo de forma que coincida exactamente con el tempo de una canción, pulse el botón TAP varias veces al ritmo de la canción. Si mantiene pulsado el conmutador TAP durante un segundo o más, se omitirán todos los efectos y se activará la función de afinador. Pars ver información detallada, consulte la sección “Uso del afinador” (página 34). Sección de alimentación/AUX IN/PHONES 12. Botón de alimentación, LED Mantener pulsado este botón le permite activar o desactivar la alimentación. El LED de alimentación se iluminará cuando la alimentación esté activada. 1. Jack DC 12V Conecte este jack al adaptador de CA incluido. NOTA: El adaptador de CA solo se debe usar con la unidad principal. No utilice el adaptador con otros dispositivos, ya que podría provocar un fallo de funcionamiento. 13. Jack AUX IN Conecte un dispositivo de audio externo a este jack. Esto le permite conectar con comodidad un reproductor de audio y tocar la guitarra junto con la salida del reproductor. 33 Función de desactivación automática El MINI3 G2 de VOX está equipado con una función de desactivación automática. La función de desactivación automática desactiva automáticamente la alimentación cuando el usuario no ha realizado ninguna operación durante 1 hora aproximadamente. Si la alimentación está desactivada, no se restaura aunque se utilice un mando o selector. Vuelva a activar la alimentación. NOTA: La función de desactivación automática estará activa cuando la señal solo se emita al jack AUX IN o cuando el volumen de entrada al jack INPUT y al jack MIC IN sea demasiado bajo. NOTA: La función de desactivación automática está activada según los ajustes de fábrica. Activación o desactivación de la función de desactivación automática 1. Mantenga pulsado el botón TAP y active la alimentación. 2. El LED TAP/TUNER indicará el ajuste actual. 3. Pulse el botón TAP para alternar entre el ajuste de activado y desactivado. 4. Espere unos segundos sin utilizar ninguno de los botones o controles. La unidad cambiará automáticamente al funcionamiento normal. Activación Uso del afinador La función de afinador del MINI3 G2 le permite afinar una guitarra conectada al jack INPUT. El afinador detecta el tono del sonido de entrada e indica la discrepancia respecto al tono estándar de E. 1. Mantenga pulsado el botón TAP durante más de un segundo. Se omitirán todos los efectos y se activará la función de afinador. Se omiten todos los efectos. (No se recibe ninguna señal válida.) 2. Toque la 6ª cuerda abierta. NOTA: Asegúrese de no tocar el resto de cuerdas. 3. Afine la guitarra de forma que únicamente el LED verde centralse ilumine, como se muestra en la parte derecha. CONSEJO: El MINI3 G2 reconoce el tono de E de cualquier octava. Esto resulta útil si desea afinar a armónicos o para afinar otros instrumentos musicales, como un bajo. 4. Para salir de la función de afinador, pulse el botón TAP. La omisión de efectos se cancelará. Desactivación NOTA: El ajuste de activación y desactivación de la función de desactivación automática se guardará aunque la alimentación esté desactivada. NOTA: Si cambia un ajuste para la función de desactivación automática, el ajuste de tiempo del efecto de retardo/reverberación volverá al valor de fábrica. CONSEJO: Una vez afinada la 6ª cuerda utilizando la función de afinador, afine el resto de cuerdas utilizando la 6ª cuerda como referencia. El tono es agudo. El tono es bastante agudo. Afinada. El tono es bastante grave. El tono es grave. 34 Modelos de amplificador y efectos En esta sección se describen las características de cada modelo de amplificador y efecto. Modelo AMP BTQ CLEAN Modela el canal limpio de un amplificador de calidad alta fabricado únicamente por pedido especial, y se conoce como el especial de distorsión. Con una preciosa gama baja curvilínea, un ataque de rango medio agudo y un registro de agudos dulce, es ideal para pastillas de bobina única. BLACK 2x12 Modela un amplificador integrado de 2x12” y superficie negra que se ha convertido en un elemento indispensable para intérpretes de country y blues. Su sonido limpio y preciso ofrece tonos graves profundos que recuerdan el sonido de un piano y proporcionará el clásico tono blues de Chicago, en especial cuando se utilice con pastillas de bobina única. TWEED 4x10 Modela un amplificador integrado de 4x10” de 1959 diseñado originalmente para un bajo. Su sonido de distorsión suave y nítido responderá con sensibilidad a la fuerza que ejercite en las cuerdas y al volumen de la guitarra. AC15 Modela el canal 2 del AC15 de VOX (1x12”, 15 W), fabricado en 1962 y que fue un gran éxito gracias a su recinto acústico compacto, potencia y magnífico tono, junto con los grupos británicos famosos de la época. AC30TB Modela un amplificador AC30 con el circuito “top boost” que se incluyó como estándar a partir de las unidades fabricadas en 1964. Proporciona un límite superior suave y refinado, una distorsión de profundidad majestuosa y un sonido limpio rico y luminoso. UK '70S Modela el canal de agudos altos y un cabezal de amplificador de conexión manual fabricado en Inglaterra a principios de la década de 1960. El subir al máximo el volumen de este amplificador de 50 W de salida se produce el crujido que siempre representará el sonido del “rock ‘n’ roll”. UK '80S Modela un cabezal de canal individual de 100 W fabricado en Reino Unido con volumen general fabricado en 1983. Suba el control GAIN al máximo para obtener ese sonido de rock duro y heavy metal denso y bronco que dominó durante la década de 1980. UK '90S Modela el canal de ganancia alta de un moderno amplificador de 100 W. Aunque las notas individuales están claramente definidas, ofrece un sonido monstruoso bastante agresivo y arrogante. CALI METAL Modela el moderno canal de ganancia alta a partir de una bestia salvaje de un amplificador de ganancia alta. Su límite inferior profundo y flexible, los brillantes altos y la ganancia monstruosa son ideales para guitarras afinadas con el tono más bajo posible, o para actuaciones metal con guitarras de siete cuerdas. US HIGAIN Modela el canal de distorsión de un cabezal de amplificador de 100 W recubierto con piel de serpiente fabricado en 1991. Con un límite inferior abierto y un rango de medios/altos comprimido, su sonido potente y heavy ofrece un tono lleno de fuerza que no se quebrará ni con los ajustes de ganancia más extremos. LINE Este modelo presenta controles de tono de dos bandas que crean un tono limpio y puro sin distorsión. Utilice el mando GAIN para ajustar el nivel de volumen para el rango bajo, y el mando TONE para el rango alto. Efectos Mando EFFECTS. Compresor/Modulación COMP Modela un compresor que presenta un sustain limpio, vibrante y suave. Adecuado para ritmos pop o funk. Utilice el mando para ajustar la cantidad de sustain. 35 CHORUS Modela un coro analógico estándar que incorpora al sonido una rica amplitud. Utilice el mando para ajustar la velocidad de modulación. FLANGER Modela un flanger analógico que crea un sonido con un peculiar efecto de “swoosh”, parecido al motor de un jet. Utilice el mando para ajustar la velocidad de modulación. Solución de problemas La alimentación no se activa aunque se mantenga pulsado el botón de alimentación. • ¿Ha colocado las pilas? ¿Es correcta la polaridad? O bien, ¿está el cable del adaptador de CA conectado al panel posterior del amplificador correctamente? TREM Modela un tremolo típico incorporado en un amplificador integrado de EE. UU. estándar que sube y baja el volumen en ciclos. Utilice el mando para ajustar la velocidad del tremolo. • ¿Está el adaptador de CA enchufado en una toma de CA? Mando DELAY/REVERB. Retardo/Reverberación El amplificador no emite ningún sonido A.DLY Modela un retardo analógico que utiliza un dispositivo de almacenamiento en cadena (BBD). La calidad de sonido es de baja fidelidad, pero su cálido sonido es muy popular entre los músicos. Utilice el mando para ajustar la cantidad de mezcla del sonido de retardo. Ajuste el tiempo de retardo con el botón TAP. El tiempo de retardo máximo es 1,25 segundos. T. ECHO Modela un eco de cinta analógico popular. El eco de cinta se creó inicialmente utilizando un cabezal de reproducción, y el tiempo de retardo se ajustaba modificando la velocidad del motor. Las funciones de los mandos y botones son las mismas que las del modelo A.DLY. SPRING Modela una reverberación de muelles en un amplificador de guitarra. Utilice el mando para ajustar la cantidad de mezcla del sonido de reverberación. Utilice el botón TAP para ajustar el tiempo de reverberación. ROOM Se trata de la reverberación de sala estándar que contiene mucho reflejo inicial. Las funciones de los mandos y botones son las mismas que las del modelo SPRING. 36 • ¿Está la toma de CA activada y en funcionamiento? • ¿Está dañado el adaptador de CA? • ¿Está subido el volumen de la guitarra? • ¿Están ambos extremos del cable de la guitarra enchufados donde deberían? • ¿Funciona el cable de la guitarra? • ¿Están subidos los mandos VOLUME y GAIN del panel superior? • ¿Tiene auriculares o algún otro dispositivo conectado en el jack PHONES del panel superior del amplificador? Si es así, desconéctelo. El amplificador no emite un sonido potente • ¿Está subido el volumen de la guitarra? • ¿Están bajados al mínimo los mandos VOLUME o GAIN del panel superior? • ¿Se han agotado las pilas? Cuando utilizo el jack PHONES, este no emite ningún sonido. • Compruebe que el mando VOLUME del panel superior no está al mínimo. • Asegúrese de que se emite sonido desde el amplificador. Tendrá que desconectar los auriculares o el cable del jack PHONES para realizar esta operación, ya que al conectar un dispositivo a este jack los altavoces del amplificador se silencian automáticamente. Si aún así no se emite ningún sonido desde el amplificador, consulte “El amplificador no emite ningún sonido”. Si se emite sonido, compruebe los auriculares o el cable que está conectando a este jack. Los efectos no se aplican al sonido. • ¿Está activada la función de afinador? Si la función de afinador está activada, se omitirán los efectos. Pulse el botón TAP para cancelar la omisión. • ¿Están los mandos EFFECTS o DELAY/REVERB ajustados en OFF o en un valor más bajo? Ajuste los mandos EFFECTS y DELAY/REVERB. Especificaciones Número de tipos de amplificador: 11 Número de efectos: 8 Intervalo de afinador: E1–E6 (41,2 Hz–1318,5 Hz) Jacks de entrada/salida: INPUT, MIC IN, AUX IN, PHONES Salida de amplificador de potencia: Aproximadamente un máximo 3 W RMS a 4 ohmios Altavoz: 5”, 4 Ω Procesamiento de señales Conversión A/D: 24 bits Conversión D/A : 24 bits • Si los efectos no se pueden aplicar a la señal MIC, es posible que el mando SEND esté ajustado en un valor más bajo. Ajuste el mando SEND. Alimentación: Seis pilas alcalinas AA/LR6 o el adaptador de CA incluido Vida útil de las pilas: 12 horas El sonido de un dispositivo conectado al jack AUX IN no se emite. Consumo de corriente: 150 mA Dimensiones (Anch. x Prof. x Alt.): 262 x 174 x 223 mm Peso: 3 kg (sin incluir batería) • Asegúrese de que el dispositivo externo está conectado correctamente. • Es posible que el control de volumen del dispositivo externo esté ajustado en un valor demasiado bajo. El sonido de un micrófono conectado al jack MIC IN no se emite. • Asegúrese de que el micrófono está conectado correctamente. • Es posible que el conmutador del micrófono esté ajustado como desactivado. Elementos incluidos: adaptador de CA (DC 12V ), correa * Las especificaciones y el aspecto est sujetas a cambios sin previo aviso por mejora. Para obtener más información sobre los productos de Vox, visite nuestro sitio web en www.voxamps.com. • Es posible que el mando TRIM esté ajustado en un valor demasiado bajo. 37 2013 VOX AMPLIFICATION LTD.