1
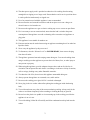
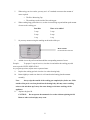
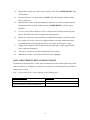
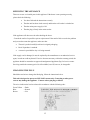
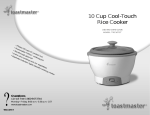
INSTRUCTIONS AND WARRANTY MODEL NO. SRMS01E SALTON ELITE COOL TOUCH RICE COOKER Thank you for purchasing our Salton Elite Sushi Kit and Rice Cooker. Each unit is manufactured to ensure safety and reliability. Before using for this appliance for the first time, please read the instruction manual carefully and keep it for future reference. IMPORTANT SAFEGUARDS When using any electrical appliance, basic safety precautions should always be followed including the following: 1. Please read the instructions carefully before using any appliance. 2. Always ensure that the voltage on the rating label corresponds to the mains voltage in your home. 3. Incorrect operation and improper use can damage the appliance and cause injury to the user. 4. The appliance in intended for household use only. Commercial use invalids the warranty and the supplier can not be held responsible for injury or damage caused when using the appliance for any other purpose than that intended. 5. Do not touch hot surfaces on the appliance when it is in use. Always hold by the handles. 6. Close supervision is required when any appliance is used near or by children or invalids. 7. Check the power cord and plug regularly for any damage. If the cord or the plug is damaged, it must be replaced by the manufacturer or a qualified person in order to avoid an electrical hazard. 8. Do not use the appliance if it has been dropped or damaged in any way. In case of damage, take the unit in for examination and/or repair by an authorised service agent 9. To reduce the risk of electric shock, do not immerse or expose the unit and/or the power cord to water or any other liquid other than that necessary for the correct operation of the product. 10. Never immerse the unit in water or any other liquid for cleaning purposes. 11. Remove the plug from the socket by gripping the plug. Do not pull on the cord to disconnect the appliance from the mains. Always unplug the unit when not in use or before cleaning or adding water. 12. Allow the unit to cool completely before putting on or taking off parts. 13. The use of accessory attachment that are not recommended or supplied by the manufacturer may result in injuries. 2 14. The short power supply cord is provided to reduce the risk resulting from becoming entangled in or tripping over a longer cord. Ensure that the cord is not in a position where it can be pulled on inadvertently or tripped over. 15. Use of an extension cord with this appliance is not recommended. 16. Do not allow the cord to touch hot surfaces and do not place on or near a hot gas or electric burner or in a heated oven. 17. Do not use the appliance on a gas or electric cooking top or over or near an open flame. 18. If it is necessary to use an extension lead, ensure that the lead is suited to the power consumption of the appliance to avoid overheating of the extension cord, appliance or plug point. 19. This appliance is not suitable for outdoor use. 20. Extreme caution must be used when moving an appliance containing hot oil or other hot liquids or foods. 21. Never carry the appliance by the power cord. 22. To disconnect, raise the “Selector Level” to POWER/READY, then remove the plug from the wall outlet. 23. The appliance generates heat and escaping steam during use. Care must be taking when using or working near the appliance to prevent the risk of burns, fires, or other injury to ones person or property. 24. When using this appliance, provide adequate airspace above and on all sides for aircirculation. Do not operate the unit when it is touching or in the near vicinity of curtains, wall coverings, clothing or any other flammable materials. 25. To reduce the risk of fire, do not leave this appliance unattended during use. 26. Always operate the appliance on a smooth, even, stable surface. 27. Do not use the cooking pot or glass lid if it is cracked or damaged. 28. Never plug in the rice cooker without first placing the cooking pot inside the heating body. 29. To avoid steam burns, stay clear of the steam vent during cooking. Always wait for the cooker to cool down completely before touching or cleaning the body or glass lid. 30. Do not leave the plastic rice paddle or rice measuring cup in the cooking pot while the appliance is on or in use. 31. To avoid scalding, lift the lid off carefully and allow condensation to drip back into the cooker. 3 32. To reduce the risk of electric shock, cook only in the removable container provided with the rice cooker. Never pour liquid directly into the heating body. Always ensure the pot is in place. PARTS DIAGRAM 1. Lid Handle 8. Power/Ready Light 2. Glass Lid 9. Cook Light 3. Steam Vent 10. Rice Cooker Selector Level 4. Wire Cooking Rack 11. Heating Plate 5. DuPont Teflon non-Stick Cooking Pot 12. Thermostat 6. Cool Touch Heating Body 13. Rice Measuring Cup/Scoop 7. Power Cord with Plug 14. Rice Paddle 4 PREPARATION FOR USE 1. Clean the glass lid, cooking pot and accessories in warm soapy water. 2. Rinse and dry well. Important: DO NOT IMMERSE THE HEATING BODY OR CORD OF THE RICE COOKER IN WATER OR ANY OTHER LIQUID. 3. Never force the Selector Level to stay in the COOK mode after it has moved up to POWER/READY. 4. Always ensure that the cooking pot contains liquid when you plug the appliance in to the mains and switch on. 5. Remember that the Rice Measuring Cup is not a standard measuring cup. When filled, it measures approximately ¾ of a cup. 6. Never wash the removable parts of the cooker in a dishwasher. These parts are not dishwasher safe! 7. If the outside of the cooking pot is wet when it is placed into the heating body, it may cause a crackling noise while the unit heats up. It may also cause the inner workings of the appliance to fail so wipe the outside of the cooking pot completely dry before use. COOKING RICE General Information Rice is grown on marshy land that flood easily. It does not need to be milled or ground; only the outer husks must be removed, leaving behind what is known as brown or whole rice, the most nutritious of rice. Information has recently been published about healthier ways to eat, by consuming less fat, less protein and more complex carbohydrates in our diets. Because brown rice is about 8% protein, 87% carbohydrate and almost no fat, it is a perfect ingredient in a healthy diet. Because rice is a valuable source of carbohydrates, it is starchy by nature. To obtain fluffier, less starchy rice, you can rinse the rice before cooking. But by rinsing or soaking rice, you loose some of the vitamins, which are water soluble. Please refer to your rice package directions for specific instructions. 5 Types of Rice Brown Rice Contains more vitamin B complex, iron and calcium and takes longer to cook than white rice. Its flavour is nutty and texture is chewy (see cooking chart) White Rice Includes several kinds of white rice, most of which can be prepared in your SALTON Automatic Rice Cooker. Long-Grain Rice Less starchy than short-grain rice, so it separates into individual grains more than short grain rice does. Short-Grain Rice More moist and tender than long-grain rice. It has a softer texture and starchier flavour White rice can take about 20-25 minutes to cook (brown rice approximately 50 min). When the rice is ready, the Selector Lever will rise and the rice cooker will switch off. Allow the rice to stand for 10-15 minutes to ensure fluffy rice. Do not remove cover until ready to serve. The cooking pot remains very hot after use. Use a pot holder or oven gloves when handling! Why Rice? Grains (including rice) are finally getting the attention they deserve as they move into the nutritional spotlight. The new USDA dietary recommendations highlight grains as an essential part of a healthy, whole foods diet. With their impressive fibre content, complex carbohydrates and protein profiles, they are, without a doubt, some of Mother Nature’s most perfect foods. Grains are the edible portion of cereal plants. The grain or kernel is technically a complete fruit and houses most of its nutritional value. in addition to their high fibre content, grains are an excellent source of B vitamins and many minerals, including magnesium, iron, zinc, potassium and selenium. The germ oils found in the germ layers of whole grains contain vitamin E, an important antioxidant. 6 Grain Glossary Rice is a staple food in many countries. Although long-grain rice is consumed more than any other rice around the world, it is inferior to brown rice in both taste and nutrition. Brown rice is not only more complete nutritionally; it has a wonderful nutty aroma and flavour. Polished Rice (white) has been bleached, cleaned, pearled (polished with talc) then often oiled and coated. This refining process causes the loss of its hull, bran and germ, which are removed from the grain (along with most of its nutrients) leaving only the starchy endosperm. As white rice is rather bland when eaten by itself, it is usually served under steamed or sautéed vegetables and topped with a flavourful sauce such as curry or peanut. Long grain brown rice contains fibre and the nutrient rich bran and germ, as well as the starchy endosperm. In addition to being more flavourful, brown rice digests more slowly, which provides energy over a longer period of time. Brown rice is a satisfying meal companion and can even serve as a main focus of a meal. While not as high in protein as wheat and some other grains (10%), the high quality protein in brown rice is easily utilised by the body. Brown rice is also a good source of the B vitamins and several mineral, including magnesium, potassium, zinc, iron and selenium. INSTRUCTIONS FOR USE Many different varieties of rice can be used, including basmati, wild, black rice, Arborio, risotto, saffron rice, brown and long grain. Do not use this appliance to prepare instant rice. A 180ml (3/4 cup) measuring cup is included for your convenience. 1. Make sure that the rice cooker is unplugged. Remove the cooking pot from the heating body. 2. Using the measuring cup provided, measure the amount of raw rice that you would like to cook. Note: Make sure that the rice is levelled when filling the measuring cup. 3. For Best Results…Rinse Your Rice Before Cooking. Pour the desired amount of rice into a separate container. Continue to wash and rinse the rice until the water is clear. 4. Place the rinsed rice into the cooking pot. 7 5. When using your rice cooker, you may use 1 of 2 methods to measure the amount of water required: 6. o The Rice Measuring Cup o The markings on the inside of the cooking pot. When cooking long grain white rice, use the rice measuring cup and add an equal amount of water to the cooking pot. 7. Raw Rice Water to be Added 3 cups 3 cups 2 cups 2 cups 1 cup 1 cup Or you may measure using the marking on the inside of the pot . MAX LEVEL Do not fill above this line 8. Add the rice to the pot first and then add the corresponding amount of water. Example: To prepare 3 cups of raw rice, rinse the rice and add to the cooking pot; add water up to the LEVEL INDICATOR 3. As you gain experience, adjust water to personal taste. 9. Replace the cooking pot back in to the rice cooker heating body. 10. Rotate slightly to make sure that it is well seated on the heating plate/thermostat assembly. Note: Always wipe the outside of the cooking pot completely dry before use. If the outside of the pot is wet when placed into the heating body, this may cause crackling noises as the unit heats up. It may also cause damage to the inner workings of the appliance. 11. Replace the glass lid. CAUTION: Do not operate the automatic rice cooker without replacing the lid. Burns or other serious injury may occur. 8 12. Plug the Rice Cooker into a 230V electrical power outlet. The “POWER/READY” light will illuminate. 13. Press the Selector Lever down and the “COOK” light will illuminate and the cooking process will begin. 14. When the Rice Cooker is finished cooking, the Selector Lever will rise and the machine will automatically switch off. At this time, the “POWER/READY” will once again illuminate. 15. For best results, let the cooked rice sit for 15 minutes before stirring or removing from the pot. This allows the steam to complete the cooking process. 16. Mix the rice. After the rice has steamed for an additional 15 minutes, carefully open the lid as steam will escape. Use the rice paddle provided or any other suitable non-metal long handled utensil to scoop and mix the rice well. Allow all the steam to escape. 17. Unplug the unit from the wall. Do not touch the heating body or cooking pot until they have cooled down completely. 18. Allow the rice cooker to cool down completely before cleaning. 19. When the rice cooker is not being used, please keep it unplugged. LONG GRAIN BROWN RICE COOKING CHART The Salton Elite Automatic Rice Cooker shuts off automatically when all the liquid in the pot has evaporated. However, for fluffy rice, allow the rice to stand covered for approximately another 10 minutes before serving. Note: Always place the rice in the cooking pot before adding water. Amount of Raw Rice Water Level 1-1/2 Rice Measuring Cups * To 3 cup line * Do not exceed 1-1/2 cups raw brown rice 9 STEAMING FOOD General Information Keep the glass lid on while cooking or steaming food, unless the recipe or chart especially calls for the lid to be removed. By removing the glass lid unnecessarily, the steam escapes and valuable cooking time is lost. If you must remove the lid to stir the contents or add an ingredient, have the rice paddle ready, add the ingredient and stir quickly, replacing the glass lid as quickly as possible. Using the Wire Cooking Rack to Steam Foods 1. Using a liquid measuring cup, add 1-1/4 cups (10 ounces) of water to the cooking pot. 2. Place the wire cooking rack on the bottom of the cooking pot. 3. Place the vegetables directly on to the wire cooking rack. Replace the glass lid. 4. Replace the cooking pot back into the heating body and rotate slightly to ensure that the pot is well seated on the heating plate/thermostat assembly. 5. Plug into the electrical outlet and press the Selector lever down to the “COOK” mode. The COOK light will illuminate and the cooking process will begin as soon as the light is illuminated. 6. The times in the cooking chart are approximate. Set a timer and check whether the vegetables are cooked completely at the suggested cooking time; continue cooking if necessary. The size and shape of the food as well as personal taste may call for adjustments. If you prefer softer vegetables, add more water if necessary, and steam for a longer time. Do not allow the water in the cooking pot to boil dry. 7. At the end of the cooking time, raise the Selector lever to “POWER/READY” and unplug the cooker from the electrical outlet. 8. Use the rice paddle provided or any other non-metallic long handled utensil to remove the vegetables from the cooker. Allow the cooker to cool down completely before cleaning. 10 Fresh Vegetable Steaming Chart Vegetable Amount Suggested Cooking Time Artichoke, Whole 2 small, cut tips off and insert upside down 25-30 min Asparagus 450g 24-27 min Baby Carrots 450g 35-40 min Broccoli 225g (2” florets, 1” stems) 25-30 min Brussels Sprouts 450g 25-28 min Cabbage ½ small, chunked 45-47 min Cauliflower 450g (3” florets, 1” stems) 25-30 min Green Beans, Whole 450g (tips removed) 30-40 min Potatoes: All Purpose 2 average size, quartered 30-40 min New 8 average size, halved 25-30 min Sweet Potato 2 medium, 1 inch slices 30-35 min Frozen Vegetable Steaming Chart Vegetable Amount Suggested Cooking Time Broccoli (Spears) 1 bag (480g) 36-38 min Brussels Sprouts 1 bag (480g) 25-29 min Cauliflower 1 bag (480g) 26-30 min CARE AND MAINTENANCE This appliance is for household use only and is not user-serviceable. Do not open or change any parts by yourself. Please refer to a qualified electrical service department or return to the supplier if servicing is necessary. Always remember to unplug the unit from the electrical outlet when not in use and before cleaning: 1. Take care not to dent the cooking pot, especially the base of the pot. To work properly and produce the best cooking results, the cooking pot must fit securely on top of the thermostat or heating plate. 2. Do not allow loose grains of rice or other foods to fall into the bottom of the heating body because they may prevent the heating plate/thermostat assembly from fitting snugly against the base of the cooking pot and result in inadequate cooking. 11 3. Use the plastic rice paddle or a wooden spoon to stir and remove food from the cooking pot. Your removable non-stick cooking pot is coated with DuPont Teflon to make cleaning easier. Never use any metal utensils, as they may damage the Teflon coating. 4. Never use abrasive cleaners or scouring pads because they can damage the finish on both the cooking pot and the heating body. CLEANING INSTRUCTIONS Please note that it is normal to have brown “rice crust” coating the bottom of the cooking 1. pot when the rice has finished cooking and steaming. 2. This appliance should be cleaned after every use. 3. Unplug the appliance from the wall outlet. 4. Never immerse the heating body or power cord in water. 5. Allow the unit to cool before cleaning. 6. Once the rice cooker has cooled, remove the cooking pot from the heating body. Fill the cooking pot with warm water and allow to soak for a while. Wash in warm, soapy water with a soft sponge and dry thoroughly with a soft cloth. 7. The glass lid, wire cooking rack, measuring cup and rice paddle may also be washed in warm, soapy water. CAUTION: Handle the glass lid with extreme care as it may become slippery when wet. 8. Never wash any removable parts of the rice cooker in the dishwasher. 9. The heating body can be wiped clean with a soft, slightly damp cloth or sponge. 10. Never pour liquid into the heating body or immerse in water. STORING THE APPLIANCE 1. Unplug the unit from the wall outlet and clean all the parts. Ensure that all parts are dry before storing. 2. Store the appliance it its box or in a clean, dry place. 3. Never store the appliance while it is still hot or wet. 4. Never wrap the power cord around the appliance. 5. To avoid damage to the cooking pot or glass lid, wrap a soft cloth around the lid and store upside down over the cooking pot. 12 SERVICING THE APPLIANCE There are no user serviceable parts in this appliance. If the heater is not operating correctly, please check the following: You have followed the instructions correctly That the unit has been wired correctly and that the wall socket is switched on. That the mains power supply is ON. That the plug is firmly in the mains socket. If the appliance still does not work after checking the above: - Consult the retailer for possible repair or replacement. If the retailer fails to resolve the problem and you need to return the appliance, make sure that: The unit is packed carefully back into its original packaging. Proof of purchase is attached. A reason is provided for why it is being returned. If the supply cord is damaged, it must be replaced by the manufacturer or an authorised service agent, in order to avoid any hazard. If service becomes necessary within the warranty period, the appliance should be returned to an approved Amalgamated Appliance (Pty) Ltd service centre. Servicing outside the warranty period is still available, but will, however, be chargeable. CHANGING THE PLUG Should the need arise to change the fitted plug, follow the instructions below: This unit is designed to operate on 230V-240V current only. Connecting to other power sources may damage the appliance. Connect a three-pin plug as follows: The wires in this mains lead are coloured in accordance with the following code: Green/Yellow = Earth Blue = Neutral Brown = Live 13 TROUBLE SHOOTING Symptom No indicator lights are illuminated Water overflows during cooking Cooked rice is too dry and not completely cooked Cooked rice is too watery Rice is scorched Steam escapes between glass lid and cooking pot during cooking Possible Solution Ensure that the appliance is plugged in and switched on at the mains. Before cooking, make sure that you do not fill above the maximum water level mark. Ensure that the lid is closed before cooking. Before cooking, make sure that you add enough water to the cooking pot for the total amount of raw rice to be added. After cooking, add ¼ cup water and set Selector Lever to “Cook”. Check between the cooking pot and the heating plate/thermostat assembly for any foreign bodies. The area must be clean. Before cooking, make sure that you do not add too much water to the cooking pot for the total amount of raw rice added. Check between the cooking pot and the heating plate/thermostat assembly for any foreign bodies. The area must be clean. Ensure that the cooking cycle is not interrupted. If the power cord is unplugged, the unit will not operate and the rice will remain uncooked. Check between the cooking pot and the heating plate/thermostat assembly for any foreign bodies. The area must be clean. Before to wash the cooking pot after each use. Be careful not to add easily scorched ingredients such as sugar, to the recipe before cooking. Check between the glass lid and cooking pot for foreign substances, including rice kernels, which may prevent the glass lid from closing all the way. Ensure that the area is clean, 14 PLEASE AFFIX YOUR PROOF OF PURCHASE/RECEIPT HERE IN THE EVENT OF A CLAIM UNDER WARRANTY THIS RECEIPT MUST BE PRODUCED. WARRANTY 1. 2. Tedelex Trading (Pty) Limited (“Tedelex”) warrants to the original purchaser of this product (“the customer”) that this product will be free of defects in quality and workmanship which under normal personal, family or household use and purpose may manifest within a period of 1 (one) year from the date of purchase (“warranty period”). Where the customer has purchased a product and it breaks, is defective or does not work properly for the intended purpose, the customer must notify the supplier from whom the customer bought the product (“the supplier”) thereof within the warranty period. Any claim in 3. terms of this warranty must be supported by a proof of purchase. If proof of purchase is not available, then repair, and/or service charges may be payable by the customer to the supplier. The faulty product must be taken to the supplier's service centre to exercise the warranty. 4. The supplier will refund, repair or exchange the product in terms of this warranty subject to legislative requirements. This warranty shall be valid only where the customer has not broken the product himself, or used the product for something that it is not supposed to be used for. The warranty does not include and will not be construed to cover products damaged as a result of disaster, misuse, tamper, abuse or any unauthorised modification or repair of the product. 5. This warranty will extend only to the product provided at the date of the purchase and not to any expendables attached or installed by the customer. 6. If the customer requests that the supplier repairs the product and the product breaks or fails to work properly within 3 (three) months of the repair and not as a result of misuse, tampering or modification by or on behalf of the customer, then the supplier may replace the product or pay a refund to the customer. 7. The customer may be responsible for certain costs where products returned are not in the original packaging, or if the packaging is damaged. This will be deducted from any refund paid to the customer. TEDELEX TRADING (PTY) LTD (JOHANNESBURG) JOHANNESBURG CAPE TOWN DURBAN TEL NO. (011) 490-9000 TEL NO. (021) 552-5161 TEL NO. (031) 792-6000 www.amap.co.za 15