1
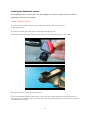
Index 1 Introduction 2 Contents of the Box 2 Features 2 Caution 3 How the video is stored 5 Understanding EVENTS 6 Installing the RoadHawk 8 Video playback 11 Installing the software 11 Using the software 11 Camera Settings 15 Camera LEDS 17 External GPS Antenna 18 Audio Input 18 Important Notice 19 Troubleshooting 20 Warranty Statement 23 Declaration of conformity 26 1 Introduction: Congratulations on purchasing the RoadHawk HD vehicle camera system. The RoadHawk HD is designed to be mounted to the windscreen of your vehicle and to record video, GPS, audio and GForce data on a constant loop. As soon as the RoadHawk HD camera is powered up, it will start recording automatically. This new RoadHawk HD camera has been designed with the very latest technology available. It provides superior video and audio quality and excels in low light conditions. Contents of the Box: 1 x RoadHawk HD Camera 1 x Power Cable 1 x GPS External Antenna 1 x 8gb SD Card 1 x USB Card Reader 1 x Windscreen adhesive mount 1 x Vertical Windscreen adhesive mount 1 x User Manual 1 x CD-ROM Features: Full HD 1080p Video Recording. High end Sensor providing excellent video quality and tuned for low light sensitivity. Gyro balanced image stabilisation. SD XC compatible (4gb to 64gb) External GPS antenna connection External Audio input connection 5hz GPS Receiver (5 times quicker than the previous version) Latest A5s processor for high quality H.264 encoding. User controlled video bit rate setting. User controlled G-Force, audio input and Speaker volume settings. Audio can be disabled. New suction mount designed to have the lens of the camera sitting closer to the screen of the vehicle minimising reflection artefacts. 1/4" standard camera mount thread for use with numerous camera mounts and grips. Low level algorithm for detecting SD card errors and warning the user of any potential problems. 2 CAUTION Do not drop the product. -It may cause damage or malfunction not covered by warranty. Do not place near magnets. -It may cause the device to malfunction or operate erratically. Keep the unit away from other GPS devices. - It may cause interference of the GPS signal rate. GPS function requires loading time when first powered on. - It can take up to a few minutes for the device to lock on to satellite signal. Metallic tinting and heated front windscreens can cause interruption in the GPS signal. - If you vehicle has this then please experiment mounting the camera in different positions. The RoadHawk HD has an external GPS antenna input which will help in cases of poor GPS reception. Sudden changes of brightness such as entering or exiting a tunnel or extremely dark place may cause a temporary loss in video quality. The front glass - camera lens should be kept clean. - If it is dirty, recording image quality may be low. Attach the product in the recommended place. - If it is installed in an obscure place, the image may be skewed. Do not disassemble, repair or attempt to modify the camera. - It may cause malfunction and injury not covered under warranty. WARNING Do not place near effective range of an air bag. - It may cause malfunction of air bag or accident. Keep the power socket clean of dust. -A poor connection will result in malfunction. Install with the power off. ( After installation, connect DC jack ) - It may cause electric shock or malfunction. Do not operate the product whilst driving. - It may cause an accident. Stop in a safe place to operate. Do not pull the power cable, remove by holding the plug and pull. Do not use a damaged cable. -It may cause cable malfunction, electric shock and fire. Do not clean exterior with alcohol, volatile or oily solvents. - It may cause deformation of the surface and malfunction. Attach the product on the front window firmly. - Clean the front window and fix it firmly, otherwise it may be detached due to temperature / humidity / dust / shock. 3 Please read the below notice for SD cards. We do not take responsibility for data loss or damage caused by SD cards malfunctioning. Please use only authentic SD cards. - The manufacturers of the camera do not takes responsibility if a nonrecommended card is used. Do not put foreign substances in to SD card slot. - It may cause a malfunction or SD card inserting problem. Do not touch the SD card with wet or oily hands. - It may cause malfunction due to card damage. Push the SD card in fully. Do not force the SD card in to the slot. Ensure the card is the correct way up before inserting. - If the SD card is not fully inserted then the camera cannot record data. Before removing the SD card, please check the power off status. - If you pull SD card out during power on status, it may cause malfunction or data loss. The RoadHawk HD will chime after the power is removed to let you know it is safe to remove the SD Card. SD cards are consumables. - SD cards do not last forever and should be checked regularly. SD cards are not covered by our 2 year warranty. Use a secure case for storing SD cards. - The data may be damaged by static while storing or moving. Please make sure the lock on the SD card is off. - If it is set to lock , recording is not possible. In case of important data, please make sure you back up your SD Card, - The data may be lost after long term usage. Please check and backup the data stored on SD card and we recommend formatting the SD card regularly. Do not disassemble or modify an SD card. - It may cause a serious damage to the SD card. Do not drop the SD card. - It may cause a serious damage to the SD card. This product supports 64GB. SD XC memory cards. We recommend using at least class 6 cards. Do NOT buy cheap memory cards…they do not last very long! During normal operation of the camera it will get warm. This is normal. Do not leave the camera in a very hot car during the daytime. It is advisable to remove the camera from the vehicle when not in use to deter thieves. 4 How the Video is stored If you choose EVENT + NORMAL mode in the settings menu of the supplied software, the camera will reserve 40% of the available memory for EVENTS. The remaining 60% of the SD card is reserved for NORMAL video. An EVENT will be a 1 minute video clip and is triggered by either the G-Force sensor or if the user presses the E button. When an EVENT is triggered, the camera will sound an audio alert. If the EVENT occurs near the end of a 1 minute file segment, the camera will also automatically lock the next 1 minute file. NORMAL video will start recording as soon as the camera is powered on. After each segment of video is recorded the RoadHawk saves the file to the SD card and instantly starts recording a new file. These files can be linked together in any normal video editing software without any gap between the files. 5 Understanding EVENTS: If you are using the RoadHawk HD camera as an “accident black box recorder” then you need to understand some important factors. If you have the camera set to EVENT + NORMAL and the G-Force sensor enabled the camera will create an EVENT file if it detects an impact. In this mode the camera will reserve 40% of the available SD card memory for these EVENT files. The amount of EVENT files you can store on your SD card will depend on the size of your SD card and the video quality you have selected. Once this 40% reserved for EVENTS becomes FULL the camera will overwrite the earliest EVENTS. An EVENT file can easily be created by driving over rough road and will depend on your GForce sensitivity settings and your vehicle’s suspension. If you have the G-Force setting too high or if the impact of the accident is very light then the camera might NOT create an EVENT file. Therefore it is possible for you to overwrite an accident if you continue to drive with your camera on after the EVENT has taken place. When any part of the SD card becomes full the RoadHawk HD will start to overwrite the earliest files. The amount of EVENT files and NORMAL video files you can store on the SD card before they start to overwrite will depend on the video quality settings and the size of the SD card you are using. IMPORTANT: In the event of an accident, we recommend unplugging the camera immediately to reduce the risk of the camera recording over these files. It is advisable to carry a spare SD card in your vehicle for such events. 6 If you choose to use the camera in NORMAL mode only (using the settings in the supplied software) then the camera will NOT create EVENT files. In this mode the camera will reserve 100% of the available space on the SD card for NORMAL recordings. When the camera receives power it will start recording video until the SD card is full. Once the SD card is full the RoadHawk HD will start to overwrite the earliest files and continue to LOOP record until the power to the camera is stopped. RoadHawk HD can only loop record if the file size is set to 1 minute. If the file size is set greater than 1 minute then the RoadHawk HD will stop recording when the SD card becomes full. Make sure you have the camera set to LOOP mode “ON” if using the camera in black box mode. File lengths are 1 minute maximum in black box mode. In the event of an accident you should remove power from the camera and wait for the tone to let you know the file has been closed and it is safe to remove the SD card. 7 Installing the RoadHawk camera: The RoadHawk camera is fitted with a very wide angled lens. This is to capture as much as what is happening in front of you as possible. 10 EASY INSTALL STEPS... 1: Choose an area towards the top of the windscreen behind the rear view mirror for the camera to sit. 2: Clean the screen with some glass cleaner and allow drying time. 3: Peel the adhesive backing away from the camera mount and place firmly on the screen. 4: Leave the mount to bond for a few minutes. 5: Use the supplied adhesive cable clips to route the power cable neatly around the windscreen. In some vehicles you might be able to push the cable in to the gap between the rubber and the screen to completely hide the cable. 8 6: Run the cable around the side of the dashboard and underneath towards the cigarette lighter socket. Use the cable ties to hide any remaining cable behind the dash. 7: Attach the camera to the mount and face it forwards. Keep the camera as level as possible. (in a Truck or Bus, aim the camera slight down) 8: Plug the power cable in to the camera. 9 9: Plug in the cigarette lighter plug. 10: Start driving with RoadHawk total video and data protection. Now you have the RoadHawk camera installed, it will start to work when you next start driving. If you have installed the RoadHawk camera correctly then it should be quite well hidden. View from behind with the RoadHawk camera hidden behind the rear view mirror. NOTE: It is possible for the RoadHawk HD camera to be hardwired to your vehicle. RoadHawk supply an optional “Hard Wiring Kit” to allow for this. It is rerecorded to have an authorised vehicle electrician carry out this work We recommend connecting the camera to an ignition LIVE circuit so the camera only operates when the vehicle is running. Connecting to a permanent LIVE will make the camera run 24/7 and this will reduce the life expectancy of the SD Card. Some vehicles have “always on” accessory sockets. We recommend unplugging the camera from these sockets when not in use. 10 Video play back: The RoadHawk HD makes standard .MP4 video files that can be viewed on most modern computers without using the supplied software. Simply insert the SD card in to your computer, locate the file you wish to play and double click to open it. Windows media player, VLC or Quicktime will be able to play the video and audio files for you but to see the G-Force, Speed, GPS and mapping details then you need to install the supplied software. The G-Force and GPS data is embedded within the .MP4 video file. To view your position on a map and to see the speed and G-Force data you will need to install the RoadHawk HD Playing software included on a CD-ROM in the box. Installing the software: Insert the CD-ROM in to your computer. Locate the install file and double click it. Once installed, the software will ask if you would like to run it. If your computer is not equipped with a CD-ROM drive then you can visit www.roadhawk.co.uk to download the software direct to your computer. You may be required to install Adobe components for the software to operate correctly. Your computer will need to have an active internet connection for this to happen. Using the software: IMPORTANT NOTE When you run the RoadHawk software it will look for the SD card from the RoadHawk HD camera. If the SD card is blank, the software will NOT see the SD Card. You MUST use the SD card in the camera BEFORE using this software. Once you insert the SD card from the camera in to your computer it will list all the video files on that card on the right hand side of the screen. A USB card reader is supplied with the RoadHawk HD camera. 11 Just above the list of files you will see three buttons. EVENT, NORMAL and ALL. EVENT: will list only the files that have been created by the camera because of an EVENT. This could be a collision, a pothole or a manual event created by pressing the E button on the camera. NORMAL: Will display only NORMAL video files created by the camera, this should be your normal everyday driving. Depending on the size of the SD card you are using and also depending on the quality settings, you should expect to see your most recent journeys here. ALL: This will display all files on the card in the order they were created. Please note that the earliest files will normally be EVENT files as these stay on the card longer than NORMAL video files. At this point, you might be seeing a video recorded several days or weeks ago at the top of the list. Towards the bottom of the list you will start to see your normal everyday driving videos. It is normal to have gaps in these files because of the way the camera overwrites the earliest files recorded. 12 Main video window: This will display the forward facing video recorded by the camera according to the file that has been selected. You can scrub through the video by clicking on the position bar at the bottom of this window. MAP: Below the list of video files you will see the MAP. This will show the location of the vehicle at the time the video was recorded. If the camera was not receiving a GPS signal at the time of recording or if your computer does not have an internet connection then you might not see the MAP. Within the MAP screen you can use the buttons in the top left to navigate around the MAP and to zoom in or zoom out. 13 Please note: Due to varying road positions and the possibility of GPS signals bouncing around in a built up area the vehicle may not always be shown directly on top of the road the vehicle was driving on. This will improve as maps are updated over time. G-Force display: Below the main windows is a G-Force Meter display. The small spot in the centre of this meter represents the G-Force experienced by the camera at the time the video was recorded. As the vehicle accelerates you would expect to see the spot move towards the bottom of the meter. Braking will show up as the spot moving upwards on the meter. Cornering will send the spot left or right. The more heavy the manoeuvre, the further the spot will travel on the graph. Speed: Just below the main video window is the speed of the vehicle shown be default in MPH. Clicking here will change the display to KPH and vice versa. Longitude / Latitude: To the right of the speed display is the Longitude and Latitude of the vehicle at the time of the recording. Load File Button: The button that looks like a folder in the top right of the screen is used for loading individual files. For instance, you might have a file on your computer’s hard disk stored locally or on other media storage. Pressing this button will bring up a standard open file dialogue box. Navigate to where the file is stored and double click it to play. 14 Camera Settings: When the camera is first powered on it looks at the SD card for a file called “configuration.txt”. This file contains parameters that tell the camera how to perform. The software supplied with the RoadHawk HD camera can be used to create the “configuration.txt” file. If the “configuration.txt” file is not found on the SD card when you first turn the camera on it will default to the last known settings. Click the settings icon within the software to change the settings on your camera. When you make a change to the settings, the software will save a small config file to your SD card. The next time the camera is powered on with this card inserted it will read the config file and set itself accordingly. In this menu you can change: Resolution: The size of the image being recorded. Frame Rate: Set the amount of frames being recorded per second. Time Zone: Set your local time zone. File Length: Set the length of time before a new file is started. LOOP: Choose if the camera should loop record or simply stop recording when the SD card is full. Bit-Rate: Set the overall video quality. (Higher = better quality) Mic Sensitivity: Set the volume of the internal mic. (Lower = quieter: 0 = off) Speaker Volume: Set the volume of the internal speaker in the camera. Record Mode: Choose if you want the camera to record EVENTS or just NORMAL video. EVENT Sensitivity: Set how sensitive the G-Force sensor is. (Lower = less sensitive) Resolution - 720p or 1080p: Changing the resolution affects the size of the image. At 1080p the image quality will be sharper but you will use more memory per hour of video. Frame Rate - 30fps or 60fps: If you set the resolution of the camera to 1080p you are limited to 30fps. If you set the resolution of the camera down to 720p mode then you can choose 30fps or 60fps. Setting the camera to 60fps will provide smoother video when travelling at speed but will use more memory. Time Zone: Set this to your current time zone. Make sure this is accurate as it will affect how quickly the camera can lock on to GPS satellites. It also affects the time that is embedded on to the video. Once the camera locks on to a GPS signal the time is set using data from the satellites and adjusted to the set time zone. 15 File Length: Can be set to 1, 5, 10, 15 or 30 mins. Once the chosen file length has been reached by the camera, it will automatically start to record the next file. NOTE: Setting the file length to more than 1 minute will not allow the camera to operate in LOOP mode. Bit-rate: The bitrate controls how much compression is used when recording the video. This directly affects the video quality and the amount of storage required for the video. At the highest quality setting the camera will consume from 6 to 8gb of data per hour. The lower the quality setting used, the more video you can store on your SD card. For car black box mode you can lower the quality setting to fit more video on to the SD card. Find a level of video quality that is acceptable to you. Keep in mind if you use the highest quality settings, a 4gb card will hold less than 1 hour of video. Mic Sensitivity: You can change the sensitivity of the built-in microphone. Setting the slider to the least sensitive will make it quieter which is useful if the ambient audio in your vehicle is loud. You can set this to ZERO if you do not want to record any audio. Record Mode: If you simple want to record just normal video, select “NORMAL”. If you would like the camera to record normal video AND create EVENT files if it detects an impact then select “EVENT + NORMAL”. Because the camera is required to reserve space on the SD card for saving event files, you will be asked to delete the data on your SD card when changing modes. EVENT Sensitivity: Set the slider bar to set the sensitivity of the G-Force sensor. If you find the camera makes a lot of “EVENTS” during normal driving conditions then you can lower this setting. Keep in mind if you set this too low in a very large vehicle then the camera might not detect a small impact and an “EVENT” may not be created. You can only change this setting if the camera Record Mode is set to “EVENT + Normal” Settings Notes: 1: Setting the mic volume to ZERO will disable the camera from making any sounds except if the camera experiences an error. 2: Setting the correct time zone will help the camera to lock on to GPS quicker. 3: Setting a high bit-rate will fill up your SD card very quickly. Setting a lower bitrate will decrease the video quality but you will get much more recording time on the SD Card. Please try and find a setting suitable to your requirements. 4: Setting the G-Force Sensor to OFF will mean the camera will not make EVENTS. In this mode, you will only see normal recorded video files. If you are in an accident the camera will not create an EVENT and will eventually overwrite this video if the camera remains recording. 5: Setting the file length to more than 1 minute will force the camera in to NORMAL mode. EVENT files can only be locked if the file length is set to 1 minute and the camera will not LOOP record when the file length is more than 1 minute 16 Camera LEDS: Record LED: Will light red when the camera is recording normal video. It will flash red when the camera is recording an EVENT. GPS LED: Will light green when the camera has a GPS lock. If this does not light up, the camera is not receiving a GPS signal. “E” Button: When pressed will manually create an “EVENT”. When you press this button the camera will chime and lock the current file as an EVENT. SD Slot: Insert your SD card in to this slot. Push until it clicks in to position and then close the door. Do not force the SD card in to this slot. Ensure the SD card is the right way around before inserting it. 17 Connecting External GPS antenna to the RoadHawk HD Camera: In some vehicles with heated front windscreens and some that may have a special anti-glare coating, the camera may not be able to lock on to a satellite GPS signal. This will be indicated by the GPS light not illuminating. A magnetic GPS antenna is included for the RoadHawk HD Camera. Use of this antenna is optional but will help the camera to get a faster, more accurate signal from the Global Positioning Satellites. The cable on the Antenna is 5m long and so should allow you to position it in various places. The best location for the GPS antenna would be outside of the vehicle with a clear view of the sky. The GPS antenna is waterproof. Connecting an Audio input: The RoadHawk HD is fitted with a 3.5mm external audio input jack. You can plug various microphones to this input to improve audio quality. As this is a LINE level input you can also connect other devices that output LINE level audio such as an intercom, radio or MP3 player. If you find the audio levels are too high or too low, you can adjust these in the settings menu of the supplied software. 18 Important Notice: When the RoadHawk is in EVENT + NORMAL mode it reserves 40% of the available memory on the SD card for EVENTS. The remaining 60% is kept for normal loop recording. If for any reason you are involved in an accident that does NOT trigger the camera to make an EVENT and you keep driving with the camera running then you can potentially record OVER the bit of video you need to use. If the camera does create an EVENT file at the time of the accident and you continue to drive and the camera makes too many EVENTS then the camera could overwrite the EVENT you need to use. If you are involved in an accident it is best to unplug the camera, wait for it to shut down and remove the SD card. Insert a new SD card in to the camera until you have transferred the files you need to keep to a computer. RoadHawk and DCS Systems cannot be held responsible for video files being overwritten or for data loss from the SD card. If the RoadHawk HD camera is being used in a commercial application. We advise the company’s fleet manager to relay this information to the drivers. We recommend keeping a spare SD memory card in the vehicle so it can be swapped in the event of an accident. WARNING: NEVER remove the SD card from the camera whilst it is powered on. Always remove the power supply from the camera and wait for the camera to chime to let you know it is safe to remove the SD card. 19 Troubleshooting/FAQs: Hardware Camera will not turn on and start recording. Ensure the power cable is connected correctly. Test to make sure you have power coming from your car’s accessory socket. The power cables have a built-in fuse. Check the fuse has not blown. Camera makes a constant bleeping sound. This is the camera’s fail safe alarm which is there to warn you that there is a problem with either the camera or most probably the SD card. Formatting your SD card could solve this issue. Camera makes lots of EVENT files. If the camera sensitivity is set high then the camera will make an EVENT when driving on an uneven road surface. The camera will overwrite these EVENT files once the SD card is full. You can lower the sensitivity setting of the camera but by setting it too low you run the risk of the camera not creating an EVENT if an impact occurs. For camera settings see page: 14 No GPS Signal is being received. Check the position of the camera, make sure it is not located too close to other electronics. Cars with heated front screens or Anti-Glare coatings will reduce the ability of the camera to lock on to GPS. If this is the case, you can use an external GPS antenna (sold separately). Software I inserted the SD card, nothing is happening. The software looks for files made by the camera. If the card has not been used in a RoadHawk camera or if the files have been deleted by the user or if the SD card has recently been formatted then the software will not do anything. Insert the SD card in to the RoadHawk HD camera, power the camera on and leave for at least 20 seconds before unplugging the camera. Now you can use the SD card and the software will be able to work. The map is not displaying. Make sure you have an internet connection. This is required for the map to display correctly. Ensure the camera has a GPS signal. The GPS LED on the camera will light up green when it has a GPS lock. The audio is distorted (noisy). Decrease the MIC SENSITIVITY setting in the software’s settings menu. This will not affect recordings made prior to making the change. The time on the video is not correct. Firstly, ensure the time zone setting is correct using the settings menu in the software. Secondly, make sure the camera has been able to get a GPS lock. The internal clock in the camera is set using GPS. 20 There are gaps in the video, portions of your journey are missing. This is very unlikely to happen. The misconception of portions of your journey missing from the SD card can be summarised in two ways. 1. If the camera detects an EVENT it will save a 1 minute portion of video to the EVENTS folder on the SD card. Clicking on NORMAL in the software will only display your normal driving minus these EVENTS. 2. The SD card can only hold a limited amount of video before it starts to overwrite itself. EVENTS stay on the SD card longer than NORMAL driving video files. If you click ALL in the software you will see a list of EVENTS that may have taken place several days or weeks ago. There will be gaps between these EVENTS. Clicking on NORMAL will display the most recent normal driving videos. Depending on the size of your SD card and the quality settings used by the camera you might only see the last 30 mins of normal driving. The camera did not create an EVENT even though I was involved in an accident. There can only be two reasons for this to happen. 1. The accident did not create enough G-Force to trigger the camera (the G-Force sensitivity is too low or off / The accident did not transmit enough force for the camera to trigger). 2. The camera triggered an EVENT but later recorded over the EVENT. This can happen if the driver continues to drive after an accident and many more EVENTS are created on the journey. A small SD card can only hold a limited number of EVENTS before they are overwritten. Potholes and rough terrain can easily cause the camera to create many events, especially if the G-Force sensitivity is set too high. It is advisable to take precautions after an EVENT takes place in order for the camera to not ERASE this important data. The best way to do this is to UNPLUG the camera, wait for the camera to chime and remove the SD card. A spare/backup SD card can be used if you need to continue to drive. The MAP display has changed/does not look the same. RoadHawk reserves the right to change the way the mapping data is displayed. The speed of the vehicle is not being displayed correctly. Ensure you have the MPH/KPH setting correctly selected. Clicking on the speed display will change the unit from MPH to KPH. The speed display is dependent on having a strong GPS signal. With no GPS signal, the speed cannot be displayed. The stronger the GPS signal, the more accurate the speed display will be. Driving in built-up areas, under tunnels or areas that have weaker GPS coverage can all affect the accuracy of the display. 21 The vehicle is not positioned directly on the road on the MAP. Disturbed or reflected GPS signals in built-up areas may mean the exact location of the vehicle on the map is not accurately displayed. In some cases, the map database may not be 100% accurate although these are improving all the time. The SD card is only holding a few EVENTS and not much of my journey. Using the highest quality settings available the RoadHawk HD can use up to 8gb of data per hour of recording. Using an SD card with a small capacity coupled with a high quality setting will seriously limit how much video you can store on your SD card. You can either lower the video quality settings using the software settings menu or it is advised to use an SD card with a greater capacity. The RoadHawk HD can use SDHC and SDXC high capacity SD cards. My SD card has failed / no longer works in the camera. SD cards may only have a limited number of READ/WRITE cycles. Eventually, even high quality SD cards can “wear out”. You should only use high quality SD cards in this camera. Choose a well-known brand and make sure it is at least rated Class 6 or better. If you wire the camera to operate 24/7 then the SD card’s life will be reduced. The life of the SD card will depend on the quality of the card, the Class of the card and how much driving you do. I can’t read number plates on other vehicles. Although the RoadHawk HD uses some of the most advanced image processing available at the time of being designed, it also uses a WIDE angled camera lens. This is to capture as much of the road ahead as possible. A side effect of using such a wide angled lens is the appearance of vehicles seeming further away than they actually are. This makes reading of number plates harder for the camera to capture. The camera’s ability to read number plates will depend on the weather conditions, the amount of available light, the distance of the vehicle from the camera and the clean condition of your windscreen. Using the camera in 1080p mode will enhance the ability of the camera to capture number plates. If you have the microphone enabled and If you need to, you can read the number plate of the vehicle in question, the camera will capture your voice. 22 LIMITED WARRANTY STATEMENT: This Limited Warranty shall apply to the Roadhawk HD product including all accessories as contained within the original RoadHawk HD box “the Product”. Roadhawk warrants the product from its authorized distributor will meet the applicable product specifications and be free from all defects in material and workmanship for an applicable period herein “Limited Warranty”. This Limited Warranty is subjected to the following terms and conditions: 1. This Limited Warranty is given only to the original purchaser of the Product “Customer” it shall neither exclude nor limit a) any statutory rights of the Customer or b) any of the Customer’s rights against the sellers of the Product. 2. The Limited Warranty shall be restricted to the country/region of Product purchase this is to avoid excessive import or exportation of the Product throughout the supported countries. 3. This Limited Warranty is only valid and enforceable in countries where the Product is sold. Outside of the country of purchase, any repairs performed by Roadhawk’s Authorized Service Centre are subject to charge to the purchaser at normal repair rates. 4. The Limited Warranty entitles the Customer to a Product replacement or a full refund of the purchase price for any defects relating to the performance and / or functioning of the Product which result from normal use of the Product, provided that such a defect arises within ten (10) days of the original date of purchase of the Product and cannot be otherwise repaired. Roadhawk will provide a replacement or repair of the Product at Roadhawk’s own expense for any such defect arising after ten (10) days but within two (2) month of the original date of purchase. This Limited Warranty may not be sold – on, assigned, transferred or given to any subsequent purchaser or acquirer of the Product. 5. This Limited Warranty shall last for two (2) years from the date of original purchase “Warranty Period”. A valid original invoice “Proof of Purchase” is required. 6. This Limited Warranty covers expenses for inspecting and repairing the product during the term of the Limited Warranty. Customer shall deliver the defective Product to the Roadhawk - designated premises together with the proof of purchase, and proof of identity of the Customer. Products shipped by the Customer missing any one of these documents may render this Limited Warranty invalid. If the defect was the result of the Customer’s own mishandling of the Product, force majeure, or the result of a repair by an unauthorized service provider, the Customer shall bear all expenses relating to shipping such a defective Product. 23 7. Roadhawk will return the repaired Product or another Product to the Customer in good working condition. All replaced faulty Products or components thereof will become the property of Roadhawk. 8. This Limited Warranty applies only to the original hardware components of the Product and does not apply to any software or other equipment. 9. If Roadhawk repairs or replaces the Product, the repaired or replaced Product shall continue to be warranted for the remaining term of the Limited Warranty period or for three (3) months from the date of repair or replacement, whichever is longer. 10. Before returning any units for service, the Customer is solely responsible for backing up data and removing any confidential, proprietary, or personal information from the Product. Roadhawk is not responsible for damage to or loss of any programs, data, or removal storage media. 11. This Warranty does NOT cover recovery from any software updates, installation and removal of the application software, or any loss of data storage. 12. Roadhawk reserves the right to add, delete or amend the terms and conditions of this Limited Liability and any such change will be made available to the purchasers of the Product either Roadhawk’s Web site (http://www.roadhawk.co.uk) or by other means. 13. THIS LIMITED WARRANTY SHALL NOT APPLY IF THE DEFECT WAS CAUSED THROUGH ANY OF THE FOLLOWING: (a) The Product serial number, the accessory date code has been removed, erased, defaced, altered or is illegible; or (b) The defect is resulting from the use of the product in a manner other than their normal and customary manner, e.g, in excess of their minimum specification of operating instructions, or malfunction or failure resulting from use of uncalibrated voltages; or (c) Deterioration of the Product due to normal wear and tear. All plastic surfaces and other natural wear of externally exposed parts of the product are scratched or damaged under normal usage; or (d) The defect is arising from improper installation, unauthorized repair, alteration or modification to the Product by third parties; or (e) The defect is arising from operating with components or accessories (ancillary or peripheral equipment) not officially authorized or provided by Roadhawk or used in other than its intended use; or (f) The defect or damage are arising from unauthorized modification: or (g) The defect or damage is arising from misuse, mishandling, accidental lost, abuse, accident, negligence and damage caused directly or indirectly by Customer, including but not limited to improper testing, installation, alteration or modification or any kind, or spillage of food or liquid, or build up of dirt or dust, or mains supply problem, thunderstorm activities, or infestation by insects or vermin, or exposure to abnormally corrosive conditions, or operation with extreme heat or humidity; or 24 14. WHERE A DEFECT WAS UNDETECTABLE BY THEN-AVAILABLE TECHNOLOGY OR WAS THE RESULT OF COMPLYING WITH THE APPLICABLE REGULATORY STANDARDS OF WHERE THE DEFECT WAS THE RESULT OF THE CHANGE IN THE DESIGN OF THE PRODUCT COMPONENTS SUPPLIED BY A THIRD PARTY, ROADHAWK WILL NOT BE LIABLE FOR ANY LOSSES OR DAMAGES OF ANY NATURE, INCLUDING BUT NOT LIMITED TO LOST PROFITS OR COMMERCIAL LOSS OF THE CUSTOMER. 15. This Limited Warranty does not affect the Customer’s statutory rights in law specific to the country of purchase, and such - rights remain protected. Some countries do not allow the exclusion or limitation of incidental or consequential loss or damage, or limitation of the implied warranties, in which case the preceding limitation of exclusions may not apply to such Customers. Please note warranty service availability and response times may vary from country to country and may also be subject to registration requirement in the country of purchase. If you require assistance regarding warranty conditions, or have any other inquiries, please contact the Roadhawk Customer Care Centre or via the official website. 16. RoadHawk reserve the right to make changes to the software including but not limited to the way mapping data is displayed and the service used to provide this data. 17. RoadHawk cannot access your personal data from the camera although the GPS data from the camera will be transmitted over the internet to the mapping data servers in order to provide the map display within the software. Video, audio and G-Force data is NOT transmitted over the internet during video playback. 18. NO data from the camera is transmitted whilst the camera is functioning as a recorder in your vehicle. 19. Video, Audio, G-Force data and GPS data stored on the camera’s SD card can be used in evidence against you in some countries. In some countries, police authorities reserve the right to seize such data from the SD card in the camera and use it as evidence against you. Product Warranty period RoadHawk HD 2 years from purchase 25 Approval Information All our products have met the requirements for approval by the FCC or CE, and have been given the FCC or CE certification. They are hereby authorized to bear FCC or CE mark. FCC Information Noted on complying with FCC’s “Statement of Conformity Information” This product meets the requirements specified in Part 15 of the FCC Regulations. This product’s performance satisfies the following two conditions: (1) The equipment must not cause any detrimental interference; (2) The equipment must receive and process any interference, including any possible interference caused by operation mistakes. After testing the product, we confirm that it complies with the provision for Class C digital equipment in Part 15 of the FCC Regulations; and the receiver complies with the limitations for Class B digital equipment in Part 15 of the FCC Regulations. The product generates, utilized and emits radio waves. It may cause detrimental interference to wireless communication if not installed and used according to the instructions in the manual. The product may cause interference in residential areas, and consumers should take necessary steps to eliminate the interference on their own. If the product causes any detrimental interference to wireless equipment or disturbs TV signals reception (which can be verified by turning on and off the product), you can try to troubleshoot by doing the following: (1) Readjust the product or set it up in another places; (2) Extend the distance between the equipment interfered and the product, and (3) Consult a dealer or an experienced radio technician for help. EU Authentication Statement This product complies with all appropriate EU standards including Low Voltage Device Directive 73/23/EEC; EMC Directive 89//336/EEF and R&TTE Directive 1999/5/EC. It passed the required product tests administered by the appropriate authorities and is authorized to bear CE Mark. 26