1
External Power Supply
User's Manual
1
Contents
1
Preface ........................................................................................3
1.1
Included.........................................................................................3
1.2
Transport .......................................................................................3
2
Overview front panel ...............................................................4
3
Overview back panel ...............................................................5
4
Installation and connection...................................................6
4.1
Placement ......................................................................................6
4.2
Mains connection ..........................................................................6
4.3
Connecting the mother unit...........................................................7
5
Usage...........................................................................................8
5.1
Powering up ..................................................................................8
5.2
Switching on/off............................................................................8
5.3
Mains phase detection ...................................................................9
6
Protection system ....................................................................9
7
Technical Information ...........................................................10
7.1
Features .......................................................................................10
8
Security advice .......................................................................11
9
Technical data .........................................................................12
2
1
Preface
The Audionet-Team would like to congratulate you for purchasing the
Audionet EPX! Surely you are a satisfied owner of an Audionet device.
With the external power supply EPX you have the possibility to provide
all connected units a more sophisticated foundation.
Please read this manual before first use to make sure that you are able to
use all provided functions of your new unit. In case of occurring questions, please do not hesitate to contact your local Audionet dealer or our
factory directly.
1.1 Included
Included you will find the following items:
• The Enhanced Power Supply EPX
• The user's manual (that you are currently reading)
• One EPX connection cable
• One standard mains cord
1.2 Transport
Important
•
Please transport the EPX only in the included package.
•
Always use the plastic bag to prevent scratches on the casing.
•
Please allow the EPX to adapt to the climatic conditions in your listening room before you switch on the unit for the first time after
transport.
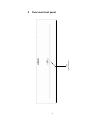
3
Overview front panel
LED
(power indicator)
2
4
1
2
3
5
Mains switch
Mains input
Marking mains phase
7-pin connector
1
2
3
4
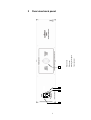
4
3
Overview back panel
4
Installation and connection
Important
•
For connecting the EPX to or removing from the mother unit, the
EPX and the mother unit must be switched off to prevent damage
from both devices.
•
Please make sure that all cables are in absolute best conditions!
Broken shields or shorted cables could damage both devices.
4.1 Placement
Important
•
•
•
•
•
•
•
Place the EPX right beside or at least 20 cm above/below of the
mother unit.
It is recommended to place the EPX into a high quality rack or onto a
stable table.
Do not expose the unit to direct sunlight.
Do not cover the ventilation slots.
Do not place the EPX in close range to heat sources like radiators. Do
not place the EPX on top of other units, especially not on top of
power amplifiers, pre amplifiers or similar that produce heat. Both
units could suffer damage from thermal overload.
Do not use the unit in places where it is exposed to vibrations.
Do not place the unit close to loudspeakers or into the corner of a
room where it is exposed to high levels of sonic energy, which might
reduce the sound quality of the unit.
4.2 Mains connection
The mains input 2 *1 is on the back panel of the EPX. To connect the unit
to the mains use the included mains cord respectively the mains
cord of your mother unit (see section 'Connecting the mother unit'
on page 7).
If you prefer to use a different power cord make sure that it meets the
specifications for your home country.
1
see numbers in section 'Overview back panel' on page 5.
6
Important
•
•
•
The electrical specifications of your home country must meet the
electrical specifications printed onto the back panel.
The EPX is a Class I unit and must be earthed. Please ensure a stable
earth connection. The Phase ('hot' pin) is marked 'PHASE' on the
back panel for the mains input.
Never pull the mains plug while the EPX is switched on! Before you
pull the mains cord off the socket, power down the unit to stand-by
mode.
Only in cases of extended absence – like vacations – or if massive trouble
on the mains power is to be expected you should switch off the EPX from
the mains using the mains switch. To disconnect the unit completely from
mains pull the mains plug.
4.3 Connecting the mother unit
For the connection of the mother unit an EPX-cord with 5-pin or 7-pin
connector is needed. An overview can be found in the following table.
EPX -cord with
5-pin connector
EPX -cord with
7-pin connector
Image of the
connector
Mother unit
Mains connection of
the mother unit
DNP, DNA, DNC,
PRE 1 G3
PRE 1, PRE 1 G2
MAP, MAP V2
VIP, VIP G2, VIP G3
CAT
MAP 1
ART, ART V2,
ART G2, ART G3
PAM, PAM V2,
PAM G2
Needed
Not needed
Needed
Important
•
Do not connect mother devices equipped with 7-pin connectors (except MAP, MAP V2, MAP I) to mains! This would compromise the
quality of audio performance. In this case (see table above) only use
one mains cord to connect the EPX to mains, and no mains cord is
needed for the mother device.
7
5
Usage
5.1 Powering up
First of all, please make sure your EPX is connected correctly to the
mother unit and the mains (see section 'Mains connection' on page 6
and 'Connecting the mother unit' on page 7).
The EPX is a stand by unit. Please operate the mains switch 1 on the
back panel to put the EPX in stand by mode.
Only in cases of extended absence (like vacations) or if massive trouble
on the mains power is to be expected (e.g. thunder storms) it is recommended to disconnect the EPX from the mains. To disconnect the EPX
from mains completely, you have to pull the mains cord off the mains
jack.
Important
•
Never pull the mains cord while the EPX or the mother unit is
switched on! Before you pull the mains plug, power down the mother
unit to stand-by mode and switch off the EPX on the back panel.
5.2 Switching on/off
Please first turn on the mother device by its mains switch on the back
panel. Then operate the mains switch on the back panel of the EPX to set
it to stand by mode.
The position of mains switch of mother devices that need no additional
mains connection (see section 'Connecting the mother unit' on page 7)
is negligible.
Now operate the mother device as usual, all functions are the same. If the
mother device is switched on, the LED on the front panel of the EPX
reports the polarization of mains phase for a few seconds (see section
'Mains phase detection' on page 9) before it keeps shining permanently.
If you switch off the mother device, the power LED of the EPX turns off.
Note
•
For further information on starting up a mother device with 5-pin
connector in combination with an EPX please consult the user's manual of the mother device.
8
5.3 Mains phase detection
The EPX is able to detect the correct polarization of the mains plug. After
pressing the power key on the front panel of the mother unit, the speed of
the LED flashing indicates the polarization of the mains plug.
•
If the polarization is correct, the LED flashes slowly: ⊗___⊗___⊗
If you see the LED flashing rapidly ⊗_⊗_⊗_⊗_⊗ ... please switch off
the unit and flip the mains plug. If you now switch on the EPX again, the
unit should show the correct mains polarization by a slowly flashing
LED.
Note
•
6
If the EPX issues the mains polarization warning or no warning at all
for both positions of the mains plug, check the connection to earth of
your mains socket and mains cord. You have to ensure a stable
connection to earth for the mains phase detection of the EPX to
work correctly!
Protection system
Your Audionet EPX is equipped with a powerful protection system that
safeguards the mother device and itself. In case of an error the EPX will
show this error state by a special LED flash code. If the EPX LED flashes
like this:
⊂x⊃_⊂x⊃_⊂x⊃_⊂x⊃ … (long on, short off)
one of the following errors have occurred:
•
Thermal protection: The EPX will power down if its heatsinks overheat.
•
Shortcut protection: The EPX will power down if an excessive current is drawn from its outputs over a longer period of time.
In this case you have to power off the EPX at mains power switch at the
back panel. Before turning on again the EPX should cool down, and you
should check for the cause of error and remove the problem.
9
7
Technical Information
Your EPX provides the mother unit with ideal operating conditions. The
popular usage of accumulators shows the following serious disadvantage:
The output voltage is not short term stable: The internal impedance is
10 times worse than the one of your EPX causing an output ripple voltage
10 times in magnitude at the same load condition.
The output voltage is not long term stable: The output voltage of an accumulator is highly dependent from its state of charge and usage history,
typically ranging from 23 V to 28 V. The EPX always provides 24.00 V.
The usage of accumulators is questionable regarding to environmental
concerns.
Last not least you are able to listen to your music with high-end quality
using the EPX whenever you like not being forced to wait for accumulators being charged.
7.1 Features
•
Discrete circuit layout for positive and negative voltage
•
Two 200 VA-toroid transformers
•
Total capacitance per voltage: 288.000 μF (totally 576.000 μF)
•
Custom made Audiograde Capacitors with silk dielectric
•
Separate power supply for control and standby purposes
•
High precision voltage regulators with discrete MOSFETs
•
High precision and low noise reference voltage
•
Short-circuit proof and protected against overheating
•
Internal wiring with ultralow impedance silver/gold cables
•
Mains phase detection
10
8
Security advice
Important
• Avoid packaging material, especially plastic bags, coming into children's hands!
• Store and operate the unit in a dry room at a reasonable room temperature only!
• Avoid moisture, any liquids, dirt or small objects getting into the unit!
• Set up the unit in a sufficiently ventilated environment!
• Do not cover the unit!
• Do not open the unit. Unauthorised opening will void warranty!
• Use dry cloth for cleaning!
11
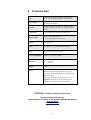
9
Technical data
Type
ultra low noise, highly stable and constant power
supply for EPS/EPX compatible Audionet units
Power supply
two encapsulated 200 VA toroidal transformers and
576.000 µF capacitance
Circuitry
reference voltage sources for pos. and neg. analog
voltages using discrete Audionet voltage regulators
(MOS)
Connections
7-pin socket for connecting the mother unit
Output voltage
±24.00 V for analog sections,
+5V for digital and control sections
Stability
±0.01 V at 3 A
Noise
-144 dB or 1.5 µVeff for 0 Hz up to 22 kHz
Mains
120 V or 230 V, 50 Hz .. 60 Hz
Power consumption
Standby < 0.5 W, max. 400 W
Dimensions
W:
H:
D:
Weight
18 kg
Finish
Front-panel:
aluminium, black anodized, light grey printing
aluminium, nature anodized (silver), black printing
430 mm
110 mm
360 mm
LED: red or blue
Top-cover: aluminium, black anodized, 4 mm
Side-plates: aluminium, black anodized, 8 mm
Chassis: 2 mm sheet-steel, black varnished
Errors and omissions excepted. Specifications and design are subject to changes without prior notice.
audionet is a trademark of Idektron GmbH & Co KG
Engineered and produced by:
Idektron GmbH & Co. KG, Herner Str. 299, Gebäude 6, 44809 Bochum, Germany
www.audionet.de
[email protected]
12