1
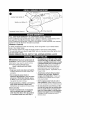
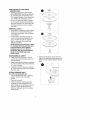
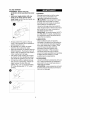
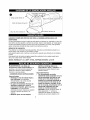
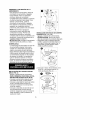
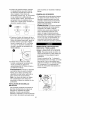
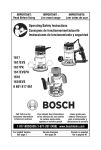
Instruction
Manual
CRRF
°
4 INCH
ANGLE GRINDER
Model 900.116500
• Safety
_4WARNING:
• Operation
Before using this product,
read this manual and follow
• Maintenance
• Parts List
all its Safety Rules and
Operating Instructions.
Sears, Roebuck
• Espa_ol
and Co., Hoffman
Estates,
IL 60179
USA
www.sears.com/craftsman
Form No. 587857-00
MAR-04
Printed in China
O
On / Off Switch (1)
Auxiliary Side Handle (5)
Spindle Lock Button (3)
Depressed
Guard (6)
Center Wheel (4)
[,._1
FULL ONE YEAR WARRANTY
WI-'I ;_1
;1-'I_/ Ik'd
ON CRAFTSMAN
ANGLE GRINDER
If this Craftsman angle grinder fails due to a defect in material or workmanship within
one year from the date of purchase, Sears wilt replace it, free of charge.
If this Craftsman angle grinder is used for commercial or rental purposes, this warranty
applies for only 90 days from the date of purchase.
WARRANTY SERVICE
To obtain replacement under this warranty, return the grinder to your nearest Sears
store in the United States.
This warranty applies only while this angle grinder is used in the United States.
This warranty gives you specific legal rights, and you may also have other rights which
vary from state to state.
SEARS, ROEBUCK AND CO., DEPT. 817 WA, HOFFMAN ESTATES, IL 60179
[_ =l_l=l;_Inu _'7.,I= =Inuk'dI;_L_"]
A
AI_WARNING! Read and understand all
instructions. Failure to follow all instructions
listed below may result in electric shock,
fire and/or serious personal injury.
SAVE THESE INSTRUCTIONS
Work Area
Keep your work area clean and well lit.
Cluttered benches and dark areas invite
accidents.
• Do not operate power tools in
explosive atmospheres, such as in the
presence of flammable liquids, gases,
or dust. Power tools create sparks which
may ignite the dust or fumes.
• Keep bystanders, children, and visitors
away whine operating a power tool.
Distractions can cause you to lose control.
Electrical Safety
Double insulated tools are equipped
with a polarized plug (one blade is
wider than the other.) This plug will fit
in a polarized outlet only one way. If
the plug does not fit fully in the outlet,
reverse the plug. If it still does not fit,
contact a qualified electrician to install
a polarized outlet. Do not change the
plug in any way. Double Insulation []
eliminates the need for the three wire
grounded power cord and grounded
power supply system. Applicable only to
Class It tools.
Avoid body contact with grounded
surfaces such as pipes, radiators,
ranges and refrigerators. There is an
increased risk of electric shock if your
body is grounded.
Don't expose power tools to rain or
wet conditions. Water entering a power
tool will increase the risk of electric shock.
Do not abuse the cord. Never use the
cord to carry the tools or pull the plug
from an outlet. Keep cord away from
heat, oil, sharp edges or moving parts.
Replace damaged cords immediately.
Damaged cords increase the risk of
electric shock.
• When operating a power tool outside,
use an outdoor extension cord marked
"W-A" or "W." These cords are rated for
outdoor use and reduce the risk of electric
shock.
Personal
Safety
• Stay alert, watch what you are doing
and use common sense when
operating a power tool. Do not use tool
while tired or under the influence of
drugs, alcohol, or medication. A
moment of inattention while operating
power tools may result in serious
personal injury,
• Dress properly. Do not wear loose
clothing or jewelry. Contain long hair.
Keep your hair, clothing, and gloves
away from moving parts. Loose clothes,
jewelry, or tong hair can be caught in
moving parts.
• Avoid accidental starting. Be sure
switch is off before plugging in.
Carrying tools with your finger on the
switch or plugging in tools that have the
switch on invites accidents.
storing the tool. Such preventive safety
measures reduce the risk of starting the
tool accidentally.
• Store idle tools out of reach of children
and other untrained persons. Tools are
dangerous in the hands of untrained
users.
• Maintain tools with care. Keep cutting
tools sharp and clean. Properly
maintained tools, with sharp cutting
edges are less likely to bind and are
easier to control.
• Check for misalignment or binding of
moving parts, breakage of parts, and
any other condition that may affect the
tools operation. If damaged, have the
tool serviced before using. Many
accidents are caused by poorly
maintained tools.
• Use only accessories that are
recommended by the manufacturer for
your model. Accessories that may be
suitable for one tool, may become
hazardous when used on another tool.
Service
• Remove adjusting keys or wrenches
before turning the tool on. Awrench or
a key that is left attached to a rotating part
of the tool may result in personal injury.
• Tool service must be performed only
by qualified repair personnel. Service
or maintenance performed by unqualified
personnel could result in a risk of injury.
• Do not overreach. Keep proper footing
and balance at all times. Proper footing
and balance enables better control of the
tool in unexpected situations.
• When servicing a tool, use only
identical replacement parts. Follow
instructions
in the Maintenance
section of this manual. Use of
unauthorized parts or failure to follow
Maintenance Instructions may create a
risk of electric shock or injury.
• Use safety equipment. Always wear
eye protection. Dust mask, non-skid
safety shoes, hard hat, or hearing
protection must be used for appropriate
conditions.
Tool Use and Care
• Use clamps or other practical way to
secure and support the workpiece to a
stable platform. Holding the work by
hand or against your body is unstable and
may lead to loss of control.
• Do not force tool. Use the correct tool
for your application. The correct toot will
do the job better and safer at the rate for
which it is designed.
• Do not use tool if switch does not turn
it on or off. Any toot that cannot be
controlled with the switch is dangerous
and must be repaired.
• Disconnect the plug from the power
source before making any
adjustments, changing accessories, or
SPECIFIC SAFETY RULES
• Always use proper guard with
grinding wheel. A guard protects
operator from broken wheel fragments.
Always position the guard so that as
much of the exposed disc as possible
is pointing away from you.
• Accessories must be rated for at
least the speed recommended on the
tool warning label. Wheels and other
accessories running over rated speed
can fly apart and cause injury.
• Hold tool by insulated gripping
surfaces when performing an
operation where the cutting tool may
contact hidden wiring or its own
cord. Contact with a "live" wire wilt make
exposed metal parts of the tool "live"
and shock the operator.
ADDITIONAL SAFETY RULES
• Always wear eye protection.
• Keep guards in place.
• Use only accessories having a
maximum operating speed at least as
high as the speed specified in the
warning on the tool's label.
• Before using, inspect recommended
accessory for cracks or flaws. If such
a crack or flaw is evident, discard the
accessory. The accessory should also
be inspected whenever you think the
tool may have been dropped.
• When starting the tool (with a new or
replacement wheel or brush installed)
hold the tool in a well protected area
and let it run for one minute. If the
wheel or brush has an undetected crack
or flaw, it should burst or separate in
tess than one minute. Never start the
tool with a person in line with the
accessory. This includes the operator.
• In operation, avoid bouncing the
wheel or giving it rough treatment. If
this occurs, stop the tool and inspect
the wheel.
• Always use guards with grinding
wheels and wire brushes. Always
position the guard so that as much of
the exposed wheel or wire brush as
possible is pointing away from you.
• Clean your tool out periodically.
• Do not use Type 1 flat cut-off or diamond
wheels without proper guard.
• Always direct stream of sparks from
grinding away from flamable materials.
• _,WARNING: Some dust created by
power sanding, sawing, grinding, drilling,
and other construction activities contains
chemicals known to cause cancer, birth
defects or other reproductive harm.
Some examples of these chemicals are:
• lead from lead-based paints,
• crystalline silica from bricks and
cement and other masonry products, and
• arsenic and chromium from
chemically-treated lumber (CCA).
Your risk from these exposures varies,
depending on how often you do this type
of work. To reduce your exposure to
these chemicals: work in a welt
ventilated area, and work with approved
safety equipment, such as those dust
masks that are specially designed to
filter out microscopic particles.
• Avoid prolonged contact with dust
from power sanding, sawing,
grinding, drilling, and other
•
•
•
construction activities. Wear
protective clothing and wash exposed
areas with soap and water. Allowing
dust to get into your mouth, eyes, or lay
on the skin may promote absorption of
harmful chemicals.
_I,WARNING: Use of this tool can
generate and/or disburse dust, which
may cause serious and permanent
respiratory or other injury. Always
use NIOSH/OSHA approved
respiratory protection appropriate for
the dust exposure. Direct particles
away from face and body.
-_CAUTION: Wear appropriate
hearing protection during use. Under
some conditions and duration of use,
noise from this product may contribute to
hearing loss.
The label on your tool may include the
following symbols.
V .............. volts
A .............. amperes
Hz ............ hertz
W ............ watts
min .......... minutes
'_ ............ alternating current
....
........ direct current
no ............ no toad speed
[] ............ Class II Construction
.../min ......revolutions or reciprocation
per minute
............ earthing terminal
............ safety alert symbol
EXTENSION CORDS
When using an extension cord, be sure to
use one heavy enough to carry the current
your product wilt draw. An undersized cord
wilt cause a drop in line voltage resulting in
loss of power and overheating. The
following table shows the correct size to
use depending on cord length and
nameplate ampere rating. If in doubt, use
the next heavier gage. The smaller the
gage number, the heavier the cord.
Minimum Gage for Cord Sets
Volts
Total Length
120V
240V
0-25
0-50
Ampere Rating
More Not more
Than Than
AWG
061012-
16
16
16
12
6
10
12
16
18
18
16
14
of Cord
26-50
51-100
in Feet
51-100
101-200
101-150
201-300
16
14
14
12
14
12
Not Recommended
MOTOR
Be sure your power supply agrees with
nameplate marking. 120 Volts AC only
means your tool wilt operate on standard
60 Hz household power. Do not operate
AC tools on DC. A rating of 120 volts
AC/DC means that your tool wilt operate
on standard 60 Hz AC or DC power. This
information is printed on the nameplate.
Lower voltage will cause toss of power
and can result in over-heating. All
Craftsman tools are factory-tested; if this
toot does not operate, check the power
supply.
An'ACHING THE WHEEL GUARD (FIG. 2)
Turn off and unplug the tool. NEVER
GRIND OR BRUSH WITHOUT GUARD
IN PLACE.
• Place the angle grinder on a table,
spindle (1) facing up.
• Place the spring washer (2) over the
spindle and locate it on the shoulder (3).
• Place the guard onto the tool as shown.
• Place the flange (4) over the spindle with
the protrusions facing towards the guard.
Make sure that the screws (5) are tight
and that the guard (6) can be rotated.
AUXILIARY HANDLE (FIG. 1)
An auxiliary handle is furnished with your
grinder and can be screwed into either
side of the grinder housing. This handle
SHOULD BE USED ATALL TIMES to
maintain complete control of the tool.
TIGHTEN SECURELY.
STARTING AND STOPPING THE TOOL
To start the tool, slide the ON/OFF switch
forward. For continuous operation, slide
the switch fully forward and press front
end down. To stop the tool, release the
ON/OFF switch. To stop the tool while
running in continuous mode, press the
rearward part of the switch.
NOTE: Do not switch the tool on or off
while under toad conditions. Allow the
grinder to run up to full speed before
touching the surface to be ground. Lift the
toot from the surface before turning the
tool off. _,CAUTION: Allow the tool to
stop before setting down.
OVERLOAD
Overloading wilt cause damage to the
motor of your angle grinder. This can
happen if your angle grinder is subjected
to heavy use for prolonged periods of
time. Do not in any circumstances,
attempt to exert too much pressure on
your angle grinder to speed up your work.
The abrasive accessories operate more
efficiently when light pressure is exerted,
thus avoiding a drop in the speed of your
angle grinder.
FITTING DEPRESSED CENTER WHEELS
(FIGS. 3,4,5,6)
Turn off and unplug the tool.
-ZkCAUTION: Never use any grinding
wheels without the proper guard.
1.)Ensure that the guard is fitted properly.
Place the inner flange (1) on the spindle
(2) as shown (Fig. 3). Ensure that it is
located on the two flats.
o
2.)Place the grinding wheel (1) on the
spindle (2) and innerflange (3) as shown
Fig. 4.
3.)Fit the threaded outer flange (4) making
sure it is facing in the correct direction for
the type of wheel fitted. For thick grinding
wheels Fig. 5, the flange (4) is fitted with
the raised portion facing towards the
wheel. For thin grinding wheels, the
flange (4) is fitted with the raised portion
facing away from the wheel.
to be grinding wheels and must be used
with guards.
FITTING WIRE BRUSHES
Wire cup brushes screw directly on the
spindle of the machine without the use of
flanges. When using wire brushes, thread
firmly on spindle by hand. The guard may
be removed for brushing with flat wire
brushes.
EDGE GRINDING
Edge grinding may be done with Type 27
depressed center wheels specifically
designed for this purpose. These wheels
are available locally. They must not be
subjected to side pressure._,CAUTION:
Wheels used for edge grinding may break
if they bend or twist while being used for
cut-off work or deep grinding. To reduce
the risk of serious injury, limit the use of
these wheels to shallow cutting and
notching (tess than 1/2" in depth). The
open side of the guard must be positioned
away from the operator.
0
REMOVING THE WHEEL GUARD
(FIG. 7 FOR SANDING)
4.)Press in the spindle lock button and
rotate the spindle until it locks. Keeping
the lock button pressed in, tighten the
outer flange with the spanner wrench
provided as shown in Fig. 6. Hubbed
wheels do not require mounting flanges
and may be tightened with standard
wrenches.
5.)When using a depressed-center wheel,
hold the tool so that an angle of
approximately 30 ° exists between the
wheel and the work.
AWARNING: Check rated speed on
depressed-center wheel. Never use a
wheel with rated speed lower than the
speed on the nameplate of the tool.
Note: Sanding flap discs are considered
Turn off and unplug the tool.
NOTE: To prevent toss of control, do not
set tool down until accessory has
completely stopped turning.
As shown in Fig. 7, place the grinder on a
table, spindle up. Use a screwdriver to
remove the 3 screws (1). Remove the
flange (2), guard (3) and spring washer
(4). Store these parts carefully.
4
PRECAUTIONS TO TAKE WHEN
SANDING PAINT
1. Sanding of lead based paint is NOT
RECOMMENDED due to the difficulty
of controlling the contaminated dust.
The greatest danger of lead poisoning
is to children and pregnant women.
2. Since it is difficult to identify whether
or not a paint contains lead without a
chemical analysis, we recommend the
following precautions when sanding
any paint:
O
PERSONAL SAFETY
1. No children or pregnant women should
enter the work area where the paint
sanding is being done until all cleanup
is completed.
2. A dustmask or respirator should be
worn by all persons entering the work
area. The filter should be replaced
daily or whenever the wearer has
difficulty breathing.
NOTE: Only those dustmasks suitable
for working with lead paint dust and
fumes should be used. Ordinary
painting masks do not offer this
protection. See your local hardware
dealer for the NIOSH approved
proper mask.
ENVIRONMENTAL SAFETY
1. Paint should be removed in such a
manner as to minimize the amount of
dust generated.
2. Areas where paint removal is occurring
should be sealed with plastic sheeting
of 4 mils thickness.
3. Sanding should be done in a manner
to reduce tracking of paint dust outside
the work area.
FITTING ABRASIVE DISCS
Turn off and unplug the tool.
Use an abrasive disc with a backing
pad for sanding with your angle
grinder.
1. Remove the guard.
2. Place the flange, (backing pad and
abrasive disc sold separately) and
outer flange on the spindle as shown in
Figure 8. Figure 8A shows how to
attach an abrasive disc with a rubber
backing pad.
3.
Tighten the abrasive disc as shown in
Figure 9 by depressing the spindle lock
button and turning the abrasive disc by
hand.
0
TO USE GRINDER
-&WARNING: Always wear eye
protection while operating this power
tool.
• Hold your angle grinder with one
hand on the body and the other
hand firmly around the side handle as
shown in Figure 10.
•
•
•
•
•
Always position the guard so that as
much of the exposed disc as possible is
pointing away from you.
Be prepared for a stream of sparks
when the disc touches the metal.
Exert light pressure on abrasive discs for
efficient operation. Pushing too hard wilt
cause a drop in speed and may result in
motor overload and damage.
Use caution when working into corners
as contact with the intersecting surface
may cause the grinder to jump or twist.
For best toot control, material removal,
and minimum overloading, maintain an
angle between the disc and work
surface (Fig. 11 & 12) of approximately
30 ° when grinding and 10°-15 ° when
sanding.
O
30 °
O
CLEANING
Blowing dust and grit out of the motor
housing using compressed air is a
CceSSarymaintenance procedure.
AUTION: Dust and grit from metal
grinding often accumulate on interior
surfaces and could create an electrical
shock hazard if not cleaned out.
Use only mild soap and a damp cloth to
clean the tool exterior. Never let any liquid
get inside the tool; never immerse any
part of the toot into a liquid.
IMPORTANT: To assure product SAFETY
and RELIABILITY, repairs, maintenance
and adjustment should be performed by
Sears Service Centers.
LUBRICATION
Sears Craftsman tools are properly
lubricated at the factory and are ready for
use. Tools should be lubricated regularly
every year depending on usage. (Tools
used on heavy duty jobs and tools
exposed to heat may require more
frequent lubrication.) This lubrication
should be performed only by trained
power tool repair specialists such as those
at Sears Service Centers or in other
qualified service organizations.
ACCESSORIES
Use only Craftsman accessories with your
tool. These accessories are available at
extra cost from your local Sears store or
Sears Service Center.
-& CAUTION: Using accessories not sold
by Sears may be hazardous and lead to
injury or tool damage.
Manual de instrucciones
@
Esmeriladora angular
de 102 mm (4 pulg.)
No. modelo 900.116500
AADVERTENCIA:
• Seguridad
Antes de usar este producto,
lea este manual y siga sus
Reglas de seguridad e
Instrucciones de
funcionamiento
• Operacibn
Sears, Roebuck
• Mantenimiento
• Lista de piezas
• Espa_ol
y Co., Hoffman
Estates,
www.sears.com/craftsman
10
IL 60179 EE.UU.
Im]F-'(e']Z..f-'1_v_!'-'11m]=l
I-'_ _..."]_N=lz..llal'_,ImIo]z..f_,V_,1_[e'IIJI_,I;..!
[e']':1_-'I _ItIIF-'_
[,._"]
GARANTJA COMPLETA POR UN ANO PARA LA ESMERILADORA ANGULAR
CRAFTSMAN
Siesta esmeriladora angular Craftsman falla debido a defectos en materiales o mano de
obra dentro del afio siguiente a la fecha de compra, Sears to reemplazar& sin costo alguno.
Siesta esmeriladora angular se utitiza con fines comerciales o de renta, esta garantia
aptica L_nicamente durante 90 dias a partir de la fecha de compra.
SERVICIO DE GARANTIA
Para obtener un reemplazo bajo esta garantia, devuelva la esmeriladora angular a su
tienda Sears mas cercana en los Estados Unidos.
Esta garantia aplica s61o mientras la esmeriladora angular sea utilizada en los Estados
Unidos.
Esta garantia te da derechos legales especificos ademas de los cuales puede tenet
otros, los cuales varian entre estados.
SEARS, ROEBUCK Y CO., DEPT. 817WA, HOFFMAN
Ir,,l=[_"]
ESTATES, IL 60179
le]=l[.,."]_e"lllJr,,lleT_,le][e']=l_l=lz/_,lll=[.,."]
A ADVERTENCIA: Lea todas las
instrucciones hasta comprenderlas. No
ajustarse alas instrucciones siguientes
puede set causa de choque electrico,
incendio o lesiones graves.
CONSERVE ESTAS INSTRUCCIONES
electrica, mantenga lejos a los
observadores, niSos y visitantes. Las
distracciones pueden ocasionar que
pierda el control.
Seguridad Electrica
• Las herramientas con doble
aislamiento estan equipadas con una
clavija polarizada (una pata es mas
ancha que la otra). Esta clavija se
acoplara a un enchufe polarizado de
una sola manera. Si la clavija no se
acopla al contacto, inviertala. Si at)n
asi no se ajusta, comuniquese con un
electricista cualificado para que
instale un enchufe polarizado
apropiado. Nunca cambie la ctavija. Et
doble aislamiento [] elimina la
necesidad de cables con tres hitos y
sistemas de suministro electrico con
Area de trabajo
• Mantenga el area de trabajo limpia y
bien iluminada. Las bancadas
desordenadas y las zonas oscuras
propician los accidentes.
• No opere herramientas electricas en
atmosferas explosivas, como en
presencia de liquidos, gases o polvos
inflamables. Las herramientas
electricas producen chispas que pueden
originar ta ignici6n del polvo o los
vapores.
• Mientras opere una herramienta
11
conexi6n
atierra.S6toesapticable
alas
herramientas
deClaseII.
•
•
•
•
Evite el contacto del cuerpo con
superficies conectadas a tierra, tales
como tuberias, radiadores, registros y
refrigeradores. El riesgo de choque
electrico aumenta si su cuerpo hace
tierra.
No exponga las herramientas
electricas a la Iluvia o a condiciones
de mucha humedad. Si entra agua en
una herramienta electrica, aumenta el
riesgo de choque electrico.
No maltrate el cable. Nunca tome el
cable para transportar la herramienta
ni para desconectarla del enchufe.
Mantenga el cable alejado de las
fuentes de calor, el aceite, las orillas
afiladas o las piezas en movimiento.
Gamble inmediatamente los cables
da_ados. Los cables da_ados
aumentan el peligro de choque electrico.
Cuando opere una herramienta
electrica a la intemperie, utilice una
extension marcada "W-A.)" o "W".
Estas extensiones estan ctasiflcadas
para uso a la intemperie y para reducir
el riesgo de choque electrico.
provocar tesiones.
No ponga en peligro su estabilidad.
Mantengase siempre bien apoyado y
equilibrado. Un buen apoyo y equitibrio
permiten controtar mejor la herramienta
si se produce algt_n imprevisto.
Utilice el equipo de seguridad. Lleve
siempre lentes protectores. Cuando
sea adecuado, tambien se debe usar
mascaritta antipotvo, zapatos de suela
antideslizante, casco o protectores
auditivos.
Uso y cuidados de la herramienta
• Utilice abrazaderas u otro elemento
adecuado para sujetar y apoyar la
pieza de trabajo en una plataforma
estable. Sujetar ta pieza con la mano o
contra el cuerpo es inestable y facilita
la perdida de control.
• No fuerce la herramienta.
Emplee la
herramienta correcta para cada
aplicacion. La herramienta correcta
hace el trabajo mejor y mas seguro
dentro del rango para el que ha sido
diseSada.
• No utilice la herramienta si el
interruptor
no la enciende y apaga.
Cualquier herramienta que no pueda
controlarse con el interruptor es
peligrosa y se debe reparar.
• Desconecte la clavija del enchufe
antes de proceder a cualquier ajuste,
cambiar un accesorio o guardar la
herramienta.
Estas medidas de
seguridad preventiva reducen el riesgo
de poner en marcha la herramienta
accidentalmente.
• Cuando no las utilice, guarde las
herramientas
fuera del alcance de
los niSos o de cualquier persona no
capacitada. Las herramientas son
peligrosas en manos de usuarios no
capacitados.
• Guide las herramientas.
Conserve
las herramientas
de corte afiladas y
limpias. Unas herramientas
adecuadamente cuidadas y con los
bordes de corte afilados se atascan
menos y son mas faciles de controlar.
• Compruebe si las piezas moviles se
desalinean o atascan, si hay alguna
pieza rota o cualquier otra
circunstancia que pueda afectar la
operacion de la herramienta.
Si la
herramienta esta daSada, hagala
reparar antes de usarla. Muchos
accidentes los provocan unas
Seguridad personal
• AI utilizar una herramienta electrica,
este atento, concentrese en Io que
hace y aplique el sentido comun. No
utilice la herramienta si se encuentra
fatigado o bajo la influencia de
drogas, alcohol o farmacos. Mientras
se utitizan herramientas electricas, basta
un instante de distracci6n para sufrir
lesiones graves.
• Lleve ropa adecuada. No utilice ropa
suelta ni joyas. Recojase el cabello
largo. Mantenga el cabello, la ropa y
los guantes apartados de las piezas
en movimiento. Las pares m6viles
pueden atrapar tas prendas de vestir
sueltas, tas joyas y el cabello.
• Evite puestas en marcha
accidentales. AsegL_rese de que el
interruptor este apagado antes de
enchufar la maquina. Transportar las
herramientas con el dedo sobre el
interruptor o enchufartas con el
interruptor encendido favorece los
accidentes.
• Antes de poner en marcha la
herramienta, retire las Ilaves de
ajuste. Una ltave que se deje en una
pieza giratoria de la herramienta puede
12
herramientas
malcuidadas.
operaci6n al menos tan alta como ta
velocidad especificada en la advertencia
de ta etiqueta de ta herramienta.
• Antes de utilizarlo, revise el
accesorio recomendado
para
confirmar que no tenga trizaduras o
fallas. Si tuviera alguna trizadura o
falta, descarte el accesorio. Et accesorio
deberia tambien ser revisado siempre
que se piense que ta herramienta
pudiera haberse caido.
• Cuando arranque la herramienta
(con un disco o escobilla nuevo o de
reemplazo instalado), sostenga la
herramienta en un area bien protegida
y dejela andar por un minuto. Si el
disco o ta escobitta tiene una trizadura
o falta no detectada, deberia romperse
o separarse en menos de un minuto.
Nunca arranque la herramienta si hay
alguna persona parada en linea con el
accesorio. Esto inctuye al operador.
• Durante la operacion, evite hacer
rebotar el disco o tratarlo
bruscamente.
Si esto ocurre, detenga
la herramienta y revise el disco.
• Utilice siempre los protectores con
los discos de esmeritado y las escobiltas
de metal. Coloque siempre el protector
de modo que la mayor parte posible del
disco expuesto quede apuntando en
direcci6n opuesta a usted.
• Limpie su herramienta peri6dicamente.
• No use discos abrasivos Tipo 1 o de
diamante sin la guarda apropiada.
• Siempre dirija ta corriente de chispas
originada al esmeritar tejos de
materiales inflamables.
• _ADVERTENCIA:
Parte del polvo
generado al lijar, serrar, esmeritar y
taladrar, asi como al realizar otras
actividades del sector de ta
construcci6n, contienen productos
quimicos que pueden producir cancer,
defectos congenitos u otras afecciones
reproductivas. Ejemplos de esas
substancias quimicas son:
• ptomo procedente de pinturas a base
de plomo,
• 6xido de siticio cristalino procedente
de tadriltos, cemento y otros
productos de mamposteria, y
• arsenico y cromo procedentes de
madera tratada quimicamente (CCA).
El peligro derivado de estas exposiciones
que usted enfrente varia en funci6n de ta
frecuencia con que se realice este tipo de
Utilice unicamente los accesorios
recomendados
por el fabricante para
su modelo. Un mismo accesorio
puede ser adecuado para una
herramienta, pero peligroso si se usa
en otra.
Servicio
• El servicio a la herramienta solo
deber ser realizado por personal de
reparacion calificado. Si el servicio o
mantenimiento es realizado por
personal no calificado, podria resultar
en riesgo de tesi6n.
• Cuando se repare una herramienta,
solo se deben usar repuestos
originales. Siga las instrucciones
en
la seccion de mantenimiento
de este
manual. El uso de repuestos no
autorizados o el incumplimiento de tas
instrucciones de mantenimiento pueden
crear un riesgo de descarga electrica o
lesi6n.
NORMAS ESPECiFICAS
•
•
•
DE SEGURIDAD
Use siempre el protector debido con
el disco de esmerilado. Un protector
protege al operador de los fragmentos
que se desprendan del disco. Coloque
siempre el protector de modo que ta
mayor parte posible del disco expuesto
quede apuntando en direcci6n opuesta
a usted.
Los accesorios deben estar
clasificados por Io menos para la
velocidad recomendada en la etiqueta
de advertencia de la herramienta. Si
funcionan a velocidades superiores a la
prevista, los discos y otros accesorios
pueden salir despedidos y provocar
lesiones.
Sujete la herramienta por las
superficies aislantes si Ileva a cabo
una operacion en que la herramienta
pueda tocar un conductor oculto o su
propio cable. El contacto con un
conductor activo provocara que las
piezas metaticas de la herramienta
conduzcan electricidad y que el
operador reciba una descarga electrica.
REGLAS DE SEGURIDAD ADICIONALES
• Utilice siempre proteccion ocular.
• Mantenga los protectores en su
sitio.
• Use solo aquellos accesorios que
tengan una velocidad maxima de
13
trabajo.
Parareducirtaexposici6n
aesas
sustancias
quimicas:
trabajeenunazona
bienventitada
y ttevando
equipos
de
seguridad
aprobados,
comomascarittas
antipolvo
especialmente
diseSadas
para
filtrarparticulas
microsc6picas.
•
Evite el contacto prolongado con el
polvo procedente del lijado, serrado,
esmerilado y taladrado electricos,
asi como de otras actividades del
sector de la construccion. Lleve
ropa protectora y lave con agua y
jabon las zonas expuestas. Si
permite que el polvo se introduzca en
la boca u ojos o quede sobre la piel,
puede favorecer la absorci6n de
productos quimicos peligrosos.
• _ ABVERTENCIA: El uso de esta
herramienta puede generar o
dispersar polvo Io cual puede
causar lesiones respiratorias serias
y permanentes y otros tipos de
lesion. Siempre use proteccion
respiratoria aprobada por
NIOSH/OSHA para la exposicion al
polvo. Dirija las particulas en
direccion opuesta a su cara y
cuerpo.
• _, PRECAUCION: Utilice una
proteccion auditiva apropiada
durante el uso. En determinadas
condiciones y con utitizaciones
prolongadas, el ruido generado por
este producto puede favorecer la
perdida de audici6n.
• La etiqueta de ta herramienta puede
incluir los siguientes simbolos:
V...................voltios
A................amperios
Hz ................hertzios
W ................vatios
min ..............minutos
'_ ..............corriente altema
.... ............corriente directa
no ................velocidad sin carga
[] ................construcci6n de Clase II
CABLES
DE EXTENSION
Cuando use un cable de extensi6n,
asegQrese de usar uno de un calibre
suficiente como para cargar con la
corriente que requerira su producto. Un
cable de menor calibre causara una
caida en el vottaje de ta linea lo que
resultara en perdida de potencia y
sobrecalentamiento.
El siguiente cuadro muestra el tamaSo
correcto a utilizar, dependiendo del largo
del cable y el amperaje nominal. Si tiene
dudas sobre cuat calibre usar, use un
calibre mayor. Mientras menor el nQmero
del calibre, mayor la capacidad del cable.
Voltios
120V
240V
Calibre minimo para juegos de cables
Largo total del cable en metros
0-7,6
7,6-15,2
15,2-30,4
30,4-45,7
0-15,2 15,2-30.4
30,4-60.9
60.9-91,4
Amperaje Nominal
Mas No mas
de de
0 -6
18
6 -10
18
10 -12
16
12 -16
14
American
16
16
16
12
Wire Gage
16
14
14
12
14
12
No Recomendado
MOTOR
AsegQrese de que su alimentaci6n
electrica sea la requerida en la placa
nominal. 120 voltios de corriente alterna
s61o signiflca que su herramienta operara
con la potencia domestica estandar de
60 Hz. No opere herramientas de
corriente alterna en corriente direct&
Una especificaci6n de 120 voltios AC/DC
significa que su herramienta operara en
60 Hz estandar de potencia en corriente
alterna o corriente direct& Esta
informaci6n esta impresa en la placa
nominal. Un voltaje menor causara
perdida de potencia y puede resultar en
sobrecalentamiento. Todas tas herramientas
Craftsman han sido probadas en la
fabrica; siesta herramienta no funciona,
revise la alimentaci6n electrica.
[o]_=l_0]_]
G ................terminal con conexi6n a
tierra
..............sfmbolo de alerta
seguridad
.../min .......... revoluciones o
reciprocaciones por
minuto
_I
MANGO AUXILIAR (FIG. 1)
Su esmeritadora viene con un mango
auxitiar y puede ser atorniltada en
cualquiera de los dos tados de la caja
protectora de la esmeritadora. Este
mango DEBERiA SER UTILIZADO EN
TODO MOMENTO para mantener el
control total de la herramienta. AJUSTE
FIRMEMENTE.
14
ARRANQUE Y DETENCION DE LA
HERRAMIENTA
Para arrancar ta herramienta, deslice el
conmutador de encendido y apagado
hacia adelante Para una operaci6n
continua, destice el conmutador
completamente hacia adelante y presione
el extremo delantero hacia abajo Para
detener ta herramienta, suelte el
conmutador de encendido y apagado
Para detener la herramienta durante su
operaci6n en modalidad continua,
presione ta parte posterior del conmutador
O
NOTA: No encienda o apague ta
herramienta cuando esta este bajo
condiciones de carga Permita a la
esmeriladora alcanzar su velocidad
completa antes de tocar ta superficie a ser
esmeritada Levante ta herramienta de la
superficie antes de apagarla.
PRECAUClON: Permita a la herramienta
detenerse antes de ponerla a un lado.
INSTALACION DE DISCOS DE CENTRO
HUNDIDO (FIG. 3, 4, 5, 6)
ague y desenchufe ta herramienta
PRECAUCION: Nunca use ningQn
disco de esmeritado sin el protector adecuado
1)AsegQrese que el protector este bien
puesto Coloque ta arandela interior (1)
en el eje (2) como se muestra (Fig 3)
AsegQrese que este ubicado sobre
ambas superficies planas
SOBRECARGA
La sobrecarga causara dafios al motor de
su esmeritadora angular. Esto puede
suceder si su esmeritadora angular es
sujeta a uso pesado durante periodos
largos de tiempo. Bajo ninguna circunstancia
intente ejercer demasiada presi6n sobre
su esmeritadora angular con el prop6sito
de acelerar su trabajo. Los accesorios
que son abrasivos operan con mayor
eficiencia cuando se ejerce una presi6n
ligera, asi evitando ta disminuci6n de ta
velocidad de su esmeriladora angular.
1
2 )Coloque el disco de esmeritado (1 en
el eje (2) y ta arandela interior (3)
como se muestra (Fig 4)
INSTALACION DEL PROTECTOR DEL
DISCO (FIG. 2)
Apague y desenchufe la herramienta
NUNCA ESIMIERILE O ESCOBILLE SI EL
PROTECTOR NO ESTA EN SU SITIO.
• Coloque ta esmeritadora angular sobre
una mesa con el eje (1) hacia arriba
• Coloque ta arandela del resorte (2) sobre
el eje y ubiquelo sobre el borde (3)
• Coloque el protector en la herramienta
como se muestra
• Coloque ta arandela (4) sobre el eje con
las protuberancias mirando hacia el
protector AsegQrese que los tornitlos (5)
esten ajustados y que el protector (6)
pueda ser rotado
0
15
3.)Coloque ta arandela exterior roscada
(4) asegurandose que este mirando
en direcci6n correcta para el tipo de
disco instalado. Para discos de
esmeritado gruesos (Fig. 5), la arandela
(4) se instala con la parte elevada
mirando hacia el disco. Para discos de
esmeritado finos, la arandela (4) se
instala con la parte interior mirando en
direcci6n opuesta al disco.
para escobillar con escobillas metalicas
ptanas.
ESMERILADO
DE BORDES
El esmeritado de bordes puede hacerse
con discos de centro hundido Tipo 27,
diseSados especificamente con este
prop6sito. Estos discos se encuentran
disponibles localmente. No deben ser
sujetos a presi6n lateral.
-& PRECAUCION: Los discos utitizados
para el esmerilado de bordes pueden
romperse si se doblan o tuercen
mientras son usados para trabajo de
corte o esmeritado profundo. Para
reducir el riesgo de tesiones graves,
restrinja el uso de estos discos a cortes
poco profundos y muescas (menores a
13 mm (1/2 pulg.) de profundidad). El
lado abierto del protector debe estar
puesto en direcci6n opuesta al operador.
4.)Presione el bot6n de bloqueo del eje y
gire el eje hasta que se bloquee. Con el
bot6n de bloqueo presionado, ajuste ta
arandela exterior con la ltave inglesa
como to muestra la Fig. 6. Los discos
con cubo no requieren arandelas de
montaje y pueden ser ajustados con
llaves estandar.
REMOCION DEL PROTECTOR
DISCO (FIG. 7 PARA LIJADO)
Apague y desenchufe
DEL
la herramienta.
NOTA: Para evitar perder el control, no
deje la herramienta a un lado hasta que
el accesorio no haya dejado de girar
totalmente.
0
Como to muestra la Fig. 7, coloque ta
esmeriladora sobre una mesa, con el eje
hacia arriba. Use un atornittador para
quitar los 3 tornittos (1). Quite la pestaSa
(2), el protector (3) y ta arandela del
resorte (4). Atmacene estas piezas con
mucho cuidado.
5.)Cuando use un disco con centro
hundido, sostenga la herramienta de
modo que exista un angulo de
aproximadamente 30° entre el disco y
el material de trabajo.
AADVERTENCIA:
Revise ta velocidad
nominal del disco de centro hundido.
Nunca use un disco que tenga una
velocidad nominal menor que ta de la
placa nominal de ta herramienta.
Nota: Los discos de tijado con aletas
son considerados como discos de
esmeritado y deben ser usados con los
protectores.
INSTALACION DE ESCOBILLAS
METALICAS
Las escobitlas metalicas encopadas se
atornitlan directamente en el eje de la
maquina sin necesidad de utitizar
pestaSas. Cuando use escobiltas
metaticas, insertelas en el eje firmemente
con la mano. El protector se puede sacar
16
PRECAUCIONES
LIJE PINTURA
A TOMAR CUANDO
Figura 8. La Figura 8A muestra c6mo
instalar un disco abrasivo con una
almohadilla de respaldo de goma.
1. El tijado de pinturas con base de
plomo NO SE RECOMIENDA debido a
la dificultad de control del polvo
contaminado. El envenenamiento por
plomo es mas peligroso para nifios y
mujeres embarazadas.
2. Ya que es dificit identificar si una
pintura contiene plomo o no, sin antes
hacer un anatisis quimico, te
recomendamos que se tomen las
siguientes precauciones cuando lije
cualquier pintura:
SEGURIDAD PERSONAL
0
1. Ningt_n nifio o mujer embarazada
deberia entrar al area de trabajo donde
se esta tijando ta pintura hasta que se
termine de limpiar el area.
2. Toda persona que entre al area de
trabajo debe usar una mascara
antipolvo o respirador. El fittro deberia
ser reemplazado a diario o cuando el
usuario tenga dificultades para respirar.
NOTA: Solo se deberian utilizar
aquellas mascaras antipolvo
adecuadas para el trabajo con
polvo y gases de pinturas de
plomo. Las mascaras regulares
para pintar no ofrecen esta
protection.
Visite su distribuidor
de
ferreteria local para obtener la
mascara NIOSH correcta.
SEGURIDAD MEDIOAMBIENTAL
3.
Ajuste el disco abrasivo como to
muestra la Figura 9, presionando el
bot6n de bloqueo del eje y girando el
disco abrasivo a mano.
1.
La pintura debe ser quitada de tal
manera que se minimice la cantidad
de polvo generada.
2. Aquellas areas en las que se esta
quitando pintura deberian ser seltadas
con laminas de plastico de 4 mm de
grosor.
3. El lijado deberia hacerse de modo que
se reduzca la cantidad de polvo de
pintura que se lleve afuera.
INSTALACION DE DISCOS ABRASIVOS
Apague y desenchufe la herramienta.
Use un disco abrasivo con una
almohaditta de respaldo cuando lije
con su esmeriladora angular.
1. Quite el protector.
2. Cotoque ta pestafia (ta almohadilla de
respaldo y el disco abrasivo se
venden por separado) y ta pestafia
exterior en el eje, como 1o muestra la
PARA USAR LA ESMERILADORA
-4,ADVERTENCIA: Utilice siempre
proteccion ocular cuando opere esta
maquina herramienta.
• Sostenga la esmeritadora angular con
una mano en el cuerpo y ta otra
firmemente agarrada del mango lateral,
como 1o muestra la Figura 10.
17
• Coloque
siempre
elprotector
demodo
quetamayor
parteposible
deldisco
expuesto
quedeapuntando
en
direcci6n
opuesta
a usted.
• Estepreparado
paralaltuviade
chispas
quesegenerara
cuando
el
discotoqueelmetal.
• Ejerza
unapresi6n
ligerasobrelos
discos
abrasivos
paraunaoperaci6n
eficiente.
Siempuja
demasiado,
disminuira
lavelocidad
locualpodria
resultar
ensobrecarga
ydafiodelmotor.
• Usecautela
cuando
trabaje
en
esquinas
yaqueelcontacto
conla
superficie
intersectada
podriahacer
quetaesmeritadora
salteo setuerza.
• Paracontrolar
mejortaherramienta,
quitarmejorelmaterial
yminimizar
la
sobrecarga,
mantenga
unangulo
entre
eldiscoy lasuperficie
detrabajo(Fig.
11y 12)deaproximadamente
30°
cuando
esmerile
y 10°-15
°cuando
lije.
O
hif-'1_ ii3_lhill3_il_i
,_
LIMPIEZA
Como procedimiento de mantenimiento
necesario, limpie el polvo y la arenitta
acumulada en la caja protectora del motor
con aire comprimido.
PRECAUCION: El polvo y ta arenitla
provenientes del esmerilado de metal
18
generalmente se acumulan en las
superficies interiores y pueden crear
peligro de choque electrico si no se
limpian.
Use s6to un jab6n suave y patio hL_medo
par timpiar el exterior de ta herramienta..
Jamas permita que te entre tiquido a la
herramienta; nunca sumerja ninguna
parte de ta herramienta.
IMPORTANTE: Las reparaciones, el
mantenimiento y los ajustes deberan ser
realizados por Centros de Servicio Sears
para garantizar ta SEGURIDAD y
FIABILIDAD del producto.
LUBRICACION
Las herramientas Sears Craftsman vienen
debidamente tubricadas de fabrica y estan
listas para usarse. Las herramientas
deben lubricarse en forma regular, todos
los afios, dependiendo del uso. (Aquellas
herramientas utitizadas para trabajos
pesados o expuestas a calor podrian
requerir una lubricaci6n mas frecuente.)
Esta lubricaci6n deberia s61oser intentada
por especialistas capacitados en la
reparaci6n de herramientas como los que
encontrara en los Centros de Servicio
Sears o en otras organizaciones de
servicio calificadas.
ACCESORIOS
Use s6to accesorios Craftsman con su
herramienta. Podra comprar estos
accesorios en su tienda Sears o Centro
de Servicio Sears local.
_, ATENCION: El uso de accesorios no
vendidos por Sears puede ser peligroso y
causar lesiones o dafios a la herramienta.
Your Home
For repair - in your home - of all major brand appliances,
lawn and garden equipment, or heating and cooling systems,
no matter who made it, no matter who sold it!
For the replacement parts, accessories and
owneris manuals that you need to do-it-yourself.
For Sears professional installation of home appliances
and items like garage door openers and water heaters.
1-800-4-MY-HOME
®
Anytime,
(1-800-469-4663)
day or night
(U.S.A. and Canada)
www.sears.com
www.sears.ca
Our Home
For repair of carry-in products like vacuums, lawn equipment,
and electronics, call or go on-line for the nearest
Sears Parts and Repair Center.
1-800-488-1222
Anytime,
day or night (U.S.A. only)
www.sears.com
To purchase a protection agreement (U.S.A.)
or maintenance agreement (Canada) on a product serviced by Sears:
1-800-361-6665
Para pedir servicio de reparaci6n
a domicilio, y para ordenar piezas:
1-888-SU-HOGAR su
(Canada)
Au Canada pour service en fran£ais:
1-800-LE-FOYER Mc
(1-800-533-6937)
www.sears.ca
(1-888-784-6427)
SEAR
© Sears, Roebuck and Co.
® Registered
Trademark
/ TMTrademark
/ SMService
Mark of Sears, Roebuck
and Co.
® Marca Registrada / TMMarca de Fabrica / SM Marca de Servicio de Sears, Roebuck
MC Marque de commerce / MD Marque depos6e de Sears, Roebuck and Co.
19
and Co.
20