1
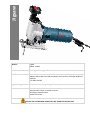
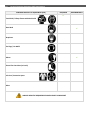
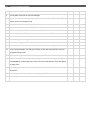
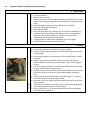
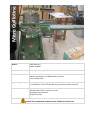
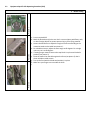
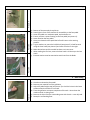
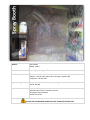
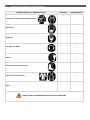
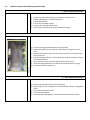
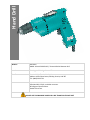
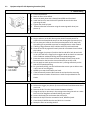
Studio Equipment Safe Operating Procedures Drawing and Painting Studio Office of Safety & Risk Management Rosalie Sharpe Pavilion 115 McCaul Room 2210 ------------------------- This page intentionally left blank --------------------------- Jigsaw Machine Jigsaw Model: 1584VS Location Drawing and Painting – 475 Manufacturer Name: Bosch Address: Robert Bosch Limited, Broadwater Park, Denham, Uxbridge, Middlesex, UB9 5HJ Tel: 0844 7360107 Applicable Legislation CAN/CSA-Z432-04 Safeguarding of Machinery Sources Manufacturer’s Manual Safe Work BC, CCOHS, and IAPA resources REA Engineer Specifications Studio Technicians DO NOT USE THIS MACHINE UNLESS YOU ARE TRAINED IN ITS SAFE USE! 1.0 Personal Protective Equipment (PPE) Requirements PERSONAL PROTECTIVE EQUIPMENT (PPE) REQUIRED RECOMMENDED ✔ Face Shield / Safety Glasses with side shields Dust Mask ✔ Respirator ✔ Ear Plugs / Ear Muffs Gloves ✔ ✔ Closed-Toe Foot Wear (no heels) Lab Coat / Protective Apron Other ALWAYS WEAR THE REQUIRED PPE WHEN USING THIS MACHINE! 2.0 Pre-use Inspection Checklist Check 1 Are the power cords free of frays and damage? 2 Do you know where the emergency stop feature is located (button/switch/cord)? Plug may be used as an emergency stop. 3 Is the saw secure with no loose parts? 4 Is the area around the saw free of slip/trip hazards? 5 Are flammable/combustible materials removed from the immediate work area? 6 Has the debris/material from previous operations been removed? 7 Are all tools/wrenches removed from the worktable? 8 Are all bolts/adjustments tight? 9 Is the tool foot in good condition? 10 Is the blade free of defects and dullness and centered between the guides? 11 Are you using the proper size and type of blade, stroke rate and pendulum action for the material being used? 12 Are the guides in good condition and properly adjusted? 13 Does the work piece have a flat surface facing down, or a suitable support is being used? Do not carry out plunge cuts or other cuts where the tool base is not flat against the work piece. 14 Is there proper clearance beneath the work piece do that the blade will not strike the workbench? 15 Is the work piece free from nails or other foreign objects? Comments/Corrective Action: Y N N/A 3.0 Safe Operating Procedure (SOP) This procedure is outlined as follows: General Safety Guidelines Equipment Specific Safety Operating Procedure 3.1 General Safety Guidelines Before using the machine, perform the following general safety checks: a) Notify the studio technician/class assistant or faculty that you are operating this machine. b) Make sure you understand all of the instructional material and/or faculty and technician instruction before operating this equipment. Failure to follow safety instruction and warnings may result in serious personal injury, fire or property damage. c) If you have any questions or uncertainties, please ask your studio technician before use. d) Long hair, scarves, loose clothing, jewellery and ties pose an entanglement hazard. Please make sure these are all constrained prior to operating the equipment. e) Make sure the cord is kept away from heat, oil, sharp edges or moving parts and does not pose a trip hazard. f) Do not conduct any maintenance or repairs on this equipment. In case of a defect, contact your technician. g) Ensure you know where the emergency stops for your equipment are prior to use and within reach during operation. In the absence of an emergency stop, ensure that the power switch is within reach. h) Ensure the work area is both well lit and organized. i) Never operate under the influence of drugs, alcohol or medication. Equipment Specific Safe Operating Procedure (SOP) 1. Before sawing a) Put on required PPE. b) Mark the areas to be cut. c) Preselect the stroke rate using the thumbwheel, the pendulum action and d) e) f) g) h) i) the air stream using the adjustment levers (depends on the material being used). Keep the pendulum action off when working on thin materials. Select the cutting angle adjustment. Select the base plate. Secure the work piece with a clamp or vise as close to the workbench as possible but not close enough for the blade to come in contact with the work bench. Do not work freehand. It is unsafe to cut wood that is unsupported and should never be attempted. If cutting widths of under 150mm repeatedly, use a fence/guide. Place the power cord out of the way of the tool. 2. Sawing Picture 1 3.2 a) There is always danger of kickback when using the jigsaw. b) Extreme caution must be exercised to avoid laceration and other hazards from the blade. c) Ensure that the blade is not contacting the work piece before the switch is turned on. d) Hold the jigsaw with both hands for maximum control and minimum vibration-operate the tool only when hand held – never leave the jigsaw running. e) Turn on the jigsaw and allow it to reach full speed-keep hands as far away from the saw as possible to prevent injury. f) Apply the entire surface of the base plate uniformly against the work piece (see picture 2)-failure to do so may cause blade breakage, resulting in injury. g) Gently move the tool forward along the marked cutting line - maintain a consistent feed rate, without forcing the blade. h) Be careful of pieces of wood falling from the work piece which cause a slip and trip hazard. i) If cutting curves, advance the tool very slowly, without twisting the blade. j) If the material gets jammed, turn off the machine. k) Once the work piece is cut, follow through and do not pull out the blade too quickly from the material. 3. After Sawing a) Turn off the jigsaw but do not place it down until it has come to a complete stop (danger of backlash). b) Disconnect the saw when not in use. c) Don’t touch the blade or work piece immediately; they may be extremely hot, resulting in burns. d) Remove the chips from the surrounding area with a brush-NEVER by hand. e) Clean the saw-use a rag to clean the blade-careful that the cloth does not hook on the teeth-NEVER clean while in motion. f) Sweep the floor surrounding the saw and ensure to remove any slip, trip hazards created by the debris. 4.0 Maintenance and Repair 4.1 Inspection Checklist DAILY Ensure that the power cords are free of frays and damage. Ensure that the saw is secure with no loose parts. Ensure that all bolts/adjustments are tight. Ensure that the tool foot is in good condition. Ensure that the blade and teeth are free of defects and dullness and centered between the guides-replace if necessary-use gloves. Ensure the guides are in good condition and properly adjusted. Ensure that the power cords are free of frays and damage. WEEKLY Check the carbon brushes-replace if worn. Clean blades. MONTHLY Check the guide roller for wear and lubricate with a drop of oil. Replace if necessary after a long period. Clean the guides with a solvent and then lubricate. ANNUALLY Clean all plastic parts with a soft damp cloth. Clean out the ventilation slots. Inspect entire tool and perform maintenance as required. 5.0 Document Control Any changes or updates to this document must be recorded and maintained. Initially Created By: The Office of Safety and Risk Management Date: September 2011 Consultation: Studio Managers and Technicians Program Chairs and faculty Date: January-April 2013 April – May, 2013 Approval By: VPFA and VPA Date: September, 2013 Review and Revisions Made By: Changes Made(indicate sections): Revisions Approved By: Date Revised: Date of Approval: ✔ ✔ ✔ ✔ ------------------------- This page intentionally left blank --------------------------- Mitre Guillotine Machine Miter Guillotine Model: MORSO-F Location Drawing and Painting – 475 Manufacturer Name: Morso Dan-List Address: Haraldsvej 21, DK-8960 Randers, Denmark Tele: +45 8643 5155 Applicable Legislation 1. CAN/CSA-Z432-04 “Safeguarding of Machinery” 2. CSA Z460-05 “Control of hazardous energy-lockout and other methods” Sources Manufacturer’s Manual Safe Work BC, CCOHS, and IAPA resources REA Engineer Specifications Studio Technicians DO NOT USE THIS MACHINE UNLESS YOU ARE TRAINED IN ITS SAFE USE! 1.0 Personal Protective Equipment (PPE) Requirements PERSONAL PROTECTIVE EQUIPMENT (PPE) REQUIRED ✔ Face Shield / Safety Glasses with side shields Dust Mask Respirator Ear Plugs / Ear Muffs X Gloves ✔ Closed-Toe Foot Wear (no heels) X Lab Coat / Protective Apron Other ALWAYS WEAR THE REQUIRED PPE WHEN USING THIS MACHINE! RECOMMENDED 2.0 Pre-use Inspection Checklist Check 1 2 3 4 5 6 7 8 9 10 11 12 13 14 15 16 Y N N/A Are the safety guards for the knives and fence in place and in good working order? Is the Miter Guillotine secure? Is the area around the Guillotine free of slip/trip hazards? Are flammable/combustible materials removed from the immediate work area? Has the debris/material from previous operations been removed? Are all tools/wrenches removed from the Guillotine table? Are the blade knives sharpened? Is there a bucket/container for waste cuts? Does the work piece have a flat surface facing down? Does the foot pedal move freely? Is the depth of the cut determined? (Set this based on the depth of the material-adjust the height stop). Is the knife block at rear most position? Are the knives in the topmost position? Are the angle lever knobs in good working condition and not loose? Has the fence been adjusted to the required angle? (usually 45 degree) Is the rebate support height adjusted (adjust to the height and depth of the moulding rebate)? Comments/Corrective Action: 3.0 Safe Operating Procedure (SOP) This procedure is outlined as follows: General Safety Guidelines Equipment Specific Safety Operating Procedure 3.1 General Safety Guidelines Before using the machine, perform the following general safety checks: a) Make sure you understand all of the instructional material and/or faculty and technician instruction before operating this equipment. b) If you have any questions or uncertainties, please ask your studio technician before use. c) Long hair, scarves, loose clothing, jewellery and ties pose an entanglement hazard. Please make sure these are all constrained prior to operating the equipment. d) Do not conduct any maintenance or repairs on this equipment. In case of a defect, contact your technician. e) Do not remove or render machine guarding ineffective in any way. f) Ensure the work area is both well lit and organized. g) Never operate under the influence of drugs, alcohol or medication. Equipment Specific Safe Operating Procedure (SOP) Picture 1 1. Before cutting a) Put on required PPE b) Mark the desired area(s) to be cut. Don’t cut a work piece with flaws, nails, c) d) Picture 2 e) Picture 3 3.2 f) g) h) i) or other foreign objects-to prevent personal injury from flying material. Loosen the hand levers to adjust the angle of the fence according to the measuring scales on the table (see picture 1). For a double mitre cut, adjust the fence angle at 45 degrees. For a single mitre cut, set it to 90 degrees. If cutting longer materials ensure the stop block is in place and locked in position (see picture 2). Place the material on the table against the fence (see picture 3)- don’t place multiple moulds at once. Line up the mark with the blade and position it in place. Make sure your fingers are not under the knife. Picture 4 2. Cutting Beware of the extremely sharp knives. Stand right in front of the machine for accessibility to the foot pedal. Lower the pedal at a moderate speed, and make the cut. Ensure you have a secure footing on the foot pedal (see picture 4). Never stand on the foot pedal. Once you release the foot pedal the knife will return to the starting position. g) To give another cut, move the knife block (see picture 5) a little forward using the lever knob (see picture 6) and move it further to the right. h) Make desired cuts until the mould has been cut in two parts. i) When making the final cut, ensure the lever knob is all the way to the last notch. j) Extreme caution must be exercised to avoid cuts from the blade. Picture 6 Picture 5 a) b) c) d) e) f) Picture 7 3. After cutting a) Once done release the foot pedal. b) Remove your material form the guillotine. c) Adjust the pedal height stop (see picture 7) to lock the knives in the lower position when the machine is not used. d) Clean the guillotine area upon completion of the task - Never clean the machine while it is being used. e) Remove the chips from the surrounding area with a brush - never by hand. f) Sweep the surrounding floor. 4.0 Maintenance and Repair 4.1 Inspection Checklist DAILY Ensure that all guards are in place and in good working order. Ensure that the area around the guillotine is free of slip/trip hazards. Ensure that the debris/material from previous operations are removed. Ensure that all tools/wrenches are removed from the table. Ensure that the angle lever knob is in good working condition and not loose. Ensure that the foot pedal moves freely. Ensure that the blade is tracking in the correct position. Ensure that the table and fence are in good condition and stable. Ensure that the blade knives are free of defects and dullness-sharpen or replace if necessary. Ensure the angle lever knobs are in good working condition and not damaged. Remove waste from all the guides. WEEKLY Thoroughly clean the guillotine and remove the waste from the basket that holds the cuts. Clean and lubricate the knife block and slide frame. MONTHLY Clean the knife blades with WD40 sprayed onto a cloth. Wipe the knives in a downward action so that neither the cloth nor your fingers can come into contact with the cutting edge of the knives. ANNUALLY Check that all nuts, bolts, screws and other fixings are properly tightened. Inspect entire machine and perform maintenance as required. 5.0 Document Control Any changes or updates to this document must be recorded and maintained. Initially Created By: The Office of Safety and Risk Management Date: September 2011 Consultation: Studio Managers and Technicians Program Chairs and faculty Date: January-April 2013 April – May, 2013 Approval By: VPFA and VPA Date: September, 2013 Review and Revisions Made By: Changes Made(indicate sections): Revisions Approved By: Date Revised: Date of Approval: ✔ ✔ ✔ ✔ ------------------------- This page intentionally left blank --------------------------- Spray Booth Machine Spray Booth Model: FABF-5 Location Drawing and Painting – 475 Manufacturer Name: Paasche Address: 4311 N. Normandy Avenue, Chicago, IL 60634-1395 Telephone: 773-867-9191 Applicable Legislation Occupational Health and Safety Act and Regulations for Industrial Establishments (R.R.O. 851/90) Sources Manufacturer’s Manual Safe Work BC, CCOHS, and IAPA resources REA Engineer Specifications Studio Technicians DO NOT USE THIS MACHINE UNLESS YOU ARE TRAINED IN ITS SAFE USE! 1.0 Personal Protective Equipment (PPE) Requirements PERSONAL PROTECTIVE EQUIPMENT (PPE) REQUIRED RECOMMENDED ✔ Face Shield / Safety Glasses with side shields Dust Mask Respirator ✔ Ear Plugs / Ear Muffs ✔ Gloves ✔ ✔ Closed-Toe Foot Wear (no heels) Lab Coat / Protective Apron Other ALWAYS WEAR THE REQUIRED PPE WHEN USING THIS MACHINE! ✔ 2.0 Pre-use Inspection Checklist Check 1 Is the ventilation system turned on? 2 Is the spray booth area free of slip/trip hazards? 3 Are flammable/combustible materials removed from the spray booth? 4 Has the debris/material from previous operations been removed? 5 Are the spraying materials (paints, primers, sealers, and other coatings) ready for use? 6 Is the spray booth free from electrical equipment, switches, lights, or other devices? Y N N/A Comments/Corrective Action: 3.0 Safe Operating Procedure (SOP) This procedure is outlined as follows: General Safety Guidelines Equipment Specific Safety Operating Procedure 3.1 General Safety Guidelines Before using the machine, perform the following general safety checks: a) Make sure you understand all of the instructional material and/or faculty and technician instruction for the chemicals being used. Failure to follow safety instruction and warnings may result in serious personal injury, fire or property damage. b) If you have any questions or uncertainties, please ask your studio technician before use. c) Make sure any sort of electrical equipment and power cords are kept away from the spray booth. d) Do not conduct any maintenance or repairs on the spray booth. In case of a defect, contact your technician. e) Ensure the work area is both well lit and organized. f) Never operate under the influence of drugs, alcohol or medication Equipment Specific Safe Operating Procedure (SOP) 1. Before using the spray booth a) b) c) d) e) f) Have the spraying material (spray cans/airbrush) ready for use. Read the MSDS for the chemical being used. Put on required PPE Turn on the ventilation system. Prepare your material to be sprayed. Use the spray booth only for spray painting and coating. 2. Using the spray booth a) All spray painting should be done in the spray booth. b) Place your material to be sprayed on a table, floor or hang them on the wall. c) Distance yourself from the work- do not place your face or hand(s) in front of the spray mist. d) Hold the spraying material in your hand and spray the work material from a comfortable distance. e) Spray downward onto your work and not up and away from it. f) Leave the sprayed material in the booth for several minutes for drying. g) Leave the ventilation system on. Picture 1 3.2 3. After using the spray booth a) Remove sprayed material from the spray booth. b) Place the spray cans in appropriate area (flammable cabinet or designated shelf). c) Turn off the ventilation system. d) Tidy up the spray booth. e) Practice proper hand hygiene- wash hands with water-based cleanser. 4.0 Maintenance and Repair 4.1 Inspection Checklist DAILY Ensure the spray booth area is free of slip/trip hazards. Ensure flammable/combustible materials are removed from the spray booth. Inspect the spray booth and do maintenance work. Ensure debris/material have been removed after each use. Ensure the spraying materials (paints, primers, sealers, and other coatings) are stored on the designated shelf or flammable cabinet. Ensure the spray booth is kept free from electrical equipment, switches, lights, or other devices. Ensure spark-producing equipment are kept away from the spray booth. Ensure flammable materials (paints, thinners) are properly stored. Maintain regular cleaning of the filters. Inspect the filtration system-ensure the air efficiently removes overspray particles and mist from exhaust air. Ensure the ventilation system is in excellent working condition (check the air vents and fan blade). WEEKLY Clean the exhaust fan and sprinkler heads. Ensure fire prevention equipment is kept near by the spray booth and maintained. Inspect the lights. Ensure lights are placed in a light fixture or outside the booth. MONTHLY Ensure the spraying material (ex. Spray cans, spray guns) are properly maintained. Ensure filters are changed once a month or as needed. Inspect the fume hoods for proper airflow. ANNUALLY Clean spray booth; remove paint from the walls of the booth. Replace ceiling filters when necessary (when replacing filters wear appropriate personal protective equipment-respirator, gloves, protective apron). Ensure proper disposing procedures are followed when disposing filters. 5.0 Document Control Any changes or updates to this document must be recorded and maintained. Initially Created By: The Office of Safety and Risk Management Date: September 2011 Consultation: Studio Managers and Technicians Program Chairs and faculty Date: January-April 2013 April – May, 2013 Approval By: VPFA and VPA Date: September, 2013 Review and Revisions Made By: Changes Made(indicate sections): Revisions Approved By: Date Revised: Date of Approval: ✔ ✔ ✔ ✔ ------------------------- This page intentionally left blank --------------------------- Hand Drill Machine Hand Drill Model: 10mm 6510LVR Drill / 13mm NHP1310 Hammer Drill Location Drawing and Painting – Room 475 Manufacturer Name: Makita Electric Works, Ltd. Address: 1950 Forbes Street, Whitby, Ontario, L1N 7B7 Tel: 1(800) 263-3734 Sources Manufacturer’s Manual Safe Work BC, CCOHS, and IAPA resources REA Engineer Specifications Studio Technicians DO NOT USE THIS MACHINE UNLESS YOU ARE TRAINED IN ITS SAFE USE! 1.0 Personal Protective Equipment (PPE) Requirements PERSONAL PROTECTIVE EQUIPMENT (PPE) REQUIRED RECOMMENDED ✔ Face Shield / Safety Glasses with side shields Dust Mask ✔ Respirator Ear Plugs / Ear Muffs ✔ Gloves ✔ Closed-Toe Foot Wear (no heels) Lab Coat / Protective Apron Other ALWAYS WEAR THE REQUIRED PPE WHEN USING THIS MACHINE! 2.0 Pre-use Inspection Checklist Check 1 Is the power cord free of frays and damage? 2 Is the drill secure with no loose parts? 3 Is the work area free of slip/trip hazards? 4 Are flammable/combustible materials removed from the immediate work area? 5 Has the debris/material from previous operations been removed? 6 Are all tools/wrenches removed from the work area? 7 Are the drill, chuck and bit free from cracks and defects? 8 Are all screws securely tightened? 9 Are you aware of the direction of rotation? 10 Is the work piece free from nails, wires or other foreign objects? (the drill may be thrown and hit someone or the tool can react dangerously, resulting in injury). If using a hammer drill, have you selected the ‘action mode’? (to safely drill different types of materials). If using a hammer drill, have you selected the speed setting? 11 12 Y N N/A Comments/Corrective Action: 3.0 Safe Operating Procedure (SOP) This procedure is outlined as follows: General Safety Guidelines Equipment Specific Safety Operating Procedure 3.1 General Safety Guidelines Before using the machine, perform the following general safety checks: a) Make sure you understand all of the instructional material before operating this equipment. Failure to follow safety instruction and warnings may result in serious personal injury, fire or property damage. b) If you have any questions or uncertainties, please ask your studio technician before use. c) Long hair, scarves, loose clothing, jewellery and ties pose an entanglement hazard. Please make sure these are all constrained prior to operating the equipment. d) Do not conduct any maintenance or repairs on this equipment. In case of a defect, contact your technician. e) Ensure the work area is both well-lit and organized. f) Never operate under the influence of drugs, alcohol or medication. Equipment Specific Safe Operating Procedure (SOP) 1. Before Drilling Put on required PPE. Mark the areas to be drilled. Secure the work piece with a clamp/vise-NEVER work free hand. Install the bit as far into the chuck as possible-do not do this when operating the tool. e) Tighten the chuck by hand. f) Select the direction of rotation using the reversing switch lever (see picture 1). Picture 1 a) b) c) d) 2. Drilling Picture 2 3.2 a) Plug in and turn on the drill-Do not point the drill toward yourself or anyone else and keep hands away from the rotating bit, to prevent injury. b) Do not place your hands on the work piece-keep them as far away from the rotating bit as possible to prevent an entanglement or other hazard. c) If drilling a large diameter hole, hold the tool firmly with both hands. d) Place the tool firmly against the work piece-do not actuate the tool unless this is done. e) Pull the trigger (see picture 2) to drive the bit and drill a hole-do not hold or carry the tool with a finger on the trigger and do not hand it to someone in this condition-accidental drilling can be extremely dangerous. f) Exert care when the drill starts to break through the work piece as the force exerted on the bit at the time could cause you to slip or fall. g) Do not apply too much pressure on the tool - pressing excessively on the tool will not speed up drilling. h) For continuous drilling, use the lock button but ensure you are able to turn it off in case of an emergency. i) NEVER try to stop the drill with your hand. j) If the bit becomes jammed, disconnect the tool and set the reversing switch to reverse rotation to back it out. Hold it firmly and back bit out slowly. 3. After Drilling a) Release the trigger (see picture 3) to turn off the drill and disconnect when not in use. b) Remove the bit. Turn the chuck counterclockwise to loosen. c) Hang the tool up or put away in dry storage-never hang the tool on a waist belt or the like-dangerous accidental drilling may result. d) Loosen the clamp/vise and remove the work piece. e) Remove the chips from the area with a brush, NEVER by hand. f) Clean the drill. NEVER clean the tool while it is in motion. g) Sweep the floor surrounding the drill. 4.0 Maintenance and Repair 4.1 Inspection Checklist DAILY ✔ Ensure that the power cord is free of frays and damage. Ensure that the drill is secure with no loose parts. Ensure that the drill, chuck and bit are free from cracks and defects. Ensure that all screws are securely tightened. Tighten if required. WEEKLY ✔ Clean all drill parts. MONTHLY ✔ Lubricate moving parts to prevent rusting and minimize friction related wear. ANNUALLY ✔ Inspect entire machine and perform maintenance as required. 5.0 Document Control Any changes or updates to this document must be recorded and maintained. Initially Created By: The Office of Safety and Risk Management Date: September 2011 Consultation: Studio Managers and Technicians Program Chairs and faculty Date: January-April 2013 April – May, 2013 Approval By: VPFA and VPA Date: September, 2013 Review and Revisions Made By: Changes Made(indicate sections): Revisions Approved By: Date Revised: Date of Approval: ------------------------- This page intentionally left blank ---------------------------