1
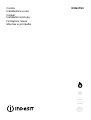
Cucina
Installazione e uso
Cooker
Installation and use
Ãîòâàðñêà ïå÷êà
Ìîíòàæ è óïîòðåáà
K3G21S/I
Cucina con forno gas e grill elettrico
Istruzioni per l’installazione e l’uso
3
Cooker with gas oven and electric grill
Instructions for installation and use
13
Ãîòâàðñêà ïå÷êà ñ ãàçîâà ôóðíà è åëåòðè÷åñêè ãðèë
Èíñòðóêöèè çà ìîíòàæ è óïîòðåáà
23
Avvertenze
Per garantire l’efficienza e la sicurezza di questo elettrodomestico:
• rivolgetevi esclusivamente a centri di assistenza tecnica autorizzati
• richiedete sempre l’utilizzo di parti di ricambio originali
1
2
3
4
5
6
7
8
9
10
11
12
13
Queste istruzioni sono valide solo per i paesi di destinazione i cui simboli figurano sul libretto e sulla targa matricola dell’apparecchio.
Questo apparecchio è stato concepito per un uso di tipo
non professionale all’interno di abitazione.
Questo libretto riguarda un apparecchio di classe 1 (isolato) o classe 2 - sottoclasse 1 (incassato tra 2 mobili).
Prima di utilizzare l’apparecchio, leggere attentamente
le avvertenze contenute nel presente libretto in quanto
forniscono importanti indicazioni riguardanti la sicurezza di installazione, d’uso e di manutenzione. Conservare con cura questo libretto per ogni ulteriore consultazione.
Dopo aver tolto l’imballaggio assicurarsi dell’integrità dell’apparecchio. In caso di dubbio non utilizzare l’apparecchio e rivolgersi a personale professionalmente qualificato. Gli elementi dell’imballaggio (sacchetti in plastica, polistirolo espanso, chiodi, ecc.) non devono essere lasciati
alla portata dei bambini in quanto potenziali fonti di pericolo.
L’installazione deve essere effettuata secondo le istruzioni del costruttore da personale professionalmente qualificato. Una errata installazione può causare danni a persone, animali o cose, nei confronti dei quali il costruttore non
può essere considerato responsabile.
La sicurezza elettrica di questo apparecchio è assicurata
soltanto quando lo stesso è correttamente collegato ad un
efficiente impianto di messa a terra come previsto dalle
vigenti norme di sicurezza elettrica. E’ necessario verificare questo fondamentale requisito di sicurezza e, in caso di
dubbio, richiedere un controllo accurato dell’impianto da
parte di personale professionalmente qualificato. Il
costruttore non può essere considerato responsabile per
eventuali danni causati dalla mancanza di messa a terra
dell’impianto.
Prima di collegare l’apparecchio accertarsi che i dati di
targa siano rispondenti a quelli della rete di distribuzione
elettrica e gas.
Verificare che la portata elettrica dell’impianto e delle prese di corrente siano adeguate alla potenza massima dell’apparecchio indicata in targa. In caso di dubbio rivolgersi
ad una persona professionalmente qualificata.
All’installazione occorre prevedere un interruttore
omnipolare con distanza di apertura dei contatti uguale o
superiore a 3 mm.
In caso di incompatibilità tra la presa e la spina dell’apparecchio fare sostituire la presa con altra di tipo adatto da
personale professionalmente qualificato. Quest’ultimo, in
particolare, dovrà anche accertare che la sezione dei cavi
della presa sia idonea alla potenza assorbita dall’apparecchio. In generale è sconsigliabile l’uso di adattatori, prese multiple e/o prolunghe. Qualora il loro uso si rendesse
indispensabile è necessario utilizzare solamente adattatori semplici o multipli e prolunghe conformi alle vigenti
norme di sicurezza, facendo però attenzione a non superare il limite di portata in valore di corrente, marcato sull’adattatore semplice e sulle prolunghe, e quello di massima potenza marcato sull’adattatore multiplo.
Non lasciare l’apparecchio inutilmente inserito. Spegnere
l’interruttore generale dell’apparecchio quando lo stesso
non è utilizzato, e chiudere il rubinetto del gas.
Non ostruire le aperture o fessure di ventilazione o di
smaltimento calore.
14 Il cavo di alimentazione di questo apparecchio non deve
essere sostituito dall’utente. In caso di danneggiamento
del cavo, o per la sua sostituzione, rivolgersi esclusivamente ad un centro di assistenza tecnica autorizzato dal
costruttore.
15 Questo apparecchio dovrà essere destinato solo all’uso
per il quale è stato espressamente concepito. Ogni altro
uso (ad esempio: riscaldamento di ambienti) è da considerarsi improprio e quindi pericoloso. Il costruttore non
può essere considerato responsabile per eventuali danni
derivanti da usi impropri, erronei ed irragionevoli.
16 L’uso di un qualsiasi apparecchio elettrico comporta l’osservanza di alcune regole fondamentali. In particolare:
· non toccare l’apparecchio con mani o piedi bagnati o
umidi
· non usare l’apparecchio a piedi nudi
· non usare, se non con particolare cautela, prolunghe
· non tirare il cavo di alimentazione, o l’apparecchio stesso, per staccare la spina dalla presa di corrente.
· non lasciare esposto l’apparecchio ad agenti atmosferici (pioggia, sole, ecc.)
· non permettere che l’apparecchio sia usato dai bambini o da incapaci, senza sorveglianza
17 Prima di effettuare qualsiasi operazione di pulizia o di manutenzione, disinserire l’apparecchio dalla rete di alimentazione elettrica, o staccando la spina, o spegnendo l’interruttore dell’impianto.
18 Allorchè si decida di non utilizzare più di un apparecchio
di questo tipo, si raccomanda di renderlo inoperante tagliandone il cavo di alimentazione, dopo aver staccato la
spina dalla presa di corrente. Si raccomanda inoltre di rendere innocue quelle parti dell’apparecchio suscettibili di
costituire un pericolo, specialmente per i bambini che potrebbero servirsi dell’apparecchio fuori uso per i propri giochi.
19 Sui bruciatori non debbono essere poste pentole instabili
o deformate onde evitare incidenti per rovesciamento.
20 Non utilizzate liquidi infiammabili (alcool, benzina...) in vicinanza all’apparecchio mentre questo è in uso.
21 Usando piccoli elettrodomestici nelle vicinanze del piano
fate attenzione che il cavo di alimentazione non finisca su
parti calde
22 Controllare sempre che le manopole siano nella posizione “·”/“¡” quando l’apparecchio non è utilizzato.
23 Durante l’uso dell’apparecchio gli elementi riscaldanti e
alcune parti della porta forno diventano molto calde. Fare
attenzione a non toccarle e tenere i bambimi a distanza.
24 Gli apparecchi gas necessitano, per un corretto funzionamento, di un regolare ricambio d’aria. Accertarsi che
nella loro installazione siano rispettati i requisiti richiesti nel paragrafo relativo al “Posizionamento”.
25 Se la cucina viene posta su di un piedistallo, prendere
adeguati accorgimenti affinchè l’apparecchio non scivoli
dal piedistallo stesso.
26 Attenzione: non utilizzare mai il vano inferiore per il deposito di materiale infiammabile.
27 Il coperchio vetro (presente solo su alcuni modelli) può
frantumarsi nel caso si surriscaldi, quindi è necessario che
tutti i bruciatori o le eventuali piastre elettriche risultino
spente prima di chiudere il coperchio.
3
Istruzioni per l’installazione
d) I gas di petrolio liquefatti, più pesanti dell’aria, ristagnano verso il basso. Quindi i locali contenenti bidoni
di GPL debbono prevedere delle aperture verso l’esterno così da permettere l’evacuazione dal basso delle
eventuali fughe di gas. Pertanto i bidoni di GPL, siano
essi vuoti o parzialmente pieni, non debbono essere
installati o depositati in locali o vani a livello più basso
del suolo (cantinati, ecc.). É opportuno tenere nel locale solo il bidone in utilizzo, collocato in modo da non
essere soggetto all’azione diretta di sorgenti di calore
(forni, camini, stufe, ecc.) capaci di portarlo a temperature superiori ai 50°C.
Le istruzioni che seguono sono rivolte all’installatore qualificato affinchè compia le operazioni di installazione
regolazione e manutenzione tecnica nel modo più corretto
e secondo le norme in vigore.
Importante: qualsiasi intervento di regolazione, manutenzione etc. deve essere eseguito con la cucina elettricamente disinserita.
Posizionamento
Importante: questo apparecchio può essere installato e
funzionare solo in locali permanentemente ventilati secondo
le prescrizioni delle Norme UNI-CIG 7129 e 7131 in vigore.
Debbono essere osservati i seguenti requisiti:
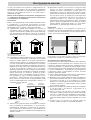
a) Il locale deve prevedere un sistema di scarico all’esterno dei fumi della combustione, realizzato tramite una
cappa o tramite un elettroventilatore che entri automaticamente in funzione ogni volta che si accende l’apparecchio.
In camino o in canna fumaria ramificata
Livellamento
Per poter livellare la cucina vengono forniti dei piedini di
regolazione. In caso di necessità questi piedini possono
essere avvitati nelle apposite sedi poste negli angoli alla
base della cucina.
Direttamente all’esterno
(riservata agli apparecchi di cottura)
Montaggio gambe (presente solo su alcuni modelli)
Vengono fornite delle gambe da montare ad incastro sotto
la base della cucina.
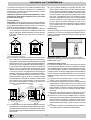
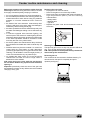
b) Il locale deve prevedere un sistema che consenta l’afflusso dell’aria necessaria alla regolare combustione.
La portata di aria necessaria alla combustione non deve
essere inferiore a 2 m3/h per kW di potenza installata. Il
sistema può essere realizzato prelevando direttamente l’aria dall’esterno dell’edificio tramite un condotto di
almeno 100 cm2 di sezione utile e tale che non possa
essere accidentalmente ostruito. Per gli apparecchi privi sul piano di lavoro, del dispositivo di sicurezza per
assenza di fiamma, le aperture di ventilazione debbono essere maggiorate nella misura del 100%, con un
minimo di 200cm2 (Fig. A). Ovvero, in maniera indiretta
da locali adiacenti, dotati di un condotto di ventilazione
con l’esterno come sopra descritto, e che non siano
parti comuni dell’immobile, o ambienti con pericolo di
incendio, o camere da letto (Fig. B).
Particolare A
Locale
adiacente
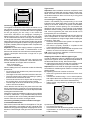
Installazione della cucina
E’ possibile l’installazione a fianco di mobili la cui altezza
non superi quella del piano di lavoro. La parete a contatto
con la parete posteriore della cucina deve essere in materiale ininfiammabile. Durante il funzionamento la parete
posteriore della cucina può raggiungere una temperatura
di 50°C superiore a quella ambiente. Per una corretta installazione della cucina vanno osservate le seguenti precauzioni:
a) L’apparecchio può essere posto in cucina, in sala da
pranzo o in un monolocale, ma non in bagno.
b) I mobili attorno all’apparecchio devono essere posti ad
almeno 200 mm dal top della cucina, nel caso in cui la
superficie dell’apparecchio si trovi più in alto del loro
piano di lavoro. Le tende non devono essere posizionate dietro la cucina o a meno di 200 mm dai lati dell’apparecchio.
c) Eventuali cappe devono essere installate secondo le
indicazioni contenute nel libretto di istruzioni cappe.
d) Allorché la cucina venga installata sotto un pensile,
quest’ultimo dovrà mantenere una distanza minima dal
piano di 420 mm (millimetri). La distanza minima a cui
possono essere posizionati mobili da cucina infiammabili direttamente sopra il piano di lavoro è di 700
mm.
e) La parete a contatto con la parete posteriore della cucina deve essere in materiale ininfiammabile.
Locale da
ventilare
A
Esempi di aperture di ventilazione
per l’aria comburente
Maggiorazione della fessura fra
porta e pavimento
Fig. A
Fig. B
c) Un utilizzo intensivo e prolungato dell’apparecchio può
necessitare di una aerazione supplementare per esempio l’apertura di una finestra o una aerazione più efficace aumentando la potenza di spirazione meccanica se
essa esiste.
4
Collegamento gas
Il collegamento dell’apparecchio alla tubazione o alla bombola del gas dovrà essere effettuato come prescritto dalle
Norme UNI-CIG 7129 e 7131, solo dopo essersi accertati
che esso è regolato per il tipo di gas con cui sarà alimentato. In caso contrario eseguire le operazioni indicate al
paragrafo “Adattamento ai diversi tipi di gas”. Su alcuni
modelli l’alimentazione del gas può avvenire indifferentemente da destra o da sinistra a seconda dei casi; per cambiare il collegamento è necessario invertire il portagomma
Allaccio con tubo flessibile in acciaio inossidabile a
parete continua con attacchi filettati
Eliminare il portagomma già presente sull’apparecchio. Il
raccordo di entrata del gas all’apparecchio è filettato 1/2
gas maschio cilindrico. Utilizzare esclusivamente tubi conformi alla Norma UNI-CIG 9891 e guarnizioni di tenuta conformi alle Norme Nazionali in vigore. La messa in opera di
tali tubi deve essere effettuata in modo che la loro lunghezza, in condizioni di massima estensione, non sia
maggiore di 2000 mm.
Controllo tenuta
Importante: ad installazione ultimata controllare la perfetta tenuta di tutti i raccordi utilizzando una soluzione
saponosa e mai una fiamma.
Ad allacciamento avvenuto assicurarsi che il tubo metallico flessibile non venga a contatto con parti mobili o schiacciato.
420 mm.
420 mm.
Min.
600 mm.
Min.
Min.
min. 650 mm. with hood
min. 700 mm. without hood
HOOD
Allacciamento del cavo di alimentazione alla rete
Montare sul cavo una spina normalizzata per il carico indicato sulla targhetta caratteristiche, nel caso di collegamento diretto alla rete è necessario interporre tra l’apparecchio e la rete un interruttore omnipolare con apertura
minima fra i contatti di 3 mm. dimensionato al carico e
rispondente alle norme in vigore (il filo di terra non deve
essere interrotto dall’interruttore). Il cavo di alimentazione
deve essere posizionato in modo che non raggiunga in
nessun punto una temperatura superiore di 50°C a quella
ambiente. Prima di effettuare l’allacciamento accertarsi
che:
• la valvola limitatrice e l’impianto domestico possano
sopportare il carico dell’apparecchiatura (vedi targhetta
caratteristiche);
• l’impianto di alimentazone sia munito di efficace collegamento a terra secondo le norme e le disposizioni di
legge;
• la presa o l’interruttore omnipolare siano facilmente
raggiungibili con il piano installato.
N.B: non utilizzare riduzioni, adattatori o derivatori in quanto
essi potrebbero provocare riscaldamenti o bruciature. La
spina e la presa devono essere facilmente accessibili.
con il tappo di chiusura e sostituire la guarnizione di tenuta (in dotazione con l’apparecchio). Nel caso di alimentazione con gas liquido, da bombola, utilizzare regolatori di
pressione conformi alle Norme Nazionali in vigore.
Importante: per un sicuro funzionamento, per un adeguato uso dell’energia e maggiore durata dell’apparecchiatura, assicurarsi che la pressione di alimentazione rispetti i
valori indicati nella tabella 1 “Caratteristiche dei bruciatori
ed ugelli”.
Allaccio con tubo flessibile
Eseguire il collegamento per mezzo di un tubo flessibile
per gas rispondente alle caratteristiche indicate nelle norme UNI-CIG 7140. Il diametro interno del tubo da utilizzare deve essere:
- 8mm per alimentazione con gas liquido;
- 13mm per alimentazione con gas metano.
In particolare, per la messa in opera di tali tubi flessibili,
debbono essere rispettate le seguenti prescrizioni:
• Non deve essere in nessun punto del suo percorso a
contatto con parti che siano a temperature maggiori di
50°C;
• Abbia una lunghezza inferiore a 1500 mm;
• Non sia soggetto ad alcun sforzo di trazione e di torsione, inoltre non deve presentare curve eccessivamente strette o strozzature;
• Non venga a contatto con corpi taglienti, spigoli vivi e
con parti mobili o schiacciato;
• Deve essere facilmente ispezionabile lungo tutto il percorso allo scopo di poter controllare il suo stato di conservazione;
Assicurarsi che il tubo sia ben calzato alle sue due estremità e fissarlo per mezzo di fascette di serraggio conformi
alla UNI-CIG 7141. Qualora una o più di queste condizioni
non possa essere rispettata, bisognerà ricorrere ai tubi
metallici flessibili, conformi alla norma UNI-CIG 9891.
Allorchè la cucina venga installata secondo le condizioni
della classe 2 sottoclasse 1 è opportuno collegarsi alla
rete gas solamente tramite tubo metallico flessibile conforme alla UNI-CIG 9891.
Adattamento del piano ai diversi tipi di gas
Per adattare la cucina ad un tipo di gas diverso da quello
per il quale essa è predisposta (indicato sulla etichetta
fissata al coperchio), occorre effettuare le seguenti operazioni:
a) Sostituire il portagomma già montato con quello contenuto nella confezione “accessori della cucina”.
Attenzione: Il portagomma per gas liquido porta
stampigliato il numero 8, quello per gas metano il numero
13). Avvalersi comunque di una guarnizione di tenuta nuova.
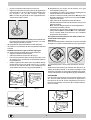
b) Sostituzione degli ugelli dei bruciatori del piano:
• togliere le griglie e sfilare i bruciatori dalle loro sedi;
• svitare gli ugelli, servendosi di una chiave a tubo da 7
mm, e sostituirli con quelli adatti al nuovo tipo di gas
(vedi tabella 1 “Caratteristiche dei bruciatori ed ugelli”).
• rimettere in posizione tutti i componenti seguendo le
operazioni inverse rispetto alla sequenza di cui sopra.
c) Regolazione minimi dei bruciatori del piano:
5
•
•
portare il rubinetto sulla posizione di minimo;
togliere la manopola ed agire sulla vite di regolazione
posta all’interno o di fianco all’astina del rubinetto fino
ad ottenere una piccola fiamma regolare.
N.B.: nel caso dei gas liquidi, la vite di regolazione dovrà essere avvitata a fondo.
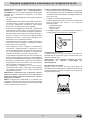
b) Regolazione del minimo del bruciatore forno gas
termostatato (vedi figura):
• accendere il bruciatore come descritto al paragrafo “la
manopola del forno” del libretto d’uso;
• portare la manopola sulla posizione di Min dopo aver
lasciato la stessa per 10 minuti circa in posizione Max.
• togliere la manopola;
• agire sulla vite di regolazione posta all’esterno
dell’astina del termostato fino ad ottenere una piccola
fiamma regolare;
N.B.: nel caso dei gas liquidi, la vite di regolazione
dovrà essere avvitata a fondo.
• verificare poi che ruotando rapidamente la manopola
dalla posizione Max a quella di Min o con rapide aperture e chiusure della porta del forno non si abbiano
spegnimenti del bruciatore.
Porre particolare attenzione ai cavi delle candele ed
ai tubi delle termocoppie.
Attenzione
Al termine dell’operazione sostituire la vecchia etichetta
di taratura con quella corrispondente al nuovo gas di utiliz-
•
verificare poi che ruotando rapidamente il rubinetto dalla posizione di massimo a quella di minimo, non si abbiano spegnimenti del bruciatore.
d) Regolazione aria primaria dei bruciatori del piano:
I bruciatori non necessitano di alcuna regolazione dell’aria
primaria.
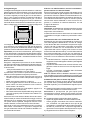
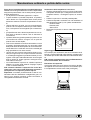
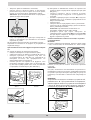
Adattamento del forno gas ai diversi tipi di gas
a) Sostituzione dell’ugello del bruciatore del forno:
• togliere il cassetto scaldavivande;
• sfilare la protezione scorrevole “A” (Fig.C);
• rimuovere il bruciatore del forno dopo aver tolto la vite
“V” (vedi Fig. D); L’ operazione viene facilitata togliendo
la porta del forno.
• svitare l’ugello del bruciatore forno servendosi dell’apposita chiave a tubo per ugelli (vedi Fig. E), o meglio
ancora di una chiave a tubo di 7 mm e sostituirlo con
quello adatto al nuovo tipo di gas (vedi tabella 1).
zo, reperibile presso i nostri Centri Assistenza Tecnica.
Nota
Qualora la pressione del gas utilizzato sia diversa (o variabile) da quella prevista, è necessario installare, sulla
tubazione d’ingresso un appropriato regolatore di pressione (secondo UNI-CIG 7430 “regolatori per gas canalizzati”).
V
ATTENZIONE
Per rimuovere la protezione scorrevole “A” svitare la vite
“S”. Alla fine delle operazioni rimontare la protezione e
bloccarla con la vite “S”. Prima di utilizzare il forno accertarsi che la protezione scorrevole “A” sia fissata nella posizione corretta.
A
Fig. C
Fig. D
S
Fig.E
A
6
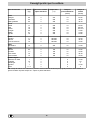
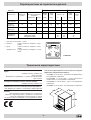
Caratteristiche dei bruciatori ed ugelli
Tabella 1
Bruciatore
Gas Liquido
Diametro
(mm)
Potenza termica
kW (p.c.s.*)
By-Pass
1/100
ugello
1/100
Gas Naturale
portata*
g/h
ugello portata*
1/100
l/h
Nomin.
Ridot.
(mm)
(mm)
***
**
(mm)
Rapido
(Grande)(R)
100
3.00
0.7
41
87
218
214
128
286
Semi Rapido
(Medio)(S)
75
1.90
0.4
30
70
138
136
104
181
Ausiliario
(Piccolo)(A)
51
1.00
0.4
30
52
73
71
76
95
-
3.10
1.0
46
85
225
221
132
295
28-30
20
35
37
25
45
Forno
Pressioni di
alimentazione
*
**
***
Nominale (mbar)
Minima (mbar)
Massima (mbar)
A 15°C e 1013 mbar- gas secco
Propano
P.C.S. = 50,37 MJ/Kg
Butano
P.C.S. = 49,47 MJ/Kg
Naturale
P.C.S. = 37,78 MJ/m3
20
17
25
K 3G21S/I
S S
R
A
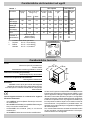
Caratteristiche tecniche
Forno:
Dimensioni (HxLxP): 34x39x44 cm
Volume: 58 litri
Assorbimento massimo grill elettrico: 2100 W
104
Dimensioni cassetto (ove presente) :
Dimensioni (HxLxP): 18x44x42cm
60
50
85/90
Tensione e frequenza di alimentazione:
vedi targhetta caratteristiche
Bruciatori:
adattabili a tutti i tipi di gas indicati nella targhetta
caratteristica situata all’interno della ribaltina oppure,
una volta aperto il cassetto scaldavivande, sulla parete
interna sinistra.
La Directive Européenne 2002/96/EC sur les Déchets des
Equipements Electriques et Electroniques (DEEE), exige
que les appareils ménagers usagés ne soient pas jetés
dans le flux normal des déchets municipaux. Les appareils
usagés doivent être collectés séparément afin d’optimiser
le taux de récupération et le recyclage des matériaux qui
les composent et réduire l’impact sur la santé humaine et
l’environnement. Le symbole de la ‘‘poubelle barrée’’ est
apposée sur tous les produits pour rappeler les obligations
de collecte séparée.
Les consommateurs devront contacter les autorités locales
ou leur revendeur concernant la démarche à suivre pour
l’enlèvement de leur vieil appareil.
7
Questa apparecchiatura è conforme alle seguenti
Direttive Comunitarie:
-
73/23/CEE del 19/02/73 (Bassa Tensione) e successive modificazioni;
89/336/CEE del 03/05/89 (Compatibilità Elettromagnetica) e successive modificazioni;
90/396/CEE del 29/06/90 (Gas) e successive
modificazioni;
93/68/CEE del 22/07/93 e successive modificazioni.
7
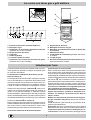
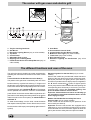
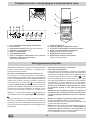
La cucina con forno gas e grill elettrico
J
A
B
C
E
D
K
G
F
A. Piano di contenimento eventuali trabocchi
B. Bruciatore a gas
C. Dispositivo di accensione istantanea elettronica
(presente solo su alcuni modelli)
D. Griglia del piano del lavoro
E. Cruscotto
F. Piedini regolabili
G. Leccarda o piatto di cottura
J. Dispositivo di sicurezza dei bruciatori del piano
(presente solo su alcuni modelli)
K. Griglia ripiano del forno
M. Manopola del forno e del grill
N. Manopole di comando dei bruciatori a gas del piano di cottura
O. Pulsante luce forno
P. La manopola del contaminuti (presente solo su alcuni modelli)
Q. La spia del grill
R. Accensione elettronica dei bruciatori del piano (presente solo su alcuni modelli)
Istruzioni per l’uso
La selezione delle varie funzioni presenti nella cucina avviene agendo sui dispositivi ed organi di comando posti
sul cruscotto dello stesso.
(presente solo su alcuni modelli)
Alcuni modelli sono dotati di accensione istantanea elettronica dei bruciatori a gas del piano di cottura: essi sono
riconoscibili per la presenza del dispositivo di accensione
(vedi dettaglio C). Questo dispositivo entra in funzione esercitando una leggera pressione sul pulsante “R” identificato
Le manopole di comando dei bruciatori a gas del
piano di cottura (N)
In corrispondenza di ciascuna delle manopole è indicata,
dal simbolo 1. Per accendere il bruciatore prescelto è
perciò sufficiente premere il pulsante “R” e contemporaneamente premere a fondo e ruotare in senso antiorario la
manopola corrispondente fino all’avvenuta accensione. Per
un’accensione immediata è consigliabile prima premere il pulsante poi ruotare la manopola.
Avvertenza: nel caso di una estinzione accidentale delle
fiamme del bruciatore, chiudere la manopola di comando e non ritentare l’accensione se non dopo almeno 1 minuto.
•
con un cerchietto pieno , la posizione del bruciatore a gas
da essa comandato. Per accendere uno dei bruciatori, avvicinare allo stesso una fiamma o un accenditore, premere
a fondo e ruotare la manopola corrispondente in senso
antiorario fino alla posizione di massimo E. Ciascun bruciatore può funzionare al massimo della sua potenza, al
minimo, o con potenze intermedie. In relazione a queste
diverse prestazioni, sulla manopola, oltre alla posizione di
•
spento, individuata dal simbolo quando questo è posto in
corrispondenza della tacca di riferimento, sono indicate le
Modelli con dispositivo di sicurezza contro fughe di
gas per i bruciatori del piano (presente solo su alcuni
modelli)
Potete identificare questi modelli per la presenza del dispositivo (Vedi dettaglio J).
Importante: dato che i bruciatori del piano sono dotati di
dispositivo di sicurezza, dopo l’accensione del bruciatore,è
necessario mantenere premuta la manopola per circa 6 secondi in modo da consentire il passaggio del gas
posizioni di massimo E e di minimo C.
Esse si ottengono facendo ruotare la manopola im senso
antiorario dalla posizione di spento. Per spegnere il bruciatore occorre invece ruotare la manopola in senso orario
•
fino all’arresto (corrispondente di nuovo al simbolo ).
Accensione elettronica dei bruciatori del piano
8
Il pulsante per l’accensione della luce del forno (O)
finchè non si scalda la termocoppia di sicurezza.
8
E’ quello individuato dal simbolo
e consente con
l’accensione della lampada all’interno del forno, di seguire
l’andamento della cottura senza aprire la porta.
Attenzione: Alla prima accensione consigliamo di far funzionare il forno a vuoto per circa mezz’ora con il termostato al massimo e a porta chiusa. Quindi trascorso tale
tempo spegnerlo, aprite la porta ed areare il locale. L’odore che talvolta si avverte durante questa operazione è
dovuto all’evaporazione delle sostanze usate per proteggere il forno durante l’intervallo di tempo che intercorre
tra la produzione e l’installazione del prodotto.
Il contaminuti (presente solo su alcuni modelli)
Per utilizzare il contaminuti occorre caricare la suoneria
ruotando la manopola “P”di un giro quasi completo in sen-
so orario 4; quindi, tornando indietro 5, impostare il
tempo desiderato facendo coincidere con il riferimento fisso del frontalino il numero corrispondente ai minuti prefissati.
Attenzione: Utilizzare il primo ripiano dal basso solamente
nel caso di cotture con grill. Per le altre cotture non utilizzate mai il primo ripiano dal basso e non appoggiate mai
oggetti sul fondo del forno mentre state cuocendo perchè
potreste causare danni allo smalto. Ponete sempre i Vostri
recipienti di cottura (pirofile, pellicole di alluminio, ecc. ecc.)
sulla griglia in dotazione con l’apparecchio appositamente
inserita nelle guide del forno.
La spia di funzionamento del grill (Q)
Risulta accesa quando sia stato messo in funzione un
qualsivoglia elemento elettrico riscaldante del forno.
Attenzione
Durante la cottura la porta del forno è calda, impedite che
i bambini vi si avvicinino.
La manopola del forno e del grill (M)
E’ il dispositivo che permette di selezionare le diverse funzioni del forno e di scegliere la temperatura di cottura più
idonea ai cibi da cuocere fra quelle indicate sulla manopola
stessa (comprese fra Min e Max).
Per accendere il bruciatore forno, avvicinare al foro “F” una
fiamma o un accenditore, contemporaneamente premere a
fondo e ruotare la manopola forno in senso antiorario fino alla
posizione Max.
Dato che la cucina è dotata di dispositivo di sicurezza è
necessario mantenere premuta la manopola per circa 6
secondi in modo da consentire il passaggio del gas.
La selezione della temperatura di cottura si ottiene facendo
corrispondere l’indicazione del valore desiderato con il riferimento posto sul cruscotto; la gamma completa delle temperature ottenibili è riportata qui sotto.
La temperatura impostata viene automaticamente raggiunta
e mantenuta costante dall’organo di controllo (il termostato)
comandato dalla manopola.
Consigli pratici per l’uso dei bruciatori
Al fine di ottenere il massimo rendimento è utile ricordare
quanto segue:
• utilizzare recipienti adeguati a ciascun bruciatore (vedere tabella) alfine di evitare che le fiamme fuoriescano
dal fondo dei recipienti.
• utilizzare solamente recipienti a fondo piatto.
• al momento dell’ebollizione ruotare la manopola fino
alla posizione di minimo.
• utilizzare sempre recipienti con coperchio.
Bruciatore
Avvertenza importante: nel caso di una estinzione accidentale delle fiamme dei bruciatori del forno, chiudere la manopola di comando del bruciatore e non riaccendere il bruciatore prima di un minuto.
Premendo a fondo e ruotando la manopola “M” fino alla posizione d si mette in funzione il grill a raggi infrarossi, che
permette la doratura dei cibi oltre ad essere consigliato per
la cottura di arrosti (braciole, salsicce, roast-beef).
•
140
145
150
•
160
180
•
200
220
Rapido (R)
24 – 26
Semi Rapido (S)
16 – 20
Ausiliario (A)
10 – 14
Vano inferiore (presente solo su alcuni modelli)
Sotto il forno è presente un vano che può essere utilizzato
per il deposito di accessori o casseruole. Per aprire lo sportello è necessario farlo ruotare verso il basso.
Attenzione: non utilizzare mai il vano per il deposito di
materiale infiammabile.
F
Min
ø Diametro recipienti (cm)
Max
250
9
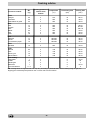
Consigli pratici per la cottura
Il forno mette a vostra disposizione una vasta gamma di
possibilità che consentono di cuocere ogni cibo nella maniera migliore. Con il tempo potrete sfruttare al meglio questo versatile apparecchio di cottura, pertanto le note riportate di seguito sono solamente delle indicazioni di massima che potrete ampliare con la vostra esperienza personale.
Cottura dei dolci
Nella cottura dei dolci infornate sempre a forno caldo, attendete la fine di preriscaldamento, (circa 10-15 minuti).
Le temperature sono normalmente nell’intorno di 160°C.
Non aprite la porta durante la cottura, per evitare un abbassamento del dolce. Gli impasti sbattuti non devono
essere troppo fluidi, per non prolungare troppo i tempi di
cottura. In generale:
Dolce troppo secco
Cottura del pesce e della carne
La carne deve pesare almeno 1 Kg. per evitare che si
asciughi troppo. Per le carni bianche, i volatili ed il pesce
utilizzate temperature basse (150°C-175°C). Per le carni
rosse che si vuole siano ben cotte all’esterno conservando all’interno il sugo, è bene iniziare con una temperatura
iniziale alta (200-220°C) per breve tempo, per poi diminuirla successivamente. In generale, più grosso è l’arrosto, più bassa dovrà essere la temperatura e più lungo il
tempo di cottura. Ponete la carne da cuocere al centro
della griglia ed inserite sotto la griglia la leccarda per raccogliere i grassi. Inserite la griglia in modo che il cibo si
trovi al centro del forno. Se volete più calore da sotto, utilizzate i ripiani più bassi. Per ottenere arrosti saporiti
bardate la carne con lardo o pancetta e posizionatela in
modo che sia nella parte superiore.
La prossima volta impostate una temperatura di10°C
superiore e riducete il tempo di cottura.
Dolce si abbassa
Usate meno liquido o abbassate la temperatura di 10°C.
Dolce scuro superiormente
Inseritelo ad altezza inferiore, impostate una
temperatura più bassa e prolungate la cottura.
Buona cottura esterna, ma interno colloso
Usate meno liquido, riducete la temperatura, aumentate
il tempo di cottura.
Utilizzo del grill
Importante: effettuare la cottura al grill con porta del
forno chiusa, ciò per ottenere unitamente ai migliori risultati un sensibile risparmio di energia (10% circa).
Nell’utilizzo delle funzioni grill disponete la griglia sugli
ultimi ripiani partendo dal basso (vedi tabella cottura)
dopodiché, per raccogliere i grassi ed evitare la formazione di fumo, disponete una leccarda nel primo ripiano dal
basso.
Dolce non si stacca dallo stampo
Ungete bene lo stampo e cospargetelo anche con un
pò di farina.
10
Manutenzione ordinaria e pulizia della cucina
Prima di ogni operazione disinserire elettricamente la
cucina. Per una lunga durata della cucina è indispensabile
eseguire frequentemente una accurata pulizia generale,
tenendo presente che:
• per la pulizia non utilizzare apparecchi a vapore
• le parti smaltate e i pannelli autopulenti, se presenti,
vanno lavate con acqua tiepida senza usare polveri
abrasive e sostanze corrosive che potrebbero rovinarle;
• l’interno del forno va pulito, con una certa frequenza,
quando è ancora tiepido usando acqua calda e detersivo, risciacquando ed asciugando poi accuratamente;
• gli spartifiamma vanno lavati frequentemente con acqua calda e detersivo avendo cura di eliminare le
incrostazioni;
• le piastre elettriche (quando presenti) si puliscono con
uno strofinaccio umido e si ungono con un pò d’olio
quando sono ancora tiepide;
• nelle cucine dotate di accensione automatica occorre
procedere frequentemente ad una accurata pulizia
della parte terminale dei dispositivi di accensione istantanea elettronica e verificare che i fori di uscita del gas
degli spartifiamma non siano ostruiti;
• l’acciaio inox può rimanere macchiato se rimane a contatto per lungo tempo con acqua fortemente calcarea
o con detergenti aggressivi (contenenti fosforo). Si consiglia di sciacquare abbondantemente ed asciugare
dopo la pulizia. E’ inoltre opportuno asciugare eventuali trabocchi d’acqua.
• nei modelli dotati di coperchio in cristallo la pulizia si
effettua con acqua calda evitando l’impiego di panni
ruvidi o sostanze abrasive.
N.B.: evitare di chiudere il coperchio fino a che i bruciatori gas sono ancora caldi. Eliminare eventuali liquidi presenti sul coperchio prima di aprirlo.
Importante: controllare periodicamente lo stato di conservazione del tubo flessibile di collegamento gas e sostituirlo non appena presenta qualche anomalia; è
consigliabile la sostituzione annuale.
Sostituzione della lampada nel vano forno
• Togliere l’alimentazione al forno tramite l’interruttore
omnipolare utilizzato per il collegamento del forno all’impianto elettrico, o scollegare la spina, se accessibile;
• Svitare il coperchio in vetro del portalampada;
• Svitare la lampada e sostituirla con una resistente ad
alta temperatura (300°C) con queste caratteristiche:
- Tensione 230V
- Potenza 25W
- Attacco E14
• Rimontare il coperchio in vetro e ridate alimentazione
al forno.
Ingrassaggio dei rubinetti
Con il tempo può verificarsi il caso di un rubinetto che si
blocchi o presenti difficoltà nella rotazione, pertanto sarà
necessario provvedere alla sostituzione del rubinetto stesso.
N.B.: Questa operazione deve essere effettuata da un
tecnico autorizzato dal costruttore.
Estrazione del coperchio
Il coperchio della cucina può essere rimosso per facilitarne la pulizia. Per rimuovere il coperchio, è necessario aprirlo completamente e tirare verso l’alto (vedi figura)
11
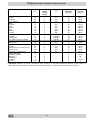
Consigli pratici per la cottura
Cibo da cucinare
Peso
(Kg)
Posizione cottura
ripiani dal basso
Temperatura
(°C)
Tempo di
preriscaldamento
(minuti)
Tempo di
cottura
(minuti)
Pasta
Lasagne
Cannelloni
Paste gratinate
2.5
2.5
2.5
3
3
3
210
200
200
10
10
10
60-75
40-50
40-50
Carne
Vitello
Pollo
Anatra
Coniglio
Maiale
Agnello
1.7
1.5
1.8
2.0
2.1
1.8
3
3
3
3
3
3
200
220
200
200
200
200
10
10
10
10
10
10
85-90
90-100
100-110
70-80
70-80
90-95
Pesce
Sgombri
Dentice
Trota al cartoccio
1.1
1.5
1.0
3
3
3
180-200
180-200
180-200
10
10
10
35-40
40-50
40-45
Pizza
Napoletana
1.0
3
220
15
15-20
Torte
Biscotti
Crostata
Torte salate
Torte lievitate
0.5
1.1
1.0
1.0
3
3
3
3
180
180
180
165
15
15
15
15
30-35
30-35
45-50
35-40
1
1,5
1
1
n.° 4
4
4
3
4
4
5
5
5
5
5
15-20
20
7
15-20
5
Cottura al grill
Bistecche di vitello
Cotolette
Hamburger
Sgombri
Toast
NB: i tempi di cottura sono indicativi e possono essere modificati in base ai propri gusti personali. Nelle cotture al
grill la leccarda va posta sempre al 1° ripiano a partire dal basso.
12
Important safety warnings
Important safety warnings
To maintain the EFFICIENCY and SAFETY of this appliance, we recommend:
• call only the Service Centers authorized by the manufacturer
1
2
3
4
5
6
7
8
9
10
11
12
13
14
• always use original Spare Parts
This appliance is intended for nonprofessional use within
the home.
These instructions are only for those countries whose symbols appear in the booklet and on the serial no. plate of the
appliance.
This owner’s manual is for a class 1 appliance (insulated) or class 2, subclass 1 appliances (installed between two cabinets.
Before using your appliance, read the instructions in this
owner’s manual carefully since it provides all the information you need to ensure safe installation, use and maintenance. Always keep this owner’s manual close to hand
since you may need to refer to it in the future.
When you have removed the packing, check that the appliance is not damaged. If you have any doubts, do not use
the appliance and contact your nearest Ariston Service
Centre. Never leave the packing components (plastic bags,
polystyrene foam, nails, etc.) within the reach of children
since they are a source of potential danger.
The appliance must be installed only by a qualified technician in compliance with the instructions provided. The manufacturer declines all liability for improper installation, which
may result in personal injury and damage to property.
The electrical safety of this appliance can only be guaranteed if it is correctly and efficiently earthed, in compliance
with regulations on electrical safety. Always ensure that
the earthing is efficient. If you have any doubts, contact a
qualified technician to check the system. The manufacturer
declines all liability for damage resulting from a system
which has not been earthed.
Before plugging the appliance into the mains, check that
the specifications indicated on the date plate (on the appliance and/or packaging) correspond with those of the electrical and gas systems in your home.
Check that the electrical capacity of the system and sockets will support the maximum power of the appliance, as
indicated on the data plate. If you have any doubts, contact
a qualified technician.
An omnipolar switch with a contact opening of at least 3
mm or more is required for installation.
If the socket and appliance plug are not compatible, have
the socket replaced with a suitable model by a qualified
technician, who should also check that the cross-section
of the socket cable is sufficient for the power absorbed by
the appliance. The use of adaptors, multiple sockets and/
or extensions, is not recommended. If their use cannot be
avoided, remember to use only single or multiple adapters
and extensions which comply with current safety regulations. In these cases, never exceed the maximum current
capacity indicated on the individual adaptor or extension
and the maximum power indicated on the multiple adapter.
Do not leave the appliance plugged in if it is not in use.
Switch off the main switch and gas supply when you are
not using the appliance.
The openings and slots used for ventilation and heat dispersion must never be covered.
The user must not replace the supply cable of this appliance. Always contact an after-sales service centre which
has been authorised by the manufacturer if the cable has
been damaged or needs replacement.
15 This appliance must be used for the purpose for which it
was expressly designed. Any other use (e.g. heating rooms)
is considered to be improper and consequently dangerous. The manufacturer declines all liability for damage resulting from improper and irresponsible use.
16 A number of fundamental rules must be followed when
using electrical appliances. The following are of particular
importance:
• Do not touch the appliance when your hands or feet
are wet.
• Do not use the appliance barefooted.
• Do not use extensions, but if they are necessary, caution must be exercised.
• Never pull the power supply cable or the appliance to
unplug the appliance plug from the mains.
• Never leave the appliance exposed to atmospheric
agents (rain, sun etc.)
• Do not allow children or persons who are not familiar
with the appliance to use it, without supervision.
17 Always unplug the appliance from the mains or switch off
the main switch before cleaning or carrying out maintenance.
18 If you are no longer using an appliance of this type, remember to make it unserviceable by unplugging the appliance from the mains and cutting the supply cable. Also
make all potentially dangerous parts of the appliance safe,
above all for children who could play with the appliance.
19 To avoid accidental spillage do not use cookware with uneven or deformed bottoms on the burners. Turn the handles of pots and pans inwards to avoid knocking them over
accidentally.
20 Never use flammable liquids such as alcohol or gasoline,
etc. near the appliance when it is in use.
21 When using small electric appliances near the hob, keep
the supply cord away from the hot parts.
22 Make sure the knobs are in the “•”/”¡” position when the
appliance is not in use.
23 When the appliance is in use, the heating elements and
some parts of the oven door become extremely hot. Make
sure you don’t touch them and keep children well away.
24 Gas appliances require regular air exchange to ensure
trouble-free performance. When installing the cooker,
follow the instructions provided in the paragraph on “Positioning” the appliance.
25 The glass top (only on certain models) can shatter if it is
overheated. Therefore, all of the burners or hot plates must
be turned off before the top is closed.
26 If the cooker is placed on a pedestal, take the necessary
precautions to prevent the same from sliding off the
pedestal itself.
27 Warning: never place hot containers or items and
flammable materials inside the dishwarmer drawer.
13
Installation
All instruction on the following pages must be carried out
by a competent person (corgi registered) in compliance
with gas safety (installation and use) regulation 1984.
Important: disconnect the cooker from the electrycity
and gas supply when any adjustment, etc.
partially full. It is advisable to keep in the room only
the can which is being used, and it must be placed
away from direct heat sources (ovens, fireplaces,
stoves, etc.) that could make the can reach
temperatures higher than 50°C.
Positioning your appliance
Important: this appliance may be installed and used only
in permanently ventilated rooms in compliance with current
directives. The following precautions should be taken:
a) The room must be provided with an external exhaust
system obtained with a hood or with an electric
ventilator that goes on automatically each time the unit
is switched on.
Levelling your appliance (only on a few models)
Your cooker is supplied with feet for levelling the appliance.
If necessary, these feet can be screwed into the housings
in the corners of the cooker base.
Mounting the legs (only on a few models)
Press-fit legs are supplied which fit under the base of your
cooker.
In the case of chimneys or flues
with branches (for cookers)
Directly to the
exterior
b) The room must be provided with a system for air inflow
which is necessary for a regular combustion. The air
flow necessary for the combustion should be at least 2
m3/h for kW of installed power. The system may be
realized by drawing the air directly from outside the
building through a pipe that has at least a 100 cm2
useable section and which must not be accidently
obstructed (Fig. A). And further it may be realized
indirectly from other adjacent rooms which are provided
with a ventilation pipe for the expulsion of the fumes to
the outside of the building as foresaid, and which must
not be part of the building in common use or rooms
with risk of fire, or bedrooms (Fig. B).
Detail A
Adjacent
room
Installation of the cooker
The appliance can be installed next to furniture units which
are no taller than the top of the cooker hob. The wall in
direct contact with the back panel of the cooker must be
made of non-flammable material. During operation the
back panel of the cooker could reach a temperature of
50°C above room temperature. For proper installation of
the cooker, the following precautions must be taken:
a) The appliance can be placed in a kitchen, dining room
or bedsit, but not in a bathroom.
b) All furniture around the appliance must be placed at
least 200 mm from the top of the cooker, should the
surface of the appliance be higher than the worktop of
this furniture. Curtains should not be placed behind
the cooker or less than 200 mm away from the sides
of the appliance.
c) Any hoods must be installed according to the requirements in the installation manual for the hoods themselves.
d) If the cooker is installed beneath a wall cabinet, the
latter must be situated at a minimum of 420 mm above
the hob. The minimum distance between the worktop
and kitchen units made of combustible material is 700
mm.
e) The wall in direct contact with the back panel of the
cooker must be made of non-flammable materials.
Room to
be ventilated
A
Fig. A
Examples of ventilation openings
for the comburent air
Fig. B
Increased opening between
the door and and floor
c) During prolonged use of the appliance you may
consider it necessary to open a window to the outside
to improve ventilation.
d) The liquefied petroleum gases, which are heavier than
air, stagnate towards the ground. Therefore, the rooms
containing LPG cans must have openings towards the
outside in order to allow the venting from the ground of
eventual gas leak. Thus, the LPG cans must not be
installed or settled in rooms that are below the ground
level, (cellar, etc.) whether the cans are empty or
14
Tight control
Important: when installation has been completed, check
the pipe fitting for leaks with a soapy solution. Never use a
flame. Once the connection has been made, ensure that
the flexible metal tube does not touch any moving parts
and is not crushed.
420 mm.
420 mm.
Min.
600 mm.
Min.
Min.
min. 650 mm. with hood
min. 700 mm. without hood
HOOD
Connecting the supply cable to the mains
Install a normalised plug corresponding to the load
indicated on the data plate. When connecting the cable
directly to the mains, install an omnipolar circuit-breaker
with a minimum contact opening of 3 mm between the
appliance and the mains. The omnipolar circuit breaker
should be sized according to the load and should comply
with current regulations (the earth wire should not be
interrupted by the circuit breaker).
The supply cable should be positioned so that it does not
reach a temperature of more than 50°C with respect to
the room temperature, along its length. Before making the
connection, check that:
• the limiter valve and the home system can support the
appliance load (see data plate);
• the mains is properly earthed in compliance with
current directives and regulations;
• there is easy access to the socket and omnipolar circuit
breaker, once the hob has been installed.
N.B: never use reducers, adaptors or shunts since they
can cause heating or burning.
Connecting the gas
The appliance should be connected to the mains or to a
gas cylinder in compliance with current directives. Before
making the connection, check that the cooker is regulated
for the gas supply you are using. If not, follow the
instructions indicated in the paragraph “Adapting to
different types of gas”. On some models the gas supply
can be connected on the left or on the right, as necessary;
to change the connection, reverse the position of the hose
holder with that of the cap and replace replace the gasket
(supplied with the appliance). When using liquid gas from
a cylinder, install a pressure regulator which complies with
current directive.
Important: check that the supply pressure complies with
the values indicated in table 1 “Characteristics of the
burners and nozzles” since this will ensure safe operation,
correct consumption and ensure a longer life to your
appliance.
Adapting the cooker to different types of gas
In order to adapt the cooker to a different type of gas with
respect to the gas for which it was produced (indicated on
the label attached to the lid), follow these steps:
a) replace the hose holder mounted on the appliance with
that supplied in the bag of “cooker accessories”.
Important: the hose holder for liquid gas is marked 8, the
hose holder for methane gas is marked 13. Always fit the
sealing gasket.
b) Replacing the burner nozzles on the hob:
• remove the grids and slide the burners from their
housings;
• unscrew the nozzles using a 7 mm socket spanner,
and replace them with nozzles for the new type of gas
(see table 1 “Burner and nozzle characteristics”).
• replace all the components by repeating the steps in
reverse order.
Connection with hose
Make the connection using a gas hose complying with
the the characteristics provided in current directive. The
internal diameter of the pipe used is as follows:
- 8mm for liquid gas;
- 13mm for methane gas.
When installing the hose, remember to take the following
precautions:
• No part of the hose should touch parts whose temperature exceeds 50°C;
• The length of the hose should be less than 1500 mm;
• The hose should not be subject to twisting or pulling,
and should not have bends or kinks.
• The hose should not touch objects with sharp edges,
any moving parts, and it should not be crushed;
• The full length of the hose should be easy to inspect in
order to check its condition;
Check that the hose fits firmly into place at the two ends
and fix it with clamps complying to current directive.If any
of the above recommendations can not be adopted, flexible
metal pipes should be used.
Should the cooker be installed according to the conditions
of Class 2, subdivision 1, only a flexible metal pipe which
is in compliance with current safety standards should be
used to make the connection to the gas mains.
Connecting a flexible jointless stainless steel pipe
to a threaded attachment
Remove the hose holder fitted on the appliance. The gas
supply pipe fitting is a threaded 1/2 gas cylindrical male
attachment. Only pipes and gaskets complying with current
directives. The full length of the pipe must not exceed 2000
mm.
c) Minimum regulation of the hob burners:
• turn the tap to minimum;
• remove the knob and adjust the regulation screw, which
is positioned in or next to the tap pin, until the flame is
small but steady.
15
N.B.: in the case of liquid gas, the regulation screw
must be screwed in to the bottom.
• check that the flame does not turn off when you turn
the tap quickly from high to low.
d) Regulating the primary air of the burners:
The primary air of the burners requires no regulation.
Pay particular attention to the plug wires and
thermocouple tubes.
Important
On completion of the operation, replace the old rating
sticker with one indicating the new type of gas used. This
sticker is available from our Service Centres.
Adapting the gas oven to different types of gas
a) Replacing the oven burner nozzle:
• remove the warming drawer;
• remove the sliding protection “A” (see Fig.C);
• remove the screw and then the oven burner “V”(see
Fig. D). Remove the oven door to facilitate this
operation.
• unscrew the oven burner nozzle using the special
socket spanner for the nozzles (see Fig. E), or better
still a 7 mm socket spanner, and replace it with a nozzle
suited to the new type of gas (see table 1).
V
Note
Should the pressure of the gas used be different (or vary)
from the recommended pressure, it is necessary to fit a
suitable pressure regulator onto the inlet pipe in
compliance with current National Regulations relative to
“regulators for channelled gas”.
A
Fig. C
Fig. D
WARNING
To remove the sliding protection “A”, unscrew screw “S”.
When you have finished, replace the protection and lock it
in place with screw “S”.
Before using the oven, make sure the sliding protection
“A” is fastened in the correct position.
Fig.E
b) Minimum regulation of the gas oven burner with
thermostat (see fig.):
• light the burner as described in the paragraph “the oven
knob” of the instruction booklet.
• turn the knob to Max for about 10 minutes and then
turn the knob to the Min setting;
• remove the knob;
• regulate the screw positioned outside the thermostat
pin until the flame is small but steady.
N.B.: in the case of liquid gas, the regulation screw
must be screwed in to the bottom.
S
A
16
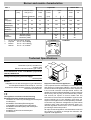
Burner and nozzle characteristics
Table 1
Burner
Liquid Gas
Diameter
(mm)
Thermal Power
kW (p.c.s.*)
By-Pass
1/100
Nozzle
1/100
Natural Gas
Flow*
g/h
Nozzle
1/100
Nominal
Reduced
(mm)
(mm)
***
**
(mm)
Flow*
l/h
Fast
(Large)(R)
100
3.00
0.7
41
87
218
214
128
286
Semi Fast
(Medium)(S)
75
1.90
0.4
30
70
138
136
104
181
Auxiliary
(Small)(A)
51
1.00
0.4
30
52
73
71
76
95
-
3.10
1.0
46
85
225
221
132
295
28-30
20
35
37
25
45
Oven
Supply
Pressures
*
**
***
Nominal (mbar)
Minimum (mbar)
Maximum (mbar)
20
17
25
K 3G21S/I
At 15°C and 1013 mbar- dry gas
Propane
P.C.S. = 50,37 MJ/Kg
Butane
P.C.S. = 49,47 MJ/Kg
Natural
P.C.S. = 37,78 MJ/m3
S S
R
A
Technical Specifications
Oven:
104
Dimensions (HxLxP): 34x39x44 cm
Volume: 58 lt
Maximum absorbed electric grill: 2100 W
60
50
85/90
Inner Dimensions of the Food Warmer (if present):
(HxLxP) 18x44x42 cm
Voltage and Frequency of Power Supply:
see data plate
Burners:
adaptable for use with all the types of gas indicated on
the data plate situated inside the flap or, once the
dishwarmer drawer has been opened, on the inside wall
of the left-hand side panel.
Disposal of old electrical appliances
The European Directive 2002/96/EC on Waste Electrical
and Electronic Equipment (WEEE), requires that old
household electrical appliances must not be disposed of
in the normal unsorted municipal waste stream. Old
appliances must be collected separately in order to optimise
the recovery and recycling of the materials they contain
and reduce the impact on human health and the
environment. The crossed out “wheeled bin” symbol on the
product reminds you of your obligation, that when you
dispose of the appliance it must be separately collected.
Consumers may take their old appliance to public waste
collection areas, other communal collection areas, or if
national legislation allows return it to a retailer when
purchasing a similar new product.
All major household appliance manufacturers are active in
the creation of systems to manage the collection and
disposal of old appliances.
7
This appliance conforms with the following
European Economic Community directives:
- 73/23/EEC of 19/02/73 (Low Voltage) and subsequent
modifications;
- 89/336/EEC of 03/05/89 (Electromagnetic
Compatibility) and subsequent modifications;
- 90/396/EEC of 29/06/90 (Gas) and subsequent
modifications;
- 93/68/EEC of 22/07/93 and subsequent
modifications.
17
The cooker with gas oven and electric grill
J
A
B
C
E
D
K
G
F
A.
B.
C.
D.
E.
F.
G.
J.
Tray for Catching Overflows
Gas Burner
Electronic Lighting Device (only on a few models)
Top Grate
Control Panel
Adjustable Feet or Legs
Dripping Pan or Baking Sheet
Flame Failure Device for Cooktop Burners (only on
a few models)
K.
M.
N.
O.
P.
Q.
R.
Oven Rack
Oven and Grill Control Knob
Control Knobs for Gas Burners on Hob
Button for Oven Light (only a few models)
Timer Knob (only a few models)
Grill Operating Light
Electronic Lighting for Hob Burners (only a few
models)
The different functions and uses of the oven
The various functions included in the cooker are selected by
operating the control devices located on the cooker control
panel.
Electronic Ignition for the Gas Hob (only on certain
models)
Some of the models are provided with instant electronic
lighting of the hob gas burners; these models are identified by the presence of a lighting device (see detail C).
This device operates when a slight pressure is applied to
Control Knobs for the Gas Burners on the Hob (N)
The position of the gas burner controlled by each one of the
•
knobs is shown by a symbol of a solid ring: . To light one of
the burners, hold a lighted match or lighter near the burner.
Press down and turn the corresponding knob in the counter-
the “R” button marked with 1 symbol. To light a specific
burner just press the button labelled “R” while pushing the
corresponding knob all the way in and turning it counterclockwise until it lights. For immediate lighting, first
press the button and then turn the knob.
Important: Should the burner flames accidentally go
out, turn off the control knob and wait at least 1 minute
before trying to relight.
clockwise direction to the maximum E setting. Each burner
can be operated at its maximum, minimum or intermediate
•
power. Shown on the knob are the different symbols for off
(the knob is on this setting when the symbol lines up with the
reference mark on the control panel), for maximum E and
Models with Hob Gas Burner Safety Devices to
Prevent Leaks (only on certain models)
These models can be identified by the presence of the
device itself (see detail J).
Important: Since the hob burners are equipped with a
safety device, you must hold the control knob in for about
6 seconds after the burner has been lighted to allow the
gas to pass until the safety thermocouple has heated.
minimum C.
To obtain these settings, turn the knob counter-clockwise
with respect to the off position. To turn off the burner, turn the
knob clockwise until it stops (corresponding again with the
symbol).
•
18
Notice: The first time you use your appliance, we recommend that you set the thermostat to the highest setting
and leave the oven on for about half an hour with nothing
in it, with the oven door shut. Then, open the oven door
and let the room air. The odour that is often detected during this initial use is due to the evaporation of substances
used to protect the oven during storage and until it is installed.
Oven Light Button (O)
8
This button is marked by the
symbol and switches on
the light inside the oven so that you can monitor the cooking process without opening the door.
Timer Knob (only a few models)
To use the timer, the ringer “P” must be wound up by turning the knob one full turn clockwise
5, to the desired time so that the number of minutes on
Attention: Only use the bottom shelf of the oven when using
the Grill to cook. For all other types of cooking, never use the
bottom shelf and never place anything on the bottom of the
oven when it is in operation because this could damage the
enamel. Always place your cookware (dishes, aluminium foil,
etc. etc.) on the grate provided with the appliance inserted
especially along the oven guides.
the knob matches the reference mark on the panel.
The Grill Operating Light (Q)
This light comes on when any of the electrical heating
elements in the oven have been turned on.
Caution
Keep children away from the oven door when in use because it becomes very hot.
Oven and Grill Control Knob (M)
This knob allows you to select the various features of the
oven and to set the most appropriate cooking temperature from among those indicated on the knob itself (between Min and Max).
To light the oven burner, hold a lighted match or lighter
near the “F” hole and, at the same time, press down and
turn the oven knob counter-clockwise to the Max setting.
Practical advice for burner use
In order to get the maximum yield it is important to
remember the following:
• Use appropriate cookware for each burner (see table)
so as to avoid flames overshooting the edges.
• At boiling point turn the knob to minimum.
• Use cookware with lids.
• Always use cookware with flat bottoms.
Burner
F
•
140
145
150
•
160
180
•
200
220
ø Cookware diameter (cm)
Fast (R)
24 - 26
Semi Fast (S)
16 - 20
Auxiliary (A)
10 - 14
Storage recess below the oven (only a few models)
Below the oven a recess can be used to contain cooking
pans and cooker accessories. Moreover, during oven
operation, it may be used to keep food warm.To open the
storage is necessary turn it downwards.
Caution: this storage recess must not be used to store
inflammable materials.
Since the cooker is equipped with a safety device which
makes it necessary to keep the knob pressed in for
about 6 seconds after the burner has been lighted to
allow the gas to pass through freely.
The cooking temperature is selected by matching the desired temperature with the reference mark on the panel;
the complete range of temperatures is shown below.
Min
4; then turn it back
Max
250
The temperature setting is then automatically reached and
kept constant by the thermostat (which is controlled by
the knob).
Important Notice: In the event the flame for the oven or
the grill accidentally goes out, turn the control knob for the
burner to the off position and do not relight the burner for
at least one minute.
Press the “M” knob all the way in and turn it to the d
setting in order to start the grill. The grill cooks by means
of infrared rays, making it possible to brown food to perfection. It is also recommended for cooking roasts, sausages, roast beef, etc.
19
Cooking advice
The oven offers a wide range of alternatives which allow
you to cook any type of food in the best possible way. With
time you will learn to make the best use of this versatile
cooking appliance and the following directions are only a
guideline which may be varied according to your own personal experience.
Baking Pastries
When baking pastries, always place them in the oven after it
has been preheated (about 15 minutes). Normal temperatures are around 160°C. Do not open the door while the pastry is cooking in order to prevent it from dropping. Batters
should not be too runny, as this will result in prolonged cooking times. In general, follow the guidelines below.
In general:
Pastry is too dry
Increase the temperature by 10°C and reduce the
cooking time.
Pastry dropped
Use less liquid or lower the temperature by 10°C.
Pastry is too dark on top
Place it on a lower rack, lower the temperature, and
increase the cooking time.
Cooked well on the inside but sticky on the
outside
Use less liquid, lower the temperature, and increase
the cooking time.
The pastry sticks to the pan
Grease the pan well and sprinkle it with a dusting of
flour.
Cooking Fish and Meat
Meat must weigh at least 1 kg in order to prevent it from
drying out. When cooking white meat, fowl and fish, use low
temperature settings (150°C-175°C). For red meat that should
be well done on the outside while tender and juicy on the
inside, it is a good idea to start with a high temperature setting (200-220°C) for a short time, then turn the oven down
afterwards. In general, the larger the roast, the lower the temperature setting and the longer the total cooking time. Place
the meat on the centre of the rack and place the dripping pan
beneath it to catch the fat. Make sure that the rack is inserted so that it is in the centre of the oven. If you would like
to increase the amount of heat from below, use the lower
rack heights. For savoury roasts, dress the meat with lard or
bacon on the top.
Using the grill
Important: always use the grill with the oven door
closed. This will allow you both to attain excellent results and to save energy (about 10%).
To prevent fat and grease from dripping onto the bottom of
the oven, place the dripping-pan beneath the rack used for
grilling.
20
Cooker routine maintenance and cleaning
Before each operation, disconnect the cooker from the
electricity.To assure the long life of the cooker, it must be
thoroughly cleaned frequently, keeping in mind that:
Replacing the oven lamp
• Unplug the oven from the mains;
• Remove the glass cover of the lamp-holder;
• Remove the lamp and replace with a lamp resistant to
high temperatures (300°C) with the following
characteristics::
- Voltage 230V
- Wattage 25W
- Type E14
• Replace the glass cover and reconnect the oven to
the mains.
• Do not use steam equipment to clean the appliance.
• the enamelled parts and the self-cleaning panels are
washed with warm water without using any abrasive
powders or corrosive substances which could ruin
them;
• the inside of the oven should be cleaned fairly often
while it is still warm using warm water and detergent,
followed by careful rinsing and drying;
• the flame spreaders should be washed frequently with
hot water and detergent taking care to eliminate any
scale;
• in cookers equipped with automatic lighting, the
terminal part of the electronic instant lighting devices
should be cleaned frequently and the gas outlet holes
of the flame spreaders should be checked to make
sure they are free of any obstructions;
• the electric plates are cleaned with a damp cloth and
they should be lubricated with a little oil while they still
warm;
• Stainless steel may become marked if it comes into
contact with very hard water or harsh detergents
(containing phosphorous) for long periods of time. After
cleaning, it is advisable to rinse thoroughly and dry. It
is also recommended to dry any water drops;
• On models with glass covers, the covers should be
cleaned with hot water; the use of rough cloths or
abrasives is to be avoided.
N.B: avoid closing the cover while the gas burners
are still warm. Remove any liquid from the lid before
opening it.
Important: periodically check the wear of the gas hose
and substitute it if there are any defects; we recommended
changing it every year.
Greasing the Taps
The taps may jam in time or they may become difficult to
turn. If so, the tap itself must be replaced.
N.B.: This operation must be performed by a technician
authorised by the manufacturer.
Removing the lid
The cooker lid can be removed to facilitate cleaning. To
remove the lid, first open it completely and pull it
upwards (see figure)
21
Cooking advice
Wt.
(Kg)
Cooking position of
shelves from
bottom
Temperature
(°C)
Pre-heating time
(min)
Cooking time
(min.)
Pasta
Lasagne
Cannelloni
Pasta bakes au gratin
2.5
2.5
2.5
3
3
3
210
200
200
10
10
10
60-75
40-50
40-50
Meat
Veal
Chicken
Duck
Rabbit
Pork
Lamb
1.7
1.5
1.8
2.0
2.1
1.8
3
3
3
3
3
3
200
220
200
200
200
200
10
10
10
10
10
10
85-90
90-100
100-110
70-80
70-80
90-95
Fish
Mackerel
Dentex
Trout baked in paper
1.1
1.5
1.0
3
3
3
180-200
180-200
180-200
10
10
10
35-40
40-50
40-45
Pizza
Napolitan
1.0
3
220
15
15-20
Cake
Biscuits
Tarts
Savoury pie
Raised Cakes
0.5
1.1
1.0
1.0
3
3
3
3
180
180
180
165
15
15
15
15
30-35
30-35
45-50
35-40
1
1,5
1
1
n.° 4
4
4
3
4
4
5
5
5
5
5
15-20
20
7
15-20
5
Food to be cooked
Grill cooking
Veal steaks
Cutlets
Hamburgers
Mackerels
Toast sandwiches
NB: cooking times are approximate and may vary according to personal taste. When cooking using the grill, the
dripping-pan must always be placed on the 1st oven rack from the bottom.
22
ÌÅÐËÎÍÈ Èíäåçèò Áúëãàðèÿ ÅÎÎÄ
ÑÂÅÒÎÂÅÍ ÒÚÐÃÎÂÑÊÈ ÖÅÍÒÚÐ ÈÍÒÅÐÏÐÅÄ
Áóë. Äðàãàí Öàíêîâ ¹ 36, îôèñ 412, ÑÎÔÈß 1057
Ãîòâàðñêà ïå÷êà ñ ãàçîâà ôóðíà è åëåòðè÷åñêè ãðèë
Ãîòâàðñêà ïå÷êà
K3G21S/I
Ïðåäè âêëþ÷âàíå íà óðåäà â åêñïëîàòàöèÿ ïðî÷åòè âíèìàòåëíî!
Препоръки
За гарантиране добрата работа и безопасността на този електродомакински уред:
• обръщайте се само към оторизирани технически сервизи
• изисквайте употребата само на оригинални резервни части
1
2
3
4
5
6
7
8
9
10
11
12
13
14 Захранващият кабел на уреда не трябва да се подменя
от потребителя. При повреда или необходимост от
подмяна на кабела, обръщайте се само към технически
сервиз, оторизиран от производителя.
15 Този уред трябва да се използва единствено по
предназначение. Всяка друга употреба (например за
отопление на помещения) се счита за неподходяща и
следователно за опасна. Производителят не носи
отговорност за възможни щети, произтичащи от
неподходяща, неправилна и неразумна употреба.
16 Употребата на всеки един електроуред е свързана със
спазването на някои основни правила. По-точно:
· не пипайте уреда с мокри или влажни ръце или
крака
· не използвайте уреда боси
· внимавайте особено много, когато ползвате
удължители
· не дърпайте захранващия кабел или самия уред,
за да извадите щепсела от електрическия контакт
· не оставяйте уреда изложен на атмосферни
влияния (дъжд, слънце и др.)
· не позволявайте уредът да се използва от деца или
хора с увреждания без надзор
17 Преди да започнете каквато и да било операция по
почистването или поддръжката, изключете уреда от
захранващата мрежа, като извадите щепсела от
контакта или изключите прекъсвача на електрическата
инсталация
18 Когато решите да не използвате повече печката,
препоръчваме да я извадите от употреба, като
отрежете захранващия кабел, след като сте изключили
щепсела от електрическия контакт. Препоръчваме да
обезопасите онези части на електроуреда,
представляващи потенциална опасност, най-вече за
децата, които биха могли да използват извадения от
употреба уред в своите игри.
19 Върху газовите котлони не трябва да се поставят
нестабилни или деформирани тенджери, за да се
избегнат нещастни случаи, предизвикани от
преобръщането им.
20 Не използвайте запалими течности (спирт, бензин и
др.) в близост до уреда, когато същият работи.
21 Ако в близост до готварския плот използвате малки
електродомакински уреди, внимавайте захранващият
кабел да не попадне върху горещите части.
22 Винаги проверявайте дали ключовете са поставени в
позиция “·”/“{”, когато печката не се използва.
23 По време на работа на печката нагревателите и някои
части на вратата на фурната стават много горещи.
Внимавайте да не ги докоснете и дръжте децата на
разстояние.
24 За доброто функциониране на уредите на газ е
необходима постоянна обмяна на въздуха. Проверете
дали при монтажа им са спазени изискванията,
посочени в раздела “Разполагане”.
25 Ако печката е повдигната на постамент, вземете
подходящи мерки да не падне от него.
26 Внимание: никога не използвайте долното чекмедже
за съхраняване на запалими материали.
27 Стъкленият капак (налице само при някои модели)
може да се счупи в случай на прекалено нагряване,
следователно е необходимо всички газови котлони или
евентуални електрически плочи да са изключени преди
затварянето му.
Инструкциите са валидни само за страните, чиито
символи фигурират в наръчника и на фабричната
табелка на уреда.
Уредът е разработен за непрофесионална употреба
в жилищни сгради.
Тази инструкция се отнася за уреди от клас 1
(монтирани самостоятелно) или от клас 2 - подклас 1
(вградени между два мебела).
Преди да използвате уреда, прочетете внимателно
препоръките, съдържащи се в настоящата
инструкция, тъй като дават важна информация за
безопасността при монтажа, употребата и
поддръжката. Съхранявайте грижливо инструкцията
за допълнителни справки.
След като сте свалили опаковката, проверете целостта
на уреда. При съмнения не използвайте уреда, а се
обърнете
към
квалифициран
специалист.
Опаковъчните елементи (найлони, стиропор, пирони
и т.н.) не трябва да се оставят на места, достъпни за
деца, тъй като биха могли да представляват опасност.
Монтажът трябва да се извърши от квалифициран
специалист съгласно инструкциите на производителя.
Неправилният монтаж може да причини нараняване
на хора и животни или материални щети, за които
производителят не носи отговорност.
Електрическата безопасност на уреда е гарантирана
само когато той е правилно заземен, съобразно
предписанията в действащите норми за електрическа
безопасност. Необходимо е да проверите това основно
изискване за безопасност и при съмнение да се
обърнете за щателна проверка на заземителната
инсталация
от
квалифициран
специалист.
Производителят не носи отговорност за възможни щети,
причинени от уреда поради липса на заземяване.
Преди да свържете уреда, проверете дали
характеристиките, указани на фабричната табелка,
съответстват на тези на електрическата и
газозахранващата мрежа.
Проверете дали електрическата инсталацията и
контактите са подходящи за максималната мощност
на уреда, указана на фабричната табелка. При
съмнение се обърнете към квалифициран специалист.
При монтажа трябва да се предвиди многополюсен
прекъсвач с разстояние между щифтовете равно или
по-голямо от 3 mm.
При несъвместимост между електрическия контакт и
щепсела на уреда, контактът се заменя от
квалифициран специалист с друг, подходящ. Техникът
трябва да провери също така дали сечението на
кабелите на контакта е подходящо за консумираната
от електроуреда мощност. Не се препоръчва употребата
на адаптери, разклонители и/или удължители. В случай,
че употребата на адаптери, разклонители и
удължители се окаже наложителна, същите трябва да
съответстват на действащите норми за безопасност,
като се внимава да не бъдат надвишени максималните
стойности на тока, указани на адаптера и удължителя,
и максималната мощност, посочена на разклонителя.
Не оставяйте уреда включен, без да е необходимо.
Изключвайте главния прекъсвач на уреда, когато
същият не се използва, и затваряйте крана на газта.
Не запушвайте отворите или процепите за вентилация
или за отвеждане на топлината.
23
Инструкции за монтаж
По-долу изложените инструкции са предназначени за
квалифицирания техник с цел да извършва операциите
по монтажа, настройката и техническата поддръжка на
уреда по най-правилния начин и в съответствие с
действащите норми.
Важно: всяка операция по настройката, поддръжката и
т.н. трябва да се извършва, когато печката е изключена
от електрическото захранване.
d) Втечненият нефтен газ е по-тежък от въздуха и пада
надолу. Ето защо в помещенията с газови бутилки
трябва да бъдат предвидени отвори навън за
отвеждането отдолу на евентуално изтекли газове.
Освен това бутилките за пропан-бутан, били те празни
или частично пълни, не трябва да се монтират или
складират в помещения или места под нивото на
земята (в мазета и т.н.). Уместно е да държите в
помещението само използваната бутилка, поставена
далеч от прякото въздействие на източници на топлина
(фурни, камини, отоплителни печки и т.н.), които могат
да я нагреят до температура по-висока от 50°C.
Разполагане
Важно: този уред може да се инсталира и да работи само
в помещения с постоянна вентилация съгласно
действащите предписания на норми UNI-CIG 7129 и 7131.
Необходимо е да се спазват следните изисквания:
a) Помещението трябва да е снабдено със система за
отвеждане навън на дима, който се отделя при
горенето. Инсталацията трябва да включва аспиратор
или електрически вентилатор, който да се включва
автоматично всеки път, когато печката бъде запалена.
В комин или в разклонена
димоотвеждаща тръба
(предназначена за готварски печки)
Нивелиране
Печката е снабдена с регулиращи се крачета за
нивелиране. В случай на необходимост тези крачета могат
да бъдат завити в специалните гнезда, разположени в
ъглите, под основата на печката.
Направо
навън
Монтиране на крачета (само при някои модели)
Към печката се доставят крачета, които се монтират
посредством сглобка под основата на печката.
b) Помещението трябва да разполага със система, която
позволява притока на въздух, необходим за постоянния
процес на горене. Дебитът на въздуха, необходим за
поддържане на горенето, не трябва да бъде по-малък
от 2 m3/h за един kW инсталирана мощност. Системата
може да бъде реализирана посредством директното
вкарване на въздух отвън през тръбопровод, който да
не може да се запуши случайно и да е с вътрешен
диаметър най-малко 100 cm2. Отворите за вентилация
при уреди, които не са снабдени с устройство за защита
срещу изгасване на пламъка, трябва да бъдат
увеличени със 100 %, при минимум от 200 cm2 (Фиг. А).
Или индиректно, през съседни помещения, които
разполагат с вентилационна тръба, излизаща навън
както указано по-горе, и които не представляват общи
части от недвижимия имот, помещения с опасност от
пожар или спални (Фиг. В).
Детайл A
Съседно
Помещение за
Инсталиране на готварската печка
Печката може да се инсталира до мебели, чиято височина
не надвишава тази на готварския плот. Стената, която е в
контакт със задната страна на печката, трябва да бъде от
незапалим материал. По време на работа задната стена
на печката може да достигне температура с 50°C по-висока
от тази в помещението. За правилното инсталиране на
готварската печка е необходимо да бъдат спазени
следните предпазни мерки:
a) Уредът може да бъде поставен в кухнята, трапезарията
или в едностайно жилище, но не и в банята.
b) Мебелите около уреда трябва да бъдат поставени на
разстояние най-малко 200 mm от горната повърхност
на печката в случай, че тя е по-нависоко от техния
работен плот. Зад готварската печка или на разстояние
по-малко от 200 mm от страничните й стени, не бива
да се поставят пердета.
c) Евентуални аспиратори трябва да бъдат инсталирани
в съответствие с указанията, съдържащи се в
инструкциите към тях.
d) Когато печката се монтира под окачен шкаф,
последният трябва да бъде на разстояние най-малко
420 mm от готварския плот. Минималното разстояние,
на което могат да бъдат разполагани запалими
кухненски мебели директно над готварския плот, е 700
mm.
e) Стената, която е в контакт със задната страна на
печката, трябва да бъде от незапалим материал.
помещение
вентилиране
A
Примерни вентилационни отвори за
вкарване на въздух за поддържане на
горенето
Увеличаване на процепа
между вратата и пода
Фиг. А
Фиг. В
c) Усиленото и продължително използване на печката
може да доведе до необходимост от допълнително
проветряване, например с отварянето на прозорец,
или по-ефикасна вентилация с увеличаване на
смукателната мощност на механичната аспирация, ако
такава е налице.
24
Свързване с газоразпределителната мрежа
Свързването на печката към тръбата за захранване с газ
или към газовата бутилка трябва да се извърши съгласно
предписанията на норми UNI-CIG 7129 и 7131, само след
като сте се уверили, че същата е настроена за работа с
типа газ, с който ще се захранва. В противен случай
направете указаното в раздела “Приспособяване към
различните видове газ”. При някои модели подаването на
газ може да става както отдясно, така и отляво, съобразно
ситуацията. За целта е необходимо да смените мястото
на блендата с това на затварящата тапа и да смените
Свързване посредством непрекъсната гъвкава тръба
от неръждаема стомана и резбови съединения
Отстранете блендата, която предварително е монтирана
на уреда. Муфата на входа на газта към печката е с външна
цилиндрична резба 1/2”. Използвайте само тръби,
съответстващи на норма UNI-CIG 9891, и уплътнения в
съответствие с действащите национални норми.
Монтирането на тези тръби трябва да бъде направено така,
че дължината им, при пълно обтягане, да не надвишава
2000 mm.
Проверка на непропускливостта
Важно: след завършване на монтажа, проверете
непропускливостта на всички връзки посредством сапунен
разтвор. Никога не правете това с пламък.
След като сте направили свързването, проверете дали
гъвкавата метална тръба не е в контакт с подвижни части
и дали не е смачкана.
Свързване на захранващия кабел към електрическата
мрежа
Монтирайте към кабела стандартен щепсел за мощността,
указан на фабричната табелка с техническите
характеристики. При директно свързване към
електрическата мрежа между последната и уреда трябва
да монтирате многополюсен прекъсвач с минимално
разстояние от 3 mm между щифтовете, оразмерен спрямо
електрическата мощност и съответстващ на действащите
норми (заземителният кабел не трябва да се изключва от
прекъсвача). Захранващият кабел трябва да бъде
разположен така, че в нито една точка да не се нагрява до
температура по-висока с 50°C от тази в помещението.
Преди да направите свързването, уверете се, че :
• ограничителният клапан и битовата електрическа
инсталация могат да издържат на електрическата
мощност
на
печката
(виж
табелката
с
характеристиките);
• захранващата инсталация е добре заземена
съобразно нормите и законовите разпоредби;
• щепселът или прекъсвачът са лесно достъпни след
монтажа.
Забележка: не използвайте преходници, редуктори или
разклонители, тъй като могат да загреят и да причинят
изгаряния. Щепселът и контактът трябва да са лесно
достъпни.
Приспособяване на котлоните към различните видове газ
За приспособяване на печката за работа с газ, различен
от този, за който е била предвидена (указан на стикера
върху капака), е необходимо да направите следното:
a) Заменете монтираната вече бленда със съдържащата
се в пакета “Аксесоари за готварската печка”.
Внимание: Блендата за втечнен газ е с щампован номер
8, а тази за природен газ – с номер 13. Във всеки случай
винаги поставяйте ново уплътнение.
b) Смяна на дюзите на горелките на газовите котлони:
• свалете решетките и извадете котлоните от местата
им;
• отвийте дюзите, като използвате тръбен ключ 7 mm, и
ги заменете с подходящите за новия вид газ (виж
таблица 1 “Характеристики на горелките и дюзите”).
• поставете отново на местата им всички елементи в
последователност, обратна на описаната по-горе.
c) Настройка по минимум на газовите котлони:
420 mm.
420 mm.
Min.
600 mm.
Min.
Min.
min. 650 mm. with hood
min. 700 mm. without hood
HOOD
уплътнението (доставено в комплект с уреда). В случай на
захранване с втечнен газ от бутилка, използвайте
регулатори за налягане, съответстващи на действащите
национални норми.
Важно: за безопасна работа, рационално изразходване
на енергията и по-дълъг живот на печката проверете дали
захранващото налягане съответства на стойностите,
указани в таблица 1 “Характеристики на горелките и
дюзите”.
Свързване посредством гъвкава тръба
Свържете печката към захранването посредством гъвкава
тръба за газ, съответстваща на характеристиките, указани
в норма UNI-CIG 7140. Вътрешният диаметър на
използваната тръба трябва да бъде:
- 8 mm при захранване с втечнен газ;
- 13 mm при захранване с природен газ.
И по-специално, при монтажа на гъвкавите тръби трябва
да се спазват следните предписания:
• в нито една точка по цялата им дължина тръбите не
трябва да са в контакт с части, чиято температура е повисока от 50°C;
• тръбите трябва да са с дължина не по-голяма от 1500
mm;
• не трябва да са подложени на опън и усукване и освен
това не трябва да бъдат изкривявани прекалено или
сплесквани;
• да не са в контакт с режещи предмети, остри ръбове и
движещи се части;
• да е възможна лесна проверка на състоянието им по
цялата дължина;
Проверете дали тръбата е добре паснала в двата си края
и я закрепете с фиксиращи скоби, съответстващи на
UNI-CIG 7141. В случай, че едно или повече от тези условия
не могат да бъдат спазени, необходимо е да използвате
гъвкави метални тръби, съответстващи на норма UNI-CIG
9891.
В случай, че готварската печка се монтира съобразно
условията за клас 2 – подклас 1, свързването към
газозахранващата мрежа може да става само
посредством гъвкава метална тръба в съответствие с
норма UNI-CIG 9891.
25
•
•
завъртете крана в минимално положение;
свалете ключа и завъртете винта за регулиране,
разположен вътре или отстрани на оста на крана,
докато не постигнете малък равномерен пламък;
Забележка: при втечнени газове винтът за регулиране
трябва да бъде завит докрай.
b) Настройка на минималния пламък на горелката на
газовата фурна посредством терморегулатора (виж
фигурата):
• запалете горелката, както е описано в раздел
“Терморегулатор на фурната” в инструкцията за
употреба;
• поставете терморегулатора в позиция Min, след като
предварително сте го оставили в продължение на 10
минути в позиция Max;
• свалете ключа;
• завъртете винта за регулиране, който е разположен
отвън на оста на терморегулатора, докато постигнете
малък равномерен пламък;
Забележка: при втечнените газове винтът за
регулиране трябва да бъде завит докрай.
• проверете дали при бързо завъртане на
терморегулатора от положение Max до положение Min
или при бързо отваряне и затваряне на вратата на
фурната горелката не угасва.
•
след това проверете дали при бързо завъртане на
крана от максимално до минимално положение
горелката не угасва.
d) Регулиране притока на въздух за газовите котлони:
Горелките на котлоните не се нуждаят от регулиране на
първичния въздух.
Особено внимавайте с кабелите на свещите и тръбите
на термодвойките.
Внимание
След като завършите настройката, сменете стария стикер
с нов, съответстващ на използвания газ. Такъв стикер
Приспособяване на газовата фурна към различни видове
газ
a) Смяна на дюзата на горелката на фурната:
• извадете чекмеджето за притопляне на храни;
• отвийте плъзгащото се защитно устройство “A” (Фиг. C);
• извадете горелката от фурната след като сте
отстранили винта “V” (виж Фиг. D); операцията се
извършва по-лесно, ако предварително сте
демонтирали вратата на фурната.
• отвийте дюзата на горелката на фурната, като
използвате подходящ тръбен ключ за дюзи (виж Фиг.
Е), или още по-добре тръбен ключ 7 mm, и я заменете
с подходяща за новия вид газ (виж таблица 1).
можете да получите в нашите технически сервизни
центрове.
Забележка
В случай, че налягането на използвания газ е различно от
предвиденото (или не е постоянно), необходимо е на входа
на тръбата да бъде монтиран подходящ регулатор за
налягане (в съответствие с UNI-CIG 7430 “Регулатори за
газ”).
V
ВНИМАНИЕ
За да свалите плъзгащото се защитно устройство “A”,
развийте винт “S”. При приключване на операциите,
завийте обратно защитното устройство и го блокирайте
с винта “S”. Преди да използвате фурната, уверете се,
че защитното устройство “A” е правилно фиксирано.
A
Фиг. C
Фиг. D
S
Фиг. Е
A
26
Характеристики на горелките и дюзите
Таблица 1
Газов котлон
Втечнен газ
Диаметър
(в mm)
Топлинна мощност
kW (горна топлина на
изгаряне*)
Байпас
1/100
Дюза
1/100
Природен газ
Разход * g/h
Дюза
1/100
Номинална
Редуц.
(mm)
(mm)
***
**
(mm)
Разход
* l/h
Бързонагрява
щ (голям) (R)
100
3.00
0.7
41
87
218
214
128
286
Полубърз
(среден) (S)
75
1.90
0.4
30
70
138
136
104
181
Помощен
(малък) (A)
51
1.00
0.4
30
52
73
71
76
95
-
3.10
1.0
46
85
225
221
132
295
28-30
20
35
37
25
45
Фурна
Налягане на
захранване
Номинално (mbar)
Минимално (mbar)
Максимално (mbar)
При 15°C и 1013 mbar - сух газ
Пропан
Горна топлина на изгаряне = 50,37
MJ/Kg
*** Бутан
Горна топлина на изгаряне = 49.47
MJ/Kg
Природен газ
Горна топлина на изгаряне = 37,78
MJ/m3
20
17
25
*
**
S S
A
R
K 3G21S/I
Технически характеристики
Тази печка e произведена в съответствие със следните
Фурна:
Директиви на Европейската общност:
Размери (HxLxP): 34x39x44 cm
Обем: 58 литра
Максимално потребление от страна на електрическия
грил: 2100 W
Размери на чекмеджето (когато такова е налице):
Размери (HxLxP): 18x44x42 cm
Напрежение и честота на електрическото захранване:
-
73/23/EEС от 19.02.1973 г. (Нисковолтова директива) и
последващите изменения;
-
89/336/EEС от 03.05.1989 г. (Електромагнитна
съвместимост) и последващите изменения;
-
90/396/EEС от 29.06.1990 г. (Газ) и последващите
изменения;
-
93/68/EEС от 22.07.1993 г. и последващите изменения.
виж фабричната табелка с техническите характеристики
104
Горелки:
60
50
приспособими за всички видове газ, посочени на
табелката с характеристиките, поставена от вътрешната
страна на повдигащия се капак или върху лявата
вътрешна стена на чекмеджето за подгряване на храни.
85/90
7
27
Готварска печка с газова фурна и електрически грил
J
A
B
C
E
D
R P Q M
K
O
G
N
F
A.
B.
C.
D.
E.
F.
G.
J.
K. Скара на фурната
M. Терморегулатор на фурната и грила
N. Ключове за регулиране газта на котлоните
O. Бутон за осветлението във фурната
P. Таймер (само при някои модели)
Q. Индикаторна лампа на грила
R. Електронна запалка на котлоните
(само при някои модели)
Плот, задържащ евентуални разливания
Газов котлон
Електронна запалка (само при някои модели)
Решетка на готварския плот
Панел за управление
Регулируеми крачета
Тава за събиране на мазнините или за печене
Защитно устройство на котлоните
(само при някои модели)
Инструкции за употреба
Избирането на различните функции на готварската печка
става посредством приборите за управление,
разположени върху панела.
Електронно запалване на котлоните
(само при някои модели)
Някои модели са оборудвани с електронно запалване
на газовите котлони. Те се разпознават по електронната
запалка (виж детайл C). Запалката се задейства с леко
Ключове за регулиране газта на котлоните (N)
За всеки ключ със запълнено кръгче е отбелязано
разположението на газовия котлон, който се управлява
от него. За запалването на котлона, приближете към него
пламък или запалка, натиснете докрай и завъртете
съответния ключ в посока обратна на часовниковата
•
натискане на бутон “R”, означен със символа 1. За да
включите избрания котлон, достатъчно е да натиснете
бутон “R” и едновременно с това да натиснете докрай и
да завъртите в посока обратна на часовниковата
стрелка съответния ключ, докато котлонът не се запали.
За по-бързо запалване е препоръчително първо
да натиснете бутона и след това да завъртите
ключа.
Внимание: при случайно угасване на пламъка на
газовия котлон, затворете ключа и изчакайте поне
1 минута, преди да направите опит да го запалите
отново.
стрелка до максимална позиция E. Всеки котлон може
да работи максимално, минимално и средно силно. За
постигане на различни параметри на работа, върху
ключа, освен положение „изключен”, означено със
символа
•
, когато същият съвпада с указателната черта,
са означени и положение „максимум” E и „минимум”
C.
Модели със защитно устройство срещу изтичане
на газ от котлоните (само при някои модели)
Можете да разпознаете тези модели по наличието на
устройството (Виж детайл J).
Важно: тъй като котлоните са оборудвани с предпазно
устройство, след запалването им, е необходимо да
задържите ключа натиснат в продължение на
около 6 секунди, за да позволите протичането на газ
За да достигнете до тях, от позиция „изключен” завъртете
ключа по посока обратна на часовниковата стрелка. За
да изгасите котлона е необходимо да завъртите докрай
ключа по посока на часовниковата стрелка (обратно до
символа
•).
до загряването на защитната термодвойка.
28
Внимание: Препоръчваме при първото включване на
фурната да я оставите да поработи на празен ход в
продължение на около половин час при максимална
температура и затворена врата. След това, я изгасете,
отворете вратата и проветрете помещението. Миризмата,
която понякога се усеща по време на тази операция, се
дължи на изпаряването на веществата, използвани за
защита на фурната в периода от време между
производството и монтирането на печката.
Този бутон е означен със символа
4; след което, връщайки назад 5, задайте желаното
време, като указателната черта върху панела трябва да
сочи предвидените минути.
Индикаторна лампа за включен грил (Q)
Тя свети, когато е включен който и да било от електрическите
нагреватели на фурната.
Внимание
По време на печене вратата на фурната е топла, така че
не позволявайте на децата да се приближават до нея.
Практически съвети при използване на котлоните
За постигане на максимален КПД, е полезно да запомните
следното:
• използвайте готварски съдове, подходящи за всеки
отделен котлон (виж таблицата), за да не излиза
пламъкът извън очертанията на дъното им.
• използвайте само съдове с плоско дъно.
• когато съдържанието започне да кипи, завъртете
ключа за регулиране на газта в минимално положение.
• използвайте винаги съдове с капак.
Терморегулатор на фурната и грила (M)
Това е приборът, който позволява избирането на различните
функции на фурната и задаването на най-подходящата
температурата на печене измежду указаните на самия ключ
(от Min до Max).
За да запалите горелката на фурната, приближете към отвора
“F” пламък или запалка, едновременно с това натиснете
напред докрай и завъртете ключа на фурната в посока
обратна на часовниковата стрелка до положение Max.
Тъй като уредът е снабден със защитно устройство,
необходимо е да задържите ключа натиснат в
продължение на около 6 секунди, така че да позволите
преминаването на газта.
Температурата на печене се задава със завъртане на ключа,
докато желаната стойност не се изравни с указателната черта
върху панела за управление. Пълната гама възможни
стойности е дадена по-долу.
Печката достига и поддържа зададената температура
автоматично посредством контролния прибор (термостат),
управляван с ключа.
Важно предупреждение: в случай на случайно изгасване на
пламъка на горелката на фурната, затворете ключа и не я
Газов котлон
включвайте отново преди да е изминала една минута.
Натискайки докрай и завъртайки ключа “M” до позиция d,
се включва грилът с инфрачервени лъчи, който се препоръчва
за печене на месо и придава златист цвят на ястията (котлети,
наденици, ростбиф).
Бутон за включване на осветлението във фурната (O)
140
145
150
•
160
180
•
200
220
ø Диаметър на съдовете
(cm)
Бързонагряващ (R)
24 – 26
Среден (S)
16 – 20
Помощен (A)
10 – 14
Долно чекмедже (само при някои модели)
Под фурната се намира чекмедже, което може да бъде
използвано за съхранение на аксесоари или тигани. За
отварянето му е необходимо да го завъртите надолу.
Внимание: никога не използвайте долното чекмедже за
съхраняване на запалими материали.
F
•
и позволява, със
Таймер (само при някои модели)
За да използвате таймера, е необходимо да навиете
звуковата аларма чрез завъртане на ключа “P” почти на
един пълен оборот в посока на часовниковата стрелка
Внимание: използвайте първото ниво отдолу нагоре само
при печене на грил. За всякакъв друг вид печене никога не
използвайте първото ниво отдолу и не поставяйте
предмети на дъното на фурната, докато печете, тъй като
може да повредите емайла. Винаги разполагайте вашите
готварски съдове (йенско стъкло, алуминиево фолио и т.н.)
върху скарата, доставена в комплект с печката, поставяйки
я на подходящо ниво във водачите на фурната.
Min
8
запалването на лампата във вътрешността на фурната, да
се следи как протича печенето, без да се отваря вратата.
Max
250
29
Практически съвети при печене
Фурната предоставя широка гама възможности за
приготвяне на всякакви ястия по най-добрия възможен
начин. С течение на времето ще можете да се
възползвате максимално от възможностите на тази
мултифункционална готварска печка. Бележките,
изложени по-нататък са само най-общи указания, които
бихте могли да разширявате с личния си опит.
Печене на сладкиши
При печене на сладкиши, винаги загрявайте
предварително фурната (около 10-15 минути).
Обикновено температурата е около 160°C. Не отваряйте
вратата по време на печене, за да избегнете спадането
на сладкиша. Разбиваните тестени смеси не трябва да
бъдат много течни, за да не се удължава прекалено
много времето за печене. Общи правила:
Когато сладкишът е прекалено сух
Печене на риба и месо
Месото трябва да тежи поне 1 kg, за да не се изсушава
прекомерно. За белите меса, птици и риба използвайте
ниски температури (150°C-175°C). За червените меса,
които трябва да бъдат добре изпечени отвън и да
останат сочни отвътре, е хубаво да използвате висока
първоначална температура (200-220°C) за кратко време,
след което да я намалите. Колкото по-голямо е печеното,
толкова по-ниска трябва да бъде температурата и подълго времето на термична обработка. Поставете
месото, което ще печете, в средата на скарата и под
нея поставете тавичката за оттичане на мазнината.
Поставете скарата така, че печивото да се намира в
средата на фурната. Ако желаете повече топлина отдолу,
използвайте по-ниските нива. За да е вкусно печеното,
увийте месото със сланина или бекон и го поставете в
горната част на фурната.
Следващият път задайте с 10°C по-висока температура и
намалете продължителността на печене.
Когато сладкишът спада
Използвайте по-малко течност или намалете
температурата с 10°C.
Когато сладкишът потъмнява отгоре
Поставете го по-долу, задайте по-ниска
температура и увеличете времето на печене.
Когато сладкишът отвън е изпечен добре, но
отвътре е клисав
Използвайте по-малко течност, намалете
температурата и увеличете времето на печене
Използване на грила
Важно: оставете ястието да се пече при затворена
врата на фурната, за да постигнете възможно найдобри резултати и едновременно с това чувствителна
икономия на енергия (около 10 %).
При използване на функцията грил, поставете скарата
на последните нива отдолу нагоре (виж таблицата
относно печенето), след което, за да съберете мазнината
и да избегнете образуването на дим, поставете тавичка
на първото ниво отдолу нагоре.
Когато сладкишът не се отлепя от формата
Намажете добре формата с мазнина и я поръсете с
малко брашно, или използвайте хартия за печене.
30
Редовна поддръжка и почистване на готварската печка
Смяна на крушката във фурната
• Изключете електрическото захранване на фурната
чрез прекъсвача, използван за свързване на фурната
с електрическата инсталация, или извадете щепсела,
ако е достъпен;
• Отвийте стъкления капак на лампата;
• отвийте крушката и я заменете с нова, устойчива на
висока температура (300°C), със следните
характеристики:
- Напрежение 230V
- Мощност 25W
- Фасунга E14
• Поставете обратно стъкления капак и свържете
отново уреда с електрическото захранване.
Преди да започнете да правите каквото и да било,
изключете
печката
от
електрическото
захранване. За по-дълъг живот на уреда е необходимо
редовно да го почиствате старателно, като имате
предвид, че:
• при почистването не бива да се използват устройства
на пара
• емайлираните части и самопочистващите се панели,
ако има такива, се мият с хладка вода, без де се
използват абразивни прахове и разяждащи
вещества, които биха могат да ги увредят;
• вътрешността на фурната се почиства, с определена
периодичност, когато още не е изстинала напълно,
като се използва топла вода и препарат за миене и
впоследствие се изплаква и подсушава старателно;
• дюзите с отвори за излизане на пламъка трябва
редовно да се мият с топла вода и препарат, като
внимателно се отстраняват налепите.
• електрическите котлони (когато такива са налице) се
почистват с влажен парцал и се намазват с малко
олио, докато са още хладки;
• при готварските печки, снабдени с автоматично
запалване, трябва редовно старателно да се
почистват накрайниците на електронните запалки и
да се проверява дали отворите за излизане на
пламъка на газовите котлони не са запушени;
• неръждаемата стомана може да стане на петна, ако
продължително време е в контакт със силно варовита
вода или агресивни миещи препарати (съдържащи
фосфор). Препоръчваме добре да изплаквате и
подсушавате след почистване. Също така, добре е
да подсушавате всяка разлята вода.
• При моделите, снабдени със стъклен капак,
почистването му става с топла вода, като трябва да
се избягва използването на груби парцали или
абразивни вещества.
Забележка: избягвайте да затваряте капака,
докато газовите котлони са все още топли.
Почистете евентуалните течности по капака,
преди да го отворите.
Важно: периодично проверявайте състоянието на
гъвкавата тръба за газта и при първата поява на някаква
аномалия, я сменете. Във всеки случай се препоръчва
тя да се сменя веднъж годишно.
Смазване на ключовете
С времето може да се случи някой от ключовете да
блокира или да се завърта трудно, поради което да се
наложи подмяната му.
Забележка: Тази операция трябва да бъде
извършена от техник, оторизиран от
производителя.
Отстраняване на капака
Капакът на печката може да бъде демонтиран, за
улесняване на почистването му. За демонтажа на капака,
е необходимо да го отворите докрай и да го издърпате
нагоре (виж фигурата).
31
Практически съвети при печене
Ястия за готвене
Тегло
(Kg)
Ниво на
печене
отдолу
нагоре
Температура
(°C)
Предварително
загряване
(минути)
Време за
печене
(минути)
Паста (макаронени ястия)
Лазаня
Канелони
Паста огретен
2,5
2,5
2,5
3
3
3
210
200
200
10
10
10
60-75
40-50
40-50
Месо
Телешко
Пиле
Патица
Заек
Свинско
Агнешко
1,7
1,5
1,8
2,0
2,1
1,8
3
3
3
3
3
3
200
220
200
200
200
200
10
10
10
10
10
10
85-90
90-100
100-110
70-80
70-80
90-95
Риба
Скумрия
Морска риба
Пъстърва в хартия за печене
1,1
1,5
1,0
3
3
3
180-200
180-200
180-200
10
10
10
35-40
40-50
40-45
Пица
Наполетана
1,0
3
220
15
15-20
Торти
Бисквити
Ронлива торта (торта Кростата)
Солени торти
Сладкиши с набухватели
0,5
1,1
1,0
1,0
3
3
3
3
180
180
180
165
15
15
15
15
30-35
30-35
45-50
35-40
1
1,5
1
1
4 бр.
4
4
3
4
4
-
5
5
5
5
5
15-20
20
7
15-20
5
Печене на скара
Телешки пържоли
Шницели
Хамбургери
Скумрия
Тостове
Забележка: Времето за печене е препоръчително и може да се променя съобразно личния вкус. При печене на
скара тавичката за събиране на мазнината трябва винаги да се поставя на първото ниво отдолу нагоре.
32
Viale Aristide Merloni 47
60044 Fabriano
Italy
Tel +39 0732 6611
Fax +39 0732 662501
www.indesit.com
Cucina con forno gas e grill elettrico
08/05 - 195046746.01
Indesit Company spa