1
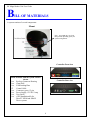
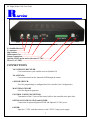
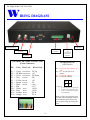
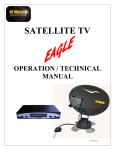
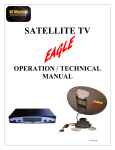
Mobile Satellite Solutions
A WiWorld Partner
SATELLITE TV
ANTENNA CONTROLLER
RFM-1000
TECHNICAL MANUAL
SEARCH STOW
Ver. 11 Dec. 2011
RF Mogul Indoor Unit User Guide
2
RF Mogul Indoor Unit User Guide
I
ndex
System Bill of Materials
4
Controller Front View
5
LCD Graphics
6
Controller Rear View
7
Configuration
8
Special Function Dip Switch Settings
9
Manual Movement
10
Wiring Diagram
11
Operation
12
LCD Displays
13
Service Messages
15
Firmware Upgrade
16
Warranty
17
Product Support
23
3
RF Mogul Indoor Unit User Guide
B
ILL OF MATERIALS
A system consists of several components.
Mount
Note: Your LNB may vary from
that pictured depending upon your
system configuration.
Controller Front view
Items included with the system and not
shown.
1 ea Roof top Connector Housing
1 ea Clam Shell
1 ea LNB Landing Plate
15'
Control Cable
1 ea Connector, green, 12 pin
1 ea Power Supply, 12 VDC 5 amp
1 ea User Guide
1 ea vGPS Installation Kit for
DirecTV SWM and SHAW
Direct systems.
Controller Rear view
4
RF Mogul Indoor Unit User Guide
F
ront view
LCD Display
POWER "ON".....
SD Card Slot ...............
LCD Display........................
SEARCH ......................................
STOW .....................................................................
Note: Pressing SEARCH / STOW at the same time will turn POWER OFF.
5
RF Mogul Indoor Unit User Guide
L
CD graphics
CONFIGURATIONS
TV Network DirecTV SWM=
Dish Network =
Bell Express =
SHAW Direct =
101, 99, 103 Satellites
110, 119, 129 Satellites
82, 91 Satellites
(For Canadian Use Only)
107.3, 111.1 Satellites (For Canadian Use Only)
CONDITIONS
Dish Stowed
Power shuts down automatically after 10 seconds. If dish is stowed and power is turned
ON, the display will continue to show Stowed for two minutes if no other command is
selected then the power will shut down automatically.
Searching
Will display as the dish is in the searching routine and not peaking.
Peaking
Will display if the dish is peaking a signal.
Locked
Will display when the dish has completed searching and is Locked onto the
correct satellite (s) (TV Services). Two 1/2 minutes after locking onto satellite(s) the power
will shut OFF.
Stowing
Will display when dish Stow command has been selected and the dish is moving to the
Stowed position. When STOWED the Power will shut OFF automatically.
6
RF Mogul Indoor Unit User Guide
R
ear view
Model No.
Controller-1
To Satellite Receiver
To Antenna..................
Dip Switches .........................
Maintenance Port ..........................
Mount Connections.........................................
Ignition STOW option and/or alternate 12 VDC...............
Power IN (12 VDC).......................................................................
CONNECTIONS
TO SATELLITE RECEIVER
Coax connection to your satellite receiver (Satellite IN)
TO ANTENNA:
Coax connection from the Antenna's LNB though the mount
6 PIN DIP SWITCH:
Used for programming or configuration of the controller (See Configuration)
MAINTENANCE PORT
Used for diagnostic purposes
CONTROL CABLE CONNECTION:
Termination of the 12 wires of the control cable to the controller takes place here.
OPTIONAL IGNITION STOW and POWER:
Connection for optional Ignition STOW and Optional 12 VDC power
POWER:
Input for 12 VDC cord that connects to the 12VDC 5 amp. power supply.
7
RF Mogul Indoor Unit User Guide
C
onfiguration
Configurable Dip Switch
On the back of the controller are 6 Dip Switches which are used to program or configure the controller to
which of the services and or satellites to locate. The position of these switches will only be read at
POWER ON. To program or configure your controller to your specific needs the dip switches will be
required to be placed into one of the following positions.
El 45 degrees up, Skew 45 degrees, return to
Skew 0 degree, Az 360 degree turn to
clockwise limit, return to stow position and
stow. Continuous movement of the mount
until power OFF.
Canadian Use
Canadian Use
El 45 degrees up, Skew 15 degrees, simulate
satellite peak, clockwise in Az to 45
degrees, return to Skew 0 degree and stow.
Continuous movement of the mount until
power OFF.
8
RF Mogul Indoor Unit User Guide
S
PECIAL FUNCTION Dip Switch Settings
The Dip Switches may be configured to operate the mount in a special way depending upon their
settings. The position of these switches will only be checked at POWER ON. After the settings have been
changed the controller will follow the commands given by the changed settings. The "Special Functions"
will perform the following actions:
To EXIT any of the following functions press SEARCH and STOW at the same time then
release. This will power OFF the controller and allow you to change the dip switch settings.
SHOW Mode
When the switches are in this position and you power up and press the SEARCH button, the mount
will
• Raise in Elevation,
• Skew a predetermined amount,
• Rotate 45% in Azimuth,
• Simulate peaking on a satellite,
• Pause and then return to the stowed position and will continuously repeat this procedure until the
dish is stowed. It is designed to show the mount in all its movements for display purposes.
MANUAL Movement AZimuth
When the switch is in this position and you turn ON power and press the SEARCH button, the
mount will respond by
moving clockwise. Press the STOW button and the mount will respond by moving
counterclockwise in azimuth
MANUAL Movement ELevation
When the switch is in this position and you turn ON and press the SEARCH button, the mount will
respond by
moving UP. Press the STOW button and the mount will respond by moving DOWN in elevation.
MANUAL Movement SKew
When the switches are in this position and you turn ON and press the SEARCH button the antenna
will respond by
rotating clockwise. Press the STOW button and the antenna will respond by rotating
counterclockwise.
Note: It is the responsibility of the person changing the settings to return them to the proper configuration
following any Special Setting change. Only change the dip switch configuration when the power is OFF.
If your system does not seem to operate properly, turn the power off (see procedure above) and check the
position of the Dip Switches. When the controller is reconfigured to "Auto" mode after using it in
"Manual" Mode and the mount is not in the stowed position it will STOW the dish before
performing the SEARCH feature.
9
RF Mogul Indoor Unit User Guide
M
ANUAL MOVEMENT
The Manual Movement mode will "manually" move the mount when the dip switches are put in a
specific mode and powered ON. It will allow you to move the mount in all directions in Elevation,
Azimuth and Skew.
CAUTION: The mount will move at your command. DO NOT rotate CLOCKWISE past the
CLOCKWISE LIMIT. To do so may cause damage to the mount. It may be rotated manually anywhere
within the AZIMUTH limit range. Counter Clockwise is ok at any time. Do not blind move your dish.
KNOW YOUR LIMITS BEFORE USING THIS COMMAND.
SEARCH button - Raises
STOW button - Lowers
SEARCH button - Clockwise
DOWN button - CounterClockwise
SEARCH button - Clockwise
DOWN button - CounterClockwise
Turning Power ON will
start the automatic SHOW
movement
10
RF Mogul Indoor Unit User Guide
W
IRING DIAGRAM
To Satellite Receiver
12 VDC Input
Control Cable
Connection
To Antenna
Dip Switches
CONTROLLER CABLE CONNECTOR
(Green Connector)
Pin
Color
How Used
P1 =
P2 =
P3 =
P4 =
P5 =
P6 =
P7 =
P8 =
P9 =
P10 =
P11 =
P12 =
Violet Limit Sensor
Dk Blue Limit Sensor
Green Limit Sensor
Gray Encoder
Yellow Encoder
Brown Encoder
Black Ground
Red
White Power
Pink
Power
Lt Blue Power
Orange Power
Ignition Stow
and
12 VDC Input
(This Port is
Optional)
IGNITION STOW
(OPTIONAL)
Where Used
P1 = To Positive side of Battery 12
VDC
P2 = To + 12 VDC side of car
ignition
P3 = To Ground of Battery
P4 = To Ground of Battery
EL Up
AZ
EL Down
SK
AZ
EL
2+ 1+
4- 3-
GND
VCC
AZ-B
AZ-A
EL-B
EL-A
Connections:
•
P1 to the side of the car ignition and
•
P2 to the +side of your battery and
•
P3/P4 are connected to the negative
side of the battery
When you turn your ignition key ON,
your dish will automatically return to
the STOWED position which is the
travel position when wired using this
plug.
11
RF Mogul Indoor Unit User Guide
O
peration
POWER ON
Pressing the POWER ON button will turn ON the power to the controller enabling it
to perform the next function. Wait for this display to appear.
SEARCH (UP)
Pressing the SEARCH button will instruct the mount to begin its searching routine
and locate the satellites according to the settings of the dip switches.
STOW: (DOWN)
Pressing the STOW button will instruct the mount to return to its Stowed or travel
position and turn power OFF automatically. Note: be sure 12 VDC is present.
SEARCH (UP) & STOW (DOWN): Pressing the SEARCH and STOW buttons at the same time will
manually turn the Power OFF.
AFTER LOCKING ONTO THE PROPER SATELLITE: The controller will remain ON and then turn
off after 2 1/2 minutes. To STOW the dish press the POWER ON button to turn the controller ON and then
press STOW.
The displays will look like this for each function
(CONFIGURATION refers to the Dip Switch settings that determine which satellites to locate.)
See LCD Displays in this manual for all displays.
12
RF Mogul Indoor Unit User Guide
M
EANING OF LCD DISPLAY
13
RF Mogul Indoor Unit User Guide
These displays will assist in the understanding of each function of the controller. These steps and
displays will also assist in diagnosing any abnormalities in the operation of the system. You will find it
interesting to follow along with what the controller is doing at any given time. Remember, the only thing
you have to do to operate this system it to.....
1. Turn POWER ON, wait approximately 5-7 seconds...
2. Press SEARCH or STOW depending on what you want the mount to do.
3. Wait for "LOCK". POWER will turn OFF 2 1/2 minutes after LOCK
14
RF Mogul Indoor Unit User Guide
S
ervice messages
Service messages will be displayed on the LCD screen should a condition occur that a person should be
alerted to. If a condition should occur the following Service Messages will be displayed:
Service Message
AZ Count
Is displayed if azimuth motor current can be detected in both directions but no counts are
detected.
AZ Motor
Is displayed if no azimuth motor current is detected or Maximum azimuth motor current is
detected and there are no counts.
AZ Limit
Is displayed when total azimuth motor counts exceed maximum count value plus 20%.
EL Count
Is displayed if elevation motor current can be detected in both directions but no counts are
detected.
EL Motor
Is displayed if no elevation motor current is detected or Maximum elevation motor current
is detected and there are no counts.
EL Limit
Is displayed when total elevation motor counts exceed maximum count value plus 20%.
SK Count
Is displayed if skew motor current can be detected in both directions but no counts are
detected.
SK Motor
Is displayed if no skew motor current is detected or Maximum skew motor current is
detected and there are no counts.
SK Limit
Is displayed when total skew motor counts exceed maximum count value plus 10%.
No Signal
Is displayed when the Antenna Controller has searched the entire sky but no signals were
detected to stop and peak.
No Sat ID
Is displayed when the Antenna Controller has searched and Peaked the entire
sky but no Satellites were ID’ed.
15
RF Mogul Indoor Unit User Guide
F
irmware upgrade
Should any firmware upgrades be available they will be posted on RF Mogul WEB site www.rfmogul.com
under "Software Upgrade". Select "Television" and download the latest software to your Desktop and
transfer the file to your SD Card in the "root directory". Make sure that this is the only file listed in your
"root directory". Insert your SD Card into the controller and turn power ON. The software will
automatically download to your controller. Remove the SD Card once the load function is complete.
When should you think about downloading new software?
1. To take advantage of new innovative features offered by the latest revision of software.
2. If you have called your installer and he recommends it.
3. If you read the History of the new software and you determine that you could benefit from its
features.
16
RF Mogul Indoor Unit User Guide
W
ARRANTY
Effective
3 Dec 2011
RF Mogul
2 YEAR Limited with 3rd YEAR Option
TELEVISION Product Warranty
RF Mogul will warrant this product against defects in materials or workmanship when
operated within the constraints of its intended use for a period of two (2) years from the date of
original purchase.
REQUIREMENTS FOR WARRANTY
1. No warranty claim will be honored unless at the time the claim is made, the customer presents
proof of purchase to an authorized RF Mogul or its authorized dealer. Customer must provide
proof of purchase with a dated sales receipt of installation of the RF Mogul product to verify
the product is under warranty. If the date of purchase/installation cannot be verified, the
warranty period shall be considered to begin thirty (30) days after the date of manufacture.
2. The party placing an order for a warranty item will be required to place a Credit Card on file
with RF Mogul prior to a part being sent out. The card will only be charged as per the
agreements in the warranty listed except in the case of:
a) Non return of an item (See "Returning Parts to the Factory" for details) or
b) If upon inspection of the returned item no defect is found. If no problem is
found in the returned item, the parties credit card will be billed for freight from
and to the factory and will be charged for the replaced part regardless of
status of warranty.
3. It is the responsibility of the requester of the replacement part to see that the defective part is
returned to RF Mogul in good condition and in a timely manner.
17
RF Mogul Indoor Unit User Guide
F
IRST YEAR
AFTER DATE OF INSTALLATION
During the First year after installation, RF Mogul will warranty its product against defects
when it has been installed and operated within the constraints of its intended use. The customer will
have two (2) options should their system fail due to one of these defects.
OPTIONS
• Option 1 - At the request of the customer, RF Mogul will send to the customer by ground freight a
replacement part at no charge and provide instructions to the customer on proper installation
procedures and pay a 'Flat Rate' for the part replacement.
• Option 2 - At the request of the customer, RF Mogul will provide a list of authorized dealers to
the customer and the customer can make arrangements for an authorized dealer to order and or
replace the defective part and pay this authorized dealer the flat rate as determined by the "Flat
Rate" schedule for the part replacement.
FREIGHT
• RF Mogul will pay for freight both ways during the first year.
• Freight will be prepaid to RF Mogul by way of a UPS Call Tag provided.
DEFECTIVE PARTS
• The defective part(s) will be required to be returned to RF Mogul for inspection and evaluation.
See "Returning Parts to the Factory" for details.
RESPONSIBILITY
• The customer is responsible for travel expenses when travel is required to get to a dealer for repairs.
Customer is responsible for any charges over and above the "Flat Rate" Schedule.
• RF Mogul will pay the party replacing the defective part a "Flat Rate" for its replacement after it is
returned to the factory and it has been inspected and verified that it is a "defective part".
• See Items 2-3 under Requirements for Warranty.
18
RF Mogul Indoor Unit User Guide
S
ECOND YEAR
AFTER DATE OF INSTALLATION
When installed and operated within the constraints of its intended use following the first year
after installation and for the one (1) additional year which is year two (2), RF Mogul will replace a
part found to be defective at no charge.
OPTIONS
• Option 1 - At the request of the customer, RF Mogul will send to the customer by ground freight a
replacement part at no charge for the part and provide instructions to the customer on proper
installation procedures.
• Option 2 - At the request of the customer, RF Mogul will provide a list of authorized dealers to
the customer and the customer can make arrangements for an authorized dealer to order and or
replace the defective part and pay this authorized dealer for the part replacement.
FREIGHT
• The requesting party will be responsible for the freight from and to the factory.
DEFECTIVE PARTS
• The defective part(s) will be required to be returned to RF Mogul for inspection and evaluation.
See "Returning Parts to the Factory" for details.
RESPONSIBILITY
• It is the customers responsibility for travel expenses when travel is required to get to an authorized
dealer for service and for any charge by that dealer.
• See Items 2-3 under Requirements for Warranty.
Failure to find a defect or failure to return a part will result in the execution of the terms of item 2 of
this Requirements For Warranty agreement.
19
RF Mogul Indoor Unit User Guide
Y
EAR THREE
AFTER DATA OF INSTALLATION
OPTION
EXTENDED WARRANTY $350.00
When installed and operated within the constraints of its intended use following the SECOND year
after installation and for the one (1) additional year which is year THREE (3), RF Mogul will
replace a part found to be defective at no charge and pay the freight from and to the factory and pay
the fixed rate for repair based upon the "Fixed Rate" schedule. This option is non-transferable and
available only to the original purchaser of the product at the time of installation. It is not and will
not be offered at any other time.
OPTIONS
• Option 1 - At the request of the customer, RF Mogul will send to the customer by ground freight a
replacement part at no charge and provide instructions to the customer on proper installation
procedures and pay a 'Flat Rate' for the part replacement.
• Option 2 - At the request of the customer, RF Mogul will provide a list of authorized dealers to
the customer and the customer can make arrangements for an authorized dealer to order and or
replace the defective part and pay this authorized dealer the flat rate as determined by the "Flat
Rate" schedule for the part replacement.
FREIGHT
• RF Mogul will pay for freight both ways during the extended warranty period.
• Freight will be prepaid to the customer and returned to RF Mogul by way of a UPS Call Tag
provided.
DEFECTIVE PARTS
• The defective part(s) will be required to be returned to RF Mogul for inspection and evaluation.
See "Returning Parts to the Factory" for details.
RESPONSIBILITY
• It is the customers responsibility for travel expenses when travel is required to get to an authorized
dealer for service and for any charge by that dealer.
• See Items 2-3 under Requirements for Warranty.
Failure to find a defect or failure to return a part result in the execution of the terms of this
warranty agreement
20
RF Mogul Indoor Unit User Guide
Parts Covered Under Warranty:
•
•
•
•
•
•
Motors - Azimuth, Elevation and Skew
Sensors - Azimuth, Elevation
Worm Drive/Gear - Azimuth, Elevation
Mount Base (excluding Skew Assembly, Antenna, LNB and LNB Arm)
Skew Assembly (excluding Mount Base, Antenna, LNB and LNB Arm)
Controller (In Door Unit)
Note: When it is determined that repairs cannot be made effectively in the field, a replacement unit (see
Mount and Skew Assembly above) may be shipped and the defective unit returned to the factory for repairs.
Replacement costs are specified in warranty periods; 90 Days, First Year after 90 Days and Year Two. See
"Returning Parts to the Factory" for details.
Failure to find a defect with the returned part will result in execution of the terms of this warranty agreement
Parts not covered under warranty:
•
•
•
•
•
Antenna (parabola)
LNB Arm
Cables - Coax or Control
Azimuth/Elevation Covers
Any part that has been determined to be abused or used in a way as to cause undo damage
Note: Replacement parts may be purchased from RF Mogul for repairs.
Flat Rate Schedule
The Flat Rate Schedule is a Labor Rate that RF Mogul will pay to replace the parts listed below when they
are found to be defective.
•
•
•
•
•
•
•
Motors - Azimuth, Elevation and Skew
$ 50.00
Sensors - Azimuth, Elevation
$ 50.00
Worm Drive/Gear - Azimuth, Elevation
$ TBD
Mount Base - (The Skew Assembly, Antenna, LNB and LNB Arm
will be required to be removed and reinstalled)
$ 100.00
Skew Assembly - (excluding Mount Base, Antenna, LNB and LNB Arm) $ 50.00
Controller - (In Door Unit)
$ 25.00
Note: The defective part will be required to be returned to RF Mogul for inspection and evaluation. See
Items 2-3 under Requirements for Warranty. See "Returning Parts to the Factory" for details.
21
RF Mogul Indoor Unit User Guide
RETURNING PARTS TO THE FACTORY
Parts returned to the factory must contain a Return Material Authorization (RMA) which will be provided
by the RF Mogul Technical Support Department at the time of troubleshooting. This will ensure proper
accountability of returned equipment or parts. Make sure that the following information is contained on
your shipment.
RF Mogul
Attn: Product Evaluation Department
RMA # _______________
3604 South Via Terra
South Salt Lake City, UT 84115
You must include your Return Address and Telephone Number failure to do so may result in you being
billed for a non-returned part.
We appreciate your business. If you need to contact us please see
the information below.
RF Mogul
3604 Via Terra
South Salt Lake City, UT 84115
Tele 801-895-3308
Fax 801-478-5850
www.rfmogul.com
[email protected]
[email protected]
Thank you for purchasing a RF Mogul System.
22
RF Mogul Indoor Unit User Guide
P
RODUCT SUPPORT
For product support please contact the following
UNITED STATES
• Your Installing Dealer is your first line of defense. If resolution cannot be made it may be passed
onto the manufacture
The manufacture
RF Mogul
3604 South Via Terra
South Salt Lake City, UT 84115
Tel - 801-895-3308
www.rfmogul.com
CANADA
Your installing Dealer or Distributor
Your issue may be passed onto the manufacture for assistance
MEXICO
Your installing Dealer or Distributor
Your issue may be passed onto the manufacture for assistance
23