1
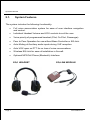
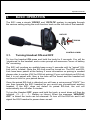
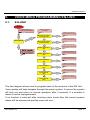
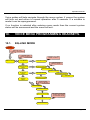
EQ-LINK SYSTEM
&
EQ1 WIRELESS
AVIATION HEADSETS
No part of this manual may be copied, transcribed, translated or reproduced in
any manner or form whatsoever, for commercial purposes, without obtaining
prior written permission from Lysar Industries. However, limited copying is
permitted for private use providing authorship is acknowledged.
Caution
No internal changes to the equipment may be performed or this could void the
user’s authority to operate the equipment.
© Copyright of Lysar Industries 2008, 2009, 2010, 2011.
Print date: January 2011
Literature Reference: EQ1 & EQ-Link Guide
Manual Title
CONTENTS
1.
Introduction ........................................................................................... 1
1.1.
About This Manual ........................................................................... 1
1.2.
Glossary of Terms ............................................................................ 1
2.
Functional Overview ............................................................................. 3
2.1.
System Features .............................................................................. 4
3.
3.1.
3.2.
3.3.
3.4.
Basic Operation .................................................................................... 5
Turning Headset ON and OFF ......................................................... 5
Volume Adjustment .......................................................................... 6
Menu Mode....................................................................................... 6
EQ-Link Controls .............................................................................. 8
4.1.
Advanced Operation (Headset mode) .................................................. 9
Headset Mode .................................................................................. 9
5.1.
5.2.
5.3.
5.4.
5.5.
5.6.
System functions ................................................................................ 10
EQ-Link........................................................................................... 10
EQ-Link Pairing .............................................................................. 10
Multiple Headset Configuration and Pairing................................... 11
PTT Detection................................................................................. 11
Optional MP3 or Cell Phone Interface............................................ 11
EQ-Link Communications Settings................................................. 13
4.
5.
6.
Installation........................................................................................... 14
6.1.
Installation EQ-Link ........................................................................ 14
7.
Headset / EQ-LINK charging .............................................................. 15
8.
Hints and Tips on Operation. .............................................................. 16
9.
9.1.
9.2.
9.3.
Voice menu Programming EQ-Link. ................................................... 17
EQ-LINK ......................................................................................... 17
Microphone Noise Reduction ......................................................... 18
Echo Reduction .............................................................................. 18
ATO Aviation Inc.
Contents 1
Manual Title
9.4.
9.5.
Intercom Mode................................................................................ 18
Phone Mode ................................................................................... 18
10.
Voice menu Programming Headsets. ................................................. 19
10.1.
EQ-LINK MODE ............................................................................. 19
11.
Device Specifications.......................................................................... 21
12.
Legal ................................................................................................... 22
Contents 2
Lysar Industries
Operation Manual
1.
INTRODUCTION
1.1.
About This Manual
The main purpose of this manual is to provide information to ensure the
optimum use and performance of the EQ1 Link Wireless Aviation headset
system.
It also provides advanced information for users who require extra functions
other than those supplied “out of the box”. This manual also contains
programming data that refers to option products that the EQ1 headset can be
used with.
1.2.
Glossary of Terms
VOX
SIDE TONE
ANC
AEC
Hz
ID
kHz
MHz
PSU
PTT
DSP
ATO Aviation Inc
Voice Operated Switch
This is a mechanism whereby the voice sounds trigger an
electronic switch to turn a circuit on, usually it links the
microphone to the transmitter or other headsets.
This is the small amount of your own voice that you hear
in your own ears when talking.
Active Noise Cancellation
This process used electronic circuits to reduce the sounds
that you hear in your own ear from external noise.
Active Echo Cancellation
Hertz (measure of frequency)
Identification
Kilohertz (measure of frequency)
Megahertz (measure of frequency)
Power Supply Unit
Press To Talk
Digital Signal Processor
Page 1
HF-90M Installation & Operation Guide
Page 2
ATO Aviation Inc.
Operation Manual
2.
FUNCTIONAL OVERVIEW
Thank You for purchasing the EQ1, EQ-Link system.
The EQ-Link Wireless Aviation Headset system is a state of the art audio
communication device specifically designed for Aviation headset applications
in high noise environments.
The EQ-1 Headset includes re-chargeable batteries and active noise
cancelling circuits for optimum listening pleasure. The headset features only
essential controls to ensure ease of operation. Advanced configuration and
operations can be accessed using the simple voice menu controls.
The development of the EQ1 Wireless Communications system represents a
significant breakthrough in the field of high noise communications without
wires.
The technical specification of the EQ1 will enable reliable communications up
to distances of 30 feet (about 10 meters), depending on conditions. In addition,
the EQ-1 transceiver incorporates superior signal handling capability, which
ensures excellent reception even in the most crowded radio environments.
In short, this revolutionary new system incorporates the very latest in RF
design technology, making the EQ-1 the most versatile, high performance
wireless headset communications solution available suitable for high noise
open and closed cockpit applications.
ATO Aviation Inc
Page 3
Operation Manual
2.1.
System Features
The system includes the following functionality:
x
Full voice annunciation system for ease of user interface navigation
and control.
x
Individual Headset Volume and VOX controls to suit the user.
x
Voice priority of programmed headset (Pilot, Co-Pilot, Passenger).
x
Peer to Peer Operation for use without Base Controller or EQ-Link.
x
Auto Muting of Auxiliary audio inputs during VHF reception.
x
Auto VOX open on PTT for no loss of voice conversations.
x
Wireless EQ-Link for ease of installation in Aircraft.
x
Optional MP3/Cell Phone (Bluetooth) Interface.
EQ-1 HEADSET
Page 4
EQ-LINK MODULE
ATO Aviation Inc.
Operation Manual
3.
BASIC OPERATION
The EQ1 uses a simple ‘PRESS’ and ‘ROTATE’ system to navigate through
the various setting using the multi function knob on the left side of the headset.
ROTATE
PRESS
CONTROL KNOB
3.1.
Turning Headset ON and OFF
To turn the headset ON press and hold the knob for 2 seconds. You will be
‘introduced’ to the headset, and a voice prompt will announce "hours of battery
life" remaining.
The EQ1 will produce an audible beep every 5 seconds until its "paired" EQLink unit is located. (Note the EQ-Link must be turned on. The EQ1 and EQLink have been paired at the factory If more information on pairing is needed
please refer to section XXX for EQ-Link pairing) If your unit detects an EQ-Link
that it is not paired with, then a low tone will be heard and the headset will
continue to look for your paired device.
Once the paired EQ-Link is detected you will hear a voice prompt "XXXX" You
can then operate the EQ1 headset as you would any conventional aviation
headset. If the EQ1 does not detect its paired EQ-Link, the unit will
automatically turn off after 2 minutes.
To turn the Headset OFF, press and hold the knob, a count down will then be
initiated. (3…..2……1… Battery xx Hours). When the message “HEADSET
OFF” is heard the knob can be released. Or turn off the EQ-Link and it will
signal the EQ1 headset to power down as well
ATO Aviation Inc
Page 5
Operation Manual
3.2.
Volume Adjustment
The volume is adjusted by rotation of the knob, to increase rotate clockwise
and to decrease wind anti-clockwise, the volume level setting will be
announced with a voice prompt. The volume has been factory preset to a level
of 4.
Increase and decrease by rotating the knob one click at a time and
listen to the voice prompt to announce volume level setting.
3.3.
Menu Mode
PRESS The KNOB 3 TIMES
The Headset will then speak “MENU MODE”.
When this is performed the headset enters the Voice Menu System,
Note: if no more actions take place then the headset will exit the menu system
after 10 seconds.
Rotate the knob for:
“VOX SETTINGS, CONFIGURATION and ADVANCED” (please
refer to the flow chart on page XX for other menu setting instructions)
Press knob to confirm menu selection
When the EQ1 is in the VOX menu the knob can be rotated to select the value
and sensitivity of the VOX circuits, a higher number means a louder voice is
required to activate the VOX system.
“ONE, TWO, THREE……….…..TEN”
Page 6
ATO Aviation Inc.
Operation Manual
When the desired VOX setting is reached press the knob to save and
confirm the setting.
The headset will then automatically leave the menu system and return to
normal operation.
ATO Aviation Inc
Page 7
Operation Manual
3.4.
EQ-Link Controls
The EQ-Link has a number of controls and system inputs, these are described
below:
Mini USB
Used for charging.
3.5mm Audio
User for Cell Phone/Blue Tooth or MP3 player.
Status Button
Used to read battery capacity, transmitted to headset.
Used also to change mode from Master to Slave.
Used to enter Menu Mode for advanced features.
Status LED’s
Green is used for charging indication and Master Indication.
Yellow is used for PTT indication and Slave Indication.
Status LED’s
Mini
USB
Audio in
Page 8
Status Button
ATO Aviation Inc.
Operation Manual
4.
ADVANCED OPERATION (HEADSET MODE)
4.1.
Headset Mode
Enter the programming voice menu as above.
Rotate the knob for:
“CONFIGURATION”
Press knob to confirm the menu selection.
Rotate the knob for:
“MASTER, PILOT, CO-PILOT, PASSENGER or EQ-LINK”
Press knob to confirm the menu selection.
The EQ-1 has been factory preset to the "EQ-Link" mode and paired with the
EQ-Link module that comes with your kit. The other configuration settings can
be disregarded if using as "Link" headset.
When using multiple EQ-1 headset paired to a single EQ-Link module the
"passenger" setting should be selected and all other settings can be
disregarded. Also please read the section "multiple headset configuration and
settings" section on page 11
ATO Aviation Inc
Page 9
Operation Manual
5.
SYSTEM FUNCTIONS
5.1.
EQ-Link
The EQ-Link is the heart of your headset system that wirelessly connects the
EQ-1 headsets and provides the interface for your radio and communications
system.
The EQ-Link must be plugged into an intercom system and will power on when
your aircraft’s communication system is energized.
5.2.
EQ-Link Pairing
The EQ-Link has been paired at the factory with the supplied EQ-1 headset.
No other adjustments are required.
However if you wish to pair a headset to a new EQ-Link:
Enter Advanced menu mode and select "pairing" from the advanced menu
settings (refer to the flow chart section 10.1)
Power the EQ-Link. Either plug the link into your intercom inputs in the aircraft
or by plugging the mini USB charging cable in an appropriate power source
(USB port on your P.C. or supplied 12 volt adapter)
Ensure that the EQ-Link that you wish to pair to is set to Master.(see P13)
The headset should then detect the EQ-Link and announce the last 4 digits of
the serial number of EQ-Link. This serial number can be found on the back to
the EQ-Link. If this is the correct unit as indicated in the headset then press
the button on the headset to confirm.
Your headset is then paired to this EQ-Link and will only link to this unit when
in "Link" or "passenger" mode.
Page 10
ATO Aviation Inc.
Operation Manual
5.3.
Multiple Headset Configuration and Pairing
EQ-Link will allow multiple EQ-1 headsets to be paired to the same EQ-Link
module. It should be noted that the multiple headset configuration is
intended for passenger communications only and should be plugged in
to a "passenger" input on the intercom system. EQ-Link operates in a
semi duplex mode and does not have the ability to distinguish between
pilots and passengers. Plugging an EQ-Link with multiple paired
headsets in a pilot input could potentially interfere with important VHF
communications.
For optimum performance all EQ-1 headsets should be set to "passenger"
setting as described Section 4.1 "Headset Mode"
Each EQ-1 headset will need to be paired to the EQ-Link module as described
in Section 5.2 "EQ-Link Pairing"
5.4.
PTT Detection
The EQ-Link can detect when the aircraft PTT is activated, this is indicated by
the YELLOW LED going fully on. This can aid in the detection of PTT Faults
and also as a general PTT indication.
On each PTT press a short tone (BEEP) will be heard in the headset and
when PTT is released a short tone (BOP) will also be heard. We call these
comfort tones and they give feedback that you really have pressed and
released the PTT button in the aircraft.
Note: only available when aircraft’s headset sockets are wired for PTT
The VHF radio system has override priority and will mute all other ancillary
inputs such as MP3, cell phone UHF etc; when a PTT signal is detected on
this input. Some aircraft may not have this active on the headset sockets and
hence this feature will not work.
5.5.
Optional MP3 or Cell Phone Interface
The EQ-Link has additional inputs suitable for Cell or MP3 type connections,
these are available on the 3.5mm connector at the end of the EQ Link.
ATO Aviation Inc
Page 11
Operation Manual
Note:
During VHF reception 3.5mm Audio input is muted to the headsets, this will
always enable clear reception of all VHF radio traffic.
An optional EQ-1 Blue Tooth Module specially designed to suit the EQ-1
System is available for Cell phone interface. When using this module ensure
that the module is mounted at least 400mm away from the EQ Link to avoid
RF interference. Usually the Blue Tooth module should be positioned in an
accessible area of the aircraft.
Page 12
ATO Aviation Inc.
Operation Manual
5.6.
EQ-Link Communications Settings
The EQ-Link will function at peak performance when the aircrafts
communications settings can be adjusted to suit. The EQ-Link acts as a cable
replacement for standard Headsets and as such will receive any imperfections
in the aircraft communications system. The extra quietness of the EQ1 system
means that some electrical noises that may not have been heard with other
headsets may now become audible.
Advanced features can be activated on the EQ-Link to further assist the noise
reduction performance of the system. These modes are activated by 3 fast
clicks of the STATUS button on the EQ-Link. These modes will be announced
on the paired headset for ease of use and understanding of the functions
performed.
Standard Modes include improved noise cancelling DSP algorithms.
The graph below shows a cockpit recording in a typical light aircraft. It
highlights the difference with noise reduction off to the left and noise reduction
on to the right. The dense bits in the middle are aircraft noise.
ATO Aviation Inc
Page 13
Operation Manual
6.
INSTALLATION
6.1.
Installation EQ-Link
The EQ-Link system is supplied with a standard aviation cables and
connectors (jacks) to suit standard aviation connections. The EQ-Link system
will automatically power ON when the aircraft communications system is
turned on, and will automatically power off when the communications is
switched off. A permanent optional charge cable can be connected for peace
of mind to ensure the EQ equipment is always charged.
When you aircraft communications is switched off the EQ-Link and EQ1
Headset will automatically power OFF.
Simply connect your EQ-Link into where your normal headset would be
connected. The EQ-Link is supplied with Velcro for simple mounting and a
cable clip for additional support. For additional performance operation when
multiple EQ-Link modules are used on one aircraft simply set extra units to
SLAVE mode. In this mode all the units will operate as one and not interfere
with each other, their must be at lease one master in all systems.
Slave mode can be entered by pressing and holding the STATUS button for 4
seconds, the LED lights will then change every 2 seconds from Master to
Slave and announce this in the headset. When on the desired mode, just
release the button.
NOTE: A typical aircraft can only have one master and up to 5 slaves in the
single system for peak performance, in the case of more units please contact
your supplier for additional information on your options.
YOUR INSTALLATION IS NOW COMPLETE…………
Page 14
ATO Aviation Inc.
Operation Manual
7.
HEADSET / EQ-LINK CHARGING
The EQ1 Headsets and EQ-Link have the most advanced battery monitory
and charging system of any headset system on the market today, this ensures
that your flying will be trouble free and you are able to judge the operational
time of your headsets correctly.
The headsets and EQ-Links are fitted with the latest NiMh low loss technology.
These batteries will lose approximately 1% of their stored charge per month
when not in use. Fully charged, the headsets will provide up to 28 hours of in
flight use, and up to 35 hours for the EQ-Link system.
NOTE: The built in charge capacity indicator accuracy will diminish and not
provide accurate indications of headsets and EQ-Links that are stored for
extended periods of time. Simply re-charge the system to bring back to full
accurate capacity.
The headsets and EQ-Link can be charged from the supplied wall charger by
simply plugging the connector into the headset socket, this will automatically
power the units on and begin the charging process. This charger can charge 2
headsets or 2 EQ-Links at the same time. Every minute the headset will
announce the state of charge as a percentage of charge accumulated. This
can also be gauged at any time by briefly pressing the ON/OFF control knob.
From completely discharged the headsets should take approximately 8 hours
to charge.
The EQ-Link has a green LED to show charge status, this system will blink
faster as the charge gets to 100%. Full charge is when the green LED is fully
on. When in operation the brief pressing of the button on the EQ-Link will also
announce the charge status of the EQ-Link in the paired headset speaker.
When the systems are fully charged they will go into a preserve mode to keep
the batteries at a fully charged state with no overcharging. When charging is
complete you can just remove the power and the headsets will automatically
turn off or keep in operation for in flight use.
The Headsets and EQ-Link system can also be in-flight charged for safe
uninterrupted operation with the optional USB charging adaptor.
When the remaining battery capacity falls to 20%, (approx 5 hours flight
duration) the headsets will announce a “Low Battery Capacity” warning every
few minutes.
ATO Aviation Inc
Page 15
Operation
Operation
Manual
Manual
Operation
Manual
3.2.
6.
8.
Volume
INSTALLATION
HINTSAdjustment
AND TIPS ON OPERATION.
The volume is adjusted by rotation of the knob, to increase rotate clockwise
Maketosure
that the wind
headset
and EQ-Link units
have fully
charged
batteries.
6.1.
Installation
EQ-Link
and
decrease
anti-clockwise,
the volume
level
setting
will be
announced
a voice prompt.
The volume
been
factory
preset
to awill
level
Make
sure with
thesystem
EQ-Link
not behind
metala has
walls
in the
aircraft
ascables
this
limit
The
EQ-Link
isis supplied
with
standard
aviation
and
of
4. effective range of the system.
the
connectors (jacks) to suit standard aviation connections. The EQ-Link system
will
automatically
power
ON or
when
the
aircraft
communications
system
Make
sure the VHF
antenna
other
high
powered
transmitters are
a leastis 2
turned
andthewillheadset
automatically
power
off
when
the communications
is
meterson,
from
system.
If
the
VHF
antenna
is
too
close
to
Increase
and decrease
by charge
rotating cable
the knob
one
click at a time
andthe
switched
off.
A
permanent
optional
can
be
connected
for
peace
headsetlisten
thento Radio
frequency
back volume
will occur
the headset when
the
prompt tofeed
announce
levelinsetting.
oftransmitting
mind to ensure
thevoice
EQ
equipment
charged.
on VHF.
This
will resultisinalways
an echo
like feedback in each headset
and live
on VHF
transmit frequencies.
When
youecho
aircraft
communications
is switched off the EQ-Link and EQ1
Headset
will
automatically
power
3.3.
Menuoperation
Mode to
Set the VOX
suit OFF.
the noise profile of the Aircraft, a high noise
aircraftconnect
like a micro-light
in full climb
out mayyour
require
a headset
VOX
setting
Simply
your EQ-Link
into where
normal
headset
would
beof
6
to
8.
connected. The EQ-Link is supplied with Velcro for simple mounting and a
cable
clipthe
for
additional
support.
For
additional
performance
operation
when
PRESS
The
KNOB
TIMES
Ensure
correct
position
of 3the
EQ1
microphone,
one finger
width from
the
multiple
are used
one aircraft
simplyMake
set extra
mouth. EQ-Link
This is modules
very important
foroncorrect
operation.
sure units
you to
are
SLAVE
mode.
this
modeside
all the
will operate This
as one
and not with
interfere
speaking
into In
the
correct
on units
the microphone.
is marked
“EQ”
Theeach
Headset
willtheir
thenmust
speak
“MENU
MODE”.
with
other,
be
at
lease
one
master
in
all
systems.
and should face the mouth. As this system is designed for high noise, all
noises
away
the microphone
are and
attenuated.
Getting
the
microphone
When
this
isfrom
performed
the
headset
enters
thethe
Voice
Menu
System,
Slave
mode
can
be entered
by pressing
holding
STATUS
button
for 4in
the correct
position
is VERY
IMPORTANT.
Note:
if nothe
more
actions
take
the headset
exit thefrom
menu
systemto
seconds,
LED
lights
will place
then then
change
every 2 will
seconds
Master
after 10
seconds.
Slave
and
announce
this in the
When
the desired
mode,
Set the
VHF
Radio Squelch
OFFheadset.
and listen
to theonnoise,
then adjust
the just
VHF
release
the
button.
radio Volume
for knob
a comfortable
level. Reset the VHF radio squelch as
Rotate the
for:
required. The overall volume of all conversations and the VHF radio can then
“VOX SETTINGS,
CONFIGURATION
and
ADVANCED” (please
be controlled
on each headset
and the aircraft
communications
module to suit
refer
to
the
flow
chart
on
page
XX
for
other
menu
NOTE:
A
typical
aircraft
can
only
have
one
master
and setting
up to 5instructions)
slaves in the
the user.
single system for peak performance, in the case of more units please contact
NOTE:
it is for
recommended
that you turn
the aircraft’s
your
supplier
additional information
on your
options. communications system
VOX (orPress
squelch)
off menu
or low,
as the headsets will now control this for
knob system
to confirm
selection
you.( ** In the case of multiple EQ1 systems)
Your EQ1 and EQ-Link system will come from the factory already paired, if this
When
the EQ1
is indone
the VOX
menu
the have
knob can
be rotated
select the
value
is required
to be
again
or you
purchased
an to
EQ-Link
separately,
and
sensitivity
of
the
VOX
circuits,
a
higher
number
means
a
louder
voice
is
follow the paring steps on page 10.
required
to activate the IS
VOX
system.
YOUR
INSTALLATION
NOW
COMPLETE…………
DO NOT LEAVE YOUR HEADSET IN FULL SUN OR CLOSED HIGH
TEMPERATURE ENVIRONMENTS.
“ONE, TWO, THREE……….…..TEN”
Page
Page
14
616
Page
ATO
ATO
Aviation
Aviation
Inc.
Inc.
ATO
Aviation
Inc.
Operation Manual
9.
VOICE MENU PROGRAMMING EQ-LINK.
9.1.
EQ-LINK
START
PRESS BUTTON
3 TIMES TO ENTER MENU
PRESS TO SELECT
then WAIT
Microphone Noise
cancelling ON
MENU MODE
Microphone Noise
cancelling OFF
ECHO Reduction
ON
ECHO Reduction
OFF
Intercom Mode
ON
Intercom Mode
OFF
Phone Mode
ON
Phone Mode
OFF
Wait for 3 seconds !
Then Function activates
Wait for 3 seconds !
Then Function activates
Wait for 3 seconds !
Then Function activates
Wait for 3 seconds !
Then Function activates
Wait for 3 seconds !
Then Function activates
Wait for 3 seconds !
Then Function activates
Wait for 3 seconds !
Then Function activates
Wait for 3 seconds !
Then Function activates
The tree diagram shows how to program each of the sections of the EQ Link.
Voice guides will help navigate through the menu system, if unsure the system
will time out and return to normal operation after 5 seconds. If a mistake is
made it can be reprogrammed.
If no function is selected after entering menu mode then the current system
status will be announced and the menu will exit.
ATO Aviation Inc
Page 17
Operation Manual
9.2. Microphone Noise Reduction
The microphone noise reduction when activated will add extra DSP processing
of the signal from the headset microphone to the Intercom system. This
algorithm will remove constant noise signals in the background and process
the voice to remove noise components. Some loss in signal richness is
expected when this mode is activated. Large gains in signal to noise
performance is expected when using this is very noisy aircraft.
9.3. Echo Reduction
The EQ Wireless system uses digital transmission of audio data packets to
send and receive information. This technique causes a small delay of the
audio stream from one end of the system to the other. In some cases the
internal intercom system of the aircraft also has processing delays. When
these delays add up to a certain point the user will get an effect of delayed
side tone, and this will sound like an echo of yourself in you own ear. When
the echo is large and the user is uncomfortable with the sound you will need to
switch the EQ Link into echo cancelling mode to reduce this effect. When in
this mode the EQ headsets will provide the side tone for the user and not use
the side tone provided by the intercom system.
9.4. Intercom Mode
When the EQ Link is operated in this mode, the EQ Link will provide a return
path or side tone path of the audio that is sent to the EQ Link from the
Headsets. This mode is used when the system that the EQ Link is plugged into
has no side tone. This often happens when used in Hand Held Radio systems
as they have no side tone until the PTT is pressed.
9.5. Phone Mode
Use this mode when you want full duplex communications from the 3.5mm
audio connector on the EQ Link. Normally the EQ Link will mute signals the
come into the EQ Link on this connector when VHF Radio traffic is being
received. When turned on and connected into a cell phone then normal
conversations can take place in full duplex.
Page 18
ATO Aviation Inc.
Operation Manual
Voice guides will help navigate through the menu system, if unsure the system
will time out and return to normal operation after 5 seconds. If a mistake is
made it can be reprogrammed.
If no function is selected after entering menu mode then the current system
status will be announced and the menu will exit.
10.
VOICE MENU PROGRAMMING HEADSETS.
10.1.
EQ-LINK MODE
START
PRESS BUTTON
3 TIMES TO ENTER MENU
ROTATE THEN
PRESS TO SELECT
MENU MODE
VOX MENU
ROTATE 0 TO 9 THEN
PRESS TO SELECT
VOX SELECTION
ROTATE THEN
PRESS TO SELECT
CONFIGURATION
MENU
MASTER HEADSET
PILOT HEADSET
CO-PILOT HEADSET
ADVANCED
MENU
EQ-LINK PAIRING
PASSENGER HEADSET
EQ-LINK
SERVICE
MENU
PARING ACTIVATED
ROTATE THEN
PRESS TO SELECT
SERIAL NUMBER
SOFTWARE VERSION
FACTORY RESTORE
SET LEVEL TO SUIT VHF
RADIO THEN PRESS
TO PROGRAM LEVEL
VHF COMMUNICATIONS LEVEL
PROGRAM MEMORY
ATO Aviation Inc
Page 19
Operation Manual
To enter pairing mode, the Headset must have first been set to EQ-Link mode.
The paring mode voice menu will then become available to enable pairing.
NOTE:
The VHF communications LEVEL is like MIC Gain on standard headsets and
can be programmed from the Pilot or EQ-Link Headset ONLY to the Base or
EQ-Link Controller, the Headset must be linked at this time to perform the
operation.
Page 20
ATO Aviation Inc.
Operation Manual
11.
DEVICE SPECIFICATIONS
GENERAL
Frequency
2.4GHz ISM Band frequency hopping
RF Power
1mW, 0dBm
EQ-Link
DC Power
5-18volts DC for charging
Current
400mA Max
Input Audio
Nominal 1000mVpp
Output Audio
Nominal 150mVpp
HEADSET
DC Power
Batteries AA, 2 units NiMh low loss
RF Power
1mW, 0dBm
Charge
+5 volt only 400mA max
ATO Aviation Inc
Page 21
Operation Manual
12.
LEGAL
ONE YEAR LIMITED WARRANTY
Lysar Industries warrants this product is to be free from defects in material and
workmanship under normal and proper use, for the period on ONE YEAR from
the date of original purchase and agrees, at its option, to repair or replace
such parts showing factory defects to the following provisions:
This Warranty applies only to a new product, which has been sold through
authorized channels of distribution. The purchaser voids the warranty if he or
other not authorized Lysar Industries attempt to repair or service the unit, or if
any parts are not supplied by Lysar Industries are inserted in the unit.
Defective products or parts must be returned to the point of sale. This warranty
does not cover cable breakages or any breakages caused by normal wear and
tear. THE FOREGOING IS YOUR SOLE REMEDY FOR FAILURE IN
SERVICE OR DEFECT, LYSAR INDUSTRIES SHALL NOT BE LIABLE FOR
UNDER THIS OR ANY IMPLIED WARRANTY FOR INCIDENTAL OR
CONSEQUENTIAL DAMAGES. This warranty is in lieu of all other warranties,
express or implied, INCLUDING THE WARRANTY OR MERCHANTABILITY
OR FITNESS FOR USE, WHICH WARRANTIES ARE HEREBY EXCLUDED.
This device complies with Part 15 of the FCC Rules.
Operation is subject to the following two conditions;
1/ This device may not cause harmful interference and
2/ This device must accept any interference received, including interference
that may cause undesired operation.
N22996
Page 22
FCC ID: W5CEQ1, W5CEQH
ATO Aviation Inc.
Operation Manual
EQ-LINKin
SYSTEM
Distributed
the USA by
&
ATO Aviation
EQ1 WIRELESS
AVIATION HEADSETS
17320 N. Dartford Dr
Spokane, WA 99208
509-731-3153
www.wirelessaviationheadsets.com
e-mail: [email protected]