1
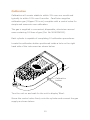
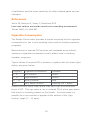
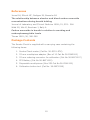
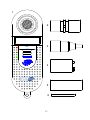
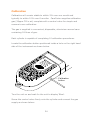
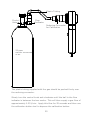
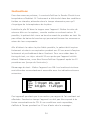
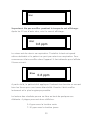
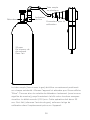
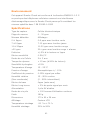
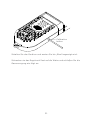
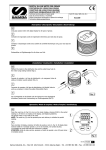
Smoke Check Meter
Operating Manual – English
Operating Manual – CareFusion USA
Manuel d’utilisation - Français
Bedienungsanleitung - Deutsch
1
Contents
I.
Overview.......................................................................... 3
Introduction – English........................................................ 4
Cigarette Consumption ...................................................... 4
Package Contents.............................................................. 5
Operation......................................................................... 7
Calibration ......................................................................10
Battery Life .....................................................................12
Sensor Expiry ..................................................................13
Cleaning .........................................................................13
Servicing.........................................................................13
Symbols..........................................................................14
Environment....................................................................14
Specifications ..................................................................14
II.
Overview.........................................................................17
Introduction – CareFusion USA ..........................................17
Cigarette Consumption .....................................................18
Package Contents.............................................................19
Operation........................................................................21
Calibration ......................................................................24
Battery Life .....................................................................26
Sensor Expiry ..................................................................27
Cleaning .........................................................................27
Servicing.........................................................................27
Symbols..........................................................................28
Environment....................................................................28
Specifications ..................................................................28
III. Présentation ....................................................................30
Introduction – Français .....................................................31
Consommation de Cigarettes .............................................31
1
Contenu de l’emballage.....................................................32
Instructions .....................................................................34
Calibration ......................................................................36
Durée de vie pile ..............................................................40
Expiration de la Cellule .....................................................40
Nettoyage .......................................................................40
Informations techniques....................................................40
Symbols..........................................................................40
Environment....................................................................41
Spécifications ..................................................................41
IV. Őberblick.........................................................................42
Einführung – Deutsch .......................................................43
Zigarettenkonsum ............................................................44
Packungsinhalte ...............................................................45
Bedienung .......................................................................47
Eichung...........................................................................50
Lebensdaduer der Batterie ................................................53
Verfall des Sensors...........................................................54
Reinigung........................................................................54
Wartung..........................................................................55
Symbole .........................................................................55
Umgebung ......................................................................55
Anforderungen .................................................................55
Customer contact information ............................................57
2
Smoke Check Meter
Operating manual
Overview
The Smoke Check is a hand held battery operated device used to
measure the concentration of carbon monoxide, CO, on the breath.
It is used for instructional purposes in smoking cessation programs
and to check on the clients’ progress and compliance.
It is accurate, easy to use, and has many features designed to
simplify its operation.
These include: Auto zero function
Smoking level colour light indicators
High CO alarm
Simple calibration
Please note: It is recommended that this unit be calibrated
upon receipt
3
I. Introduction - English
The Smoke Check is based on an electrochemical fuel cell sensor,
which works through the reaction of carbon monoxide (CO) with an
electrolyte at one electrode, and oxygen (from ambient air) at the
other. This reaction generates an electrical current proportional to
CO concentration. Output from the sensor is monitored by a
microprocessor, which detects and displays peak expired
concentrations of alveolar gas. High levels of expired CO indicate
raised levels of carboxyhaemoglobin, most commonly caused by
cigarette smoking.
The results are displayed in four ranges on a clear LCD display.
Warning lights are provided to give an instant indication of the
smoking level. A particular feature of the CareFusion Smoke Check
is its stability of calibration and low cross sensitivity to other exhaled
gases such as hydrogen.
References
Jarvis MJ, Belcher M, Vesey C, Hutchison DCS
Low cost carbon monoxide monitors in smoking assessment
Thorax 1986; 41: 886-887
Cigarette Consumption
The Smoke Check meter provides a simple screening test for
cigarette consumption for use in anti-smoking clinics and all smoking
cessation programs.
Measurement of expired CO has been well validated as an indirect
measure of cigarette consumption and is widely used in smoking
cessation programs.
Typical values for expired CO in smokers, together with the alarm
light status, are given below:
4
CO(ppm)
Cigarette consumption
Indicator
0-6
Non smoker
Green
7 -10
Light smoker
Amber
11 – 20
Heavy smoker
Red
20+
Very heavy smoker
Flashing red + alarm
Please note that some urban areas may have high environmental
levels of CO. This can cause a rise in exhaled CO of a few ppm
above that which is normally present on the breath. In these cases
it is possible for a non-smoker to appear at the bottom of the ‘light
smoker’ range (7 – 10 ppm).
References
Jones RH, Ellicott MF, Cadigan JB, Gaensler EA
The relationship between alveolar and blood carbon
monoxide concentrations during breath holding
Journal of Laboratory and Clinical Medicine 1958; 51, 553 - 564
Wald NJ, Idle M, Boreham J, Baily A
Carbon monoxide in breath in relation to smoking and
carboxyhaemoglobin levels
Thorax 1981; 36, 366-369
Package Contents
The Smoke Check is supplied with a carrying case containing the
following items:
1. Smoke Check meter (Cat No. 36-SC01-STK)
2. 22 mm mouthpiece adapter (Box of 10 Cat No.36-PSA2000)
3. 22 mm reducing connector (Cat No.36-MEC1007)
4. PP3 Battery (Cat No.36-BAT1002)
5. Disposable mouthpieces (Box 250 Cat No.36-PSA1200)
6.
Calibration button tool (Cat No. 36-MEC1299)
5
1
2
3
ON
OFF
4
5
6
6
Operation
For accurate results the Smoke Check should be used at room
temperature. If the instrument has been stored in cool or hot
conditions then allow time to reach room temperature prior to use.
Install the PP3 battery by sliding open the battery cover, clipping the
battery in place and replacing the cover. Insert the mouthpiece
adapter into the Smoke Check meter and then insert a disposable
cardboard mouthpiece into the adapter. If possible, the subject
should rinse their mouth with clean water prior to performing a test.
Do not use mouthwash, as the readings will be affected.
To obtain an accurate reading from a sample of alveolar gas the
patient should inspire and hold their breath for 20 seconds before
expiring slowly and fully through the mouthpiece. As an aid to
timing the breath holding period, a buzzer will sound 20 seconds
after the unit is turned on. However the instrument may be used
any time after the first 12 seconds when the auto-zero has been
performed.
Turn the unit on by pushing the central slide switch up and the three
coloured lights will illuminate momentarily together with all the
display legends:
Bat
Wait
Blow
Gas
7-10 ppm 20+ ppm
0-6 ppm 11-20 ppm
Ask the subject to inspire and hold their breath.
The unit will auto-zero for twelve seconds during which time the
following will be displayed:
7
Wait
Important note: the unit must not be used during this period.
After twelve seconds the display will change to:
Wait
0-6 ppm
The subject may now seal their lips around the mouthpiece and
exhale slowly and fully if they cannot hold their breath any longer.
However, more accurate results will be obtained if they hold their
breath until the buzzer sounds and the display changes to:
Blow
0-6 ppm
The CO reading will rise to a plateau over the course of several
seconds. The final value will be held until the unit is turned off and
will be displayed in one of the four ranges:
0–6 ppm with green indicator
7–10 ppm with amber indicator
11–20 ppm with red indicator
20+ ppm with flashing red indicator and alarm
8
Important note:
Before repeating a measurement the unit must be turned off,
and the mouthpiece and adapter removed for at least 1
minute. This is to allow re-equilibration with ambient air and
to dry the surface of the sensor. Visually inspect that all
moisture has evaporated from the surface of the sensor
before reuse.
If the unit is switched on again too quickly after use there
may be a response to residual expired carbon monoxide from
the previous test.
In this case the display will show:
Gas
If this is displayed then turn the unit off, remove the mouthpiece
adapter, and expose to ambient air for 2 minutes before repeating
the test.
Note: If this warning appears again after following the above
procedure then turn off and leave the sensor exposed to ambient air
for a further 3 minutes. If the same message appears again then
this indicates possible contamination of the sensor with a solvent.
In this case remove all sources of solvent from the vicinity of the
sensor and expose to ambient air for 24 hours before switching on
again.
9
Calibration
Calibration will remain stable to within 2% over one month and
typically to within 10% over 6 months. CareFusion supplies
calibration gas (20ppm CO in air) complete with a control valve for
simple and economic user calibration.
The gas is supplied in convenient, disposable, aluminium aerosol
cans containing 18 litres of gas (Cat. No.36-MCGK020).
Each cylinder is capable of completing 10 calibration procedures.
Locate the calibration button positioned inside a hole on the right
hand side of the instrument as shown below.
Calibration
button
Turn the unit on and wait for the unit to display ‘Blow’.
Screw the control valve firmly onto the cylinder and connect the gas
supply as shown below:
10
Plastic Tubing
Control
Valve
Flow
Indicator
Reducing Connector
for Calibration
20 ppm
carbon monoxide
in air
The plastic tubing supplied with the gas should be pushed firmly
over the reducing connector.
Slowly turn the control knob anti-clockwise until the ball in the flow
indicator is between the two marks. This will then supply a gas flow of
approximately 0.25 l/min. Apply this flow for 25 seconds and then use
the calibration button tool to depress the calibration button.
11
The sounder will beep and the display will flash three times as the
calibration is recorded. The ‘GAS’ legend will then be displayed.
Turn off the gas supply and the unit. When the cell has expired it
will be impossible to obtain a correct calibration and all the legends
and the three lights will flash five times with no beeps after the
calibration button is depressed. The ‘GAS’ legend will be displayed
as before and the unit must be turned off before recalibration is
attempted.
Important Notes:
•
Only certified calibration gas (20ppm) from a reputable source
should be used.
•
Ensure that no CO is present on the sensor for 3 minutes before
starting the calibration procedure.
•
Ensure that the instrument and gas cylinder have stabilised at
room temperature before calibrating.
•
Do not immerse the unit in the calibration gas.
•
In order to stop any gas leak from the can after calibration,
ensure that the control knob is tightened firmly.
Battery Life
Battery life is sufficient for approximately 8000 tests.
When the battery has approximately 1 hour of useful life left the
following message will be displayed:
Bat
12
and the alarm will sound momentarily after the unit is first switched
on. When the battery has completely expired the above will be
displayed continuously and the battery must be replaced.
Note: Please remove the battery if the meter is likely to be unused
for some time.
Sensor Expiry
Sensor life ranges from 2 to 5 years and depends upon both the
amount of exposure to CO and other gases, particularly solvents
such as alcohol and cleaning fluids.
When the sensor has expired it will become impossible to obtain a
correct calibration. When this occurs, the Smoke Check must be
returned to CareFusion or an authorised agent, for sensor
replacement.
Cleaning
The mouthpiece adapter may be cleaned using a mild detergent
solution or replaced if there is risk of contamination. Exposed
surfaces of the meter, other than the sensor surface, may be wiped
with a clean, damp cloth. It is recommended that this procedure is
performed after each use and all used cardboard mouthpieces
discarded.
Important note: The sensor surface must not be wiped with any
aqueous solutions and must not be exposed to solvents e.g. alcohol
or permanent damage may result.
Servicing
A full service manual including circuit diagram and parts list is
available upon request.
13
Symbols
Type B device
In accordance with Directive 93/42/EEC
0086
Disposal in compliance with WEEE
Environment
This instrument complies with directive EN60601-1-2
electromagnetic compatibility but can be affected by cellular phones
and by electromagnetic interference exceeding levels specified in EN
50082-1:1992
Specifications
Sensor type
Electro-chemical fuel cell
Range
0 - 20 ppm
Detected levels:
Display:
0 to 6ppm
0-6 ppm with green indicator
7 to 10ppm
7-10 ppm with amber indicator
11 to 20ppm
11-20 ppm with red indicator
>20 ppm
20+ ppm with red indicator + alarm
Accuracy
+/-5% of reading or 1ppm whichever
is the greater
Sensitivity drift
0.5%/°C
Sensor life
2 to 5 years
Response time
< 15 sec (to 90% of reading)
Hydrogen cross sensitivity
<15%
Operating temperature
15 – 25 °C
Operating pressure
Atmospheric +/- 10%
14
Pressure coefficient
0.02% signal per mBar
Relative humidity
15 - 90% continuous
(Non condensing)
(0 - 99% intermittent)
Baseline drift
0ppm (auto-zero)
Long term drift
< 2% signal loss per month
Power source
Single Alkaline 9 volt PP3
Battery life
> 8000 tests
Weight
130g without battery
Dimensions
170 x 60 x 26 mm
Display
Custom LCD
Storage temperature
-20 ° to +70 °C
Storage humidity
30% to 90%
15
Smoke Check Meter
Operating manual
Federal (USA) law restricts this device to sale by or on the order of a
physician or licensed practitioner.
CareFusion,
22745 Savi Ranch Parkway,
Yorba Linda
CA 92887-4668
USA
16
Overview
The Smoke Check is a hand held battery operated device used to
measure the concentration of carbon monoxide, CO, on the breath.
It is used for instructional purposes in smoking cessation programs
and to check on the clients’ progress and compliance.
It is accurate, easy to use, and has many features designed to simplify
its operation.
These include: Auto zero function
Smoking level colour light indicators
High CO alarm
Simple calibration
Please note: It is recommended that this unit be calibrated
upon receipt
II. Introduction – CareFusion USA
The Smoke Check is based on an electrochemical fuel cell sensor,
which works through the reaction of carbon monoxide (CO) with an
electrolyte at one electrode, and oxygen (from ambient air) at the
other. This reaction generates an electrical current proportional to CO
concentration. Output from the sensor is monitored by a
microprocessor, which detects and displays peak expired
concentrations of alveolar gas. High levels of expired CO indicate
raised levels of carboxyhaemoglobin, most commonly caused by
cigarette smoking.
The results are displayed in four ranges on a clear LCD display.
Warning lights are provided to give an instant indication of the
smoking level. A particular feature of the Smoke Check is its stability
17
of calibration and low cross sensitivity to other exhaled gases such as
hydrogen.
References
Jarvis MJ, Belcher M, Vesey C, Hutchison DCS
Low cost carbon monoxide monitors in smoking assessment
Thorax 1986; 41: 886-887
Cigarette Consumption
The Smoke Check meter provides a simple screening test for cigarette
consumption for use in anti-smoking clinics and all smoking cessation
programs.
Measurement of expired CO has been well validated as an indirect
measure of cigarette consumption and is widely used in smoking
cessation programs.
Typical values for expired CO in smokers, together with the alarm light
status, are given below:
CO(ppm)
Cigarette consumption
Indicator
0-6
Non smoker
Green
7 -10
Light smoker
Amber
11 – 20
Heavy smoker
Red
20+
Very heavy smoker
Flashing red + alarm
Please note that some urban areas may have high environmental
levels of CO. This can cause a rise in exhaled CO of a few ppm above
that which is normally present on the breath. In these cases it is
possible for a non-smoker to appear at the bottom of the ‘light
smoker’ range (7 – 10 ppm).
18
References
Jones RH, Ellicott MF, Cadigan JB, Gaensler EA
The relationship between alveolar and blood carbon monoxide
concentrations during breath holding
Journal of Laboratory and Clinical Medicine 1958; 51, 553 - 564
Wald NJ, Idle M, Boreham J, Baily A
Carbon monoxide in breath in relation to smoking and
carboxyhaemoglobin levels
Thorax 1981; 36, 366-369
Package Contents
The Smoke Check is supplied with a carrying case containing the
following items:
1. Smoke Check meter (Cat No. 36-SC01-STK)
2. 22 mm mouthpiece adapter (Box of 10 Cat No.36-PSA2000)
3. 22 mm reducing connector for calibration (Cat No.36-MEC1007)
4. PP3 Battery (Cat No.36-BAT1002)
5. Disposable mouthpieces (Box 250 Cat No.36-PSA1200)
6. Calibration button tool (Cat No. 36-MEC1299)
19
1
2
ON
3
OFF
4
5
6
20
Operation
For accurate results the Smoke Check should be used at room
temperature. If the instrument has been stored in cool or hot
conditions then allow time to reach room temperature prior to use.
Install the PP3 battery by sliding open the battery cover, clipping the
battery in place and replacing the cover. Insert the mouthpiece
adapter into the Smoke Check meter and then insert a disposable
cardboard mouthpiece into the adapter. If possible, the subject should
rinse their mouth with clean water prior to performing a test. Do not
use mouthwash, as the readings will be affected.
To obtain an accurate reading from a sample of alveolar gas the
patient should inspire and hold their breath for 20 seconds before
expiring slowly and fully through the mouthpiece. As an aid to timing
the breath holding period, a buzzer will sound 20 seconds after the
unit is turned on. However the instrument may be used any time after
the first 12 seconds when the auto-zero has been performed.
Turn the unit on by pushing the central slide switch up and the three
coloured lights will illuminate momentarily together with all the display
legends:
Bat
Wait
Blow
Gas
7-10 ppm 20+ ppm
0-6 ppm 11-20 ppm
Ask the subject to inspire and hold their breath.
The unit will auto-zero for twelve seconds during which time the
following will be displayed:
21
Wait
Important note: the unit must not be used during this period.
After twelve seconds the display will change to:
Wait
0-6 ppm
The subject may now seal their lips around the mouthpiece and exhale
slowly and fully if they cannot hold their breath any longer. However,
more accurate results will be obtained if they hold their breath until
the buzzer sounds and the display changes to:
Blow
0-6 ppm
The CO reading will rise to a plateau over the course of several
seconds. The final value will be held until the unit is turned off and
will be displayed in one of the four ranges:
0–6 ppm with green indicator
7–10 ppm with amber indicator
11–20 ppm with red indicator
20+ ppm with flashing red indicator and alarm
22
Important note:
Before repeating a measurement the unit must be turned off,
and the mouthpiece and adapter removed for at least 1 minute.
This is to allow re-equilibration with ambient air and to dry the
surface of the sensor. Visually inspect that all moisture has
evaporated from the surface of the sensor before reuse.
If the unit is switched on again too quickly after use there may
be a response to residual expired carbon monoxide from the
previous test.
In this case the display will show:
Gas
If this is displayed then turn the unit off, remove the mouthpiece
adapter, and expose to ambient air for 2 minutes before repeating the
test.
Note: If this warning appears again after following the above
procedure then turn off and leave the sensor exposed to ambient air
for a further 3 minutes. If the same message appears again then this
indicates possible contamination of the sensor with a solvent.
In this case remove all sources of solvent from the vicinity of the
sensor and expose to ambient air for 24 hours before switching on
again.
23
Calibration
Calibration will remain stable to within 2% over one month and
typically to within 10% over 6 months. CareFusion supplies calibration
gas (20ppm CO in air) complete with a control valve for simple and
economic user calibration.
The gas is supplied in convenient, disposable, aluminium aerosol cans
containing 18 litres of gas.
Each cylinder is capable of completing 10 calibration procedures.
Locate the calibration button positioned inside a hole on the right hand
side of the instrument as shown below.
Calibration
button
Turn the unit on and wait for the unit to display ‘Blow’.
Screw the control valve firmly onto the cylinder and connect the gas
supply as shown below:
24
Plastic Tubing
Control
Valve
Flow
Indicator
Reducing Connector
for Calibration
20 ppm
carbon monoxide
in air
The plastic tubing supplied with the gas should be pushed firmly over
the reducing connector.
Slowly turn the control knob anti-clockwise until the ball in the flow
indicator is between the two marks. This will then supply a gas flow of
approximately 0.25 l/min. Apply this flow for 25 seconds and then use
the calibration button tool to depress the calibration button.
25
The sounder will beep and the display will flash three times as the
calibration is recorded. The ‘GAS’ legend will then be displayed. Turn
off the gas supply and the unit. When the cell has expired it will be
impossible to obtain a correct calibration and all the legends and the
three lights will flash five times with no beeps after the calibration
button is depressed. The ‘GAS’ legend will be displayed as before and
the unit must be turned off before recalibration is attempted.
Important Notes:
•
Only certified calibration gas (20ppm) from a reputable source
should be used.
•
Ensure that no CO is present on the sensor for 3 minutes before
starting the calibration procedure.
•
Ensure that the instrument and gas cylinder have stabilised at
room temperature before calibrating.
•
Do not immerse the unit in the calibration gas.
•
In order to stop any gas leak from the can after calibration, ensure
that the control knob is tightened firmly.
Battery Life
Battery life is sufficient for approximately 8000 tests.
When the battery has approximately 1 hour of useful life left the
following message will be displayed:
Bat
and the alarm will sound momentarily after the unit is first switched
on. When the battery has completely expired the above will be
displayed continuously and the battery must be replaced.
26
Note: Please remove the battery if the meter is likely to be unused for
some time.
Sensor Expiry
Sensor life ranges from 2 to 5 years and depends upon both the
amount of exposure to CO and other gases, particularly solvents
such as alcohol and cleaning fluids.
When the sensor has expired it will become impossible to obtain a
correct calibration. When this occurs, the Smoke Check must be
returned to CareFusion, or an authorised agent, for sensor
replacement.
Cleaning
The mouthpiece adapter may be cleaned using a mild detergent
solution or replaced if there is risk of contamination. Exposed surfaces
of the meter, other than the sensor surface, may be wiped with a
clean, damp cloth. It is recommended that this procedure is
performed after each use and all used cardboard mouthpieces
discarded.
Important note: The sensor surface must not be wiped with any
aqueous solutions and must not be exposed to solvents e.g. alcohol or
permanent damage may result.
Servicing
A full service manual including circuit diagram and parts list is
available upon request.
For US Customer Care: Toll Free 1-800-231-2466, phone 1-714283-2228
27
Symbols
Type B device
Environment
This instrument complies with directive EN60601-1-2 electromagnetic
compatibility but can be affected by cellular phones and by
electromagnetic interference exceeding levels specified in EN 500821:1992
Specifications
Sensor type
Electro-chemical fuel cell
Range
0 - 20 ppm
Detected levels:
Display:
0 to 6ppm
0-6 ppm with green indicator
7 to 10ppm
7-10 ppm with amber indicator
11 to 20ppm
11-20 ppm with red indicator
>20 ppm
20+ ppm with red indicator + alarm
Accuracy
+/-5% of reading or 1ppm whichever
is the greater
Sensitivity drift
0.5%/°C
Sensor life
2 to 5 years
Response time
< 15 sec (to 90% of reading)
Hydrogen cross sensitivity
<15%
Operating temperature
15 – 25 °C
Operating pressure
Atmospheric +/- 10%
Pressure coefficient
0.02% signal per mBar
Relative humidity
15 - 90% continuous
(Non condensing)
(0 - 99% intermittent)
Baseline drift
0ppm (auto-zero)
Long term drift
< 2% signal loss per month
28
Power source
Single Alkaline 9 volt PP3
Battery life
> 8000 tests
Weight
130g without battery
Dimensions
170 x 60 x 26 mm
Display
Custom LCD
Storage temperature
-20 ° to +70 °C
Storage humidity
30% to 90%
29
Smoke Check Meter
Manuel d’utilisation
Présentation
Le Smoke Check est un appareil totalement portable permettant la
mesure de concentration de monoxyde de carbone issu du souffle.
Il est utilisé en dépistage dans les programmes de cessation de
tabagisme, en cabinet médical, en urgence, dans les écoles, dans les
pharmacies, en médecine du travail, etc...
C’est un appareil fiable, facile d’emploi, avec plusieurs fonctionnalités
permettant un usage simple et convivial.
Parmi elles :
Fonction d’Auto Zéro
Diodes lumineuses vert/jaune/rouge
Alarme pour haut niveau de CO
30
III.
Introduction - Français
Le Smoke Check permet une mesure à partir d’une cellule
électrochimique, qui fonctionne par réaction du monoxyde de carbone
avec son électrolyte par rapport à l’oxygène de l’air ambiant. Cette
réaction génère un courant électrique proportionnel à la concentration
de monoxyde de carbone. La tension de sortie de la cellule est
récupérée par un microprocesseur qui détecte dans l’expiration la
concentration de gaz contenu dans les alvéoles des poumons. Les
hauts niveaux de CO expire indiquent des forts taux de
carboxyhémoglobine, le plus souvent synonymes de consommation de
cigarettes, cigares et autres dérivés de tabac.
Les résultats sont affichés en quatre plages sur un écran LCD clair. Les
lumières tricolores s’allument pour donner une indication à l’instant du
souffle du niveau de tabagisme. Une des particularités du Smoke
Check est sa très grande stabilité de calibration et sa sensibilité à bas
niveau d’expiration de gaz comme l’hydrogène.
References
Jarvis MJ, Belcher M, Vesey C, Hutchison DCS
Low cost carbon monoxide monitors in smoking assessment
Thorax 1986; 41: 886-887
Consommation de Cigarettes
La mesure du CO expire a été validée comme mesure indirecte de
consommation de cigarettes et est couramment pratiquée en
programmes de cessation de tabagisme.
Les échelles de valeurs typiques pour le CO expiré chez les fumeurs
sont indiquées ci-dessous.
31
CO(ppm)
Tabagisme
Diode
0-6
Non fumeur
Verte
7 - 10
Fumeur léger
Jaune
11 - 20
20+
Fumeur régulier
Rouge
Fumeur important
Rouge + alarme
Attention il convient de noter que certaines zones urbaines peuvent
avoir un environnement à fort niveau de CO dans l’air ambiant. Cela
peut causer une augmentation des valeurs du CO expiré de quelques
ppm. Dans ces cas il est possible pour un non fumeur que l’appareil le
situe dans la tranche des fumeurs légers (7-10 ppm).
References
Jones RH, Ellicott MF, Cadigan JB, Gaensler EA
The relationship between alveolar and blood carbon monoxide
concentrations during breath holding
Journal of Laboratory and Clinical Medicine 1958; 51, 553 - 564
Wald NJ, Idle M, Boreham J, Baily A
Carbon monoxide in breath in relation to smoking and
carboxyhaemoglobin levels
Thorax 1981; 36, 366-369
Contenu de l’emballage
Le Smoke Check est fourni avec une valisette de transport contenant
les accessoires suivants:
1. analyseur Smoke Check
2. valve de retenue d’air diamètre 22mm
3. valve de calibration
4. pile alcaline 9 Volt
5. embouts carton usage unique
6. Tige de calibration
32
1
2
ON
3
OFF
4
5
6
33
Instructions
Pour des mesures précises, il convient d’utiliser le Smoke Check à une
température d’habitat. Si l’instrument a été stocké dans des conditions
froides ou chaudes, attendez alors le temps nécessaire pour qu’il
s’imprègne de la température de la pièce.
Installez la pile 9V dans la trappe sous l’appareil. Mettez la valve de
retenue d’air sur le capteur ; ensuite mettez un embout carton. Si
possible, le patient doit rincer sa bouche avant de procéder au test. Ne
pas utiliser de bains de bouches qui pourraient fausser les mesures en
raison de leur composants.
Afin d’obtenir la valeur la plus fiable possible, le patient doit inspirer
fortement et retenir sa respiration pendant env 20 sec avant d’expirer
lentement et profondément dans l’embout. Pour vous aider dans le
timing du test, un «bip» retentit 20 sec après que l’appareil ait été
allumé. Néanmoins, vous êtes libres d’utiliser l’appareil après les 12
premières sec (temps de l’auto zéro).
Démarrage du test : Mettre l’appareil sur ON. Les lumières tricolores
sont allumées momentanément ensemble avec les indications écrans
suivantes :
Bat
Wait
Blow
Gas
7-10 ppm 20+ ppm
0-6 ppm 11-20 ppm
Ceci apparaît pendant que la correction par rapport à l’air ambiant est
effectuée. Pendant ce temps l’appareil ne doit pas être exposé à de
fortes concentrations de CO. Si ces conditions sont respectées,
s’affiche à l’écran pendant les 12 sec d’auto zéro le message:
34
Wait
Important: Ne pas souffler pendant le temps de cet affichage.
Après les 12 sec d’auto zéro, voici le nouvel affichage:
Wait
0-6 ppm
Le mieux est de retenir sa respiration. Toutefois le test est quand
même réalisable si le patient ne peut pas retenir sa respiration. Pour
commencer à faire souffler dans l’appareil il faut attendre que s’affiche
l’écran suivant:
Blow
0-6 ppm
A partir de là, le patient doit appliquer l’embout à sa bouche en serrant
bien les lèvres pour une bonne étanchéité. Ensuite il doit souffler
lentement et le plus longtemps possible.
La lecture des résultats pourra se faire au bout de quelques sec
d’attente. 4 plages pourront alors s’afficher:
0–6 ppm avec la lumière verte
7–10 ppm avec la lumière jaune
35
11–20 ppm avec la lumière rouge
20+ ppm avec la lumière rouge flashée + alarme
Important: Avant d’effectuer un nouveau test, il faut éteindre
l’appareil, retirer la valve et laisser la cellule se réinitialiser à
l’air ambiant pendant au moins une minute (ne pas la saturer).
Sinon, le message suivant pourrait s’afficher à l’écran :
Gas
Si cela se produisait, éteignez alors votre appareil, retirez valve et
embout, et attendez 2 minutes en laissant l’appareil à l’air ambiant
avant de recommencer un test.
Note: Si le message d’alerte “Gas” s’affichait à nouveau après cela,
recommencez la même procédure en le laissant cette fois 3-4 min. S’il
s’affichait encore une 3ème fois malgré ces précautions, une possible
contamination de la cellule (solvant ou autre) est à diagnostiquer, ou
du moins un disfonctionnement de la cellule. Laissez alors l’appareil 24
H avant de le rallumer.
Calibration
La calibration restera stable avec une déviance maximum de 2%
mensuel, en général 10% maximum sur 6 mois.
Il est possible de faire étalonner l’appareil par Eolys (forfait avec
transport à nous demander). Sinon vous pouvez effectuer vous-même
l’opération. Pour ce faire il faut acheter le gaz et le détendeur
nécessaire. Le gaz est fourni dans des bouteilles de 18 litres
comprimés minimum (valable pour env 10 calibrations). Attention, la
36
garantie et conservation de ce gaz ne dépasse pas un an (voir la
rentabilité des deux hypothèses).
Pour procéder vous-même à l’étalonnage, voici comment faire:
Positionner la tige de calibration sur le côté droit de l’appareil comme
sur le graphique ci-après:
Bouton de
calibration
Vérifiez bien que la molette du détendeur (Control Valve) soit en
position fermée. Reliez ensuite tous les matériels selon le schéma cidessous.
37
Tube souple
en plastique
Détendeur
Indicateur
de flux
Connecteur pour la
calibration
20 ppm
De monoxy de
de carbone
Dens l’air
Le tube souple (fourni avec le gaz) doit être correctement positionné
sur chaque extrémité. Allumez l’appareil et attendez que l’écran affiche
“Blow”. Tournez alors la molette du détendeur lentement (sens inverse
aiguilles de montre) jusqu’à maintenir la bille entre les deux marques
visuelles. Le débit sera de 0,25 l/min. Cette opération doit durer 25
sec. Ceci fait (refermez l’arrivée de gaz), enfoncez la tige de
calibration dans l’emplacement prévu sur l’appareil.
38
Un “bip” doit retentir et les lumières doivent flasher trois fois de suite,
ce qui signifie que la calibration est bien enregistrée. Le message
«Gas» est alors affiché.
Eteignez l’appareil. L’opération est terminée.
Quand la cellule est périmée (durée de vie de 2-3 ans), il sera
impossible d’effectuer l’opération d’étalonnage sans la changer. Il y
aurait non plus 3 mais 5 flashs et aucun bip ne retentirait après avoir
enfoncé la tige calibration (même si le message «Gas» apparaissait)
Important :
•
N’utilisez que les bouteilles de gaz fourni par CareFusion et Eolys.
Toute utilisation avec d’autre bouteille non certifiée se ferait à vos
risques et périls.
•
Assurez-vous qu’il n’y ait pas eu de CO injecté/soufflé dans la
cellule depuis au moins 3 minutes avant d’étalonner l’appareil.
•
De même, assurez-vous que la bouteille de gaz ait été maintenue
à une température ambiante avant d’étalonner.
•
Pour éviter toute fuite, contrôlez bien que la molette soit bien
serrée.
Durée de Vie Pile
Une pile 9V alcaline est suffisante pour environ 5000 tests.
Quand il ne restera qu’environ 1 heure de vie possible à la pile de
votre Smoke Check, celui-ci vous affichera le message suivant :
Bat
39
et l’alarme retentira dès que vous voudrez réutiliser l’appareil sans
changer la pile. Note: Il est bien de retirer la pile de l’appareil si vous
savez qu’il ne sera pas utilisé avant longtemps.
Expiration de la Cellule
La durée de vie de la cellule électrochimique est entre 2 et 3 ans,
selon l’utilisation et la concentration de CO soufflé et injecté dans
l’appareil (les solvants et autres alcools et entretiens de nettoyage
diminuent voire annihilent la durée de vie!).
Nettoyage
La valve de retenue d’air peut être nettoyée à l’aide d’un détergent
léger, voire remplacé si vous pensez qu’un risque de contamination
subsiste. Sinon un passage à l’eau tiède le plus souvent possible est
une pratique routinière non contraignante que nous vous conseillons
L’embout carton est jeté entre chaque patient. Quant à l’appareil, un
coup de chiffon suffit (ne pas tremper l’appareil dans quoique ce soit)
Informations techniques
Un manuel technique est disponible sur demande pour voir le
diagramme des circuits ainsi que la liste des composants.
Symbols
Appareil de catégorie B
Conforme à La directive 93/42/EEC
0086
Disposition conformément à WEEE
40
Environnement
Cet appareil Smoke Check est conforme à la directive EN60601-1-2 Il
se peut que des téléphones cellulaires causent une interférence
électromagnétique avec le Smoke Check parce qu’ils excèdent les
niveaux spécifiés dans l’ EN 50082-1:1992
Spécifications
Type de capteur
Cellule électrochimique
Plage de mesure
0 - 30 ppm
Niveaux détectés:
Affichage:
0 à 6ppm
0-6 ppm avec lumière verte
7 à 10ppm
7-10 ppm avec lumière jaune
11 à 20ppm
11-20 ppm avec lumière rouge
>20 ppm
20+ ppm avec lumière rouge + alarme
Précision
+/-5% à la lecture ou 1ppm
Dérive sensibilité
0.5%/°C
Durée de vie Cellule
2 à 3 ans
Temps de réponse
< 15 sec (à 90% de lecture)
Sensibilité hydrogène
<15%
Temperature d’usage
15 - 25 °C
Pression d’usage
Atmosphérique +/- 10%
Coefficient de pression
0.02% signal par mBar
Humidité relative
15 - 90% continu
(Non condensée)
(0 - 99% intermittent)
Dérive de base
0ppm (auto-zero)
Dérive Long terme
< 2% de perte signal par mois
Alimentation
1 pile 9V alcaline
Durée de vie pile
> 100 heures d’utilisation continue
Poids
180 g
Dimensions
170 x 60 x 26 mm
Affichage
Custom LCD
Temperature stockage
-20 ° to +70 °c
Humidité stockage
30% to 90%
41
Smoke Check Meter
Bedienungsanleitung
Őberblick
Der Smoke Check ist ein tragbares, batteriebetriebenes Gerät, um die
Konzentration von Carbon Monoxide, CO, im Atem zu messen. Es wird
als erzieherische Maβnahme in Programmen zur
Zigarettenentwıhnung und zur Őberprőfung der Fortschritte und der
Einhaltung des Patienten eingesetzt.
Es ist genau, einfach zu bedienen und hat viele Funktionen, die seine
Anwendung noch erleichtern.
Diese beinhalten:
Automatische Null Funktion
Farbanzeige főr Rauchgrad
Alarm bei hohem CO Gehalt
Einfache Eichung
42
IV.
Einfőhrung - Deutsch
Der Smoke Check ist auf einem elektrochemischen
Brennstoffzellensensor aufgebaut, der durch die Reakation auf Carbon
Monoxide mit einem Elektrolyt an der einen Elektrode, und Sauerstoff
(von Umgebungsluft) an der anderen funktioniert. Diese Reaktion
erzeugt ein elektrisches Stromverhältnis zu der CO Konzentration. Die
Ausgabe des Sensors wird von einem Mirkroprozessor őberwacht,
welcher den hıchsten Verfall von Aveolärgas erfasst. Ein hoher Grad
von abgelaufenem CO deutet auf ein gestiegenes Carboxyhämoglobin
hin, was meistens durch Rauchen verursacht wird.
Die Ergebnisse werden in vier Bereichen auf einem klaren LCD Display
angezeigt. Warnlichter bieten eine Sofortanzeige des Rauchgrades.
Eine besondere Eigenschaft des CareFusion Smoke Check ist seine
stabile Eichung und seine geringe Querempfindlichkeit főr andere
ausgeatmete Gase wie z.B. Hydrogen.
Mit Bezug auf:
Jarvis MJ, Belcher M, Vesey C, Hutchison DCS
“Low cost carbon monoxide monitors in smoking assessment”
Thorax 1986; 41: 886-887
43
Zigarettenkonsum
Das Smoke Check Messgerät bietet einen einfachen Auslesetest főr
Zigarettenkonsum zur Anwendung in Anti-Rauch-Kliniken und wird des
weiteren auch in Rauchentwıhnungs- programmen eingesetzt.
Die Messung von ausgeatmetem CO wurde als eine gute indirekte
Messung des Zigarettenkonsums eingestuft und wird weitgehend in
Rauchentwıhnungsprogrammen genutzt.
Typische Werte von ausgeatmetem CO von Rauchern, kombiniert mit
der zugehırigen Anzeige des Alarmlichts, werden in untenstehender
Tabelle aufgezeigt.
CO (ppm)
Zigartettenkonsum
Anzeige
0–6
Nichtraucher
Grőn
7 - 10
Leichter Raucher
Gelb
11 – 20
Starker Raucher
Rot
20 +
Sehr starker Raucher
Aufblinkendes Rot mit Alarm
Bitte beachten Sie, dass einige Stadtgebiete einen hohen Grad an
umweltbedingtem CO haben kınnen. Das kann einen erhıhten
ausgeatmeten CO Grad verursachen, welcher um ein paar ppm őber
dem wirklich im Atem enthaltenen Wert liegt. In diesem Fall kınnte
auch ein Nichtraucher im unteren Abschnitt des „Leichter Raucher“
Bereichs erscheinen (7-10 ppm).
Mit Bezug auf:
Jones RH, Ellicott MF, Cadigan JB, Gaensler EA
“The relationship between alveolar and carbon monoxide
concentrations during breath holding”
Journal of Laboratory and Clinical Medicine 1958; 51, 553 – 564
Wald NJ, Idle M, Boreham J, Baily A
“Carbon monoxide in breath in relation to smoking and
carboxyhaemoglobin levels”
Thorax 1981; 36, 366 - 369
44
Packungsinhalte
Der Smoke Check wird in einem tragbaren Behälter angeliefert,
welcher folgende Elemente enthält:
1. Smoke Check Messgerät (Cat No. 36-SC01-STK)
2. 22 mm Mundstőckadapter (Box of 10 Cat No. 36-PSA2000)
3. 22 mm Drosselanschluβ főr Eichung (Cat No. 36-MEC1007)
4. PP3 Batterie (Cat No. 36-BAT1002)
5. Einwegmundstőcke (Box 250 Cat No. 36-PSA1200)
6. Hilfsmittel főr Kalibrierungsdruckknopf (Cat No. 36-MEC1299)
45
1
2
ON
3
OFF
4
5
6
46
Bedienung
Um genaue Ergebnisse mit dem Smoke Check zu erreichen, sollte das
Gerät bei Raumtemperatur benutzt werden. Falls das Instrument an
einem kőhlen oder heiβen Ort gelagert wurde, sollte es vor dem
Gebrauch Raumtemperatur erreicht haben. Setzen Sie die PP3 Batterie
wie folgt ein: Schieben Sie zuerst die Batterieabdeckung auf, setzen
sie dann die Batterie ein und verschlieβen sie die Abdeckung wieder.
Stecken sie den Mundstőckadapter in den Smoke Check und
befestigen sie dann ein Einwegmundstőck aus Papier an dem Adapter.
Wenn mıglich sollte die Person vor Durchfőhrung des Tests den Mund
mit sauberem Wasser ausspőhlen. Benutzen sie keine Mundspőhlung,
da die Messungen dadurch beeinfluβt werden kınnten.
Um ein genaues Ergebins von einer Alveolärgasprobe erzielen zu
kınnen, sollte der Patient einatmen und den Atem főr 20 Sekunden
anhalten, bevor er langsam und vollständig wieder durch das
Mundstőck ausatmet. Als Hilfestellung zur Dauer des Atemnanhaltens
ertınt 20 Sekunden nachdem das Gerät angeschaltet wurde eine
Hupe. Indes darf das Gerät zu jeder Zeit genutzt werden nachdem die
Auto-Null angezeigt wurde.
Schalten Sie das Gerät an, in dem sie den zentralen Schiebeschalter
betätigen, drei frabige Lichter werden dann főr einen Augenblick
zusammen mit allen anderen Display Legenden aufleuchten.
Bat
Wait
Blow
Gas
7-10 ppm 20+ ppm
0-6 ppm 11-20 ppm
Weisen Sie den Patienten an, einzuatmen und den Atmen anzuhalten.
47
Das Gerät wird sich automatisch főr 12 Sekunden nullen,
währenddessen folgendes im Display erscheinen wird:
Wait
Wichtiger Hinweis: Das Instrument darf wärend dieser Zeit nicht
anderweitig benutzt werden!
Nach 12 Sekunden wird sich die Anzeige wie folgt ändern:
Wait
0-6 ppm
Der Patient darf nun das Mundstőck mit den Lippen fest umschlieβen
und langsam und vollständig ausatmen, falls er seinen Atem nicht
mehr länger anhalten kann. Jedoch kınnen genauere Messergebnisse
erreicht werden, wenn der Atem angehalten wird, bis die Hupe ertınt
und die Anzeige sich wie folgt ändert:
Blow
0-6 ppm
48
Die CO Messung wird főr einige Sekunden zu einer Ebende őber dem
Verlauf steigen. Der endgőltige Wert wird gehalten bis das Gerät
abgeschaltet ist und wird in einem der vier Bereiche angezeigt.
0 – 6ppm mit grőner Anzeige
7 – 10ppm mit gelber Anzeige
11 – 20ppm mit roter Anzeige
20 +ppm mit aufblinkender roter Anzeige
Wichtiger Hinweis:
Bevor eine Messung wiederholt wird, muss das Gerät
abgeschaltet werden und das Mundstőck und der Adapter
mőssen főr mindestens eine Minute entfernt werden. Das ist
wichtig zur Re-Äquilierung mit Umgebungsluft und um die
Oberfläche des Sensors zu trocknen. Vor der Wiederbenutzung
sollte auch visuell sicher gestellt werden, dass jegliche
Feuchtigkeit auf der Oberfläche des Sensors verdunstet ist.
Wenn das Gerät nach dem Gebrauch zu frőh wieder
angeschaltet wird, kınnte es auf restliches verfallenes Carbon
Monoxid des vorherigen Tests reagieren.
In diesem Fall wird das Display folgendes anzeigen:
Gas
Falls dieses angezeigt wird, schalten Sie das Gerät aus, entfernen die
den Adapter főr das Mundstőck und setzen Sie das Instrument főr zwei
Minuten der Umgebungsluft aus bevor Sie den Test wiederholen.
49
Hinweis: Falls die Warnung nach der oben beschriebenen Prozedur
erneut erscheinen sollte, schalten Sie den Smoke Check aus und
setzen Sie den Sensor weitere drei Minunten der Umgebungsluft aus.
Eine nochmalige Anzeige der Warnung bedeutet eine mıgliche
Verunreinigung durch ein Lısungsmittel.
In diesem Fall entfernen Sie alle Lısungsmittelquellen aus der
Umgebung des Sensors und setzen Sie ihn vor der nächsten
Inbetriebnahme 24 Stunden der Umgebunsluft aus.
Eichung
Die Eichung wird einen Monat im Rahmen von 2% stabil bleiben and
őberlicherweise innerhalb von 10% őber 6 Monate. CareFusion liefert
ein Kalibrierungsgas (20ppm CO in der Luft) komplett mit Regelventil
főr eine einfache und wirtschaftliche Benutzereichung.
Das Gas wird in einer praktischen Einwegspraydose aus Aluminium
geliefert, die 18 Liter Gas entählt (Cat No. 36-MCGK020).
Mit jeder Walze kınnen 10 Eichungsvorgänge durchgefőhrt werden.
Suchen Sie den Kalibrierungsknopf, der, wie unten angezeigt,
innerhalb einer Vertiefung an der rechten Seite des Instruments
angebracht ist.
50
Calibration
button
Schalten Sie das Gerät an und warten Sie bis „Blow“angezeigt wird.
Schrauben sie das Regelventil fest auf die Walze und schlieβen Sie die
Gasversorgung wie folgt an:
51
Plastic Tubing
Control
Valve
Flow
Indicator
Reducing Connector
for Calibration
20 ppm
carbon monoxide
in air
Der Plastikschlauch, der mit dem Gas geliefert wurde, sollte fest őber
den Drosselanschluβ geschoben werden.
Drehen Sie den Kontrollknopf nun langsam und gegen den
Uhrzeigersinn bis der Ball in der Durchflussanzeige zwischen den
beiden Markierungen liegt. Nun entsteht ein Gasfluss von ungefähr
52
0,25 l/m. Verwenden Sie diesen Fluss 25 Sekunden und benutzen Sie
dann das mitgelieferte Werkzeug, um den Eichungsknopf zu drőcken.
Wenn die Eichung gespeichert wurde, ist ein Piepton zu hıren und das
Display blinkt drei mal. Die „GAS“ Anzeige wird dann angezeigt.
Schalten Sie die Gaszufuhr und das Gerät ab. Wenn die Dose
abgelaufen ist, ist es unmıglich eine korrekte Eichung zu erreichen
und alle Legenden und die drei Lichter blinken 5 mal ohne Piepton auf,
wenn der Kalibrierungsknopf gedrőckt wurde. Die „GAS“ Anzeige wird
wie vorher angezeigt und muss abgeschaltet werden, bevor eine
Rekalibrierung versucht wird.
Wichtige Hinweise:
•
Es sollte nur ein zertifiziertes Eichungsgas (20 ppm) aus einer
seriısen Quelle benutzt werden. Versichern Sie sich, dass sich főr
drei Minuten kein CO auf dem Sensor befindet, bevor Sie den
Kalibrierungsvorgang starten.
•
Stellen Sie sicher, dass das Instrument und die Gaswalze sich vor
der Eichung bei Raumtemperatur stabilisiert haben.
•
Tauchen Sie das Gerät nicht in das Eichungsgas.
•
Um nach der Eichung jegliche Undichtigkeiten an der Dose zu
verhindern, versichern Sie sich, dass der Kontrollknopf fest
zugedreht ist.
Lebensdauer der Batterie
Die Haltbarkeit der Batterie reicht főr ungefähr 8000 Tests aus.
Wenn die Batterie noch etwa eine Stunde brauchbare Lebenszeit őbrig
hat, wird die folgende Meldung erscheinen:
Bat
53
Ebenso wird bei Einschalten des Geräts augenblicklich der Alarm
ertınen.Wenn die Batterie vollständig leer ist, wird oberes
durchgehend angezeigt und die Batterie muss ersetzt werden.
Hinweis: Bitte entfernen sie die Batterie, wenn das Instrument főr
einige Zeit so gut wie unbenutzt ist.
Verfall des Sensors
Die Lebenszeit des Sensors bewegt sich zwischen zwei und főnf Jahren
und hängt sowohl von der Menge des verfallenen CO als auch von
anderen Gasen ab, vor allem von Lısungsmitteln wie Alkohol und
Reinigungsflőssigkeiten.
Wenn der Sensor verfallen ist, wird es unmıglich sein, eine korrekte
Eichung zu erzielen. In diesem Fall sollte der Sensor ausgetauscht
werden und das Gerät muss zu CareFusion, oder einem authorisiertem
Händler, zurőckgeschickt werden.
Reinigung
Der Mundstőckadapter kınnte mit einer milden Waschmittellısung
gereinigt oder ausgetauscht werden, falls das Risiko einer
Verunreinigung besteht. Ungeschőtzte Oberflächen auf dem
Messgerät, andere als die Sensoroberfäche, kınnten mit einem
sauberen, feuchten Lappen abgewischt werden. Es empfliehlt sich,
diesen Vorgang nach jedem Gebrauch des Gerätes zu wiederholen und
alle benutzten Papiermundstőcke wegzuwerfen.
Wichtiger Hinweis: Der Sensor darf nicht mit irgendwelchen
wässrigen Lısungen abgewischt und keinen Lısungsmitteln, wie z.B.
Alkohol, ausgesetzt werden, da ein bleibender Schaden entstehen
kınnte.
54
Wartung
Eine vollständige Wartungsanleitung inklusive Schaltplan und Teileliste
ist erhältlich auf Anfrage.
Symbole
Gerät Typ B
In Őbereinstimmung mit Richtlinie 93/42/EEC
0086
Entsorgung gemäβ WEEE
Umgebung
Dieses Gerät befolgt die Richtlinie EN60601-1-2 Elektromagnetische
Verträglichkeit, kann aber von Handys beeinträchtigt werden und bei
elektromagnetischer Beeinflussung die in EN500-1:1992
vorgeschriebenen Level őberschreiten.
Anforderungen
Sensortyp
Elektrochemische Brennstoffzelle
Bereich
0 – 100 ppm
Auflısung
1 ppm
Grőnes Anzeigelicht
0 bis 6 ppm (0 bis 1% COHb)
Gelbes Anzeigelicht
7 bis 10 ppm (1,1 bis 1,6% COHb)
Rotes Anzeigelicht
11 bis 72 ppm (1,8 bis 12% COHb)
Blinkendes Rotlicht + Alarm
>72 ppm (>12% COHb)
Genauigkeit:
+/- 5 % des Messwertes oder 1 ppm
(es gilt der größere Wert)
Empfindlichkeitsdrift
0,5% / °C
Sensorlebenszeit
2 bis 5 Jahre
55
Anlaufzeit
< 15 Sek. (bis zu 90% der Messung)
Wasserstoffquerempfindlichkeit
< 15%
Betriebstemperatur
15 – 25 °C
Betriebsdruck
atmosphärisch +/- 10%
Druckzahl
0,02 % Signal pro mBar
Relative Feuchtigkeit
15 – 90% durchgehend
(nicht kondensierend)
(0 – 99 % stoβweise)
Grundliniendrift
0 ppm (auto-null)
Langzeitdrift
< 2% Signalverlust pro Monat
Stromquelle
Single Alkaline 9 Volt PP3
Lebenszeit der Hauptbatterie 30 Stunden
durchgehender Gebrauch entspricht
ungefähr 2000 Tests
Lebenszeit der Innenbatterie
10 Jahre
Gewicht
180 g (inklusive Batterie)
Ausmaβe
170 x 60 x 26 mm
Display
3 ½ Ziffer - LCD
Lagertemperatur
-20 ° bis +70 °C
Lagerfeuchtigkeit
30% bis 90%
56
Customer contact information
UK Customers only
For all Sales Order processing for products, training and spare parts,
Service and Technical Support enquiries, please contact the following:
CareFusion UK 232 Ltd
UK Customer Service & Support
The Crescent
Jays Close
Basingstoke
RG22 4BS
Customer Service Sales Enquiries:
Telephone:
01256 388550
Email:
[email protected]
Factory Repair and Administration Enquiries:
Telephone:
01256 388552
Email:
[email protected]
Technical Support Enquiries:
Telephone:
01256 388551
Email:
[email protected]
International customers only
For all Sales Order processing for products and Spare parts, Service
and Technical Support enquiries, please contact the following:
Carefusion Germany 234 GmbH
Customer Service & Support International
Leibnizstrasse 7
97204 Hoechberg
Germany
57
Customer Service Sales Enquiries:
Telephone:
0049 931 4972 670
Email:
[email protected]
Factory Repair and Administration Enquiries:
Telephone:
0049 931 4972 867
Email:
[email protected]
Technical Support Enquiries:
Telephone:
0049 931 4972 127
Email:
[email protected]
58
Notes:
CareFusion UK 232 Ltd.,
Quayside
Chatham Maritime
Kent ME4 4QY
U.K.
0086
JDE no. 36-MAN1281
Drg no. 041-04WW
Issue 1.0
January 2010
© CareFusion 2010