1
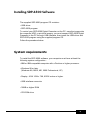
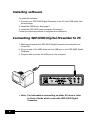
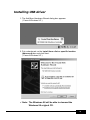
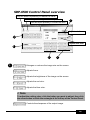
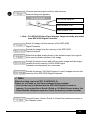
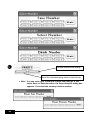
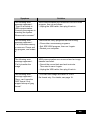
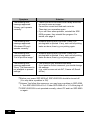
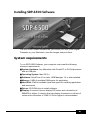
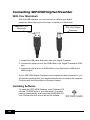
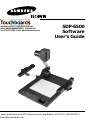
SDP-6500
Software
User’s Guide
www.touchboards.com 205 Westwood Ave.Long Branch, NJ 07740 1-866-942-6273
[email protected]
Contents (Windows Program)
Installing SDP-6500 Software
.................................................3
System requirements ...............................................................................3
Installing software ....................................................................................3
Connecting SDP-6500 Digital Presenter to PC ................................4
Installing USB driver .........................................................................5
Installing SDP-6500 program............................................................7
Installation tips .........................................................................................8
How can I determine if my computer's USB port is enabled?...........8
How do I remove the USB driver and SDP-6500 program? .............9
Can I update the USB driver for SDP-6500 .....................................9
Running SDP-6500 Program
....................................................11
SDP-6500 View Panel & Main Panel overview......................................13
Working with SDP-6500 Program
......................................14
Using SDP-6500 Control Panel ............................................................14
SDP-6500 Control Panel overview .......................................................15
Saving the image into the conputer HDD ..............................................19
Printing the image .................................................................................21
Troubleshooting (Windows Program) .......................................................24
1
Contents (Macintosh Program)
Installing SDP-6500 Viewer Software ..........................................27
System requirements ......................................................................................27
Connecting SDP-6500 Digital Presenter with your Macintosh ..................................28
Installing Software ...........................................................................................28
Using the SDP-6500 Software ......................................................30
Launching the Software...................................................................................30
Looking at the Interface ...................................................................................30
SDP-6500 Viewer window ...............................................................................31
Control window: Overview ...............................................................................32
Controls ...........................................................................................................33
Capture and Print Image ..............................................................38
Capturing Image .............................................................................................38
Printing the image ..........................................................................................39
Troubleshooting (Macintosh Program)........................................40
2
Installing SDP-6500 Software
The supplied SDP-6500 program CD contains :
• USB driver
• SDP-6500 program
To control your SDP-6500 Digital Presenter on the PC, save the images into
the computer HDD, or print the images, you must connect SDP-6500 Digital
Presenter to the PC through USB interface, then install the USB driver and
SDP-6500 program using the supplied program CD.
Follow the procedure below.
System requirements
To install the SDP-6500 software, your computer must have at least the
following system configuration :
• IBM or IBM compatible computer with a Pentium or higher processor.
• Windows 98 or later
(Windows 98, 98SE, ME, 2000 Professional, XP)
• Display : XGA 1024 x 768, 65536 colors or higher
• USB interface connector
• 32MB or higher RAM
• CD-ROM drive
3
Installing software
To install the software
1. Connect your SDP-6500 Digital Presenter to the PC with USB cable. See
the next page.
2. Install the USB driver. See page 5.
3. Install the SDP-6500 control program. See page 7.
Follow the instructions below to complete the installation:
Connecting SDP-6500 Digital Presenter to PC
1. Make sure that both the SDP-6500 Digital Presenter and computer are
turned ON.
2. Plug one end of the USB cable into the USB port on the SDP-6500 Digital
Presenter.
3. Plug the other end into the USB port on the computer.
✔ Note : For information connecting on other AV device, refer
to User’s Guide which came with SDP-6500 Digital
Presenter.
4
Installing USB driver
1. The Add New Hardware Wizard dialog box appears.
( Case of Windows XP )
2. Put a checkmark on the Install from a list or specific location
(Advanced) box and click Next..
( Case of Windows XP )
✔ Note : The Windows 98 will be able to demand the
Windows 98 original CD.
5
3. Insert the SDP-6500 software into your CD-ROM drive, then put a
checkmark on the CD-ROM drives box and Include this location in the
search box then type x:\ (where x is the drive letter for the CD-ROM
drive).
4. Click Next. The USB driver will be inserted.
5. Follow the instructions on the screen to complete the installation.
✔ Note
• The other Windows designates the SDP-6500 CD with different
method. ( The SDP-6500 CD designate the SDP65.inf file inside.)
6
Installing SDP-6500 program
1. Insert the SDP-6500 CD in a CD-ROM drive, select ENGLISH, and select
USB S/W Install.
(SDP-6500 CD have Autorun ability.)
2. The Welcome window opens. Click Next.
3. Follow the instructions on the screen to complete the installation. Restart
your computer after the installation is complete.
4. After the SDP-6500 software is properly installed, you can see the
Samsung Digital Presenter 6500 icon created on the Windows desktop.
7
Installation tips
How can I determine if my computer’s USB port is enabled ?
1. In Windows 98, select Start ➪ Setting ➪ Control Panel.
2. Double-click the System icon.
3. Click the Device Manager tab.
4. Click the plus (+) icon before the Universal serial bus controller item.
5. If you see s USB host controller and a USB root hub listed, USB is
properly enabled. If you have multiple hubs on the USB chain, try
connecting your Digital Presenter to a different hub or to another USB
device. Also, make sure the cable connections are firm. (USB hubs are
hardware devices into which you can plug multiple USB cables.)
8
How do I remove the USB driver and SDP-6500 program ?
USB Driver :
1. In Windows 98, select Start ➪ Setting ➪ Control Panel.
2. Double-click the System icon.
3. Click the Device Manager tab.
4. Click the plus (+) icon before the Universal serial bus controller item.
5. From the Universal serial bus controller item, select Samsung Digital
Presenter 6500, then click Remove.
6. In the Confirm Device Removal dialog box, click OK.
SDP-6500 Program :
1. Select Start ➪ Setting ➪ Control Panel.
2. Double-click the Add/Remove Programs icon.
3. From the Program list, click the SDP6500, then click Add/Remove.
Can I update the USB driver for SDP-6500 ?
Yes. You can update the USB driver file for the Digital Presenter if you have
updated driver file. Do as follows
1. In Windows 98, select Start ➪ Setting ➪ Control Panel.
2. Double-click the System icon.
3. Click the Device Manager tab.
9
4. Click the plus (+) icon before the Universal serial bus controller item.
5. From the Universal serial bus controller item, select Samsung Digital
Presenter 6500, then click Properties.
6. The Samsung Digital Presenter 6500 Properties dialog box opens. Click
the Driver tab.
7. Click Update Driver. The Device Driver Update Wizard screen opens.
Follow the on-screen instructions to complete the installation.
10
Running SDP-6500 Program
1. Make sure that your SDP-6500 Digital Presenter is connected to the PC
and both are turned on.
2. Double-click the Samsung Digital Presenter 6500 icon
(automatically placed on the Windows desktop when you installed) to run.
3. You can also select SDP6500 under its program group of Start menu
(Start ➪ Programs ➪ Samsung Digital Presenter ➪ Samsung Digital
Presenter 6500)
11
4. The SDP-6500 View Panel and Main Panel opens. The image presented
from the SDP-6500 Digital Presenter will appear in the View Panel
window.
For information on working with the SDP-6500 View Panel and Main
Panel, see page 13.
✔ Note
• SDP-6500 program does not run if the Digital Presenter is not
connected to the PC or not turned on.
• If the whole view of the SDP-6500 View Panel does not appear, check
if the graphic card on your PC supports 1280 x 1024, 65536 colors or
higher.
12
SDP-6500 View Panel & Main Panel overview
View area
Image presented from the
SDP-6500 Digital Presenter
appears in this view area.
If you adjust the image using the
controls in the desktop SDP-6500
Control Panel, you will see the
applied result in this area.
Exits SDP-6500 program
Allows you to select the screen size :
Full, Half, Quarter
Captures the image currently displayed
in the View Panel. When capturing is
complete, the Capture button discolor.
In this status, you can save or print the
image.
Prints the captured image. For details,
see page 21.
Saves the captured image with BMP,
JPG format. For details, see page 19.
Opens or closes the Control Panel.
For details, see page 14.
13
Working with SDP-6500 Program
With the SDP-6500 program, you can control and adjust the image
presented from your SDP-6500 Digital Presenter. You can also save it as
a graphic file and print the image through the printer connected to the PC.
Using SDP-6500 Control Panel
To adjust the image presented from the SDP-6500 Digital Presenter, open
the Control Panel on your computer desktop.
1. Run SDP-6500 program. For details, see page 11.
2. From the Main Panel, click Control. For details on the control buttons in
the desktop SDP-6500 Control Panel, see the following page.
3. To close the on-screen Control Panel, click Exit button on the Control
Panel. Or click Control in the Main Panel.
Exit button
Display the current status.
✔ Note
The button functions on this desktop SDP-6500 Control Panel are
equivalent to the buttons on the SDP-6500 Digital Presenter and the
SDP-6500 remote control. For further details on the control buttons,
refer to the User’s Guide which came with the SDP-6500.
14
SDP-6500 Control Panel overview
Click this button repeatedly to reduce the value.
Click and drag this rectangle to the value you want.
5
Click this button repeatedly to increase the value.
Adjusts auto focus
1
Adjusts auto color
2
3
1
4
Enlarges or reduces the image size on the screen.
Adjusts focus.
Adjusts the brightness of the image on the screen.
Adjusts the red color.
Adjusts the blue color.
✔ Note
To adjust the setting value, click the button you want to adjust, then click
the arrow button or slide the rectangle at the left top of the Control Panel.
Controls the sharpness of the output image.
15
2
Current lamp indicator. The currently
selected lamp turns on.
Turns off all lamps
Turns on the light box
Turns on the head lamp
Turns the head lamp or the light box on/off.
3
Keeps the current image on the screen.
To rotate the image by 90˚ / 180˚ / 270˚ / 0˚
Chooses the graphic mode.
Mode dialog box appears
Exits Mode dialog box
Selects SVGA mode
Selects XGA mode
Selects SXGA mode
✔ Note : SDP S/W View Panel image does not Freeze, Rotate, Mode.
Turns the image to positive or negative.
Chooses internal signal out from the SDP-6500.
16
Chooses external signal out from other devices.
External dialog box appears.
4
Exits External dialog box
Selects External 2 port
Selects External 1 port
✔ Note : The SDP-6500 View Panel displays image currently presented
from SDP-6500 Digital Presenter
Saves the image into the memory of the SDP-6500
Digital Presenter.
Recalls the image from the memory of the SDP-6500
Digital Presenter.
Shifts the recalled image shown in the divided screen from right to
left to see the hidden portion of the image.
Divides the screen to see both of the current image and the image
recalled from the memory of SDP-6500 Digital
Presenter simultaneously on one screen.
Divides the screen (3X3 Multi-Screen) to see 9 images saved in the
memory of the SDP-6500 Digital Presenter.
✔ Note
When the video source is EXT1,2 (NOSYNC1,2),
Freeze on, or Recall on, the Save command is not available.
- You can save up to 8 frames into the SDP-6500 Digital Presenter’s
memory. If you select Save, Recall, Divide or 3X3 Multi-Screen button, the
Select Number dialog box appears. Select the memory location number.
Cancels Freeze, Divide, Recall, or Preset Exe mode and returns to
the Standby mode.
17
5
Activates the preset user settings.
Saves the customized setting values for next time use.
✔ Note : You can save up to 4 different custom use settings. If you
select Save, or Execute button, the Select Number dialog box
appears. You select the memory location number.
18
Saving the image into the computer HDD
You can save the image currently displayed in the View Panel as a BMP or
JPEG format graphic file. Do as follows:
1. Run SDP-6500 program. For details, see page 11.
2. SDP-6500 View Panel displays image currently presented from SDP6500 Digital Presenter. To adjust the image, open the on-screen SDP6500 Control Panel and adjust the image.
For details, see page 14.
3. When the desired image is displayed in the View Panel, click Capture in
the Main Panel. You see the capture process on the screen.
4. When capturing is complete, the Capture button discolor.
5. Click Save in the Main Panel.
6. Specify the file name, file format, and file path. Then, click Save in the
Save As dialog box. The image is saved as a selected file format.
7. When completed, you must click Capture in the Main Panel to release the
capture mode. The Capture button discolor.
✔ Note
If you do not release the Capture mode after you saved or printed the image,
the View Panel remains occupied with the captured image. To view another
object presented from SDP-6500 Digital Presenter and view the result after
you adjust controls, you must release the Capture mode.
19
Specify the file path.
Specify the
file name.
Specify the file format.
You can select either
BMP or JPEG.
Select the image size to store.
The higher the resolution, the
finer the image detail, and the
larger the file size
20
Printing the image
You can print the image currently displayed in the View Panel.
Do as follows:
1. Run SDP-6500 program. For details, see page 11.
2. The View Panel displays image currently presented from SDP-6500
Digital Presenter. To adjust the image, open the on-screen Control Panel
and adjust the image.
For details, see page 14.
3. When the desired image is displayed in the View Panel, click Capture in
the Main Panel. You see the capture process on the screen.
4. When capturing is complete, the Capture button discolor.
5. Click Print in the Main Panel.
✔ Note : Paper size and paper source items vary depending on the
printer you use.
21
Select paper size
Select paper feed
source
Select print orientation
Select print margin
22
6. Click OK. The Print dialog box opens.
✔ Note : For further available print options, refer to your printer User’s
Guide.
7. Select print options and click OK to start printing.
8. After printing is complete, click Capture in the on-screen Main Panel to
release the capture mode. If you do not release the capture mode, the
View Panel remains occupied with the captured image.
23
Troubleshooting (Windows Program)
Symptom
SDP-6500 program fails
to run.
Solution
There may be a communication problem between
SDP-6500 Digital Presenter and the computer. Exit
SDP-6500 program and do as follows:
• Unplug the USB cable, then plug it back in.
• Close other unnecessary software programs that
are running (especially programs related to USB
communication).
• If you turn the unit off, turn it back on after at least
10 seconds.
24
The following error
message appeared :
"Fail to find USB device
driver. Check the USB
plug or the power of
SDP-6500 set."
Your computer system could not find USB driver.
The following error
message appeared :
"There is a problem in
communication of USB.
Please disconnect the
plug of USB and
reconnect it."
System error occurred and USB communication has
failed. Do as follows:
• Check the USB cable connection.
• Make sure that SDP-6500 Digital presenter turns
on.
• Check that USB driver is properly installed.
For information on installing USB driver, see page
5.
• Unplug the USB cable, then plug it back in.
• Check the power condition of SDP-6500.
Symptom
Solution
The following error
message appeared :
“There is a trouble in
USB communication.
Currently the program is
checking the system.
Please wait a moment.”
USB communication error occurred. Exit SDP-6500
program, then do as follows:
The following error
message appeared :
“Fail to allocate memory
or resource. Please exit
the program, and restart
it.”
There are too many programs that are running.
The following error
message appeared :
“Fail to transfer the
image”
USB communication error occurred and an image
transfer has failed.
• Unplug the USB cable, then plug it back in.
• Close other unnecessary programs.
• Exit SDP-6500 program, then run it again.
• Restart your computer.
• Cancel the current task and wait a minute.
Then start to save it again.
• Unplug the USB cable, then plug it back in.
The following error
message appeared :
• You can save image as a BMP or JPEG
file format only. For details, see page 19.
“Sorry, can’t save the
OOO format. Only
support bitmap or jpeg
format.”
25
Symptom
The following error
message appeared:
“Library can’t operate
correctly.”
Solution
• There is an error occurred in the Library which will
be used to save an image.
Cancel the current task and wait a minute.
Then start your operation again.
• If you still have same problem, uninstall the SDP6500 program, then reinstall the program. For
details, see page 9.
The following error
message appeared:
“Windows API can’t
operate correctly.”
• Windows printing error occurred. Check if no
printing task is spooled. If any, wait until all printing
tasks are done, then try your printing again.
The following error
message appeared:
“Fail to print the image.”
• Windows printing error occurred. Check if no
printing task is spooled. If any, wait until all printing
tasks are done, then try your printing again.
The following error
message appeared:
“Sorry. This command is
not available in present
settings.”
• The operation you activated has failed.
If you want to do the command, you should change
the settings.
(e.g. video source set into INT, Freeze off, Recall
off etc.)
❐ Before your power SDP-6500 off, SDP-6500 S/W should be turned off.
(You may have a problem in OS)
❐ Unlesss You follow this sequence, you may have a problem in SDP-6500.
1. Turn SDP-6500 S/W off ➔ 2. Power SDP-6500 off ➔ 3. Pull the plug off
❐ If SDP-6500 S/W is not operated normally, reboot PC and turn SDP-6500
on again.
26
Installing SDP-6500 Software
The SDP-6500 Viewer software lets you control your SDP-6500 Digital
Presenter on your Macintosh, save the images and print them.
System requirements
To run SDP-6500 Software, your computer must meet the following
minimum requirements:
■ System Hardware: Any Macintosh with PowerPC or G3/G4 processor
and an USB port.
■ Operating System: Mac OS 9.x
■ Software: QuickTime 4.0 or later, USB Manager 1.2 or later installed.
■ Memory: 8 MB of available RAM space for application.
■ Hard Disk: 3 MB of available hard disk space for installing application
and documents.
■ Drives: CD-ROM drive to install software.
■ Display: A monitor that can display 256 colors and a resolution of
800x600 or higher. A monitor that can display thousands or millions of
colors and a resolution of 1280 X 1024 or higher is recommended
27
Connecting SDP-6500 Digital Presenter
With Your Macintosh
With the USB interface, you can connect or remove your digital
presenter without having to shut down or restart your Macintosh.
Flat end to your
Macintosh
Square end to your
SDP-6500 Digital
Presenter
1. Locate the USB cable that came with your Digital Presenter.
2. Connect the square end of the USB cable to the Digital Presenter's USB
port.
3. Connect the flat end of the USB cable to your Macintosh's USB port or
USB hub port.
If your SDP-6500 Digital Presenter and computer are both powered on, you
will see the message that your digital presenter driver needs to be installed.
Continue with the instructions on the next chapter.
Installing Software
To install the SDP-6500 Software, insert Software CD
into the CD-ROM drive in your Macintosh. A window
pops up automatically and shows the SAMSUNG CD
icon. Double-click the icon to launch the installer.
28
You see startup screen of the software installer. Click OK to continue.
Choose a location to install SDP-6500 software in your Macintosh, and click
Install.
Your Macintosh needs to restart when the installation is finished.
29
Using the SDP-6500 Software
Launching the Software
Make sure that the SDP-6500 Digital Presenter is connected to your
Macintosh and both are turned on. Locate the SDP-6500 Viewer software
where you have installed them and double-click the icon to launch.
The SDP-6500 Viewer and Control window opens. The image presented
from the SDP-6500 Digital Presenter will appear in the Viewer window.
Looking at the Interface
The interface of SDP-6500 software is pretty straight forwarded. And it also
has 'Tooltip' feature, so you can see what a button does by just holding your
mouse over it.
Tooltip
30
SDP-6500 Viewer window
Image presented from the SDP-6500 Digital Presenter appears in this
window.
If you adjust the image using the Control window or the hardware control
panel, the applied result will be displayed here.
Capture
Capture the current image.
Show Captured Image
Show Captured Image window.
Screen Size
Set Viewer window size from three different sizes:
Full,1/4, and 1/16..
Show Control Window
Show or hide Control window.
31
Control window : Overview
With the Control window, you can control and adjust the image presented
from your SDP-6500 Digital Presenter. You can also save it as a file and
print it using the printer connected to your Macintosh.
1.Status Panel
2.Focus Slider
3.Zoom Slider
4.Image Control
5.Light Control
6.Control Buttons
7.Device Control
8.Memory Control
9.Preset
The Control window of SDP-6500.
32
Controls
1. Status Panel
Display current status listed below:
■ Invert: Positive / Negative
■ Mode: SXGA / XGA / SVGA
■ Aperture: On / Off
■ Output: Internal / External 1 / External 2
■ Rotate: Off / 90˚ / 180˚ / 270˚
■ Freeze: On / Off
2. Focus Slider
Click and drag the slider button to manually control the SDP-6500's focus.
3. Zoom Slider
Click and drag the slider button to control the SDP-6500's zoom.
33
4. Image Sliders
Click and drag the slider button to manually control the image’s
characteristics listed below:
■ Iris: Make image Darker or Lighter
■ Red: Control the Red color of the image
■ Blue: Control the Blue color of the image
5. Light Control
Turn on or off the lights of SDP-6500 Digital Presenter.
Small green light indicates the light is turned on.
■ Lamp Up: Turn on the headlamps.
■ Lamp Low: Turn on the light box
■ Lamp off: Turn off all the lights.
34
6. Control Buttons
■ Invert image: Make image Positive or Negative.
■ AWC: Click to correct the image’s color automatically.
■ Aperture: Controls the sharpness of the output image.
■ Auto focus: Click to set the focus automatically.
■ Rotate: Click to rotate the image.
7. Device Control
■ Freeze: Click to keep the current image on the screen.
Click again to see the live image.
■ Choose Internal Output from SDP-6500.
■ Choose External Output from other devices.
■ Mode: SXGA(1280X1024) / XGA(1024X768) / SVGA(800X600)
■ Select Output Mode: NTSC / PAL
35
8. Memory Control
■ Free: Click to reset all the settings to default like Freeze, Rotate, and
Divide.
■ Save to Memory: Save current image to memory.
■ Recall from Memory: Load saved image from memory.
■ Divide: Divide screen to halves. Live image is being displayed on the lefthand side, and the saved image is being displayed on the righthand side.
■ Shift: Move the saved image on the right-hand side to the left.
■ 3X3 Multi: Divide screen to 3 by 3 to display all 8 images saved to
memory simultaneously.
You can save up to 8 frames into
the SDP-6500 Digital Presenter’s
internal memory. When you click
Save, Load, or Divide buttons,
the Select Number dialog box
appears, and lets you select the
memory location number.
36
9. Preset
■ Preset Exe: Load and activate saved settings.
■ Preset Save: Save current settings for next time use.
You can save up to four different custom presets. When you click
the Save or Load button, the Select Number dialog box appears.
Select appropriate preset number.
37
Capture and Print Image
You can capture the image presented from the SDP-6500 Digital Presenter,
and save the image as a JPEG or PICT file, or print the image.
Capturing Image
You can select the image size from three different sizes: Full, 1/4, and 1/16.
Select the size of the image being captured, then press Capture. The
Captured Image window appears, and there are two buttons on the
window.
Save Image
Save the captured image on your hard disk drive.
Print Image
Print the captured image with your default printer.
38
Printing Image
If you press the Print Image button on the Captured Image window, the Print
Preview dialog box appears. Here, you can set the image size on the paper.
■ Fit to Paper: Enlarge or reduce the image
size to fit the size of the paper.
■ Print to Original Size: Don’t change the
image size. If the size of the image is
larger than the paper’s, it will be reduced
to fit in the paper.
Once you set the image size, click Print to print the image.
39
Troubleshooting (Windows Program)
Symptom
Solution
Device Not Found
Either USB connection is broken or SDP-6500
Digital Presenter is turned off. Please checkup the
USB cable connection or turn on the Digital
Presenter.
Device Disconnected
This is not an error. If you disconnect the USB cable
or turn off the Digital Presenter while the software is
running, this message will be displayed and the
software will be quit.
File I/O Error
The image file you want to replace is locked or it has
invalid name. Please give it a different name and try
again.
Cannot Initialize Printer
There is no default printer selected. Please Select a
printer on Chooser and try again. You Can find
Chooser on the Apple Menu.
QuickTime Not Found
or Version Invalid
You don’t have QuickTime on your Macintosh or the
version is too low. Please install QuickTime 4.0 or
later and try again. You can download QuickTime
software from Apple Computer’s web site.
Mac OS Version Invalid
This software runs on Mac OS version 9.0 or later.
Please upgrade your Mac OS to use this software.
USB Software Version
Invalid
This software needs USB Software version 1.1 or
later. You can download USB Software from Apple
Computer’s web site.
USB Software Not
Found
This software needs USB Software version 1.1 or
later. You can download USB Software from Apple
Computer’s web site.
■ If SDP-6500 S/W is not operated normally, reboot PC and turn SDP-6500 on again.
40
Office :
TEL
Plant
TEL
SAMSUNG TECHWIN CO., LTD.
145-3, Sangdaewon 1-Dong, Jungwon-Gu,
Sungnam, Kyungki-Do, Korea 462-121
: +82-31-740-8137 ~ 8141
: Plant #1, SAMSUNG TECHWIN
42, Sungju-dong, Changwon-city,
Kyungsangnam-do, Korea.
: +82-55-282-1181
P/No : 6806-0420-01A