1
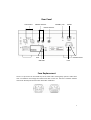
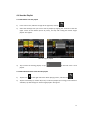
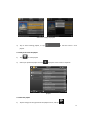
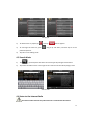
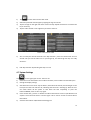
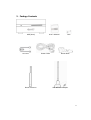
QAT MS5 Music Server USER MANUAL 1 QAT MS5 Music Server USER MANUAL Content 1. 2. 3. 4. 5. 6. 7. Product features ..........................................................................................................3 Start up and shut down the host ..................................................................................6 2.1 Start up the host ..................................................................................................6 2.2 Shut down the host..............................................................................................6 Connect iPad and the host ...........................................................................................6 3.1 Using an external wireless router ...........................................................................6 3.2 Using USB wireless adapter ....................................................................................6 Basic operation of QAT Remote....................................................................................7 4.1 Acquire music ........................................................................................................7 4.1.1 Rip CD tracks to hard disc of MS5 ...................................................................7 4.1.2 Acquire music from external USB storage .......................................................9 4.2 Play music............................................................................................................10 4.2.1 Play an album ..............................................................................................10 4.2.2 Play selected tracks in an album ...................................................................10 4.2.3 Set music playback mode .............................................................................11 4.3 Edit album............................................................................................................11 4.3.1 View and edit album cover information .....................................................11 4.3.2 Edit Artist ..................................................................................................12 4.3.3 Edit music style..........................................................................................12 4.3.4 Delete music..............................................................................................12 4.4 Use the playlist.....................................................................................................13 4.4.1 Add albums into the playlist.......................................................................13 4.4.2 Add individual music tracks into the playlist ...............................................13 4.4.3 Play music from the playlist .......................................................................14 4.4.4 Edit the playlist..........................................................................................14 4.5 Search music ........................................................................................................15 4.6 Listen to the Internet radio...................................................................................15 4.7 System settings ....................................................................................................16 Package contents .......................................................................................................17 IMPORTANT SAFETY INSTRUCTIONS ...........................................................................18 After-sales Service......................................................................................................19 Thank you for choosing QAT! 2 1. Product Features TEAC CD drive for ripping Built-in 2TB 3.5-inch Seagate Enterprise hard drive for music data storage (Saving up to 3000 music CDs in WAV format or 5000 music CDs in FLAC format) DAC: Balanced DAC circuitry, 2 Analog-Devices AD1955(192KHz/24Bit)chips Analog outputs: RCA, XLR Digital outputs: RCA Network connection: RJ45 2 USB ports for data transfer Fully Balanced output with proprietary full discrete OP amplifiers consisting of FET and Bipolar devices. Very high slew rate with high drive capability. Supported audio formats: PCM, WAV, APE, FLAC, AIFF, WMA, M4A, MP3, AAC, Ogg Vorbis etc. Remote control software tailored for both Android and iOS (for iPad) Independent intellectual property rights and unique user interface Aluminum, fan-less chassis design; various colors available Dimensions (W x D x H): 325×270×165 (mm) / 12.8 x 10.6 x 6.5 (inches) Weight: 12.7 Kg / 28 lbs. 3 Front Panel POWER INDICATOR SUCTION-TYPE CD-ROM DRIVE EJECT 4 Rear Panel XLR OUTPUT ANALOG OUTPUT STANDBY / ON POWER DIGITAL OUTPUT RJ45 USB PORT POWER OUTLET FUSE Fuse Replacement There is a square slot in the middle top of the tube cabin. Please gently open the tube cabin with a screwdriver and change the broken tube with a new one. The fuse is without cathode and anode. Please push the fuse cabin back after installation. 5 2. Start Up and Shut Down the Host 2.1 Start up the host 1) 2) 3) 4) 5) Use the RCA or XLR cables to connect the host to an amplifier (see “ANALOG OUTPUT” and “XLR OUTPUT” on the rear panel). Connect the host and the wireless network adapter (see 3.2). Use the power cable to connect the host to the power supply (see “POWER OUTLET” on the rear panel). Once all necessary connections are made, find the power supply button above the POWER OUTLET on the rear panel and switch it to the “on” position. Now the host is standing by. Wait for about 5 seconds, then press the round button “STANDBY/ON” to turn on the host, which is indicated by a white light on the front panel. 2.2 Shut down the host It is highly recommended to shut down the host by tapping "shut down music server" button in the QAT Remote software (see details in 4.7). Wait for about 10 seconds until the white light on the front panel turns off, meaning the host is standing by. Now you can press “STANDBY/ON” to turn on the host again, or completely shut it down by switching off the power supply. Irregular operation may cause unexpected data loss or damage to the machine. 3. Connect iPad and the Host There are two ways to connect iPad and the host: 3.1 Using an external wireless router If the user has a wireless router network in home, the existing router and the host can be connected by an Ethernet cable. The user needs to insert one end of the Ethernet cable in the LAN interface of the wireless router, and the other end into the RJ45 interface on the rear panel of the host. Then follow the steps below: 1) Tap “Settings” on the iPad screen, and find “WLAN”. Choose the correct network (“QATyour S/N”), and type in code “QATQATQAT”, if it is required. Then iPad and the host will be connected. 2) Back to iPad main screen, and tap “QAT Remote” to operate the host. Note: If the router is connected to the Internet, the information of the CD album will be downloaded and saved in iPad during the CD ripping process. 3.2 Using USB wireless adapter In case that the user has no wireless router network in home, we offer a USB wireless adapter, with which the user could connect iPad and the host by following the steps below: 1) Connect the USB wireless adapter and the host through the USB port on the rear pane. 6 2) Follow the steps in 3.1 Note: To connect the MS5 to your local network (router) via an Ethernet cable, the DHCP server must be enabled. 4. Basic Operation of QAT Remote 4.1 Acquire music 4.1.1 Rip CD tracks to hard disc of MS5 1) Tap “QAT Remote” on your iPad and see the main screen. Insert a CD into the CD-Room. A CD-shaped icon will pop up on the left top corner after a few seconds: show main screen show play list show online radio CD ripper play bar 2) clock settings search music album cover Main Screen Tap . If the host is connected to the Internet, the screen will display the information of the CD such as its cover, track titles and time, etc., and relevant operational options. 7 Note: the manufacturer makes no guarantee that the information of all CDs will be completely acquired. Most of the successful CDs are from Europe and the US currently. 3) By default, all the CD tracks are selected, which is indicated by the orange boxes in front of every track title. If the user wishes to rip individual tracks, tap the box in front of the track title to deselect it, or use the “select all/deselect all” option. Then tap “ripper”, the tracks will be ripped and imported one by one to the hard disk of MS5, indicated by a progress bar. Rip CD tracks to MS5 4) After completing the ripping, tap to enter album style (genre) selecting screen: Album style selecting screen Tap the music style tags to label the current album. Tap to add a new music style tag. 8 Tap to edit music style tags: Tap Tap 5) 6) Tap to eject the CD. If the user re-inserts the CD which is already imported: to delete music style tags, or tap the name to edit. to complete the operation. The user can choose to: Overwrite: Repeat the above steps. Copy duplicate: Repeat the above steps, and establish a duplicated album. Tap CANCEL to exit. 4.1.2 Acquire music from external USB storage 1) Connect an external USB storage to the host via USB port on the rear panel, and a USB icon will pop up. Tap the icon to enter: 9 USB connection 2) 3) USB storage connected Select the folder that you want to copy to the host, and tap “Copy to Local Drive”. The user can also back up the albums in the host to external USB storage by selecting and tapping “Backup to USB Storage”. Copy and backup music files 4.2 Play Music 4.2.1 Play an album 1) 2) Press and hold the album cover for one second until you see a CD icon at the tip of your figure, and then drag it to the “play” button to enter the album playing screen. Or: enter the album playing screen by tapping the album cover in main screen, and then tap “play” button. 4.2.2 Play selected tracks in an album 1) Tap the album cover in main screen to enter the album playing screen where the information of tracks and operational options are displayed. 10 2) Select the track by tapping the box in front of every track title to highlight it (turn orange). Multi-selection is available. 3) Tap play button to play the selected track(s). Note: You can also play a single track by tapping and holding the track title for a second until you see a note icon at the tip of your figure, and then drag it to the play button. 4.2.3 Set music playback mode 1) Tap to highlight it (turn white) to play the tracks in order and repeat the sequence. Tap the icon again to turn it into , meaning to loop the current track. Tap the icon once again to quit repeat playing mode. 2) Tap to highlight it to play the tracks randomly. Tap again to quit random playing mode. 4.3 Edit Album 4.3.1 View and edit album cover information Tap the album cover in the album playing screen: 1) Publisher: Tap to list all albums by the same publisher. 2) Release time: Tap to list all albums released at the same time of the current album. 3) Composer: Tap to list all albums with the same composer. 4) Edit: Tap “Edit”, a pen icon will appear after each editable field. Tap to input, and tap “Done” to save and exit, or tap 5) Tap to quit without saving. to go back to album cover. Edit album cover information 11 4.3.2 Edit Artist On the left side of the album playing screen, the icon indicates the artist of the current album. Tap the icon to enter the artist edit screen, where albums by the same artist are listed. To edit the artist of the current album, tap . 4.3.3 Edit music style On the left side of the album playing screen, the icon indicates the music style of the current album. Tap the icon to enter the music style edit screen and edit. (see 4.1.1, step 4) 4.3.4 Delete music This will physically erase the music track(s) from the hard disk of the host! 1) Tap the icon at the right side of the album playing screen, and then tap . 2) 3) Select the track(s) that you want to delete by tapping the title(s) or tapping “Select all/none” (turn red; multi-selection available). Tap OK to delete. You can delete the entire album from the main screen: In the main screen, slide the triangle at the right side, and tap Select the album(s) that you want to delete by tapping the small box at the left up corner of each album (shown by a tick), and tap “OK”. ; 12 4.4 Use the Playlist 4.4.1 Add albums into the playlist 1) In the main screen, slide the triangle at the right side, and tap ; 2) Select the album(s) that you want to add to playlist by tapping the small box at the left upper corner of each album (shown by a tick), and tap “OK”. Dialog box “Select target playlist” will appear. Add album(s) to playlist 3) Tap to select the existing playlist, or tap to add and name a new playlist. 4.4.2 Add individual music tracks into the playlist 1) Tap the icon at the right side of the album playing screen, and then tap . 2) Tap the track title(s) (or “Select all/none”) to add it to playlist (turn orange; multi-selection available). Tap OK. Dialog box “Select target playlist” will appear. 13 Add music track(s) to playlist 3) Tap to select existing playlist, or tap playlist. to add and name a new 4.4.3 Play music from the playlist 1) Tap to enter playlist. 2) Select your preferred playlist and tap to play the music tracks in sequence. playlist 4.4.4 Edit the playlist 1) Tap the triangle at the right side of the playlist screen, and tap . 14 Edit playlist 2) To delete music or playlist, tap 3) To rearrange the music list, press 4) preferred position. Tap "OK" to exit editing mode. , and tap after it appears. , drag it up and down, and then drop it to the 4.5 Search Music 1) Tap , input keywords and select the search types by ticking the boxes below. 2) Tap either the album covers or the single music tracks to enter the album playing screen. Search music 4.6 Listen to the Internet Radio The Internet radio functions only when the host is connected to the Internet. 15 1) Tap 2) 3) Select the preferred channel types by tapping the tags on the left. Tap the triangle on the right side of the screen and tap "Update channel list" to refresh the list, if necessary. Tap the radio channel on the right that you want to listen to. 4) to enter the Internet radio mode. Listen to the Internet radio 5) You can add your favorite channels into "My channels": press the channel title for one second until you see the radio icon on your finger tip, and then drag and drop it to "My channels". 6) Edit "My channels" by following the steps in 4.4.4. 4.7 System Settings Tap 1) 2) 3) 4) 5) on the right upper corner. The user can: Check the server information such as album numbers, track numbers and free disk space. Change the display settings. Shut down the music server: tap the button, after about 10 seconds, the white light on the front panel of the host will turn off, indicating that the host is standing by. Now the user can either switch off the power to shut down the host completely, or press the button”STANDBY / ON” to start it up again. Clear cached data / picture: to delete the album information stored in QAT Remote and acquire it from the host when it connects again. This is used to correct erroneous album information. View the information of QAT Audio Technology Ltd. 16 5. Package Contents MS5 (Host) Net Cable Router Antenna User’s Manual Power Cable Fuse Router Base USB Wireless Adapter 17 6. IMPORTANT SAFETY INSTRUCTIONS IT IS IMPORTANT THAT YOU READ AND OBSERVE BOTH THE INSTRUCTIONS IN THIS MANUAL AND THE INSTRUCTIONS ON THE DEVICE. PLEASE KEEP THIS MANUAL FOR FUTURE REFERENCE. Check the working voltage of the DEVICE Please do check the working voltage to make sure it accords with the local standard before using. If the voltage marked on the rear panel does not fit your needs, please inform your local distributor or the company. Do not disassemble the DEVICE Danger! High voltage! Do not open the device. You run the risk of getting an electric shock. The machine does not contain any user-serviceable parts (except the fuse). Please leave all maintenance work to qualified technicians. Turn the power off when the accident occurred If you find the chassis emitting smoke or strange smells, please unplug the AC power, (pay attention not to be burned.) Using the device under such circumstance may cause fire. Insure ventilation The slots and openings in the chassis are to ensure ventilation and reliable operation to protect the device against overheating. Do not block or cover these openings for instance by placing the device on a bed, a sofa, a carpet or similar surfaces. Avoid penetration of foreign objects and liquid Never drop any foreign objects through the openings into the device, as they may touch dangerous voltage points or short-circuit parts and thus cause fire or electric shock. Do not allow any liquid to be spilled on or into the device. Do not use liquid detergents or aerosol cleaning agents. Please use only a dry cloth for cleaning the unit. Avoid high temperature, moisture and dust The device shall not be exposed to dripping or splashing. Do not place any sources of danger on the apparatus (such as liquid filled objects, lighted candles and so on). 18 Additional instructions QAT does not guarantee successful ripping of each CD. For CDs from certain regions, countries or in certain languages, recognition rate can be lower. Working temperature should be under 28℃ (82℉) for best performance. The product is subject to technical changes without further notice. For the latest news on products, please visit http://www.qat-audio.com We recommend all users make a copy of the data saved in the hard disc of MS5, in case of loss of some or all of the files on the server. QAT accepts no responsibility for any loss of data that is stored by users in the MS5. 7. After-Sales Service This warranty applies to all the units sold and delivered by QAT to the first user within two years of the invoice or receipt date issued by QAT. After service or repairs on the unit, ask the service technician to carry out a safety check to ensure that the unit is ready for use. The QAT’s technical staff will provide the most excellent service. Note of the Warranty Limitation 1. The MS5 & RP5 are not covered by warranty without proof of purchase. 2. Damage due to operator’s misuse including water damage, physical damage and modification are not covered by this Warranty Policy. 3. Any system bugs such as flashing screen, unable to turn on, unstable system running due to ROM flashing/system upgrading by operators are not covered by this Warranty Policy. 4. Normal wearing down of housing or other consumable parts is not covered by this Warranty Policy. 5. Damage due to any unauthorized disassembling or repairing is not covered by this Warranty Policy. 6. The Warranty Policy is void if the security seal tape is removed or broken. QAT Audio Technology Ltd. Website: www.qat-audio.com Version: 1.5 Aug. 2012 19