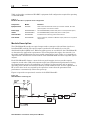
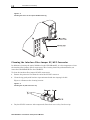
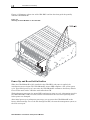
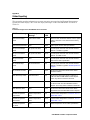
1
Installation and Operation Manual GX2-LM1000E* 1310 nm Forward Path Transmitter STATUS RF TP1 RF TP2 LM1000E12 CAUTION RISK OF ELECTRIC SHOCK CAUTION: TO REDUCE THE RISK OF ELECTRIC SHOCK, DO NOT REMOVE COVER (OR BACK). NO USER-SERVICEABLE PARTS INSIDE. REFER SERVICING TO QUALIFIED SERVICE PERSONNEL. Caution These servicing instructions are for use by qualified personnel only. To reduce the risk of electrical shock, do not perform any servicing other than that contained in the Installation and Troubleshooting Instructions unless you are qualified to do so. Refer all servicing to qualified service personnel. Special Symbols That Might Appear on the Equipment DAN GER In visib le La se r Ra d ia tio n Avo id D ir ect Exp o sur e to Be a m O u tp ut P o w e r: + 17 d B m M a x im u m W av e len gt h: 1 31 0 n m T h is P rod u c t c o m plies w ith 2 1 C F R 10 4 0. 10 . F D A -C la ss I F D A -C la ss III B L as e r in s id e pro d uc t R efe r to U s e r’s M a nu a l fo r R eg ula to ry C o m p lian c e This is a class 1 product that contains a class IIIb laser and is intended for operation in a closed environment with fiber attached. Do not look into the optical connector of the transmitter with power applied. Laser output is invisible, and eye damage can result. Do not defeat safety features that prevent looking into optical connector. This product contains a class IIIb laser and is intended for operation in a closed environment with fiber attached. Do not look into the optical connector of the transmitter with power applied. Laser output is invisible, and eye damage can result. Do not defeat safety features that prevent looking into the optical connector. CAUTION – Use of controls or adjustments on performance of procedures other than those specified herein may result in hazardous radiation exposure. This symbol indicates that dangerous voltage levels are present within the equipment. These voltages are not insulated and may be of sufficient strength to cause serious bodily injury when touched. The symbol may also appear on schematics. The exclamation point, within an equilateral triangle, is intended to alert the user to the presence of important installation, servicing, and operating instructions in the documents accompanying the equipment. Caution – This product contains parts and assemblies susceptible to damage by electrostatic discharge (ESD). For continued protection against fire, replace all fuses only with fuses having the same electrical ratings marked at the location of the fuse. Caring for the Environment by Recycling When you see this symbol on a Motorola product, do not dispose of the product with residential or commercial waste. Recycling your Motorola Equipment Please do not dispose of this product with your residential or commercial waste. Some countries or regions, such as the European Union, have set up systems to collect and recycle electrical and electronic waste items. Contact your local authorities for information about practices established for your region. If collection systems are not available, call Motorola Customer Service for assistance. FCC Compliance This equipment has been tested and found to comply with the limits for a Class A digital device, pursuant to Part 15 of the FCC Rules. These limits are designed to provide reasonable protection against harmful interference when the equipment is operated in a commercial environment. This equipment generates, uses, and can radiate radio frequency energy and, if not installed and used in accordance with the Installation Manual, may cause harmful interference to radio communications. Operation of this equipment in a residential area is likely to cause harmful interference in which case the user will be required to correct the interference at his/her own expense. Any changes or modifications not expressly approved by Motorola could void the user’s authority to operate this equipment under the rules and regulations of the FCC. Canadian Compliance This Class A digital apparatus complies with Canadian ICES-003. Cet appareil numérique de la classe A est conforme a la norme NMB-003 du Canada. FDA Compliance This product meets the requirements of the Code of Federal Regulations, Title 21, Chapter I, Subchapter J, Sections 1010.2, 1010.3, 1040.10, and 1040.11 IEC Compliance This product meets the IEC60825-1 requirements for a CLASS 1M LASER PRODUCT. Declaration of Conformity We Motorola, Inc. 101 Tournament Drive Horsham, PA 19044, U.S.A. declare under our sole responsibility that the OMNISTAR® Model GX2-LM1000E* to which this declaration relates is in conformity with one or more of the following standards: EMC Standards EN55022 EN55024 EN50083-2 CISPR-22 EN60950 IEC 60825-1:1993+A1:1997+A2: 2001 IEC 60950-1:2001 CISPR-24 Safety Standards following the provisions of the Directive(s) of the Council of the European Union: EMC Directive 89/336/EEC Low Voltage Directive 73/23/EEC Copyright © 2007 by Motorola, Inc. All rights reserved. No part of this publication may be reproduced in any form or by any means or used to make any derivative work (such as translation, transformation or adaptation) without written permission from Motorola, Inc. Motorola reserves the right to revise this publication and to make changes in content from time to time without obligation on the part of Motorola to provide notification of such revision or change. Motorola provides this guide without warranty of any kind, either implied or expressed, including, but not limited to, the implied warranties of merchantability and fitness for a particular purpose. Motorola may make improvements or changes in the product(s) described in this manual at any time. _______________________________________________________________________________________________________________________________ Motorola, the stylized M logo, and OMNISTAR are registered in the US Patent & Trademark Office. All other product or service marks are the property of their respective owners. © Motorola, Inc. 2007 Contents Section 1 Introduction Using This Manual ........................................................................................................................................................................... 1-2 Related Documentation................................................................................................................................................................... 1-3 Document Conventions................................................................................................................................................................... 1-3 If You Need Help............................................................................................................................................................................... 1-4 Calling for Repairs ........................................................................................................................................................................... 1-4 Section 2 Overview Module Description.......................................................................................................................................................................... 2-2 Operating Modes.............................................................................................................................................................................. 2-4 AGC Modes .............................................................................................................................................................................. 2-4 MGC Modes.............................................................................................................................................................................. 2-4 Quick-Swap Module Configuration ....................................................................................................................................... 2-4 Additional Features.......................................................................................................................................................................... 2-5 RF Section ........................................................................................................................................................................................ 2-5 Embedded Section........................................................................................................................................................................... 2-6 Communication Interfaces.............................................................................................................................................................. 2-6 Front-Panel ....................................................................................................................................................................................... 2-7 Rear Panel......................................................................................................................................................................................... 2-9 Section 3 Installation and Setup Before You Begin ............................................................................................................................................................................. 3-1 Unpacking the GX2-LM1000E*........................................................................................................................................................ 3-2 Installing the RF Interface Connectors .......................................................................................................................................... 3-2 Cleaning the GX2-LM1000E* Optical Bulkhead Fitting ................................................................................................................ 3-3 Cleaning the Interface Fiber Jumper SC/APC Connector............................................................................................................ 3-4 Inserting the SC/APC Connector.................................................................................................................................................... 3-5 Installing the GX2-LM1000E* in the GX2-HSG* ............................................................................................................................. 3-6 Power-Up and Reset Initialization .................................................................................................................................................. 3-8 Measuring and Checking the Optical Output Power .................................................................................................................... 3-9 Measuring and Checking the RF Input Signal Levels .................................................................................................................. 3-9 GX2-LM1000E* Installation and Operation Manual ii Contents Protecting the Laser ..............................................................................................................................................................3-11 Operating Modes ............................................................................................................................................................................3-11 MGC Modes ............................................................................................................................................................................3-11 AGC Modes.............................................................................................................................................................................3-12 Section 4 Operation Embedded Section ...........................................................................................................................................................................4-1 Boot Operation.........................................................................................................................................................................4-1 Operating Modes ..............................................................................................................................................................................4-1 AGC Modes...............................................................................................................................................................................4-1 Preset................................................................................................................................................................................4-1 Set .................................................................................................................................................................................4-2 Set Equate ........................................................................................................................................................................4-2 CW/Video..........................................................................................................................................................................4-2 MGC Modes ..............................................................................................................................................................................4-2 Manual ..............................................................................................................................................................................4-3 Manual Equate..................................................................................................................................................................4-3 Additional Controls and Configurations ........................................................................................................................................4-3 Optical Output Control ............................................................................................................................................................4-3 RF Drive Level Control ............................................................................................................................................................4-3 Quick Swap...............................................................................................................................................................................4-4 Implementing a Reduced Channel Load ........................................................................................................................................4-5 Implementing an Increased Channel Load ....................................................................................................................................4-5 Using Set Mode........................................................................................................................................................................4-6 Using Manual Mode .................................................................................................................................................................4-6 Using Preset Mode (with AGC control in the GX2-LM1000E* and each node) ..................................................................4-6 Using Preset Mode (with AGC control in the GX2-LM1000E* only)....................................................................................4-7 Network Management ......................................................................................................................................................................4-8 Operating the GX2-LM1000E* with the Optional SDU ..........................................................................................................4-9 Downloading New Firmware...................................................................................................................................................4-9 Section 5 Troubleshooting Using the Status LED .......................................................................................................................................................................5-1 Using Available Options ..................................................................................................................................................................5-3 GX2-LM1000E* Installation and Operation Manual Contents iii Appendix A Specifications RF.......................................................................................................................................................................................................A-1 Optical ...............................................................................................................................................................................................A-1 Power ................................................................................................................................................................................................A-1 Environmental ..................................................................................................................................................................................A-1 Physical.............................................................................................................................................................................................A-1 GX2-LM1000E* Models ....................................................................................................................................................................A-2 Appendix B Menus RF/OPTICAL Menu ..........................................................................................................................................................................B-1 MODULE STATUS Menu .................................................................................................................................................................B-2 MODULE INFO Menu.......................................................................................................................................................................B-2 REMOTE Menu.................................................................................................................................................................................B-2 Appendix C Status Reporting Abbreviations and Acronyms Figures Figure 1-1 GX2-LM1000E* transmitter front panel....................................................................................................................... 1-1 Figure 1-2 Fully populated GX2-HSG* equipment shelf............................................................................................................... 1-2 Figure 2-1 GX2-HSG* ....................................................................................................................................................................... 2-1 Figure 2-2 GX2-LM1000E* block diagram ...................................................................................................................................... 2-2 Figure 2-3 GX2-LM1000E* front and rear side views................................................................................................................... 2-3 Figure 2-4 GX2-LM1000E*front panel............................................................................................................................................. 2-7 Figure 2-5 GX2-LM1000E* rear panel ............................................................................................................................................. 2-9 Figure 3-1 Installing the RF interface connectors on the rear of the GX2-HSG* ....................................................................... 3-2 Figure 3-2 Cleaning the barrel of the optical bulkhead fitting..................................................................................................... 3-4 Figure 3-3 Cleaning the SC/APC connector tip............................................................................................................................. 3-4 Figure 3-4 Inserting the SC/APC connector .................................................................................................................................. 3-5 Figure 3-5 Typical GX2-HSG* configuration.................................................................................................................................. 3-6 Figure 3-6 GX2-LM1000E* installation in a GX2-HSG* ................................................................................................................ 3-7 Figure 3-7 Inserting the GX2-LM1000E* in the GX2-HSG* ........................................................................................................... 3-8 Figure 3-8 GX2-HSG*rear-panel RF connections........................................................................................................................ 3-10 Figure 3-9 RF test-point level versus channel loading ............................................................................................................. 3-13 GX2-LM1000E* Installation and Operation Manual iv Contents Tables Table 2-1 Minimum GX2-HSG* equipment-shelf configuration....................................................................................................2-2 Table 2-2 GX2-LM1000E* front-panel features...............................................................................................................................2-8 Table 2-3 GX2-LM1000E* rear-panel features ..............................................................................................................................2-10 Table 4-1 Status LED indications for given parameters ...............................................................................................................4-8 Table 5-1 Troubleshooting using the status LED only .................................................................................................................5-1 Table 5-2 Troubleshooting — using available options .................................................................................................................5-3 Table A-1 GX2-LM1000E* models and optical outputs ............................................................................................................... A-2 Table B-1 Using the GX2-LM1000E* menus................................................................................................................................. B-1 GX2-LM1000E* Installation and Operation Manual Sect ion 1 Introduction The OmniStar® GX2 is a fiber optic broadband transmission platform for headend and hub locations that supports advanced broadband hybrid-fiber/coax telecommunications systems. The OmniStar GX2 platform includes a complete line of headend fiber optic products designed to transport video and data signals in CATV systems and related applications. The OmniStar GX2 platform is flexible in its application and includes a series of modules and options that you can select to accommodate system requirements. This manual describes the GX2-LM1000E* RoHS compliant, high-performance, directly-modulated, 1310 nm distributed feedback (DFB) laser transmitters. This series has a range of optical output powers to serve link budgets from 2 to 16 dB. The GX2-LM1000E* has one primary RF input for broadcast and one secondary RF input for narrowcast applications. It is capable of transmitting a mix of analog and digital channels from 47 MHz to 1 GHz through a front-panel optical output connector. It also has two front-panel RF test points and a front-panel LED provides status and alarm information. The GX2-LM1000E improved narrowcast input port design requires a significantly lower input level (+6 dBc above broadcast level) compared to the GX2-LM1000B (+22 dBc). This improvement provides more flexibility and requires less amplification in headend combining network designs. Figure 1-1 illustrates a front view of the GX2-LM1000E*. Figure 1-1 GX2-LM1000E* transmitter front panel GX2-LM1000E* Installation and Operation Manual 1-2 Introduction An internal microprocessor controls and monitors the GX2-LM1000E*. Remote control is implemented through the GX2-HSG* equipment-shelf backplane by the GX2-CM100B control module, which can receive input from a variety of sources. Using status monitoring software, you can electronically update the firmware without removing the GX2-LM1000E* from the equipment shelf. Different OmniStar GX2 application modules can be intermixed in the 16-slot GX2-HSG*. For illustrative purposes, Figure 1-2 depicts a GX2-HSG* populated with 16 GX2* modules, and a GX2-CM100B control module. Figure 1-2 Fully populated GX2-HSG* equipment shelf For more information regarding this product or other OmniStar GX2 modules, consult the Motorola product catalog or visit the web site: http://www.motorola.com/broadband. Using This Manual The following sections provide information and instructions to install and operate the GX2-LM1000E*. Section 1 Introduction provides a product description, related documentation, the technical help line, and repair/return information. Section 2 Overview describes the functions of the GX2-LM1000E*. Section 3 Installation and Setup provides instructions on how to install the GX2-LM1000E*, clean the optical bulkhead and fiber connector, determine the operating mode, and verify signal levels. Section 4 Operation provides instructions on how to operate the GX2-LM1000E*. Section 5 Troubleshooting provides general guidelines to follow for problem resolution. Appendix A Specifications provides general specifications for the GX2-LM1000E*. Appendix B Menus provides the GX2-LM1000E* menu structure and information on how to use the optional SDU with display. Appendix C Status Reporting provides information on status reporting messages for the Element Management System and shelf display. Abbreviations and Acronyms The Abbreviations and Acronyms list contains the full spelling of the short forms used in this manual. GX2-LM1000E* Installation and Operation Manual Introduction 1-3 Related Documentation The following documents provide information that is required for products that can be used with the GX2-LM1000E*: GX2-HSG* Equipment Shelf Installation and Operation Manual GX2-CM100B Control Module Installation and Operation Manual GX2-PSAC10D-R AC Power Supply Installation and Operation Manual GX2-PSDC10D-R DC Power Supply Installation and Operation Manual Although these documents provide information that may be of interest to you, they are not required to install or operate the GX2-LM1000E*: GX2-RX1000B Forward Path Receiver Installation and Operation Manual GX2-RX200BX2 Dual Return Path Receiver Installation and Operation Manual GX2-SDU100B Shelf Door Unit Installation and Operation Manual GX2-OA100* Optical Amplifier Installation and Operation Manual GX2-EM870* Externally Modulated Broadcast Transmitter Installation and Operation Manual GX2-DM870* Directly Modulated Forward Path Transmitter Installation and Operation Manual GX2-RSW200B RF Switch Installation and Operation Manual GX2-OSW10B Optical Switch Installation and Operation Manual Web Browser Interface Instruction Sheet Document Conventions Before you begin using the GX2-LM1000E*, familiarize yourself with the stylistic conventions used in this manual: SMALL CAPS Denotes silk screening on the equipment, typically representing front- and rear-panel controls, input/output (I/O) connections, and LEDs * (asterisk) Indicates that several versions of the same model number exist and the information applies to all models; when the information applies to a specific model, the complete model number is given Italic type Denotes a displayed variable, a variable that you must type, or is used for emphasis GX2-LM1000E* Installation and Operation Manual 1-4 Introduction If You Need Help If you need assistance while working with the GX2-LM1000E*, contact the Motorola Technical Response Center (TRC): Toll-free: 1-888-944-HELP (1-888-944-4357) Direct: 1-847-725-4011 Motorola Online: http://businessonline.motorola.com The TRC is on call 24 hours a day, 7 days a week. In addition, Motorola Online offers a searchable solutions database, technical documentation, and low-priority issue creation and tracking. Calling for Repairs If repair is necessary, call Motorola’s Repair Facility at 1-800-642-0442 for a Return for Service Authorization (RSA) number before sending the unit. The RSA number must be prominently displayed on all equipment cartons. The Repair Facility is open from 8:00 AM to 5:00 PM Central Time, Monday through Friday. For after hours, or international customers, a request for an RSA can be submitted via e-mail to [email protected]. Please include the following information in the e-mail: Shipping address (for returning the unit(s) to you) Contact name and phone number Serial number(s) of unit(s) Detailed description of problem(s) for each unit When shipping equipment for repair, follow these steps: 1 Pack the unit securely. 2 Enclose a note describing the exact problem. GX2-LM1000E* Installation and Operation Manual Introduction 3 Enclose a copy of the invoice that verifies the warranty status. 4 Ship the unit PREPAID to the address indicated on the RSA form provided by Motorola. 1-5 For customers in Europe, the Middle East, and Africa (EMEA) contact the Technical Assistance Centre (TAC) which offers the following high levels of services: Toll-free phone numbers where available – see list below 24 hours a day, 7 days a week, multilingual technical assistance (Spanish, German, and French) Central tracking of all issues utilizing the Clarify Call Management System Automated escalation management, both technical and issue related, if necessary through to the high-level development teams or senior account management. The e-mail address for the Call Management System is: [email protected]. Or, you may call the following toll-free individual country phone numbers: C oun t ry P ho ne Num be r Belgium 0-800-72-163 Denmark 80-88-6748 Finland 0-800-114-263 France 0-800-90-7038 Germany 0-800-18-73019 Hungary 06-800-18164 Ireland 1-800-55-9871 Israel Golden Lines Israel Bezeq Israel Barak 1-809-25-2071 1-809-42-9181 1-809-31-5435 Italy 800-788-304 Luxembourg 0-800-2-5310 NetherlandsHolland 0-800-022-0176 Norway 800-15-670 Poland 00-800-111-3671 Portugal 800-81-3461 Spain 900-99-1771 Sweden 020-79-0241 Switzerland 0-800-561-872 United Kingdom 8-800-404-8439 All other countries +1 847 725 4011 If the toll-free number fails, please use +1 847 725 4011. The new repair process enables you to track your issue by quoting your unique system ID or Customer Service Report number. GX2-LM1000E* Installation and Operation Manual Sect ion 2 Over view OmniStar GX2 equipment is designed for increased rack density, reliability, ease of operation, and computer-aided troubleshooting through extensive network management. All OmniStar GX2 modules are accessible and replaceable from the front of the GX2-HSG* equipment shelf, resulting in low time-to-repair. An installed module mates with the equipment-shelf connectors for signal interfacing and power. Fiber connections are made at the front of a module. The OmniStar GX2 housing incorporates blind-mate connectors that enable all option modules to be hot swapped without removing the RF cables. When modules are replaced with power applied to the equipment shelf, ensure that all laser hazard warnings provided in Section 3, “Installation” are strictly enforced. You can install the GX2-LM1000E* in any of the sixteen universal slots in the equipment shelf. The narrow slot on the far right is reserved for the GX2-CM100B control module. Although the GX2-HSG* can have a mix of different OmniStar GX2 modules, Figure 2-1 illustrates an equipment shelf populated with sixteen GX2-LM1000E* modules, a GX2-CM100B control module, and an optional shelf door unit (SDU) with display: Figure 2-1 GX2-HSG* GX2-LM1000E* Installation and Operation Manual 2-2 Overview Table 2-1 describes a minimum GX2-HSG* equipment shelf configuration required for operating a GX2-LM1000E*: Table 2-1 Minimum GX2-HSG* equipment-shelf configuration Compo nen t Mode l Functi on Equipment-shelf GX2-HSG* Rack-mountable shelf that houses up to sixteen modules, AC or DC power supplies, and a control module Power supply module GX2-PSAC10D-R or GX2-PSDC10D-R The GX2-PSAC10D-R provides shelf power in an AC powered system; the GX2-PSDC10D-R provides shelf power in a DC system Control module GX2-CM100B Provides status monitoring and control functions Laser module GX2-LM1000E* Laser transmitter, available in different output powers to fit any system requirement Module Description The GX2-LM1000E* provides an optical output used to transport video and data signals on a broadband HFC network. The optical output is produced in the module by a 1310 nm distributed-feedback (DFB) laser. Different output powers are available for the GX2-LM1000E*, as determined by application requirements. The trailing digits that replace the asterisk (*) in the model number differentiate the laser module output-power levels. Table A-1 in Appendix A, “Specifications” identifies the various models of the GX2-LM1000E* and their respective optical outputs. Each GX2-LM1000E* features a state-of-the-art pre-distortion circuit to provide superior composite second order (CSO) and composite triple beat (CTB) distortion performance. During the manufacturing process, the performance of each laser is characterized, and its optimal operating point is stored in non-volatile memory (NVM) within the unit. No user adjustments of RF or laser drive levels are required by the operator to ensure that the guaranteed link performance is automatically achieved on power up. Figure 2-2 provides an operational overview of the GX2-LM1000E*: Figure 2-2 GX2-LM1000E* block diagram GX2-LM1000E* Installation and Operation Manual Overview 2-3 Two front-panel mounted test points are convenient for setup and maintenance of the module. One test point directly monitors the main RF input, and the other test point monitors the RF drive into the laser. The rear panel contains two RF inputs and two cooling fans. Complete descriptions of the front and rear panel features are provided later in this section. Figure 2-3 illustrates front and rear side views of the GX2-LM1000E*. Figure 2-3 GX2-LM1000E* front and rear side views GX2-LM1000E* Installation and Operation Manual 2-4 Overview Operating Modes The user can select one of several operating modes depending on the application. The modes are characterized as either Automatic Gain Control (AGC) or Manual Gain Control (MGC): AGC Modes Each of the following modes uses the AGC function of the module. The specific mode determines the laser drive level relative to the factory-set reference point: Preset — initiates AGC using factory settings for optimal laser performance. Set — enables the user to adjust the AGC reference point for specific product applications or performance requirements. Set Equate — Places the transmitter in Set mode with the same laser drive level as Preset. This is useful in resetting the Set mode operating point to a known level. CW/Video — this is a variable back-off from the level used to proof the system. This mode is not a separate mode from Preset or Set but is used in conjunction with these modes. MGC Modes In Manual mode, the positive intrinsic-negative (PIN) attenuator setting is controlled and changes the laser drive level. Manual — MGC is a fixed gain that is adjusted by the user. Manual Equate — places the module in Manual mode with the attenuator setting remaining the same as the previous mode. After setting the Preset mode, you can use manual equate to find the optimum laser drive level before you switch to Manual mode. Mode settings are stored in NVM. When powering up, a module will revert to the last operating mode settings. Quick-Swap Module Configuration The quick-swap module configuration saves operators time when replacing application modules. When selected, the system saves all previous settings for a module and then automatically downloads those settings to a new module of the same type when it is installed in the same housing slot. This feature works in conjunction with the GX2-CM100B module. Detailed information regarding operating the GX2-LM1000E* is provided in Section 4, “Operation.” GX2-LM1000E* Installation and Operation Manual Overview 2-5 Additional Features Functions performed by the GX2-LM1000E* include: Precision thermoelectric cooler (TEC) maintains the laser at a constant temperature RF overdrive cutoff circuit protects the laser from excessive input levels Provides local alarm indication by changing the color of the front-panel STATUS LED Stores module identity, laser operating parameters, and set-up information in NVM Downloadable firmware to support field upgrades Factory birth certificate stored in NVM and accessible through local interfaces RF Section The RF input signals are applied to the GX2-HSG* equipment-shelf rear panel. The upper connector is the main-broadcast input. The lower connector is provided for narrowcast input and requires a 6 dB higher input signal level than the main input to produce the same output level as the main. The narrowcast input is a convenient method of adding channels to serve select areas of the cable plant. The narrowcast input must be terminated in 75 ohms when not in use. Both inputs provide full bandwidth. The main input test point (RF TP 1) is located directly at the main input connector. This enables verification of the input signals with the highest possible accuracy. Low noise, low distortion gain stages amplify the input signal to the optimum drive level required for the laser. A programmable PIN attenuator, located midway in the amplifier chain, is controlled by the microprocessor and, in turn, controls the drive level. Following the final gain stage is a calibrated RF test point (RF TP 2). This test point provides a reliable secondary indication of modulation. A sample of the RF level is detected after the final gain stage. The output of the RF level detector is a DC voltage level that corresponds to the total signal power applied to the laser. To protect the laser, the laser drive signal automatically cuts off when the RF drive level exceeds a safe limit. A calibrated table of RF power meter voltages is stored in NVM and is used by the AGC modes. When in Preset mode, the microprocessor references laser characteristics stored in the NVM and adjusts the PIN attenuator to apply the optimum RF level to the laser. The power meter is constantly monitored and the PIN attenuator is adjusted to maintain a constant drive level into the laser. Other AGC modes operate in a similar manner but use different laser drive level reference points, as set by the user. These are described in the previous subsection “Operating Modes.” GX2-LM1000E* Installation and Operation Manual 2-6 Overview Embedded Section The microprocessor section controls and monitors the laser module. The main and local microprocessors: Control the RF level into the laser, the laser temperature, and its optical-output power. Monitor laser module status and alarm conditions. If errors are detected in laser-module operation, the microprocessor acts to prevent damage to the laser. Provide an interface to the GX2-CM100B control module through the GX2-HSG* backplane to enable status monitoring. This interface is also used by the GX2-CM100B to control the GX2-LM1000E*. Provide the ability to download new firmware code into the GX2-LM1000E* through the status-monitoring and control interface. Ensure that the module continues to operate normally with minimal interruption from the firmware download. When the download has completed, it resets the module, as commanded by the operator, to start the new firmware. Reset the module to start new firmware if you switch firmware banks using the status-monitoring software. Retain all settings in NVM and maintain operating conditions after a power cycle. Provide the ability to change settings using the network management interfaces. Communication Interfaces The GX2-LM1000E* can be monitored and controlled locally using the GX2-CM100B, in conjunction with network management software. A PC interface is available through an Ethernet port on the front of the GX2-CM100B. Using a standard Web browser, the graphical user interface (GUI) provides a point-and-click method of monitoring and controlling the shelf. For higher-level management, the GX2-LM1000E* can be easily connected to a remote network management system using the standard Ethernet SNMP interface. See Table 4-1 in Section 4, “Operation” for specific information on alarm parameters. GX2-LM1000E* Installation and Operation Manual Overview 2-7 Front-Panel The GX2-LM1000E* front panel includes an optical connector, a tri-color STATUS alarm indicator, and two RF test points. Figure 2-4 illustrates the GX2-LM1000E* front panel: Figure 2-4 GX2-LM1000E*front panel GX2-LM1000E* Installation and Operation Manual 2-8 Overview Table 2-2 describes the GX2-LM1000E* front-panel features: Table 2-2 GX2-LM1000E* front-panel features K ey 1 F ea tu re F unc ti on There are three STATUS LED colors: Green indicates normal operation with no alarms reported. Red indicates a significant error occurred or a major alarm limit was violated. Yellow indicates a minor alarm is detected. A minor alarm signals an out-of-tolerance monitored parameter value, but the system can operate. 2 Blinking STATUS LED indicates that the transmitter is being accessed locally. The RF TP1 F-type connector provides a sample of the RF input level relative to the main RF input port on the rear of the GX2-LM1000E*. 3 The RF TP2 F-type connector provides a sample of the RF drive level to the laser. 4 Optical bulkhead fitting that has a protective shutter for the optical output fiber connection. 5 Slotted thumbscrew that secures the GX2-LM1000E* to the GX2-HSG*. Torque to 7 ±3 in-lbs. GX2-LM1000E* Installation and Operation Manual Overview 2-9 Rear Panel The GX2-LM1000E* rear panel includes cooling fans, the main (broadcast) RF input, secondary (narrowcast) RF input, and power/signal connector. Figure 2-5 illustrates the GX2-LM1000E* rear panel: Figure 2-5 GX2-LM1000E* rear panel GX2-LM1000E* Installation and Operation Manual 2-10 Overview Table 2-3 describes the GX2-LM1000E* rear-panel features: Table 2-3 GX2-LM1000E* rear-panel features K ey F ea tu re F unc ti on 1 Forced air fan that is required to circulate cooling air. 2 Additional forced air fan that is required to circulate cooling air. 3 G-type connector for main (broadcast) RF input to the GX2-LM1000E*. This connector mates with the G- to F-type adapter on the GX2-HSG*. 4 G-type connector for secondary (narrowcast) RF input to the GX2-LM1000E*. This connector mates with the G- to F-type adapter on the GX2-HSG*. 5 This 24-pin connector provides the interface for DC power, ground, remote control, and monitoring functions to the GX2-LM1000E*. While this is a rear facing connector, it is located in a more forward location immediately above the slotted thumbscrew as illustrated in Figure 2-2. 6 The guide pin and thumbscrew secures the GX2-LM1000E* to the GX2-HSG*. GX2-LM1000E* Installation and Operation Manual Sect ion 3 Installation and Setup This section provides instructions on how to: install the GX2-LM1000E*, connect it to other equipment, select the operating mode, and verify its operation. To function, the GX2-LM1000E* requires a GX2-HSG* equipment shelf configured with a GX2-PSAC10D-R or GX2-PSDC10D-R power supply and a GX2-CM100B control module. These modules are shipped with documentation; follow the installation instructions in each manual to populate the GX2-HSG* equipment shelf. Installing the GX2-LM1000E* in the equipment shelf requires: Unpacking the GX2-LM1000E* and recording the model number, serial number, and other related information Installing the RF interface connectors on the rear of the GX2-HSG* Cleaning the GX2-LM1000E* optical bulkhead and interface fiber connectors Inserting the optical interface connector in the GX2-LM1000E* Installing the GX2-LM1000E* in the GX2-HSG* Power-up and reset initialization Measuring and checking the optical output power Measuring and checking the input signal levels Implementing the GX2-LM1000E* MGC and AGC operating modes DANGER! OmniStar GX2 application modules can be damaged by electrostatic discharge (ESD). The use of an appropriate wrist ground strap is strongly recommended. A ground connection is provided on the front of the GX2-HSG*. Before You Begin Before performing the installation, acquire a fiber maintenance kit (Alcoa Fujikura part number C008812, ACT-1, or equivalent). See the instructions to properly use the kit. The following items are required for proper fiber maintenance: 99% isopropyl alcohol Lint-free, anti-static wipes Compressed, filtered air Lint-free swabs GX2-LM1000E* Installation and Operation Manual 3-2 Installation and Setup Unpacking the GX2-LM1000E* 1 Unpack the GX2-LM1000E* and inspect it for damage. If damaged, set it aside in its original packing material and contact the Motorola Customer Service department for further instructions. See Section 1, “Introduction.” 2 Record the model number, serial number, and related information for future reference. This information is on a label on the side of the module. Installing the RF Interface Connectors The GX2-HSG* is unique in that it enables you to install the GX2-LM1000E* in any application module slot. To accommodate this feature, you need to install the RF interface connectors provided with the GX2-LM1000E*. To install the two RF G-to-F connectors on the rear of the GX2-HSG*: 1 Locate the plate containing the two G- to F-type connectors and the two mounting screws included in the GX2-LM1000E* shipping carton. 2 Identify the slot that the GX2-LM1000E* will occupy in the GX2-HSG*. 3 Hold the connector plate so that the F side of the G- to F-type connectors face outward and the tabs are in the up position. 4 Insert the tabs on the mounting plate into the slots on the rear of the GX2-HSG* that correspond to the location of the GX2-LM1000E*. 5 Secure the plate with the two screws provided. Figure 3-1 illustrates the RF connector plate and its correct position on the rear of the GX2-HSG*: Figure 3-1 I n s t a l l i n g t h e R F i n t e r f a c e c o n n e c to r s o n t h e r e a r o f t h e G X 2 - H S G * GX2-LM1000E* Installation and Operation Manual Installation and Setup 3-3 The GX2-HSG* is now ready to accept the GX2-LM1000E*. However, before you insert the GX2-LM1000E* into the GX2-HSG*, you need to perform some basic cleaning procedures on the optical interfaces. It is highly recommended that the following cleaning procedures be performed prior to installing the GX2-LM1000E* in the GX2-HSG*. GX2-LM1000E* installation and routine maintenance should be performed by properly trained personnel. In all cases they should be aware of and observe the following warnings associated with fiber optic transmitters: DANGER! Laser Hazard! Invisible laser radiation when the module is open and the interlock defeated. Avoid direct exposure to the beam. Do not look into the optical connector or a fiber connected to the output of a laser module. Laser output is invisible and eye damage can result. CAUTION! Handle fiber carefully and avoid sharp bends, strain, or pinching. Avoid contacting the highly polished end of the exposed fiber at the connector by keeping the protective boot in place when practical. CAUTION! Use of controls or adjustments, or performance of procedures other than those specified herein, may result in hazardous radiation exposure. While some models of the GX2-LM1000E* do not have SC/APC type connectors, cleaning procedures similar to the following are recommended as appropriate for the connector type installed. Cleaning the GX2-LM1000E* Optical Bulkhead Fitting To ensure the specified output power of the GX2-LM1000E* is achieved out of the optical bulkhead fitting, it is important to clean all the optical interfaces. To clean the barrel of the optical bulkhead fitting: 1 Set the GX2-LM1000E* on a clean flat surface. 2 Carefully open the shutter of the optical bulkhead fitting. 3 Gently clean the barrel of the optical bulkhead fitting with a lint-free swab as illustrated in Figure 3-2: GX2-LM1000E* Installation and Operation Manual 3-4 Installation and Setup Figure 3-2 Cleaning the barrel of the optical bulkhead fitting Cleaning the Interface Fiber Jumper SC/APC Connector In addition to cleaning the optical bulkhead on the GX2-LM1000E*, it is also important to clean the interface fiber jumper optical connector(s). This cleaning should be performed before you insert the GX2-LM1000E* into the GX2-HSG*. To clean the interface fiber jumper SC/APC connector(s): 1 Remove the protective boot from the end of the SC/APC connector. 2 Clean the tip gently with lint-free wipes moistened with 99% isopropyl alcohol. Figure 3-3 illustrates the cleaning location: Figure 3-3 Cleaning the SC/APC connector tip 3 Dry the SC/APC connector with compressed, filtered air or use a dry, lint-free wipe. GX2-LM1000E* Installation and Operation Manual Installation and Setup 3-5 Inserting the SC/APC Connector Before inserting the GX2-LM1000E* into the GX2-HSG*, insert the interface fiber jumper SC/APC connector into the optical bulkhead fitting. It is recommended that you use a short optical jumper for initial GX2-LM1000E* installation. This provides greater flexibility for installation and can be used to verify the optical output power after the unit is installed. To insert the SC/APC connector into the optical bulkhead fitting: 1 Carefully open the shutter of the optical bulkhead fitting. 2 Align the key on the SC/APC connector with the mating key slot of the optical bulkhead fitting. Figure 3-4 illustrates proper SC/APC alignment with the optical bulkhead fitting: Figure 3-4 Inserting the SC/APC connector 3 Insert the SC/APC connector into the optical bulkhead fitting. 4 Push the SC/APC connector into the optical bulkhead fitting until it snaps in place. DANGER! Subsequent to the initial installation, when any of the above optical cleaning procedures are performed, it is recommended that power be removed from the GX2-LM1000E* transmitter for your protection. GX2-LM1000E* Installation and Operation Manual 3-6 Installation and Setup Installing the GX2-LM1000E* in the GX2-HSG* You are now ready to insert the GX2-LM1000E* into the GX2-HSG*. All slots in the GX2-HSG* are universal and intended for the Omnistar GX2 application modules, except the narrow, right-most slot, which is reserved for the control module. All GX2 application modules can be installed or removed in a powered-on or powered-off GX2-HSG*. Figure 3-5 illustrates a fully installed, typical GX2-HSG* configuration: Figure 3-5 Typical GX2-HSG* configuration To insert and power-up the GX2-LM1000E*in the GX2-HSG*: 1 Slide the GX2-LM1000E* fully into the designated shelf slot that contains the previously installed G- to F-type connectors mounted on the GX2-HSG*. 2 Ensure that a firm connection is achieved with the GX2-HSG* backplane. Power is automatically applied when contact is made with the backplane connectors. 3 Tighten the thumbscrew at the bottom of the GX2-LM1000E* to secure it in the GX2-HSG* slot. You can tighten the thumbscrew firmly with your fingers or torque to 7 ±3 in-lb. GX2-LM1000E* Installation and Operation Manual Installation and Setup 3-7 Figure 3-6 illustrates the correct procedure of first installing the RF connector plate and then installing the GX2-LM1000E*: Figure 3-6 GX2-LM1000E* installation in a GX2-HSG* GX2-LM1000E* Installation and Operation Manual 3-8 Installation and Setup Figure 3-7 illustrates a front view of the GX2-HSG* and the slots that guide the partially inserted GX2-LM1000E*: Figure 3-7 Inserting the GX2-LM1000E* in the GX2-HSG* Power-Up and Reset Initialization When the GX2-LM1000E* is fully installed in the GX2-HSG* and power is applied, the initialization process begins. The GX2-LM1000E* STATUS LED completes a red–yellow–green cycle. Upon initial power-up of a new unit, the GX2-LM1000E* conforms to the factory default Preset/Video mode with a 4 dB video mode offset from CW. With subsequent power-ups, the status LED completes its power-on cycle, information stored in the GX2-LM1000E* NVM is recalled, and the unit defaults to the last stored operating mode before power was disrupted. After initial power-up or subsequent power-ups, you can return the GX2-LM1000E* to the factory default settings. You can do this through the SDU, the network management system, or the local access port. GX2-LM1000E* Installation and Operation Manual Installation and Setup 3-9 Measuring and Checking the Optical Output Power The following procedures for measuring optical output power and routine maintenance of the GX2-LM1000E* should be performed by properly trained personnel. In all cases they should be aware of and observe the following warnings associated with fiber optic transmitters: DANGER! Laser Hazard! Invisible laser radiation when the module is open and the interlock defeated. Avoid direct exposure to the beam. Do not look into the optical connector or a fiber connected to the output of a laser module. Laser output is invisible and eye damage can result. CAUTION! Handle fiber carefully and avoid sharp bends, strain, or pinching. Avoid contacting the highly polished end of the exposed fiber at the connector by keeping the protective boot in place when practical. Once the initialization process is complete, you may want to verify the optical output power of the GX2-LM1000E*. You can perform this verification using an optical power meter, the SDU, the network management system, or the local access port. However, for initial installation, it is recommended that you use the previously installed short optical interface jumper in combination with an optical power meter to verify the optical output power. To measure and check the optical output power from the GX2-LM1000E*: 1 Verify that the GX2-LM1000E* is correctly seated in the GX2-HSG* and that power is applied. 2 Verify that the previously installed end of the optical interface jumper remains in the GX2-LM1000E*. 3 Connect the other end of the optical interface jumper to an optical power meter. 4 Observe the optical output power in dBm or mW. 5 Verify the optical power of the unit in use by referring to Table A-1 in Appendix A, “Specifications.” 6 If the measured power is less than the optical power noted in Table A-1, you may need to repeat the cleaning procedure or reverify the optical power using an alternative method. 7 After you verify the optical output power, disconnect the optical power meter and make the appropriate fiber connections to close the transmission link. Measuring and Checking the RF Input Signal Levels Following verification of the optical output power, you need to confirm the levels of the RF input signal being applied to the GX2-LM1000E*. To measure and check the RF input signal levels: 1 Verify that the GX2-LM1000E* is seated correctly in the GX2-HSG* and that power is applied. GX2-LM1000E* Installation and Operation Manual 3-10 Installation and Setup 2 Before you connect the input cable to the main (broadcast) input or secondary (narrowcast) input on the GX2-HSG* rear panel, use a signal level meter, RF power meter, or a spectrum analyzer to measure the RF input signal level. 3 Compare the RF input signal level to the specified RF input level noted in Appendix A, “Specifications.” It may be necessary to adjust the RF input-per-channel level to be within the noted specification. You can calculate this level based on the equation: 10 x log10 (ratio of channels). Referring to Figure 3-9 may also be useful in determining appropriate input levels. Avoid varying from the nominal input, as higher levels cause degraded distortion performance and lower levels can approach the AGC range limit and add additional noise to the link. Reminder—the narrowcast RF input port requires a +22 ±0.5 dBmV higher RF input level than the broadcast RF input port. 4 After you correctly set the RF signal level, connect the corresponding RF cable to the preferred RF input port G- to F-type connector (broadcast and/or narrowcast) on the rear of the GX2-HSG*. Confirm that it is connected to the slot occupied by the GX2-LM1000E*. 5 Install a 75-ohm terminator on any unused RF input ports. A 75-ohm terminator is provided with the GX2-LM1000E*. Figure 3-8 illustrates the RF connection points. Figure 3-8 GX2-HSG*rear-panel RF connections Upon receipt of an acceptable RF input signal level, the GX2-LM1000E* front panel STATUS LED illuminates green. With RF input signals applied to the GX2-LM1000E*, you can monitor the broadcast RF input level using RF TP1 on the front panel without removing the RF signal from the rear of the GX2-HSG*. GX2-LM1000E* Installation and Operation Manual Installation and Setup 3-11 Protecting the Laser The GX2-LM1000E* microprocessor and RF circuitry act to protect the laser diode if any of the following are detected: The RF input level into the GX2-LM1000E* is above a safe limit. This condition is referred to as RF overdrive mode and is controlled by a hardware cutoff circuit, which clamps the RF level and reduces it by 10 dB. The front-panel STATUS LED illuminates red and the microprocessor sends a major alarm to the network management system. After the RF input level decreases to a safe level, the GX2-LM1000E* resumes normal operation. The GX2-LM1000E* optical output is turned off. If you turn the optical output off, the RF drive level to the laser diode is also turned off and the RF attenuator is set to maximum attenuation to protect the laser from damage. When the GX2-LM1000E* optical output is turned on, the RF drive level is restored to the previously set RF level. The GX2-LM1000E* laser bias current acceptable operating range is not achieved. If the microprocessor determines that the laser bias current is not set properly, it sets the laser bias current to a previously determined, manufacturer specified, safe operating point (50 mA). It also turns off the laser bias control loop. A hardware status alarm is sent to the network management system to inform the user that the laser bias control loop is not operating in the specified range. Operating Modes At this time, you need to select the preferred GX2-LM1000E* operating mode, MGC or AGC. Reminder—on initial power up, the factory default is Preset/Video mode with a 4 dB Video mode offset from CW. The following subsections describe how to set up the GX2-LM1000E* based on the operating mode selected. For more detailed information on operating modes, refer to Section 4, “Operation.” MGC Modes To implement MGC mode: 1 Adjust the input signal levels, as previously described in this section. The total CW input signal power should be approximately −14 dBm total power or +34.75dBmV. This is the sum of the main and narrowcast (+6 dBmV higher level than main input required) input signals. 2 Confirm that appropriate RF input signal connections to the G- to F-type interface connectors on the rear of the GX2-HSG* are complete. 3 Measure the RF levels at RF TP1 (main RF input level) and RF TP2 (laser diode RF input level) on the GX2-LM1000E* front panel. Refer to Figure 3-9, as necessary, for RF TP2 signal levels for various channel loading. The signal level present at RF TP2 is a sample of the input level to the laser diode and is representative of the laser optical modulation index (OMI). The measured reading at this test point varies based on the test equipment used, AGC operating mode, quantity of channels, signal type, and any measurement errors due to response flatness. 4 Select Preset mode and allocate time for the AGC to adjust the RF signal levels to the laser diode to the optimum operating point. GX2-LM1000E* Installation and Operation Manual 3-12 Installation and Setup The RF drive level is optimized during manufacturing to achieve the link performance required for each laser according to the specified number of channels. The factory-default, laser-drive level, is the operating point in Preset mode. 5 Select Manual Equate mode. This sub-mode equates the Preset Mode RF-drive-level (to the laser diode) to Manual mode and enables you to perform any additional level adjustments from a known good operating point. Manual Equate is a momentary sub-mode and, after the microprocessor configures the RF parameters, the GX2-LM1000E* is automatically switched to Manual mode. 6 If it is necessary to optimize for C/N or distortion, use the RF attenuator to adjust the RF drive level to the laser diode. Increasing the drive levels more than 0.5 dB above the Preset mode optimum drive level may result in the appearance of clipping artifacts in analog video signals. AGC Modes To implement AGC modes: 1 Adjust the input signal levels per the GX2-LM1000E* specification, as described previously in “Measuring and Checking the RF Input Signal Levels.” The total CW input signal power should be approximately −14 dBm or +34.75 dBmV. This is the sum of the main and narrowcast (+6 dBmV higher level than main input required) input signals. 2 Make the appropriate RF input signal connections to the G- to F-type interface connectors on the rear of the GX2-HSG*. 3 Measure the RF levels at RF TP1 and RF TP2 on the GX2-LM1000E* front panel. Refer to Figure 3-9 for RF TP2 signal levels for various channel loading. 4 Choose which AGC mode you prefer to use—Preset or Set. 5 If you choose Preset mode, you must allocate time for the AGC to adjust the signal levels to the laser diode to the optimum operating point. Additional level adjustments will not be required. 6 If you choose Set mode to optimize C/N or distortion, then initially select Set Equate. This sub-mode equates the Preset Mode RF-drive-level (to the laser diode) to Set mode and enables you to perform any additional level adjustments from a known good operating point. Set equate is a momentary sub-mode and, after the microprocessor configures the RF parameters, the GX2-LM1000E* is automatically switched to Set mode. 7 If necessary, adjust the OMI offset from the Preset level to optimize for C/N or distortion. 8 If you wish to proof the system using CW carriers, set the Video/CW mode to CW. 9 For normal video operation, select the appropriate video mode offset (2, 3, 4, or 5 dB) from CW. GX2-LM1000E* Installation and Operation Manual Installation and Setup 3-13 Figure 3-9 illustrates the change in RF test-point level versus NTSC channel loading for the GX2-LM1000E*: Figure 3-9 RF test-point level versus channel loading 4 digital channels = 1 NTSC analog channel GX2-LM1000E* Installation and Operation Manual Section 4 Operation This section describes the GX2-LM1000E* embedded section, user selectable operating modes, network management system, and provides information necessary to properly use the optional SDU. It also provides information on increasing and decreasing channel loading and, if necessary, how to download new GX2-LM1000E* firmware. Embedded Section The GX2-LM1000E* microprocessor section contains NVM, which stores the operating firmware, factory-programmed module information, and calibration data. Additionally, this section contains digital-to-analog (D/A) and analog-to-digital (A/D) converters that control and monitor module operation. The backplane communication interface is provided for communication to the GX2-CM100B control module through the GX2-HSG* equipment-shelf backplane. Boot Operation When the GX2-LM1000E* is powered on or reset, the microprocessor boots up and begins operating. It first performs a cyclic redundancy check (CRC) to verify the integrity of the firmware. If the CRC indicates error-free firmware, the microprocessor begins operating. After the boot up completes successfully, the front-panel LED communicates an initialization sequence: Red, Yellow, Green. If an error occurs during the boot up, the STATUS LED illuminates red. An alarm message indicating that the boot up failed is also sent to the network management system. If the firmware fails the CRC test, the microprocessor stops operating and the STATUS LED blinks red to indicate the boot up failed. Operating Modes The following subsections describe the operating modes available and offer suggestions regarding their application and implementation. The two basic modes are AGC and MGC. Information on additional settings and functionality is also included. Details on how to select and implement the operating modes using the SDU are described in a later subsection. AGC Modes The following settings (submodes) are available in AGC: Preset Preset is a primary mode that establishes the factory default setting and maintains an ideal RF input level to the laser. The laser RF input level is maintained by (1) sampling the main RF-path power through an internal RF power meter, (2) comparing it to a factory-calibrated default AGC power level stored in NVM, and (3) adjusting the RF attenuator until the factory calibrated default AGC power level is achieved. This process provides the ideal RF input level to GX2-LM1000E* Installation and Operation Manual 4-2 Operation the laser. The internal microprocessor is responsible for AGC control of the RF attenuator and constant monitoring of the RF power meter level. Preset is most useful when you need to ensure optimal performance regardless of the number of channels applied. A lower number of channels results in a higher signal level per channel into the laser and out of each receiver. This improves carrier-to-noise (c/n), while second and third order distortion products remain approximately constant. Set Set is a primary mode setting that enables you to adjust the AGC reference point for specific product applications or performance requirements. In Set, you can increase or decrease the OMI offset by 0.25 dB steps from the preset value through the backplane communication interface. When the new offset (from the preset value) is set, AGC maintains the laser OMI at the newly selected level and the OMI offset value is stored in NVM. Set is most useful if you need to compromise c/n for distortion. You can do this by decreasing the RF drive level to the laser, which improves distortion and reduces c/n performance. Additionally, you can use Set when you plan to increase the channel load over time and prefer not to re-adjust the GX2-LM1000E* after initial setup. Increasing the RF drive level increases the OMI to the laser and increases the output level of each receiver. This increase in RF drive level improves c/n but degrades distortion. Set Equate Set Equate is a primary submode that equates the laser RF drive level to the factory-default, optimum RF drive level established in Preset. You can choose Set Equate from any other primary or primary submode. As this is a momentary submode, after the RF parameters are configured by the microprocessor, the GX2-LM1000E* is automatically switched to Set. You can now make RF level adjustments as described previously in “Set.” When you select Set Equate the RF drive level setting, previously stored in Set, is overwritten. Set Equate is most useful in resetting the Set mode operating point to a known level. CW/Video CW is a secondary mode that uses unmodulated channels for a proof-of-performance rating. Video is also a secondary mode that is used when modulated channels are applied to the input of the GX2-LM1000E*. CW and Video are used in conjunction with Preset and Set. When in Set or Preset, you can toggle between CW and Video using the backplane communication interface. CW and Video are not applicable in Manual mode. When switching from CW to Video, the RF level decreases by the amount of offset selected—2 dB, 3 dB, 4 dB, or 5 dB. You can select the offset value using the SDU, the network management system, or the local access port. This decrease in RF level is provided to compensate for the difference in average power between CW channels and modulated video channels. On initial power up, the factory default mode for the GX2-LM1000E* is Preset/Video mode with a Video mode offset of 4 dB from CW. MGC Modes The following settings (submodes) are available in MGC: GX2-LM1000E* Installation and Operation Manual Operation 4-3 Manual Manual is a primary mode setting that enables you to adjust the RF level in 0.1 dB steps through the backplane communication interface. Because the gain of the GX2-LM1000E* is not adjusted by the microprocessor after you set the RF level, this mode is referred to as the “fixed-gain mode”. When you select Manual, the previously stored Manual mode RF attenuator setting is recalled from NVM. Manual is most useful if the input load is fixed and you prefer to control the RF drive level to the laser to achieve a certain performance. Reducing the RF attenuation level from the optimum setting may result in improved CNR, but degrades second and third order distortion products depending on the channel load. Conversely, increasing the RF attenuation level from the optimum setting may result in degraded CNR, but slightly improves second and third order distortion products depending on the channel load. When you use Manual mode, you must adjust the RF attenuator setting to meet your specific performance requirements. Manual Equate Manual Equate is a primary submode that equates the RF attenuator setting to the previously selected (Preset, Set, or Manual) RF attenuator setting. You can select Manual Equate from any mode. As this is a momentary submode, after the RF parameters are configured by the microprocessor, the GX2-LM1000E* is automatically switched to Manual. You can now make RF level adjustments, as described previously in “Manual.” When you select Manual Equate, the RF attenuator value, previously stored in Manual mode, is overwritten. Manual Equate is useful in resetting the Manual mode operating point to a known level. Its most common use is to equate the Preset mode RF attenuator setting to Manual mode. Additional Controls and Configurations The following subsections describe additional features of the GX2-LM1000E*. Optical Output Control You can turn the optical output power from the laser diode ON and OFF using the local interface port, the network management system, or the optional SDU. The factory default setting is ON. RF Drive Level Control You can turn the RF drive level to the laser diode ON and OFF. The factory default setting is ON. A common use of this control is to turn the RF drive level off, thus eliminating fiber effects when measuring the received optical power at a node. When using the optical output or RF drive level ON/OFF controls, the following actions ensure that the laser is not damaged: If you turn the optical output power OFF, the RF drive level to the laser is automatically turned OFF and the RF drive level control is disabled. If the RF drive level to the laser is ON when you turn the optical output power OFF, it will come on automatically when the optical output power is restored. GX2-LM1000E* Installation and Operation Manual 4-4 Operation If the RF drive level to the laser is OFF when you turn the optical output power OFF, it will remain off when the optical output power is restored. Quick Swap The quick-swap feature reduces down time by eliminating the need to manually reconfigure replacement application modules of the same type in the same housing slot. Replacement modules are recognized and updated with settings pre-stored by the GX2-CM100B control module. This feature is particularly useful in the event of module failure. The following module-specific parameters are contained in the quick-swap message sent from the GX2-CM100B to the GX2-LM1000E*: Module Alias RF input on/off control setting Optical output on/off control setting Primary operating mode Secondary operating mode CW/Video mode offset Laser RF input level control (OMI offset) RF attenuator setting The GX2-LM1000E* reads the quick-swap message from the GX2-CM100B, automatically resets, and re-initializes itself to the same configuration as contained in the message. If the GX2-LM1000E* is in Preset mode, it uses the factory default optimum OMI setting to determine the RF level at the laser. If the GX2-LM1000E* is in Set mode, the laser RF input level control (OMI offset) determines the RF level at the laser. If the GX2-LM1000E* is in Manual mode, the attenuator setting determines the RF level at the laser. If the quick-swap message intended for the GX2-LM1000E* is sent to another type of module, the command is rejected and the module information is not replaced. Instructions for selecting and implementing the quick-swap mode are provided in the GX2-CM100B Control Module Installation and Operation Manual. GX2-LM1000E* Installation and Operation Manual Operation 4-5 Implementing a Reduced Channel Load The GX2-LM1000E* performance is optimized during manufacturing for a full load of 79 NTSC channels (47 through 550 MHz) and 450 MHz of digital at –6 dBc (550 through 1002 MHz). However, some CATV systems begin optical-link operations with a reduced channel load and later add additional channels. Operating with a reduced channel load can be advantageous, as it improves the c/n ratio. This is the method used in supertrunk applications. The c/n ratio improvement is approximately 10 x log10 (ratio of channels). For example, a 79-channel laser operating with a 40-channel input improves the c/n ratio by approximately 3.0 dB [10 x log10 (40/79)] and requires a 3.0 dB higher input level. By carefully implementing the GX2-LM1000E* and additional distribution equipment, you can avoid costly field trips to reset node levels after adding channels. The following subsection presents several options to meet individual system requirements. Implementing an Increased Channel Load Many systems operate under a reduced channel load with the capacity to add additional channels as required. If the system initially operated with less than a full load (79 NTSC channels from 47 through 550 MHz and 450 MHz of digital at –6 dBc from 550 through 1002 MHz) and you need to increase the channel load, you may have to decrease the RF input level per channel accordingly in order to maintain an optimum drive level to the laser. The controlling factor here is total power. For a full channel load, the minimum input specification is +15 dBmV per analog channel and +9 dBmV per digital channel. This equates to a minimum total power of 34.91 dBmV. Total power is calculated for analog and digital channels separately because they are normally at different levels. These total powers are calculated using the following formulas: Pa = Ia + 10 x log10(# of analog channels) Pd = Id + 10 x log10(# of digital channels) Where: Pa = Total Power of Analog Channels Pd = Total Power of Digital Channels Ia = Analog Input Level Per Channel Id = Digital Input Level Per Channel These powers must now be combined to yield a total power (Pt) that will drive the laser. However, the total analog power (Pa) and the total digital power (Pd) cannot simply be added together. They must be added using power addition with the following formula: Pt = 10 x log10[10(Pa/10) + 10(Pd/10)] GX2-LM1000E* Installation and Operation Manual 4-6 Operation The result of this formula should be within +/- 1dB of the minimum total power specification. If it falls outside this window, change the input levels per channel and re-calculate. Repeat this process until the answer falls within the +/- 1dB window. To increase the channel load, you must perform one of the following procedures: Using Set Mode To implement an increased channel load using Set mode: 1 Operate the GX2-LM1000E* in Preset mode and apply the preferred initial channel load. 2 Allocate time for the AGC to adjust the RF drive level to the laser. 3 Select Set Equate mode to equate the Preset mode OMI setting to Set mode. Set equate is a momentary mode and the GX2-LM1000E* soon proceeds to Set mode automatically. Based on the additional channel load required, you need to adjust the OMI [based on the equation: 10 x log10 (ratio of channels)] from the Preset OMI set point. 4 Perform the calculation and make the appropriate OMI offset adjustment in Set mode to maintain the same per channel power to the laser as was applied with the initial channel load. The benefit of using Set mode for an increase in channel load is that you eliminate the need to re-adjust levels to each fiber node in the field. 5 Apply the planned additional channel loading. 6 Use one channel and RF TP2 to verify that the per-channel power remained the same as with the initial channel load. Using Manual Mode To implement an increased channel load using Manual mode: 1 Operate the GX2-LM1000E* in Manual mode. 2 Apply the preferred initial channel load. 3 Adjust the RF attenuator setting to achieve the preferred performance. 4 Apply the additional channel load. 5 Manually adjust the RF attenuator to again achieve the preferred performance. Any change in the number of channels applied requires that you change the RF attenuator setting to maintain a constant signal level as measured at RF TP2. Manual mode does not compensate for incidental changes in the RF input signal level and continuous monitoring and RF attenuator adjustments may be required. Using Preset Mode (with AGC control in the GX2-LM1000E* and each node) Implementation using Preset mode requires AGC control in the GX2-LM1000E* and in each node. To implement an increased channel load using Preset mode: 1 Operate the GX2-LM1000E* in Preset mode. GX2-LM1000E* Installation and Operation Manual Operation 4-7 2 Install an AGC option in the systems’ nodes to compensate for the expected signal-level change within the dynamic range of the equipment. Allow for adequate gain reserve at the optical node during installation. 3 Apply the preferred initial channel load. 4 Allocate time for the AGC to adjust the RF drive level to the laser and to adjust the levels at the nodes. 5 Apply the additional channel load. 6 Allocate time for the AGC to adjust levels to the new channel load. Additional adjustments to the GX2-LM1000E* should not be necessary because the AGC maintains a constant per-channel level to the laser diode. The benefit of using Preset mode with AGC for an increase in channel load is that you eliminate the need to re-adjust levels to each fiber node in the field. Using Preset Mode (with AGC control in the GX2-LM1000E* only) Implementation using Preset mode requires AGC control in the GX2-LM1000E* but not in each node. To implement an increased channel load using Preset mode: 1 Operate the GX2-LM1000E* in Preset mode. 2 Apply the preferred initial channel load. 3 Allocate time for the AGC to adjust the RF drive level to the laser. 4 Apply the additional channel load. 5 With the GX2-LM1000E* in Preset mode, visit each fiber node in the field and adjust the drive levels as necessary. Additional adjustments to the GX2-LM1000E* should not be necessary because the AGC maintains a constant per-channel level to the laser diode. GX2-LM1000E* Installation and Operation Manual 4-8 Operation Network Management The GX2-LM1000E* monitors selected parameters during operation and compares the measurements to a table stored in NVM. This table defines high and low limits, as well as the STATUS LED indication if a fault occurs. When a measurement exceeds the alarm limit, the STATUS LED displays the appropriate color and the fault is reported to the GX2-CM100B. You can use the network management system to further isolate fault conditions. Table 4-1 identifies the default alarm limits and describes the STATUS LED indication for given parameters: Table 4-1 Status LED indications for given parameters Parameter Status LED All Green Laser RF input level-major high alarm Red Laser RF input level-minor low alarm Yellow Laser RF Input overload-major high alarm Red Laser RF drive level change from factory/user setpoint-major low alarm Red Laser RF drive level change from factory/user setpoint-minor low alarm Yellow Laser RF drive level change from factory/user setpoint-minor high alarm Yellow Laser RF drive level change from factory/user setpoint-major high alarm Red Optical power-major high alarm Red Optical power-major low alarm Red Laser bias current-major high alarm Red Laser bias current-major low alarm Red Laser temperature-major high alarm Red Laser temperature-major low alarm Red Cooler current (TEC or +3.7V current)-major high alarm Red Cooler current (TEC or +3.7V current)-major low alarm Red +5 V fan current-major low alarm Red +5 V fan current-minor low alarm Yellow +5 V fan current-minor high alarm Yellow +5 V fan current-major high alarm Red +12 V current-major low alarm Red +12 V current-minor low alarm Yellow +12 V current-minor high alarm Yellow GX2-LM1000E* Installation and Operation Manual Operation Parameter Status LED +12 V current-major high alarm Red Module temperature-major low alarm Red Module temperature-minor low alarm Yellow Module temperature-minor high alarm Yellow Module temperature-major high alarm Red Factory data NVM CRC-minor alarm Yellow Laser Data NVM CRC-major alarm Red Alarm Limit NVM CRC-major alarm Red Boot status-major alarm Red Flash status-major alarm Red Hardware-major alarm Red 4-9 Operating the GX2-LM1000E* with the Optional SDU You can control and operate the GX2-LM1000E* using the optional SDU with display. This includes selecting any of the previously referenced control modes and the ability to monitor the numerous parameters and alarm conditions within the GX2-LM1000E*. Appendix B, “Menus” provides the GX2-LM1000E* SDU menu structure and information on how to use the optional SDU with display. Downloading New Firmware The GX2-LM1000E* can store up to two sets of firmware programs, which you can download through the network management system. When the download is complete, the GX2-LM1000E* uses the new firmware for each subsequent boot up. The operator also has the option of selecting and using any stored set of firmware code at each boot up. The network management system enables the operator to view the following information about the firmware programs stored in the GX2-LM1000E*: Firmware revision level Firmware code CRC Which set of firmware will run at the next boot up The operator has the option of selecting a specific module or all modules of the target type for download. After all options are selected, the operator can initiate the download. To download firmware, the network management system must be running and communicating with the GX2-CM100B. The GX2-CM100B and the network management system perform the following tasks to download the new firmware: The network management system reads the firmware download file selected by the operator and verifies the program code CRC. The software reads the target module type and firmware revision to be downloaded from the file and displays this information for operator verification. GX2-LM1000E* Installation and Operation Manual 4-10 Operation The network management system transfers the download firmware and selected options to the GX2-CM100B. The GX2-CM100B verifies that the firmware was transferred correctly and that the selected options are valid. If the GX2-CM100B detects any errors it responds with an error message to the network management system. From this point on, the firmware download is handled exclusively by the GX2-CM100B. Following firmware verification, the GX2-CM100B begins the firmware download to the target modules. It monitors the programming of new firmware and reports any errors. It also sends a message informing the network management system that the firmware download was successful. The GX2-CM100B is now ready to reset the GX2-LM1000E* to run the new firmware program. The operator can determine whether the reboot is immediate or occurs at a later time following the issuance of a reset command. This option enables the operator to choose between immediate, delayed, or scheduled reboots. The GX2-LM1000E* continues to operate normally during a firmware download, which is transparent to the operator and the network management system. Refer to the GX2-CM100B Control Module “Installation and Operation Manual” and the Network Management System “Instruction Manual” for additional information regarding the downloading of firmware. GX2-LM1000E* Installation and Operation Manual Sect ion 5 Tr oubleshooting This section provides troubleshooting procedures for the GX2-LM1000E*. You can use the procedures to correct minor problems or better define the malfunction. If the error condition cannot be corrected, contact the TRC at 1-888-944-HELP (1-888-944-4357). Before you call, record the input signal levels, optical output power, operating mode(s), and ambient temperature. This information is most useful to the TRC and repair facility in troubleshooting and repairing your GX2-LM1000E*. The GX2-LM1000E* is a self-contained unit; therefore, when a problem is diagnosed within the module, the entire GX2-LM1000E* must be returned for repair. See Section 1, “Introduction” for information on equipment return. Using the Status LED Table 5-1 lists the troubleshooting checks you can perform using the STATUS LED only. It is assumed that an SDU, network management system, or local access port are not available. If these additional options are available, this table can be used in conjunction with Table 5-2. To use Table 5-1, identify the symptom and then perform the checks in the order listed under that symptom. For example: If the front-panel STATUS LED is yellow, indicating a minor alarm, go to the yellow column. Find c and perform that check (Verify SC/APC connector . . .). Continue performing all checks in the yellow column, in the order given, to help identify the cause of the minor alarm and if possible, fix the problem. Table 5-1 Troubleshooting using the status LED only Symptom S t a tu s LED I nd ica t ion Fla shi ng Red Red Yellow N o t Li t Poor RF R e spon se C o rr ec ti ve Ac t ion Microprocessor boot up failure. Reseat the GX2-LM1000E* in the GX2-HSG* slot or in a known good slot. If still flashing red, return the GX2-LM1000E* for repair. c c c Check the STATUS LEDs on other GX2 application modules in the GX2-HSG*. If they are not lit, verify that AC power is applied to the system. Check the STATUS LEDs on other GX2 application modules in the GX2-HSG*. If they are also red, a possible GX2 system-powering problem may exist. Perform the following checks before contacting the TRC. GX2-LM1000E* Installation and Operation Manual 5-2 Troubleshooting Symptom S t a tu s LED I nd ica t ion Fla shi ng Red Red Yellow N o t Li t Poor RF R e spon se Check the STATUS LEDs on other GX2 application modules in the GX2-HSG*. If they are also yellow, a possible system powering problem may exist. Perform the following checks before contacting the TRC. c c d A yellow LED indicates that the signal level may be too low. Measure the input signal level at RF TP1 and verify that it is within the acceptable specification limit noted in Appendix A, “Specifications.” Readjust the input signal as required. e Verify that an acceptable input level is being applied. Measure the signal level at RF TP2 and compare it to Figure 3-9. Signal loading is a factor. The input signal level may be correct, but the total power to the laser may need to be readjusted. A significantly low level may indicate a potential RF circuitry problem. Measure the optical output power using an optical power meter. If marginal compared to the appropriate module specification in Appendix A, “Specifications” then verify that the interface connector and optical bulkhead connector are clean. See Section 3, “Installation and Setup” for the cleaning procedure. Ensure that you follow all safety precautions when cleaning the interface connector and optical bulkhead. If the optical level is still low contact the TRC. f g Verify that the interface connector and optical bulkhead connector on the GX2-LM1000E* are clean. See Section 3, “Installation and Setup” for the cleaning procedure. Ensure that you follow all safety precautions when cleaning the interface connector and optical bulkhead. A red LED indicates that the signal level may be too high. Measure the input signal level at RF TP1 and verify that it is within the acceptable specification limit noted in Appendix A, “Specifications.” Readjust the input signal as required. d e C o rr ec ti ve Ac t ion f GX2-LM1000E* Installation and Operation Manual Observe the ambient operating temperature. If 50°C or above, verify that the fans on the rear panel are running. This may specifically indicate a problem within the GX2-LM1000E*. Contact the TRC. Troubleshooting 5-3 Symptom S t a tu s LED I nd ica t ion Fla shi ng Red Poor RF R e spon se Red Yellow N o t Li t h g d Verify that the GX2-LM1000E* is seated correctly in the equipment shelf and the thumbscrew is fully tightened. i h e Reseat the GX2-LM1000E* by removing it and reinstalling it in its designated GX2-HSG* slot. d j i Check for proper input-signal flatness using RF TP1. Check for a proper RF level at RF TP2. Some amount of tilt (up to +1 dB) may be observed at RF TP2. The presence of tilt within the noted level should not be confused with a specific module failure. Relocate the GX2-LM1000E* to a known good GX2-HSG* slot. f d C o rr ec ti ve Ac t ion g e Contact the TRC for additional support. Using Available Options Table 5-2 lists the troubleshooting checks available and identifies the reported alarm condition displayed through the optional SDU, network management system, or local access port. To use Table 5-2, refer to the appropriate row and column in the table. Perform the necessary checks and make any suggested adjustments to resolve the problem. If the problem persists, note the value in the “Reported Value” column. This information is useful when seeking additional help from the TRC. Table 5-2 Troubleshooting — using available options Alarm Cond ition s S t a tu s LED Indication R e p o r te d Va lue Laser RF input overload-major high alarm Red The signal level to the laser is too high. Verify that the input signal level is within the specification and reduce if necessary. If the level is correct, increase the attenuation in the RF attenuator to reduce the level at RF TP2. Laser RF input level-major high alarm Red The signal level to the laser is too high. Verify that the input signal level is within the specification and reduce if necessary. If the level is correct, increase the attenuation in the RF attenuator to reduce the level at RF TP2. C o rr ec ti ve Ac t ion GX2-LM1000E* Installation and Operation Manual 5-4 Troubleshooting Alarm Cond ition s Laser RF input level-minor low alarm S t a tu s LED Indication Yellow R e p o r te d Va lue C o rr ec ti ve Ac t ion The signal level to the laser is too low. Use RF TP1 to verify that a signal is applied to the input. Using the SDU, network management system, or local access port, verify that the RF level control is turned ON. If necessary, decrease the attenuation in the RF attenuator. If an alarm still exists, contact the TRC. Laser RF drive level change from factory/user setpoint-major low alarm Red An alarm will occur only in the AGC modes (Preset and Set). The signal level to the laser has changed abruptly or drifted out of the acceptable operating range. Use RF TP1 to verify that a signal is applied to the input and that it is within the input level specification. If an alarm still exists, contact the TRC. Laser RF drive level change from factory/user setpoint-minor low alarm Yellow An alarm will occur only in the AGC modes (Preset and Set). The signal level to the laser diode has changed abruptly or drifted out of the acceptable operating range. Use RF TP1 to verify that a signal is applied to the input and that it is within the input level specification. If an alarm still exists, contact the TRC. Laser RF drive level change from factory/user setpoint-minor high alarm Yellow An alarm will occur only in the AGC modes (Preset and Set). The signal level to the laser diode has changed abruptly or drifted out of the acceptable operating range. Use RF TP1 to verify that a signal is applied to the input and that it is within the input level specification. If an alarm still exists, contact the TRC. Laser RF drive level change from factory/user setpoint-major high alarm Red An alarm will occur only in the AGC modes (Preset and Set). The signal level to the laser diode has changed abruptly or drifted out of the acceptable operating range. Use RF TP1 to verify that a signal is applied to the input and that it is within the input level specification. If an alarm still exists, contact the TRC. Optical power-major high alarm Red Using the SDU, network management system, or local access port, read the optical output power. If out of specification, cycle the optical power. Check to see if a laser bias alarm also exists. If the alarm still exists, contact the TRC. Optical power-major low alarm Red Using the SDU, network management system, or local access port, verify that the optical output power control is turned ON and is within specification. If out of specification, cycle the optical power. Check to see if a laser bias alarm that also exists. If an alarm still exists, contact the TRC. GX2-LM1000E* Installation and Operation Manual Troubleshooting R e p o r te d Va lue 5-5 Alarm Cond ition s S t a tu s LED Indication Laser bias current-major high alarm Red An excessive amount of bias current is being supplied to the laser to try and maintain the proper output level. Cycle the optical power using the SDU, network management system, or local access port. If an alarm still exists, contact the TRC. Laser bias current-major low alarm Red Using the SDU, network management system, or local access port, verify that the optical output power control is turned ON and the optical power is within specification. If out of specification, cycle the optical power. If an alarm still exists, contact the TRC. Laser temperature-major high alarm Red The laser is not being properly cooled by the TEC. Using the SDU, network management system, or local access port, verify if a TEC current alarm is present. If present, confirm that the ambient temperature is within the operating specification. If possible, reduce the ambient temperature. If a TEC current alarm is not present contact the TRC. Laser temperature-major low alarm Red The laser diode is not being properly heated by the TEC. Using the SDU, network management system, or local access port, verify if a TEC current alarm is present. If present, confirm that the ambient temperature is within the operating specification. If possible, increase the ambient temperature. If a TEC current alarm is not present, contact the TRC. Cooler current (TEC or +3.7V current)-major high alarm Red The ambient operating temperature is too high, there is a potential 3.7 V line problem, or a TEC circuitry problem. Using the SDU, network management system, or local access port, verify that the 3.7 V output from the GX2-PS* is within specification. Contact the TRC. Cooler current (TEC or +3.7V current)--major low alarm Red The ambient operating temperature is too high, there is a potential 3.7 V line problem, or a TEC circuitry problem. Using the SDU, network management system, or local access port, verify that the 3.7 V output from the GX2-PS* is within specification. Contact the TRC. +5 V fan currentmajor low alarm Red Potential problem with the fans or fan circuitry. If the ambient temperature is greater than +40ºC, verify that both fans are functioning. Contact the TRC. +5 V fan currentminor low alarm Yellow Potential problem with the fans or fan circuitry. If the ambient temperature is greater than +40ºC, verify that both fans are functioning. Contact the TRC. +5 V fan currentminor high alarm Yellow Potential problem with the fans or fan circuitry. The failure may be a locked rotor on the fan. Ensure that the fans are free from dirt or debris. If the ambient temperature is greater than +40ºC, verify that both fans are functioning. Contact the TRC. C o rr ec ti ve Ac t ion GX2-LM1000E* Installation and Operation Manual 5-6 Troubleshooting Alarm Cond ition s S t a tu s LED Indication R e p o r te d Va lue C o rr ec ti ve Ac t ion +5 V fan currentmajor high alarm Red Potential problem with the fans or fan circuitry. The failure may be a locked rotor on the fan. Ensure that the fans are free from dirt or debris. If the ambient temperature is greater than +40ºC, verify that both fans are functioning. Contact the TRC. +12 V current-major low alarm Red Potential problem with the RF circuitry. Contact the TRC. +12 V current-minor low alarm Yellow Potential problem with the RF circuitry. Contact the TRC. +12 V current-minor high alarm Yellow Potential problem with the RF circuitry. Contact the TRC. +12 V current-major high alarm Red Potential problem with the RF circuitry. Contact the TRC. Module temperature-major low alarm Red The ambient operating temperature is too low. Using the SDU, network management system, or local access port, verify that the on-board module temperature is within specifications. If not, see if the ambient temperature outside the GX2-LM1000E* is too low. If the alarm persists, contact the TRC. Module temperature-minor low alarm Yellow The ambient operating temperature is too low. Using the SDU, network management system, or local access port, verify that the on-board module temperature is within specifications. If not, see if the ambient temperature outside the GX2-LM1000E* is too low. If the alarm persists, contact the TRC. Module temperature-minor high alarm Yellow The ambient operating temperature is too high or the fans are not operating. Using the SDU, network management system, or local access port, verify that the on board module temperature is within specifications. If not, see if the ambient temperature outside the GX2-LM1000E* is too high. If the alarm persists, contact the TRC. Module temperature-major high alarm Red The ambient operating temperature is too high or the fans are not operating. Using the SDU, network management system, or local access port, verify that the on board module temperature is within specifications. If not, see if the ambient temperature outside the GX2-LM1000E* is too high. If the alarm persists, contact the TRC. Factory data NVM CRC-minor alarm Yellow The GX2-LM1000E* continues normal operation. Contact the TRC. GX2-LM1000E* Installation and Operation Manual Troubleshooting Alarm Cond ition s S t a tu s LED Indication R e p o r te d Va lue 5-7 C o rr ec ti ve Ac t ion Laser Data NVM CRC-major alarm Red The GX2-LM1000E* defaults to a laser protection mode— a laser bias of 50 mA, an attenuator setting of 7.5 dB, and Manual Mode only operation. The GX2-LM1000E* continues to operate with these settings. Contact the TRC. Alarm Limit NVM CRC-major alarm Red Alarm checking is automatically shut off. The GX2LM1000E* continues to operate. Contact the TRC. Boot status-major alarm Red The preferred firmware boot bank is corrupt. The alternate firmware boot bank will be utilized. The GX2-LM1000E* continues to operate using alternate firmware. Contact the TRC. Flash status-major alarm Red The Flash programming procedure has failed. The GX2-LM1000E* continues to operate with the currently loaded version of firmware. Contact the TRC. Hardware-major alarm Red The laser bias control loop window has been exceeded. To protect the laser, the laser bias is automatically set to 50 mA. The GX2-LM1000E* continues to operate with this setting. Cycle the optical output power using the SDU, network management system, or local access port to clear the alarm. If the problem persists, contact the TRC. GX2-LM1000E* Installation and Operation Manual Appendix A Specifications Specifications for the GX2-LM1000E* are valid over the given bandwidth and operating temperature range listed in this section. The current Motorola Product Catalog may contain additional information not listed below. RF RF bandwidth 47 through 1002 MHz RF input impedance 75 Ohms RF input return loss 47-870 MHz 870-1000 MHz 16 dB minimum 14 dB minimum Broadcast input-analog +15 ±0.5 dBmV/ch for 79 NTSC channels plus 320 MHz of digital at −6 dBc Narrowcast input 6 dB above broadcast input level Main RF input test point −20 ±0.5 dB relative to main RF input port AGC range 12 dB (2 dB below the nominal input to 10 dB above the nominal input Optical Optical wavelength 1310 nm ±20 nm Laser shutdown Enable/disable through the control module, SDU, or network management software Eye protection Optical safety shutter Optical power See Appendix A, Table A-1 for the optical output power of each GX2-LM1000E* model. Power Power consumption 18 W maximum, 13 W typical Environmental Operating temperature range −20°C to +60°C (−4°F to +149°F) Storage temperature range −40°C to +80°C (−40°F to +176°F) Over temperature laser protection Software and hardware active Physical Dimensions 1”W × 5.9”H × 14.6”D (2.5 cm × 15 cm × 37.1 cm) Weight 2.2 lbs. (1 kgs) GX2-LM1000E* Installation and Operation Manual A-2 Specifications GX2-LM1000E* Models Table A-1 identifies the models of the GX2-LM1000E* and their respective optical outputs: Table A-1 GX2-LM1000E* models and optical outputs Model G X 2- L M 1 0 0 0E * Optical Power ( minim um) dBm mW 2 2.1 – 3.2 1.62 – 2.09 3 3.1 – 4.2 2.04 – 2.63 4 4.1 – 5.2 2.57 – 3.31 5 5.1 – 6.2 3.24 – 4.17 6 6.1 – 7.2 4.07 – 5.25 7 7.1 – 8.2 5.13 – 6.61 8 8.1 – 9.2 6.46 – 8.32 9 9.1 – 10.2 8.13 – 10.47 10 10.1 – 11.2 10.23 – 13.18 11 11.1 – 12.2 12.88 – 16.60 12 12.1 – 13.2 16.22 – 20.89 13 13.1 – 14.2 20.42 – 26.30 14 14.1 – 15.2 25.70 – 33.11 15 15.0 – 15.7 31.62 – 37.15 The optical output powers are specified by substituting a 1 M jumper with one end inserted in the GX2-LM1000E* optical bulkhead and the other end inserted into an optical power meter. GX2-LM1000E* Installation and Operation Manual App endix B Menus This appendix provides information about: Using the GX2-LM1000E* menus The menu structure Using the optional SDU with display Table B-1 Using the GX2-LM1000E* menus To U se Scroll through the top-level menu Press the up or down arrows to scroll through RF/OPTICAL, MODULE STATUS, MODULE INFO, and REMOTE. Enter a level two menu from the top-level menu Press the right arrow. Then press the up and down arrows to scroll through the level two menu. Change a parameter value Press the right arrow to enter edit mode. Use the up and down arrows to change the value. Press ENTER to save the new value or press the left arrow to exit edit mode without changing the value. If you press no key for 10 to 15 seconds, you exit edit mode with the value unchanged. Go up from level two to level one Press the left arrow. The following subsections provide the menu structure. Factory defaults are shown in bold. RF/OPTICAL Menu MODE PRESET|SET|SET EQUATE|MANUAL| MANUAL EQUATE SIGNAL TYPE CW|VIDEO CW / VIDEO OFFSET 2dB|3dB|4dB|5dB OPTICAL OUTPUT ON|OFF RF INPUT ON|OFF ATTENUATOR SETTING xx.y dB Can only be changed in manual mode. OMI OFFSET CONTROL xx.yy dB Can only be changed in set mode. OMI OFFSET MONITOR xx.yy dB OPTICAL POWER xx.y dBm LASER BIAS CURRENT xx.y mA LASER TEMP xx.y C TEC CURRENT xxx.y mA FACTORY DEFAULT RESET OFF|ON GX2-LM1000E* Installation and Operation Manual B-2 Menus MODULE STATUS Menu MODULE TEMP xx.y C 12V CURRENT xxx.y mA FAN CURRENT xxx.y mA MODULE INFO Menu ALIAS THIS-ALIAS (OMNISTAR GX2-LM1000 LASER MODULE) MODEL GX2-LM1000E-* SERIAL NUMBER 0123456789ABCDEF DATE CODE mm/dd/yyyy FIRMWARE REVISION XX HARDWARE REVISION XX REMOTE Menu REMOTE CONTROL OFF|ON GX2-LM1000E* Installation and Operation Manual Appendix C Status Reporting This appendix provides information on status reporting messages for the Element Management System and shelf display. The event and display messages on the GX2-LM1000E* are listed in Table C-1. Table C-1 Event/Alarm messages for the GX2-LM1000E* 1310 nm transmitter EMS Event Message SDU Display Message Status LED Event Optical Power Major Alarm Optical Power Alarm Red Based on laser diode back detector current, optical power is 10% less or 10% more than the factory setpoint. Optical Power No Alarm None Green Optical power returns within specification. RF Input Level Major Alarm RF Input Level Alarm Red The total power of the RF drive level at the laser diode is +14.5 dBm or greater. RF Input Level Minor Alarm RF Input Level Alarm Yellow The total power of the RF drive level at the laser diode is -10.5 dBm or less. RF Input Level No Alarm None Green The total power of the RF drive level at the laser diode returns within specification. RF Overload Major Alarm RF Overload Alarm Red The total power of the RF drive level at the laser diode is +16.0 dBm or greater. Module operation is stopped. RF Overload No Alarm None Green RF drive level at the laser diode returns below overload condition. OMI Offset Major Alarm OMI Offset Alarm Red RF drive level at the laser diode is 2 dB less or 2 dB more than the OMI Offset Control setpoint. This is only active in Preset or Set mode. OMI Offset Minor Alarm OMI Offset Alarm Yellow RF drive level at the laser diode is 0.5 dB less or 0.5 dB more than from the OMI Offset Control setpoint. This is only active in Preset or Set mode. OMI Offset No Alarm None Green RF drive level at the laser diode returns within specification from the OMI Offset Control setpoint. Module Temperature Major Alarm Module Temperature Alarm Red Internal module temperature is less than -20°C or greater than +80°C. Module Temperature Minor Alarm Module Temperature Alarm Yellow Internal module temperature is less than -15°C or greater than +75°C. Module Temperature No Alarm None Green Module temperature returns within specification GX2-LM1000E* Installation and Operation Manual C-2 Status Reporting Laser Temperature Major Alarm Laser Temperature Alarm Red Laser temperature is 5°C less or 5 °C more than the factory setpoint Laser Temperature No Alarm None Green The laser temperature returns within specification. TEC Current Major Alarm TEC Current Alarm Red Laser cooler current is more than +1.5 A or less than -1.5 A. TEC Current No Alarm None Green Laser cooler current returns to acceptable level. Laser Bias Current Major Alarm Laser Bias Current Alarm Red Bias current is more than 35% above or 35% below the factory setpoint. Laser Bias Current No Alarm None Green Bias current returns to acceptable level. Laser Bias Control Loop Major Alarm Laser Bias Control Loop Alarm Red The laser bias control loop has reached maximum current level trying to maintain the targeted optical output power. Laser Bias Control Loop No Alarm None Green The problem with the laser bias current loop is cleared. Fan Current Major Alarm Fan Current Alarm Red +5V Fan current exceeds the nominal operating point by 40 mA or goes below 200 mA. Fan Current No Alarm None Green Fan current returns within specification. 12V Current Major Alarm 12V Current Alarm Red +12V supply current is greater than or equal to 1300 mA or less than or equal to 100 mA. 12V Current Minor Alarm 12V Current Alarm Yellow +12V supply current is greater than or equal to 1200 mA but less than 1300 mA or less than or equal to 200 mA but greater than 100 mA. 12V Current No Alarm None Green +12V supply current returns within limits. User RF Off User RF Off Green Either user selected to turn off RF or the optical output is turned off. User Optical Off User Optical Off Green Either user selected to turn optical output off or laser temperature is in major alarm. Bank 1 Boot Major Alarm Boot Alarm Red Fails to boot using bank 0 Bank 0 Boot Major Alarm Boot Alarm Red Fails to boot using bank 1 Laser Bias Control Loop Init Major Alarm Laser Bias Control Loop Init Alarm Red The lookup table for laser bias control loop failed to initiate. TEC Parameter Init Major Alarm TEC Parameter Init Alarm Red The lookup table for TEC current failed to initiate. GX2-LM1000E* Installation and Operation Manual Status Reporting C-3 RF Parameter Init Major Alarm RF Parameter Init Alarm Red The lookup table for RF parameters failed to initiate. Power Meter Table Init Major Alarm Power Meter Table Init Alarm Red The lookup table for RF power meter failed to initiate. Attenuator Table Init Major Alarm Attenuator Table Init Alarm Red The lookup table for pin attenuator failed to initiate. Flash Error Major Alarm Flash Alarm Red Fails to erase or program alternate flash bank. Flash No Alarm None Green Flash returns to working order. Laser Data CRC Major Alarm Laser Data CRC Alarm Red Fails to verify stored laser data. Module will not operate. Factory Data CRC Minor Alarm Factory Data CRC Alarm Yellow Fails to verify stored factory data (i.e. serial number). Alarm Data CRC Major Alarm Alarm Data CRC Alarm Red Fails to verify stored alarm limits. Alarm reporting is stopped. Reset To Factory Default None Green User selected to reset parameters to factory defaults. GX2-LM1000E* Installation and Operation Manual Abbreviations and Acronyms The abbreviations and acronyms list contains the full spelling of the short forms used in this manual: A/D analog-to-digital AGC automatic gain control APC angled physical contact c/n carrier-to-noise CATV Community Antenna Television CRC cyclic redundancy check CSO composite second order CTB composite triple beat CW continuous wave D/A digital-to-analog dB decibels dBm decibels per milliwatt dBc decibels, carrier level dBmV decibels per millivolt DFB distributed-feedback laser ESD electrostatic discharge FCC Federal Communications Commission HFC hybrid fiber coax I/O input/output LED light-emitting diode MGC manual gain control MHz Megahertz mW milliwatts NTSC National Television Systems Committee NVM non-volatile memory OMI optical modulation index PIN positive intrinsic-negative RF radio frequency RSA Return for Service Authorization SDU shelf door unit TEC thermo-electric cooler TRC Technical Response Center XMOD cross modulation GX2-LM1000E* Installation and Operation Manual Visit our website at: www.motorola.com 535234-001-a 10/07