1
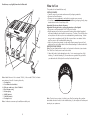
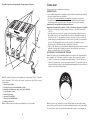
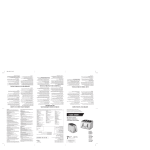
Please Read and Save this Use and Care Book Por favor lea este instructivo antes de usar el producto 2-Slice Toaster Tostador de 2 rebanadas 4-Slice Toaster Tostador de 4 rebanadas Register your product online at www.prodprotect.com/applica, for a chance to WIN $100,000! For US residents only Registre su producto en la Internet en el sitio Web www.prodprotect.com/applica y tendrá la oportunidad de GANAR $100,000! solamente para los residentes de EE.UU USA/Canada 1-800-231-9786 www.prodprotect.com/applica Accessories/Parts (USA/Canada) Accesorios/Partes (EE.UU/Canadá) 1-800-738-0245 Models Modelos ❑ T2808 ❑ T4808 IMPORTANT SAFEGUARDS When using electrical appliances, basic safety precautions should always be followed, including the following: ❑Read all instructions. ❑Do not touch hot surfaces. Use handles or knobs. ❑To protect against electrical shock do not immerse cord, plugs or appliance in water or other liquid. ❑Close supervision is necessary when any appliance is used by or near children. ❑Unplug from outlet when not in use and before cleaning. Allow to cool before putting on or taking off parts, and before cleaning the appliance. ❑Do not operate any appliance with a damaged cord or plug, or after the appliance malfunctions or has been damaged in any manner. Return appliance to the nearest authorized service facility for examination, repair or adjustment. Or, call the appropriate toll-free number on the cover of this manual. ❑The use of accessory attachments not recommended by the appliance manufacturer may cause injuries. ❑Do not use outdoors. ❑Do not let cord hang over edge of table or counter, or touch hot surfaces. ❑Do not place on or near a hot gas or electric burner, or in a heated oven. ❑Extreme caution must be used when moving an appliance containing hot oil or other hot liquids. ❑To disconnect remove plug from wall outlet. ❑Do not use appliance for other than intended use. ❑Oversized foods, metal foil packages or utensils must not be inserted in a toaster as they may involve a risk of fire or electric shock. ❑A fire may occur if toasters are covered or touching flammable material, including curtains, draperies, walls and the like, when in operation. ❑Do not attempt to dislodge food when toaster is plugged in. POLARIZED PLUG (120V Models Only) This appliance has a polarized plug (one blade is wider than the other). To reduce the risk of electric shock, this plug is intended to fit into a polarized outlet only one way. If the plug does not fit fully into the outlet, reverse the plug. If it still does not fit, contact a qualified electrician. Do not attempt to modify the plug in any way. TAMPER-RESISTANT SCREW Warning: This appliance is equipped with a tamper-resistant screw to prevent removal of the outer cover. To reduce the risk of fire or electric shock, do not attempt to remove the outer cover. There are no user-serviceable parts inside. Repair should be done only by authorized service personnel. ELECTRICAL CORD a) A short power-supply cord (or detachable power-supply cord) is to be provided to reduce the risk resulting from becoming entangled in or tripping over a longer cord. b)Longer detachable power-supply cords or extension cords are available and may be used if care is exercised in their use. c) If a long detachable power-supply cord or extension cord is used, 1)The marked electrical rating of the detachable power-supply cord or extension cord should be at least as great as the electrical rating of the appliance, 2)If the appliance is of the grounded type, the extension cord should be a grounding-type 3-wire cord, and 3)The longer cord should be arranged so that it will not drape over the countertop or tabletop where it can be pulled on by children or tripped over. Note: If the power supply cord is damaged, it should be replaced by qualified personnel or in Latin America by an authorized service center. SAVE THESE INSTRUCTIONS. This product is for household use only. 1 2 Product may vary slightly from what is illustrated. How to Use This product is for household use only. GETTING STARTED •Carefully unpack your toaster and remove all packaging materials. •Remove and save literature •Please go to www.prodprotect.com/applica to register your warranty. •To remove any dust that may have accumulated during packaging, simply wipe toaster exterior with a clean, damp cloth. Important: Do not use abrasive cleansers. Important: Do not put toaster, cord or plug in water or other liquid. •Plug power cord into standard 120V AC electrical outlet. •Before toasting for the first time, operate all toasting slots without bread and with toast shade selection knobs set to maximum (7) setting. This will help burn off any dust or oils that may have accumulated during manufacturing. Toaster may give off an unpleasant smell, but this is normal for a new toaster. Make sure the room is well ventilated while doing this. •Select a location where toaster is to be used, allowing enough space at back and top of the unit to allow heat to flow without damage to cabinets and walls. SELECTING TOAST COLOR Note: The toast shade selection knob(s) can be found on the front of your toaster. The T4808 has 2 knobs, one for each set of slots. 1.Adjust the knob(s) to the desired toast color: 1 is for warming and very light toasting; 7 is for dark toasting (B); the numbers are a guide to help you select your desired color (the higher the number, the darker the toast). Note: Model shown is 4-slice toaster (T4808); 2-slice model (T2808) includes same features, but with 2 toasting slots only. 1. 2. †3. 4. 5. 6. 7. 8. Toasting slots Toast shade selection knob(s) Slide out crumb tray(s) (Part # T2808-01) Sleek chrome casing Polarized plug BAGEL button(s) CANCEL button(s) Toasting lever(s) Note: † indicates consumer replaceable/removable parts. 3 Note: The first time you toast, it is best to use all of the toasting slots; position toast shade selection knob(s) to the middle setting (4); then adjust each subsequent toasting to your preference. 4 CANCEL BUTTON If you wish to stop the toasting cycle before it is complete, press the CANCEL button. Heating elements will be turned off and toast or toaster food will pop up. Note: The T4808 has 2 CANCEL buttons, one for each set of slots. BREAD TOASTING INSTRUCTIONS 1.Place your toaster on a flat, level surface. 2.Plug power cord into a standard 120V AC electrical outlet. 3.Set toast shade selection knob(s) to desired toasting color (see SELECTING TOAST COLOR). 4.Remove all protective wrappings from bread or toaster food before placing in slots. Important: Avoid toasting torn slices of bread and broken pastries that may get lodged in toasting slots. 5.Place bread or toaster food into toasting slots and push down toasting lever(s) to lower bread and begin toasting. Self-adjusting guides will automatically center bread for even toasting. Note: When toasting a single slice in the T4808, bread may be placed in any toasting slot, but may toast slightly darker on the inside of either pair of toasting slots than on the outside. Note: Toasting lever(s) will not lock down unless toaster is plugged into an electrical outlet. 6.When selected color is reached, toasting lever(s) will pop up and toaster will shut off automatically. 7.Unplug cord from wall outlet when not in use. Note: To prevent a fire hazard, never place bread over opening of toaster. Note: Do not operate toaster unless crumb tray(s) are in position and correctly fitted. 8.To interrupt toasting, press CANCEL button(s). BAGEL AND ENGLISH MUFFIN TOASTING INSTRUCTIONS Note: This setting changes the toaster to gently heat the outside of each bagel while toasting, the cut side of the bagel to the desired color. The BAGEL setting works great for English muffins, too! 1.Place your toaster on a flat, level surface. 2.Plug power cord into a standard 120V AC electrical outlet. 3.Set toast shade selection knob(s) to desired toasting color (see SELECTING TOAST COLOR). 4.Remove all protective wrappings from bread or toaster food before placing in slots. 5.Slice bagel or English muffin in half; place one half in each toasting slot with cut sides facing center of toasting slots. 6.Push down to lower toasting lever(s). 7.As soon as toasting lever(s) are lowered and locked into position, press BAGEL button(s). 8.When bagel or muffin is done, toasting lever(s) will pop up. Toaster will shut off automatically. 9.To interrupt toasting, press CANCEL button(s). CONVENIENCE FOODS TOASTING Tip: The extra-wide toasting slots can accommodate many varieties of packaged convenience food available today, both frozen and non-frozen (shelf pastry). Note: Since toaster foods and individual tastes vary, it is difficult to recommend exact toaster shade settings. However, after a little experimentation you will discover the best setting for your needs. You may also wish to refer to the heating instructions on food packaging. Pastries Tip: For best results, follow instructions printed on pastry package; if package does not have instructions, position toast shade selection knob(s) midway (4). Some pastries may require a second toasting cycle. Note: Do not use this toaster for toasting pastry items with runny-type frosting or open fillings. REMOVING LODGED FOOD If a piece of toast or toaster food becomes lodged in toaster, unplug and allow to cool. Turn toaster upside down and shake toast/toaster food loose. Important: Never use a fork or sharp-edged utensil to remove toast, as this may damage the heating elements or cause injury. IMPORTANT POINTS •Remove all protective wrappings from bread or toaster food before placing in toasting slot(s). •For best results, clean crumb tray(s) frequently. •Different breads require different color settings. Press CANCEL button(s) at any time to check toast color. •Do not block toasting slot(s). Do not place any object over toasting slots. •Do not toast buttered bread or buttered pita bread. Melted butter will cause fire. •Bread which has been toasted but not buttered may be reheated. Use a lighter setting and watch it carefully. •When toasting more than one slice of bread, use slices of similar size, thickness and freshness. •Stale bread, thin bread or sweet bread products – such as tea cakes and fruit loaf – brown more quickly than ordinary bread; they should be toasted on the lighter settings. •Never immerse toaster in water. •Never use a fork or sharp-edged utensil to remove toast or toaster foods because this may damage the heating elements or cause injury. 5 6 Care and Cleaning This product contains no user serviceable parts. Refer service to qualified service personnel. CLEANING Caution: Do not immerse in water or other liquid. 1. Unplug toaster and allow to cool. 2. Wipe outside with soft, damp cloth. Polish with soft, dry cloth. Important: Do not use abrasive cleaners, as they may scratch the stainless steel surface. 3. Crumb tray(s) are located under toaster. For easy cleaning, grasp crumb tray handle and pull out. 4. Brush crumbs from tray(s) and, if necessary, wipe with a clean, damp cloth. Always dry tray(s) thoroughly before replacing. 5. When replacing tray(s), be sure to push firmly so that it is fully inserted in bottom of toaster. TO STORE Unplug unit, allow to cool and clean before storing. Store in its box in a clean, dry place. Never store it while it is hot or still plugged in. Never wrap cord tightly around the appliance. Do not put any stress on the cord where it enters the unit, as this could cause the cord to fray and break. TROUBLESHOOTING PROBLEM POSSIBLE CAUSE SOLUTION Unit not heating or stops heating. Electrical outlet is not working or toaster is unplugged. Check to make sure outlet is working. Unplug unit and reinsert plug. Test toaster by selecting a setting and depressing the toast lever with nothing in the toaster. Second toasting is too dark. Setting on toast is too dark. If doing repeated toasting in the toaster, you may want to select a shade slightly lighter than the previous setting. Bread is jammed The bread may be too thick. Most breads, pastries and bagels will fit into the slot, however, occasionally the bread may be too thick, simply remove from the toaster and slice a slightly thinner piece Toast is too light or too You may have dark. changed the shade selector and need to readjust the setting. 7 Burnt food odor or smoking when toaster is being used. Remnants of food in crumb tray. Simply reset the shade selector to the desired setting for the function you wish to use. 8 Refer to directions in CARE AND CLEANING section of this Use & Care booklet. Make sure the crumb tray is empty and wiped clean. Check to make sure no large crumbs are caught in the slot. Turn unplugged unit upside down over the sink and shake to remove. INSTRUCCIONES IMPORTANTES DE SEGURIDAD Cuando se usan aparatos eléctricos, siempre se deben respetar las siguientes medidas básicas de seguridad: ❑Por favor lea todas las instrucciones. ❑No toque las superficies calientes. Use las asas o las perillas. ❑A fin de protegerse contra un choque eléctrico y lesiones a las personas, no sumerja el cable, los enchufes ni el aparato en agua ni en ningún otro líquido. ❑Todo aparato eléctrico usado en la presencia de los niños o por ellos mismos requiere la supervisión de un adulto. ❑Desconecte el aparato de la toma de corriente cuando no esté en uso y antes de limpiarlo. Espere que el aparato se enfríe antes de instalarle o retirarle piezas y antes de limpiarlo. ❑No use ningún aparato eléctrico que tenga el cable o el enchufe averiado, que presente un problema de funcionamiento o que esté dañado. Acuda a un centro de servicio autorizado para que lo examinen, reparen o ajusten o llame gratis al número correspondiente en la cubierta de este manual. ❑El uso de accesorios no recomendados por el fabricante del aparato puede ocasionar incendio, choque eléctrico o lesiones a las personas. ❑No use este aparato a la intemperie. ❑No permita que el cable cuelgue del borde de la mesa o del mostrador ni que entre en contacto con superficies calientes. ❑No coloque el aparato sobre ni cerca de las hornillas de gas o eléctricas ni adentro de un horno caliente. ❑Tome mucha precaución al mover de un lugar a otro un aparato que contenga aceite u otros líquidos calientes. ❑Para desconectar retire el enchufe de la toma de corriente. ❑Este aparato se debe usar únicamente con el fin previsto. ❑A fin de evitar el riesgo de incendio o choque eléctrico, nunca introduzca en el aparato alimentos demasiado grandes, utensilios ni envolturas de metal. ❑Existe el riesgo de incendio si el tostador permanece cubierto o en contacto con materiales inflamables, incluyendo cortinas, tapicería, paredes y demás superficies semejantes mientras está en funcionamiento. ENCHUFE POLARIZADO (Solamente para los modelos de 120V) Este aparato cuenta con un enchufe polarizado (un contacto es más ancho que el otro). A fin de reducir el riesgo de un choque eléctrico, este enchufe encaja en una toma de corriente polarizada en un solo sentido. Si el enchufe no entra en la toma de corriente, inviértalo y si aun así no encaja, consulte con un electricista. Por favor no trate de alterar esta medida de seguridad. TORNILLO DE SEGURIDAD Advertencia: Este aparato cuenta con un tornillo de seguridad para evitar la remoción de la cubierta exterior del mismo. A fin de reducir el riesgo de incendio o de choque eléctrico, por favor no trate de remover la cubierta exterior. Este producto no contiene piezas reparables por el consumidor. Toda reparación se debe llevar a cabo únicamente por personal de servicio autorizado. CABLE ÉLECTRICO a) El producto se debe de proporcionar con un cable eléctrico corto (o uno separable), a fin de reducir el riesgo de tropezar o de enredarse en un cable más largo. b)Existen cables eléctricos más largos y separables o cables de extensión que uno puede utilizar si toma el cuidado debido. c) Si se utiliza un cable separable o de extensión, 1)El régimen nominal del cable separable o del cable de extensión debe ser, como mínimo, igual al del régimen nominal del aparato. 2)Si el aparato es de conexión a tierra, el cable de extensión debe ser un cable de tres alambres de conexión a tierra. 3)Uno debe de acomodar el cable más largo de manera que no cuelgue del mostrador o de la mesa, para evitar que un niño tire del mismo o que alguien se tropiece. Nota: Si el cordón de alimentación es dañado, en América Latina debe sustituirse por personal calificado o por el centro de servicio autorizado. CONSERVE ESTAS INSTRUCCIONES. 9 10 Como usar El producto puede variar ligeramente del que aparece ilustrado. Este aparato es para uso doméstico solamente. PRIMEROS PASOS •Con cuidado, desembale su tostadora y retire todos los materiales de embalaje. •Retire el material impreso y guárdelo •Por favor, visite www.prodprotect.com/applica para registrar su garantía. •Para eliminar el polvo que pueda haberse acumulado durante el embalaje, simplemente pásele un paño limpio y húmedo al exterior de la tostadora. Importante: No use productos de limpieza abrasivos. Importante: No sumerja la tostadora, el cable o el enchufe en agua u otro líquido. •Enchufe el cable de suministro de energía eléctrica en un tomacorriente de 120V CA. •Antes de tostar por primera vez, ponga en funcionamiento todas las ranuras de tostado sin pan y con las perillas de selección de intensidad de tostado en el ajuste máximo (7). Esto ayudará a quemar y eliminar el polvo o aceite que pueda haberse acumulado durante la manufactura. Es posible que la tostadora emita un olor desagradable, pero esto es normal en una tostadora nueva. Asegúrese que el ambiente esté bien ventilado al hacer esto. •Elija un lugar donde se usará la tostadora, dejando espacio suficiente en la parte posterior y superior de la unidad para que el calor pueda fluir sin ocasionar daños a los muebles de cocina y las paredes. SELECCIÓN DE LA INTENSIDAD DE TOSTADO Nota: La(s) perilla(s) se intensidad de tostado se encuentran en la parte delantera de su tostadora. La T4808 tiene 2 perillas; una para cada conjunto de ranuras. 1.Ajuste la(s) ranura(s) a la intensidad de tostado deseada: 1 es para calentar y tostar muy ligeramente; 7 es para un tostado intenso (B); los números sirven de guía para ayudarle a elegir la intensidad de tostado deseada (cuanto más alto el número, más intenso será el tostado). Nota: El modelo ilustrado es una tostadora para 4 rebanadas (T4808); el modelo para 2 rebanadas (T2808) incluye las mismas características, pero sólo 2 ranuras para tostadas. 1. 2. †3. 4. 5. 6. 7. 8. Ranuras para tostadas Perilla(s) de selección de intensidad de tostado Bandeja(s) deslizantes para migas (No de pieza T2808-01) Caja elegante de cromo Enchufe polarizado Boton(es) para BAGELS Boton(es) de CANCELACIÓN Palanca(s) de tostado Nota: † indica piezas removibles reemplazables por el consumidor 11 Nota: La primera vez que tueste, es mejor utilizar todas las ranuras de tostado; posicione la(s) perilla(s) de selección de intensidad de tostado en el ajuste medio (4); luego, ajuste cada ciclo de tostado siguiente de acuerdo con su preferencia. 12 BOTÓN DE CANCELACIÓN Si desea interrumpir el ciclo de tostado antes de que concluya, oprima el botón de CANCELACIÓN (CANCEL). Las resistencias se apagarán y las tostadas o los alimentos tostados saltarán de la tostadora. Nota: La T4808 tiene 2 botones de CANCELACIÓN; uno para cada conjunto de ranuras. INSTRUCCIONES PARA EL TOSTADO DE PAN 1.Coloque su tostadora sobre una superficie plana y nivelada. 2.Enchufe el cable de suministro de energía eléctrica en un tomacorriente de 120V CA. 3.Coloque la(s) perilla(s) de selección de intensidad de tostado en la intensidad deseada (vea SELECCIÓN DE LA INTENSIDAD DE TOSTADO). 4.Retire todos los envoltorios protectores del pan o de los alimentos que tostará antes de colocarlos en las ranuras. Importante: Evite las rebanadas de pan y pastelería despedazados porque pueden quedar alojados en las ranuras de tostado. 5.Coloque el pan o alimento a ser tostado en las ranuras de tostado y presione la(s) palanca(s) de la tostadora para bajar el pan e iniciar el tostado. Las guías con autoajuste centralizarán el pan automáticamente para obtener un tostado uniforme. Nota: Al tostar una sola rebanada en la T4808, se puede colocar el pan en cualquier ranura de tostado; sin embargo, el pan puede tostarse un poco más en la parte interior de cualquier par de ranuras de tostado. Nota: La(s) palanca(s) de tostado no quedará(n) trabada(s) cuando las baje si la tostadora no está enchufada en un tomacorriente. 6.Cuando se logre la intensidad de tostado seleccionada, la(s) palanca(s) de tostado subirá(n) y la tostadora se apagará automáticamente. 7.Desenchufe el cable del tomacorriente cuando no esté usando la tostadora. Nota: Para evitar incendios, nunca coloque el pan sobre la abertura de la tostadora. Nota: No opere la tostadora sin la(s) bandeja(s) para migas en su lugar y calzada(s) correctamente. 8.Para interrumpir el tostado, presione el/los boton(es) de CANCELACIÓN. INSTRUCCIONES PARA EL TOSTADO DE BAGELS Y PANECILLOS INGLESES Nota: Este ajuste hace que la tostadora caliente ligeramente el exterior de cada bagel y tueste el lado cortado del bagel a la intensidad deseada. ¡El ajuste para BAGELS es excelente para panecillos ingleses también! 1.Coloque su tostadora sobre una superficie plana y nivelada. 2.Enchufe el cable de suministro de energía eléctrica en un tomacorriente de 120V CA. 3.Coloque la(s) perilla(s) de selección de intensidad de tostado en la intensidad deseada (vea SELECCIÓN DE LA INTENSIDAD DE TOSTADO). 4.Retire todos los envoltorios protectores del pan o de los alimentos que tostará antes de colocarlos en las ranuras. 5.Corte el bagel o el panecillo inglés en mitades; coloque una mitad en cada ranura de tostado con las caras cortadas mirando hacia el centro de las ranuras de tostado. 6.Baje la(s) palanca(s) de la tostadora. 7.Enseguida después de bajar la(s) palanca(s) y con la(s) misma(s) trabada(s) en 13 posición, oprima el/los boton(es) “BAGEL”. 8.Cuando el bagel o el panecillo inglés esté listo, la(s) palanca(s) subirá(n). La tostadora se apagará automáticamente. 9.Para interrumpir el tostado, presione el/los boton(es) de CANCELACIÓN. TOSTADO DE COMIDAS RÁPIDAS Consejo: Las ranuras extra anchas permiten el tostado de muchas variedades de comidas rápidas embaladas disponibles actualmente, tanto congeladas como no congeladas (pastelería comercial). Nota: Debido a que los alimentos tostados y los gustos individuales varían, es difícil recomendar intensidades exactas de tostado. Sin embargo, después de haber experimentado un poco, descubrirá cuál es la mejor intensidad de tostado para sus necesidades. Consulte, también, las instrucciones de calentamiento en el embalaje del alimento. Pastelería Consejo: Para mejores resultados, siga las instrucciones impresas en el embalaje de la pastelería; si el embalaje no contiene instrucciones, coloque la(s) perilla(s) de selección de intensidad de tostado en el ajuste intermedio (4). Cierta pastelería puede requerir un segundo ciclo de tostado. Nota: No use esta tostadora para tostar artículos de pastelería con glaseados que chorreen o rellenos abiertos. EXTRACCIÓN DE ALIMENTOS ATASCADOS Si una tostada o algún alimento tostado quedan atascados en la tostadora, desenchúfela y espere que se enfríe. Coloque la tostadora boca abajo y agítela para aflojar la tostada o alimento tostado. Importante: Nunca use un tenedor o un utensilio afilado para extraer la tostada, ya que esto puede dañar las resistencias o causar lesiones. PUNTOS IMPORTANTES •Retire todos los envoltorios protectores del pan o de los alimentos que tostará antes de colocarlos en la(s) ranura(s) de la tostadora. •Para mejores resultados, limpie la(s) bandeja(s) para migas con frecuencia. •Distintos tipos de panes requieren distintos ajustes de intensidad de tostado. Presione el/los boton(es) de CANCELACIÓN en cualquier momento para verificar la intensidad del tostado. •No bloquee la(s) ranura(s) de la tostadora. No coloque ningún objeto sobre las ranuras de la tostadora. •No tueste pan con manteca o pan árabe con manteca. La manteca derretida causará un incendio. •Se puede recalentar pan previamente tostado, sin manteca. Use un ajuste de menor intensidad de tostado y vigílelo detenidamente. •Al tostar más de una rebanada de pan, use rebanadas de tamaño, espesor y frescura similares. •El pan añejo, pan delgado o los productos de pan dulce – tales como pastelitos para el te y torta de frutas – se doran más rápidamente que el pan común; se los debe tostar con ajustes de intensidad menor. •Nunca sumerja la tostadora en agua. •Nunca use un tenedor o un utensilio afilado para extraer una tostada o alimentos tostados, ya que esto puede dañar las resistencias o causar lesiones. 14 Cuidado y limpieza Este producto no contiene piezas reparables por el consumidor. Para servicio, por favor acuda a personal calificado. INSTRUCCIONES PARA LA LIMPIEZA Precaución: No sumergir en agua u otro líquido. 1. Desenchufe la tostadora y déjela enfriar. 2. Pase un paño suave húmedo en su exterior. Lústrela con un paño suave seco. Importante: No use productos de limpieza abrasivos, ya que pueden rayar la superficie de acero inoxidable. 3. La(s) bandeja(s) para migas está(n) ubicada(s) debajo de la tostadora. Para limpiarla(s) fácilmente, tome la manija de la bandeja para migas y deslícela hacia afuera. 4. Con un cepillo, retire las migas de la(s) bandeja(s) y, si fuera necesario, pásele(s) un paño húmedo limpio. Siempre seque bien la(s) bandeja(s) antes de volver a colocarla(s). 5. Al volver a colocar la(s) bandeja(s), asegúrese de empujar firmemente para que quede(n) totalmente insertada(s) en la base de la tostadora. ALMACENAJE Desenchufe la unidad, déjela enfriar y límpiela antes de almacenarla. Guárdela en su caja en un lugar seco y limpio. Nunca la almacene caliente o enchufada. Nunca enrosque el cable firmemente alrededor del aparato. No tensione el cable en su punto de conexión a la unidad, ya que el cable podría pelarse y quebrarse. DETECCIÓN DE FALLAS PROBLEMA POSIBLE CAUSE El aparato no está calentando o ha dejado de calentar. La toma de corriente está defectuosa o el tostador está desenchufado. Compruebe que la toma de corriente está en buen estado. Desenchufe el tostador y vuelva a enchufarlo. Pruebe el funcionamiento del tostador, eligiendo un ajuste y presionando la palanca de control sin introducir alimentos en el tostador. En la segunda tanda de El ajuste es demasiatostado, el pan resulta do alto. demasiado tostado. Si prepara ciclos repetidos en el tostador, se recomienda ajustar el nivel de tostado a un grado más ligero que el anterior. El pan se traba. Las rebanadas pueden ser demasiado gruesas. La mayoría de los panes, reposterías y “bagels” se acomodan perfectamente en las ranuras. Sin embargo, si estos alimentos resultan muy gruesos, simplemente retire del tostador y corte un rebanada delgada para acomodarlos mejor. Las tostadas resultan demasiado claras u oscuras. El selector del grado de tostado debe ser reajustado. Simplemente reajuste el selector del grado de tostado al nivel deseado para la función que desea usar. Olor a comida queHay residuos de mada o emisión de comida en la(s) humo cuando se usa el bandeja(s) de recolectostador. ción. 15 SOLUCIÓN 16 Consulte la sección de Cuidado y limpieza en el manual del producto. Asegúrese que la(s) bandeja(s) para los residuos esté vacía y limpia. Asegúrese que no haya pedazos grandes trabados en las ranuras. Desconecte el aparato, inviértalo sobre el fregadero y agítelo hasta expulsar más residuos. NEED HELP? For service, repair or any questions regarding your appliance, call the appropriate "800" number on the cover of this book. Do not return the product to the place of purchase. Do not mail the product back to the manufacturer nor bring it to a service center. You may also want to consult the website listed on the cover of this manual. One-Year Limited Warranty (Applies only in the United States and Canada) What does it cover? •Any defect in material or workmanship; provided; however, Applica’s liability will not exceed the purchase price of the product. For how long? •One year after the date of original purchase. What will we do to help you? •Provide you with a reasonably similar replacement product that is either new or factory refurbished. How do you get service? •Save your receipt as proof of the date of sale. •Check our on-line service site at www.prodprotect.com/applica, or call our toll-free number, 1-800-231-9786, for general warranty service. •If you need parts or accessories, please call 1-800-738-0245. What does your warranty not cover? •Damage from commercial use •Damage from misuse, abuse or neglect •Products that have been modified in any way •Products used or serviced outside the country of purchase •Glass parts and other accessory items that are packed with the unit •Shipping and handling costs associated with the replacement of the unit •Consequential or incidental damages (Please note, however, that some states do not allow the exclusion or limitation of consequential or incidental damages, so this limitation may not apply to you.) How does state law relate to this warranty? •This warranty gives you specific legal rights, and you may also have other rights that vary from state to state or province to province. ¿NECESITA AYUDA? Para servicio, reparaciones o preguntas relacionadas al producto, por favor llame al número del centro de servicio en el país donde usted compró su producto. NO devuelva el producto al fabricante. Llame o lleve el producto a un centro de servicio autorizado. UN AÑOS DE GARANTÍA LIMITADA (No aplica en México, Estados Unidos o Canadá) ¿Qué cubre la garantía? •La garantía cubre cualquier defecto de materiales o de mano de obra. Applica no se responsabiliza por ningún costo que exceda el valor de compra del producto. ¿Por cuánto tiempo es válida la garantía? •Por un años a partir de la fecha original de compra. ¿Cómo se puede obtener servicio? •Conserve el recibo original de compra. •Por favor llame al número del centro de servicio autorizado. Esta garantía no cubre: •Los productos que han sido utilizados en condiciones distintas a las normales •Los daños ocasionados por el mal uso, el abuso o negligencia •Los productos que han sido alterados de alguna manera •Los daños ocasionados por el uso comercial del producto •Los productos utilizados o reparados fuera del país original de compra •Las piezas de vidrio y demás accesorios empacados con el aparato •Los gastos de tramitación y embarque asociados al reemplazo del producto •Los daños y perjuicios indirectos o incidentales 17 18 is a trademark of The Black & Decker Corporation, Towson, Maryland, USA Marca registrada de The Black & Decker Corporation, Towson, Maryland, E.U. Copyright © 2008 Applica Consumer Products, Inc. Made in People’s Republic of China Printed in People’s Republic of China 2008/9-15-85E/S Fabricado en la República Popular de China Impreso en la República Popular de China