1
MITEL
COLLABORATION ADVANCED
CONFIGURATION AND MAINTENANCE MANUAL
ISSUE 5.0 SP1
NOVEMBER 2013
NOTICE
The information contained in this document is believed to be accurate in all respects but is not warranted
by Mitel Networks™ Corporation (MITEL®). The information is subject to change without notice and should
not be construed in any way as a commitment by Mitel or any of its affiliates or subsidiaries. Mitel and its
affiliates and subsidiaries assume no responsibility for any errors or omissions in this document. Revisions
of this document or new editions of it may be issued to incorporate such changes.
No part of this document can be reproduced or transmitted in any form or by any means - electronic or
mechanical - for any purpose without written permission from Mitel Networks Corporation.
Trademarks
Mitel® is a registered trademark of Mitel Networks Corporation.
Inter-Tel® is a registered trademark of Inter-Tel (Delaware), Incorporated.
Acknowledgements
The Mitel Applications Suite product uses Audio Coding: ITU-T Rec. G722.1 Annex C, licensed from
Polycom®.
All other trademarks mentioned in this document are the property of their respective owners, including Mitel
Networks Corporation and Inter-Tel (Delaware), Incorporated. All rights reserved.
, Trademark of Mitel Networks Corporation
©Copyright 2013, Mitel Networks Corporation
All rights reserved
ii
Table of Contents
Chapter 1:
Overview
Introduction . . . . . . . . . . . . . . . . . . . . . . . . . . . . . . . . . . . . . . . . . . . . . . . . . . . . . . . . . . . . . . . . . . . 3
New Features, Enhancements, and Changes to MCA 5.0 SP1 . . . . . . . . . . . . . . . . . . . . . . . . . . . 4
MCA Launcher . . . . . . . . . . . . . . . . . . . . . . . . . . . . . . . . . . . . . . . . . . . . . . . . . . . . . . . . . . . . . . . 4
Remote Control enhancement . . . . . . . . . . . . . . . . . . . . . . . . . . . . . . . . . . . . . . . . . . . . . . . . . . . 4
Features, Enhancements, and Changes to MCA 5.0 . . . . . . . . . . . . . . . . . . . . . . . . . . . . . . . . . 4
Client and Web Browser Support Enhancements . . . . . . . . . . . . . . . . . . . . . . . . . . . . . . . . . . . . 4
Personal ID (Identification) . . . . . . . . . . . . . . . . . . . . . . . . . . . . . . . . . . . . . . . . . . . . . . . . . . . . . 5
Google Apps Integration . . . . . . . . . . . . . . . . . . . . . . . . . . . . . . . . . . . . . . . . . . . . . . . . . . . . . . . 6
SIP and HD Video Support . . . . . . . . . . . . . . . . . . . . . . . . . . . . . . . . . . . . . . . . . . . . . . . . . . . . . 6
Client Only Delivery . . . . . . . . . . . . . . . . . . . . . . . . . . . . . . . . . . . . . . . . . . . . . . . . . . . . . . . . . . . 7
Audio-Through Client (2-way Client Audio) . . . . . . . . . . . . . . . . . . . . . . . . . . . . . . . . . . . . . . . . . 7
1-way Audio to Web Client . . . . . . . . . . . . . . . . . . . . . . . . . . . . . . . . . . . . . . . . . . . . . . . . . . . . . 7
Conference Enhancements . . . . . . . . . . . . . . . . . . . . . . . . . . . . . . . . . . . . . . . . . . . . . . . . . . . . . 7
Session Recording Enhancements . . . . . . . . . . . . . . . . . . . . . . . . . . . . . . . . . . . . . . . . . . . . . . . 8
Audio Codec (change to G.729 Audio compression ports) . . . . . . . . . . . . . . . . . . . . . . . . . . . . . 8
MAS 5.0 Enhancements . . . . . . . . . . . . . . . . . . . . . . . . . . . . . . . . . . . . . . . . . . . . . . . . . . . . . . . 8
Specifications and Requirements . . . . . . . . . . . . . . . . . . . . . . . . . . . . . . . . . . . . . . . . . . . . . . . . . . 9
Licenses . . . . . . . . . . . . . . . . . . . . . . . . . . . . . . . . . . . . . . . . . . . . . . . . . . . . . . . . . . . . . . . . . . . . 10
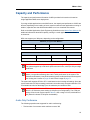
Capacity and Performance . . . . . . . . . . . . . . . . . . . . . . . . . . . . . . . . . . . . . . . . . . . . . . . . . . . . . . 11
Audio-Only Conference . . . . . . . . . . . . . . . . . . . . . . . . . . . . . . . . . . . . . . . . . . . . . . . . . . . . . . . 11
Web-Only Conference . . . . . . . . . . . . . . . . . . . . . . . . . . . . . . . . . . . . . . . . . . . . . . . . . . . . . . . . 12
Determining Bandwidth . . . . . . . . . . . . . . . . . . . . . . . . . . . . . . . . . . . . . . . . . . . . . . . . . . . . 12
Bandwidth Requirements . . . . . . . . . . . . . . . . . . . . . . . . . . . . . . . . . . . . . . . . . . . . . . . . . . . 13
Audio and Web Conference . . . . . . . . . . . . . . . . . . . . . . . . . . . . . . . . . . . . . . . . . . . . . . . . . . . . 14
Firewall and DNS Server Configuration . . . . . . . . . . . . . . . . . . . . . . . . . . . . . . . . . . . . . . . . . . . . 15
Outlook Form Template . . . . . . . . . . . . . . . . . . . . . . . . . . . . . . . . . . . . . . . . . . . . . . . . . . . . . . . . 17
IAWC Migration. . . . . . . . . . . . . . . . . . . . . . . . . . . . . . . . . . . . . . . . . . . . . . . . . . . . . . . . . . . . . . . 18
Manually Backup IAWC Data . . . . . . . . . . . . . . . . . . . . . . . . . . . . . . . . . . . . . . . . . . . . . . . . 18
Changing to MCA Licenses . . . . . . . . . . . . . . . . . . . . . . . . . . . . . . . . . . . . . . . . . . . . . . . . . 18
MAS Installation and Configuration . . . . . . . . . . . . . . . . . . . . . . . . . . . . . . . . . . . . . . . . . . . 19
Chapter 2:
iii
Configuration and Maintenance Manual
Configuration
Introduction . . . . . . . . . . . . . . . . . . . . . . . . . . . . . . . . . . . . . . . . . . . . . . . . . . . . . . . . . . . . . . . . . . 23
Configure the Mitel Communications Director (MCD). . . . . . . . . . . . . . . . . . . . . . . . . . . . . . . . . . 24
Configure SIP Device Capabilities . . . . . . . . . . . . . . . . . . . . . . . . . . . . . . . . . . . . . . . . . . . . . . . 24
Configure Extended Hunt Groups . . . . . . . . . . . . . . . . . . . . . . . . . . . . . . . . . . . . . . . . . . . . . . . 24
Configure Class of Service (COS) . . . . . . . . . . . . . . . . . . . . . . . . . . . . . . . . . . . . . . . . . . . . . . . 24
Create IP Devices . . . . . . . . . . . . . . . . . . . . . . . . . . . . . . . . . . . . . . . . . . . . . . . . . . . . . . . . . . . 25
Create a Hunt Group . . . . . . . . . . . . . . . . . . . . . . . . . . . . . . . . . . . . . . . . . . . . . . . . . . . . . . . . . 25
Configure the Mitel 5000 CP. . . . . . . . . . . . . . . . . . . . . . . . . . . . . . . . . . . . . . . . . . . . . . . . . . . . . 26
Create IP Devices for 86xx Ports . . . . . . . . . . . . . . . . . . . . . . . . . . . . . . . . . . . . . . . . . . . . . . . . 26
Configure Phone Settings . . . . . . . . . . . . . . . . . . . . . . . . . . . . . . . . . . . . . . . . . . . . . . . . . . . . . 26
Create a Hunt Group . . . . . . . . . . . . . . . . . . . . . . . . . . . . . . . . . . . . . . . . . . . . . . . . . . . . . . . . . 27
Enable OAI Connection . . . . . . . . . . . . . . . . . . . . . . . . . . . . . . . . . . . . . . . . . . . . . . . . . . . . . . . 27
Configure the Inter-Tel Axxess System Platform . . . . . . . . . . . . . . . . . . . . . . . . . . . . . . . . . . . . . 28
Add IPRC and Create IP Devices . . . . . . . . . . . . . . . . . . . . . . . . . . . . . . . . . . . . . . . . . . . . . . . 28
Configure IP Station Settings . . . . . . . . . . . . . . . . . . . . . . . . . . . . . . . . . . . . . . . . . . . . . . . . . . . 28
Create a Hunt Group . . . . . . . . . . . . . . . . . . . . . . . . . . . . . . . . . . . . . . . . . . . . . . . . . . . . . . . . . 28
Enable OAI Connection . . . . . . . . . . . . . . . . . . . . . . . . . . . . . . . . . . . . . . . . . . . . . . . . . . . . . . . 29
Chapter 3:
Programming
Introduction . . . . . . . . . . . . . . . . . . . . . . . . . . . . . . . . . . . . . . . . . . . . . . . . . . . . . . . . . . . . . . . . . . 33
Admin Web Client Login and Initial Configuration . . . . . . . . . . . . . . . . . . . . . . . . . . . . . . . . . . . 33
Stopping and Starting the MCA Server . . . . . . . . . . . . . . . . . . . . . . . . . . . . . . . . . . . . . . . . . . . 34
Configuring Web Conferencing Settings . . . . . . . . . . . . . . . . . . . . . . . . . . . . . . . . . . . . . . . . . . 34
Configuring Port Reservation Settings . . . . . . . . . . . . . . . . . . . . . . . . . . . . . . . . . . . . . . . . . . . . 35
Configuring System Options . . . . . . . . . . . . . . . . . . . . . . . . . . . . . . . . . . . . . . . . . . . . . . . . . . . 36
Configuring LDAP Authentication and Auto-Provisioning . . . . . . . . . . . . . . . . . . . . . . . . . . . . . 40
Configuring Voice Prompts . . . . . . . . . . . . . . . . . . . . . . . . . . . . . . . . . . . . . . . . . . . . . . . . . . . . 42
Recording Custom Prompts . . . . . . . . . . . . . . . . . . . . . . . . . . . . . . . . . . . . . . . . . . . . . . . . . 43
Uploading Custom Prompts . . . . . . . . . . . . . . . . . . . . . . . . . . . . . . . . . . . . . . . . . . . . . . . . . 43
Configuring Music-on-Hold . . . . . . . . . . . . . . . . . . . . . . . . . . . . . . . . . . . . . . . . . . . . . . . . . . . . 44
Viewing the Licenses . . . . . . . . . . . . . . . . . . . . . . . . . . . . . . . . . . . . . . . . . . . . . . . . . . . . . . . . . 45
Customizing the User Interface . . . . . . . . . . . . . . . . . . . . . . . . . . . . . . . . . . . . . . . . . . . . . . . . . 46
Configuring Dial Access String (DAS) Rules . . . . . . . . . . . . . . . . . . . . . . . . . . . . . . . . . . . . . . . 47
iv
Table of Contents
Migrating IAWC Data . . . . . . . . . . . . . . . . . . . . . . . . . . . . . . . . . . . . . . . . . . . . . . . . . . . . . . . . . 49
Configuring SIP Server . . . . . . . . . . . . . . . . . . . . . . . . . . . . . . . . . . . . . . . . . . . . . . . . . . . . . . . 50
Configure SIP Server – MCD . . . . . . . . . . . . . . . . . . . . . . . . . . . . . . . . . . . . . . . . . . . . . . . . 50
Configure SIP Server – Mitel 5000 . . . . . . . . . . . . . . . . . . . . . . . . . . . . . . . . . . . . . . . . . . . . 51
Configure SIP Server – Inter-Tel Axxess . . . . . . . . . . . . . . . . . . . . . . . . . . . . . . . . . . . . . . . 53
Recording Retention Settings . . . . . . . . . . . . . . . . . . . . . . . . . . . . . . . . . . . . . . . . . . . . . . . . . . 54
Manage Clients . . . . . . . . . . . . . . . . . . . . . . . . . . . . . . . . . . . . . . . . . . . . . . . . . . . . . . . . . . . . . 54
User Setup and Account Management. . . . . . . . . . . . . . . . . . . . . . . . . . . . . . . . . . . . . . . . . . . . . 56
Adding User Accounts . . . . . . . . . . . . . . . . . . . . . . . . . . . . . . . . . . . . . . . . . . . . . . . . . . . . . . . . 56
Adding Guest User Accounts . . . . . . . . . . . . . . . . . . . . . . . . . . . . . . . . . . . . . . . . . . . . . . . . . . . 57
Deleting a user profile . . . . . . . . . . . . . . . . . . . . . . . . . . . . . . . . . . . . . . . . . . . . . . . . . . . . . . . . 57
Managing User Accounts . . . . . . . . . . . . . . . . . . . . . . . . . . . . . . . . . . . . . . . . . . . . . . . . . . . . . . 57
Accessing a User Account . . . . . . . . . . . . . . . . . . . . . . . . . . . . . . . . . . . . . . . . . . . . . . . . . . 58
Editing a User Profile . . . . . . . . . . . . . . . . . . . . . . . . . . . . . . . . . . . . . . . . . . . . . . . . . . . . . . 58
Viewing Scheduled Conferences . . . . . . . . . . . . . . . . . . . . . . . . . . . . . . . . . . . . . . . . . . . . . 60
Generating a Call Activity Report . . . . . . . . . . . . . . . . . . . . . . . . . . . . . . . . . . . . . . . . . . . . . 60
Scheduling a Reservationless Conference . . . . . . . . . . . . . . . . . . . . . . . . . . . . . . . . . . . . . . 61
Adding a Delegate . . . . . . . . . . . . . . . . . . . . . . . . . . . . . . . . . . . . . . . . . . . . . . . . . . . . . . . . 62
Listing User Accounts . . . . . . . . . . . . . . . . . . . . . . . . . . . . . . . . . . . . . . . . . . . . . . . . . . . . . . . . 63
Bulk Provisioning User Accounts . . . . . . . . . . . . . . . . . . . . . . . . . . . . . . . . . . . . . . . . . . . . . . . . 63
Bulk Provisioning Reservationless Conferences . . . . . . . . . . . . . . . . . . . . . . . . . . . . . . . . . . . . 64
Downloading Reservationless Conferences . . . . . . . . . . . . . . . . . . . . . . . . . . . . . . . . . . . . . . . 65
Configuring the Default User Settings . . . . . . . . . . . . . . . . . . . . . . . . . . . . . . . . . . . . . . . . . . . . 66
Sending a Broadcast E-mail . . . . . . . . . . . . . . . . . . . . . . . . . . . . . . . . . . . . . . . . . . . . . . . . . . . 67
Configuring Billing Codes . . . . . . . . . . . . . . . . . . . . . . . . . . . . . . . . . . . . . . . . . . . . . . . . . . . . . 67
Server and User Activity Monitoring . . . . . . . . . . . . . . . . . . . . . . . . . . . . . . . . . . . . . . . . . . . . . . . 69
Viewing Active Calls . . . . . . . . . . . . . . . . . . . . . . . . . . . . . . . . . . . . . . . . . . . . . . . . . . . . . . . . . 69
Checking Proxy Extension Status . . . . . . . . . . . . . . . . . . . . . . . . . . . . . . . . . . . . . . . . . . . . . . . 69
Manage Recordings . . . . . . . . . . . . . . . . . . . . . . . . . . . . . . . . . . . . . . . . . . . . . . . . . . . . . . . . . . 72
License Usage . . . . . . . . . . . . . . . . . . . . . . . . . . . . . . . . . . . . . . . . . . . . . . . . . . . . . . . . . . . . . . 73
Accessing SIP Logs . . . . . . . . . . . . . . . . . . . . . . . . . . . . . . . . . . . . . . . . . . . . . . . . . . . . . . . . . . 73
Server Reporting. . . . . . . . . . . . . . . . . . . . . . . . . . . . . . . . . . . . . . . . . . . . . . . . . . . . . . . . . . . . . . 75
Call Activity Report . . . . . . . . . . . . . . . . . . . . . . . . . . . . . . . . . . . . . . . . . . . . . . . . . . . . . . . . . . 75
VoIP Utilization Statistics . . . . . . . . . . . . . . . . . . . . . . . . . . . . . . . . . . . . . . . . . . . . . . . . . . . . . . 76
Scheduled Conferences . . . . . . . . . . . . . . . . . . . . . . . . . . . . . . . . . . . . . . . . . . . . . . . . . . . . . . 77
System Alerts Log . . . . . . . . . . . . . . . . . . . . . . . . . . . . . . . . . . . . . . . . . . . . . . . . . . . . . . . . . . . 78
v
Configuration and Maintenance Manual
Install History Log . . . . . . . . . . . . . . . . . . . . . . . . . . . . . . . . . . . . . . . . . . . . . . . . . . . . . . . . . . . 78
Port Reservations Report . . . . . . . . . . . . . . . . . . . . . . . . . . . . . . . . . . . . . . . . . . . . . . . . . . . . . . 79
To install MCAC for all users (as the administrator) . . . . . . . . . . . . . . . . . . . . . . . . . . . . . . . . . . . 81
Chapter 4:
Troubleshooting
Introduction . . . . . . . . . . . . . . . . . . . . . . . . . . . . . . . . . . . . . . . . . . . . . . . . . . . . . . . . . . . . . . . . . . 85
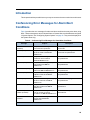
Conferencing Error Messages for Alarm/Alert Conditions . . . . . . . . . . . . . . . . . . . . . . . . . . . . . . 85
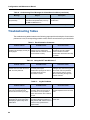
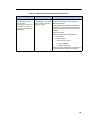
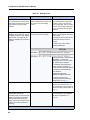
Troubleshooting Tables . . . . . . . . . . . . . . . . . . . . . . . . . . . . . . . . . . . . . . . . . . . . . . . . . . . . . . . . 86
Technical Support . . . . . . . . . . . . . . . . . . . . . . . . . . . . . . . . . . . . . . . . . . . . . . . . . . . . . . . . . . . . . 92
Technical Support Department . . . . . . . . . . . . . . . . . . . . . . . . . . . . . . . . . . . . . . . . . . . . . . . . . 92
Emergency Assistance . . . . . . . . . . . . . . . . . . . . . . . . . . . . . . . . . . . . . . . . . . . . . . . . . . . . . . . 92
Troubleshooting Guidelines . . . . . . . . . . . . . . . . . . . . . . . . . . . . . . . . . . . . . . . . . . . . . . . . . . . . 92
Appendix A :
Voice Prompts
Introduction . . . . . . . . . . . . . . . . . . . . . . . . . . . . . . . . . . . . . . . . . . . . . . . . . . . . . . . . . . . . . . . . . . 94
Index . . . . . . . . . . . . . . . . . . . . . . . . . . . . . . . . . . . . . . . . . . . . . . . . . . . . . . . . . . . . . . . . . . . . . . 101
vi
CHAPTER 1
OVERVIEW
Configuration and Maintenance Manual
2
Introduction
Formerly known as Audio and Web Conferencing (AWC), Mitel® Collaboration Advanced (MCA)
provides an integrated application to create audio and Web conferences using corporate
directories and personal address books from Microsoft® Outlook® and Lotus Notes®. MCA is
packaged on the Mitel Applications Suite (MAS) server, which is linked by an Ethernet
connection to the IP network. A link on the MAS server provides access to a Web-based
administrator interface for configuring MCA, scheduling conferences, viewing conference calls,
and administering collaboration controls. You can access all interfaces through either HTTP or
HTTPS.
Authorization and authentication allows only valid users to access services. To meet the highest
security requirements, MCA uses Secure Sockets Layer (SSL) encryption for secured
messages, server-side digital certificates, and Comprehensive Lightweight Application Security
(CAST) 128-bit encryption for data transmission during Web conferences. MCA provides:
•
Instant, flexible calling: Initiate an instantaneous call or to create a conference call from
a two-party call. A conference call can also be pre-scheduled.
•
Complete call control and management: Add and drop other call participants as well as
mute, hold, or transfer the call directly from the desktop. A call detail record (CDR) provides
a log of all calls. The CDR includes the dates and times of all calls call duration of all calls
for billing purposes.
•
Cost-effective conferencing: Delivers the most cost-effective group calling, with ultimate
flexibility to customize solutions to best meet individual needs.
•
Web-based collaboration tools: Facilitate online meetings, training, and presentations
with features designed for sharing your desktop or individual applications. Enhance conferences to increase participation and understanding by using interactive markup tools,
user polling, and video-conferencing. Use the file transfer utility to immediately share the
outcome of online collaborative sessions by transmitting updated files and presentations
to conference participants.
•
Conference archiving: Create recordings of conference calls and collaborative sessions
for playback later.
3
Configuration and Maintenance Manual
New Features, Enhancements, and Changes to MCA
5.0 SP1
This MCA Configuration and Maintenance Manual was last published as MCA 5.0. This section
provides information about the following new features included in the MCA 5.0 SP1 release.
MCA Launcher
This release provides a new Launcher feature on MCA for Windows clients. Prior to this release,
the only methods to join a conference were via the MCA web page or via the UC Advanced
Collaboration feature.
The behavior when launched from a web page has been improved. Once the device and browser
being used have been verified to work with the MCA Client for Windows, the client application
is launched directly.
In addition, the behavior when the application is launched directly, has been enhanced to allow
not only local recording and playback, but also joining a new or recent conference. You will be
able to join a conference by starting the client and entering a conference access code or link;
you will also be able drag and drop a conference access code or link onto the application or
select a recent conference from a dropdown list.
There are no changes to the Admin procedure for this feature. It only changes the client behavior
when joining a conference (see MCA user help).
Remote Control enhancement
MCA 5.0 SP1 provides an enhancement to Remote Control called Transfer Control.
Transfer control is enabled after the leader has requested and gained control of a participant's
computer. This new ability of the leader is to give a participant control of a second participant's
computer. This feature can be useful in many environments such as Technical Support for
handing over control of a computer to support personnel.
There are no changes to the Admin procedure for this feature. It only changes the client behavior
(see MCA user help).
Features, Enhancements, and Changes to MCA 5.0
Client and Web Browser Support Enhancements
The MCA Client and Web browser look and feel is being refreshed and enhanced for this
release. MCA 5.0 allows users to participate in an MCA conference on a wide variety of devices
and platforms. As a result, this release further enhances the support of web browsers on multiple
4
platforms: Chrome, Firefox, Internet Explorer, Safari as well as iOS and Android built-in
browsers. Specific to this release, Internet Explorer 9 and 10, Windows 8, iOS 6.0 and Android
4.1 will be supported. See User Computer Requirements on page 9.
Personal ID (Identification)
MCA 5.0 introduces Personal ID which is a unique numeric identifier for each user of the system.
The Personal ID provides a way to identify and link audio and web participants. The Personal
ID also allows for a level of control over who is allowed access to conferences. This feature
especially impacts the Join Page and the process associated with joining a conference by
phone.
Personal ID has two main purposes:
•
Uniquely identifies participant’s conference legs for the merging of audio and web legs.
•
It provides finer control over who has access to conferences.
A new setting under System Options called Prompt for Access Code First (see Table on
page 40). When selected the Access Code will be required before the Personal ID can be
entered when accessing the Audio portion of the conference.
Personal IDs can be defined in one of three ways:
•
Through the MCA user interface (under Settings)
•
The system administrator can create, modify and delete Personal ID for system and Adding
Guest User Accounts on page 57
•
From the publicly accessible join page, guest users can have a Personal ID auto-generated
for them.
Note: If a conference does not require Personal ID's and if a user is not a system or
guest user, they can enter the conference by typing their name. In this case, a temporary
Personal ID will be generated for that user. This temporary Personal ID will remain valid
while the conference is active.
Leader impact:
The following options under Call features are available when setting up or editing a conference:
•
•
Personal IDs are required to enter the conference:
•
If selected, participants must enter their personal ID to join a conference.
•
If not selected, participants can choose to enter their personal ID but it is not
mandatory.
Conference access requires approval:
•
If selected (the above option is also automatically selected), the leader will need to
approve each user via the e-mail requesting approval or by using the View Participant
Approvals menu item in the Collaboration Client. Alternatively, the leader can use the
Approval tab in My Conferences to approve users. Once the registration is approved,
an e-mail is automatically sent to the participant indicating Approval Granted.
5
Configuration and Maintenance Manual
•
Restrict duplicate personal IDs on audio connections:
•
If selected, duplicate IDs are not allowed on audio connections.
Participant impact:
Depending on the option selected by the leader, participants may be forced to enter a Personal
ID upon joining a conference. The email invitation will indicate if a Personal ID is required to
attend the conference. Additionally, as stated under Leader impact, if Personal ID approval is
required, the participants will receive an email once the leader has approved their attendance
indicating Approval Granted.
Google Apps Integration
MCA 5.0 will support Google integration. In this release, we will provide the ability to invite
members to a conference via Google and also have the invited guests easily enter the scheduled
conference into their calendar.
SIP and HD Video Support
SIP Video Call Support
A SIP (Session Initiation Protocol) Device such as the UC360, UC Advanced Desktop and
Mobile clients as well as tested and supported 3rd party endpoints will be able to send and
receive video stream after joining an active conference call on the MCA server. This functionality
will be supported through a configured MCD PBX only. Prior to MCA 5.0, a SIP Device could
only participate in the audio portion of the conference. SIP Video requires an Enhanced Video
license.
Note: SIP device(s) can only receive a single video stream. MCA system determines
the active video based on the precedence level of the participants in the following order:
1) MCA client - leader
2) MCA client - participant (sharing host)
3) MCA client - participant (if more than one is broadcasting then the first that joined
takes precedence)
4) SIP device - leader (if more than one SIP device joined as a leader and is broadcasting,
then the one that joined first takes precedence)
5) SIP device - participant (if more than one SIP device joined as a participant and is
broadcasting, then the one that joined first takes precedence).
Deployment with SIP Servers and End Points
MCA supports the SIP protocol. As a result, it is capable of operating with a number of third
party SIP Servers and SIP end points such as SIP phones, Audio Conference Units and Video
Conference Units.
Mitel maintains a SIP Centre of Excellence (SIP CoE); the CoE performs interoperability testing
between third party devices and Mitel SIP devices. The CoE generates documents that cover
6
the results of the interoperability tests and how the devices should be configured for successful
interoperation.
For the complete list of devices that can interoperate with please refer to Knowledge Base
article called the SIP Technical Reference Guide 08-5159-00014. This Reference Guide can
be found on Mitel On-Line under ‘Support’ and then under ‘Mitel Knowledge Base’.
High Definition (HD) Video Support
MCA 5.0 introduces HD Video support by adding user control to effectively manage this new
capability. In order to support HD Video, a profiling tool will be available to help determine the
capabilities of the client endpoints in a conference. This tool will determine if the endpoint can
support HD Video stream encoding and decoding. The existing Enhanced Video License will
cover HD Video support. HD Video capable camera is also required.
Client Only Delivery
The MCA 5.0 client applications are packaged as RPM files and are installed by the MCA
software blade. MCA 5.0 Client Only Delivery mechanism allows these client RPMs to be
upgraded or downgraded independent of the MCA software blade. This allows fixes to the MCA
client applications to be delivered independent of the MCA server which eliminates the need
to upgrade MAS blades for client updates. The Client Only Delivery mechanism allows much
more flexibility in the delivery of client only enhancements and fixes.
See Manage Clients on page 54.
Audio-Through Client (2-way Client Audio)
MCA 5.0 introduces fully integrated and fully functional 2-way client audio also known as
Audio-Through Client. There is no configuration required at the server level as this feature is
always on and always available for use. However, the user has a new Audio button option part
of the Meeting Center to start using the microphone/speaker connected to their PC.
1-way Audio to Web Client
The ability from the Web Client to enable "listen-only" capability (1-way audio).
Conference Enhancements
Several conference feature enhancements were introduced in MCA 5.0, such as an audio
conference lock and muted conference join announcement.
7
Configuration and Maintenance Manual
Session Recording Enhancements
Additional administration mechanisms were added to better manage Session Recordings, such
as auto-clean mechanism, disk utilization alert, deletion of recordings as well as the
identification of recordings as permanent records.
Audio Codec (change to G.729 Audio compression ports)
MCA 5.0 will provide the ability to adjust or disable the number of G.729 audio compression
ports being used. Uncompressed audio will be used once the set value of G.729 ports have
been reached.
MAS 5.0 Enhancements
MCA must be run on a Mitel Application Suite (MAS) server. MAS R5.0 supports the new
features and enhancements included in MCA 5.0. For detailed information about MAS 5.0 new
features, enhancements, and changes, refer to the MAS R5.0 documentation suite on the Mitel
eDocs Web site (http://edocs.mitel.com/default.htm).
8
Specifications and Requirements
Hardware, software, network, and communication platform specifications and requirements for
MCA are defined in accordance with MAS server specifications. Because MCA must be installed
on a MAS server (v5.0 or later), hardware requirements for the server are determined by MAS
requirements.
MCA hardware requirements for single and multi-application configurations are the same. For
detailed hardware requirements information, refer to the Mitel Applications Suite Engineering
Guidelines on the Mitel eDocs Web site (http://edocs.mitel.com/default.htm).
Note: Technical documentation on the Mitel eDocs Web site is for registered Mitel
Online users and requires a valid user name and password.
To use MCA and the MCAC application, the user’s computer must meet the requirements
detailed in the following tables.
Table 1: User Computer Requirements
Component
Mitel Collaboration Advanced
Client Computer Hardware
Requirements
Dual Core, 1.6 GHz processor or higher
RAM: 2 GB minimum (4 GB or more recommended).
Performance may decline if running other applications in conjunction
with MCA. Performance may decline if broadcasting HD video.
Mitel Collaboration Advanced
Client Computer Operating
System
One of the following operating systems:
• Windows XP Home Professional and Media Center with Service
Pack 3 (SP3)
• Windows Vista™ Home Basic, Home Premium, Business, Ultimate,
and Enterprise with SP2
• Windows 7 Home Premium, Professional, and Ultimate
• Windows 8 (Desktop mode only)
Note that Microsoft .Net 4.0 is required.
Mitel Collaboration Advanced
Web Client
One of the following:
• Internet Explorer® 8.0, 9.0 and 10.0
• Mozilla Firefox 20
• Google Chrome 26
• Apple Safari 5.0 or 6.0
• Tablet browsers: Safari 5.x and 6.x Android 4.2
Administrator Web Client
Internet Explorer® 8.0, 9.0 and 10.0
9
Configuration and Maintenance Manual
VMware View
The following MCA user interfaces can be presented by VMware View:
•
UI presentation, including MCA Web Portal and streaming video (receive only) through the
MCA Collaboration Client application running in the virtual desktop. All Web-based conferencing and collaboration features are fully supported. Collaboration Client application and
screen sharing features are fully supported.
Note: See Virtual Appliance Deployment Guide at
http://edocs.mitel.com/TechDocs/Solutions-Guides/BP-Virtualization.pdf for
description, requirements and configuration information specific to virtualization
environment.
Licenses
You can create as many user accounts on MCA as MAS will allow. However, the number of
concurrent conference participants, for any conference type, is equal to one participant per one
MCA port type (audio or Web) license. Therefore, you can set up many MCA user accounts,
but for licensing purposes the product restricts the total number of concurrent conference
participants. For additional licensing information and details about license upgrades, refer to
the Mitel Applications Suite Installation and Maintenance Manual available on the Mitel eDocs
Web site (http://edocs.mitel.com/default.htm).
Table 2: Communications Platform License Requirements
Platform
Licenses
Mitel Communications Director
(MCD)
One SIP User License per MCA User License
Mitel 5000
• One Category C License per MCA User License
• One IP Enabler Unit License per MCA User License
or One IP Enabler System License
• System OAI Events License
• System OAI Third-party Call Control License
Inter-Tel Axxess
• System OAI Events License
• System OAI Third-party Call Control License
10
VMware View
Capacity and Performance
The capacity and performance information for MCA provided in this section is based on
single-application MAS server deployment.
If running multiple applications on the MAS server, the capacity and performance of MCA are
affected, depending on the loading of server resources with the other applications running. In
addition, capacities are also affected when MAS is run in a virtualized environment.
Refer to the Mitel Applications Suite Engineering Guidelines on the Mitel eDocs Web site for
additional information about MCA capacity running in a multi-application or virtualized
environment.
MCA can support up to 300 ports, depending on the configuration.
Maximum per system with MAS 5.0
MAS 5.0
Audio
Web
Video
MCA
300
300
300
Maximum per conference with MAS 5.0
MAS 5.0
Audio
Web
Video
MCA
200
300
100
Note: Three hundred audio ports are supported on a single MCA application on MAS.
The system supports up to 300 audio ports at the same time, with up to 200 per single
conference.
Note: In addition to telephone devices calling into a conference, the Browser audio
feature (1-way audio streaming) also uses 1 audio port/license on the system. The
Windows audio feature (2-way audio streaming) uses 1 audio port/license on the system.
See Viewing the Licenses on page 45 and License Usage on page 73.
The system will negotiate G.729 or G.711 calls based on the incoming call settings. Once the
system reaches the G.729 port setting (combined in all conferences), the system will offer G.711
for all additional calls into the bridge up to the maximum per conference limit.
Note: New to MCA 5.0 is the G.729 audio compression port setting of 0-100. Prior to
MCA 5.0, G.729 had a preset setting of 100 ports (non-configurable). The G729 port
setting is found under system options Table 6, it has a range of 0-100, with default of
100 (where 0 indicates G.729 ports are disabled).
Audio-Only Conference
The following capacities are supported for audio conferencing:
•
Total number of concurrent audio conference users: 300
11
Configuration and Maintenance Manual
•
Maximum number of users per audio conference: 200
A maximum of 100 concurrent users with G.729 encoding can connect to all audio conference
calls in progress (as per previously noted, the number of G.729 ports is configurable under
system options Table 6 with a range of 0-100, with default of 100). Once the maximum number
of G.729 ports have been reached, additional users with G.711 encoding can connect and join
an audio conference up to the supported limits.
Note: MCA supports a maximum of 100 G.729 ports is a single application configuration
and a maximum of 50 ports on MAS running multiple applications.
Web-Only Conference
Note: Terminal server environments, such as Citrix® and Remote Desktop, do not
support video.
Higher bandwidth requirements are necessary to support Web conferencing collaboration
features. The MCA server does not prevent more than the supported limits, it only tracks what
is licensed. The following capacities are supported for Web conferencing:
•
Total number of concurrent Web conference users: 300
•
Maximum number of users per Web conference: 300
Determining Bandwidth
Note: Bandwidth is a significant factor for performance during a Web conference or a
Video Call and MCA server resources (CPU and memory) used are minimal.
The following is a scenario to help determine approximate usage type and measure the amount
of bandwidth required. Video quality and frames per second (fps) are features that are
configurable by the individual user according to their preference. Combine the collaboration
bandwidth (Table 3) and video bandwidth (Table 4) for the number of users to estimate the total
bandwidth required.
Running multiple Web conferences simultaneously with high quality video (30 fps) and Desktop
Sharing on a network with high traffic could degrade overall performance. Mitel recommends
that you set up a test conference based on the intended use to determine actual performance
and monitor the attendee settings. This is the most accurate way to approximate the actual
bandwidth required, which provides an estimate of required throughput needed by the host and
participants.
Note: The recommended setting for video quality is 8 fps (default) or 15 fps. Settings
above the recommended values will significantly increase the bandwidth required.
12
VMware View
•
Bandwidth consumption varies widely based on the features in use, the settings chosen
for each feature, and the content of the Viewer (Desktop Sharing). Settings that impact
bandwidth include:
•
Video: Video size, frame rate, video quality, raw image size and number of participants.
•
Application/Desktop Sharing: Size, scan rate, content, and color resolution.
•
File Sharing: File size and the number of participants a file is being shared.
Bandwidth Requirements
There are bandwidth limitations to consider when running the features of MCA. Table 3 shows
the estimated bandwidth requirements for a typical Web collaboration meeting (see the
examples for Determining Bandwidth above) and Table 4 shows the maximum and peak
bandwidth requirements for a single video stream.
Note: As an example, a user will consume approximately 37.5 KBps in bandwidth
operating at 1024x768 and 50 KBps operating at 1280x1024.
In other words, as per Table 3 at 1024x768 with 5 users: 5 times 37.5 = 188 KBps.
Table 3: Web Collaboration (Estimated) Bandwidth Requirements
Bandwidth (KBps)
Users
Viewer (1280x1024) 1
Viewer (1024x768)
2
75
100
5
188
250
10
375
500
938
1250
25
1. Typical meeting description running Microsoft® PowerPoint® presentation at a Viewpoint resolution of
1280x1024 (16-bit color resolution) with medium graphics changing slides every 6 seconds.
13
Configuration and Maintenance Manual
Table 4 shows the maximum and peak bandwidth capacity for a single video stream. One
two-party video involves four streams; from each participant to the server and from the server
to each participant. A 200-party conference with only the host broadcasting video involves 200
streams; one from the host to the server and 199 from the server to each participant's computer.
Table 4: Video Bandwidth Guide (single stream)
Raw Image Size
352 x 288
640 x 360
640 x 480
800 x 450
800 x 600
1280 x 720
1280 x 1024
Image Quality Setting
Maximum Bandwidth
(KBps)
Good
96
Better
128
Best
256
Good
128
Better
256
Best
384
Good
128
Better
256
Best
384
Good
448
Better
896
Best
1792
Good
512
Better
1024
Best
2048
Good
1024
Better
2048
Best
4096
Good
1536
Better
3072
Best
6144
Peak Bandwidth
(KBps)
768
10000
10000
14000
14000
14000
20000
Audio and Web Conference
Audio and Web conference requirements are based on that of an audio-only and Web-only
conference. That is, bandwidth is a significant factor for performance during a Web conference,
and MCA server resources (CPU and memory) used are relatively minimal. Whereas, an audio
conference requires more MCA server resources and has relatively minimal impact to
bandwidth. Capacities of an audio and Web conference are the same as that defined previously
in this section for the conference type.
14
VMware View
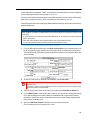
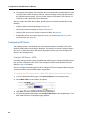
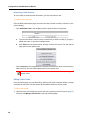
Firewall and DNS Server Configuration
MCA can operate on MAS configured either behind a firewall in LAN mode (server-only), see
the figure below, or in Network Edge mode (server-gateway), see page 16, where the MAS
server provides the firewall. Refer to the Mitel Applications Suite Installation and Administration
Guide for information about MAS network deployments. The firewall or MAS Network Edge
configuration must provide Network Address Translation (NAT) for external connections to MCA
and for external clients and Web browsers to connect.
In addition, NAT connections (originated by the MAS server) to an external Domain Name
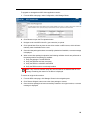
System (DNS) server must be provided. Table 5 provides firewall port setting information when
configuring MCA on MAS. Refer to the Mitel Applications Suite Engineering Guidelines for
additional information about MAS configuration requirements.
Consider the following when configuring MCA.
•
MCA must be behind a firewall or router that allows port mapping.
•
You must have two external IP addresses available for MCA.
•
Have two domain names (or subdomains) available when using address translation.
•
External IP address 1 must be routed to Internal IP address 1.
•
External IP address 2, port 443 (default) must be routed to Internal IP address 1 port
4443 (default).
Note: Ports 443 and 4443 are the default values in MCA. These ports values are what
you enter when configuring Web conference settings, see page 34.
In the following examples, the firewall does not rewrite the source address. The DNS is split.
Everyone uses the external name. Inside the firewall, it resolves to the internal address. Outside
the firewall, it resolves to the external address. To configure this, set the Web server name to
the external name. The customer can upload a certificate/key pair to the User Provisioning
Gateway (UPG).
Figure 1: MCA on MAS (LAN Mode)
15
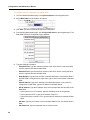
Configuration and Maintenance Manual
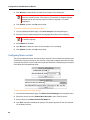
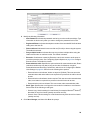
Note: If MAS is configured in LAN mode with a Mitel Multi-protocol Border Gateway
(MBG) Web Proxy, refer to the MAS Installation and Maintenance Guide and Mitel
Border Gateway Guide with Web Proxy 2.0 Guide, located on the Mitel Web site
(http://edocs.mitel.com), for configuration information.
Figure 2: MCA on MAS (Network Edge)
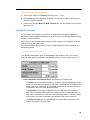
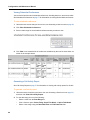
Table 5: Firewall Port Settings
Port Range
Direction
Purpose and Details
TCP 22 (SSH)
Server → Internet
TCP 80 (HTTP)
Server ← Internet (IP address 1) and Allows inbound packets and replies on TCP
Server ← LAN
port 80. Used for MC A Web pages.
TCP 443 (HTTPS)
Server ← Internet (IP address 1) and Remote server management and Web pages of
Server ← LAN
MCA when set for SSL mode. If MCA is not set
to SSL mode, Mitel recommends that you close
this port or limit it to specific hosts that have
remote management capability.
TCP 4443
Server ← LAN
Allows outbound packets and replies from
internal users and port 4443. Used between
internal users for Web conferencing
Server ← Internet (IP address 2)
Allows outbound packets and replies from
external users on port 443 and redirects them to
port 4443 on the server. Used between external
users for Web conferencing.
Allows outbound packets and replies on TCP
port 22 between MAS and the Internet. Used to
enable server registration, software and license
key downloads, alerts, and reporting.
(Sheet 1 of 2)
16
VMware View
Table 5: Firewall Port Settings (continued)
Port Range
Direction
Purpose and Details
UDP 5060
UDP 6060
SIP phone ← → MCD
Mitel 5000 and
Inter-Tel Axxess
By default for UDP connections, the MCD
listens on port 5060 and the Mitel 5000 and
Inter-Tel Axxess listens on port 6060. MCA SIP
phones are configured to use the same port.
Refer to the communication platform
documentation for configuring this port.
UDP 20000–20998
(SRTP)
SIP phone ← → MCD
MCD SIP phone default port range.
(Sheet 2 of 2)
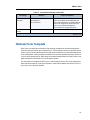
Outlook Form Template
MCA users can associate conferences with meetings scheduled in their Microsoft Outlook
calendar using the Outlook form template (OFT). This template is located on the MAS server
(https://<server name>/awc/Enterprise.oft) and can be installed on an e-mail Exchange server
by an administrator, making it readily accessible for those users with MCA accounts. If the form
is not on the Exchange server, MCA users can install and publish the form locally. Refer to the
Mitel Collaboration Advanced User online Help for details.
For information on installing the OFT on an e-mail Exchange server, refer to the appropriate
Microsoft documentation. It may be necessary to make this the default form before it can be
seen in the user’s Outlook calendar.
17
Configuration and Maintenance Manual
IAWC Migration
This release of MCA allows you to maintain your existing Inter-Tel Audio and Web Conferencing
(IAWC) data and upgrade to the latest version of MCA on MAS. If qualified, the existing IAWC
server hardware can be reused and upgraded to run the latest MCA software. In this section,
an overview of the IAWC to MCA migration process is provided.
Note: The IAWC server must be running the latest software version (v3.0.46) before
the existing data can be migrated to MCA.
Manually Backup IAWC Data
Note: Install the IAWC migration software (v3.0.b45), available at Mitel OnLine
(https://www.ebiz.mitel.com) in Software Downloads, prior to performing a backup to
ensure IAWC data is migrated properly. For details, refer to the release notes included
with the IAWC migration software.
Use the IAWC administrator interface to backup the legacy IAWC system data. For details on
performing a backup, refer to the Inter-Tel Audio and Web Conferencing Installation and
Programming Manual (part number 835.2726). From the Manual Server Backup page, you can
select the data that you want to restore for the upgrade to MCA. The following options are
available:
•
User/call database: Selected by default. This data includes user information, such as
accounts and scheduled conferences. The user/call database must be backed up or the
IAWC migration restore will fail.
•
SSL Certificate: Selected by default. If an SSL Certificate is included in the manual backup,
the information is saved but not restored during the IAWC migration. For information about
restoring SSL Certificates on MAS, refer to the Mitel Applications Suite Installation and
Maintenance Guide.
•
Documents: This data includes recordings and uploaded documents from active and expired conferences.
•
Configuration files: This data includes system settings, such as Web conferencing settings, port reservations, and LDAP configuration.
•
Custom branding: This data is not included in the IAWC backup file (see NOTE below).
Note: Custom logos, prompts, and music-on-hold recordings are not included when
you back up the IAWC data. You must manually save these files to restore them after
the migration to MCA is complete.
The IAWC manual backup will create a .tgz file on the IAWC server, and then allow you to select
a location to save the data. Save the data to a location other than on the IAWC server, so it will
be easy to retrieve and restore to MCA.
Changing to MCA Licenses
Licensing is different after migrating from IAWC to MCA. The HASP key is not used with MCA
and the old license file is not restored during the data migration. The license for MAS is created
18
VMware View
on the Application Management Center (AMC) and should include MCA with the appropriate
number of audio and Web ports. For details about MAS licensing, refer to the Mitel Applications
Suite Installation and Maintenance Guide.
MAS Installation and Configuration
Refer to the Mitel Applications Suite (MAS) documentation for installing and configuring MAS
with MCA. The MAS Installation and Configuration Manual and MAS Engineering Guidelines
are available on the Mitel Web site (http://edocs.mitel.com).
After the IAWC data is saved and the MAS server is configured, you can restore the data to
the upgraded MCA product, see Migrating IAWC Data on page 49.
19
Configuration and Maintenance Manual
20
CHAPTER 2
CONFIGURATION
Configuration and Maintenance Manual
22
Introduction
This chapter describes the initial set up and configuration of the communications system
platform you are using with MCA. For detailed procedures and information about the
communication platform, refer to the applicable system documentation.
Refer to the Mitel Applications Suite Installation and Maintenance Guide on the Mitel eDocs
Web site (http://edocs.mitel.com/default.htm) for the following information:
•
Installing MCA on MAS
•
Upgrading MCA
•
Backing up MCA data
•
Restoring MCA data
NOTICE
To migrate existing data from an Inter-Tel Audio and Web Conferencing (IAWC) server to Mitel
Collaboration Advanced (MCA) on a MAS server, see IAWC Migration on page 18 and Migrating
IAWC Data on page 49 for more information.
23
Configuration and Maintenance Manual
Configure the Mitel Communications Director (MCD)
When the system platform you are using is the Mitel Communications Director (MCD), configure
it first before you enter the SIP Server Configuration information in MCA. This allows the MCD
to communicate and operate with the MCA product installed on the MAS server.
Configure the MCD as follows:
•
Configure SIP Device Capabilities, below
•
Configure Extended Hunt Groups on page 24
•
Configure Class of Service (COS) on page 24
•
Create IP Devices on page 25
•
Create a Hunt Group on page 25
Configure SIP Device Capabilities
MCA is configured as a SIP extension on the MCD and allows the two to communicate. If the
SIP Session Timer times-out before the system establishes a session with MCA, the session
is torn down and the call does not complete. Configure the SIP device to prevent a scenario
where attendees may be inadvertently dropped when an outgoing call is place during a
conference.
Configure SIP Device Capabilities and set the following:
•
Replace System based with Device based In-Call Features: Set to Yes.
•
Session Timer: Set value to 0.
•
SDP Options/Allow Device To Use Multiple Active M-lines: Set to Yes
Configure Extended Hunt Groups
It is only necessary to configure Extended Hunt Groups when more than 65 MCA User Licenses
are purchased. Configure the MCD for Extended Hunt Groups to allow you to program a hunt
group with more than 64 members.
Note: When selecting Extended Hunt Groups, the Hunt Group capacity of the system
changes from 176 hunt groups with a maximum of 64 members each, to 16 hunt groups
with a maximum of 240 members each. Although you can program more, only one
240-member hunt group is recommended per system.
Configure License and Option Selection, and then set Extended Hunt Group to Yes.
Configure Class of Service (COS)
Create a new COS for MCA SIP ports by modifying the default COS configuration. This COS
is assigned to the hunt group you create for MCA, see Create a Hunt Group on page 25.
24
Configure Class of Service Options/Assignment for COS you will use for MCA ports, and then
set Suppress Simulated CCM after ISDN Progress to Yes.
Create IP Devices
Create IP devices on the system for conferencing extensions on MCA.
Add a new device and configure the Multiline IP Set Configuration. Complete the following
information for the multiline IP set range:
•
Enter the number of records to add: The number of IP devices that you are creating.
Typically, the value entered equals the number of MCA User Licenses purchased.
•
Device Type: Select Generic SIP Phone from the list.
•
Number: Type the starting extension number. If the extension numbers are consecutive
(recommended) increment by 1.
•
Interconnect Number: Type 1.
Create a Hunt Group
Program a hunt group for dialing into a conference using the IP devices you created.
Configure the Hunt Group Assignment. Complete the following information for the hunt group
range:
•
Enter the number of records to add: Type 1 (typical) for the number of hunt groups you
are creating.
•
Hunt Group: Type an extension number for the hunt group.
•
Class of Service Day: Type the number of the COS you created earlier, see Configure
Class of Service (COS) on page 24. Default is 1.
•
Class of Service – Night1: Type the number entered for Class of Service Day. Default is 1.
•
Class of Service – Night2: Type the number entered for Class of Service Day. Default is 1.
•
Hunt Group Priority: Leave as the default value, which is 64.
•
Hunt Group Type: Select Voice from the list.
Add a member to the Hunt Group Assignment, and then complete the following information for
the hunt group member range:
•
Enter the number of records to add: This is the number of IP devices that you added
previously, see Create IP Devices on page 25.
•
Number: Type the starting extension number. If the extension numbers are consecutive
(recommended), increment by 1.
25
Configuration and Maintenance Manual
Configure the Mitel 5000 CP
When the system platform you are using is the Mitel 5000 Communications Platform (CP),
configure it first before you enter the Server Configuration information in MCA. Configure
extensions in the Mitel 5000 Database Programming as 86xx ports, and then set the
communication link to allow the system to communicate and operate with the MCA product
installed on the MAS server. For additional Database Programming information, refer to the
Mitel 5000 CP Features and Programming Guide, part number 580.8006.
Configure the Mitel 5000 as follows:
•
Create IP Devices for 86xx Ports, below
•
Configure Phone Settings, below
•
Create a Hunt Group, below
•
Enable OAI Connection on page 27
Create IP Devices for 86xx Ports
Create IP devices (phones) on the Mitel 5000 to allow communication between the system and
MCA. These IP devices are configured as 86xx conference ports.
Create IP devices and configure them as follows:
•
Type the starting extension number, and then choose the number of devices to create. The
number of devices you create is equal to the number of MCA ports licensed.
•
For each extension, set the MAC address to FF:FF:FF:FX:XX:XX, FF:FF:FF:FF:XX:XX, or
FF:FF:FF:FF:FX:XX where X represents the digits of the extension number.
Configure Phone Settings
After the IP devices are created for the conferencing extensions, the settings for each device
(phone) must be configured on the Mitel 5000. Create a call configuration for the MCA devices,
and then configure the settings.
Create a new call configuration for the conference extensions (see Create IP Devices for 86xx
Ports on page 26), and then set DTMF Encoding Setting to RFC 2833. For an installation in
the United Kingdom (UK), set Speech Encoding Setting to G 7.11 Mu-Law.
Configure the phone settings (Flags) as follows for each of the conference extensions you
created:
26
•
Handsfree On/Off: set to No.
•
Ring Intercom Always On/Off: Set to Yes.
•
Headset On/Off. Set to Yes
•
Transfer to Connect Allowed. Set to Yes.
Create a Hunt Group
After the IP devices are created and configured to communicate with MCA, you need to create
a hunt group and add the IP phone extensions to it. The hunt group extension is the number
you enter for the dial-in number in System Options (see page 38).
Create a hunt group, and then add members. The members of this hunt group are the extensions
you created previously for the conference extensions; see Create IP Devices for 86xx Ports on
page 26. Do the following:
•
Create a hunt group extension number. Leave the Number of Extensions as 1 (default).
•
Type a description for the extension, for example, MCA1. Descriptions can contain up to
20 characters and hunt group user names can contain up to 10 characters. Do not use
slash (/), backslash (\), vertical slash ( | ), or tilde (~) characters in user names. Do not use
Control characters in descriptions or user names.
Enable OAI Connection
The Mitel 5000 and MCA communicate using Open Architecture Interface (OAI). You must set
the OAI connection in Database Programming to allow the systems to communicate. Under
Sockets, set System OAI Level 2 to Yes.
27
Configuration and Maintenance Manual
Configure the Inter-Tel Axxess System Platform
If the system platform you are using is the Inter-Tel Axxess system (v11.0 or later), configure
it first before entering the Server Configuration information in MCA. Configure extensions in
the Inter-Tel Axxess Database Programming as IPRC ports, and then set the communication
link to allow the system to communicate and operate with the MCA product installed on the
MAS server. For additional Database Programming information, refer to the latest Inter-Tel
Axxess Installation and Maintenance Manual, part number 580.8000.
Configure the Inter-Tel Axxess as follows:
•
Add IPRC and Create IP Devices, below
•
Configure IP Station Settings, below
•
Create a Hunt Group on page 28
•
Enable OAI Connection on page 29
Add IPRC and Create IP Devices
Add an Internet Protocol Resource Card (IPRC), and then create IP devices (phones) on the
Inter-Tel Axxess to allow communication between the system and MCA. These IP phones are
configured as the SIP conference ports.
After you add the IPRC, create IP phones associated with it. For each device you create, change
the MAC address to FF:FF:FF:FX:XX:XX where X:XX:XX represents the extension number.
Configure IP Station Settings
After the IP devices are created for the conferencing extensions, the settings for each device
(IP phone) must be configured on the Inter-Tel Axxess system. Create a call configuration for
the MCA IP devices, and then configure the IP device settings.
Create a new call configuration for the conference extensions (see Add IPRC and Create IP
Devices on page 28), and then set DTMF Encoding Setting to RFC 2833.
Configure the phone settings (Flags) as follows for each of the conference extensions you
created:
•
Handsfree On/Off: set to No.
•
Ring Intercom Always On/Off: Set to Yes.
Create a Hunt Group
After the IP devices are created and configured to communicate with MCA, you need to create
a hunt group and add the IP phone extensions to it. The hunt group extension is the number
you enter for the dial-in number in System Options (see page 38).
28
Create a hunt group, and then add members. The members of this hunt group are the extensions
you created previously for the conference extensions; see Add IPRC and Create IP Devices
on page 28. Do the following:
•
Create a hunt group extension number. Leave the Number of Extensions as 1 (default).
•
Type a description for the extension, for example, MCA1. Descriptions can contain up to
20 characters and hunt group user names can contain up to 10 characters. Do not use
slash (/), backslash (\), vertical slash ( | ), or tilde (~) characters in user names. Do not use
Control characters in descriptions or user names.
Enable OAI Connection
The Mitel 5000 and MCA communicate using Open Architecture Interface (OAI). You must set
the OAI connection in Database Programming to allow the systems to communicate. Under
Sockets, set System OAI Level 2 to Yes.
29
Configuration and Maintenance Manual
30
CHAPTER 3
PROGRAMMING
Configuration and Maintenance Manual
Chapter 3:
32
Introduction
This chapter describes the initial set up and configuration of Mitel Collaboration Advanced
(MCA). After the communications platform is configured, the initial configuration of MCA and
any future changes (for example, adding a user) are done through the Mitel Applications Suite
(MAS) Server Manager – Mitel Collaboration Advanced Web interface. Only the Mitel
Collaboration Advanced portion of the interface is described in this chapter. For information
about the MAS Server Manager, refer to the Mitel Applications Suite Installation and
Maintenance Manual.
Admin Web Client Login and Initial Configuration
After you complete the setup of the communications system platform, configure Mitel
Collaboration Advanced through the MAS Server Manager.
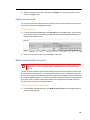
To log on and configure MCA settings:
1.
Open a Web browser, and then type the URL or IP address where the MAS server is
located. For example, https://<hostname> or https://<xxx.xxx.xxx.xxx>.
2.
Click Yes at the security prompt.
3.
Type admin (default) for Username, and then type the password that you created when
Mitel Standard Linux (MSL) was installed on the MAS server.
4.
Click Login to display the MAS Server Manager main page.
5.
Select Mitel Collaboration Advanced in the navigation pane to open the MCA Management Console Welcome page.
After you are in the MCA administrator interface, you can access all the MCA administrator
pages from the navigation pane.
For initial set up, program the following sections before you configure the rest of MCA:
•
Configuring Web Conferencing Settings on page 34
•
Configuring System Options on page 36
•
Configuring SIP Server on page 50
33
Configuration and Maintenance Manual
After completing these areas, set up the remainder of the MCA configuration in any order you
choose.
The programming information provided in this chapter is presented in the same order (top to
bottom) as displayed in the MCA Administrator interface navigation bar.
Stopping and Starting the MCA Server
As an MCA administrator, you can stop and start all the MCA services without having to reboot
the entire MAS server.
Note: Restart MCA only if you are experiencing a problem. Stopping MCA will
end all conferences in progress.
To start and stop the MCA server:
1.
From the MCA administrator page, click Start/Stop MCA on the navigation pane.
2.
Do one of the following:
•
Click Start All. All MCA services are started.
•
Click Stop All. All MCA services are stopped.
A list of services and their status appears.
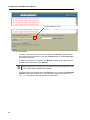
Configuring Web Conferencing Settings
This section describes the Web conferencing settings configuration that is used to connect to
a Web conference. See Firewall and DNS Server Configuration on page 15 for information
about Web conferencing settings.
To configure Web Conferencing options:
34
1.
From the MCA administrator page, click Web Conferencing Settings in the navigation
pane.
2.
Edit or view the following:
3.
•
Internal Port: The port to which internal (local network) attendees connect for Web
conferencing. The local network must allow access to this port for internal users.
•
External Port: The port to which external attendees connect when joining a Web conference. Port 443 (default) is recommended because it is a common port open on
firewalls.
•
Web Conferencing Name: The additional hostname designated for the Web conferencing server. The hostname must resolve to a public IP address that is externally
accessible. The internal DNS must resolve the hostname to the local IP address of
MCA. For more information, see the example in Figure on page 16.
•
Domain Name: Configured on the MAS server; the Domain Name cannot be edited
through the MCA interface. This is the URL or IP address for users to access the Web
page of the MCA interface. The name must be accessible to everyone who will be
invited to attend a Web conference, both inside and outside of your local network.
Click Save, and then click Ok at the prompt.
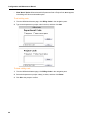
Configuring Port Reservation Settings
This section describes the configuration of port reservations. The Port Reservations feature
allows the MCA administrator to monitor and manage port usage for conferences.
The Port Reservations Report (see page 79) provides conference related information on MCA
for the date and time range selected when Port Reservation Settings are configured.
To configure port reservation settings:
1.
From the MCA administrator page, click Port Reservation Settings in the navigation pane.
2.
Select or deselect the following options:
•
Enable Port Reservations: When you select the Enable Port Reservations option, the
MCA server tracks how many audio and Web conferencing ports are scheduled for
use at any given date and time.
Note the following for the Enable Port Reservations option:
• When you select Enable Port Reservations:
- All prior scheduled conferences are set to 0 (zero) ports available. All currently
scheduled conferences must be modified to reserve conference ports.
- Mitel recommends that you select “Reservationless Calls Not Allowed” under
Default User Settings (see page 66) to preserve ports on the server for one-time
and recurring conferences.
35
Configuration and Maintenance Manual
- The “To listen to this recording using your telephone” area on the Recording
page is hidden and is not available to the user. This prevents ports from being
used that may conflict with ports reserved for scheduled conferences.
• When you do not select Enable Port Reservations, the “Conference Size” field on
the One-time, Recurring, and Reservationless Conference Web pages is hidden.
The conference size is not relevant when the server does not track port resources.
Note: To preserve ports on the server for one-time and recurring conferences, Mitel
recommends that you do the following when you select Enable Port Reservations:
• Make sure the Allow user to schedule conference if conflict occurs option
is not selected (see page 36).
• Select Reservationless Calls Not Allowed for the Reservationless Calls
option under Default User Settings (see page 66).
3.
•
Allow user to schedule conference if conflict occurs: If the “Enable Port Reservations” is selected, selecting the “Allow user to schedule conference if conflict occurs”
option allows users to schedule a meeting even if the total number of attendees exceeds
the number of licensed ports available. When the number of ports is exceeded, the
user is prompted that not all attendees for the meeting may get in the conference if
they choose to schedule it for that specific date and time. However, the user will still
be allowed to schedule the conference.
•
E-mail administrator on scheduling conflicts: If the “Allow user to schedule conference if conflict occurs” option is selected, selecting the “E-mail administrator on
scheduling conflict” option provides the MCA administrator with an e-mail message
any time a user chooses to schedule a conference after they are warned about potential
port licensing conflicts.
Click Save, and then click Ok at the prompt.
Configuring System Options
This section describes the settings for system options on MCA.
To configure system options:
36
1.
From the MCA administrator page, click System Options in the navigation pane. The
System Options page appears.
2.
Configure the system options using the information provided in Table 6 on page 37.
3.
Click Save, and then click Ok.
Table 6: System Options Settings
Option
Description
Dial-In Phone Number 1
Type the first telephone number assigned to MCA that users dial to join
conferences. This is typically a Direct Inward Dialing (DID) telephone
number, but it can be any number used to dial into a conference. This
value is included in the "Dial-In numbers" section of the Meeting Details
displayed by the Mitel Advanced Collaboration Clients and included in the
default contents of the Conference invitation.
Dial-In Phone Number 1 Label
Type the label associated with the first telephone number. This label is
included in the "Dial-In numbers" section of the Meeting Details displayed
by the Mitel Advanced Collaboration Clients.
Dial-In Phone Number 2
Type the second telephone number assigned to MCA that users dial to
join conferences. This is typically a toll-free telephone number, but it can
be any number used to dial into a conference. This value is included in the
"Dial-In numbers" section of the Meeting Details displayed by the Mitel
Advanced Collaboration Clients and included in the default contents of the
Conference invitation
Dial-In Phone Number 2 Label
Type the label associated with the second telephone number. This label
is included in the "Dial-In numbers" section of the Meeting Details
displayed by the Mitel Advanced Collaboration Clients.
(Sheet 1 of 4)
37
Configuration and Maintenance Manual
Table 6: System Options Settings (continued)
Option
Description
Dial-In Phone Number 3
Type the third telephone number assigned to MCA that users dial to join
conferences. This is typically an extension or hunt group number, but it
can be any number used to dial into a conference. This value is included
in the "Dial-In numbers" section of the Meeting Details displayed by the
Mitel Advanced Collaboration Clients and included in the default contents
of the Conference invitation
Dial-In Phone Number 3 Label
Type the label associated with the third telephone number. This label is
included in the "Dial-In numbers" section of the Meeting Details displayed
by the Mitel Advanced Collaboration Clients.
International Dialing Prefix
Type the digits used before dialing international calls (for example, 011).
This is based on the site where the MCA server is located.
National Dialing Prefix
Type the digit(s) required to make domestic toll calls.
Country Code
Type the country code of the location where MCA is located. The default
is 1 (for United States).
Webserver Admin Email
Type the e-mail address of the system administrator. Web server alerts
are sent to this address.
Outgoing Prefix
Type the number used by the communications platform (switch) to seize
a CO trunk for outgoing calls. This prefix is pre-pended to the digits when
the number dialed by a user is greater than the Max Extension Length.
When Enable DAS Rules is set this setting is not applicable.
Max Extension Length
Type the maximum number of digits MCA should use to determine an
extension. If the number dialed is more than the maximum length, MCA
sees it is an external call and appends it to the Outgoing Prefix.
When Enable DAS Rules is set this setting is not applicable.
Enable DAS Rules
Set this option if DAS rules apply to MCA; the DAS Rules option shows in
the navigation pane. The normal default for this option is cleared, but set
for an IAWC to MCA migration. See Configuring Dial Access String (DAS)
Rules on page 47.
Active Speaker Indication
Set this option to allow the audio conference leader to view the current
speaker in the conference. When set in System Options, the leader can
set or clear this feature for each audio conference. The default for this
option is set.
Default Caller ID
Type the caller ID that is provided by MCA to the Public Switched
Telephone Network (PSTN) on outgoing calls.
Always use Default Caller ID
Set this option to always use the default caller ID option above for all
outbound calls. Otherwise, the Caller ID of the first party in a call will be
used (if available), or each party will see the other’s Caller ID.
General Alarm Email
Type the e-mail address of the person who gets notified of general alarms
(typically the system administrator).
General Alert Email
Type the e-mail address of the person who gets notified of general alerts
(typically the system administrator).
Port Usage Notification Threshold
Type the number of concurrent ports being used on MCA, so that when
this value is reached, an alert e-mail is sent to the e-mail address specified
in the Alert Email box when the threshold is reached.
(Sheet 2 of 4)
38
Table 6: System Options Settings (continued)
Option
Executive Ports
Description
Type the number of audio ports on the system you want to reserve for the
exclusive use of conferences created by executive users. If the number of
Executive Ports is non-zero, when someone joins a conference created by
a non-executive user, the number of ports available is decreased by the
number of Executive Ports. See Editing a User Profile on page 58 for
information on how to configure a user to be an executive user.
Note: Executive port settings are disregarded when Port Reservations is
selected.
Prompts Language
Select from the list the language that is used for the audio voice prompts.
Custom Language 1 and Custom Language 2 are used for selecting a
language other than those provided in the prompts list. For additional
information, see Configuring Voice Prompts on page 42.
Conference URLs
Select whether conference URLs will be protected (encrypted) by SSL
(https) or not protected (http). If you select https, be sure that port 443 is
open on any firewall placed between MCA and the Internet.
Document Timeout
Type the length of time that documents uploaded to the MCA will remain
after a conference has expired. MCA periodically deletes documents that
remain past this time-out period.
User Login Timeout
Type the period of time of user inactivity before a browser session with
MCA is automatically terminated. Because a session may remain open
during a conference, and because that session may be used for call
control at some point well after that call has started, this should be set long
enough so that users will not be logged out during a conference. It should
be set short enough so that an open session does not constitute a
potential security issue. The default is 8 hours.
Custom Access Codes Allowed
Select this option to enable custom access codes to be created when
setting up conferences.
Minimum IVR Access Code Length Cannot be changed from the default value of 7. Reserved for future use.
Use HTTPS Only
Select this option to force a secure connection for users that access the
conference. This setting overrides the Conference URLs setting.
Note: You must set Use HTTPS Only for MCA hyperlinks to work when
MAS is configured in LAN mode (see Figure on page 16) with a Mitel
Multi-protocol Border Gateway (MBG) Web Proxy. For more information
about the MBG Web Proxy, refer to the MAS documentation located on
the Mitel Web site (http://edocs.mitel.com).
Platform
Select the communication system being used with this installation of Mitel
Collaboration Advanced.
Dial 1 to join outbound calls
When selected, a user added to the conference call is prompted by the
system to press 1 to join the conference. The user must respond correctly
within the specified time or the system drops the outgoing call attempt.
(Sheet 3 of 4)
39
Configuration and Maintenance Manual
Table 6: System Options Settings (continued)
Option
G.729 Port Limit
Description
Audio Compression port limit valid values are 0-100 (default is 100).
Uncompressed audio ports will be used once the maximum has been
reached. A value of 0 indicates G.729 audio compression ports are
disabled.
Note: 2-way Client Audio feature introduced in MCA 5.0 will only use
G.711 voice encoding ports (it will not use G.729 ports).
Prompt for Access Code First
When selected the Access Code will be required before the Personal ID
can be entered when accessing the Audio portion of the conference.
Email Admin informing when the
MCA disk space utilized reaches
% of XX GB
This option allows the administrator to be notified by email when the MCA
server disk space reaches xx% utilization. This option is checked
(enabled) by default with a value of 80%. The administrator also has the
option of disabling this option.
Note: The disk space allocated to the MCA conference recordings and
documents is 40% of the total available disk space on the MAS/MCA
server. The 40% of the entire disk space is determined when the page
loads.
For example on a system with 100GB disk space, the option will read
"Email Admin informing when the MCA disk space utilized reaches
_________ % of the 40GB allotted to recordings and documents".
Prompt to extend conference <x>
minutes prior to its end time
When selected, the End of Conference Prompting (EOCP) minutes box
becomes active. The value selected in this box determines the number of
minutes prior to the end of a conference that the user receives a prompt
the conference will terminate.
Enable HD Resolutions
OFF by default. Clients will not be presented with the ability to select HD
resolutions.
ON: This will enable HD resolutions for all clients in all conferences. Client
PC profiling will still occur, however this must be enabled before any client
can select HD resolution.
(Sheet 4 of 4)
Configuring LDAP Authentication and Auto-Provisioning
When a user attempts to log on to MCA, a Lightweight Directory Access Protocol (LDAP) query
authenticates the user logon credentials. Rather than querying its own internal database to
verify if the user name and password are authorized, an LDAP query is launched against the
corporate directory. If the response indicates the username/password combination is legitimate,
the user can access MCA for scheduling and placing calls. In this scenario, the user’s password
is not stored on MCA and you do not need to administer the user database on MCA, except
to change some enhanced service features for users.
MCA also uses the LDAP query process to set auto provisioning. If the LDAP query indicates
the user name/password combination is legitimate, but the user name does not match any
existing user name on MCA, a new account is automatically established for that user. The user
is set up with the default level of authorization to use the system’s special features and is able
40
to start using MCA immediately. These user defaults are set when MCA is initially configured
(see Configuring the Default User Settings on page 66).
If a user requires authorizations that differ from the MCA defaults, you can use the administrator
Web client to change that user’s profile. See Editing a User Profile on page 58.
The following procedure is for configuring LDAP with Active Directory, which is the most common
LDAP authentication.
NOTICE
To use LDAP authentication with Active Directory, you must have Active Directory set up prior to
configuring MCA. Contact the site administrator to view the Active Directory configuration, and then verify
the following.
• An Active Directory user exists that is used as the LDAP Admin ID. The user does not need any special
rights or permissions.
• Users with name, password, and e-mail information exist as Active Directory users.
• You can ping the MCA server by hostname from the Active Directory server.
To configure LDAP authentication with Active Directory:
1.
From the MCA administrator page, click LDAP Configuration in the navigation pane. The
LDAP Configuration page appears as does sample values for LDAP server parameters.
The following LDAP Configuration page illustrates an example of user authentication with
Active Directory.
2.
To use an LDAP server to store the user database, select Use LDAP.
When Use LDAP is set, Add User and Bulk Provision Users are not available in the MCA
navigation pane.
If this option is cleared, the user database is stored on the MCA server and the settings on this
page have no affect on authentication.
3.
Type the server name where Active Directory resides in the LDAP Server Name box.
4.
Leave LDAP Port No. at the default (389). However, you may need to change this setting
to the global catalog port number (3268) for installations with a large Active Directory
database or if there is a need to authenticate users from multiple/nested organizational
units (OU) or containers (CN).
5.
Type the LDAP Search Base information in the box using the format:
CN=<userdirectory>,DC=<domain>,DC=<com>.
41
Configuration and Maintenance Manual
6.
•
Entered text must be lower case except for DC, OU, CN, which must be upper case.
Using upper case letters for anything else may cause the LDAP integration to fail.
•
If not using the standard Users folder, use OU instead of CN for the folder names.
•
If OUs are in sub-folders, list them in reverse order separated by commas.
•
If authenticating users from multiple/nested OUs or CNs, LDAP Search Base must be
a folder that is a parent of all OUs or CNs in which users exist. For example, specify
the top domain level as LDAP Search Base: DC=<domain>,DC=<com>.
Type the LDAP Admin ID information in the box using the format:
CN=<active directory admin ID>,CN=<userdirectory>,DC=<domain>,DC=<com>.
•
Entered text must be lower case except for DC, OU, CN, which must be upper case.
Using upper case letters for anything else may cause the LDAP integration to fail.
•
If not using the standard Users folder, use OU rather than CN for the folder names.
•
If OUs are in sub-folders, list them in reverse order separated by commas.
•
When entering the information, the first entry for CN must be the CN name of the user
account that is the admin ID, not the username or the display name. The username,
display name, and CN names are typically the same however, it is possible that they
could be different.
7.
Type the active directory admin's password in the LDAP Admin ID Password box.
8.
Type sAMAccountName in the LDAP UID box.
9.
Type the e-mail domain as <yourdomain.com> in the Email domain box.
10. Select Auto synchronize and leave Sync interval at 5 (minutes).
11. Click Submit, and then click Ok at the prompt.
To verify LDAP authentication is functioning:
1.
Log on using the username (not the e-mail address) of a user listed in the Active Directory,
along with their Active Directory password. The MCA server checks the Active Directory
for authentication and allows the user to log on.
NOTICE
The name and password are sent as plain text and present a possible security risk.
2.
After the user has logged on, they are automatically added to a list of users that can be
viewed and administered through the MCA admin Web client using Adding User Accounts
on page 56.
Configuring Voice Prompts
MCA includes the voice prompts that are played for audio conferences. The audio prompts are
available in multiple languages and the default prompt language is determined by the
Application Suite Language set on the MAS server. The Voice Prompt page allows you to upload
custom voice prompts and substitute them for selected prompts or upload an entire set of
custom language prompts, which are played instead of the existing prompts. The individual file
names are listed and include a brief description of the voice prompt to help you identify the file
42
to change. For a complete list of audio prompts (United States English only), see Voice Prompts
on page 93.
Recording Custom Prompts
Recording prompts is not a feature of MCA and must be done externally, then saved in the
proper format. Prompts are stored in 8 KHz, 8-bit or 16-bit, mono, mu-law, .wav format. In
network environments where A-law encoding is used, the internal prompts are stored in mu-law
format.
The file name of a custom prompt recording must match the existing file it is replacing. If a file
name does not match, the file is ignored and the default prompt (and language) is used. For
example, the “Welcome” prompt file name is 01.wav, therefore, the file replacing it must be
named 01.wav.
Note: If the custom prompt you are recording contains a beep tone, you must include
the tone when recording the prompt.
Uploading Custom Prompts
When replacing multiple prompts you can save all of them to a .zip file that you can upload to
MCA as a batch file. When selected, the batch mode process unzips the file, and then replaces
the corresponding prompt files for the language selected. However, if any file is not named
correctly, the same as the file it is replacing, it is ignored during the upload and the existing
prompt is played. Mitel recommends that you verify the file names before uploading them to
MCA. To view a list of the prompt names, see Voice Prompts on page 93.
Save the file locally, and then upload it to MCA as Custom Language 1 or Custom Language
2. To play these prompts for audio conferences they must be selected in System Options, see
Prompts Language on page 39, after they are uploaded to MCA.
Note: After uploading custom prompts, you must restart MCA before new prompts are
played for a conference.
To upload a custom voice prompt file:
1.
From the MCA administrator page, click Voice Prompts in the navigation pane.
2.
Select a language from the Prompts Language list.
3.
Select File for the Mode.
4.
Select from the Voice Prompt File list the prompt that you want to change.
43
Configuration and Maintenance Manual
5.
Click Browse to locate the file you want to use in place of the existing file.
Note: If necessary, click Revert This Prompt to Default to return to the default
file for the selected prompt. This feature is only available for English language
prompts and will not restore prompts for Custom Language 1 or Custom
Language 2.
6.
Click Upload, and then click Ok at the prompt.
To upload custom voice prompt batch files:
1.
From the MCA administrator page, click Voice Prompts in the navigation pane.
2.
Select from the Prompts Language list the language (files) that you are replacing.
Note: Typically, Custom Language 1 (or 2) is selected when replacing all prompts
for another language.
3.
Select Batch for the Mode.
4.
Click Browse to locate the .zip file for the prompts you are uploading.
5.
Click Upload, and then click Ok at the prompt.
Configuring Music-on-Hold
The product ships with several .wav files for Music-On-Hold. You can determine whether music
is heard when users are placed on hold, and if so, what music is played. Music-On-Hold files
are stored as an 8 KHz, 8-bit, monophonic mu-law .wav file format. The following is an example
of the Music-On-Hold parameter page.
To set or clear Music-On-Hold settings:
44
1.
From the MCA administrator page, click Music-On-Hold Settings in the navigation pane.
2.
Select the check box next to Enable Music-On-Hold to set or clear the option.
3.
Select a file from the Music-On-Hold File Name list.
4.
Click Save, and then click Ok at the prompt. The system plays the file that you selected
for the Music-On-Hold.
To Upload a new Music-On-Hold file:
1.
Type the path name or click Browse to select a new .wav file.
2.
Click Upload, and then click Ok at the prompt. Your file will be added to the end of the
Music On Hold File Name list.
3.
Select the file from the Music-On-Hold File Name list, and then upload it to set it as the
Music-On-Hold.
Viewing the Licenses
Server port and user capacity is controlled by an application ID through the Applications
Management Center (AMC) and registered on the MAS server. The Licensing page shows the
number of licenses available.
MCA 4.0 and newer releases require Enhanced Video licenses to use the higher resolution
video provided by the H.264 codec.
For information about adding licenses, refer to the Mitel Applications Suite Installation and
Maintenance Guide.
To view the license certificate:
From the MCA administrator page, click Licensing in the navigation pane. The License
Certificate page appears and displays the following (also see License Usage on page 73):
•
Audio, Web/Video and Enhanced Video: The MCA server currently uses:
•
one Audio port for each audio connection to an Audio-Only or Audio-and-Web conference. This audio connection occurs from an audio call through one of the MCA's SIP
Server extensions. Effective in v5.0, this audio connection can also occur from the
Collaboration Client new Audio-broadcast feature.
•
one Web/Video port for each Collaboration Client or Web Client connection to a
Web-Only or Audio-and-Web conference. Effective in v5.0, one Web/Video port for
each video connection from a SIP device (new SIP-video feature). This video connection occurs from a video call through one of the MCA's SIP Server extensions.
•
one Enhanced Video port for each Web/Video port used when the number of Enhanced Video ports licensed is not 0.
45
Configuration and Maintenance Manual
Note: SIP Video and High Definition (HD) Video require enhanced video ports.
When the number of Enhanced Video ports purchased is not 0, the number of
Web/Video ports licensed and the number of Enhanced Video ports licensed are
always the same.
•
Max users licensed: The number of MCA user accounts allowed that can be configured
on the system.
Note: The Licensing Usage page shows the current number of in-use ports/users.
See License Usage on page 73.
Customizing the User Interface
The User Interface Wizard allows you to customize the appearance of the Mitel Collaboration
Advanced graphical user interface (GUI).
Note: Only users that do not have an MCA account will see a custom top banner logo,
background, and Welcome page image.
To view the current settings:
From the MCA administrator page, click UI Wizard in the navigation pane, and then click View
Current to show the current graphic for the selected area of the MCA user interface.
To change a graphic:
46
1.
Click Browse. A window opens that allows you to navigate to the location of the new graphic
file.
2.
Select the new file, and then click Open. The file path for the graphic appears in the User
Interface Wizard page. Select additional files to change, if necessary.
3.
Click Save, and then click Ok in the confirmation dialog box.
To restore default settings:
1.
Click Restore All Defaults to select all settings to change back, or select the Default check
box next to the individual areas of the user interface.
2.
Click Save, and then click Ok in the confirmation dialog box.
Configuring Dial Access String (DAS) Rules
The DAS Rules options are available in the MCA navigation pane only when you set Enable
DAS Rules on the Systems Option page.
Note: When DAS rules are applied, Outgoing Prefix and Max Extension Length are
not applicable (see Configuring System Options on page 36).
Note: DAS rules are processed by the Perl Compatible Regular Expressions (PCRE)
library distributed as libpcre. Details on the library are available from
http://www.pcre.org/. MCA supports only the 'g' flag.
Consider the following when you configure the dialing plan:
•
Check for special or specific dialing plans for your company. For example, if you have
access codes to connect to branch offices, remote locations, or international offices.
•
Check for blocked area codes (such as 800 or 900) and if so, what numbers that are blocked.
•
Check that all call processing programming has been completed, including Automatic Route
Selection (ARS), dial rules, and other related information.
MCA uses DAS rules to dial outside numbers and internal private branch exchange (PBX)
extensions. You can configure the MCA server with rules to handle a wide range of call routing
and dial plan requirements. These rules can handle international dialing, PBX extension calling,
and sophisticated SIP call processing.
DAS rules are a set of up to 20 UNIX® regular expressions that are applied to dialed digits. The
rules are applied in the order in which they are listed in the DAS Rules table. The output of
each rule is the input to the next rule. The result is used as the dialed digits that are processed
through conferencing server call processing.
Note: Performing the following procedure disconnects all active calls.
To configure dialing rule parameters:
1.
From the MCA administrator page, click DAS Rules from the navigation pane.
47
Configuration and Maintenance Manual
2.
Type the specific rules you want the conferencing server to follow when processing dialed
digits or SIP addresses. An example is shown below:
Length of Intercom Call (IC) extension
Outside line dialing prefix
DAS Rule 1 = s/^\+(.{4}$)/\1@$(PRIMARYINTERNALIP)/
DAS Rule 2 = s/^\+(.{5}$)/\1@$(PRIMARYINTERNALIP)/ National direct dialing prefix
DAS Rule 3 = s/^\+x(.*)/\1@$(PRIMARYINTERNALIP)/
DAS Rule 4 = s/^\+1(.*)/81\1@$(PRIMARYINTERNALIP)/
DAS Rule 5 = s/^\+(.*)/8011\1@$(PRIMARYINTERNALIP)/
Server IP address
Linux syntax
(must be the same for all DAS Rules)
International direct dialing prefix
Consider adding DAS rules to reflect your calling area. In the example below, 602 is used
for an area code in Phoenix, Arizona.
First Half
s/^\+1(602.*)/8\1@$(PRIMARYINTERNALIP)/
Second Half
•
First Half – what is being searched for (between “s/” and the second “/”)
^: beginning of string to search
\+1: phone numbers that start with a “1”
(602.*): “grab” any phone number that starts with a “602” and “save it”
•
Second Half – the replacement (between second “/” and third “/”)
8: most often 8 is used as the first number (the Mitel Communications Director (MCD)
uses either 8 or 9 to get an outside line, the Mitel 5000 uses 8.)
\1: this is the “(602.*)” that was “saved” in the first half (the complete phone number)
@: literally, the “@” sign
(PRIMARYINTERNALIP): variable for the main IP address
In the example, any phone number starting with 1602 will have the leading “1” stripped
off, replacing it with an “8”, the number, @, and then the IP address. Table 7 provides
additional descriptions for DAS rule syntax. Assuming the phone number to be dialed
is 1-602-555-1212 and the IP address configured is 192.168.22.55 results in:
16025551212 becomes [email protected]
48
Table 7: DAS Rule Syntax Descriptions
Character
Description
$
End of the string
^
Beginning of the string
. (period)
Any character
*
0 (zero) or more items. For example, a* means 0 or more number of a in the string.
?
0 (zero) or one item.
+
1 or more number items
x
The number that follows is dialed as it appears.
\d
Digits
\1, \2, \3,...
Equivalent to the corresponding set of parentheses matches
()
Used to group matching characters in a string that can be referred to later
[]
Used to define a range. Example: [0-9] matches any digit
{n}
Exactly n occurrences of the previous item
Examples: a{4} matches aaaa, and .{4} matches any four characters
{n,}
At least n occurrences of the previous item
Example: a{4,} matches aaaa or aaaaa or aaaaaa, etc.
{n,m}
At least n but not more than m occurrences of the previous item
Example: a{4,5} matches only aaaa or aaaaa
3.
Click Save, and then click Ok when prompted.
Migrating IAWC Data
This feature allows you to maintain your existing Inter-Tel Audio and Web Conferencing (IAWC)
data and upgrade to the latest release of MCA. See IAWC Migration on page 18 for additional
information about the migration process.
After MSL, MAS, and MCA are installed, login in to the MAS Server-Manager Web interface
and navigate to the Mitel Collaboration Advanced administrator from the main pane.
To restore the IAWC data:
1.
From the MCA administrator page, click IAWC Migration in the navigation pane. The IAWC
Data Migration page appears.
2.
Click Browse, and then navigate to the location where you saved the IAWC data.
3.
Click Restore to start uploading the IAWC data to the MAS (MCA) server.
Do not click away from the IAWC Data Migration page while the saved data is being
uploaded. If you navigate away before the upload completes, it will fail and you will have to
start the upload again.
49
Configuration and Maintenance Manual
4.
This page shows progress of the migration and it is automatically refreshed while the data
is being restored. After the data is restored, a status message on the page will indicate if
the migration was successful. If for any reason a portion of the data is not restored, it is
indicted by a red X along with a brief description.
After you restore the IAWC data on MCA, the MCA server will restart automatically. Do the
following:
•
Configure Web Conferencing settings, see page 34.
•
Verify System Options settings are correct, see page 36.
•
Configure SIP server for the system connected to MCA, see page 50.
•
If applicable, restore any custom logos (see page 46), prompts (see page 43), or music-on-hold files (see page 44).
Configuring SIP Server
The signaling protocol used between the communications platform and MCA is SIP. MCA
supports multiple Mitel communication platforms. The platform you select in System Options
(see page 36) determines which SIP Server page appears when you select Configure SIP
Server in the navigation pane.
Configure SIP Server – MCD
Use these settings only when configuring MCA with a MCD system. Configure the MCD system
first, and then configure the SIP server. See Configure the Mitel Communications Director
(MCD) on page 24 for details.
After you configure the MCD system for MCA, configure SIP Server settings in MCA using the
account information from the MCD system configuration.
To configure the SIP component for a Mitel 3300 (Mitel Communications Director):
50
1.
From the MCA administrator page, click System Options in the navigation pane.
2.
Select Mitel 3300 from the Platform list options.
3.
Click Save, and then click Ok at the prompt to restart MCA.
4.
From the MCA administrator page, click Configure SIP Server in the navigation pane. The
Mitel 3300 SIP Server Configuration page appears.
5.
Enter the following information:
•
Extension First: Type the extension number of the first IP device in the hunt group
used by the MCA server to register itself with the Mitel 3300.
•
Extension Last: Type the extension number of the last IP device in the hunt group
used by the MCA server to register itself with the Mitel 3300.
•
Extension PIN: Type the User PIN for the MCA ports on the Mitel 3300. This field is
NOT mandatory.
•
SIP Domain: This can be the domain name, fully qualified domain name (FQDN), or
the IP address of the Mitel 3300 system used to register the MCA SIP ports. If you do
not know the domain name or FQDN, type the Mitel 3300 system IP address.
•
IP Address: Type the IP address of the Mitel 3300 system. Alternatively, type the FQDN
of the Mitel 3300 system.
Note that when typing the FQDN, only the first IP Address value returned by the DNS
lookup will be used.
•
SIP Port: Type the SIP port number of the Mitel 3300 system. The port number is
typically 5060.
•
Registration Period: Type the number of seconds for the registration period used by
MCA when it registers itself with the Mitel 3300.
Note that this value also controls the registration refresh rate, which is normally half of
the Registration Period.
6.
Click Save, and then click Ok at the prompt.
7.
Verify the results of the SIP registration process, go to Checking Proxy Extension Status
on page 69.
Configure SIP Server – Mitel 5000
Use the following settings only when configuring MCA with a Mitel 5000 system. Configure the
Mitel 5000 system first, and then configure the SIP server settings using the information from
the Mitel 5000 system configuration. See Configure the Mitel 5000 CP on page 26 for details.
51
Configuration and Maintenance Manual
To configure the SIP component for a Mitel 5000:
1.
From the MCA administrator page, click System Options in the navigation pane.
2.
Select Mitel 5000 from the Platform list options.
3.
Click Save, and then click Ok at the prompt to restart MCA.
4.
From the MCA administrator page, click Configure SIP Server in the navigation pane. The
Mitel 5000 SIP Server Configuration page appears.
5.
Type the following information:
•
Extension First: Type the extension number of the first IP device used by the MCA
server to register itself with the Mitel 5000.
•
Extension Last: Type the extension number of the last IP device used by the MCA
server to register itself with the Mitel 5000.
•
Node Number: Type the node number of the Mitel 5000 that is connected to MCA. If
the Mitel 5000 is configured as a single node, type 1, which is the default of the Mitel
5000.
•
5000 IP Address: Type the IP address of the Mitel 5000 system. If the system is
configured as a Mitel 5600, type the IP address of the Base Server.
•
OAI IP Address: Type the IP address of the server that provides OAI and SIP for the
Mitel 5000.
• If the system uses a CT Gateway, type the IP address of the of the gateway.
• If the system has a PS-1, type the IP address of the PS-1.
• If the system does not have a PS-1, type the same IP address you entered for Mitel
5000.
52
•
OAI Port: Type the port number used on the Mitel 5000 for OAI. The default value is
4000.
•
OAI Password: Type the password used to connect to OAI.
6.
Click Save, and then click Ok at the prompt.
7.
Verify the results of the SIP registration process, go to Checking Proxy Extension Status
on page 69.
Configure SIP Server – Inter-Tel Axxess
Use the following settings only when configuring MCA with an Inter-Tel Axxess system.
Configure the Inter-Tel Axxess system first, and then configure the SIP server settings using
the information from the Axxess system configuration. See Configure the Inter-Tel Axxess
System Platform on page 28 for details.
An Inter-Tel Axxess system has one Call Processing (CP) node but can have multiple Internet
Protocol Resource Cards (IPRCs). Up to 20 IPRCs can be configured on MCA, however, at
least one IPRC must be programmed to communicate with the MCA server.
To configure the SIP component for Inter-Tel Axxess:
1.
From the MCA administrator page, click System Options in the navigation pane.
2.
Select Inter-Tel Axxess from the Platform list options.
3.
Click Save, and then click Ok at the prompt to restart MCA.
4.
From the MCA administrator page, click Configure SIP Server in the navigation pane. The
Inter-Tel Axxess SIP Server Configuration page appears.
5.
Type the following information:
•
Node Number: Type the node number of the Inter-Tel Axxess that is connected to
MCA. If the Inter-Tel Axxess is configured as a single node, type 1, which is the default.
•
OAI IP Address: Type the IP address of the Inter-Tel Axxess system.
53
Configuration and Maintenance Manual
6.
7.
•
OAI Port: Type the port number used on the Inter-Tel Axxess for OAI. The default value
is 4000.
•
OAI Password: Type the password used to connect to OAI.
Type the following information for the IPRC you want to connect to MCA:
•
IP Address: Type the IP address of the Inter-Tel Axxess IPRC.
•
Extension First: Type the extension number of the first IP device used by the MCA
server to register itself with the Inter-Tel Axxess.
•
Extension Last: Type the extension number of the last IP device used by the MCA
server to register itself with the Inter-Tel Axxess.
Do one of the following:
If you are configuring another IPRC, click New IPRC, and then repeat step 6 to add the IPRC.
If you are finished configuring the IPRC, click Save, and then click Ok at the prompt.
8.
Verify the results of the SIP registration process, go to Checking Proxy Extension Status
on page 69.
Recording Retention Settings
The Recording Retention Settings allows an administrator to set:
•
auto-clean mechanism, in other words the length of time recordings should be saved
before being deleted
To view the server Recording Retention Settings:
1.
From the MCA main page, click Recording Retention Settings in the navigation pane.
To change the server Recording Retention Settings:
2.
Options to Delete Records After xx Days (the range is from 30-365 days, default value is
60 days).
3.
Options to Send email alert to the user xx Days before deletion (the range is from 1-30
days, default is 7 days)
4.
Click Save.
Manage Clients
MCA Client Management panel allows you to control the versions of the MCA client applications
that are available to users.
54
To upgrade or downgrade an MCA client application version:
1.
From the MCA main page, under Configuration, click Manage Clients.
2.
Click Browse to open the File Upload window.
3.
Navigate to the new MCA client file (.rpm extension) to upload.
4.
Click Upload New Client to place the new client version on MCA server, which will automatically make it available for the users.
5.
Once the client package has been successfully uploaded and installed, a success message
is displayed.
6.
When a new client package is uploaded, the following validation checks are performed on
the package before the package is installed:
1. Verify the package is a valid RPM file
2. Verify the RPM has not been corrupted
3. Verify the RPM is a valid MCA client RPM
4. Verify the RPM version is not already installed
Note: If any of these validation steps fail, then the RPM is not installed and an error
message containing the reason for the failure is displayed.
To restore an original client version:
1.
From the MCA main page, click Manage Clients in the navigation pane.
2.
Click Restore Original, button next to the client package to restore.
3.
Once the client package has been successfully restored to its original version, a success
message is displayed.
55
Configuration and Maintenance Manual
User Setup and Account Management
Note: Do not add new MCA users, delete existing MCA users, or manage accounts
from the MCA administrator interface. Instead, you should configure users from the
MAS administrator interface, Server Manager – Users and Services. If you create new
users through the MCA administrator, they will appear as an Unassigned service
associated with MCA. Refer to the MAS administrator online Help for managing user
accounts.
Manage users through functions available under Provisioning on the menu bar. Navigation links
are located on the left side of the page.
User accounts on MCA contain user-specific information needed to log on and use MCA. When
a user is initially set up, most parameters are set to system defaults, but you can change specific
settings for individual users, as described in this section.
Note: You can set up users either through the Provisioning Web page or through LDAP
queries to a corporate directory. The following sections describe the process for setting
up users locally in the MCA database. Using LDAP is described in Configuring LDAP
Authentication and Auto-Provisioning on page 40.
Adding User Accounts
As an administrator, you can create user accounts for Mitel Collaboration Advanced. See Note
on page 56.
To add individual accounts:
56
1.
From the MCA Administrator page, click Add User in the navigation pane.
2.
Type the Username and Password for the new user. The user name must be in the format:
[email protected].
3.
Type a Personal ID for this user (select a 3 to 5 digit identification number).
4.
Type the Registered Phone number for this user. For non-extensions, type the full number,
with area code -- it is formatted automatically.
5.
Click Create User. A prompt appears to confirm that the new user is added to MCA.
Adding Guest User Accounts
As an administrator, you can create guest user accounts for Mitel Collaboration Advanced.
Note: Guest User Accounts must be created on MCA, they cannot be created via MAS
administrator interface.
To add individual guest accounts:
1.
From the MCA Administrator page, click Add Guest User in the navigation pane.
2.
Type the Display Name and Email for the new guest user. The email must be in the format:
[email protected].
3.
Type a Personal ID (select a 3 to 5 digit identification number).
4.
Type a Registered Phone number for this user. For non-extensions, type the full number,
with area code -- it is formatted automatically.
5.
Click Create User. A prompt appears to confirm that the new user is added to MCA.
Deleting a user profile
To delete a user profile:
1.
Select the user account that you want to delete, see Accessing a User Account on page 58.
2.
Click Manage User Profile.
3.
Click Delete User at the bottom of the user profile page, and then click Ok at the prompt.
Managing User Accounts
As an administrator, you can view, modify, or delete the following MCA user account information:
•
Editing a User Profile on page 58
•
Viewing Scheduled Conferences on page 60
•
Generating a Call Activity Report on page 60
•
Scheduling a Reservationless Conference on page 61
•
Adding a Delegate on page 62
57
Configuration and Maintenance Manual
Accessing a User Account
To view, modify or delete account information, you must first select a user.
To select a user account:
From the MCA administrator page, select the user that you want to modify or delete. Do one
of the following:
•
Click Administer User in the navigation pane to open the User Lookup page.
a.
Type the user name in the box for the account that you want to modify. If you type a
partial user name, it may return multiple results.
b. Click Search to view search results, and then click the user name. The user options
page opens for the specific user.
•
Click List Users in the navigation pane, and then select the user name account that you
want to access. The user options page opens for the specific user.
Note: Guest account users are found at the bottom of the user list following the
system users.
Editing a User Profile
In the user profile page, you can edit settings. When a user profile is deleted, MCA is no longer
accessible for that user. This also deletes all associated conference access codes.
To edit a user profile:
1.
58
Select the user account that you want to edit, see Accessing a User Account on page 58,
and then click Manage User Profile to open the following page.
2.
Modify the following information:
•
New Password: Indicates the password used to log on to the conference bridge. Type
information in this box only when you want to change the password for this user.
•
Registered Phone: Indicates the telephone number of the user that MCA will call when
calling out to the User ID.
•
Dial out allowed: Indicates this user can dial out (CO call) to others using the system.
The default is selected.
•
Deny multiple leaders: Indicates this user may not have multiple callers using the
leader access code on conference calls. The default is cleared.
•
Executive: Conferences created by Executive users have access to audio ports reserved as executive ports. See Configuring System Options on page 36 to configure
Executive Ports. The default is cleared.
•
Reservationless calls: Specifies the option selected for reservationless calls. Reservationless conferences may last as long as the value for Maximum Length of
Reservationless and Recurring Conferences, which is set in Configuring the Default
User Settings on page 66. Select from the following three options:
• Reservationless calls allowed, leader not required: (Default) This user can make
reservationless calls and a leader is not required to be present in the call for the call
to start.
• Reservationless calls allowed, leader required: This user can make reservationless
calls, but a leader is required to be present in the call for the call to start.
• Reservationless calls not allowed: This user cannot make reservationless calls.
•
Email Type: Specifies the e-mail type the user sends for invitations to a conference.
Select either of the following e-mail types:
• Generic Long: Use this setting for e-mail clients (for example, Microsoft® Outlook®)
that allow for long form inserts (usually more than one line).
• Generic Short: Use this setting for e-mail clients that only allow short form inserts
(usually one line).
3.
Click Save Changes, and then click Ok at the prompt.
59
Configuration and Maintenance Manual
Viewing Scheduled Conferences
You can view a list of the user’s scheduled conferences, including date, time, and access codes.
See Scheduled Conferences on page 77 for information on viewing all scheduled conferences.
To view scheduled conferences:
1.
Select the user account that you want to view, see Accessing a User Account on page 58.
2.
Click View Scheduled Conferences.
3.
Select a date range for the scheduled conferences that you want to view.
4.
Click View to see a detailed list of conferences scheduled by the user for those dates, as
shown in the example below.
Generating a Call Activity Report
See Call Activity Report on page 75 for information on viewing call activity reports for all calls.
To generate a call activity report:
60
1.
Select the user account that you want to view, see Accessing a User Account on page 58,
and then click View Call Activity Report.
2.
For the date range, do one of the following:
•
Select a value from the Date Range list.
•
Click a shortcut option: Select Today, Select This Week, or Select This Month.
•
Select a date range using the Start Date/Time and End Date/Time lists.
3.
(Optional) If project or department codes are required when a user creates a conference,
you can type a specific Project Code or Department Code to filter the data based on the
parameters entered.
4.
Select from the Sort By list to determine how you want the report to appear.
5.
Select one of the following report formats:
6.
•
Web Report: Generates a report in a new Web browser window.
•
CSV Report: Generates a comma-separated values file that you can save to your
computer. You can use these reports in other programs such as Microsoft Excel.
Click View to see the report. An example Web report is shown below.
Scheduling a Reservationless Conference
You can create reservationless conferences for users. This allows users to hold conferences
at anytime, without having to schedule them in advance or use the MCA Web client.
If Custom Access Codes is enabled on the System Options page, you can define three to five
digit access codes for both the leader and participants. If Custom Access Codes is not enabled
on the System Options page, you have the option of pre-defining a user’s participant access
code only (the leader’s code is generated automatically). This user code, given to participants
61
Configuration and Maintenance Manual
dialing into the conference, must match the Minimum IVR Access Code Length as defined
in the System Options parameters (see page 36).
To set up a reservationless conference:
1.
Select the user account that you want to set up conferences, see Accessing a User Account
on page 58.
2.
Click Schedule a Reservationless Conference.
3.
If Custom Access Codes are enabled on the System Options page, you can define three
to five digit custom access codes for both the leader and participants. These access codes
cannot begin with zero. If Custom Access Codes have not been enabled on the System
Options page, type a seven-digit participant access code (starting with 01) in the box. If
the box is left blank, the system uses a random access code.
If the participant access code you requested is already in use on MCA, a prompt informs
you that the access code is not available. Try a different code. In all cases, MCA
automatically generates a leader code that is unique.
4.
Select the Create interactive Web Conference option if the conference also includes a
Web conference.
5.
If Port Reservations is selected, type a value in the Conference Size box. For details about
port reservation, see Configuring Port Reservation Settings on page 35.
6.
Click Create. Make a note of the participant and leader access codes for this user.
Adding a Delegate
A “delegate” is a user who can view and create conferences and change another user’s call
schedule. Delegates are often administrative assistants, but they can be any user with an MCA
account.
To assign a delegate:
62
1.
Select the user account that you want to assign a delegate, see Accessing a User Account
on page 58.
2.
Click Add a Delegate to open the following page.
3.
Type the delegate’s user name, and then click Assign. The user name must be in the
format: [email protected].
Listing User Accounts
You can view a list of users with accounts on MCA to see the current setting, and then click a
user name to access and manage their profile.
To list user accounts:
1.
From the MCA administrator page, click List Users in the navigation pane. The list of user
page appears with all of the currently configured users (defined within the database), as
shown in the example below.
2.
Click on a user name to open the profile page for that user.
Bulk Provisioning User Accounts
Note: The Bulk Provision Users option does not appear in the navigation pane when
Use LDAP is set, see Configuring LDAP Authentication and Auto-Provisioning on
page 40.
The bulk-provision feature is used to create multiple user accounts in a single step. Also, when
users are created in this manner, a reservationless conference can be created for each user
as well. The account and optional reservationless conference information is read from an ASCII
text, comma-separated values (.csv) file that you prepare in advance. Each user is represented
by one line in the file. Refer to the notes provided on the page about the format of the bulk
provision file for instructions to assemble the file.
To bulk provision/modify user accounts:
1.
From the MCA administrator page, click Bulk Provision Users in the navigation pane to
open the following page.
63
Configuration and Maintenance Manual
2.
Click Browse to locate the .csv file with the user information you created previously.
3.
Indicate whether or not you want to encrypt passwords, and then click Process File. The
status of the creation of each user (and their optional reservationless conferences) is
displayed.
Bulk Provisioning Reservationless Conferences
As an administrator, you can set up reservationless conferences for system users. If you
program reservationless conferences, users do not need to use the MCA Web client to set up
their own conferences.
If Custom Access Codes have been enabled on the System Options page, MCA enables you
to define an access code for both the leader and the participants. If Custom Access Codes
have not been enabled on the System Options page, the bulk provisioning process for MCA
allows you to select a user’s participant access code. In this case, if you specify the participant
access code, the corresponding leader access code is automatically generated. Or, you can
let MCA set both the participant access code and the leader access code.
In either case, the process is performed using a text file, in .csv format. Each line starts with a
registered username and (if selected) a desired participant access code. If Custom Access
codes have been enabled, each line starts with the registered username, the participant access
code, and then the leader access code. This file needs to be prepared in advance using standard
computer application editing tools or a spreadsheet that is saved in .csv format (for example,
Microsoft Excel). Refer to the notes provided on the page about the format for additional
instructions to assemble the file.
To bulk provision reservationless conferences:
1.
64
From the MCA administrator page, click Bulk Provision Res. Confs in the navigation pane
to open the following page.
2.
Select the file you want to process by entering the path and file name or click Browse to
navigate to the file.
3.
Click Process File. The status of the reservationless conferences appears.
4.
After you select the file and upload it to MCA, perform the procedure Downloading Reservationless Conferences on page 65 to retrieve the resulting leader/participant access code
pairs.
Note: If Custom Access Codes have been enabled, the access codes for both the
leader and participants are provided. If Custom Access Codes have not been enabled,
the access code provided here is the “participant” access code. MCA automatically
creates the “leader” access code. To inform users of their pre assigned leader and
participant access codes, you need to retrieve the complete list of all users’ participant
and leader access codes. See Downloading Reservationless Conferences on page 65.
Downloading Reservationless Conferences
If Custom Access Codes have been enabled, you can retrieve a list of the access codes created
for both leaders and participants. If Custom Access Codes have not been enabled, you can
manually create access codes for participants, and then retrieve a list of them along with the
corresponding (system generated) leader access code from MCA.
To download reservationless access code sets for all users:
1.
From the MCA administrator page, click Download Res. Confs in the navigation pane to
open the following page.
2.
Type in a path and file name (to save on your computer) for the file that contains the users’
reservationless access code sets.
3.
Click Save. The resulting .txt file is a CSV-formatted file containing information about all
the reservationless conferences on the system, including reservationless conferences created by users.
65
Configuration and Maintenance Manual
Configuring the Default User Settings
When initially provisioned, all users are given the same set of user settings and permissions.
This configuration is called the Default User Settings. You can set the defaults for all users on
MCA.
To view or edit the default user settings:
1.
From the MCA administrator page, click Default User Settings in the navigation pane.
2.
Set the following options:
•
Dial Out Allowed: Indicates this user can dial out to others using MCA (CO call). The
default setting is selected.
•
Deny Multiple Leaders: Indicates this user may not have multiple callers as the conference leader. When selected, only the first person that enters the leader access code
is the conference leader. Subsequent users that enter the leader access code will join
the conference as a participant. The default setting is cleared.
•
Reservationless Calls: Select one of the following three options:
• Reservationless calls allowed, leader not required: (default) The user can make
reservationless calls and a leader is not required to be present on the call for the
call to start.
• Reservationless calls allowed, leader required: The user can make reservationless
calls, but a leader is required to be present on the call for the call to start.
• Reservationless calls not allowed: The user cannot make reservationless calls.
Note: To preserve ports on the server for one-time and recurring conferences,
Mitel recommends that you do the following when you select Enable Port
Reservations (see page 35):
• Select Reservationless Calls Not Allowed for the Reservationless Calls option.
• Make sure the Allow user to schedule conference if conflict occurs option is not
selected under Port Reservations (see page 35).
66
•
Maximum Length of Reservationless and Recurring Conferences: Indicates this
is the number of weeks in which these conference types can occur. The default setting
is 26 weeks.
•
Email Type: Select either of the following e-mail types:
• Generic Long: Use this setting for e-mail clients (for example, Microsoft Outlook)
that allow for long form inserts (usually more than one line).
• Generic Short: Use this setting for e-mail clients that only allow short form inserts
(usually one line).
3.
Do one of the following, if necessary:
•
To restore the original defaults at any time, click Restore Original Defaults, and then
click Ok at the prompt.
Note: If the defaults are changed, users who are set up in the system prior to this
change are not affected.
•
4.
To restore all users to the new system defaults, click Restore All Users to Defaults.
Any individual settings that differ from the defaults will need to be reapplied as described
in Editing a User Profile on page 58.
Click Save Changes, and then click Ok at the prompt.
Sending a Broadcast E-mail
The Broadcast E-mail feature sends an e-mail message to all the users on MCA at the same
time.
To broadcast e-mail:
1.
From the MCA administrator page, click Broadcast E-mail in the navigation pane.
2.
Enter text in the Subject and Message boxes.
3.
Click Send E-mail to broadcast the e-mail to registered MCA users.
Configuring Billing Codes
The Billing Code feature allows you to create billing codes and set the feature as required for
a user to schedule a meeting. The Billing Codes page has two areas, Department Code and
Project Code, which allows you to add or delete billing codes of either type. A list appears for
the existing billing code types. The following options are available in each area and when
selected, apply system wide for all users.
•
Required: When selected for Department Code or Project Code, the user must choose a
billing code from the list when scheduling a conference. If cleared and billing codes exist,
the user is given the option to select a billing code when scheduling a conference.
67
Configuration and Maintenance Manual
•
Allow “None” Option: When selected for Department Code or Project Code, None appears
in the billing code list as a selectable option.
To add a billing code:
1.
From the MCA Administrator page, click Billing Codes in the navigation pane.
2.
Type a new department or project code in the box, and then click Add.
To delete a billing code:
68
1.
From the MCA administrator page, click Billing Codes in the navigation pane.
2.
Select the department or project code(s) to delete, and then click Delete.
3.
Click Ok at the prompt to confirm.
Server and User Activity Monitoring
Application and server management is provided through functions available under the
Monitoring menu button. As an administrator, you can monitor MCA and user activities.
Viewing Active Calls
You can view information about conferences that are in progress on MCA. The call information
page is updated according to the refresh rate that is selected at the top of the page. The default
refresh rate is every 30 seconds.
To view active conference calls:
1.
From the MCA administrator page, click Active Calls in the navigation pane. The page in
the following example shows a conference call in progress and participants.
2.
While monitoring active conferences, you can perform the following operations:
(
•
End Call: Ends the conference without any warning or notice to conference participants.
•
Drop Leg: Drops this participant from the conference without any warning or notice to
the participant.
•
Collect call quality data: Collects call quality data for support purposes. The call must
active for at least one minute or no data is collected.
Click Collect call quality data link for the conference that you want to collect call quality
information. At the prompt, click Save, and then choose a location and save the file.
Checking Proxy Extension Status
The Proxy Extension Status page provides connection status of the MCA registration process.
The information on this page is updated according to the refresh rate that is selected at the top
of the page. The default refresh rate is every 30 seconds.
To view the proxy extension status:
From the MCA administrator page, click Proxy Extension Status in the navigation pane to
view the page.
MCA registers itself with the Mitel Communications Director (MCD) and Mitel 5000 as a single
device based on the settings in Configuring SIP Server on page 50. The Proxy Extension Status
page displays the results of this registration process. Because this registration process happens
69
Configuration and Maintenance Manual
often (about every 30 minutes), only the last attempt is displayed. An explanation of the Proxy
Extension Status page results for each system is provided in this section.
The following is an example for the Mitel 3300 (MCD).
The following defines the Proxy Extension Status page results for the Mitel 3300 example.
•
MCA sends a REGISTER message to icp3300 indicating that it would like to register itself
as a particular phone, in this [email protected]:
Apr
2 15:55:35.756948 Sending to UDP_CH socket (10.0.0.198:5060):
REGISTER sip:icp3300.linktivity.lab SIP/2.0
Via: SIP/2.0/UDP 10.0.0.74:5064
70
Call-ID: 843296448@awc2
CSeq: 1 REGISTER
From: <sip:[email protected]>;tag=764313295
To: <sip:[email protected]>
Contact: <sip:10.0.0.74:5064>;methods="INVITE, SUBSCRIBE, BYE, CANCEL, ACK”
Expires: 3600
User-Agent: Mitel-AWC/3.5
Content-Length: 0
•
The Mitel 3300 receives this message and lets MCA know that it is now trying to authenticate
the user:
Apr 2 15:55:35.777764 Received UDP message from socket 7 (UDP_CH
10.0.0.198:5060):
SIP/2.0 100 Trying
Via: SIP/2.0/UDP 10.0.0.74:5064 ;received=10.0.0.198:5060
Call-ID: 843296447@awc2
CSeq: 1 REGISTER
From: <sip:[email protected]>;tag=764313294
To: <sip:[email protected]>;tag=0_3939248944-60431496
Content-Length: 0
•
The Mitel 3300 sends back a message letting MCA know that the registration was successful
(“200 OK”):
Apr 2 15:55:35.790258 Received UDP message from socket 7 (UDP_CH
10.0.0.198:5060):
SIP/2.0 200 OK
Via: SIP/2.0/UDP 10.0.0.74:5064 ;received=10.0.0.198:5060
Call-ID: 843296447@awc2
CSeq: 1 REGISTER
From: <sip:[email protected]>;tag=764313294
To: <sip:[email protected]>;tag=0_3939248944-60431496
Contact: sip:10.0.0.74:5064
User-Agent: Mitel-3300-ICP 8.0.9.18
Allow:
INVITE,BYE,CANCEL,ACK,INFO,PRACK,OPTIONS,SUBSCRIBE,NOTIFY,REFER,REGISTER
,UPDATE
Date: Wed, 02 Apr 2008 15:55:42 GMT
Content-Length: 0
71
Configuration and Maintenance Manual
The following is an example for the Mitel 5000 and Inter-Tel Axxess systems.
The columns display the following information:
•
i: The proxy entry number (starts at 0 and increases).
•
N: The extension entry number.
•
U: The username (in most cases this will be the extension number).
•
H: The domain name.
•
I: The in-use flag (1 for in use, 0 for not used).
•
E: The expiration time (when e equals 0, the server will re-register).
•
R: The registration status (when it is 1, the server has properly registered. 0 or -1 indicates
the server has not properly registered).
Manage Recordings
To Manage Recordings:
From the MCA main page, under Monitoring, click Manage Recordings from the navigation
pane. The page shows a listing of Recordings.
From here, you can perform the following operations:
Delete: Manually delete a selected file.
72
Mark them as permanent: In this case the recording will never be auto deleted. The only way
to delete recordings marked as permanent is for the administrator to select a record and
manually delete it from the admin portal. Once a recording is marked as permanent, it cannot
be changed back to a time limit expiration.
Backup: This option will provide the admin an option to save files to an external drive.
License Usage
Server port and user capacity is controlled by an application ID through the Applications
Management Center (AMC) and registered on the MAS server. License Usage shows the
number of licenses available and the licenses used. See Viewing the Licenses on page 45.
For information about adding licenses, refer to the Mitel Applications Suite Installation and
Maintenance Guide.
From the MCA administrator page, click License Usage in the navigation pane. The License
Usage page appears and displays the following:
•
Options to modify the "Refresh rate", which can be set to every 30, 60, or 90 seconds.
•
MAX column: The maximum number of ports/users licensed for each license type.
•
IN USE column: The number of licensed ports/users for each license type currently in use.
Accessing SIP Logs
The SIP Logs viewer page is available for access to SIP log information. This viewer allows
you to access logs directly on the MCA server, and then save them to your remote computer
in .zip file format. Use a text file reader (for example, Notepad) to view the files.
The SIP Logs option appears in the navigation pane only when the Mitel 5000 or
Inter-Tel Axxess is selected as the platform in System Options. These log files are
provided for Technical Support use and are not explained in detail in this document.
To access SIP Server logs:
1.
From the MCA administrator page, click SIP Logs on the navigation pane. The SIP Logs
viewer page appears.
73
Configuration and Maintenance Manual
Log files available on server
2.
Do the following:
•
To view a log file, select a file from the list, and then click Process. (Files are listed
from most current to least current.) You can click Next Log >> or << Previous Log to
view additional log files.
•
To view a log file from your computer, click Browse, navigate to the log file location,
and then double-click the file. Click Process.
Note: Using this option may require you to change IE security settings when trying
to view a file locally through the Web interface.
•
74
To zip the log files and download them, click Zip Logs. Then, click the blue Download
Zip File link and save the file to your local computer. The default file name is ZipLogs.zip. Trace logs are also included with the zipped files.
Server Reporting
Reports are available on MCA that allow you to view call activity, VoIP utilization, scheduled
conferences, system alerts, and install history.
Note: The time information in reports is based on the local time zone where the MCA
server is located, not the location of the computer where the reports are generated.
Call Activity Report
You can view daily usage statistics to track MCA usage and system conferencing information.
See Generating a Call Activity Report on page 60 for information about viewing user-specific
call activity reports.
To view activity reports:
1.
From the MCA administrator page, click Call Activity Reports in the navigation pane. The
Call Activity Report page opens.
2.
Do one of the following to determine a date range for the report you want to create:
•
Select a value from the Date Range list.
- Today: Today's date.
- Yesterday: Yesterday's date.
- This Week: Sunday of the current week through today's date.
- Last Week: Sunday of last week through the Saturday of last week.
- This Month: First day of the month through today's date.
- Last Month: First day of last month through the last day of last month.
75
Configuration and Maintenance Manual
- This Quarter: First day of this quarter (1/1, 4/1, 7/1, or 10/1) through today's
date.
- Last Quarter: First day of last quarter (1/1, 4/1, 7/1, or 10/1) through the last day
of last quarter.
•
Click a shortcut option: Select Today, Select This Week, or Select This Month. (The
shortcut button selected appears in the Date Range box.)
•
Select a date range using the Start Date/Time and End Date/Time lists.
3.
(Optional) To view only system usage associated with a project or department code, type
the code in the box.
4.
Select a user or users from the list to include in the report.
5.
Select an item from the Sort By list to determine the organization of the report.
6.
Select a format, either a Web Report (default) or a CSV Report, and then click View.
•
If you select Web Report for the format, the results appear on the page.
•
If you select CSV Report for the format, click Save at the prompt to save the file to a
location or click Open to display the results in your default text editor (for example,
Microsoft Excel).
VoIP Utilization Statistics
The VoIP Utilization Statistics page displays the VoIP port usage on MCA for the date and time
range selected. A bar chart displays the active number of ports and the port usage in the time
increments selected for the date range. This is useful for monitoring capacity utilization of MCA
over time.
To check VoIP utilization statistics:
76
1.
From the MCA administrator page, click VoIP Utilization Statistics in the navigation pane.
2.
Select a start and end date/time range from the list.
3.
Select an interval rate, and then click View. An example of the VoIP Utilization Statistics
graph is shown below.
Scheduled Conferences
The Scheduled Conferences report list conference details for the time range specified.
To view a list of scheduled conferences:
1.
From the MCA administrator page, click Scheduled Conferences in the navigation pane.
2.
Select a date range, and then click View to see the results. For each scheduled conference,
all call-specific information is listed, as shown in the example below.
77
Configuration and Maintenance Manual
System Alerts Log
You can view a history of the e-mail notifications that MCA has issued for a particular date
period. This history includes alarms and general notifications that are sent out by MCA as a
result of events on the system.
To view the system alerts log:
1.
From the MCA administrator page, click System Alerts Log in the navigation pane.
2.
Select a date range, and then click View to see the results. An example of a system alerts
log is shown below.
Install History Log
You can view a history of MCA software installs that have been completed during the selected
period.
To view the installation history log:
1.
78
From the MCA administrator page, click Install History Log in the navigation pane.
2.
Select the date range for the report to generate.
3.
Select a Package Type from the list or view all package types (default).
4.
Click View to display the installation history log, as shown in the example below.
Port Reservations Report
When the Port Reservations feature is selected, (see Configuring Port Reservation Settings
on page 35), the Port Reservations Report lists conference related information on MCA for the
date and time range selected.
To view Port Reservations:
1.
From the MCA administrator page, click Port Reservations in the navigation pane.
2.
Select a date range for the report.
3.
(Optional) Type a Username to narrow the report results.
4.
Click View to see the report.
79
Configuration and Maintenance Manual
You can select the user name in the report to send them an e-mail.
80
To install MCAC for all users (as the administrator)
If you are running in a networked environment, you can (as the administrator of the computers)
install MCAC for all users. This is usually done in a Terminal server or Citrix environment.
If you wish to do this, download the executable file from http://<MCA server
FQDN>/wd/MCAClient-admin.exe and follow the instructions.
Note: You must have Administrator privileges to install MCAC for all users. The software
must be placed in a location that all users can access. If a user on the system already
has the MCAC installed on their machine locally, that version takes precedence over
the administrator-installed version.
81
Configuration and Maintenance Manual
82
CHAPTER 4
TROUBLESHOOTING
Configuration and Maintenance Manual
Chapter 4:
84
Introduction
This chapter describes possible issues you may encounter and common solutions to the issues.
Conferencing Error Messages for Alarm/Alert
Conditions
Table 8 provides the error messages for alarm and alert conditions that may arise when using
MCA. These messages are sent to General Alarm or General Alert e-mail addresses configured
in System Options. See “Configuring System Options” on page 36. They are also displayed in
the System Alerts Log.
Table 8: Conferencing Error Messages for Alarm/Alert Conditions
Message
Subject
Description
No trunks available
(trunkalert)
“Enterprise alarm” Message = “no
phone trunks are operational”
No VOIP ports available to make or
receive calls.
ivr restart (alert)
“Enterprise alert” Message = “Incoming
call server restart at HH:MM:SS
MM/DD/YYYY”
A restart of the Incoming call server
occurred at the specified time.
mcu restart (alert
“Enterprise alert” Message =
“Conference server restart at
HH:MM:SS MM/DD/YYYY”
A restart of the mcu server occurred at
the specified time.
upg restart (alert)
“Enterprise alert” Message = “http
server restart at HH:MM:SS
MM/DD/YYYY”
A restart of the Web server occurred at
the specified time.
database restart (alert)
“Enterprise alert” Message = “database
restart at HH:MM:SS MM/DD/YYYY”
The Database service was restarted at
the specified time.
mux restart (alert)
“Enterprise alert” Message = “Sip
multiplexor restart at HH:MM:SS
MM/DD/YYYY”
The muxer application was restarted at
the specified time.
tns restart (alert)
“Enterprise alert” Message = “Outgoing
Call Server restart at HH:MM:SS
MM/DD/YYYY”
A restart of the Outgoing Call Server at
the specified time.
tp240driver restart (alert)
“Enterprise alert” Message = “phone
trunk driver restart at HH:MM:SS
MM/DD/YYYY”
The main call server was restarted at the
specified time.
Fewer than n ports are still
available (trunkalert)
“Enterprise alert” Message = “only %d
This is a number of ports available
ports are currently unused at
threshold alert.
%s”,$nlines, HH:MM:SS MM/DD/YYYY”
Some trunk line went down
(trunkalert
“Enterprise alert” Message = “trunk lines
%d went down HH:MM:SS
MM/DD/YYYY”
Specified trunk ID went out of service.
(Sheet 1 of 2)
85
Configuration and Maintenance Manual
Table 8: Conferencing Error Messages for Alarm/Alert Conditions (continued)
Message
Some trunk line(s) came
up (trunkalert)
Subject
“Enterprise info” Messages = “trunk
lines $linecode ($resultCode) came up
HH:MM:SS MM/DD/YYYY”
Description
Trunk(s) ID are now in service at the
specified time.
(Sheet 2 of 2)
Troubleshooting Tables
The troubleshooting tables located on the following pages provide a description of some basic
problems or errors, a corresponding probable cause, and the corrective action you should take.
Table 9: E-mail Invitation Characters
Problem or Error
Probable Cause
Some characters in the e-mail
invitation do not display correctly for
all languages.
The user has Outlook 2003 or
settings are not configured in
Outlook 2007 and 2010 to convert
the characters correctly.
Corrective Action
Change the international settings in
Outlook for the UTF-8 mailto
protocol. Refer to the Mitel
Collaboration Advanced User Help
for details.
Table 10: Using the OFT with Windows 7
Problem or Error
Probable Cause
Corrective Action
The Mitel Conferencing tab in
Outlook does not retain the server
URL and user password.
Windows 7 includes enhancements
to security that require
Administrator privileges to write to
the folder where the OFT
information is saved.
Unless the user has the necessary
privileges, they will need to type the
server URL and user password
every time they want to access
MCA conferencing through their
Outlook calendar.
Table 11: Log On Problems
Problem or Error
Probable Cause
Corrective Action
When trying to log on by typing the
user name and password the
screen returns to the log on page.
Internet Explorer cookies are case
sensitive. When the user logs on,
the cookie is not set up with the
same case and the user is denied
access.
Make sure the cookie and
username/password use the same
case.
The user logs on successfully but is
returned to the log on page when
attempting to perform any action
within MCA.
The URL does not match the URL in
the Internet Explorer cookies. It is
likely that the URL used to connect
to MCA is only a partial of the
required URL.
Make sure the cookie uses the
entire URL.
86
Table 12: Text on popup windows not as expected
Problem or Error
Probable Cause
Users will not see expected text on
some popup windows.
The display language of some
popup windows and buttons is
determined by the version of
For example, "Documents" tab
shows the word "Browse" using IE operating system installed as well
or Firefox but shows "Choose File" as the web browser being used (IE
and "No file chosen" using Chrome. or Firefox vs Chrome).
For example, Spanish version of
Windows is required for specified
buttons/popups to be displayed in
Spanish.
Corrective Action
Use the correct language version of
Windows to see those prompts
diplayed in the selected MCA
language.
Table 13: Unable to Connect to Web Conference
Problem or Error
Probable Cause
Corrective Action
A “Connection to Server not
complete” message is displayed
when attempting to join a Web
conference.
After performing an upgrade for the
MCA blade, Web conferencing may
not fully restart.
Log on the MCA Administrator
Portal, and save the Web
Conferencing Settings. A reboot is
recommended after completing any
application blade update.
Cannot join a Web conference
using the hyper link provided in the
e-mail invitation when outside of the
corporate network.
The recommended port 443, default
setting is 4443. This port setting
depends on the configuration of the
firewall (see page 15 for firewall
configuration details).
Check the Web conference external
port setting, see “Configuring Web
Conferencing Settings” on page 34.
If the network firewall is not using
the recommended port, then the
external port setting should be
adjusted accordingly to the port
value selected by the network
administrator.
87
Configuration and Maintenance Manual
Table 14: Mitel Collaboration Advanced Client Does Not Upgrade
Problem or Error
Probable Cause
The Mitel Collaboration
Advanced Client (MCAC)
does not upgrade, or the
upgrade is slow to complete.
When the MCAC detects an
existing version, it instructs
Microsoft Windows Installer to
remove the existing version
first. If this operation fails, the
MCAC upgrade fails.
Corrective Action
The Installer or Registry could be corrupt or is
missing files.
Uninstall the existing Mitel Collaboration
Advanced Client manually before you upgrade
the client.
1. Log into Windows as the user who is trying to
install the MCAC.
2. Verify that the existing MCAC will not
uninstall using Add/Remove Programs.
3. Install the Windows Installer Clean Up Utility,
available for download from Microsoft.com.
4. Run the utility; select and remove the Mitel
Collaboration Advanced Client.
If the MCAC does not uninstall, search through
the registry key sections (see Note below) and
remove the keys that are related to the MCAC.
You will see MCAC 1.0 information in the frame
on the right-hand side when you have found the
correct keys.
Note: The following Registry Sections contain keys pertaining to the Mitel
Collaboration Advanced Client:
• HKEY_LOCAL_MACHINE\SOFTWARE\Microsoft\Windows\CurrentVersion\Unin
stall
• HKEY_CURRENT_USER\Software\Microsoft\Installer\Products
To remove the CC 2.0 program settings (preferences) from the registry, remove the
following key:
HKEY_CURRENT_USER\Software\Inter-Tel\DesktopClient32
88
Table 15: Microsoft Outlook Already Has a Default Form
Problem or Error
Probable Cause
The user has an existing tab
for an appointment form
(such as “Web
Conferencing”) and they run
the Outlook Form install. A
new form is not installed for
Collaboration.
The installation makes the
form available, but the install
does not force a new tab to
appear in Outlook.
Corrective Action
The corrective action will help only if the
previous Outlook form is part of a different
software application.
If the existing default Outlook form belongs to
the previous version of MCA, the default form
must be removed before the new form can be
installed.
Follow these steps:
open the Outlook Calendar Appointment
--> “Tools” Menu
--> “Forms” Option
--> “Choose Form” Option
--> Look in “Calendar”
--> Select “Collaborate”
When you choose “Collaborate,” it replaces your
“Web Conferencing” appointment form/tab.
89
Configuration and Maintenance Manual
Table 16: Dialing Issues
Problem or Error
Probable Cause
Corrective Action
The conference leader receives an
error message when trying to add a
participant’s outside phone number
(not extension) using the Web
interface.
The conference leader attempted to
add an outside phone number and
did not use the correct dialing
format.
The conference leader must type
the complete phone number that
includes country code and area
code, if applicable, with an outside
number when adding a participant
to the conference using the Web
interface.
An operator error message is
audible in the conference: “It is not
necessary to dial a 1 when dialing
this number.” The audio may be
different, depending on the service
provider.
Dial Access String (DAS) rules
have not been set up correctly.
Add additional DAS rules to allow
for the +1 to be stripped out from the
local number.
For example, 602 and 480 are two
of the area codes for Phoenix,
Arizona.
For these area codes, add the
following DAS Rules:
The result: any phone number
starting with 1602 or 1480 will have
the leading “1” stripped off,
replacing it with a “9,” the number,
@, and then the IP address.
For example, assuming that the
phone number to be dialed is
1-602-555-1212 and the IP address
configured in TCP/IP Settings is
192.168.22.55:
16025551212 becomes
[email protected]
For more information, see
“Configuring Dial Access String
(DAS) Rules” on page 47.
Calls dialed from MCA fail.
DAS rules contain errors.
Check DAS rules for typing errors
(missing dots, slashed, etc.). For
more information, see “Configuring
Dial Access String (DAS) Rules” on
page 47.
An attempt to create a three-way
call with two users and a
conference fails. The two users are
briefly connected to one another,
but then that call drops as well.
Other users on the conference hear
garbled voice while the failure is
occuring.
SIP default settings are incorrect.
Use the default SIP settings. For
more information, see “Configure
SIP Device Capabilities” on
page 24.
(Sheet 1 of 2)
90
Table 16: Dialing Issues
Problem or Error
Probable Cause
Corrective Action
One-way audio is experienced
when the MCA server makes an
outbound call using the Mitel 5000
PBX.
The Speech Encoding settings are
incorrect.
The Speech Encoding Setting must
be set to G.711 Mu-Law for UK
installations.
(Sheet 2 of 2)
Table 17: Flicker on Android Xoom Tablets
Problem or Error
When in a conference on an
Android Xoom tablet, the sharing
viewer flickers constantly if the
shared area contains a blinking
cursor.
Probable Cause
The cause of this issue is unknown.
Corrective Action
There is no solution for this issue.
91
Configuration and Maintenance Manual
Technical Support
Technical support is provided through the Technical Support Department (see the Notice page
in the front of this manual). Emergency assistance is also available.
Technical Support Department
If problems persist when installing or servicing the conferencing server, certified technicians
who are on site and have the proper troubleshooting tools available can contact the Technical
Support Department for assistance.
Emergency Assistance
After office hours and on weekends, call 1-888-777-EASY (3279) and leave a message with
the voice mail service. A Technical Support Product Specialist will return your call as soon as
possible, which is usually within an hour. Please remember that this is an emergency number
for critical system problems only.
Sales questions, equipment orders, etc., can be handled only during normal business hours.
Troubleshooting Guidelines
To save time, perform troubleshooting procedures in the following order:
92
1.
Make sure the server running the MCA application is functional.
2.
Isolate the problem and refer to the appropriate troubleshooting section.
3.
If the problem continues to occur, reboot MCA. See “Stopping and Starting the MCA Server”
on page 34 for instructions on how to reboot MCA from the administrator Web interface. If
the problem persists, refer to the Notice page in the front of this manual for technical support
contact information.
APPENDIX A
VOICE PROMPTS
Configuration and Maintenance Manual
Introduction
Appendix:
The following table lists the English (United States) voice prompts available in the Mitel
Collaboration Advanced (MCA) product. See “Configuring Voice Prompts” on page 42 for
information about adding or changing voice prompt files and the additional languages that are
available with the MCA product. The prompt numbers and names listed are the same for all
available languages. The following table lists the English (United States) voice prompts.
Table 18: English (United States) Voice Prompts
#
Prompt Name
Script
0
TURN_OFF_MUSIC
To turn off the music, press one.
1
WELCOME
Welcome to the conference center.
2
ENTER_PIN
Enter an access code, and then press #. To cancel, press *.
3
CANCELLED_RETRY
Cancelled. Please try again.
4
FIRST_BADPIN
That access code isn’t recognized — please try again.
5
NEXT_BAD_PIN
That access code isn’t recognized.
6
REENTER_PIN
To enter another code, press *.
7
REENTER_END
To enter another code, press *, or to end this call, press #.
8
REENTER_ASSIST
To enter another code, press *, or for assistance, press zero.
9
SAY_NAME
At the tone, say your name and then press #. <beep>
10
NO_LEADER
The leader hasn’t activated this call yet. Please stay on the line.
11
GOODBYE
Thank you for calling the conference center. Goodbye.
12
CONNECTING
One moment while your call is connected.
13
TOO_EARLY
That conference hasn’t started yet.
14
TOO_LATE
That conference has already ended.
15
CALL_NOT_AVAIL
That conference isn’t available now.
16
NO_OPER
I’m sorry, the operator isn’t available now.
17
FIRSTCALLER
You’re the first person in this conference. Please stay on the line.
18
CAN’T_COMPLETE
Sorry, we’re unable to complete your call.
19
CALLER_UNAVAIL
That person isn’t available right now.
(Sheet 1 of 6)
94
Table 18: English (United States) Voice Prompts (continued)
#
Prompt Name
Script
20
ZERO
Zero
21
ONE
One
22
TWO
Two
23
THREE
Three
24
FOUR
Four
25
FIVE
Five
26
SIX
Six
27
SEVEN
Seven
28
EIGHT
Eight
29
NINE
Nine
30
ONE_MOMENT
One moment, please.
31
NO_PORTS
All circuits are busy. Please try again in a few minutes.
32
DBL_POUND
At any time, you may press the # key twice for a list of options.
33
RECORDING_END
The recording has ended. To start again, press one. Otherwise, you may
hang up.
34
PAUSED
Paused. To resume, press two.
35
RECORDINGS
Recordings
36
DIALOUT_CONFIRM
You’ve been invited to a conference call. To join, press one. To decline,
press two.
37
DECLINED
Invitation declined. Goodbye.
40
LIST_NAMES
For a list of names, press three.
41
PLACE_CALL
To place a call, press two.
42
NO_NAMES
Names are not available.
43
RETURN_CONF
To return to the conference, press *.
44
INVALID_OPTION
Sorry, that’s not a recognized option.
45
OPTION_NA
Sorry, that option isn’t available.
(Sheet 2 of 6)
95
Configuration and Maintenance Manual
Table 18: English (United States) Voice Prompts (continued)
#
Prompt Name
Script
46
RETURNING
Returning to conference.
47
2ND_LEG_2WAY
Do you want to keep this call? To keep the call and return to the
conference, press one. To drop the call and return, press two.
48
BUSY
That number is busy.
49
CALL_2WAY
To return to the conference, press *. To try another number, press one.
50
CANT_JOIN
I’m sorry. The call leader hasn’t given approval for you to join this
conference. Goodbye.
51
HUNG_UP
The person you called is no longer on the line.
52
INCOMPLETE_CALL
Sorry, we couldn’t complete your call.
53
JOINING
Now joining...
54
NAME_2WAY
I’m not sure if you recorded a name. To keep this recording, press one.
To try again, press two.
55
NEXT_NO_NAME
Sorry, I still didn’t hear you say a name. You can’t join the conference
until you record your name. To try again, press one.
56
NO_ANSWER
There’s no answer at that number.
57
MAGIC_KEY
Ready to place a call. To return to the conference at any time, press the
* key twice.
58
NO_NAME
Sorry, I didn’t hear you say a name.
59
RECORD_CANCELLED
Recording cancelled.
60
ROLLCALL
To cancel the list at any time, press *.
61
ROLLCALL_2WAY
To return to the conference, press *. To repeat the list, press one.
62
CANCELLED
Cancelled.
63
ENTER_NUMBER
Enter a phone number. When you have finished, press #.
64
DIAL_ANOTHER
Cancelled. You may dial another number now, or to return to the
conference, press *.
65
INVALID_PHONE
Sorry, we’re unable to call that number. You may dial another number
now, or to return to the conference, press *.
66
INVALID_PHONE2
Sorry, that phone number isn’t valid.
67
COUNT1
There are...
68
COUNT2
...people in this call.
(Sheet 3 of 6)
96
Table 18: English (United States) Voice Prompts (continued)
#
Prompt Name
Script
69
TEN
Ten
70
ELEVEN
Eleven
71
TWELVE
Twelve
72
THIRTEEN
Thirteen
73
FOURTEEN
Fourteen
74
FIFTEEN
Fifteen
75
SIXTEEN
Sixteen
76
SEVENTEEN
Seventeen
77
EIGHTEEN
Eighteen
78
NINETEEN
Nineteen
79
TWENTY
Twenty
80
THIRTY
Thirty
81
FORTY
Forty
82
FIFTY
Fifty
83
SIXTY
Sixty
84
SEVENTY
Seventy
85
EIGHTY
Eighty
86
NINETY
Ninety
87
HUNDRED
Hundred
88
OPTIONS
Options.
89
DROPPED
The call has been dropped.
90
ONE_CALLER
There is one person in this call.
91
MUTE
To mute your line, press one.
92
UNMUTE
To unmute your line, press one.
93
NUMCALLERS
To hear the number of callers, press three.
(Sheet 4 of 6)
97
Configuration and Maintenance Manual
Table 18: English (United States) Voice Prompts (continued)
#
Prompt Name
Script
94
CHECK_RETURN
To return to the conference, press * now. Otherwise select from the
following options...
95
NAMES
Names.
96
DIALOUT_NO_PORTS
All circuits are busy. Please try your call again in a few minutes.
97
RECORD
This call is being recorded.
98
REC_STOP
The recording has been stopped.
99
TRY LATER
Please try your call again in a few minutes.
100
JOIN_TONE
<Rising beep tone>
101
LEAVE_TONE
<Descending beep tone>
102
MUTE_TONE
<double beep tone>
103
UNMUTE_TONE
<triple beep tone>
104
DIALTOJOIN
To join the call press one.
105
EOCP_CONFWILLEND
This conference will end in...
106
EOCP_MINUTES
...minutes.
107
EOCP_ENDNOW
Please conclude your conference now to avoid being disconnected when
this conference terminates.
108
EOCP_LDREXTEND
The designated leader will now be asked to extend this conference. You
may continue this conference while the leader is away.
109
EOCP_LDRMNU1
Extend conference. Press the * key to cancel and return to the
conference at any time.
110
EOCP_LDRMNU2
To extend the conference for 15 minutes, press one; for 30 minutes,
press two, for 45 minutes, press three; for 60 minutes, press four.
111
EOCP_EXTGOOD
This conference has been extended successfully.
112
EOCP_EXTFAIL
I'm sorry, currently there are not enough ports available to extend this
conference for that length of time.
113
EOCP_TOOLONG
Please select a shorter extension period...
114
EOCP_ENDED
This call has ended. Goodbye.
115
EOCP_LDRMNU3
...or press the * key to return to the conference.
116
AUDIO_LOCKED
This conference has been locked by the leader.
(Sheet 5 of 6)
98
Table 18: English (United States) Voice Prompts (continued)
#
Prompt Name
Script
117
AUDIO_LK_MNU1
To lock this conference, press 5.
118
AUDIO_LK_MNU2
To unlock this conference, press 5.
119
AUDIO_LK_ST_1
This meeting is now locked.
120
AUDIO_LK_ST_2
This meeting is now unlocked.
121
PID_TOGGLE
To enter a Personal ID, press star.
122
PID_SELECT
Enter your Personal ID, then press pound.
123
ACODE_TOGGLE
To enter an Access Code, press star.
124
PID_SKIP
To skip your Personal ID, press star.
125
PID_RETRY
That Personal ID isn’t recognized, please try again.
126
PID_FINAL
That Personal ID isn’t recognized.
127
PID_APPROVAL
Access to this conference requires leader approval.
128
PID_LEADER
Contact your Conference Leader to accept your request to attend this
conference.
129
PID_MNU_4
To enter your Personal ID, press 4.
130
PID_MNU_RET
To return to the conference, press star.
131
PID_NOT_REG
That Personal ID isn't registered for this conference.
132
PID_CHG_FAIL
There was an error when attempting to change your Personal ID.
133
ACODE_SELECT
Enter an Access Code, then press pound.
134
JOIN_MUTED
Your audio is muted. You can hear the conference but cannot speak
unless enabled by the conference leader.
135
DUPLICATE_PID
This conference restricts duplicate Personal IDs. That Personal ID is
already in use.
136
AUDIO_ONLY_CONF
You have accessed an audio-only conference. Video is not available.
(Sheet 6 of 6)
99
Configuration and Maintenance Manual
100
Index
Index
A
F
Accounts
adding 56, 57
bulk provisioning 63
call activity report, viewing 60
conferences, viewing scheduled 60
delegate, adding for 62
deleting 57
listing 63
profiles for, managing 58
reservationless conference, scheduling 61
user settings, defaulting 66, 67
Alarm e-mail 38
Alert e-mail 38
Assistance, emergency 92
Firewall 15
B
Bandwidth 13
Billing Code 67
C
Capacity
audio conference 11
G729 12
Web conference 12
Checklist, troubleshooting 92
Conference URLs 39
Conferences
bulk provisioning 64
downloading all 65
Conferencing programming 77–80
Country Code 38
D
Default Caller ID 38
Diagnostic Logs, Accessing SIP 72, 73
Dial-in phone number 37
Dialing plan checklist 47
Dialing prefix 38
DNS 15
Document time-out 39
E
Emergency assistance 92
End of Conference Prompting (EOCP) 40
Executive ports 39
G
General alarm e-mail 38
General alert e-mail 38
H
Hunt Group
creating 25
extended 24
I
International dialing prefix 38
L
LDAP 40
License
SIP user 10
Login time-out 39
N
National dialing prefix 38
New Features 4
P
Port usage notification threshold 38
S
Secure Socket Layer (SSL) 3
SIP
diagnostic logs, accessing 72, 73
Support, technical 92
System options, configuring 36
T
Technical Support 92
Troubleshooting 83
checklist 92
U
Unassociated Users 56
User Interface Wizard 46
User login time-out 39
101
Configuration and Maintenance Manual
102