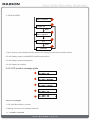
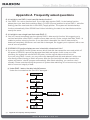
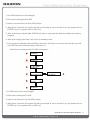
1
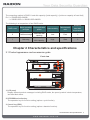
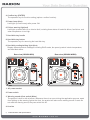
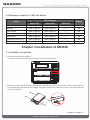
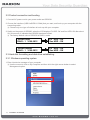
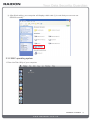
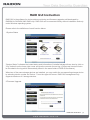
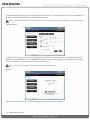
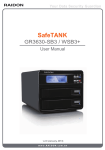
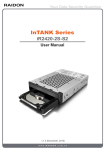
SafeTANK
GR3630-SB3 / WSB3
User Manual
v.1.3 (June, 2011)
About this Manual
Thank you for purchasing RAIDON products.
This manual will introduce the RAIDON GearTANK GR3630 and before using it, please read this
manual thoroughly.
Although all information contained in this user manual has been carefully verified before publishing,
however, the actual product specifications or relevant information may be found on
www.RAIDON.com.tw. Products are subject to change without prior notifications. If you have any
questions regarding the products of RAIDON, or you would like to know the latest product information,
user manual update, or firmware update, please contact your local supplier or visit
www.RAIDON.com.tw for further information.
Copyright © RAIDON TECHNOLOGY, INC. All rights reserved.
Index
Chapter 1 An introduction to RAID............................................................ 4
1.1
1.2
What is RAID?................................................................................. 4
Comparison of RAID 0 and RAID 1................................................. 4
Chapter 2 Characteristics and specifications......................................... 5
2.1
Product appearance and accessories guide.................................... 5
2.2
Product detailed specifications........................................................ 7
2.3
Precautions before application......................................................... 8
2.4
Message Indication of LED and Buzzer........................................... 9
Chapter 3 Installation of GR3630.............................................................. 9
3.1
Installation of hard disk.................................................................... 9
3.2
Product connection and booting...................................................... 10
3.3
Hard disk formatting and disk drive establishing.............................. 10
3.3.1
Windows operating system.............................................................. 10
3.3.2
MAC operating system..................................................................... 13
3.4
An introduction to other functions.................................................... 16
3.4.1
LCD monitor operation guide........................................................... 16
3.4.2
LCD monitor message guide........................................................... 18
Appendix A Frequently asked questions.................................................. 20
RAID GUI Instruction..................................................................................... 23
Chapter 1 An introduction to RAID
1.1 What is RAID?
The idea of RAID (Redundant Array of Inexpensive Disks) was first proposed by David A. Patterson,
Garth Gibson and Randy H. Katz at University of California, Berkeley in 1988. The purpose of RAID
is to store the same data in multiple hard disks at different places, and to improve the performance of
storage system. The advantages of RAID are to provide better productivity effectiveness and data error
tolerance, and these can be done by distributing workload parallelly to a number of disk drive entities to
achieve better performance. And through multi-operation of data, whenever one (or several) hard disk
or magnetic area has a problem, we can still find the mirror copy of data in another hard disk, and so to
achieve error tolerance.
Not only does RAID controller be able to assist users in ensuring that they can see their operating
system in logical disk drive, they can also feel at ease without having to worry on how to manage this
complicated construction. Generally, in order to get better result, we suggest users to choose a hard
disk in same brand and same model while installing them in RAID, as a matching performance of these
hard disks would allow the array to operate better than a single hard disk.
1.2 Comparison of RAID 0 and RAID 1
RAID 0: Striping (fast speed but has no error tolerance; two hard disks are required)
RAID 0 is currently the fastest RAID. It is a type of performance-oriented disk mirroring method.
The function of RAID 0 is that it is able to combine two or more hard disks to work as a large hard
disk. While all the hard disks are reading or writing under Stripe mode, they will be started up
simultaneously. Assuming that you are writing a 10MB file and you have two hard disks to work under
Strip. At this instant, every disk will start up simultaneously to write this file and sub-divide it into two
equal parts, and simultaneously write it in two hard disks (each in writing 5MB). Therefore, the writing
time is only half the original time. When you want to retrieve this file, you only need to retrieve 5MB
each from two hard disks vice versa, and so, the time needed is only half. As reading and writing of file
by each hard disk is only half the original time, therefore, the reading and writing performances are the
fastest among all RAIDs. However, as RAID 0 array does not backup data, whenever one of the disks
is damaged, the entire array will be malfunctioned to result with all data lost in the array. Thus, we can
say that RAID 0 does not have any error tolerance capability at all.
The computing method of RAID 0 hard disk capacity:
[total capacity] = [hard disk number] x [minimum capacity of hard disk]
Ex: 2 × 500GB HDD=2 × 500GB=1000GB
1 × 500GB HDD+1× 200GB HDD=2×200GB=400 GB
RAID 1: Mirroring (possesses error tolerance capability; two hard disks are required)
As RAID 1 is composed of two hard disks, it can be referred to as disk mirroring. Each data will
simultaneously be written in two disks and that the data in two disks are exactly the same. Whenever
one of the disks fails, the system is still able to operate normally. RAID 1 features excellent data
security, and is most commonly and widely used among all the RAID levels, and most compliance to
the original design concept.
4 An introduction to RAID
The computing method of RAID 1 hard disk capacity: [total capacity] = [minimum capacity of hard disk]
Ex: 2 × 500GB HDD=500GB
1 × 500GB HDD+1× 200GB HDD=200GB
The following is a comparison of two RAID levels:
RAID Level
Basic operation Disk applicable
principle
space
Data reliability
Data transmit
rate
Minimum
hard disk
requirement
0
Partition storage
Total hard disk
capacity
Low
Fast
2
1
Mirroring
Minimum hard
disk capacity
High
Slow
2
Chapter 2 Characteristics and specifications
2.1 Product appearance and accessories guide
Front view
3
ESC
1
PWR
2
ENTER ALARM
5
6
4
7
8
9
1. LCD panel
Display different product messages including RAID mode, fan speed, product interior temperature,
and hard disk status.
2. UP/DOWN selection key
The operation key for function setting (options: cycle function).
3. Cancel key (ESC)
The operation key for function setting (options: abandon function).
Characteristics and specifications 5
4. Confirm key (ENTER)
The operation key for function setting (options: confirm function).
5. Power lamp (blue)
It will light up continuously after power ON.
6. Failure warning light(red)
It will light up when there is an interior fault, including three status of hard disk failure, fan failure, and
when temperature is too high.
7. Hard disk tray handle
8. Hard disk tray button
The operation key for removing the hard disk tray
9. Hard disk reading/writing light (blue)
Display different product messages including RAID mode, fan speed, product interior temperature,
and hard disk status.
Rear view (GR3630-SB3)
Mute
Rear view (GR3630-WSB3)
Mute
1. AC power socket
2. Power switch
3. Warning sound effect switch (Mute)
The product is built in with a buzzer. Whenever there is an error during the application process, apart
from lighting up the warning light at the front, the product will also emit a warning sound. If users do
not want the warning sound, they can switch this off.
4. 6cm fan
6 Characteristics and specifications
5. USB port
6. eSATA port
7. Security lock hole
If users want to secure the product in a specific place permanently, they can buy themselves a lock
to secure the lock at this position.
8. 1394b port
Parts list
Item
GR3630-SB3
GR3630-WSB3
GR3630 main unit
AC power cord
USB 3.0 connecting cable
eSATA connecting cable
1394b connecting cable
Quick installation guide
CD
Screw pack
※ After opening the package of this product, please ensure that the related accessories of the model
you purchased are complete with nothing missing, and the appearance and functions are all intact.
Should you discover any problem with the product, please contact the store or agent where you
bought the product as soon as possible.
2.2 Product detailed specifications
Model
ASIC
Host Chip
Host Interface
Supporting Hard Disk
Hard Disk Supporting Number
Hard Disk Size
Hard Disk Maximum Supporting Capacity
Product Maximum Storage Capacity
RAID Level
Hot Swap Hard Disk
GR3630-SB3
GR3630-WSB3
SR2045
SR2045
ASM1051 + SR2045
ASM1051 + OXFW934DSB
USB3.0 & eSATA
USB 3.0 & eSATA & 1394b
SATA 3.0 Gb/s
SATA 3.0 Gb/s
2 pieces
2 pieces
3.5 inches
3.5 inches
3TB
3TB
Under 6TB / RAID 0 status Under 6TB / RAID 0 status
RAID 0 & RAID 1
RAID 0 & RAID 1
yes
yes
Characteristics and specifications 7
Auto-rebuilding
yes
yes
LCD Display
yes
yes
Status Indicator Light
yes
yes
Error Status Warning Sound
yes
yes
Environmental Detection
yes /abnormal temperature yes /abnormal temperature
and fan operation
and fan operation
Cooling Fan
DC-12V / 6cm / 3500 rpm
Power Input
AC 100~240V
AC 100~240V
DC 12V & 5V / 70W
DC 12V & 5V / 70W
Built-in Power Supply
GUI
Operating System
Quality Certification
DC-12V / 6cm / 3500 rpm
Windows
Windows
Windows & Mac & Linux
Windows & Mac & Linux
CE & FCC
CE & FCC
2.3 Precautions before application
1. Although GR3630 allows users to use hard disks of different capacities, but if you want to get best
application performance and best product compatibility, we suggest you to use brand new hard disks
of same specifications, model number and brand.
2. If you want to install GR3630 in two used hard disks, before installation, please first backup data in
these hard disks to other hard disk to avoid data loss in the setting process later on.
3. Please ensure that the two hard disks do not contain bad track as a precaution if one of them fails, it
may cause a system crash or a risk to lose all data.
4. The factory default value of GR3630 is RAID 1, we suggest users to first consider the application
before using it. If your requirement is data security, please set it as RAID 1 mode; and if your
consideration is to expand storage capacity, please set it as RAID 0 mode. Should you need
resetting later on, it would destroy the data in the disks.
5. RAID 0 has no data backup function, but it is capable of combining all the hard disks to form a largecapacity hard disk with faster transmission performance. But whenever one of the hard disks fails, it
would destroy the data in all the hard disks.
6. Users are able to set RAID level and GR3630 basic functions through the LCD monitor and the right
keys at the front of the product.
8 Characteristics and specifications
2.4 Message Indication of LED and Buzzer
LED Indicators
Status
Power LED
Alarm LED
HDD LED
Buzzer
Power on
Blue / Light On
------
------
------
No disk
Blue / Light On
Red / Light On
------
Yes
Disk Failure
Blue / Light On
Red / Light On
------
Yes
Access
Blue / Light On
------
Blue / Blink
------
Fan Failure
Blue / Light On
Red / Light On
------
Yes
Overheat (Over 55°C)
Blue / Light On
Red / Light On
------
Yes
Rebuilding
Blue / Light On
------
Blue / Blink
------
Chapter 3 Installation of GR3630
3.1 Installation of hard disk
1. Press the hard disk tray button
※ Press the hard disk tray button and pull out the hard disk tray
ESC
PWR
ENTER ALARM
2. Install two brand new SATA hard disks in the hard disk trays and secure each of them with screws at
four positions as indicated in the diagram using the screw pack provided. Finally, insert the hard disk
trays into GR3630.
Installation of GR3630 9
3.2 Product connection and booting
1. Connect AC power cord to your power outlet and GR3630.
2. Choose the interface (USB & eSATA & 1394b) that you want, and hook up your computer with the
connecting cable.
※ Choose only one type of interface to hook up with your computer.
3. Switch on the power of GR3630, when the LCD displays Pri HDD: OK and Sec HDD: OK after about
20~30 seconds, it indicates that GR3630 has been booted.
※ The factory default value of GR3630 is RAID 1 mode.
GR3630-SB3
RAID - 1 V100.0812
Pri HDD : OK
Sec HDD : OK
GR3630-WSB3
RAID - 1 V100.0812
Pri HDD : OK
Sec HDD : OK
3.3 Hard disk formatting and disk drive establishing
3.3.1 Windows operating system
1. Enter into device manager of your computer.
※ Use the mouse to click on My Computer and then click the right mouse button to select
Management option.
10 Installation of GR3630
※ Click on Disk Management
2. Add in GR3630 hard disk and format it.
※ During the setting process, we suggest you to choose NTFS format.
※ Move the mouse to the upper region of Non-configured area and click the right button; it will
display the list of New Disk Partition
Installation of GR3630 11
※ According to Disk Management Wizard instructions, click Next to proceed the process until finish.
3. Setting is finished, you can start using this product.
※ After finish setting and formatting the hard disk, it will display a disk drive code (I:) as shown in
the diagram.
12 Installation of GR3630
※ After finish setting, your computer will display a disk code (I:) to note that you can now use
GR3630 normally.
3.3.2 MAC operating system
1. Enter into Disk Utility of your computer.
Installation of GR3630 13
※ Click on this hard disk device
2. Add in GR3630 hard disk name and do formatting operation.
※ Choose hard disk formatting and disk drive name setting (can be set as GR3630)
14 Installation of GR3630
※ After finish setting the disk drive, please click Erase buttons
hard drive.
1
&
2
, then start formatting the 2
1
3. Setting is finished, you can start using this product.
※ After finish formatting the hard disk, it will display the disk drive name GR3630.
Installation of GR3630 15
※ The desktop will automatically create a disk drive name GR3630, you can start using this product.
3.4 An introduction to other functions
3.4.1 LCD monitor operation guide
※ GR3630-SB3
EnterE
2
Pri HDD : OK
Sec HDD : OK
Down
GR3630-SB3
RAID-1 V090707.1
Down
SYSTEM TEMP
35 C
Down
SYSTEM FAN
3500 RPM
16 Installation of GR3630
6
1
GR3630-SB3
Booting...
3
4
5
Down
PASSWORD
0000
nter
CHANGE RAID MODE
YES
NO
Down
Up
SETUP PASSWORD
YES
NO
1. After power ON and before entering standby screen, click on ENTER key, you will enter into product
function setup options (product default password is: 0000)
2. Upon booting, the standard standby screen will display the hard disk operation status.
3. It will display product model/RAID level/firmware edition.
4. It will display system temperature.
5. It will display fan rotation.
7
CHANGE RAID MODE
YES
NO
Down
6
Up
SETUP PASSWORD
YES
NO
Enter
EnterE
RAID - 0
YES
MODE
NO
PASSWORD
0000
8
EnterE
nter
DATA WILL LOSE
YES
NO
PASSWORD : 0000
YES
NO
nter
Enter
Raid Mode Changed
Pls Reboot Sys
SETUP PASSWORD
OK
6. There are two functional setup options, one of them is RAID level setting, and the other is login
password setting.
7. The factory default setting of RAID level is RAID-1, therefore, upon entering, you will be asked
whether or not to change RAID-0. A change of RAID level would cause the original hard disk data to
get lost, please pay special attention to it.
8. Use UP/DOWN key to input custom password. Password changing is to allow users to customize
their personal preferences. After it has been changed, please record the password personally.
Should you forget about it, it would cause disturbances to application.
Installation of GR3630 17
※ GR3630-WSB3
GR3630-WSB3
RAID-1 V100.0812
2
1
Pri HDD : OK
Sec HDD : OK
Down
GR3630-WSB3
RAID-1 V100.0812
Down
SYSTEM TEMP
35 C
Down
SYSTEM FAN
3500 RPM
2
3
4
Down
1. Upon booting, the standard standby screen will display the hard disk operation status.
2. It will display product model/RAID level/firmware edition.
3. It will display system temperature.
4. It will display fan rotation.
3.4.2 LCD monitor message guide
1
Pri HDD : OK
Sec HDD : OK
2
Pri HDD : OK
Sec HDD : MISSING
3
Pri HDD : OK
Sec HDD : FAILED
4
Pri HDD : OK
Sec HDD : OK
5
Pri HDD : OK
Sec HDD : OK
Common messages
1. OK: hard disk status is normal.
2. Missing: You have not installed hard disk
18 Installation of GR3630
F
T
3. Failed: You have installed hard disk, but it has failed to operate.
4. F: When F appears on the top right corner of monitor, it represents that the fan has already
malfunctioned and is not working.
Please visual inspect whether or not the fan has stopped working. If the malfunction is confirmed,
please return it to original factory to repair.
5. T: When T appears on the right bottom corner of monitor, it represents that the interior temperature
of product is too high (exceeding 60℃). If it is being used for a long period of time under an
overheated condition, it would damage the hard disks. We suggest you to switch off the power to
allow the temperature to drop before rebooting.
Installation of GR3630 19
Appendix A Frequently asked questions
Q: Is it alright to use RAID 1 to do hard disk backup function?
A: Yes. RAID 1 is a mirror function itself. If your hark disk requires RAID 1 to do backup function,
please place your hard disk containing data in Pri HDD (Source) position to set as RAID 1, and after
booting, place the new hard disk in Sec HDD (Target) position. The system will do data backup
function automatically. After GR3630 has finished rebuilding, the data in two hard disks would be
exactly the same.
Q: Is it alright to use a single hard disk under RAID 1?
A: Yes, but it would completely loss its originally RAID 1 data security function. We suggest you to
use two hard disks under RAID 1 mode to ensure data security. Under a single hard disk, RAID 1 is
unable to perform mirroring function. If one hard disk is damaged, the interior data would be
destroyed completely. Whenever one hard disk is damaged, we suggest you to replace it with a new
one as soon as possible.
Q: If GR3630 LCD monitor displays an error in hard disk, what should I do?
A: If you are using RAID 0 mode, please ensure which hard disk has caused the error and switch off
the power of GR3630, remove the damaged hard disk and replace it with a new one. After
rebooting, the system will rebuild RAID 0 system, but the original data would all be lost.
If you are using RAID 1 mode, you can remove the damaged hard disk and replace it with a new
one directly without having to switch off power. After the new hard disk has been inserted, the
system will start to “rebuild” program automatically. After finish rebuilding, you can then use it
normally. Please note that during the process of system data rebuilding, do not remove any hard
disk to ensure an integrity of data.
※ Under RAID 1 status, the data “rebuild”process.
Under the circumstance that Sec HD is damaged …
1
Pri HDD : OK
Sec HDD : FAILED
2
Pri HDD : OK
Sec HDD : MISSING
3
Pri HDD : OK
Sec HDD : INSERT
4
Rebuild Pri => Sec
ENT = Y ESC = N 10s
5
Rebuilding ......
Pri => Sec
6
Pri HDD : OK
Sec HDD : OK
20 Appendix A Frequently asked questions
00%
Pri HDD : OK
Sec HDD :FAILED
7
1. Sec HDD has found to be damaged
2. Remove the damaged Sec HDD
3. Insert a new hard disk into Sec HDD position
4. After about 5 seconds, the system will ask you whether or not to rebuild? If you do, please click on
ENTER key; if not, please click on ESC key.
5. After confirming to rebuild data, GR3630 will start to copy hard disk data and display the working
progress.
6. After finish copying the data, it will return to standby screen.
7. If you choose to abandon data rebuilding, the screen will return to a screen that reminds user that
Sec HDD has been destroyed (same as screen 1).
Under the circumstance that Pri HDD is damaged …
1
Pri HDD : FAILED
Sec HDD : OK
2
Pri HDD : MISSING
Sec HDD : OK
3
Pri HDD : INSERT
Sec HDD : OK
4
Rebuild Sec => Pri
ENT = Y ESC = N 10s
5
Rebuilding ......
Sec => Pri
6
Pri HDD : OK
Sec HDD : OK
Pri HDD : FAILED
Sec HDD : OK
7
00%
1. Pri HDD has found to be damaged
2. Remove the damaged Pri HDD
3. Insert a new hard disk into Pri HDD position
4. After about 5 seconds, the system will ask you whether or not to rebuild? If you do, please click on
ENTER key; if not, please click on ESC key.
Appendix A Frequently asked questions 21
5. After confirming to rebuild data, GR3630 will start to copy hard disk data and display the working
progress.
6. After finish copying the data, it will return to standby screen.
7. If you choose to abandon data rebuilding, the screen will return to a screen that reminds user that Pri
HDD has been destroyed (same as screen 1).
Q: Do GR3630 Series have volume limitation?
A: If you want to use GR3630 with the volume over 2TB (RAID 0 mode), please make sure that your
computer and the operating system are both 64-bit or above. Or the computer may not work well
with GR3630. (Due to the hardware limitation, the 32 bit PC and OS can only support storage
volume under 2TB.)
22 Appendix A Frequently asked questions
RAID GUI Instruction
RAID GUI is the software for device status monitoring and firmware upgrades self-developed by
RAIDON for RAIDON 2045 RAID chip. RAID GUI can be executed directly without installation and only
under Windows operating system.
Please refer to the definitions of each function below:
1.System Status
“System Status” indicates the instant status and information of installed storage drives, also by click on
“Log” button from the lower right corner will give the records of event log. (Concurrent events will also
be recorded to the log which automatically saved in the same folder of RAID GUI software.)
When two of the same storage devices are installed, you may switch the corresponding storage device
by selecting device number as “Device 1” from the upper left corner. RAID GUI management only
supports maximum of 2 storage devices.
2.Firmware Upgrade
RAID GUI Instruction 23
“Firmware Upgrade” allows for the upgrades to the firmware of corresponding device, also indicates the
existing version of firmware to the corresponding device.
Note : If installed storage device operates normally, we strongly recommend not upgrading the existing firmware.
3.E-Mail Notify
“E-Mail Notify” provides auto E-Mail notifications of HDD removal or failures to the designated E-Mail
addressee. (“E-Mail notify” can be disabled temporarily or permanently after configuration by selecting
“Don’t send Email for this event” from each error options.)
Note : This function activates only under operating states of RAID GUI.
4.About
“About” indicates the version of RAID Management, the RAID GUI software.
24 RAID GUI Instruction