1
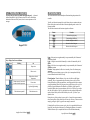
AQUA SPAS PRODUCT REFERENCE Please fill out and keep this form for future reference. The serial number is on your right below the keypad on the spa base. Spa Information Congratulations Aqua Spa Owner! You’ve made a wonderful investment toward your own general health and well being. We are certain that you will enjoy this spa for many years. In order to receive the full benefit of your spa, you need to understand how it functions. We suggest than you take some time to carefully read this owner’s manual. The manual is meant to be a supplement to the training you should receive from your Aqua Spas dealer when you purchase and start up your spa for the first time. Your spa is a powerful piece of electrical equipment, with proper care and installation it will provide years of safe use and enjoyment for your family and friends. This manual contains safety warnings and installation instructions, as well as operating and maintenance procedures. Spa Model: Spa Serial Number: If you have any questions or comments regarding this manual or your new spa, please contact your authorised Aqua Spas dealer. Spa Model Number: Welcome to your Aqua Spa experience Spa Color: Sincerely, Date of purchase: Aqua Spa Team Dealer Information Company: Address: Telephone Number: Email: Every effort has been made to ensure the accuracy of this manual. However, due to continuous improvement projects, all models, operation, and /or specifications are subject to change without prior notice. Aqua Spa Owner´s Manual, page 1 Aqua Spa Owner´s Manual, page 2 TABLE OF CONTENTS SAFETY PRECAUTIONS PLEASE, BE A RESPONSIBLE OWNER. TAKE THE TIME TO READ ALL OF THESE WARNINGS AND CAUTIONS BEFORE USING YOUR SPA. SAFETY PRECAUTIONS ………………………………………………… pg. 4 BASIC OPERATION INFORMATION…………………………………... pg. 6 SPA SPECIFICATION AND COMPONENTS …………………………...pg. 6 When installing and using this spa, be aware of your safety. Be sure to list emergency telephone numbers in a visible area near the spa, including doctor, hospital, ambulance, police, and the fire department. Explain safety precautions to all new or occasional users of your spa. Remember, they may not be aware of the possible risk associated with the spa water temperature. Have at least one family member learn CPR (cardiopulmonary resuscitation). IT COULD SAVE A LIFE! SITE PREPARATION …………………………………………………….. pg. 9 READ AND FOLLOW ALL WARNINGS! ELECTRICAL REQUIREMENTS………………………….. ………….... pg. 9 INSTALLATION PROCEDURE …………………………………………. pg. 10 STARTING FOR THE FIRST TIME ..………………………………….. pg. 10 OPERATING INSTRUCTIONS ………………………………………….. pg. 11 MAIN FUNCTIONS ....……………………………………………………. pg. 12 LOW LEVEL PROGRAMMING ………………………………………… pg. 14 WATER QUALITY AND MAINTENANCE …………………………….. pg. 15 GENERAL SPA MAINTENANCE ……………………………………….. pg. 17 TROUBLESHOOTING …………………………………………………… pg. 19 Aqua Spa Owner´s Manual, page 3 · WARNING Risk of Accidental Drowning To avoid accidents, do not permit children to use this product unless they are closely supervised by an adult at all times. Do not let children dive under the water they may get trapped by suction line. Always lock the spa cover after using your spa for your children’s safety. · WARNING Risk of injury Never operate your spa if the suction fittings are broken or missing to prevent body and hair entrapment. Never replace a suction fitting with one rated less than the flow rate marked on the original suction fitting. The suction fittings in your spa are sized to match the specific water flow created by the pump. In case of replacement of the suction fittings or the pump, be sure the flow rates are compatible. · Wiring should be done by a qualified electrician according to EU regulations. · DANGER Risk of Electrical Shock Install at least 1.5 m from all metal surfaces. · DANGER Risk of Electrical Shock Do not permit any electrical appliances such as a light, telephone, radio, or television sets, within 1.5m of your spa. · Do not touch or come to contact with any electrical accessory when in your spa or when your body is wet. Do not use the spa with the equipment compartment door missing. · Switch off the main power source breaker before performing any service or repairs on your spa. · Do not allow the pumps to operate for an extended period of time with the cover on the spa top. Extended pump operation causes a slow heat buildup due to water friction. The spa equipment control is equipped with a builtin safety timer that automatically turns off the jet pumps after 20 minutes. · Do not use or operate the spa when the filter cartridges are not in place. · Do not store chemicals in the spa’s equipment compartment. Aqua Spa Owner´s Manual, page 4 Health Precautions · Users with a history of heart disease, low or high blood pressure, circulatory system problems, or diabetes and obese people should consult a physician before using a spa. · People using medication should consult a physician before using a spa since some medication may induce drowsiness while other medication may affect heart rate blood pressure, and circulation. · If you experience symptoms of hypothermia (increase in body temperature, dizziness, fainting, lethargy, drowsiness) refrain from further use of the spa and consult your physician. · People with infectious disease should not use a spa. · Pregnant or possibly pregnant women should consult a physician before using a spa. · Do not use the spa immediately after strenuous exercise. · Water temperatures between 38ºC and 40ºC are considered safe for a healthy adult. Most people in good health find water temperature of about 39 ºC and the time limit of about 2030 minutes in this water to be satisfying. Children are especially sensitive to hot water, therefore lower water temperatures are recommended for young children and when spa use exceeds 10 minutes. · Do not use drugs and/ or alcohol before or during the use of a spa or hot tub to avoid possible drowning or unconsciousness. · Maintain water chemistry in accordance with instructions. · CAUTION Risk of Electrical Shock Do not leave compartment door open. · Replace components only with identical components. · To prevent electrocution, do not connect any auxiliary components (for example cable, additional speakers, headphones, additional audio/video components, etc.) to the system. · Do not service this product yourself. Opening or removing cabinet door should be done by a qualified personal due to dangerous voltage or other risk of injury. BASIC OPERATION INFORMATION · Place your spa on a flat surface · Wipe the interior of the spa with a damp cloth. · Fill the spa with water · Never turn the spa on without water. It will void your warranty if any damage occurs to the pumps, heater, or controller. · Connect spa to power supply · Set your water temperature · Wait until the water is comfortable. The length and time required to heat your spa to the set temperature is different depending on the season, air temperature and wind factor of the environment. Usually it warms 1 °C an hour. There is one Double Speed Pump. First speed is used for circulation, filtration and heating. Second Speed is used for Hydrotherapy. There is a blower. · Turn any of the pumps on, enter the spa and enjoy it You can turn clockwise or counterclockwise to open or close jets by twisting the outer jet housing control the water pressure and direct water to different spa areas by using the diverter valves regulate mixture of air and water flowing through jets by adjusting the air control valves Pumps and blower automatically stop after 20 minutes of continuous running. Replacing and cleaning filter. · When replacing and cleaning your filter cartridge, make sure that the pump is off before you remove the filter. The best way to clean them is to blast them with a hose fitted with a high pressure nozzle once a week. · Clean your spa every 3 to 4 months. Drain your spa and clean it with a non aggressive cleaner. Do not use any sharp tools. Fill with regular tap water and chemically treat the spa. If you winterize your spa or leave it empty without water for a long period of time, do not allow direct exposure to sunlight in order to avoid the damage of plastic parts, jets, headrests and the acrylic surface. Damage caused by sun exposure will not be covered under warranty. SPA SPECIFICATION AND COMPONENTS SPA SPECIFICATION Model Dimensions cm Cassaone 220x220x95 Cassione 220x220x95 Aqua Spa Owner´s Manual, page 5 Weight (kg) Volume Water Jets Air Empty/Full lt Injectors 360/1720 1360 20 15 360/1770 1410 20 15 Aqua Spa Owner´s Manual, page 6 Pumps 1 1 SPA COMPONENTS Interior Components Description To access the equipment compartment, remove the cabinet panel directly below the control keypad. Serial Number – found below the keypad down on the spa base. Write this number into your owner’s manual and have it ready whenever you contact your dealer. Control Pack monitors all of the spa’s functions. WARNING: Do not attempt to access the control pack without turning the mains power off! Heater works with a defined temperature setting to heat the spa’s water as it flows through the system. Jet Pump Runs water through the spa. Knife Valves – the knife valves are used to cut off water flow to the pump in case you need to remove it. For normal operation, the gate valves must remain open. Filter Housing – creates a powerful suction used to pull particles and debris through the filter element. Air Blower – supplies air to the air injectors creating a hydro massage action. Drain Valve – Drains water from the spa. Exterior Components Description Control panel / Keypad – gives you unrestricted access to all of the spa’s functions Light – illuminates the spa water at dark. Massage Jets – the individual jets can be turned on and off. This is done by simply turning the outer jet housing. Turning clockwise will turn the jet on, and turning counterclockwise will turn the jet off. Individual jet control can be done independently from normal diverter valve settings. Suction Intake – it sucks water back into the pumps system to recirculate and run through the jets. Filter Intake – point at which water is drawn into the filter assembly to remove both large debris and small particles. Diverter Valve – allow you to control water pressure and direct water to different spa areas. Air Control Valves –regulate the mixture of air and water that flows through the jets. Air injectors – inject air bubbles in the water Bottom Drain Valve – allows attaching a garden hose for easy drainage. Pillows – cushioned head rests for maximum comfort. Aqua Spa Owner´s Manual, page7 Aqua Spa Owner´s Manual, page 8 SITE PREPARATION INSTALLATION PROCEDURE Because your new spa is portable, you can locate it just about anywhere you wish on a patio, on a deck, in the middle of your yard, or even indoors. Just be sure to position it above ground in a levelled area with good drainage. It has to support the weight of the spa when filled with water and people. · It is responsibility, of the spa owner, to make sure that the spa is on a solid, level, and appropriate surface or base. · Place the spa on at least 1012 cm of solid dry concrete. Do not place spa on wet or not completely dry concrete, which may tend to sink or sag and damage the spa and will void your warranty. Make sure that the concrete is leveled. · If the spa is to be placed on a wood deck or patio be sure that the wood structure is able to hold the weight. · Placing your spa on a bed of peagravel or on a dirt surface will damage your spa, voiding your warranty. · Make sure any wood decking does not have any low spots, high spots, or any gaps between the surface and the bottom of the spa. This will cause damage to your spa and will void your warranty. · If any damage is done to your spa due to the surface on which the spa is placed the warranty will be voided. · We recommend that you leave some space open around your spa to allow for easy access from all sides, making any maintenance easier. · Fill the spa with the water from the hose through the filter inlet (after filling is complete, remember to put the filter cartridge in place prior to starting the spa). This way you minimise the chances of trapping air into the pump system. The water level should be half way up the filter area. · Never allow the water level to drop bellow the skimmer opening. Air will enter into water lines system, causing problems with the water flow. Running the pump without water flow will damage the pump seal assembly and could result in further equipment damage. ELECTRICAL REQUIREMENTS INSTALLING POWER THROUGH THE SPA CABINET · Open the front panel located under keypad. · Open the control head panel to reveal the terminal blocks. · Run cable from the opening on the bottom of the spa through the plastic pipe into the controller. · Connect power cable to the terminal. · Make sure the wires are in their correct positions before turning the power on · Once the spa is wired in make sure all water knife valves area open. Do not run spa with valves closed, this could damage the spa equipment. IMPORTANT: When installed in the EU, the electrical wiring of the spa must meet the requirements of the given country. The electrical circuit must be installed by an electrical contractor and approved by a local building/ electrical inspector. It is the customer’s responsibility to acquire necessary permits and to arrange for installation and connection to electrical power supply by a licensed electrician. Correct wiring of the electrical service box, GFCI box and pack terminal block is essential. STARTING FOR THE FIRST TIME Before switching the controller on for the first time, make sure that: · · · there is sufficient water in the pool; all the valves are open; there is nothing that can block the flow of the water in the pipes. Connection to the power supply IMPORTANT: Carefully read this paragraph before connecting the controller! Failure to observe the instructions contained in this paragraph may cause serious damage to the controller and to the other electrical devices installed. Generally, when starting for the first time, the temperature of the water introduced into the spa should be lower than the temperature set point (35°C). For This ensures that once the spa is started up the controller will activate the pump to send water to the heater. The power cable should be connected to the main power supply. The MICROSPA controller can be connected to power supply: Singlephase: 230 V, 50/60Hz, 15 A All models must be permanently connected (hard wired) and GFCI protected in accordance with local and national electrical codes. All electrical wiring must be performed by a licensed electrician knowledgeable in the operation and wiring of a GFCI protected systems. Aqua Spa Owner´s Manual, page 10 Aqua Spa Owner´s Manual, page9 OPERATING INSTRUCTIONS MAIN FUNCTIONS To operate your spa you use your main control panel (keypad). – it features 4 buttons (Pump, Blower, Light, Up/Down) and an LCD screen, which displays information on the status of the system, such as the water temperature or error messages. This section describes the most commonly used functions during the operation of the controller. Keypad TSC9 Key to Display Panel Icons and Buttons Button /icon Blinking On Pump active Blower active display shows desired temperature Heater not active, but water is heated to desired temperature. Heater active Light on (high intensity) Filter function suspended Filter function active Typically, each function is managed by a specific button, however sometimes the same button can be used to control more than one function (depending on the version of the firmware installed). The table below summarises the functions assigned to each button. Button Function Pump Starts and stops jet pump. Blower Light Starts and stops the blower. Switches the light on and off Up Down Increase the values being set. Decrease the values being set. Pump if the pump is not stopped manually, it stops automatically after 20 minutes of continuous operation. Light if the light is not switched off manually, it switches off automatically after 20 minutes. Blower if the blower is not stopped manually, it stops automatically after 20 minutes of continuous operation. Filtration – during operation, the filter icon is on steady; if one of the buttons, pump, blower or light is pressed during a purge cycle, the cycle is interrupted and will only resume 40 minutes after the last device stops. Filtering function. When the filtration cycle is active, the filter icon will light up continuosly. The spa is programmed to run a filtration cycle once a day for 6 hours. During the filtration cycle the pump and blower run in high speed mode for one minute to purge the plumbing, followed by the pump at low speed for the rest of the cycle. It is possible to program the duration of the filtration cycle. Hold the “light” button for 5 seconds, the display shows the current duration value. Use the “Up/Down” key to adjust this value. Press again the “Light” key, the display shows the parameter D indicates the number of hours to delay the start of the filtration cycle, use the “ Up/Down” key to adjust the value. During the set up, if the user doesn’t press any key for 5 seconds, the system memorises the new setting, but it will take effect only at the next cycle. However, if the user exits the setting by pressing the “light” key again the new setting is memorised. If during the filter cycle the user presses any key, the cycle is suspended whilst the spa is being used. Once the spa has been inactive for 40 minutes the filtration cycle continues. When the Filtration cycle is suspended the filter icon LED will flash intermittently. Aqua Spa Owner´s Manual, page 11 Aqua Spa Owner´s Manual, page12 Automatic functions The controller has a number of functions that cannot be accessed directly by a user, and are managed by the controller. This section describes the functions and their purpose. Powerup signal the PowerUp function signals that a power failure has occurred, if this is the case the current water temperature flashes on the display. Controlling the water temperature water temperature is maintained automatically and the spa will heat to within 0.5 °C either side of the desired temperature. When the heater is activated, the corresponding icon on the display remains lit. The same icon flashes when the water needs to be heated, but the heater is not active. Setting the water temperature – the desired water temperature in a spa can be set, in 0.5 °C steps, between 15 and 40 °C, using the Up and Down buttons from main keypad. Depending on equipment, this will normally take 8 to 10 hours. Smart winter mode – function is activated automatically when the room temperature, measured by a sensor located inside the controller, is less than 6 °C, so as to prevent the water in the pipes of the spa from freezing. This protection function automatically activates all the pumps and the blower for 1 minute at variable time intervals; the lower the room temperature the more frequently the pumps will be started. The longest interval between two consecutive starts is two hours. The activation of this function is not related to the water temperature inside the spa. The filter LED will blink whilst the spa is operating in Smart Winter Mode. Current management This feature helps to avoid overloading the input breaker. If the LC mode (Low current) is selected, the heater is not allowed to be on when the pump and the blower are running. If the HC mode (High current) is selected, the heater is allowed to be on when pump is running at the low speed together with blower. If the pump is running at high speed the heater is automatically turned off. Low Level Programming WARNING!!! The current management feature should only be adjusted by a qualified spa technician. Any problems and damages cause by unauthorised adjustment of the current management feature will invalidate your warranty. It’s possible to configure various system operating parameters from the key pad. This is normally done by the spa manufacturer, but may be done at any time. The configuration will be stored in the controller’s memory. To program these system parameters, the light key must be held for 20 seconds. After this time, the first parameter will be displayed (see below). For each parameter, use the Up/Down key to modify its value. The light key is used to accept the new value and switch to the next parameter. The display returns to the normal display when there are no more parameters to change. There are three (3) lowlevel programmable parameters: First parameter HC/LC With the Up/Down key is possible to select the HC (High current) or LC (Low current) options and the speed of the pump. Second parameter – BL/O3 With the Up/Down key is possible to select on of the two options. If the user select BL it is possible to connect a blower or a single speed pump. If the user selects O3 it is possible to connect an ozonator. In this case the keys on the overlay will have the following composition: Pump1, Light, Up, Down. Third parameter With the Up/Down key is possible to select on of the two options. TuC The temperature on the display is showed in ° Celsius TuF The temperature on the display is showed in ° Fahrenheit. To go from one parameter to the other one press the light key. To save your settings and exit from the low level programming function press the light key. Error Messages Highlimit error The heater turns off when High Limit (HL) probe temperature reaches 48ºC. This safety feature keeps the heater switched off until the temperature sensed by the HL probe falls below 44ºC and the power is reset. Three blinking dots on the display signify a high limit error. Pressure switch error Turns the heater off when there is a flow problem The error will warning continue to be displayed until flow problem is resolved The display will show three dots blinking. Aqua Spa Owner´s Manual, page13 Aqua Spa Owner´s Manual, page14 WATER QUALITY AND MAINTENANCE WATER QUALITY Safe, comfortable and clean spa water is a fairly simple task to achieve, but it does require attention because of the numerous factors that can alter it (water used to fill the spa, water temperature, user load, etc.). Spa water maintenance consists of three separate programs: · sanitization · pH balancing and maintaining the recommended mineral content level · achieving and maintaining the water clarity For chemicals and water quality maintenance aids, consult your Aqua Spa dealer. Sanitizers Sanitizer must be used regularly to destroy bacteria and organic compounds in the spa water. Chlorine, bromine and also some nonchlorine bsaed chemicals are the most widely used disinfectants for maintaining properly balanced water. pH balance pH (potential Hydrogen) is a measure of your water’s acidity or alkalinity. The measurement scale runs from 014. Recommended pH levels for spa water are pH 7.2 7.6. Water with a pH level above 7.8 can allow limescale to form, become excessively cloudy and can reduce the effectiveness of sanitizers. Total Alkalinity Total alkalinity refers to the amount of all alkaline salts in the water. Total alkalinity of spa water should be maintained within the range of 80120 mg/l. This will keep the pH stable and help prevent against scaling and cloudy water. Chemicals used to maintain total alkalinity are available from your dealer. Total Hardness Total hardness refers to the amount of calcium and magnesium in the water. High pH levels can produce scale deposits on a spa’s surface and also in the pump equipment. To maintain water clarity additional chemicals such as flocculants, algaecides, antifoam agents can be used. Consult with your Aqua Spa dealer for more details. Aqua Spa Owner´s Manual, page 15 BALANCING YOUR SPA WATER CAUTION: Never place sanitizers and other chemicals directly on the spa shell as it will damage the surface. Use a dispenser or place the sanitizer tablets in the filter basket. · Test the spa water using water test strips. · Check and adjust chlorine/sanitzer level (recommended level of free chlorine in the water is 0.2 – 0.5 mg/l .Also non chlorine sanitizer can be used) · Check and adjust pH (7.27.6) by using pH minus or pH plus chemicals; total alkalinity should be 80 to 120 mg/l. · Use other additives according to the water quality if necessary – metal inhibitor for breaking down metal deposits, mineral surface protector for scale deposit control, etc. RECOMMENDED WATER MAINTENANCE PROCEDURE 13 times a week: · Check water level · Check and adjust sanitizer level · Check and adjust pH Once a week: · Spray filter cartridge to remove loose particles · Every one to two weeks inspect and clean the spa filter cartridges using suitable detergent. If the filter is not cleaned on regular basis, the filter may clog and restrict water flow, which causes improper filtration and poor jet performance. · Drain your spa every three – four months. CHEMICAL SAFETY INSTRUCTIONS Do not keep your water treatment chemicals outside. KEEP ALL CHEMICALS OUT OF THE REACH OF CHILDREN! · Always read your chemical kit’s instructions before adding anything to the spa water. · Always use brand name spa chemicals. Consult your dealer who will know how to use the spa chemicals and where to buy them. · Never use spa chemicals if you do not know how to use them. · Remember to always maintain a safe and ideal level of chemicals in the spa’s water. · Failure to keep the spa’s water clean, balanced, and filtered may result in clogged jets and calcification to the spa’s surface, which may result in discoloration, texture to become rough, and to crack, heater to calcify and stop heating, filter to get clogged more often, and pumps to leak or crack around the unions and seals. · It is your responsibility to always maintain clean, balanced, and safe water. Improper water chemistry balance can damage the spa surfaces, and/or equipment and is not covered under your warranty. Aqua Spa Owner´s Manual, page 16 To receive many years of enjoyment from your Aqua Spa, remember the following points: There are three ways to drain your spa: 1/ External Drain Valve 2/ Reverse Siphon Method 3/ Submersible Pump – if you use a small submersible pump, be careful not to scratch the spa’s surface. It is recommended that after draining your spa you put the cover back on. Avoid exposing the acrylic surface to direct sunlight for an extended period of time. · · · · · · · Winterizing your spa Drain completely. Be sure all water is removed. Loosen unions at each pump to ensure water from pump area is removed. Remove pump freeze plugs. Vacuum all jets thoroughly to remove any water left over in the plumbing lines. Remove and clean filter cartridges, and store in a secure place to prevent freezing. Do not turn unit off with water in the spa. Frozen water may rupture plumbing. Freeze damage repairs are not covered under warranty. GENERAL SPA MAINTENANCE Overall Maintenance Checklist Keep the spa covered when not in use. Clean the filter every week. Replace at least one per year. Test the GFCI breaker once per month. Make sure the spa is situated on a solid, sturdy base. Change the water approximately every threefour months. Open the equipment compartment and check for leaks every few months. Clean your cabinet as needed. Spa surface Always keep your spa cover on the spa to avoid the spa’s surface from being discolored, cracked, sun grazed, spiderlike cracks, or gloss to fade on the smooth glossy acrylic finish. To clean the spa surface, all you need is a soft cotton towel or moist cellulose sponge with clean water. Never use abrasive cleaner or hand brush, cleaning solvents, acetone, or alcohol to clean the spa. This can fade, discolor, or even crack the surface, voiding the warranty. Spa equipment and pumps The spa equipment and the pumps do not need any regular maintenance. The equipment and the pumps are maintenance free. Jets Once a month check all your jets to see if they are working properly. The jets that are adjustable turn face left and right making sure they are free from any obstructions. Changing the Water It is suggested that you change the water once every four months depending on the area and the amount of usage. Draining the spa Because your spa holds a relatively small amount of water, contaminants such as body oil, perspiration, dirt, hair, etc., may become quite concentrated. For this reason, the water should be drained and replaced every threefour months depending on use. Before draining the spa, turn of power at the breaker. Aqua Spa Owner´s Manual, page 17 Aqua Spa Owner´s Manual, page 18 SPA WATER TROUBLESHOOTING TROUBLESHOOTING Symptom ERROR MESSAGES Signal on display Possible Causes Actions The display flashes Not a malfunction. The controller signals a previous power failure. 3 dots flashing The system has switched off the heater because the temperature at the heater has reached 48 °C. Press any button 3 dots flashing DO NOT ENTER THE SPA Wait for the water to cool down then switch the controller off. DO NOT ENTER THE SPA If the problem persists, contact our technical service department. The pressure switch/ flow Check that the low level switch does not detect the settings of the circulation movement of the water when pump correspond to the the low speed of pump is on configuration of the spa. Check that the circulation pump is operating. Check that the level of the water is sufficient and that the valves are open. Clean the filter. If the problem persists contact our technical service department. Possible Causes Cloudy Water Dirty filter High pH/alkalinity Suspended particles Improper sanitation Excessive oils/ Organic matter Old water Water Odor Low pH Foaming Solution Clean filter, use cleaner or degreaser Adjust pH using pH minus or pH plus Use clarifier chemical agent Increase sanitizer to recommended level Shock the spa with appropriate chemical agent Drain, clean and refill the spa Improper sanitation Adjust sanitizer to recommended level High content of chloramines – insufficient free available chlorine with chlorine odor Drain, clean and refill the spa Bacterial or algae growth with Shock the spa with a stronger sanitizer, a musty odor use algaecide Increase pH with pH plus Body oils, lotion And chemicals Resulting in soap Or detergent Excessive organics Old water Add antifoam agent Shock the spa with appropriate chemical agent Drain, clean and refill the spa If you have any questions please visit or call your dealer for assistance. Sometimes you may need to get advice from your dealer to further understand this manual or for help with your spa. Aqua Spa Owner´s Manual, page 19 Aqua Spa Owner´s Manual, page 20