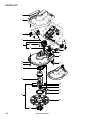
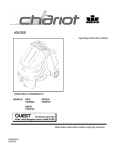
1
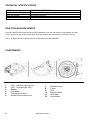
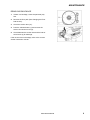
MODELS: 8.631-213.0 (Burnisher Head)
Operating Instructions (ENG)
8.631-214.0 (Burnishing Pad)
Read instructions before operating the machine.
86312550 - D
02/05/09
TABLE OF CONTENTS
Table Of Contents................................... 2
Important Safety Instructions.................. 3
Technical Specifications. ........................ 4
How This Machine Works....................... 4
Components ........................................... 4
Assembly ................................................ 5
Precaution And Floor Protection............. 5
OPERATIONS
First Cleaning.......................................... 6
Using Your Burnisher.............................. 6
LED-Display............................................ 6
Floor Pads .............................................. 7
MAINTENANCE
Changing The Floor Pad ........................ 8
Removing Blockage................................ 9
PARTS.................................................... 10
2
86312550 02/05/09
SAFETY
IMPORTANT SAFETY INSTRUCTIONS
When using an electrical appliance, basic precaution
must always be followed, including the following:
READ ALL INSTRUCTIONS BEFORE USING THIS MACHINE.
To reduce the risk of fire, electric shock, or injury: Use only indoors. Do not use outdoors or expose to
rain.
Use only as described in this manual. Use only manufacturer’s recommended components and attachments.
If the machine is not working properly, has been dropped, damaged, left outdoors, or dropped into water,
return it to an authorized service center.
Do not operate the machine with any openings blocked. Keep openings free of debris that may reduce
airflow.
Machine can cause a fire when operating near flammable vapors or materials. Do not operate this machine
near flammable fluids, dust or vapors.
For cleaning dry hard floors only. Do not use on wet floor.
Do not expose the machine to liquid, moisture or heat.
Do not touch the floor pad or drive while the machine is running.
Do not use machine without floor pad.
Do not use outdoors or on inappropriate surfaces, e.g stone or concrete.
Before using machine, remove all sharp and abrasive materials (i.e. grit and sand) with a vacuum cleaner.
This machine is suitable for commercial use, for example in hotels, schools, hospitals, factories,
shops and offices for more than normal housekeeping purposes.
Maintenance and repairs must be done by qualified personnel.
During operation, attention shall be paid to other persons, especially children.
The machine shall only be operated by instructed and authorized persons.
When leaving unattended, unplug the machine.
Do not handle the plug or machine with wet hands.
Do not unplug machine by pulling on cord. To unplug, grasp the plug, not the cord.
Do not use with damaged cord or plug. Follow all instructions in this manual concerning grounding the
machine.
Do not pull or carry by cord, use cord as a handle, close a door on cord, or pull cord around sharp edges or
corners.
Do not pull/run machine over cord. Keep cord away from heated surfaces.
Connect to a properly grounded outlet. See Grounding Instructions.
SAVE THESE INSTRUCTIONS
86312550 07/15/08
3
TECHNICAL SPECIFICATIONS
ITEM
DIMENSION/CAPACITY
Motor
Speed
Floor pad diameter
Protection
200 Watts
2000 rpm
11.50 inches (294 mm)
Grounded
HOW THIS MACHINE WORKS
The high speed of the burnisher pad causes the ingredients in the floor maintainer to bond together and form
a layer. In this way you achieve a high gloss shine and create a new surface which protects the flooring.
NOTE: All repairs should be performed by an authorized service representative.
COMPONENTS
1.
2.
3.
4.
5.
6.
4
LED – operation light (green)
LED – overload light (red)
Bumper
Foot pedal
Turning swivel neck
Suction duct access cover
7.
8.
9.
10.
11.
12.
86312550 07/15/08
Release button
Castor
Seal
Support castor
Floor pad
Pad retainer
ASSEMBLY
1. Fit the floor pad (11) to the bottom of the
burnisher, so that the pad will engage the pad
retainer (12).
2. Push the floor pad down with one hand
against the resistance of the four orange
spring-loaded ejector pins. Fit the Quickrelease pad holder (13) with the other hand
and turn it clockwise until the lever arms click
into the floor pad. (11). The Quick-release pad
holder is fitted correctly when its lines (22) and
the lines on the floor pad (23) coincide.
3. Push the telescopic tube (15) of your
vacuum(14) onto the swivel neck (5) of your
burnisher head.
PRECAUTIONS AND FLOOR PROTECTION
•
Not suitable for wet or uneven floors.
•
Do not operate the burnisher in a stationary position as this may damage the floor.
•
Do not operate the burnisher on soft floors.
•
Remove as much furniture as possible, and cover any that is left.
•
If heavy particles of dirt are not removed before polishing, small stones and grains of sand may damage
the floor.
•
Do not use on soft vinyl floors which are not properly attached or glued. They can be suctioned up or
damaged.
86312550 02/05/09
5
OPERATIONS
NOTE: Follow the safety instructions in the manual
that comes with your vacuum.
NOTE: Always check the cleaning and
maintenance instructions of your floor
manufacturer.
FIRST CLEANING
1. Vacuum your floor thoroughly.
2. Clean your floor with the appropriate cleaning
products for floor type.
3. When floor is completely dry you may then
proceed.
USING YOUR BURNISHER
1. Check to make sure the on/off switch (16) is in
the OFF position.
2. Plug the machine into the electrical outlet.
3. Switch the machine on.
4. To start the machine, push the foot pedal (4)
down and tilt the handle (15) downward.
The burnisher has a soft-start system so there
may be a slight delay before it starts.
5. Move the burnisher slowly over the floor in a
regular motion.
6. When the finish can no longer be restored
repeat the First Cleaning process and then repolish the floors.
NOTE: Failure to use the foot pedal will cause
lasting damage to the machine.
The foot pedal locks the swivel neck (5) in an
upright position. In this position the burnsiher
automatically turns off. The swivel neck has an
internal lock which will hold the machine in the
central position to avoid unwanted rotation.
LED-Display
The green LED light (1) indicates that the
burnisher is operational.
The red LED light (2) comes on if the machine has
shut down for safety reasons, for example,
overload or clogging. (See Removing Blockage
section.)
6
86312550 02/05/09
OPERATIONS
FLOOR PADS
There are three different cleaning pads available
to cover applications for your bunisher.
Blue Floor Pad
The blue floor pad is recommended for daily
maintenance and will maintain a high gloss on soft
coated floors.
Green Floor Pad
The green floor pad is recommended for daily
maintenance and will maintain a high gloss finish
with a hard surface.
Red and Yellow Floor pad
The red and yellow floor pads are for restoring a
gloss finish to worn floor which have a hard
surface.
86312550 02/05/09
7
MAINTENANCE
NOTE: Use only genuine Windsor replacement
floor pads to ensure performance, longevity and
safety.
All repairs should be performed by an authorized
Windsor dealer.
Check regularly for sharp and abrasive materials.
If necessary change the pad, otherwise floor
damage may occur.
Switch off and Unplug machine from electrical
outlet before doing any maintenance.
CHANGING THE FLOOR PAD
1. Hold the floor pad with one hand and squeeze
the lever arms (24) of the Quick-release pad
holder together.
2. Turn the Quick-release pad holder counterclockwise and remove it.
3. The floor pad (11) will release from the pad
retainer (12) and can be removed.
4. Replace with new pad.
5. Clean the underside of the machine and
remove any debris.
8
86312550 02/05/09
MAINTENANCE
REMOVING BLOCKAGE
1. If there is a blockage, check the pad area (20)
first.
2. Remove the floor pad. (See Changing the Floor
Pad section).
3. Check the suction duct (21).
4. Push the release button (7) and remove the
suction duct access cover (6).
5. Check between the suction duct and the inlet of
swivel neck (5) for blockage.
If the vacuum has no blockage, refer to the vacuum
cleaner instruction manual.
86312550 02/05/09
9
PARTS LIST
2
1
4
8
9
5
11
12
10
3
7
6
13
21
5
14
16
17
18
20
19
23
15
22
24
27
25
28
26
20
29
34
20
31
30
32
20
35
33
36
10
86312550 02/05/09
PARTS LIST
POS.
1
2
3
4
5
6
7
8
9
10
11
12
13
14
15
16
17
18
19
20
21
22
23
24
25
26
27
28
29
30
31
32
33
34
35
36
PRV
NO.
3204WI
3205TG
3258DG
3227DG
3249
2947DG
2950ER
1737DG
2952DG
2945DG
2951DG
01027ER
2954
3257ER
3238
2938ER
3252ER
05141S
3222
01016ER
3245
3242ER
01029ER
2937OR
3201DG
3254DG
0102
3268ER
3221
3220ER
01033ER
3202DG
3230WI00
3230WI30
3286WI40
3219
3281NE
3280
PRODUCT
CODE
86314610
86314360
86314370
86314380
86314390
86314400
86144990
86314410
86314420
86314430
86314440
86144820
86138140
86314450
86314460
86314470
86314480
86138390
86314490
86144780
86314500
86314510
86321410
86141710
86314520
86314530
86147030
86314540
86314550
86314560
86314570
86314580
86312140
86320520
86320530
86314590
86314600
86321420
DESCRIPTION
POWER HEAD COVER
SUCTION DUCT ACCESS COVER
SWIVEL NECK SUPPORT
TURNING SWIVEL NECK
WIRING SWIVEL NECK
COVER
BEARING SEGMENTS
RELEASE BUTTON
BUTTON COVER
SWIVEL NECK SLIDE
SOCKET COVER, TS-NECK
SCREW F 3,9X9,5 DIN7981
SWIVEL NECK BEARING
SWIVEL NECK SUPPORT L.H.
SWITCH LEVER
AXLE HSB
MOTOR 120V CPL HSB
PAIR OF CARBON BRUSHES
MOTOR PULLEY HSB
SCREW
INTERNAL CABLE
PRINTED CIRCUIT BOARD 120V
SCREW C 2,9X13
FOOT PEDAL
CHASSIS HSB
REAR CASTOR
SCREW F 3,9X13 DIN 7981
SEALING STRIP
DRIVE BELT HSB
CENTER CASTOR
SCREW, M10X25 DIN 7991
BELT DRIVE COVER
BLUE FLOOR PAD
DIAMOND PAD GREEN FINE ABRASION
DIAMOND PADS RED/YELLOW COMBO PACK
SEAL HSB
PAD ADAPTOR CPL
PAD HOLDER QUICK RELEASE
86312550 02/05/09
11
86312550 02/05/09
06048WI