1
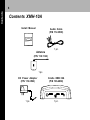
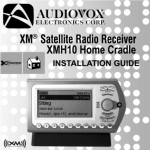
Table of Contents
2
Table of Contents
Congratulations .................................................................................. 3
FCC Information ................................................................................. 4
Cautions and Warnings ...................................................................... 5
Contents XMH-10A ............................................................................. 6
Installation/Wiring Precautions .......................................................... 7
Setting Up and Installing Your Kit ....................................................... 7
Cabling Interconnections ............................................................. 7
Installing/Positioning the Antenna ............................................... 7
Interconnect Diagram .................................................................. 8
Installing the Xpress In the Cradle .............................................. 9
Aiming Your XM® Home Antenna ............................................... 10
Warranty ........................................................................................... 16
3
Thank you for purchasing the Audiovox Xpress XM® Satellite Radio Home Kit.
You are one step closer to experiencing the latest innovation in XM
Satellite Radio. XM Satellite Radio will revolutionize your vehicle or
in-home entertainment.
XM is America’s number one satellite radio service with more than 7 million
subscribers. Broadcasting live daily from studios in Washington, DC, New York
City, the Country Music Hall of Fame in Nashville, Toronto and Montreal, XM’s
2006 lineup includes more than 170 digital channels of choice from coast to
coast: the most commercial-free music channels, sports, talk, comedy, children’s
and entertainment programming; and the most advanced traffic and weather
information.
XM, the leader in satellite-delivered entertainment and data services for the
automobile market through partnerships with General Motors, Honda, Toyota,
Hyundai, Nissan, Subaru, Suzuki and Porsche, is available in more than 140
different vehicle models for 2006. XM’s industry-leading products are available
at consumer electronics retailers nationwide. For more information about XM
hardware, programming and partnerships, please visit http://www.xmradio.com.
Required subscription for service sold separately. Premium Channels available at
additional monthly costs. Installation costs and other fees and taxes may apply,
including a one-time activation fee. All fees and programming subject to change.
College sports games subject to availability. Subscriptions subject to Customer
Agreement included with the XM Welcome Kit and available at
http://www.xmradio.com. Only available in the 48 contiguous United States.
©
2006 XM ® Satellite Radio Inc. XM is a trademark of XM Satellite
Radio. All rights reserved. All other trademarks are the property of their
respective owners.
Congratulations
Congratulations
FCC Infomation
4
FCC Information
The user is cautioned that changes or modifications not expressly approved by
XM® Satellite Radio Inc. can void the user’s authority to operate this device.
This device complies with Part 15 of the FCC Rules. Operation is subject to the
following two conditions: (1) This device may not cause harmful interference, and
(2) this device must accept any interference received, including interference that
may cause undesired operation.
This equipment has been tested and found to comply with the limits for a Class B
digital device, pursuant to Part 15 of the FCC Rules. These limits are designed to
provide reasonable protection against harmful interference in a residential
installation.
This equipment generates, uses, and can radiate radio frequency energy and, if not
installed and used in accordance with the installation instructions, may cause
harmful interference to radio communications. However, there is no guarantee that
interference will not occur in a particular installation. If this equipment does cause
harmful interference to radio or television reception, which can be determined by
turning the equipment off and on, the user is encouraged to try to correct the
interference by one or more of the following measures:
- Reorient or relocate the antenna of the affected receiver.
- Increase the separation between the XM equipment and the affected receiver.
- Connect the XM equipment into an outlet on a circuit different from that to
which the affected receiver is connected.
- Consult the dealer or an experienced radio/TV technician for help.
Warning: The FCC and FAA have not certified XM Satellite Radio Receivers for use
in any aircraft (neither portable nor permanent installation). Therefore, XM Satellite
Radio, Inc. cannot support this type of application or installation.
5
1. Do not install the Home Cradle in a position that obstructs viewing
of any home entertainment component, such as a television, or
stereo system indicators and displays.
2. This unit complies with the interference limits relative to a Class B
digital device, applicable under Part 15 of the FCC Rules regarding
installation in a residential environment. If the unit is not installed in
accordance with these instructions, it could cause harmful
interference to radio or television reception. If this condition persists
after corrective action, consult your dealer or experienced
installation facility.
3. By adhering to these warnings and safety considerations, serious
accidents and/or personal injury can be avoided.
Cautions and Warnings
Cautions and Warnings
Contents
6
Contents XMH-10A
Install Manual
Audio Cable
(P/N 112-3599)
1 pc.
Antenna
(P/N 118-1134)
1 pc.
DC Power Adapter
(P/N 112-3592)
Cradle XMH-10A
(P/N 136-4060)
1 pc.
1 pc.
7
1. Make sure the adapter cable is not connected to an AC wall outlet
until all interconnections have been made and verified. The adapter
power cable should be connected last.
2. Do not install the unit in the locations exposed to direct sunlight or
in areas subject to extreme temperatures.
3. Incorrect installation may cause damage to the system.
4. During antenna placement/installation, refer to the Antenna Aiming
procedure outlined in the Xpress XM User Guide.
Setting Up and Installing Your Kit
NOTE: The XM signal can be received and processed virtually
anywhere as long as there are no obvious satellite signal
obstructions such as high terrain, trees, overhangs, etc.
1. Cabling Interconnections
You can begin to enjoy XM Satellite Radio as soon as the Xpress
XM Receiver and home kit installation are complete. Set up your
Xpress home kit using the following installation instructions, or
enlist the help of a professional installer.
2. Installing/Positioning the Antenna
For best reception, the supplied antenna should be placed near a
window; some repositioning may be required to achieve optimum
results. The following guidelines are recommended:
Installation / Wiring Precautions
Installation/Wiring Precautions
Installation / Wiring Precautions
8
a. In a major city, where XM ground repeaters are present, you can
usually place the antenna away from a window and still achieve
the desired results. If you experience a loss of signal or audio,
reposition the antenna inside the home or outside as necessary.
b. You can also place the antenna outside (on the roof structure),
provided it is clear of any overhead obstructions.
Interconnect Diagram
CRADLE
XMH-10A
AUDIO CABLE
HOME
ANTENNA
AUDIO INPUT TO
EXTERNAL AMPLIFIER.
DC POWER
ADAPTER
TO AC WALL
OUTLET
3. Installing the Xpress In the Cradle
Install the Xpress XM Receiver in the docking station as follows:
a. After making sure the connectors and guide pin hole are properly
lined up, gently lower the Xpress XM Receiver into the cradle
and gently press down on the Xpress XM Receiver to mate
the connectors together.
DOCKING
STATION
TOP VIEW
DOCKING
STATION
FRONT VIEW
CONNECTOR
GUIDE PIN
16-PIN SYSTEM
CONNECTOR
Installation / Wiring Precautions
9
Installation / Wiring Precautions
10
b. The Xpress XM Receiver should now be nestled securely in
the docking station.
DOCKING STATION
REAR VIEW
ANT IN RF
CONNECTOR
DC IN CONNECTOR
AUDIO OUT
CONNECTOR
4. Aiming your XM Home Antenna
If the Xpress display says “NO SIGNAL,” the antenna needs to be
repositioned. In addition, even if you are receiving the XM signal, it is
recommended that you optimize the position of your XM Antenna as
described in this section enabling you to receive the strongest
possible signal and consistent, mute-free reception.
11
To access and use this screen, refer to the Xpress XM Satellite
Radio Receiver User Guide. Adjust the antenna location until the
maximum number of “Satellite” bars is displayed. The Xpress XM
Receiver will receive programming as long as either the satellite or
terrestrial signal has at least two bars displayed. Selecting a
position with the maximum number of “Satellite” bars displayed will
ensure a consistently strong signal.
Installation / Wiring Precautions
Your Xpress XM display has two different signal-strength indicators
which will help you optimize the antenna’s position. The first is a
basic signal strength indicator visible at the upper right corner of the
display screen during normal listening. It has from zero to four
vertical bars; four bars represent the strongest signal. The other is
a higher resolution signal strength indicator screen which allows
you to optimally aim your XM Antenna. This screen shows
Terrestrial and Satellite indications in a horizontal bar graph
presentation, with a minus (-) sign on the left and a plus (+) sign on
the right.
Installation / Wiring Precautions
12
a. Positioning the XM Antenna
The antenna supplied with the Xpress XM Home Kit is a high gain
type that can receive XM’s signal from one of XM’s satellites and/or,
depending on where you live, XM’s terrestrial repeaters. It is
recommended that the antenna be positioned near a south-facing
window or outdoors with a clear view of the south eastern sky in
order to receive the satellite signal. In some cases, it will be
possible to receive XM’s signal through standard home walls or a
roof. To position your antenna, first set up the home system as
described earlier in this installation guide. Next, position the
antenna until you receive the strongest possible satellite signal. If
the satellite signal is not available, you can optimize it for a
terrestrial signal (where available).
b. Indoor installation on a flat surface
To aim your antenna at the satellite:
1. Set antenna flat against its base on a flat (horizontal)
surface.
2. Turn the base of the antenna so that the XM logo is facing
to the south if you are in the eastern half of the U.S. and to
the south/southeast if you are in the western half.
3. Use the “Antenna Aiming” screen, as described on the
previous page, to optimize antenna tilt angle and position.
4. If necessary, experiment with different locations near a
south-facing window or outside.
13
1. Holding your antenna up, find a wall location that ensures a
strong signal. It is recommended that you use an extension
cord to temporarily locate your Xpress XM antenna outdoors
while optimizing the antenna location with the “Antenna
Aiming” screen.
2. Attach four screws to the wall using the template provided.
Use screws with head sizes small enough to fit in the
center of each of the four holes but large enough not to pop
out of the elongated sections. Leave 1/8 inch of the screw
shanks behind the heads sticking out of the wall.
3. Tilt the antenna fully back on the base, place the antenna
base on the four screw heads with the antenna pivot at the
top, and pull down approximately 1/4 inch until the base is
firmly secured. Note that the XM logo will be upside down
when the antenna is properly installed.
4. Tilt the antenna away from the wall/base until the signal
strength is optimized.
Installation / Wiring Precautions
c. Outdoor installation or indoor wall mounting
The antenna can also be attached vertically to an external or
internal wall if that is more convenient than placing it on a
horizontal surface.
Installation / Wiring Precautions
14
NOTE:
Do not cut the antenna cable and attempt to splice it
or attach alternative connectors or cable. The cable
and connectors used in your XMH-10A Home Kit are
specially chosen and attached at the factory to
ensure that they will work with XM‘s unique
frequency band. If an antenna extension is required,
use the Terk by Audiovox XM-EXT50. This is an XM
approved 50 foot amplified extension cable
available at your local consumer electronics retailer.
Failure to do so could damage the unit.
5. Apply power to the Xpress XM Receiver as outlined in the
associated User Guide and obtain an audio output. If no
audio is heard, move the antenna to different positions on the
surface until an audio output is heard. This is the desired
antenna position and should be marked with masking tape or
by another nonscratch method.
6. After determining the optimum position, turn off Xpress
Power, disconnect the power adapter from the wall outlet
receptacle and disconnect the antenna cable.
7. Plan the routing of the antenna cable to the cradle. Make sure
you avoid any obstructions that could crimp, kink or twist the
cable; use protective grommets wherever rough openings are
encountered.
15
9. Plug the antenna cable into the ANT IN connector on the back
of the cradle.
10. Plug the DC Adapter jack into the DC IN receptacle on the
cradle.
11. Plug the other end of the AC/DC wall adapter into 110-volt wall
receptacle; then press the Xpress XM Receiver Power button
(
) to energize the unit. You are now ready to enjoy XM
programming within your home.
Installation / Wiring Precautions
8. If the antenna is mounted outside, route the cable from the
antenna position to the interior of the home, working the cable
through the basement, under a window sill, etc.; make
adjustments and take up slack whenever necessary.
Warranty
16
12 MONTH LIMITED WARRANTY
AUDIOVOX ELECTRONICS CORPORATION (the Company) warrants to
the original retail purchaser of this product that should this product or any
part thereof, under normal use and conditions, be proven defective in
material or workmanship within 12 months from the date of original
purchase, such defect(s) will be repaired or replaced with new or
reconditioned product (at the Company's option) without charge for parts
and repair labor.
To obtain repair or replacement within the terms of this Warranty, the
product is to be delivered with proof of warranty coverage (e.g. dated bill
of sale), specification of defect(s), transportation prepaid, to an approved
warranty station or the Company at the address shown below.
This Warranty does not extend to the elimination of externally generated
static or noise, to costs incurred for installation, removal or reinstallation
of the product, damage to speakers, accessories, or vehicle and home
electrical systems, malfunction of satellite transmissions, repeater signal
or receiver unit.
This Warranty does not apply to any product or part thereof which, in the
opinion of the Company, has suffered or been damaged through
alteration, improper installation, mishandling, misuse, neglect, accident,
or by removal or defacement of the factory serial number/bar code label(s).
17
This Warranty is in lieu of all other express warranties or liabilities. ANY
IMPLIED WARRANTIES, INCLUDING ANY IMPLIED WARRANTY OF
MERCHANTABILITY, SHALL BE LIMITED TO THE DURATION OF
THIS WRITTEN WARRANTY. ANY ACTION FOR BREACH OF ANY
WARRANTY HEREUNDER INCLUDING ANY IMPLIED WARRANTY
OF MERCHANTABILITY MUST BE BROUGHT WITHIN A PERIOD
OF 48 MONTHS FROM DATE OF ORIGINAL PURCHASE. IN NO
CASE SHALL THE COMPANY BE LIABLE FOR ANY CONSEQUENTIAL OR INCIDENTAL DAMAGES FOR BREACH OF THIS OR ANY
OTHER WARRANTY, EXPRESS OR IMPLIED, WHATSOEVER. No
person or representative is authorized to assume for the Company any
liability other than expressed herein in connection with the sale of this
product.
Some states do not allow limitations on how long an implied warranty
lasts or the exclusion or limitation of incidental or consequential damage
so the above limitations or exclusions may not apply to you. This
Warranty gives you specific legal rights and you may also have other
rights which vary from state to state.
U.S.A. : AUDIOVOX ELECTRONICS CORPORATION, 150 MARCUS BLVD.,
HAUPPAUGE, NEW YORK 11788 (1-800-645-4994)
128-7351
Warranty
THE EXTENT OF THE COMPANY'S LIABILITY UNDER THIS WARRANTY
IS LIMITED TO THE REPAIR OR REPLACEMENT PROVIDED ABOVE
AND, IN NO EVENT, SHALL THE COMPANY'S LIABILITY EXCEED THE
PURCHASE PRICE PAID BY PURCHASER FOR THE PRODUCT.
128-7476G