1
Owner’s Manual
RDV-1045
DVD Player
�������
��������������������������������
V CD DVD VR WMA MP3 3D PHONIC BONUS B.S.P PROGRESSIVE
GR TITLE PG PL TR CHAP PRGM RND GR
ALL A - B
TIMER
����
�������
����������
Register your product at
www.Rotel.com/register
RDV-1045 DVD Player
2
Important Safety Instructions
WARNING: There are no user serviceable parts inside. Refer all servicing to qualified
service personnel.
WARNING: To reduce the risk of fire or electric shock, be sure that the apparatus shall
not be exposed to dripping or splashing and that no objects filled with liquids, such as
vases, shall be placed on the apparatus.
Do not allow foreign objects to get into the enclosure. If the unit is exposed to moisture,
or a foreign object gets into the enclosure, immediately disconnect the power cord from the
wall. Take the unit to a qualified service person for inspection and necessary repairs.
Read all the instructions before connecting or operating the component. Keep this manual so you
can refer to these safety instructions.
Heed all warnings and safety information in these instructions and on the product itself. Follow
all operating instructions.
Clean the enclosure only with a dry cloth or a vacuum cleaner.
You must allow 10 cm or 4 inches of unobstructed clearance around the unit. Do not place the unit on a bed, sofa, rug, or similar surface
that could block the ventilation slots. If the component is placed in a bookcase or cabinet, there
must be ventilation of the cabinet to allow proper cooling.
Keep the component away from radiators, heat registers, stoves, or any other appliance that
produces heat.
The unit must be connected to a power supply only of the type and voltage specified on the
rear panel of the unit.
Connect the component to the power outlet only with the supplied power supply cable or an exact
equivalent. Do not modify the supplied cable in any way. Do not attempt to defeat grounding
and/or polarization provisions. Do not use extension cords.
Do not route the power cord where it will be crushed, pinched, bent at severe angles, exposed to
heat, or damaged in any way. Pay particular attention to the power cord at the plug and where
it exits the back of the unit.
The power cord should be unplugged from the wall outlet if the unit is to be left unused for a
long period of time.
Immediately stop using the component and have it inspected and/or serviced by a qualified
service agency if:
• The power supply cord or plug has been damaged.
• Objects have fallen or liquid has been spilled into the unit.
• The unit has been exposed to rain.
• The unit shows signs of improper operation
• The unit has been dropped or damaged in any way
Please use Class 2 Wiring when connecting the speaker terminals of the
unit to ensure proper insulation and minimize the risk of electrical shock.
�������
�������
�������
�������
��������������������������������
V CD DVD VR WMA MP3 3D PHONIC BONUS B.S.P PROGRESSIVE
GR TITLE PG PL TR CHAP PRGM RND GR
ALL A - B
TIMER
������
������
����
�������
����������
������
�������
������
IMPORTANT
FOR LASER PRODUCTS
1. CLASS 1 LASER PRODUCT
2. DANGER: Visible laser radiation
when open and interlock failed or bypassed. Avoid
direct exposure to beam.
3. CAUTION: Do not open the top cover. There are
no user serviceable parts inside the player; leave all
servicing to qualified service personnel.
WARNING!
To reduce the risk of electrical shock,
fires, etc.:
1. Do not remove screws,
covers or cabinet.
2. Do not expose the unit to rain
or moisture.
3. Do not touch the power cord
or plug with wet hands.
Rotel products are designed to comply with international directives on the Restriction
of Hazardous Substances (RoHS) in electrical and electronic equipment and the
disposal of Waste Electrical and Electronic Equipment (WEEE). The crossed wheelie
bin symbol indicates compliance and that the products must be appropriately
recycled or processed in accordance with these directives.
This symbol means that this unit is double insulated. An
earth connection is not required.
Place the unit on a fixed, level surface strong enough
to support its weight. Do not place it on a moveable
cart that could tip over.
English
3
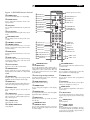
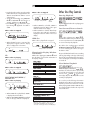
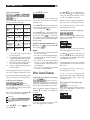
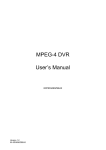
Figure 1: RR-DV99 Remote Control
1 POWER button
Press to turn the RDV-1045 on or off (standby).
2 DISPLAY button
Press to change the information shown in the
display window.
3 VSS button
Turn on/off the simulated Virtual Surround Sound
system.
4 Repeat button
Switches the RDV-1045 among the various repeat
modes.
� ������������
� �����������������������������
� ��������������
� ����������
� �������������
� ���������������
� �������p�������
� ��������t�������
� ������������
� ������������
� ���������������
� �����������������
� �������������
� �������������
� �����������
� ���������������
� ������������
� �����������
� �������������
� ��������������
� ����������������������
� ���������������������
� �����������������
� �������������
� ������������
� �������������
� ����������
� �����������
� ��������������
� ����������������
� �������u�������
� �������q�������
� ����������������
5 TOP MENU button
Press to display a menu to select specific scenes
on a disc.
6 CURSOR p and Button
7 CURSOR t Button
Press to select an item from a menu or on-screen
display, or to change the setting of an item in the
on-screen display.
8 ENTER button
Press to accept selections from menus or on-screen
displays.
9 SETUP button
Press to access the Setup menu and select settings
for language display, video, audio and several
other operation controls.
0 Numeric buttons
Use these to select a title or track number.
y {/PREVIOUS button
u }/NEXT button
� ����������������
� ����������������
s ON SCREEN Button
Press to display the status bar and the menu bar
on the TV screen.
Used to activate the on-screen subtitle selection
display and to turn the subtitle on or off (for DVD
VIDEO).
Press to skip forward or back a chapter, title or
track. Hold down the button during to playback
rapidly scan to earlier or later scenes. Also used
for the page selection from menu screens (VCD
and SVCD only).
= ANGLE button
i Infrared signal output window
Point this toward the remote sensor on the front
panel when pressing buttons.
f CANCEL Button
Changes camera angles when playing a DVD
VIDEO disc that has multiple camera angles.
q PAGE button
o OPEN/CLOSE button
g VFP button
- SUBTITLE button
Some Audio DVDs have Browsable Still Pictures.
This button changes the picture being viewed.
Opens and closes the disc tray.
w REPLAY button
Press to change the brightness of the display
window
Press to replay the previous 10 seconds of a
DVD.
e P.SCAN button
Press to select an ouput signal that is compatible
with your television – NTSC, NTSC Progressive,
PAL or PAL Progressive.
r / (PLAY) button
Starts playback of a disc.
t . (STOP)/CLEAR button
Stops playback.
p DIMMER button
[ RETURN button
Press to go back to the previous menu during PBC
playback of VCD or SCVD discs.
] MENU button
Displays menus that let you make select items
from the disc.
\ CURSOR u Button
a CURSOR q Button
Press to select an item from a menu or on-screen
display, or to change the setting of an item in the
on-screen display.
d AUDIO Button
Press to select the audio language on discs that
have soundtracks in multiple languages.
Press to remove selections from a programmed
playback list.
Presss to access the Video Fine Processor to adjust
settings such a brightness, contrast, etc.
h ZOOM button
Press to change the magnification of the picture
on the screen.
j P. Mode button
Press the Play Mode button to change among
regular play, program play and random play
modes.
k , (PAUSE) button
Pauses playback.
l ]/SLOW + button
; [/SLOW – button
During playback press repeatedly to speed up
or slow down playback speed. When disc play
is paused press repeatedly to play forward or
backward at reduced speed.
RDV-1045 DVD Player
4
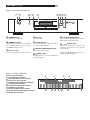
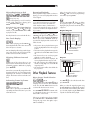
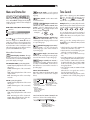
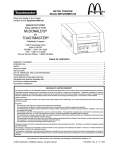
Figure 2: Front Panel Controls
��
� �
�
��� �
��������������������������������
�������
VCD DVD VR WMA MP3 3D PHONIC BONUS B.S.P PROGRESSIVE
GR TITLE PG PL TR CHAP PRGM RND GR
ALL A - B
TIMER
����
�������
1 STANDBY button
Turns the unit on or off (standby).
4 Disc tray
2 STANDBY indicator
5 Display Window
Lights when the power cord is connected and the
unit is on standby. When the unit is turned on,
the STANDBY indicator goes off.
3 Remote sensor
Receives the signal from the remote control unit.
����������
9 //, (PLAY/PAUSE) button
Used to load discs.
Starts and pauses playback. Also, used as a
SELECT button for PBC of Video CDs.
Shows various indicators and information about
the operation of the RDV-1045.
6 OPN/CLS (OPEN/CLOSE) button
8 { } (SKIP) buttons
Used to skip a chapter, title or track. Also used
for the page selection of a menu screen (for DVD
Video/Video CD).
Opens and closes the disc tray.
Holding down { } during playback reverses
or advances playback rapidly.
7 . (STOP) button
Stops playback. Also used to erase tracks from a
programmed play list.
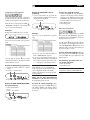
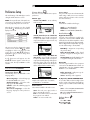
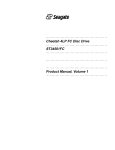
Figure 3: Display Window
A
B
C
D
E
F
G
H
I
J
K
Disc Content indicators
VSS (3D Phonic) indicator
Browsable Still Pictures indicator
Progressive Scan indicator
Original Program/Play List indicators
Track/Chapter indicators
Programmed Playback indicator
Random Play indicator
Group/All Repeat Play indicator
Specified Section Repeat Play indicator
Multi-Purpose Display
�
�
�
�
V CD DVD VR WMA MP3 3D PHONIC
B.S.P PROGRESSIVE
PG PL TR CHAP PRGM RND GR
ALL A - B
�
� � � �
�
�
English
5
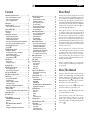
Contents
About Rotel
Important Safety Instructions .............................. 2
Figure 1: RR-DV99 Remote Control
Figure 2: Front Panel Controls
Figure 3: Display Window
3
4
4
About Rotel ........................................................ 5
About This Manual .............................................. 5
Figure 4: Rear Panel Connections
6
About the RDV-1045 ........................................... 6
Precautions ........................................................ 6
Placement
6
Audio/Video Connections .................................... 6
Component Input TV Connection
Composite Input TV Connection
S-Video Input TV Connection
Connecting to Audio Equipment with a Digital Input
Connecting to an Audio Amplifier or Receiver
7
7
7
8
8
Connecting the Power Cord.................................. 9
AC Input 0
9
Installing the Batteries
Precautions for the safe use of batteries
Using the Remote Control
Remote Control Numeric Buttons
External Remote In r
9
9
9
9
9
RR-DV99 Remote Control .................................... 9
Playable Discs................................................... 10
Notes on Discs
Invalid Operation Icon
10
10
Unplayable Discs .............................................. 10
Notes About Disc Copying .................................. 10
About Copyright Laws
About the Copy Guard System
10
10
Disc Care and Handling ..................................... 11
DVD Video Disc Region Codes ............................ 11
Initial Setup...................................................... 11
Turning On the RDV-1045
Turn On Messages
Setting the Output Signal Type
Selecting Preferences
Changing the Display Window Brightness
11
11
11
11
11
Playing a DVD or CD ......................................... 12
On-Screen Menu
12
Selecting a Track/Chapter with the Numeric Buttons 12
Playing Other Discs ........................................... 12
On Screen Icons ................................................ 12
Display Window ............................................... 12
DVD VIDEO/DVD AUDIO/DVD VR
VCD/SVCD
CD
MP3/WMA/ASF/MPEG1/MPEG2 disc
JPEG disc
Changing the Display Window Information
12
12
13
13
13
13
Other Disc Play Controls .................................... 13
Pausing Playback
Fast Forward/Reverse Search
Slow Motion Playback
Skip to Beginning or End
One Touch Replay
Skipping 5 Minute Intervals
Advancing Frame by Frame
Resuming Playback
13
13
13
14
14
14
14
14
Other Playback Features ................................... 14
Menu Screen Track Selection
Programmed Playback
Random Playback
Repeat Playback
A-B Repeat Playback
14
15
15
16
16
Other Control Features ...................................... 16
Selecting the Subtitle Language
Selecting the Audio Language
Selecting the Viewing Angle
Magnifying the Picture (Zoom)
Adjusting the Picture Quality (VFP)
Browsable Still Pictures (BSP)
VSS - Simulated Surround Sound
16
16
16
17
17
17
17
Menu and Status Bar ........................................ 18
Menu Bar Functions
18
Time Search...................................................... 18
Preference Setup .............................................. 19
Language Menu
Picture Menu
Audio Menu
Others Menu
19
19
19
19
Caring for the RDV-1045................................... 20
Cabinet and Disc Tray Cleaning
Condensation
20
20
Locking the Disc Tray ........................................ 20
Disc Structure ................................................... 20
DVD VIDEO/DVD VR
DVD AUDIO
VCD/SVCD/CD
MP3/WMA/JPEG/ASF/MPEG1/MPEG2 Discs
Additional Disc Information
20
20
20
20
20
Troubleshooting ................................................ 22
Power source
Operation
Images
Other
If Problems Persist
22
22
22
22
22
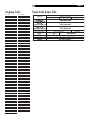
Language Codes ............................................... 23
Digital Audio Output Table................................. 23
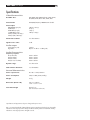
Specifications ................................................... 24
Video Characteristics
Audio output
Audio Characteristics
General Characteristics
24
24
24
24
A family whose passionate interest in music led
them to manufacture high fidelity components
of uncompromising quality founded Rotel over
45 years ago. Through the years that passion
has remained undiminished and the family goal
of providing exceptional value for audiophiles
and music lovers regardless of their budget, is
shared by all Rotel employees.
The engineers work as a close team, listening
to, and fine tuning each new product until it
reaches their exacting musical standards. They
are free to choose components from around the
world in order to make that product the best
they can. You are likely to find capacitors from
the United Kingdom and Germany, semi conductors from Japan or the United States, while
toroidal power transformers are manufactured
in Rotel’s own factory.
Rotel’s reputation for excellence has been
earned through hundreds of good reviews and
awards from the most respected reviewers in
the industry, who listen to music every day.
Their comments keep the company true to its
goal - the pursuit of equipment that is musical,
reliable and affordable.
All of us at Rotel, thank you for buying this
product and hope it will bring you many hours
of enjoyment.
About This Manual
Throughout this manual the controls and components of the RDV-1045 are identified with
numbers and letters in dark gray circles. Numbers in circles such as o identify items on the
RR-DV99 remote control. (To help you remember
this think of “round equals remote”.)
Numbers in squares such as 9 identify items
on the front and rear panel of the unit.
Letters in circles such as A identify items in the
front panel display window.
In the operation section of the manual some
function descriptions apply only to certain
kinds of discs. The types of discs to which the
information applies are indicated with symbols
such as
.
RDV-1045 DVD Player
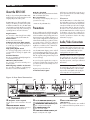
About the RDV-1045
Thank you for purchasing the Rotel RDV-1045.
It will provide years of enjoyment when used in
a high-quality audio/video system.
The RDV-1045 is one of the most flexible components you can add to your audio/video system.
In addition to DVD Video discs, the RDV-1045
can play Video and audio CD discs recorded in
a variey of formats. It provides a full range of
operating features and control functions.
Angle function*
You can select a desired angle from multiple
camera angles recorded on the DVD disc.
Zoom function
You can view scenes close-up.
Video Fine Processor (VFP) controls
You can adjust many video image characteristics
to suit the type of program being played or
personal preferences.
High quality digital sound
You can enjoy high quality sound from disc
recorded with a full range of digital audio
formats.
Surround function*
The unit is compatible with Dolby Digital surround and DTS surround.
3D Phonic (VSS) function
You can enjoy surround sound with your 2channel system.
Multi-language subtitles and sound*
You can select a subtitle or sound language
from those recorded on the DVD disc.
6
Multi-disc playback
The RDV-1045 can play Audio CDs and Video
CDs as well DVD Video discs.
On-screen display
User-friendly on-screen displays allow you to
operate the unit easily.
* Functions only with DVD discs.
Precautions
Please read this manual carefully, particularly
the Caution information on page 2. In addition
to basic installation and operating instructions
this manual provides valuable information on
various system configurations as well as general
information that will help you get the most from
your system. Please contact your authorized
Rotel dealer for answers to any questions you
might have. In addition, all of us at Rotel welcome your questions and comments.
Save the RDV-1045 shipping carton and all
enclosed packing material for future use. Shipping or moving the RDV-1045 in anything other
than the original packing material may result
in severe damage.
Be sure to keep the original sales receipt. It is
your best record of the date of purchase, which
you will need in the event warranty service is
ever required.
Register your product online at:
www.rotel.com/register
Also keep your original sales receipt. It is your
proof of purchase in the event that warranty
service is required.
Placement
Place the RDV-1045 on a surface that is level,
dry and neither too hot nor too cold (between
41˚F and 95˚F, 5˚C and 35˚C). Do not place the
unit where it will be exposed to direct sunlight.
Avoid locations that are dusty. Do not place
the unit too close to the television set. Do not
place the RDV-1045 where it will be exposed
to vibrations, such as near a subwoofer. To
ensure proper ventilation observe the minimum
clearance specifications listed in the safety
information on page 2.
Audio/Video Connections
NOTE: Do not plug in the power cable until
all audio/video signal connections are complete. Do not change any audio/video cable
connections until the RDV-1045 has been
unplugged from the power outlet.
Carefully read the instructions supplied with
the components you are going to connect to
the RDV-1045 to be sure they are compatible.
If you have questions, contact your authorized
Rotel dealer.
NOTE: Connect VIDEO OUT qwe of
the unit directly to the video input of your TV.
Connecting VIDEO OUT to a TV via a VCR
may result in unacceptable video quality because many discs are copy-protected.
Figure 4: Rear Panel Connections
�
0 AC power cord receptacle
For the power cord connected to the wall
outlet.
-OPTICAL DIGITAL OUTPUT
Provides a digital output signal to receivers or
sound processors that can decode it.
�
�
�
= Audio ANALOG OUTPUT jacks
Left and right channel analog audio outputs.
q COMPONENT VIDEO OUTPUT jacks
Outputs component video signals.
w S VIDEO OUTPUT jack
Outputs an S-video signal.
e COMPOSITE VIDEO OUTPUT jack
Outputs a composite video signal.
��
�
r External Remote Input
(“Ext Rem In”)
This feature is useful when the unit is installed
in a cabinet and the front panel IR sensor is
blocked.
7
Composite Input TV Connection
Connect the COMPOSITE VIDEO e output to
the composite video input of your TV. Connect
the ANALOG AUDIO = outputs to the audio
inputs of your TV. A cable for these connections
is supplied.
If your TV has a single monaural audio input
instead of a pair of stereo inputs, you need to use
a “Y” cable adapter to connect the two output
channels of the RDV-1045 to the single input.
You can improve the sound quality of the
system by connecting the audio outputs to a
separate hi-fi audio system. (See the following
section.)
S-Video Input TV Connection
If your TV has an S-video input, you should
connect it to the S-VIDEO e output of
RDV-1045 using an S-video cable. This will
produce better picture quality.
NOTEs: Do not connect an S-video cord
and a component video cord at the same
time. The may prevent proper playback
Connect the DVD player directly to a TV
or a monitor. Do not route through a video
cassette recorder (VCR). Otherwise picture
distortion may occur during playback. Connecting the DVD player to a VCR-built-in-TV
may also cause picture distortion.
Component Input TV Connection
If your TV has component video signal input
jacks you will get better video performance by
using the COMPONENT VIDEO q output
jacks of the RDV-1045. The required cable is
not provided. Be sure to connect the “Y” output
to the “Y” input, “PB” output to the “PB” input,
and the “PR” output to the “PR” input.
NOTES: When using the Component Video
outputs do not connect an S-Video cable.
The component signal inputs on some TV’s
have BNC type connectors. (BNC connectors
are coaxial connectors that have keyed locking collars.) In such instances adapters or a
special cable may be needed.
When the Component Video outputs are
connected to an NTSC/PAL television you
may be able to use the Progressive Scan
mode of the RDV-1045 which produces a
picture with less flicker. See the P.SCAN section of this manual.
English
RDV-1045 DVD Player
8
Connecting to Audio Equipment
with a Digital Input
You can enhance the sound quality by connecting the OPTICAL DIGITAL OUTPUT - of the
RDV-1045 to the digital input of an amplifier
or signal processor by using an optional digital
cable. The digital stereo audio signal from a
disc is directly transferred. If you connect the
unit to a Dolby Digital or DTS decoder or an
amplifier with built-in decoder by using an
optional digital cable, you can enjoy highquality surround sound.
When you make the digital connection, also
make the analog connection = , because,
depending on the disc type, no audio may be
reproduced from the DIGITAL OUTPUT.
With the digital connection, the Preference menu
settings for COMPRESSION and DOWN MIX
are disabled. Settings for these items must be
made from the decoder.
IMPORTANT NOTE ABOUT
DIGITAL SIGNAL CONNECTION:
The Digital Audio Output setting in the Audio Preferences on-screen display must be set so
the digital output of the RDV-1045 is compatible with the digital input of the component it is
connected to. If this preference setting is not done correctly, loud noise may be generated which can damage the speakers. Before using the RDV-1045 with a digital signal
connection be sure the proper type of Digital Audio Output has been selected. See the Audio
Menu information in the Preferences Setting section of this manual.
NOTE: Bending an optical digital cable at a sharp angle can damage it. Use caution when
handling optical cables.
Some optical digital cables have a protective cover over the end of the plug. Be sure to remove any covers before attempting to connect optical cables.
Connecting to an Audio
Amplifier or Receiver
You will get better sound quality if you connect
the audio outputs of the RDV-1045 to a high
quality amplifier or receiver and use component
loudspeakers, rather than those built into the
television.
Connect the AUDIO OUTPUTS = of the
RDV-1045 to any high level input (such as AUX,
DVD, CD, etc.) of an amplifier or receiver.
English
9
Connecting the Power Cord RR-DV99 Remote Control
AC Input
0
It is best to plug the RDV-1045 directly into a
2-pin polarized wall outlet. Avoid the use of
extension cords.
Your RDV-1045 will automatically configure
itself for the proper AC line voltage ranging
from 110 volts to 240 volts at 50/60Hz. No
setting is required to match the unit to your
local voltage.
Plug the supplied cord into the AC INPUT
receptacle on the back of the unit. After all
connections have been made, plug the cord
into an appropriate AC wall outlet.
NOTE: If you are away for an extended
period of time, it is a sensible precaution to
unplug your audio/video components
Observe the following precautions:
• Do not connect or disconnect the power cord
with wet hands.
• Disconnect the power cord if you are not
going to use the unit for a long time.
• When unplugging the player from the wall
outlet, always pull the plug, not the power
cord.
• Disconnect the power cord before cleaning
the unit.
• Disconnect the power cord before moving
the unit.
• Do not damage, alter, twist or pull the power
cord. This may damage the cord and cause
fire, electric shock, or other accidents. Contact
your authorized Rotel dealer and get a new
power cord if the cord is damaged.
• Do not put anything heavy, on the unit, or the
power cord, as this may cause fire, electric
shock, or other accidents.
Installing the Batteries
The battery compartment is located on the back
of the remote control unit. Place three AAA
batteries in the remote control according to
the polarity markings (“+” and “–”) inside the
compartment and on the batteries. Replace the
battery compartment cover.
The batteries will last about six months with
normal use. If the functions of the remote control
become erratic, replace the batteries.
Precautions for the safe use of
batteries
Observe the following precautions for the safe
use of batteries. If they are used improperly
their life will be shortened, they may burst or
their contents may leak.
• Remove the batteries from the remote control
if it will not be used for a long period of
time.
• Remove dead batteries and dispose of them
properly.
• Never leave dead batteries lying around.
Do not take them apart, mix them with other
refuse, or throw them into an incinerator.
• Never touch liquid that has leaked out of a
battery.
• Do not mix new and old batteries, or batteries
of different types, when replacing them.
Using the Remote Control
When using the remote control point it at
the front panel of the RDV-1045. The remote
control may not always properly operate the
RDV-1045 if it used from too far away or if
you are at too great of an angle relative to
the front panel.
The remote control may also fail to properly
operate the RDV-1045 if the remote control
sensor 3 on the front panel is exposed to
strong light, such a sunlight.
For best results there must be a direct, unobstructed path from the remote control to the
front panel sensor.
Remote Control Numeric Buttons
For many operations selections are made using
the RR-DV99 NUMERIC BUTTONS 0 . The
examples below show how to select various
numbered items.
External Remote In
r
The 3.5mm mini-jack (labeled EXT REM IN)
receives command signals from an industry
standard infrared receiver. This feature is
useful when the unit is installed in a cabinet
and the front panel sensor is blocked. Consult
your authorized Rotel dealer for information
on external receivers and the proper wiring of
a jack to fit the mini-jack receptacle.
RDV-1045 DVD Player
10
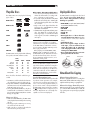
Playable Discs
The RDV-1045 unit can play the following
types of discs:
DVD Video
DVD Audio
�� � � �
VCD
SVCD
CD
CD-R
CD-RW
The RDV-1045 can also play back the following
discs produced in CD or DVD recorders:
Audio CD
VCD/SVCD
MP3/WMA/JPEG
DVD Video
DVD VR
ASF
MPEG1/MPEG2
CD-R/
CD-RW
DVD-R
DVD-RW
✔
✔
✔
✘
✘
✔
✔
✘
✘
✔4
✔
✔2
✔
✔
✘
✘
✔4
✔
✔
✔
✔
Discs should be “finalized” while being recorded.
1 A DVD-R recorded in multi-border format is
also playable (except for dual layer discs).
2 Only when a DVD-R is compatible with CPRM
(Content Protection for Recordable Media),
DVD VR format can be used.
3 Among MP3/WMA/JPEG discs, only discs
formatted with a combination of Universal
Disc Format and ISO 9660 (known as UDF
Bridge) are playable.
Notes on Discs
• With some DVD VIDEO discs, the RDV-1045
starts playback automatically after inserting
the disc.
• The image may be sometimes poor or noisy
due to defects in the disc itself.
• With some discs, operations described in
this manual may not be possible.
Other Notes About Recordable Discs
• Some discs may not be played back because
of their disc characteristics, recording conditions, or damage or stains on them.
• It is possible to play back finalized +R/+RW
(DVD Video Format only) discs. “DVD” lights
on the front display panel when a +R/+RW
disc is loaded.
• Only sounds can be played back from the
following discs: MIX-MODE CD, CD-G
CD-EXTRA and CD TEXT
• The RDV-1045 can play NTSC and PAL system
discs. If an NTSC disc is played when the
Video Signal Type is set to PAL, the NTSC
visdeo signal is converted to a PAL60 signal
and output.
NOTE: If a disc is dirty, scratched or
warped, or has unusual disc or recording
characteristics, it may take considerable time
for the RDV-1045 to read the disc contents.
In some instances the RDV-1045 may not be
able to play certain discs.
When playing some DVD VIDEOs, DVD
AUDIOs, VCDs or SVCDs the operation of
the RDV-1045 may be different from what is
described in this manual. This is due to the
disc programming and disc structure, not a
malfunction of this system.
Unplayable Discs
The RDV-1045 does not play back discs listed
below. If you try to play back these
discs, noise may generate causing
damage to speakers.
• DVD-ROM (except for MP3/WMA/JPEG/
ASF/MPEG1/MPEG2 format)
• DVD-RAM
• CD-ROM
• CD-I (CD-I Ready)
• Photo CD
• SACD, etc.
• Damaged discs and discs that are
not standard sizeor shape (other than
round 12 cm/43/4” or 8 cm /33/16” diameter
discs).
• Unfinalized discs
• Discs of irregular shape or discs
with tape, seals or adhesives on
either the label side or playback
side. Playing back these discs may
damage the RDV-1045.
• Discs with labels that are not completely bonded to the disc.
Sticker
Label sticker
Other Notes About Playable Discs:
Because the RDV-1045 can play such a variety of disc formats, and because many disc
formats can be recorded to a variey of standards, there are many things can affect how
certain discs will work. See the “Additional
Notes About Playable Discs” section of this
manual for more information.
Notes About Disc Copying
Invalid Operation Icon
About Copyright Laws
With some discs the RDV-1045 may not be able
to perform certain operations. For example,
some discs may not allow rapid advance/reverse or slow motion playback. When you
press a remote control or front panel button if
the RDV-1045 cannot perform the operation
the
Invalid Operation icon appears on your
TV screen. Operations are occasionally unacceptable even if it is not displayed.
Paste
Check the copyright laws before recording from
DVDs, VCDs, SVCDs and CDs. Recording of copyrighted material may infringe copyright laws.
About the Copy Guard System
DVDs are protected by a copy guard system. When
you connect the RDV-1045 directly to a VCR, the
copy guard system can prevent proper playback
of the disc.
English
11
Disc Care and Handling
Initial Setup
Proper handling and storage of discs is very
important. If a disc gets dirty, dusty, scratched
or warped, playback, sound and picture will
be adversely affected.
Turning On the RDV-1045
Handling
• To avoid damage do not touch the surface
of the disc.
• Do not apply labels or use any adhesive on
either the label side or playback side.
Storing discs
• Keep discs in their cases. If discs are piled
on top of one another without their protective
cases, they can be damaged.
• Do not put discs where they may be exposed
to direct sunlight, or high temperatures or
humidity. Avoid leaving discs in a car!
Cleaning discs
• Wipe with a soft dry cloth, moving from the
center outwards. If a disc is difficult to clean,
wipe with a cloth moistened with water.
• Never use record cleaners, petrol, alcohol
or any anti-static agents.
DVD Video Disc Region Codes
All DVD players and DVD discs have a Region
Code number. This unit only can play back DVD
discs whose Region Code numbers include the
unit’s Region Code, which is indicated on the
region code symbol on the rear panel.
Examples of playable DVD discs for a unit with
Region Code “1”
NOTE: With some DVD and Video CD discs,
you may not be able to control them according
to the instructions described in this manual,
because of the contents of the disc.
If a DVD VIDEO with an improper Region
Code number is loaded, “REGION CODE ERROR!” appears on the TV screen and playback
cannot start.
When the RDV-1045 is connected to a power
outlet the STANDBY indicator 2 on the front
panel is always on. Press the STANDBY 1
button on the front panel, or the POWER button 1 on the remote,
to turn the unit
on and light the display 5.
Turn On Messages
One of the following messages may appear in
the display when the RDV-1045 is turned on:
NOW READING – Appears when the DVD
player is reading the disc information. Do
not try to operate the unit until this message
goes away.
REGION CODE ERROR! – Appears when the
Region Code of a DVD that has been loaded
is not supported by the player.
NO DISC – Appears when no disc is loaded.
OPEN – Appears when the disc tray is opening.
CLOSE – Appears when the disc tray is
closing.
CANNOT PLAY THIS DISC – Appears when
you try to play an unplayable disc.
Setting the Output Signal Type
With the RDV-1045 and the TV turned on, press
the P.SCAN button e on the remote. The The
current video signal type will flash.
If necessary, press the t/u buttons 7\
to select the video signal type suitable for the
TV. Then press ENTER 8. The selected video
signal type is displayed for a short time.
About Output Signals
NTSC is the correct choice for TVs in North
America. PAL TVs are used through most of
the rest of the world.
With either NTSC or PAL TV’s you can select
INTERLACE (“NTSC” or “PAL”) or PROGRESSIVE (“NTSC PROG” or “PAL PROG”). Picture
quality is better with the “PROGRESSIVE”
mode. But only newer, high performance TVs
can accept progressive signals. A progressive
signal is only available from the Component
Output Connectors q so the TV must have
component inputs.
If you are unsure about which setting to use,
contact your authorized Rotel dealer.
Output Signal Notes
• The picture may be distorted for a period
of time after you press ENTER button. This
is not a malfunction of the system.
• Some progressive signal and high-definition
TVs are not fully compatible with this unit.
This will result in an unnatural picture when
playing a DVD VIDEO with progressive scanning. In this case, change the scan mode to
INTERLACE.
• Even if the power cord of the DVD player
is disconnected from the AC outlet or the
power is interrupted, the video signal type
setting is stored.
Selecting Preferences
See the “Selecting Preferences” of this manual
for information on changing the preferred setting
for such things as menu languages, video picture
options, audio options and other features.
Changing the Display Window
Brightness
To change the brightness of the display window
press the DIMMER button o of the remote
control. Each time you press DIMMER, the
brightness of the display changes in the order
shown.
��������
��������
����������
�����������
If “DIMMER AUTO” is selected, the setting
automatically changes to “DIMMER 2” when
a video disc is played. The display goes back
to the “DIMMER AUTO” setting when play is
stopped.
If “DIMMER AUTO” is selected, the setting
automatically changes to “DIMMER OFF” while
a non-video disc is being played. The display
goes back to the “DIMMER AUTO” setting when
play is stopped.
RDV-1045 DVD Player
Playing a DVD or CD
Press ^ OPEN/CLOSE o6 to open the disc
tray. Place a disc, label side up, in the tray.
Place smaller 8 cm/33/16” dics in the recessed,
inner part of the disc tray.
12
Playing Other Discs
After a disc is loaded, an on-screen display is
shown. The sample menu screen shown below
is what appears when an MP3 disc is loaded.
With a JPEG disc “File” is shown on the right
side instead of “Track”.
���������������
��������������
�����������������
����������������
�����������
���������������
��������������
�����������������
���������������
����������������
�������������
��������
�����������������
������������������
�������������
����������
���������
�������
Press ^ again to close the tray. Then press
//, PLAY/PAUSE j9 .To stop disc play
press . (STOP) t7.
NOTES: Do not insert an unplayable disc.
(See Playable Discs section.)
When placing a disc on the disc tray, be
sure to set it in the recess. Otherwise, the
disc may be damaged when the disc tray is
closed, or you may not be able to remove
the disc from the RDV-1045.
On-Screen Menu
After loading a DVD VIDEO, SVCD or Video
CD disc, a menu may appear on the TV screen.
From the menu, you can select an item to be
played.
For DVD VIDEO
1 Press pqt u 6a7\ to select an
item.
2 Press ENTER 8 . The RDV-1045 starts
playback of the selected item.
You can also use the numeric buttons to select
an item. Key in the number of the item and
press ENTER. The RDV-1045 starts playback
of the selected item.
Selecting a Track/Chapter with
the Numeric Buttons
–(PBC Off)
Press the Numeric Buttons 0 to select a track
or chapter number. Refer to the “Remote Control Numeric Buttons” section. This method
of Track/Chapter selction will not work with
some discs.
��������
�����
��������
����
�������������
������������ ������������ ��������������������
���������
���������������
�����������
����������
Press the pq6a buttons to select a Group.
Then press u\ to move to the Track (File) list.
Use the pq6a buttons again to select a
Track or File. The Numeric Buttons 0 can also
be used to select a Track or Title. Then press /
(PLAY) r or ENTER x.
When a disc with JPEG images is loaded,
pressing / (PLAY) will start a “slide show” of
the images. Each image is shown for about 3
seconds. If ENTER is pressed only the selected
file is shown.
On Screen Icons
At times you may see the following icons on
the screen:
Play
Pause
Fast reverse/fast forward search
Slow motion playback
(reverse/forward directions)
Containing multi-view angles
(See “Selecting Viewing Angles”)
Containing multi-audio languages
(See “Selecting the Audio Language”)
Containing multi-subtitle languages
(See “Selecting the Subtitle Language”)
The disc cannot accept the operation
you have attempted.
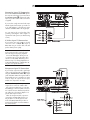
Display Window
The information in the diaply window changes,
depending on the type of disc that is loaded and
the operating mode of the RDV-1045.
DVD VIDEO/DVD AUDIO/DVD VR
When a disc is playing
Title/group/ Chapter/
original track
program/play number
list number
Elapsed playback time
• When a DVD AUDIO is played back, “GR”
and “TR” are displayed instead of “TITLE”
and “CHAP”.
• When a DVD VR is played back, “VR” is
displayed and “PG” (original program)
or “PL” (play list) is displayed instead of
“TITLE”.
• If “B.S.P.” is displayed during DVD AUDIO
playback, refer to the “Browsable Still Pictures” section of this manual.
When a disc is stopped
• When a DVD AUDIO is loaded; “DVDA”
is displayed instead of “DVDV”, and the
total numbers of groups and the tracks are
displayed instead of the total numbers of the
titles.
• When a DVD VR is loaded; “VR” is displayed
instead of “DVDV”, the total number of original programs or the play lists is displayed
instead of the total number of titles, and
“DVD VR” is displayed instead of “DVD”.
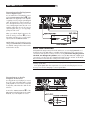
VCD/SVCD
When a disc is playing
• PBC (Play Back Control) is a signal recorded
in a VCD (version 2.0) for controlling playback. You can enjoy interactive software
or software with a search function using a
menu screen recorded in a PBC compatible
VCD. To play back a disc without the PBC
function, follow the instructions below.
English
13
• Specify the track number using the number
buttons when the disc is stopped. Refer to the
“Remote Control Numeric Buttons” section
of this manual.
• Specify the track number using PREVIOUS
{ u or NEXT } y when the disc is
stopped, and then press / (PLAY) r.
• Press RETURN [ to go back to the upper
layer during PBC playback of a VCD or
SVCD.
When a disc is stopped
Total playback time
Disc type Total
number of
tracks
Other Disc Play Controls
When a disc is stopped
Pausing Playback
Disc type Group number
Track
number
• When a WMA disc is loaded, “WMA” is
displayed instead of “MP3” in the upper
indicator and the lower display.
• When an ASF disc is loaded; “MP3” disappears in the upper indicator, and “ASF” is
displayed instead of “MP3” in the lower
display.
JPEG disc
When a disc is played back or stopped
• When the PBC function is activated, the
display below appears after the display
above is displayed for a short time.
Changing the Display Window
Information
When a disc is playing
While a disc is playing press DISPLAY 2. Each
time the button is pressed the information in
the display changes.
���������
����������������
Track number
Elapsed playback time
When a disc is stopped
���������
������������������������������������
MP3/WMA/ASF/MPEG1/
MPEG2 disc
When a disc is playing
������
����������������
����������������������������������������������
��������������
������������
�����������������
Group Track
number number
Elapsed playback time
������������������������������������
�����
• When a WMA disc is played back, “WMA”
is displayed instead of “MP3”.
• When an ASF/MPEG1/MPEG2 disc isplayed
back, no disc type indicator is displayed.
While a disc is playing press [ ] ;l.
Each time these buttons are pressed the forward
or reverse speed increases. Press / (PLAY) r
to resume normal speed playback.
{ } NEXT/PREVIOUS y/u. Fast forward
or reverse searching will continue as long as
the button is held.
The speeds of the fast forward/reverse searching
will vary, depending on the type of disc being
played. Also note that during fast forward/reverse searching the sound may be intermittant
or turned off.
Slow Motion Playback
��������������������������������������
����������������
Disc type Total
Total playback time
number of
tracks
Fast Forward/Reverse Search
Or, while is disc is playing press and hold
Group number File number
CD
To pause playback when a disc is playing press
, (PAUSE) k.
���������������������
����������������
������������������������������������
�����������������������������������������������������
����������������������������������������������
������������������������������������������������������
–(moving images only)
While disc play is caused press [ ] ;l.
Each time one of these buttons is presssed the
speed of the slow forward or reverse play will
increase. Press , (PAUSE) k to pause slow
motion play. Or press / (PLAY) r to resume
normal speed playback.
No sound is produced during Slow Motion
Playback. During Reverse Slow Motion Playback the picture motion will not be smooth.
When playing VCD, SVCD or DVD VR discs,
Slow Motion Playback will work only in the
forward direction.
RDV-1045 DVD Player
Skip to Beginning or End
14
Resuming Playback
When playback is stopped while a selection is
playing, you can resume playback from where
it was stopped.
After selecting the track you want press
ENTER 8 . With some discs playback may
start without pressing ENTER.
–(moving images only)
To skip to the beginning or end of a track (or
chapter or file), while a disc is playing, press
{ } PREVIOUS/NEXT yu.
During playback of an MP3/WMA/JPEG/ASF
disc, press } NEXT u or qa to play the
next file, or press { PREVIOUS y or p6
to play the next file.
The Skip funtion does not work with all discs.
One Touch Replay
When a disc is playing, press the REPLAY w
button. Playback will continue from 10 seconds
before the previous location.
One Touch Replay will not skip past the beginning of the track or title being played. This
function will not work with some discs.
Skipping 5 Minute Intervals
With the type of discs shown above you can
skip forward or backward at intervals of approximately 5 minutes. While a disc is playing
press t u7\.
Intervals are automatically assigned from the
beginning of the file. You cannot skip past the
beginning or the end of the current file being
played. This function will not work with some
discs.
Advancing Frame by Frame
–(moving images only)
When a disc is paused, press , (PAUSE) k
repeatedly. Easch time the button is press the
next frame shown.
NOTE: The Resume function must be turned
on in order for this function to work. If the
feature does not work as described here
check “Preference Menu / Others Menu”
section of this manual. This menu can also be
used to turn off the Resume Playback feature
if you want to.
While a disc is playing press . STOP tonce.
“RESUME” will appear in the displayed. Press
/ PLAY r to resume playback. If the . STOP
button is pressed twice “RESUME” will disappear from the display and the stored location
will be cleared.
• The position where playback starts again
may be slightly different from the stopped
position.
• The location where playback was stopped is
remembered even if the RDV-1045 is turned
off.
• This function does not work in program
playback or random playback.
• When the menu screen is displayed, the
resume playback function may not work.
• The audio language, the subtitle language
and the viewing angle are stored with the
stopped position.
• The stored position will be cleared if the disc
tray is opened.
Other Playback Features
Menu Screen Track Selection
–(PBC off)
Press the MENU ] or TOP MENU 5 button
to display an on-screen menu. Note: With DVD
audio discs the TOP MENU button most be
used. Not all discs have menu screens.
Press pqt u 6a7\ for DVD audio
or video track selection. Or use the numeric
buttons 0 to select a track.
If the menu screen has more than one page
press } NEXT u or { PREVIOUS y to
change the page. Note: This applies only to
VCD or SVCD discs.
Press the TOP MENU 5 button to display
the original program or press MENU ] to
display the play list. Note: Not all discs have
a play list.
Original Program
��
�
�
�
�
�
�
����
��������
��������
��������
��������
��������
��������
��
����
����
����
����
����
����
����
�����
�����
�����
�����
�����
�����
�����
��������
�����������������
����������
�����
������������
���������
Title name
Starting time for the
title recording
Channel information
Recording date
Play List
��
�
�
�
�
����
��������
��������
��������
��������
����
�����
�����
����
����
������
�������
�������
�������
�������
�����
���������
���
�������������
���������
Recording Total playback time
for the title
Number of chapters
included in the title
Press pq6a to select the desire title. Then
press ENTER 8.
When you select the original program using
the TOP MENU button, playback will start from
the selected title to the following titles. When
you select the playlist using the MENU button
only the selected title will be played.
English
15
Programmed Playback
You can program up to 99 track or chapters to
be played in a specific order. The same track or
chapter can be prgrammed more than once.
Display for VCD/SVCD/ CD programming:
• Select a track number. As you finish the
track selection, the total time for the program
playback will be displayed.
Track indicator
While the disc is stopped press P. MODE j.
“PROGRAM” will appear in the display and
an on-screen menu will appear.
Examples:
Display when a DVD video disc is loaded.
Track number Program number
Example:
On-screen menu for DVD Video programming.
On-screen menu for DVD video programming:
Press the Numeric buttons 0 to program
chapters/tracks. Refer to the “Remote Control
Numeric Buttons” section.
Display for DVD Video programming:
• Select a title number, and then a chapter
number.
Title indicator
Chapter indicator
Title number Chapter number Program number
Display for DVD AUDIO/MP3/WMA
disc programming:
• Select a track number.
Group
indicator
Track indicator
Group
Chapter
number number
Program number
To erase the program content:
• Hold down CANCEL f until “ALL CLEAR!”
appears in the display window while the
program screen is displayed on the TV screen
(if CANCEL is pressed and released quickly,
programs will be erased one by one).
• Open the disc tray.
• Turn off the power.
Random Playback
While disc play is stopped press P. MODE
j repeatedly until “RANDOM” appears in
the display window. “RANDOM” will also be
displayed on the TV screen.
Press / (PLAY) r. During Random Play the
same chapter or track will not be played twice
even if the { (PREVIOUS) y button is pressed.
(Playback will be returned to the beginning of
the current chapter or track.)
• If you try to enter more than 99 chapters or
tracks, “MEMORY FULL” appears.
• If you are programming selections from a
VCD, SVCD or CD, when the total playback
time reaches 9 hours 59 minutes 59 seconds,
“--:--” will appear in the display window.
NOTE: Only for a DVD Video, DVD Audio,
MP3, WMA disc,: If you press ENTER instead of specifying a track/chapter number,
“ALL” is displayed and all of the tracks/
chapters included in the selected group/title
are programmed.
When you are done programming
selections: Press / (PLAY) r to start playing
the programmed items selected.
To return to normal playback: While
disc play is stopped press P. MODE j repeatedly until the “PRGM” in the display window
is turned off. The program content will not
be erased.
To return to normal playback: While disc
play is stopped, press P. MODE j repeatedly
to turn off “RND” (the upper indicator) in the
display window.
The following operations also cancel random playback:
• Open the disc tray.
• Turn off the power.
NOTE: You cannot use the random playback function with some DVD VIDEO discs.
RDV-1045 DVD Player
16
Repeat Playback
Press pq6a to display
–(PBC off)
Press REPEAT 4 . Each time you press the
button the repeat mode changes.
Display on the
TV screen
Display in the
display window
TITLE
ALL
REPEAT TITLE
Repeats the
current title
ALL
or REPEAT ALL
ALL
REPEAT ALL
Repeats the
whole. disc *1
GROUP*2
or REPEAT
GROUP
CHAP*4
TRACK*4
or REPEAT
TRACK
OFF
or no display
*1
*2
*3
*4
Usage for the
repeat mode
GR
Repeats the
REPEAT GROUP*2 current group*3
Repeats the
current chapter
REPEAT CHAP*4
Repeats the
REPEAT TRACK*4 current track
REPEAT OFF
Repeat off
Repeats the whole program during
program playback.
For a DVD VR, “PG” is displayed during
original program playback, and “PL” is
displayed during play list playback.
Repeats the current original program or
the current play list for a DVD VR.
“STEP” is displayed during program/
random playback.
The repeat playback can also be set on the menu
bar. (See the “A-B Repeat Playback” section.)
The repeat mode will be automatically cancelled
if there is a file that cannot be played back.
A-B Repeat Playback
Other repeat modes can be selected in this
step. For other repeat modes, refer to “Repeat
Playack” section.
Press ENTER 8 at the start point of the part
to be repeated (specifying point A). The icon
A- .
on the menu bar will be
Press ENTER 8 at the end point of the part to
be repeated (specifying point B).The icon on
A-B . ; will appear
the menu bar will be
in the display window on the DVD player and
the part between points A and B will be played
back repeatedly.
You can play back a specific section of a selection repeatedly by specifying a start point (A)
and an end point (B).
While a disc is playing press ON SCREEN s
twice. The menu bar will be displayed.
NOTE:
• You can use A-B repeat playback only within
the same title or track.
• You cannot use A-B repeat playback during
program playback, random playback or
repeat playback.
• You cannot use the A-B repeat playback
function for some DVD VIDEOs.during
program playback, random playback or
repeat playback.
• You cannot use the A-B repeat playback
function for some DVD VIDEOs.
Other Control Features
Selecting the Subtitle Language
The following describes how to control the subtitle display with a DVD Video disc. Most other
types of discs will work in the same manner.
While a disc that has subtitles is playing press
SUBTITLE -. A selection menu appears on
the screen.
Status bar
Menu bar
Press t u 7\ to select
press ENTER 8.
Each time you press the button, the subtitle
menu will toggle between on and off.
OFF
. Then
Subtitles can also be controlled using the Menu
Bar. See the “Menu and Status Bar” section.
For a language code such as “AA”, refer to
the “Language Codes” table.
Selecting the Audio Language
While a disc that has multiple audio languages
is playing press AUDIO d. A selection menu
appears on the screen.
To Cancel A-B Repeat Playback: Press
. (STOP). Select A-B and press ENTER 8
OFF .)
twice. (Select
–(only for moving images)
–(PBC off)
Press pq6a to select a subtitle language.
Then press ENTER 8. The subtitle language
setting will change automatically in a few
seconds even if ENTER is not pressed.
Each time you press the button, the language
menu will toggle between on and off.
Press pq6a to select a audio language.
Then press ENTER 8. The audio language setting will change automatically in a few seconds
even if ENTER is not pressed.
Audio language selection can also be controlled
using the Menu Bar. See the “Menu and Status
Bar” section.
For a language code such as “AA”, refer to
the “Language Codes” table.
If “ST”, “L” and “R” are displayed when
playing back a VCD, SVCD or DVD VR, they
respectively represent “Stereo”, “Left sound”
and “Right sound”.
Selecting the Viewing Angle
–(only for moving images)
While a scene from a disc containing multi-view
angles press ANGLE = . A selection menu
appears on the screen.
17
Each time you press the button, the angle will
be changed. The angle can also be changed
by pressing pq 6a . Then press ENTER
8. The subtitle language setting will change
automatically in a few seconds even if ENTER
is not pressed.
The viewing angle can also be controlled using the Menu Bar. See the “Menu and Status
Bar” section.
Magnifying the Picture (Zoom)
–(only for moving images)
While a disc is playing or is paused press
ZOOM h. Each time you press the button,
the picture magnification is changed.
When the picture is magnified there will be
portions of the image you cannot see on the
screen. Use the pqt u6a7\ buttons
to move the viewable area to a different part
of the image.
To return to normal playback, press the ZOOM
button until “ZOOM OFF” appears on the
screen.
For a JPEG disc, you cannot change the picture
magnification during slide-show playback.
When playing an ASF disc the cursor buttons
may allow you to move the viewable part of
the image.
Adjusting the Picture Quality
(VFP)
When a disc is playing or paused press VFP g
(Video Fine Processor). A table with the current
settings will appear on the TV screen.
The “SHARPNESS” setting adjusts the sharpness
of the on-screen image.
VSS - Simulated Surround Sound
Press t u7\ to select a VFP mode. “NORMAL” is suitable for normal usage. “CINEMA”
is suitable for a dark room. If the “NORMAL”
or “CINEMA” setting produces satisfactory
results, press ENTER 8.
Using the VSS function (3D Phonic), you can
get a simulated surround effect from your
stereo system.
“USER 1 and “USER 2” allow you make detailed
adjustments to the various settings on the menu.
Press pq6a to select an item to be adjusted
then press ENTER 8.
Adjustment menu example:
GAMMA
Use the pq buttons again to change the value.
Press ENTER to accept the selected setting.
To adjust other items, use the pq buttons agaig
to select another item to adjust and repeat the
process described above. When you are done
make adjustments press the VFP button again
to save the adjustments. If not adjustments are
made for several seconds the settings that have
been made will be automatically stored.
Browsable Still Pictures (BSP)
Some Audio DVDs have pictures called B.S.P.
(Browsable Still Pictures). The pictures can be
viewed as if you are turning pages. You can
use this function when the BSP indicator C
lights in the display window.
While a disc is playing press the PAGE button
q. Each time you press the button, the still
picture is changed. You can also switch the
picture using pq6a
BSP Selection menu example:
Press ENTER 8.The picture setting will change
automatically in a few seconds even if ENTER
is not pressed.
The “GAMMA” setting adjusts the brightness
of medium tones while leaving the darkest and
brightest portions unchanged.
English
This feature can also be controlled using the
Menu Bar. See the “Menu and Status Bar”
section.
While a disc is playing press the VSS Button 3
repeatedly to select the desired VSS mode. The
VSS mode selected and 3D Phonic indicator
appear in the display window.
Each time you press the button, the VSS mode
changes as follows:
• “ACTION” is suitable for action movies, sport
programs or other lively programs.
• Select “DRAMA” to enjoy a sound effect with
a relaxing, natural atmosphere.
• Select “THEATER” to enjoy a sound effect as if
you were watching the movie in a theater.
To turn off the VSS function press the VSS
button on the remote until OFF appears in
the display.
NOTES
• VSS is effective for both the speakers and
headphones.
• If noise is produced or sound is distorted,
turn the VSS feature off.
• For an ASF/MPEG1/MPEG2 disc, VSS does
not work and creates no sound effect even
when “ACTION”, “DRAMA” or “THEATER”
is displayed.
RDV-1045 DVD Player
Menu and Status Bar
While a disc is playing press ON SCREEN s
twice. “ON SCREEN” will appear in the display
window. The status and menu bars will appear
on the TV screen.
DVD Video Status/Menu Bar Example:
Status bar
Menu bar
Press t u7\ to select an item on the menu
bar to be changed. Press ENTER 8. The currently active function is shown in blue. Refer to
the Menu Bar Functions section that follows for
more information on the control features available on the Menu Bar. To turn off the menu bar,
press the ON SCREEN button again.
Menu Bar Functions
TIME
Time display selection – Changes
the time information in the display window
and on the status bar. Each time ENTER 8 is
pressed the display is changed.
DVD VIDEO/DVD AUDIO (operating during playback)
TOTAL: Elapsed playback time of the current
title/group.
T.REM: Remaining time of the current title/
group.
TIME : Elapsed playback time of the current
chapter/track.
REM : Remaining time of the current chapter/track.
DVD VR (operating during playback)
TOTAL: Elapsed playback time of the current
title/group.
T.REM: Remaining time of the current title/
group.
CD (operating during playback)/VCD/ SVCD
TIME : Elapsed playback time of the current
track.
REM : Remaining time of the current track.
TOTAL: Elapsed playback time of the disc.
T.REM: Remaining time of the disc.
18
Repeat mode – See the “Repeat
Playback” section of this manual on a preceding page.
Time search – See the “Time Search”
Section that follows.
CHAP.
/ TRACK
Chapter search (DVD
VIDEO/DVD VR) / Track search (DVD
AUDIO) – Selects a chapter/track. Press the
Numeric Buttons 0 to input the chapter/ track
number and press ENTER 8.
5
Examples:
5:
2
24:
g 4
Audio language / Audio (DVD
VIDEO/DVD AUDIO/VCD/SVCD) – See the
“Selecting the Audio Language” of this manual
on a preceding page.
Subtitle language (DVD VIDEO/
DVD VR/SVCD) – See the “Selecting the
Subtitle Language” section of this manual on
a preceding page.
View angle – (DVD VIDEO/DVD
AUDIO) See the “Selecting the Viewing Angle”
section of this manual on a preceding page.
Page switch (DVD AUDIO) –
Switches the browsable still pictures (B.S.P.)
recorded on a DVD AUDIO. See the “Browsable Still Pictures” section of this manual on a
preceding page.
Status Bar Information
DVD Video/DVD Audio/DVD VR (the DVD
Video status bar is shown in the example
below)
Sound
Time Playback
signal type
status
(DVD
VIDEO/DVD
VR)
(DVD VIDEO)
Current chapter number
Current title number
(DVD AUDIO)
(DVD AUDIO)
Current group number Current track number
(DVD VR)
Current original
program number (PG)/
current play list
number (PL)
VCD/SVCD/CD/ASF/MPEG1/MPEG2 (the CD
status bar is shown in the example below)
0:25:58
Playback mode status
Time Playback
status
(VCD/SVCD/CD)
Current track number
(ASF/MPEG1/MPEG2 disc)
Repeat mode status
Time Search
While a disc is playing press ON SCREEN
s twice. The Menu Bar will appear. Press
t u7\ to select
. Press ENTER 8.
Input the time using the Numeric Buttons 0.
Example: When you want to play back a Video
DVD from the position of (0 hour) 23 minutes 45
seconds, press the buttons in the following order:
0
g
2
g
3
g
4
g
5
You can skip the minute and second setting. If
an incorrect Numeric Button is pressed, press
< 7 to delete the incorrect entry and re-enter
numbers as needed.
When you are done entering numbers press
ENTER 8. To turn off the Menu Bar press ON
SCREEN again.
• This function does not work for a DVD Video
with no time information recorded.
• This function does not work during program
playback or random playback.
• For a CD, you can use this function any
time.
• For a VCD or SVCD, you can use this function
during playback without the PBC function.
• Time search for a DVD Video is from the
beginning of the title. Time search for a DVD
Audio is from the beginning of the track
being played back.
• Time search for a VCD, an SVCD and a CD
is as follows:
When the disc is stopped, time search is
from the beginning of the disc.
When the disc is being played, time search
is within the track currently being played
back.
English
19
Preference Setup
The initial settings of the DVD player can be
changed with the Preference screen.
NOTE: The top and bottom of the preference
screen may not be displayed on a wide TV. If
necessary adjust the picture size on the TV.
Picture Menu
This menu is used to select the various picture
preferences.
Monitor Type
16:9 or 16/9 Multi – For an ordinary
wide screen TV.
4:3 LB (Letterbox) or 4:3 Multi LB
(Letterbox) – For a TV with conventional
4:3 aspect ratio. When a wide screen picture
is input, the black bars appear on the top
and bottom of the screen.
A pull down menu will appear. Use the
pq6a buttons again to select the setting you want. Then press ENTER to set the
selection.
NOTE: The initial settings for the Preference
menus are shown in bold italics.
4:3 PS (Pan Scan) / 4:3 Multi PS
(Pan Scan) – For a TV with conventional
4:3 aspect ratio. When a wide screen picture
is input, the left and right edges of the picture
will not be shown on the screen. (If the disc
is not compatible with Pan Scan, the picture
will be displayed at the Letterbox ratio.)
Language Menu
Audio Menu
Digital Audio Output
Select the output signal type suitable to the
equipment connected to the DIGITAL OUT
terminal (a decoder-built-in amplifier or other
digital equipment with an optical input terminal).
Refer to “Digital Audio Output Table” pn page
23. The default setting is Stream/PCM.
PCM Only – Equipment corresponding
only to linear PCM.
Dolby Digital/PCM – Dolby digital
decoder or equipment having the same
function.
Stream/PCM – DTS/Dolby digital decoder
or equipment having the same function.
Down Mix
Select the signal suitable to the equipment
connected to the DIGITAL OUT terminal. Set
“DOWN MIX” only when “DIGITAL AUDIO
OUTPUT” is set to “PCM ONLY”.
Dolby Surround – Dolby Pro Logic decoder-built-in equipment.
Stereo – Ordinary audio equipment.
The following choices are available on the
Language Menu.
Menu Language – Selects the language
for the DVD VIDEO menu screen.
Audio Language – Selects the audio
language for the DVD VIDEO.
Subtitle – Selects the subtitle language for
the DVD Video.
On Screen Language – Selects the
language displayed on the preference
screens.
File Type
Select an item suitable to the file type.
Audio – For MP3/WMA files.
Still Picture – For JPEG files.
Video – For ASF/MPEG1/MPEG2 files.
When the disc is stopped or no disc is loaded
press SET UP 9. The following screen will be
displayed on the TV.
The same procedure for changing the settings
on these screens. Use the tu7\ buttons
to highlight on of the icons at the top of the
screen. The use the pq 6a buttons to
highlight the item you want to change. Then
press ENTER 8.
Screen Saver
Lets you turn the Screen Saver function On (the
initial setting or Off. (Screen Saver activates
when a still picture remains on the screen for
more than 5 minutes.)
NOTE: When using a TV compatible with
multiple video signals select “16:9 Multi”,
“4:3 Multi LB” or 4:3 Multi PS”
Picture Source
Select an item suitable to the video source.
Auto – The video source type (a video or
film) is automatically selected.
Film – To view a film or video recorded with
the progressive scan method.
Video – To view a normal video.
D (Dynamic) RANGE COMPRESSION
To correct the difference between high volume
and low volume when playing back with low
volume (only for a DVD recorded with Dolby
digital).
Auto – The D. RANGE COMPRESSION
function automatically works.
On – The D. RANGE COMPRESSION function always works.
Others Menu
Resume
Select On or OFF.
On Screen Guide
Select On or OFF.
RDV-1045 DVD Player
20
Caring for the RDV-1045
Disc Structure
Cabinet and Disc Tray Cleaning
DVD VIDEO/DVD VR
Clean the cabinet and disc tray by gently wiping
them with a soft cloth dampened with a small
amount of a neutral detergent diluted with
water. Do not use benzene, thinner or other
organic solvents including disinfectants. These
may cause deformation or discoloring.
Condensation
In s ome situations, condensation (water
drops) can accumulate on the optical lense of
the disc reading mechanism, preventing the
RDV-1045 from working properly. This can
happen when:
• When the RDV-1045 is suddenly moved
from a cold place to a warmer place.
• When the RDV-1045 is in a cool room and
a heating system is turned on.
• When the RDV-1045 is installed in a steamy
or damp space.
In any of these cases, leave the system turned
on for 1 or 2 hours before use.
Locking the Disc Tray
You can lock the disc tray to prevent a loaded
disc from being ejected.
While the RDV-1045 is off, press and hold
the . STOP t button then press the OPEN/
CLOSE o button. “LOCKED” will appear in
the display window. Repeat the procedure to
unlock the disc tray. Then “UNLOCKED” will
appear in the display window.
A DVD Video disc consists of “titles” and each
title may be divided into “chapters”.
A DVD VR disc consists of “original programs”
or “play lists” and each original program/play
list may be divided into “chapters”.
This system simplifies the hierarchical construction of a disc and manages folders by
“groups”. This system can recognize up to 4
000 tracks/files in a disc. Also, the system can
recognize up to 150 tracks/files per group and
up to 99 groups in a disc. Since the system
ignores tracks/files with numbers exceeding
150 and groups with numbers exceeding 99,
these cannot be played back.
.
Title 1/Original program 1/
Play list 1
Title 2/Original
program 2/Play list 2
Chapter 1 Chapter 2 Chapter 3 Chapter 1 Chapter 2
DVD AUDIO
A DVD Audio disc consists of “groups” and
each group may be divided into “tracks”.
VCD/SVCD/CD
VCD, SVCD and CD consist of “tracks”. In
general, each track has its own track number.
(On some discs, each track may also be further
divided by indexes.)
Track 1
Track 2
Track 3
Track 4
Track 5
MP3/WMA/JPEG/ASF/
MPEG1/MPEG2 Discs
On an MP3/WMA/JPEG/ASF/MPEG1/
MPEG2 disc, each still picture (material) is
recorded as a track/file. Tracks/files are usually grouped into a folder. Folders can also
include other folders, creating hierarchical
folder layers.
Group 1
Track 1/
File 1
Track 2/
File 2
Group 2
Group 3
Group 4
Group 5
• If there is any type of files other than MP3/
WMA/JPEG/ASF/MPEG1/MPEG2 files in
a folder, those files are also counted in the
total file number.
Additional Disc Information
About MP3/WMA/JPEG/ASF/
MPEG1/ MPEG2 discs
Playable MP3/WMA/JPEG/ASF/MPEG1/
MPEG2 discs and files
• CDs recorded in the ISO 9660 format are
playable (except CDs recorded in the “packet
write” format (UDF format)).
• CDs recorded with multiple sessions are also
playable.
• Files with an extension of “.mp3”, “.wma”,
“.jpg”, “.jpeg”, “.asf”, “.avi”, “.mpg” or
“.mpeg” (extensions with uppercase and
lowercase letters mixed are also acceptable)
are playable.
21
Notes on MP3/WMA/JPEG/ASF
discs and files
• A disc may not be played back, or reading
it may take a long time depending on its
recording conditions or properties.
• The time needed for reading varies with the
number of groups or tracks (files) recorded
on the disc.
• If a character other than single byte English
characters is used in the file name of an
MP3/WMA/JPEG/ASF file, the track/file
name will not be displayed correctly.
• The order of tracks/groups displayed on the
MP3/WMA control screen, and the order of
files/groups displayed on the JPEG control
screen may be different from that of files/
folders displayed on a computer monitor
screen.
• A commercially available MP3/WMA disc
may be played back in an order different
from that indicated on the label attached to
the disc.
• Playing back an MP3/WMA/JPEG/ASF disc
may take a long time. The elapsed time is not
displayed until playback starts. The elapsed
time may also not be displayed correctly.
• For an MP3/WMA file, a disc with a sampling
frequency of 44.1 kHz and transmission rate
of 128 kbps is recommended.
• This system can play back a baseline JPEG
file, excluding monochromatic JPEG files.
• This system can play back JPEG data taken
with a digital camera conforming to the DCF
(Design Rule for Camera File System) standard (when a function such as the automatic
image rotation function of a digital camera
is applied, the data no longer complies with
the DCF standard, so the image may not be
displayed).
• If data has been processed, edited and restored with computer image editing software,
the data may not be displayed.
• This system cannot play back animations
such as MOTION2 JPEG, still images (TIFF
etc.) other than JPEG, or image data with
sound.
• The resolution of 640 x 480 pixels is recommended for JPEG files. If a file has been
recorded at a resolution of more than 640
x 480 pixels, display may take a long time.
An image with a resolution of more than
8192 x 7680 pixels cannot be displayed.
• The system supports ASF files recorded with
the maximum bit rate of 384 kbps and an
audio coder decoder of G.726.
• The maximum size of the playback picture
is 352 x 288 pixels (CIF).
Notes on MPEG1/MPEG2 discs and
files
• The stream structure of MPEG1/MPEG2
discs and files should conform to MPEG
system/program stream.
• 720 x 576 pixels (25 fps)/720 x 480 pixels
(30 fps) is recommended for the highest
resolution.
• This system also supports the resolutions of
352 x 576/480 x 576/352 x 288 pixels
(25 fps) and 352 x 480/ 480 x 480/352
x 240 pixels (30 fps).
• The profile and level should be MP@ML (Main
Profile at Main Level)/SP@ML (Simple Profile
at Main Level)/ MP@LL (Main Profile at Low
Level).
• Audio streams should conform to MPEG1
Audio Layer- 2 or MPEG2 Audio Layer-2.
Caution for DualDisc playback:
The Non-DVD side of a “DualDisc” does not
comply with the “Compact Disc Digital Audio”
standard. Therefore, the use of Non-DVD
side of a DualDisc on this product may not be
recommended.
English
RDV-1045 DVD Player
Troubleshooting
Power source
Power does not come on.
• The power cord of the RDV-1045 is not
connected to an AC outlet.
Connect the power cord correctly.
Operation
Controls and button do not work.
• Some specific operations may be restricted
for some discs.
The remote control does not work.
• The batteries have run out.
Replace the batteries.
A disc cannot be played back.
• In the case of DVD Videos.
Check the Region Code number of the
disc.
• “PLAYABLE Err” is displayed in the display
window.
The disc cannot be played back on this
DVD player. Check the disc type. See
the “Playable Discs” and “Unplayable
Discs” sections of this manual.
MP3, WMA, JPEG, ASF, MPEG1 or
MPEG2 files cannot be played back.
• The loaded disc may include files of different
types (MP3, WMA, JPEG, ASF, MPEG1 or
MPEG2). You can play back only the files
of the types selected with “FILE TYPE”. See
the “Preference Setup/Picture” section of this
manual.
22
Images
No picture appears.
• The composite video cord is not connected
correctly.
See the “Audio/Video Connections”
section of this manual.
• An S-video cord and a component video
cord are connected at the same time.
Disconnect one of the cords.
The picture is distorted.
• A video cassette recorder is connected
between the DVD player and the TV.
Connect the DVD player directly to the
TV.
The screen size is abnormal.
• The screen size is not set correctly.
Select the correct “Monitor Type” for the
TV you are using. See the “Preference
Setup/Picture” section of this manual.
The TV screen darkens.
• “SCREEN SAVER” is set to “ON”.
Press any button.
Other
You cannot switch audio or subtitles
between languages.
• The disc does not contain multiple languages.
If only a single language is recorded on
the disc, you cannot switch the current
language to another language.
No subtitle is displayed.
• The disc does not contain any subtitles.
A DVD Video without subtitles cannot
display any subtitles.
• The subtitle language is set to “OFF”.
Specify a subtitle language. See the
“Preference Setup/Language” section
of this manual.
• Before or after point A or B in A-B repeat
playback, no subtitle may be displayed.
“LR ONLY” is displayed in the display window (for a DVD AUDIO).
• This is not a malfunction. When a down
mix prohibited track is played back for
multichannel sound, the left and right sounds
are output directly as they are.
If Problems Persist
Many functions of the RDV-1045 are controlled
by microprocessors that can be affected by
things like power surges. You can “reset” the
microprocessors by cycling the power supply. If
the unit seems “frozen” and does not respond
to buttons being pressed, disconnect the power
cord from the outlet, wait for a while, and connect the power cord again.s
23
Digital Audio Output Table
Language Codes
AA
AB
AF
AM
AR
AS
AY
AZ
BA
BE
BG
BH
BI
BN
BO
BR
CA
CO
CS
CY
DA
DZ
EL
EO
ET
EU
FA
FI
FJ
FO
FY
GA
GD
GL
GN
GU
HA
HI
HR
HU
HY
IA
IE
IK
IN
IS
IW
JI
JW
KA
KK
KL
KM
KN
KO
KS
KU
KY
LA
LN
LO
LT
LV
MG
MI
Afar
Abkhazian
Afrikaans
Ameharic
Arabic
Assamese
Aymara
Azerbaijani
Bashkir
Byelorussian
Bulgarian
Bihari
Bislama
Bengali, Bangla
Tibetan
Breton
Catalan
Corsican
Czech
Welsh
Danish
Bhutani
Greek
Esperanto
Estonian
Basque
Persian
Finnish
Fiji
Faroese
Frisian
Irish
Scots Gaelic
Galician
Guarani
Gujarati
Hausa
Hindi
Croatian
Hungarian
Armenian
Interlingua
Interlingue
Inupiak
Indonesian
Icelandic
Hebrew
Yiddish
Javanese
Georgian
Kazakh
Greenlandic
Cambodian
Kannada
Korean (KOR)
Kashmiri
Kurdish
Kirghiz
Latin
Lingala
Laothian
Lithuanian
Latvian, Lettish
Malagasy
Maori
MK
ML
MN
MO
MR
MS
MT
MY
NA
NE
NL
NO
OC
OM
OR
PA
PL
PS
PT
QU
RM
RN
RO
RU
RW
SA
SD
SG
SH
SI
SK
SL
SM
SN
SO
SQ
SR
SS
ST
SU
SV
SW
TA
TE
TG
TH
TI
TK
TL
TN
TO
TR
TS
TT
TW
UK
UR
UZ
VI
VO
WO
XH
YO
ZU
Macedonian
Malayalam
Mongolian
Moldavian
Marathi
Malay (MAY)
Maltese
Burmese
Nauru
Nepali
Dutch
Norwegian
Occitan
(Afan) Oromo
Oriya
Panjabi
Polish
Pashto, Pushto
Portuguese
Quechua
Rhaeto-Romance
Kirundi
Rumanian
Russian
Kinyarwanda
Sanskrit
Sindhi
Sangho
Serbo-Croatian
Singhalese
Slovak
Slovenian
Samoan
Shona
Somali
Albanian
Serbian
Siswati
Sesotho
Sundanese
Swedish
Swahili
Tamil
Telugu
Tajik
Thai
Tigrinya
Turkmen
Tagalog
Setswana
Tongan
Turkish
Tsonga
Tatar
Twi
Ukrainian
Urdu
Uzbek
Vietnamese
Volapuk
Wolof
Xhosa
Yoruba
Zulu
English
RDV-1045 DVD Player
24
Specifications
Video Characteristics
Readable discs:
DVD VIDEO, DVD AUDIO,VideoCD, SVCD, CD-DA,
CD-R/RW, DVD-R/RW for MP3, WMA, JPEG
Video format:
NTSC(480i)/PAL(576i), PROGRESSIVE selectable
Video output:
COMPONENT (pin jack):
PB/PR Output:
VIDEO OUT (pin jack):
S-VIDEO OUT (S jack):
C Output (NTSC): 286 mVp-p
C Output (PAL): 300 mVp-p
Y Output: 1.0 Vp-p
0.7 Vp-p
1.0 Vp-p
Y Output 1.0 Vp-p
Horizontal resolution:
more than 500 Lines
Signal to noise ratio:
65 dB
Audio output
Analog Out (pin jack):
Digital Out:
2.0 Vrms
Optical –21 dBm to –15 dBm (peak)
Audio Characteristics
Frequency response:
CD (at 44.1 kHz)
DVD (at 48 kHz)
DVD (at 96 kHz)
DVD (at 192/176.4 kHz)
20 Hz to 20 kHz
20 Hz to 22 kHz
20 Hz to 44 kHz
20 Hz to 88 kHz
Dynamic range:
more than 98 dB
Total harmonic distortion:
Less than 0.006%
General Characteristics
Power requirements:
AC 110 V – 240 V, 50-60 Hz
Power consumption:
9W (Power ON), 0.9W (Standby)
Weight:
4.6 kg
Dimensions (W x H x D):
432 x 93 x 340 mm
17.01” x 3.62” x 13.23”
Front Panel Height
80 mm/3.15”
(feet removed/for rack mount)
Specifications and appearance subject to change without prior notice.
DTS is a registered trademark of Digital Theater Systems. Manufactured under license from Dolby
Laboratories Licensing Corporation. “Dolby” and the double-D symbol are trademarks of Dolby
Laboratories Licensing Corporation. All rights reserved.
The Rotel Co. Ltd.
10-10 Shinsen-Cho
Shibuya-Ku
Tokyo 150-0045
Japan
Phone: +81 3-5458-5325
Fax: +81 3-5458-5310
Rotel of America
54 Concord Street
North Reading, MA 01864-2699
USA
Phone: +1 978-664-3820
Fax: +1 978-664-4109
Rotel Europe
Dale Road
Worthing, West Sussex BN11 2BH
England
Phone: +44 (0)1903 221 600
Fax: +44 (0)1903 221 525
Rotel Deutschland
Kleine Heide 12
D-33790 Halle/Westf.
Germany
Phone: +49 05201-87170
Fax: +49 05201-73370
www.rotel.com
082 OMRDV-1045 110806
English