1
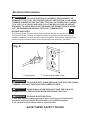
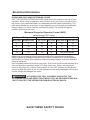
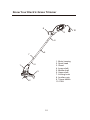
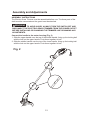
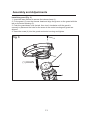
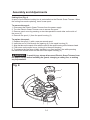
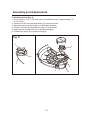
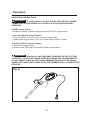
Electric Grass Trimmer
Model 21182
Owner’s Manual
TOLL-FREE HELPLINE: 1-888-90WORKS (888.909.6757)
Read all safety rules and instructions carefully before operating this tool.
Contents
CONTENTS................................................................................................................. 2
TECHNICAL DATA...................................................................................................... 2
GENERAL SAFETY RULES.....................................................................................3-4
SPECIFIC SAFETY RULES.........................................................................................5
SYMBOLS....................................................................................................................6
ELECTRICAL INFORMATION..................................................................................7-9
KNOW YOUR ELECTRIC GRASS TRIMMER...........................................................10
ASSEMBLY AND ADJUSTMENTS.......................................................................11-15
OPERATION.........................................................................................................16-18
MAINTENANCE..........................................................................................................19
WARRANTY...............................................................................................................20
PARTS LIST..........................................................................................................21-22
Technical Data
ELECTRIC GRASS TRIMMER
Model Number.......................................................................................................21182
Motor..........................................................................................120 V AC, 60 Hz, 2.2 A
Trimmer Line.........................................0.065" (1.65 mm) diameter monofilament nylon
Power cord..................................................................9 in (22.9 cm), 2-prong polarized
Cutting circle diameter ................................................................................9" (22.8 cm)
Overall trimmer length.................................................................................45" (115 cm)
Double insulated.......................................................................................................Yes
Weight..............................................................................................3 lb 10 oz (1.64 kg)
2
General Safety Rules
Safety is a combination of common sense, staying alert, and knowing how to use
your Electric Grass Trimmer.
WARNING
TO AVOID MISTAKES THAT COULD CAUSE SERIOUS INJURY, DO NOT PLUG
IN THE ELECTRIC GRASS TRIMMER UNTIL THE FOLLOWING STEPS HAVE
BEEN READ AND UNDERSTOOD.
1. READ and become familiar with this entire instruction manual. LEARN the tool’s
applications, limitations, and possible hazards.
2. AVOID DANGEROUS CONDITIONS. DO NOT use power tools in wet or damp
areas or expose them to rain.
3. DO NOT use power tools in the presence of flammable liquids or gases.
4. ALWAYS keep your work area clean, uncluttered, and well lit. DO NOT work on
floor surfaces that are slippery with sawdust or wax, or water.
5. KEEP BYSTANDERS A MINIMUM 50’ AWAY FROM the work area, when the
tool is operating. NEVER allow children near the tool.
6. DO NOT FORCE THE TOOL to do a job for which it was not designed.
7. DRESS FOR SAFETY. DO NOT wear loose clothing, gloves, neckties, or jewellery
(rings, watches) when operating tool. They can get caught and draw you into moving
parts.
8. Wear safety glasses or goggles that are marked to comply with ANSI Z87.1 standard
when operating this unit.
9. ALWAYS remove the power cord plug from the electric outlet when making
adjustments, changing parts, cleaning or working on the tool.
10.AVOID ACCIDENTAL STARTUPS. Make sure the power switch is in the OFF
position before plugging in the power cord.
11.DO NOT abuse the power cord. Do not use it to carry the tool. Keep cord away
from heat, oil, sharp edges, or moving parts. Replace damaged cords immediately;
they may create a shock or fire hazard.
12.NEVER LEAVE A RUNNING TOOL UNATTENDED. Turn the power switch to
OFF. Do not leave the tool until it has come to a complete stop.
13.DO NOT OVERREACH. Keep proper footing and balance at all times. Wear
oil-resistant, rubber-soled footwear.
14.To avoid overloading, use the tool as it was intended to be used.
SAVE THESE SAFETY RULES
3
General Safety Rules
15.MAINTAIN TOOLS PROPERLY. ALWAYS keep tools clean and in good working
order.
16.CHECK FOR DAMAGED PARTS. Check for alignment of moving parts, binding,
breakage, or any other conditions that may affect the tool’s operation. Any part that is
damaged should be properly repaired or replaced before use.
17.DO NOT operate tool if you are under the influence of any drugs, alcohol or
medication that could affect your ability to use the tool properly.
18.KEEP THE HANDLE DRY, CLEAN, AND FREE FROM OIL AND GREASE.
Always use a clean cloth when cleaning. Do not use solvents, brake fluids, gasoline,
or other petroleum products to clean the tool, they may damage plastic parts.
ALWAYS WEAR EYE PROTECTION.
An Electric Grass Trimmer can throw foreign objects into your eyes,
which could cause permanent eye damage. ALWAYS wear safety
goggles (not glasses). Ordinary eyeglases have only
impact-resistant lenses that comply with ANSI Z87.1.
PROPOSITION 65
Some dust created by power sanding, sawing, grinding, drilling, and other construction
activities contains chemicals known to cause cancer, birth defects or other reproductive
harm. Some examples of these chemicals are:
· lead from lead-based paints
· crystalline silica from bricks and cement and other masonry products
· arsenic and chromium from chemically-treated lumber
Your risk from these exposures varies, depending on how often you do this type of work.
To reduce your exposure to these chemicals: work in a well ventilated area, and work with
approved safety equipment, such as those dust masks that are specially designed to filter
out microscopic particles.
SAVE THESE SAFETY RULES
4
Specific Safety Rules
1. IF YOU ARE NOT thoroughly familiar with the operation of the Electric Grass Trimmer,
obtain advice from a qualified person.
2. MAKE SURE wiring codes and recommended electrical connections are followed.
The Electric Grass Trimmer is double insulated. When servicing, use only identical
replacement parts.
3. DO NOT grasp the spool, line or the guard when picking up or holding the trimmer.
The line and line trimming blade can cause severe injury to hands and fingers.
4. AVOID UNINTENTIONAL STARTING. Don’t carry plugged-in Electric Grass Trimmer
with finger on switch. Be sure switch is OFF when plugging in.
5. DO NOT FORCE THE ELECTRIC GRASS TRIMMER. It will do the job better and
with less likelihood of a risk of injury at the rate for which it was designed.
6. DO NOT OVERREACH. Keep proper footing and balance at all times.
7. STORE the Electric Grass Trimmer indoors. When not in use, trimmers should be
stored indoors in dry, high, or a locked-up place, out of the reach of children.
8. MAKE all adjustments with the power OFF and the Electric Grass Trimmer
disconnected from the power source.
WARNING
NEVER REACH UNDER THE ELECTRIC GRASS TRIMMER (CUTTING LINE AREA)
UNTIL IT HAS COMPLETELY STOPPED. THE ELECTRIC GRASS TRIMMER WILL
CONTINUE TO ROTATE FOR A FEW SECONDS AFTER IT IS SWITCHED OFF.
9. ALWAYS use accessories provided or recommended by the manufacturer of the
Electric Grass Trimmer. Do not substitute.
10. KEEP guards in place and in working order. Keep the line trimming blade sharp.
Keep hands and feet away from cutting areas.
11. WHEN LENGTHENING NEW CUTTING LINE, be careful of the line cutter on the
guard, it is sharp.
12. KEEP VENTILATION OPENINGS clear of debris.
13. Before using the Electric Grass Trimmer, remove any stones, sticks, debris or
objects that could become entangled or thrown by the trimmer.
SAVE THESE SAFETY RULES
5
Symbols
The following signal words and meanings are intended to explain the levels of risk associated with
this product.
SYMBOL
SIGNAL
MEANING
DANGER
Indicates an imminently hazardous situation, which, if not avoided,
will result in death or serious injury.
WARNING
Indicates a potentially hazardous situation, which, if not avoided,
could result in death or serious injury.
CAUTION
Indicates a potentially hazardous situation, which, if not avoided,
may result in minor or moderate injury.
CAUTION
(Without Safety Alert Symbol) Indicates a situation that may
result in property damage.
Some of the following symbols may be used on this product. Please study them and learn their
meaning. Proper interpretation of these symbols will allow you to operate the product better and safer.
SYMBOL NAME
Safety Alert
DESIGNATION/EXPLANATION
Indicates a potential personal injury hazard.
To reduce the risk of injury, user must read and
Read The Operator’s Manual understand operator’s manual before using this
product.
Eye Protection
Always wear eye protection with side shields marked
to comply with ANSI Z87.1.
Wet Conditions Alert
Do not expose to rain or use in damp locations.
Keep Bystanders Away
Keep all bystanders at least 50 ft. away.
Ricochet
Thrown objects can ricochet and result in personal
injury or property damage.
No Blade
Do not install or use any type of blade on a product
displaying this symbol.
V
Volts
Voltage
A
Amperes
Current
Hz
Hertz
Frequency (cycles per second)
W
Watt
Power
min
Minutes
Time
Alternating Current
Type of current
Direct Current
Type or a characteristic of current
Class II Tool
Double-insulated construction
6
Electrical Information
WARNING TO AVOID ELECTRICAL HAZARDS, FIRE HAZARDS, OR
DAMAGE TO THE TOOL, USE PROPER CIRCUIT PROTECTION. YOUR LAWN
TRIMMER IS WIRED AT THE FACTORY FOR 120 V AC OPERATION. CONNECT
TO A 120 V, 15 A CIRCUIT AND USE A 15 A TIME DELAY FUSE OR CIRCUIT
BREAKER. TO AVOID SHOCK OR FIRE WHEN THE POWER CORD IS WORN,
CUT, OR DAMAGED IN ANYWAY, REPLACE IT IMMEDIATELY.
DOUBLE INSULATED
This Electric Grass Trimmer has a plug that looks like the one shown in Fig. A.
The Electric Grass Trimmer is double insulated to provide a double thickness of
insulation between you and the tool’s electrical system. All exposed metal parts are
isolated from the internal metal motor components with protecting insulation.
Fig. A
2
1
1. 2-prong plug
2. Properly-grounded outlet
WARNING TO AVOID INJURY, WHEN SERVICING THE ELECTRIC GRASS
TRIMMER, USE ONLY IDENTICAL REPLACEMENT PARTS.
WARNING DOUBLE INSULATION DOES NOT TAKE THE PLACE OF
NORMAL SAFETY PRECAUTIONS WHEN OPERATING THIS TOOL.
WARNING TO AVOID ELECTROCUTION:
1. Use only identical replacement parts when servicing a tool with double
insulation. Servicing should be performed by a qualified technician.
2. Do not use in wet or damp areas or expose to rain.
SAVE THESE SAFETY RULES
7
Electrical Information
GROUNDING INSTRUCTIONS
IN THE EVENT OF A MALFUNCTION OR BREAKDOWN, grounding provides the
path of least resistance for electric current and reduces the risk of electricshock. This
tool is equipped with an electric cord that has a POLARIZED plug.The plug MUST be
plugged into a matching outlet that is properly installed and grounded in accordance
with ALL local codes and ordinances.
DO NOT MODIFY THE PLUG PROVIDED. If it will not fit the outlet, have the proper
outlet installed by a qualified electrician.
CAUTION! IN ALL CASES, MAKE CERTAIN THE RECEPTACLE IN QUESTION
IS PROPERLY GROUNDED. IF YOU ARE NOT SURE, HAVE A CERTIFIED
ELECTRICIAN CHECK THE RECEPTACLE.
WARNING THIS ELECTRIC GRASS TRIMMER IS FOR OUTDOOR USE
ONLY. DO NOT EXPOSE TO RAIN OR USE IN DAMP LOCATIONS.
SAVE THESE SAFETY RULES
8
Electrical Information
GUIDELINES FOR USING EXTENSION CORDS
USE THE PROPER EXTENSION CORD. Make sure your extension cord is in good
condition. When using an extension cord, be sure to use one heavy enough to carry
the current your product will draw. An undersized cord will cause overheating. The
table below shows the correct size to use depending on cord length and nameplate
ampere rating. If in doubt, use the next heavier gauge. The smaller the gauge
number, the heavier the cord.
Minimum Gauge for Extension Cords (AWG)
(when using 120 V only)
Ampere Rating
More Than
Total Length of Cord in Feet (metres)
Not More Than
25' (7.6 m)
50' (15 m)
100' (30.4 m)
150' (45.7 m)
0
6
18
16
16
14
6
10
18
16
14
12
12
10
12
16
16
14
12
16
14
12
Not Recommended
Make sure your extension cord is properly wired and in good electrical condition.
Always replace a damaged extension cord or have it repaired by a qualified person
before using it. Protect your extension cords from sharp objects, excessive heat and
damp or wet areas.
Use a separate electrical circuit for your tools. This circuit should not be less than #14
wire and should be protected with a 15 A time-delay fuse. Before connecting the
motor to the power line, make sure the switch is in the OFF position and the electric
current is rated the same as the current stamped on the motor nameplate. Running at
a lower voltage will damage the motor.
WARNING ALTHOUGH THIS TOOL IS DOUBLE INSULATED, THE
EXTENSION CORD AND RECEPTACLE MUST STILL BE GROUNDED WHILE IN
USE TO PROTECT THE OPERATOR FROM ELECTRICAL SHOCK.
SAVE THESE SAFETY RULES
9
Know Your Electric Grass Trimmer
8
9
6
5
7
1. Motor housing
2. Spool head
3. Guard
4. Lower shaft
5. Middle shaft
6. Upper shaft
7. Locking knob
8. Auxiliary grip
9. Trigger switch
10. Cord
4
1
3
2
10
10
Assembly and Adjustments
UNPACKING (Fig. 1)
Remove the motor housing (1), the handle with locking knob (2), the guard (4), and
screw (3) from the carton and examine carefully.
NOTE: Do not discard box or any packing material until all parts are examined. If any
parts are missing or damaged, please call 1-866-456-8934 for assistance.
Fig. 1
4
2
1
1. Motor housing
2. Handle with locking knob
3. Guard screw
4. Guard
3
WARNING IF ANY PART OF THE ELECTRIC GRASS TRIMMER IS MISSING
OR DAMAGED, DO NOT PLUG THE ELECTRIC GRASS TRIMMER IN UNTIL THE
DAMAGED PART IS REPAIRED OR REPLACED.
11
Assembly and Adjustments
ASSEMBLY INSTRUCTIONS
The Electric Grass Trimmer must be assembled before use. The three parts of the
shaft must be connected and the guard must be attached.
WARNING TO AVOID INJURY, ALWAYS TURN THE SWITCH OFF AND
DISCONNECT THE ELECTRIC GRASS TRIMMER FROM THE POWER OUTLET
BEFORE INSTALLING OR CHANGING THE TRIMMER LINE OR MAKING ANY
ADJUSTMENTS.
Connect the handle to the motor housing (Fig. 2)
1. Slide the upper handle over the top of the middle handle, lining up the locking ball
with the hole on the upper handle. Push them together to lock.
2. Slide the middle handle over the top of the lower handle, lining up the locking ball
with the hole on the upper handle. Push them together to lock.
Fig. 2
12
Assembly and Adjustments
Install the guard (Fig. 3)
1. Invert the lawn trimmer to access the trimmer head (1).
2. Fit the guard (2) over the trimmer head and align the groove on the guard with the
tab on the motor housing (3).
3. Push the guard down over the tab, then turn it clockwise until the guard is
securely in place and the hole for the screw in the motor housing and guard are
aligned.
4. Insert the screw (4) into the guard and motor housing and tighten.
Fig. 3
4
2
(1) DOWN
1
3
13
Assembly and Adjustments
Cutting Line (Fig. 4)
A spool of monofilament cutting line is preinstalled on the Electric Grass Trimmer. When
the cutting line needs replacing, insert a new spool.
To remove the spool:
1. Disconnect the Electric Grass Trimmer from the power supply.
2. Turn the Electric Grass Trimmer over to access the spool.
3. Remove spool cover by pressing on two tabs parallel to each other on the side of
the cover (2).
4. Remove the spool (1) from the spool housing (3).
To replace the spool:
1. Replace the spool (1) with a new pre-wound spool.
2. Insert the end of line through the opening (4) in the spool housing (3).
3. Align the tabs on the spool cover with the slots in the spool housing on the trimmer head.
4. Push down on the spool cover, locking it to the spool housing.
5. To advance the line when initially installed, you must pull the line while pressing
the black line release button on the side of the spool housing (3).
WARNING To avoid injury, always disconnect Electric Grass Trimmer from
the power supply before installing the guard, changing a cutting line, or making
any adjustments.
Fig. 4
2
1
4
3
14
Assembly and Adjustments
To Refill the Spool (Fig. 5)
1. Cut a length of 1/16" (1.65 mm) nylon monofilament line (1) approximately 13’
(4.0 m) long.
2. Insert end of line into the small hole (2) to anchor the line.
3. Wind the line evenly and tightly in a clockwise direction.
4. DO NOT wind the line beyond the edge (3) of the spool.
5. Insert the line through hole (4) in the spool housing.
6. Position line spool (5) in spool housing (6).
Fig. 5
3
5
2
1
4
6
15
Operation
OPERATING INSTRUCTIONS
WARNING TO AVOID INJURY, DO NOT CARRY THE ELECTRIC GRASS
TRIMMER WITH YOUR FINGER ON THE SWITCH. AVOID UNINTENTIONAL
STARTING.
ON/OFF switch (Fig. 6)
Your Electric Grass Trimmer is equipped with an ON/OFF trigger switch.
Turn on the Electric Grass Trimmer:
1. Plug the Electric Grass Trimmer into an AC power outlet.
2. Squeeze the trigger switch (1) to turn ON the Electric Grass Trimmer.
Turn off the Electric Grass Trimmer:
1. Release the trigger switch.
2. Allow at least 5 seconds for the cutting spool to stop rotating.
WARNING ALWAYS ALLOW 5 SECONDS OR MORE FOR THE CUTTING
LINE SPOOL TO STOP ROTATING AFTER RELEASING THE TRIGGER SWITCH.
DO NOT INVERT THE ELECTRIC GRASS TRIMMER OR PLACE YOUR HANDS
UNDER THE PROTECTIVE GUARD UNTIL THE TRIMMER SPOOL IS COMPLETELY
STOPPED.
Fig. 6
1
16
Operation
Lengthening the Line (Fig. 7)
While the Electric Grass Trimmer is operating, the cutting line gets worn down and
becomes shorter. This Electric Grass Trimmer is equipped with Automatic Line
Advancement, which automatically feeds additional line to the correct length as it
wears down. If the line does not automatically advance, the trimmer line may be
tangled or empty. (To replace the spool, see Page 13)
To advance the line, restart the Electric Grass Trimmer. Upon starting, the line will
automatically advance.
Fig. 7
17
Operation
TRIMMER TIPS
Before each use
• Make sure the protective guard is tightly installed. Tighten the guard screw.
• Before trimming, inspect the area for string, wire, branches, or other material that
may become entangled in the cutting line or thrown.
During use
• Trim only when the grass and weeds are dry.
• Do not trim grass at night. Always make sure you have adequate lighting.
• Hold the Electric Grass Trimmer by both the switch handle and the auxiliary hand
for best control and balance.
• Stand with the cutting head tipped down at an angle in front, guiding the Electric
Grass Trimmer in a semi-circular motion around you.
• If possible, guide the trimmer to the left to cut. The line will cut as soon as it leaves
the guard, and the clippings are thrown away from you.
• To produce a smoothly trimmed area, move the Electric Grass Trimmer in and out
of the area being cut with a consistent speed and height.
• Use only the tip of the cutting line to do the trimming, especially near walls and
fences. Trimming with the side of the cutting line may overload the motor, wear out
the line faster, and break the line more often.
• Do not rest the trimmer spool on the ground while trimming. This will cause spool
wear.
• If the grass is higher than 6" (15 cm), trim in small stages.
• When the trimmer is stopped and the spool stops rotating, the cutting line will relax
and may recede. Feed extra cutting line before storing the trimmer to prevent losing
the line into the spool.
• If the diameter of the cutting area gets smaller, the line is worn down and needs to
be advanced more often.
• If the Electric Grass Trimmer is not cutting correctly, the cutting line may not be
feeding properly. Remove and rewind the line spool.
18
Maintenance
WARNING ALWAYS TURN OFF THE TOOL AND UNPLUG THE POWER
CORD FROM THE OUTLET BEFORE MAINTAINING THE LAWN TRIMMER.
GENERAL MAINTENANCE
Keep your Electric Grass Trimmer clean and in good repair for maximum performance
and machine longevity. Before each use inspect the switch and cord for damage. Check
for damaged, missing, or worn parts. Check for loose screws, misalignment, moving
parts that are jammed, or any other conditions that may affect the operation. If
abnormal vibration or noise occurs, turn off the tool immediately and have the
problem corrected before further use. Do not use the Electric Grass Trimmer until it is
properly repaired or replaced.
Cleaning
WARNING TO AVOID INJURY, ELECTRIC SHOCK, OR DAMAGE TO THE
LAWN TRIMMER, NEVER IMMERSE THE LAWN TRIMMER IN LIQUID OR ALLOW
A LIQUID TO FLOW INSIDE THE TOOL.
Wipe the outside of the Electric Grass Trimmer with a dry soft cloth. Do not hose
down or wash the trimmer with water. Scrape the guard and spool area to remove
dried clippings and mud. Brush or blow dust, debris, and grass clippings out of the air
vents. Keep the vents free of obstruction.
WARNING TO AVOID DAMAGE OR ELECTRIC SHOCK, DO NOT USE
STRONG SOLVENTS OR DETERGENTS ON THE PLASTIC HOUSING OR
PLASTIC COMPONENTS. CERTAIN HOUSEHOLD CLEANERS MAY DAMAGE
AND MAY ALSO CAUSE A SHOCK HAZARD.
Cutting Line
Replace the cutting line only with nylon monofilament line on pre-wound spools.
Always wind the line in the same direction as the arrow on the spool.
19
LIMITED FOUR-YEAR WARRANTY
Greenworks™ hereby warranties this product, to the original purchaser with proof of
purchase, for a period of four (4) years against defects in materials, parts or workmanship.
Greenworks ™, at its own discretion will repair or replace any and all parts found to be
defective, through normal use, free of charge to the customer. This warranty is valid only for
units which have been used for personal use that have not been hired or rented for industrial/
commercial use, and that have been maintained in accordance with the instructions in the
owners’ manual supplied with the product from new.
ITEMS NOT COVERED BY WARRANTY:
1. Any part that has become inoperative due to misuse, commercial use, abuse, neglect,
accident, improper maintenance, or alteration; or
2. The unit, if it has not been operated and/or maintained in accordance with the owner's
manual; or
3. Normal wear, except as noted below;
4. Routine maintenance items such as lubricants, blade sharpening;
5.
GREENWORKS HELPLINE: 1-888-909-6757 (1-888-90WORKS)
Warranty service is available by calling our toll-free helpline, 9 a.m. to 5 p.m. EST. Monday –
Friday.
TRANSPORTATION CHARGES:
Transportation charges for the movement of any power equipment unit or attachment are the
responsibility of the purchaser. It is the purchaser’s responsibility to pay transportation charges
for any part submitted for replacement under this warranty unless such return is requested in
writing by Greenworks™ .
20
Parts list
21
Parts list
Item No.
1
2
3
4
5
6
7
8
9
10
11
12
13
14
15
16
17
18
19
20
21
22
23
24
25
26
27
28
29
30
31
32
33
34
35
Part No.
3640129
3420102
3650135
3130129-6
3650101
3220905
3410801
36303152
3340115
3410315-1
36902332
3220313
3130129-6
33301332-9
31101332-2
31102332-2
3130229-7
36101332
3130229-7
3290805B
3411629
3220345
33901332
34100709
3320146
32201504
34111504
3340646
3411746
3110382A
3411546A-1
34103332-1
3290350
3220811
33300709
Description
Cord with plug assy.
Terminal sleeve
B- terminal
Handle casing(left)
Terminal
Screw
Cable restraint
Micro switch
Spring
Swith trigger
Internal cabel
Screw
Handle casing(right)
Upper tube
Middle tube assy
Lower tube assy
Motor housing(right)
Motor assy
Motor housing(left)
Nut
Motor mounting plate
Screw
Axle sleeve
Fan
Eyelet
Nut
Fan
Feed spring
Feed slider
Spool assy
Spool cover
Guard assy
Washer
Screw
Blade
22
Qty
1
1
3
1
2
6
3
1
1
1
1
18
1
1
1
1
1
1
1
1
1
4
1
1
1
1
1
1
1
1
1
1
1
1
1
TOLL-FREE HELPLINE: 1-888-90WORKS (888.909.6757)
Rev: 01 (09-24-13)
Printed in China on 100% Recycled Paper