1
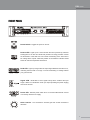
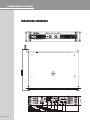
Professional Amplifiers
DW-Series Amplifiers
OPERATING MANUAL AND USER GUIDE
www.wharfedalepro.com
OPERATING MANUAL AND USER GUIDE
TABLE OF CONTENTS
1. Important Warnings & Safety Information............................................ 2
2. Introduction.......................................................................................... 3
3. About The DW Series Amplifiers.......................................................... 3
4. Features............................................................................................... 3
5. Front Panel.......................................................................................... 4
6. Rear Panel .......................................................................................... 5
7. Wiring................................................................................................... 6
8. Powering Up........................................................................................ 6
9. Input Trim Values................................................................................. 6
10. Dimensional Drawings......................................................................... 7
11. Wiring Diagram.................................................................................... 8
12. Specifications....................................................................................... 9
13. Warranty............................................................................................. 10
1
DW
Series
IMPORTANT WARNINGS & SAFETY INSTRUCTIONS
1. Please read and retain these safety instructions.
2. Heed all warnings in the operating instructions and on the appliance.
3. Do not use this apparatus near water or moisture.
4. Clean only with a dry cloth.
5. Install in a good quality 19" equipment rack.
6. Do not install near sources of heat such as radiators, heat registers, stoves or other apparatus
that produce heat.
7. Refer all servicing to authorised personnel.
8. There are no user serviceable parts inside this product. Users should not attempt to service this
product. Warranty nullification could result if this is attempted.
9. Servicing is required when the apparatus has been damaged in any way including: Impact
damage, power cord/supply damage, liquid spillages, small objects falling into the unit or
exposure to moisture. In addition please refer to authorised service personnel if the apparatus
is not operating normally.
10. To completely disconnect this equipment from the AC mains disconnect the power plug from
the AC receptacle.
11. To prevent fire never place the unit near any naked flame such as a candle.
12. Do not defeat the purpose of the polarized or grounding type plug. A polarized plug has
two blades with one wider than the other. A grounding type plug has two blades and a third
grounding prong. The wide blade or the third prong are there for your safety. If the plug does
not fit into your outlet, consult an electrician for replacement of the obsolete outlet.
13. USING AMPLIFIERS – In order to avoid damage to drivers and other equipment, it is advisable
to establish and follow a routine for powering up and powering down a sound system. With all
system components connected, turn on source equipment (mixers, signal processors, record
and playback units, etc.) BEFORE powering up amplifiers. Transient voltages from powering
up source equipment can damage speakers if amplifiers are already turned on. Make sure that
amplifier volumes are set to their minimum settings and power up any system amplifiers LAST.
It is recommended that all system components be allowed to stabilize for several seconds
before any source signals are introduced or level setting adjustments are made. Similarly, when
shutting systems down, turn all amplifiers off first, before powering down any other system
components.
14. CABLES – Do not use shielded or microphone cables for connection between amplifiers and
speakers. Use only approved speaker cables with proper connectors.
15. RIGGING – SUSPENDING – MOUNTING – Rigging, suspending and mounting of speaker
systems can expose members of the public to serious health risks and even death. UNDER
NO CIRCUMSTANCES ATTEMPT TO RIG, SUSPEND OR OTHERWISE MOUNT SOUND
REINFORCEMENT PRODUCTS UNLESS YOU ARE FULLY QUALIFIED AND CERTIFIED
TO DO SO BY RELEVANT LOCAL, STATE AND NATIONAL AUTHORITIES. ALL RELEVANT
SAFETY REGULATIONS MUST BE FOLLOWED. IF YOU ARE NOT PROPERLY QUALIFIED
OR DO NOT KNOW OF PERTINENT REGULATIONS, CONSULT QUALIFIED PERSONNEL
FOR ADVICE.
16. CAUTION – Professional sound reinforcement systems are capable of generating very high
sound pressure levels. Take care with placement and operation to avoid exposure to excessive
volume levels. Permanent hearing damage can result when operated to extreme levels.
2
OPERATING MANUAL AND USER GUIDE
INTRODUCTION
The Wharfedale Pro DW-Series power amplifiers are designed and constructed to the highest
standards. We wish to thank you for entrusting us with your sound.
Please take a few minutes to read through this manual to ensure you get the most from your DWSeries amplifier.
ABOUT THE DW-SERIES AMPLIFIERS
The DW-Series of professional sound reinforcement power amplifiers are designed for high volume
and quality sound reproduction in demanding applications. Housed in a rugged yet portable 2U
rackmount chassis the DW-Series is road-ready and can handle a wide range of applications.
The extensive feature list includes dual mono and bridged mono making the DW-Series a versatile
contender and ensuring compatibility with the broadest range of tasks. Simple yet effective status
indicators make the DW-Series the obvious choice for the busy live sound professional that needs a
no-nonsense approach to amplification.
The DW Series are fan cooled with filtered air intakes on the front panel, hot air is expelled from the
rear of the unit. The air intakes are foam lined and can be vacuum cleaned from the front of the unit
to remove dirt and dust and ensure optimum airflow.
Each channel has independent control over input trim with signal and peak indicators. Status
indicators make you aware of of AC power supply, bridge mode and the status of the onboard
protection system.
The rear panel has XLR inputs with through outputs for parallel wiring of additional power amps
while the main outputs use Speakon™ connectors for quick installation and guaranteed durability.
FEATURES
3
♦
Switchable stereo and bridged modes
♦
Individual channel input trim controls
♦
XLR inputs with through outputs
♦
Speakon™ main outputs
♦
Power, Protect, Bridge, Signal and Peak indicators
♦
Fan cooled with front panel mounted filters
♦
IEC mains input receptacle
♦
Road ready 2U rackmount chassis
DW
Series
FRONT PANEL
Power Switch - Toggles the power on and off
Protect LED - Lights up for 3 seconds when the unit is powered up, after this
startup period it is used to indicate that protection is being provided. Causes
for illumination of the fault LED can include overheating of the heat sink or
DC voltage at the outputs. When the problem is corrected the indicator should
switch off and normal operation will resume.
Peak LED - Lights up orange when the output signal distortion rises above 1%,
indicating that the level is too high. To avoid overheating or damage assess
your gain structure.
Signal LED - Illuminates to show signal activity above -35dB at the input
stage. If there is no illumination check your inputs (including the power supply!)
and source devices.
Power LED - With the power switch set to on the LED will illuminate. If there
is no activity check the AC supply.
Gain Controls - Turn clockwise to increase gain and counter clockwise to
decrease.
4
OPERATING MANUAL AND USER GUIDE
REAR PANEL
Mains Power - Take care to ensure the voltage selector shows the correct
mains voltage for your local mains supply at the installation site. An appropriate
mains cord is included in the original packaging, if this is not the case contact
your dealer.
Audio inputs/outputs - The main XLR input connectors should be
connected to the outputs of your mixing console. The XLR outputs are designed
to through-connect additional amplifiers in parallel, permanent electrical
connection is maintained regardless of the power switch setting.
Bridged mode connections
When selecting the output mode always make sure that the amplifier is
powered down to minimize the risk of any unwanted transient voltages that can
damage speakers and hearing.
Stereo mode - allows both channels to operate independently with the
source material amplified according to the input trim and outputted from the
corresponding output connector.
Bridged mono mode - this allows the amp to be used as a single channel
amplifier with increased power when compared to normal stereo operation.
The minimum impedance of a single load is higher in bridged mode, for
example the amplifier should not operate with a load less than 2 ohms in stereo
mode or 4 ohms in bridged mono mode.
Ground lift switching - Use the ground lift switch if you are experiencing
earth loop issues, as with all the rear panel switching ensure that the unit is
safely powered down before the switch is used.
5
DW
Series
WIRING
Connecting sources with unbalanced outputs requires bridging PIN1 and PIN3 of the power amps
input connectors or removing PIN3, if this is not done hum and HF interference may occur.
Use of high quality balanced cables (with 2 conductors for audio signal plus separate shielding)
is recommended as most mixing consoles have balanced outputs. This type of interconnect will
greatly reduce the chance of interference, noise or hum.
Observe the table above the Speakon™ outputs that shows the correct terminal connection for the
respective output modes. When connecting Speakon™ cables ensure that they are securely locked
into place by turning clockwise, and ensure that the cables are fully unlocked before you attempt to
remove them.
POWERING UP
The DW Series is simple to install and operate.
When powering up your DW-Series amplifier make sure that the input trim controls for both
channels are at the lowest possible setting. Always ensure that you establish a safe routine to
power up all of the stages in your rig, starting from source through to amplifier.
Transient voltages from powering up source equipment can damage your speakers and hearing
if your amplifiers are already turned on. Always ensure that the system amplifiers are powered up
last.
INPUT TRIM VALUES
With input trim settings below 4 you will not be able to achieve full output power without clipping the
input stages.
Input Level (dBu)
Volume
Full rated power
Full rated power
THD+N=0.5%
THD+N=1%
10
+1 dBu
+4 dBu
9
+4 dBu
+6 dBu
8
+8 dBu
+10 dBu
7
+12 dBu
+15 dBu
6
+16 dBu
+20 dBu
5
+19 dBu
+22 dBu
4
+21 dBu
> +22 dBu
3
> +22 dBu
> +22 dBu
2
> +22 dBu
> +22 dBu
1
> +22 dBu
> +22 dBu
0
-----
----6
OPERATING MANUAL AND USER GUIDE
DIMENSIONAL DRAWINGS
7
DW
Series
WIRING DIAGRAM
MixerOutput
Microphone
Mixer
DW-Series
ProfessionalAmplifier
LoudspeakerB
LoudspeakerA
AmplifierOutput
8
OPERATING MANUAL AND USER GUIDE
SPECIFICATIONS
Model
DW800
DW1600
DW2400
Load Impedance
8ohm
4ohm
2ohm
8ohm
4ohm
2ohm
8ohm
4ohm
Rated output power
2x230W
2x330W
2x340W
2x450W
2x620W
2x800W
2x590W
2x910W 2x1200W
650W
800W
-----
1250W
1600W
-----
1800W
2400W
2ohm
Maximum bridged output
power (THD<1%, 1KHz)
-----
Maximum RMS voltage
swing (THD=1%, 1KHz)
42.8V
60V
68.7V
Slew rate(at 1KHz)
32V/us
42V/us
50V/us
Current consumption (at 1/8 maximum output
220W
334W
380W
280W
400W
600W
380W
610W
935W
power)
Input senstitivity (at rated output
1.0V
1.0V
1.0V
THD at rated output power
<0.1%
<0.1%
<0.1%
IMD-SMPTE(60Hz,7KHz)
<0.1%
<0.1%
<0.1%
DIM30(3.15KHz,15KHz)
<0.1%
<0.1%
<0.1%
<-80dB
<-80dB
<-80dB
20Hz-20kHz (0~2dB)
20Hz-20kHz (0~2dB)
20Hz-20kHz (0~2dB)
power,1KHz)
Crosstalk(ref.1KHz,at 10%
rated output power)
Frequency
response(ref.1KHz)
Input impendance 20kΩ / balanced,
20kΩ / balanced,
20kΩ / balanced,
(20Hz-20KHz,balanced)
10kΩ / unbalanced
10kΩ / unbalanced
10kΩ / unbalanced
>350
>450
>450
105dB
106dB
106dB
Damping factor (at 100Hz/1KHz 8Ω)
Signal to noise ratio (A weighted)
Power requirements
AC~230V 50Hz-60Hz
Protection
Audio limiters, thermal overload, short circuit
Cooling
Dimensions(WxDxH)
Net weight
Gross weight
9
Front-to-rear
483x380x88mm
483x380x88mm
483x380x88mm
17.5kg
19.5kg
21.5kg
19kg
21kg
23kg
DW
Series
WHARFEDALE PRO LIMITED WARRANTY
Wharfedale Pro DW Series products are warranted of manufacturing or material defects for a
period of one year from the original date of purchase. In the event of malfunction, contact your
authorized Wharfedale Pro dealer or distributor for information.
*Be aware that warranty details may differ from country to country. Contact your dealers or
distributor for information. These terms do not infringe your statutory rights.
10
Wharfedale Professional
IAG HOUSE, Sovereign Court, Ermine Business Park Huntingdon, Cambs, PE29 6XU, England
www.wharfedalepro.com
Wharfedale Professional reserves the right to alter or improve specifications without notice.
All rights reserved © 2010 Wharfedale Pro. Wharfedale Pro is a member of the IAG Group.