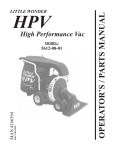
1
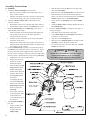
SELF PROPELLED
Models 5621 and 5631
© 2005 Little Wonder, Div. of Schiller-Pfeiffer Inc. All Rights Reserved.
Table of Contents
Important Information
Important Information
A. Introduction
Introduction . . . . . . . . . . . . . . . . . . . . . . . . . . . .1
Service Information . . . . . . . . . . . . . . . . . . . . .1
Special Safety Information . . . . . . . . . . . . . . . .1
Unpackaging
Unpackaging Information . . . . . . . . . . . . . . . . .2
Safety and Warnings
Safety Decals . . . . . . . . . . . . . . . . . . . . . . . . . .2
General Safety Rules
Warnings - "Don’ts" . . . . . . . . . . . . . . . . . . . . .4
Warnings - "Do’s" . . . . . . . . . . . . . . . . . . . . . . .4
Engine/ Fuel Warnings - "Don’ts" . . . . . . . . . .5
Engine/ Fuel Warnings - "Do’s" . . . . . . . . . . . .5
Assembly Instructions
Assembly . . . . . . . . . . . . . . . . . . . . . . . . . . . . . .6
Speed Controller Setup . . . . . . . . . . . . . . . . . . .7
Put Oil and Gasoline in Engine
Before Starting . . . . . . . . . . . . . . . . . . . . . . . . .8
Use of Lifting Lug . . . . . . . . . . . . . . . . . . . . . .9
Operation
Starting Instructions . . . . . . . . . . . . . . . . . . . . .9
Self-Propelled Setup . . . . . . . . . . . . . . . . . . . . .9
Vacuuming . . . . . . . . . . . . . . . . . . . . . . . . . . .10
Empty Debris Bag . . . . . . . . . . . . . . . . . . . . . .10
Refueling the Engine . . . . . . . . . . . . . . . . . . .10
Storage and Maintenance
Storage . . . . . . . . . . . . . . . . . . . . . . . . . . . . . .11
Maintenance . . . . . . . . . . . . . . . . . . . . . . . . . .11
Removing Blockage in Moving Parts . . . . . . .12
Removing the Fan . . . . . . . . . . . . . . . . . . . . . .12
Changing V-Belt . . . . . . . . . . . . . . . . . . . . . . .12
Part Numbers
HPV Parts Assembly . . . . . . . . . . . . . . . . . . . .13
HPV Parts List . . . . . . . . . . . . . . . . . . . . . . . .14
HPV Engine Assembly . . . . . . . . . . . . . . . . . .15
HPV Deck Assembly . . . . . . . . . . . . . . . . . . .15
HPV Collector Assembly . . . . . . . . . . . . . . . .16
HPV Liner Assembly . . . . . . . . . . . . . . . . . . .17
HPV Nozzle Assembly . . . . . . . . . . . . . . . . . .17
Warranties
Warranty . . . . . . . . . . . . . . . . . . . . . .Back cover
On behalf of everyone at Little Wonder, we would like to
thank you for your purchase of a Little Wonder High
Performance Vac. This professional debris handling machine
was designed to the highest standards to ensure you many
hours of uninterrupted service.
This manual provides the information necessary for safe and
efficient operation and service. For your safety, it is critically
important that you read and understand this entire manual
before operating your High Performance Vac.
Specifications:
Model
5621
5631
Dry Weight
258 lbs.
260 lbs.
Max Rpm
3400
3400
B. Service Information
High Performance Vac Unit
Contact your local Little Wonder dealer.
Engine
Contact an authorized Briggs & Stratton dealer. Dealers are
listed in the Yellow Pages under “Lawn and Garden Equipment
Supplies”, “Lawn Maintenance” or “Lawn Mowers”. Your
dealer will need to know the model and serial number of your
engine. For their location, please consult the operator’s manual
provided with your engine.
C. Special Safety Information
WARNING
DANGER
ATTENTION: THIS SYMBOL POINTS OUT
IMPORTANT SAFETY INSTRUCTIONS
WHEN YOU SEE THIS SYMBOL
HEED ITS WARNING! STAY ALERT!
WARNING
DANGER
TO REDUCE THE POTENTIAL FOR ACCIDENTS,
COMPLY WITH THE SAFETY INSTRUCTIONS IN
THIS MANUAL. FAILURE TO COMPLY MAY RESULT
IN SERIOUS PERSONAL INJURY AND OR
EQUIPMENT AND PROPERTY DAMAGE.
WARNING
DANGER
THE ENGINE EXHAUST FROM THIS PRODUCT
CONTAINS CHEMICALS KNOWN TO THE STATE OF
CALIFORNIA TO CAUSE CANCER, BIRTH DEFECTS
OR OTHER REPRODUCTIVE HARM.
1.
Unpacking
Safety and Warnings
1. Remove Collector assembly, Nozzle assembly, and
Debris bag from the top section of the package.
A. Safety Decals
2. Remove cardboard insert.
3. Cut away short side of box and fold down.
An important part of the safety system incorporated in this
High Performance Vac are the warnings and informational
decals (labels) found on various parts of the unit.
These decals (labels) must be replaced if they become illegible
due to abrasion, etc.
4. Pull and latch “transaxle engagement lever.”
See page 9.
It is your responsibility to replace the decals (labels) when they
become hard to read. The location of these decals and their
part numbers for ordering are shown on page 3.
5. Roll HPV base unit out of box.
WARNING
DANGER
IMPROPER USE OR CARE OF THIS HIGH
PERFORMANCE VAC, OR FAILURE TO WEAR PROPER
PROTECTION CAN RESULT IN SERIOUS INJURY.
READ AND UNDERSTAND THE RULES FOR
SAFE OPERATION AND ALL INSTRUCTIONS
IN THIS MANUAL.
WEAR HEARING, EYE, AND BREATHING
PROTECTION.
Keep hands and
feet away from
air discharge
areas. Rotating
fan will cause
serious injury.
Before
performing
any service or
maintenance,
disconnect spark
plug wire. Make
sure throttle is in
STOP position.
Caution:
Thrown
objects.
Keep
bystanders
away.
Always wear
eye, ear and
breathing
protection.
2.
P/N 600605
Warning Label
P/N 600602
Warning Label
Read and
understand the
Owners Manual.
Store your
Owners Manual
in a safe place.
P/N 600604
Safety and Warnings
P/N 600605
Warning Label
P/N 600604
P/N 600602
Warning Label
3.
General Safety Rules
1. Read and understand manual.
A.
2. Wear eye, hearing, and breathing protection, proper
clothing and footwear.
Don’t attempt to remove materials from intake or discharge
when High Performance Vac is running, or fan is rotating.
3. While operating the machine always be sure of a safe and
secure operating position, maintain a firm footing and
good balance at all times.
Don’t install or remove components while High Performance
Vac is running. Turn off engine to make changeover. Be sure
throttle is in the stop position, and the High Performance Vac
has come to a complete stop. Remove the spark plug wire
from the spark plug before removing material.
4. Keep area clear of children, pets, and bystanders.
5. Never attempt to use an incomplete machine or one fitted
with an unauthorized modification.
6. Avoid contact with and inhalation of harmful fluids, gases,
mists, fumes, and dust.
Warnings - "Don’ts"
Don’t attempt to repair High Performance Vac. Have repairs
made by qualified Little Wonder dealer or repairman. See that
only Little Wonder and recommended engine manufacturers
replacement parts are used.
7. Do not allow children to operate machine.
8. Do not override or remove any safety devices.
WARNING
WARNING
DANGER
DO NOT SMOKE WHEN FILLING FUEL TANK
DANGER
9. FAN COASTS AFTER THE ENGINE IS TURNED OFF.
WARNING
DANGER
10. ROTATING FAN. DON’T ATTEMPT TO REMOVE
MATERIALS FROM INTAKE OR DISCHARGE WHEN
UNIT IS RUNNING, OR FAN IS ROTATING.
WARNING
DANGER
11. DO NOT OPERATE UNIT IF EXCESSIVE VIBRATION
OCCURS; SHUT ENGINE OFF IMMEDIATELY!
REMOVE SPARK PLUG WIRES AND CHECK FOR
DAMAGED IMPELLER, LOOSE IMPELLER BOLT,
LOOSE IMPELLER KEY, OR LODGED
FOREIGN OBJECTS.
12. Keep hands away from hose inlet and discharge chute.
13. Disconnect spark plug wire before doing any cleaning or
maintenance.
14. Wear gloves to protect your hands.
15. Beware that the machine is loud and, during normal
operation; may interfere with speech communication.
Don’t leave the engine running while the High Performance
Vac is unattended.
Don’t store, spill, or use gasoline near flames or spark
B.
Warnings - "Do’s"
Always dress properly. Do not wear loose clothing or jewelry.
They can be caught in moving parts. Use of sturdy gloves,
non-skid footwear and safety glasses are recommended.
Always wear ear protectors where possible. Use face filter to
avoid breathing dust.
Always stay alert. Watch what you are doing and use common
sense. Do not operate High Performance Vac when fatigued.
Always keep hands away from air intake and air outlet chute.
Keep both hands on handles when power is on.
Always maintain and examine High Performance Vac with
care. Follow maintenance instructions given in manual.
WARNING
DANGER
DO NOT USE THE HIGH PERFORMANCE VAC IF THE
MUFFLER IS DEFECTIVE OR MISSING.
4.
B.
Warnings - "Do’s" Continued
Always store High Performance Vac indoors. When not in use,
store High Performance Vac indoors in a sheltered area
(a dry place) where it’s not accessible to children. The High
Performance Vac, as well as fuel, should not be stored in a
house. Keep throttle in the stop position.
Always be sure High Performance Vac is fully assembled.
Never operate High Performance Vac without all guards and
deflectors in place. Ensure that all nuts, bolts, screws are
installed and properly tightened.
Don’t run engine when electrical system causes spark
outside the cylinder. During periodic checks of the
spark plug, keep plug a safe distance from cylinder to
avoid burning of evaporated fuel from cylinder.
Don’t check for spark with spark plug or plug wire
removed and grounded. Use an approved tester. Sparks
can ignite fumes.
Don’t run engine when the odor of gasoline is present
or other explosive conditions exist.
Always keep the throttle in the “stop” position when not in use.
Don’t operate the unit if gasoline is spilled. Clean up
spill completely before starting engine.
Always keep a safe distance between two or more operators
when working together simultaneously.
Don’t refuel indoors or in an improperly ventilated
area.
Don’t operate your High Performance Vac if there
is an accumulation of debris around the muffler or
cooling fins.
WARNING
DANGER
IF THE HIGH PERFORMANCE VAC IS USED
IMPROPERLY OR SAFETY PRECAUTIONS ARE NOT
FOLLOWED, THE USER RISKS SERIOUS INJURY TO
THEMSELVES AND OTHERS.
Don’t touch hot mufflers, cylinders or cooling fins as
contact may cause serious burns.
READ AND UNDERSTAND THE FOLLOWING
BEFORE ATTEMPTING TO OPERATE THIS
HIGH PERFORMANCE VAC.
D.
WARNING
DANGER
HANDLE FUEL WITH CARE. IT IS HIGHLY
FLAMMABLE. FUELING A HOT ENGINE OR NEAR
AN IGNITION SOURCE CAN CAUSE A FIRE AND
RESULT IN SERIOUS PERSONAL INJURY AND/ OR
PROPERTY DAMAGE.
C.
Engine/ Fuel Warnings - "Don’ts"
Don’t fuel, refuel or check fuel while smoking or near
an open flame or other ignition source. Stop engine and
be sure it is cool before refueling.
Don’t leave the engine running while the High
Performance Vac is unattended. Stop engine before
transporting High Performance Vac from one place to
another.
Engine/ Fuel Warnings - "Do’s"
Always use fresh gasoline. Stale gasoline can cause
difficult starting, poor performance and leakage.
Always pull starter cord slowly until resistance is felt.
Then pull cord rapidly to avoid kickback and prevent
arm or hand injury.
The use of spark arrestor mufflers is required by law in
the state of California (Section 4442 of the California
Public Resources Code), as well as in other states or
municipalities. Federal laws apply on federal lands.
Always handle fuel with care; it is highly flammable.
Never add fuel to a machine with a running or hot
engine. Do not inhale fuel fumes as they are toxic.
The spark ignition system meets all requirements of
the Canadian Interference Causing Equipment
Regulations.
Don’t start or run this High Performance Vac indoors,
or in an improperly ventilated area as poisonous carbon
monoxide and other gasses are emitted.
5.
Assembly Instructions
A. Assembly
1. Attach the collector assembly to the base unit:
• Bolt the collector assembly to the frame with 4 sets of
bolts, washer, and nuts
• Slide the rectangular end of the collector over the housing
and mount the flange with 2 sets of washers and nuts
2. Attach the throttle control cable to the handle on the
collector assembly:
• Bolt throttle control lever to handle with washer and nut
• Secure throttle cable to handle with cable ties in 2 places
3. Install the band clamp into the debris bag (wear gloves
when handling band clamp):
• Slide the bracket end of the band clamp through the left
side opening of the sleeve on the debris bag until it
emerges from the right side
• Feed the tail end of the band (on the clasp side) behind
the bracket in the sleeve
• Pinch the wire form on the clasp together and connect it
through 2 holes in the adjustment bracket such that it will
close tightly over the collector
4. Connect the debris bag by placing it over the bottom lip of
the collector and closing the clasp to secure the bag. Adjust
the clasp wire form to the appropriate hole position on the
bracket to insure a tight fit. If the bag will not fit tight within
the range of the 3 adjustment holes, insert the bag seal strap:
• Unhook the wire form from the bracket
• Pull the tail end of the
band back out from
behind the bracket
• Feed one end of the seal
strap behind the metal
band and through the
channel to the other side
• Tuck the other end of
the seal strap behind
the bracket
(overlapping the lead
end of the seal strap)
• Feed the tail end of the
band clamp behind the
bracket (overlap the
seal strap)
• Connect the wire form
to the appropriate holes
in the bracket and
secure the debris bag to
the collector
5. Attach nozzle assembly to
base unit:
• Attach one end of the
hose to the nozzle
assembly with the
bridge clamp
6.
•
Slide the other end of the hose over the edge of the
inlet on the front plate
• Hook one side of the nozzle bracket over the front axle
• Bend the other end of the nozzle bracket inward to
hook it over the axle and engage the pins on the wheel
bracket with the slots on the nozzle bracket
• Secure the hose to front plate inlet with the bridge
clamp
• Attach the nozzle cable end fitting through the hole in
the nozzle bracket
6. To remove nozzle assembly (for purposes of storage, or
clearing blockages):
• Turn engine off and disconnect spark plug
• Loosen hose clamp on the front plate with flathead
screwdriver or 5/16 wrench
• Slide hose off of front plate inlet
• Bend one side of nozzle bracket inward and twist the
assembly to remove the hook from the axle
• Twist back and lift to remove the other side of nozzle
bracket from the axle
WARNING
DANGER
NEVER RUN OR OPERATE YOUR MACHINE
UNLESS DISCHARGE BAG IS ATTACHED,
AND THE INTAKE NOZZLE IS INSTALLED.
7. Speed Controller Setup
c.
d.
1.
2.
If the Actuator does not work smoothly, binds up,
or does not fully return to the “normal” position,
loosen the Self-Locking Acorn Nut slightly and
recheck the operation. Repeat as needed to achieve
proper operation.
Depress the Reversing Lever and then press lightly
on the Bail Handle until the Front Face of the Rear
Slot on the Bail Handle just touches the Actuator
Pin (also refer to picture in step ‘e’ below).
Attach the Lower Connecting Rod Assembly to the
Lower Bellcrank.
a. Attach Lower Connecting Rod Assembly to the
Lower Bellcrank with a 3/8”-24 Nyloc Nut.
Tighten using 9/16” and 1/2” wrenches.
Setup the Speed Controller Mechanism – Critical for
proper operation.
a. Verify that the Self-Locking Acorn Nut is
tightened sufficiently to hold the Upper
Connecting Rod Assembly firmly in place. If not,
slightly tighten the Self-Locking Acorn Nut.
e.
The Front Face of the Rear Slot and the Actuator
Pin Bushing should be in contact with each other
and appear as shown below:
f.
If the Actuator Pin does not enter into the Rear
Slot as show below, the Upper Connecting Rod
Assembly is too short and must be lengthened.
i.
b.
Verify the Actuator reversing function by
depressing the Reversing Lever (Red) and then
releasing it. It should work smoothly and, when
released, it should fully return to the “normal”
position.
Remove the nut that holds the Rod End to the
Upper Bellcrank.
ii. Disconnect the Rod End from the Upper
Bellcrank.
iii. Adjust the Rod End outwards by unscrewing it
counterclockwise.
iv. Reattach the Rod End to the Upper Bellcrank
and secure it with the nut (hand tightened).
v. Repeat this adjustment as needed to position
the Rear Slot and Actuator Pin as shown in
step ‘e’ above.
7.
g.
If the Actuator Pin enters into the Rear Slot as
show below, the Upper Connecting Rod Assembly
is too long and must be shortened.
Remove the nut that holds the Rod End to the
Upper Bellcrank.
ii. Disconnect the Rod End from the Upper
Bellcrank.
iii. Adjust the Rod End inwards by screwing it
clockwise.
iv. Reattach the Rod End to the Upper Bellcrank
and secure it with the nut (hand tightened).
v. Repeat this adjustment as needed to position
the Rear Slot and Actuator Pin as shown in
step ‘e’ above.
j.
Depress the Bail Handle and verify that the
Actuator Pin smoothly engages the Front Slot on
the Bail Handle.
k.
Verify the forward and reverse operations several
times to assure that the set up is correct.
Lock the Rod End of the Upper Connecting Rod
Assembly by holding the Rod End in position with
a 1/2” wrench and then tightening the nut with a
9/16” wrench as shown below:
i.
l.
m. Verify that Rod End is straight and not cocked as
depicted below:
n.
h.
While holding the Reversing Lever down,
gradually press down on the Bail Handle. The
Actuator Pin should engage the Rear Slot smoothly
with minimal or no “snapping” action when the
Bail Handle is depressed. It may be necessary to
readjust the Rod End as described above to finetune this action.
Remove the standard 3/8”-24 Nut from the Rod
End of the Upper Connecting Rod Assembly and
replace it with the 3/8”-24 Nyloc Nut. Tighten
using both a 9/16” & 1/2” wrench.
Setup of Speed Controller complete.
B. Put Oil and Gasoline in Engine
Before Starting
WARNING
i.
Release the Bail Handle. It should return to its full
upright position and the Actuator Assembly should
also return to its “normal” position as shown below:
DANGER
HANDLE FUEL WITH CARE. IT IS HIGHLY
FLAMMABLE. FUELING A HOT ENGINE OR NEAR
AN IGNITION SOURCE CAN CAUSE A FIRE AND
RESULT IN SERIOUS PERSONAL INJURY AND/ OR
PROPERTY DAMAGE.
1. Little Wonder recommends using SAE 30 Oil. The use of
multi-viscosity oil will result in high oil consumption and
possible engine damage.
2. Add gasoline to the fuel tank, and you are ready to start.
3. See Engine Operating & Maintenance instructions for
more detail description of type and amount of oil and
gasoline used.
8.
C. Use of Lifting Lug
B. Self-Propelled Instructions
Little Wonder High Performance Vac is supplied with convenient
Lifting Lug that can be used when you need to move or tie down
the unit.
WARNING
DANGER
DO NOT USE OR SERVICE THE UNIT WHEN IT’S
SUSPENDED FROM THE LIFTING LUG.
Operation
WARNING
DANGER
THE OPERATOR OF THIS HIGH PERFORMANCE
VAC IS RESPONSIBLE FOR ACCIDENTS OR
HAZARDS OCCURRING TO HIMSELF, OTHER
PEOPLE OR THEIR PROPERTY.
1. With engine running (and Transaxle Lever in Engage
position) slowly press Bail Handle downward to selfpropel vacuum FORWARD. The farther down you press
the Bail Handle, the faster the speed of the vacuum.
Slowly release the Bail Handle to reduce speed or to stop.
2. To self-propel in Reverse, first press downward on the
Reverse Lever, and (with the Reverse Lever pressed
down) press downward on the Bail Handle. The farther
down you press the Bail Handle, the faster the speed of
the vacuum in REVERSE. Slowly release the Bail Handle
to reduce speed or to stop.
3. Releasing the Bail Handle at any time stops the vacuum
from movement.
HPV Control Levers
A. Starting Instructions
RECOIL STARTER HANDLE
WARNING
DANGER
NOZZLE CONTROL
KNOB
FUEL IS EXTREMELY FLAMMABLE. HANDLE IT
WITH CARE. KEEP AWAY FROM IGNITION
SOURCES. DO NOT SMOKE WHILE FUELING
YOUR EQUIPMENT.
1. Perform pre-starting checks (engine oil and gas level, all
safety inspections, etc. Read entire Owners’ Manual for all
pre-starting information.)
BELT TENSION LEVER
Step on to release belt
tension when starting
2. Release the Transaxle Engagement Lever
3. Make sure Gas Supply Knob (located above Recoil
Starter) is turned to On position.
REVERSE LEVER
Press to engage
reverse mode
THROTTLE CONTROL LEVER
GAS SUPPLY KNOB
CHOKE LEVER
BAIL HANDLE
Press to propell
HPV forward or reverse
4. Move Choke Lever (located above and to the left of the
Recoil Starter) to Choke position.
BAND CLAMP
CLASP
5. Move Throttle Control Lever (located on Left Handlebar)
to Middle Position or Full Position (toward Rabbit symbol.)
6. Pull Recoil Starter Handle slowly until resistance is felt,
then pull firmly to start engine.
7. When engine starts, slowly move Choke Lever to
Open position.
TRANSAXLE ENGAGEMET LEVER
Pull and latch to disengage
Release to engage
8. Increase Throttle Control Lever to Full Speed if desired.
9. NOTE: If engine is difficult to start: Press Belt Tension
Lever down with your left foot before pulling Recoil
Starter Handle. (This disengages the belt for easier
starting.) When engine starts, slowly release your foot
from the Belt Tension Lever.
WARNING
DANGER
ENGINE EMITS CARBON MONOXIDE. DO NOT
OPERATE OR REFUEL IN ENCLOSED AREA.
9.
C. Vacuuming
1. Adjust nozzle to desired height by turning the nozzle
control knob, secure position with wing nut.
2. Vacuum debris from lawn or paved surfaces. Vacuum the
following: leaves, small twigs and sticks, acorns, thistles,
seed pods, grass clippings, straw, wood chips, dry mulch,
litter, small cans & bottles, paper products, styrofoam
products.
3. Avoid the following: excessively wet surfaces and debris,
gravel surfaces, large hard objects, rocks, long fibrous
materials (vines, rope, string etc). Do not force anything
into vacuum.
D. Empty Debris Bag
1. Turn off engine and let it come to a complete stop before
removing the debris bag.
2. Roll vacuum to the desired unloading location
(compost pile, curb-side, wooded area, tarp, etc.).
3. Open clasp on band clamp to release bag to the ground.
Avoid dragging bag on surface to prolong bag life.
4. Empty contents of debris bag (handle straps are provided
on the under side of the bag for aid in dumping contents).
5. Reconnect bag to collector.
E. Refueling the Engine
1. Stop engine and allow it to cool for a few minutes before
refueling.
10.
WARNING
DANGER
KEEP RECOIL STARTER SCREEN AND ENTIRE
ENGINE CLEAR OF ALL DEBRIS. DO NOT
OPERATE ENGINE WITH AN ACCUMULATION OF
GRASS, DIRT, LEAVES OR OTHER
COMBUSTIBLE MATERIAL NEAR MUFFLER.
WARNING
DANGER
DO NOT OPERATE UNIT IF EXCESSIVE
VIBRATION OCCURS; SHUT ENGINE OFF
IMMEDIATELY! REMOVE SPARK PLUG WIRES
AND CHECK FOR DAMAGED IMPELLER,
LOOSE IMPELLER BOLT, LOOSE IMPELLER KEY,
OR LODGED FOREIGN OBJECTS.
Storage and Maintenance
A. Storage
1. After each use, run HPV with the empty bag attached to help clear out any loose material in the housing.
2. When not in use store High Performance Vac in sheltered area (a dry place) not accessible to children. Keep throttle
in the “Stop” position.
3. The High Performance Vac, as well as fuel, should not be stored in a house or poorly ventilated areas.
4. Do not store fuel in the engine’s gas tank longer than 30 days.
B. Maintenance
Area
Every
Use
Every
5 Hrs
After First
8 Hrs of Use
Every
25 Hours
Every
50 Hours
See Engine Manual
*Engine
Check muffler area for
accumulation of debris
Check for excessive vibration
Inspect for loose or damaged parts
Inspect for clean intake nozzle
Inspect labels condition
Check oil level
**Oil change
Service air cleaner
Clean and inspect spark plug
arrester
Check tire pressure
Inspect speed control for proper
operation
Check V Belt for excessive wear,
cracks, etc.
Check idler pulleys for smooth
operation
* See Engine Operating & Maintenance instructions for more detail maintenance and service schedule.
** Change oil every 25 Hrs if operating under heavy load or high ambient temperature.
11.
C. Removing Blockage in Moving Parts
WARNING
DANGER
TURN OFF ENGINE BEFORE YOU DISCONNECT
HOSE, AND MAKE SURE ALL MOVING PARTS
COME TO A COMPLETE STOP.
WARNING
DANGER
BE SURE THROTTLE IS IN “STOP” POSITION, AND
FAN HAS COME TO A COMPLETE STOP.
WARNING
DANGER
DISCONNECT THE SPARK PLUG WIRES BEFORE
ANY CLEANING OR MAINTENANCE!
WARNING
DANGER
WEAR GLOVES, THE CLOG MAY CONTAIN
SHARP MATERIALS.
1. Support the housing with 2x4 lumber such that front wheel
are 1” above the ground.
2. Chock the rear wheels with blocks.
3. Remove the nozzle assembly from the front plate.
(See Assembly Instruction 6.)
4. Remove the front wheel assembly.
5. Remove the front plate.
6. Wear gloves and clear out debris from around the impeller
and housing.
D. Directions for removing the Fan
and reinstallation
1. Remove spark plug wire from spark plug.
2. Remove nozzle assembly.
3
Remove front plate assembly.
4. Remove the bolt that secures the fan to the engine
crankshaft.
5. The fan has a 3/4-16 nut welded on the fan hub. Insert a
3/4-16 x 5" long grade 5 (or better) bolt and jack or push
the fan off the engine. (Little Wonder P/N 910505 pressure
screw is recommended.)
12.
6. Replace damaged or worn fan with a new one. If during
fan removal the key (#915) was removed from the keyway,
reinstall it by applying a few drops of the Loctite 380
instant adhesive (“Black Max” P/N 38050) on the key, and
load the key in the keyway of the shaft. (Cure time is
approx. 1 min.)
7. Use a new bolt (#600524) (add Loctite 242 to new bolt)
and washer (#910527) and complete fan installation.
Insure a secure fit upon re-assembling. Torque bolt to
39-51 Ft. lbs.
E. Changing V-Belt
1. Turn off engine. Remove Spark Plug Wire from Spark
Plug. Chock or block wheels of vacuum to prevent it
from rolling.
2. Remove Debris Bag from vacuum.
3. Remove 3 hex head bolts that attach Belt Guard to
Deck. (Use 7/16” wrench or socket.) Set Belt Guard aside.
Note how V Belt goes around each of 4 pulleys and how
it “twists.”
4. Remove 4 hex head bolts that attach Recoil Starter Cover
to Engine Standoffs. (Use 8 millimeter nut driver, socket or
wrench.) Remove Recoil Starter Cover.
5. Loosen (but do not remove) 2 hex head bolts that attach
Fixed Idler Bracket to Deck. (Use 7/16” wrench or socket.)
This allows clearance for belt to be removed.
6. Press down on Belt Tension Lever and lift V Belt off its
pulley. Release Belt Tension Lever. Remove V Belt from
Engine Pulley.
7. Remove V Belt from large horizontal pulley of transaxle
(under Deck.) Pushing V Belt forward with both hands,
then lifting V Belt up, then pulling V Belt backwards
should remove it from large pulley. Remove V Belt from
under Deck.
8. Reverse above steps to replace V Belt. Install V Belt with
the same “twists” that the old V Belt made around the
pulleys. Make sure the “V” side of the V Belt goes into
each pulley. Before replacing Belt Guard or starting
engine, pull Recoil Starter Handle several times to make
sure V Belt rides in the grooves of each pulley.
9. Make sure Belt Tension Lever and return spring operate
smoothly. If it sticks or does not operate smoothly,
lubricate the Belt Tension Lever and its mounting bracket
with a few drops of Motor Oil, or other medium weight
oil. Push Belt Tension Lever down and release it several
times to allow lubrication to penetrate between lever and
mounting bracket. Proper operation of the Belt Tension
Lever and its return spring will insure that your V Belt
will operate properly and last many hours of use.
HPV Parts Assembly
64
48
57
4x 43
37
4x 51
45
4x 34
20
CONNECT TO ENGINE
THROTTLE LEVER
58
18
47
22
4x 46
19
21
2x 45
1
52 2x
7
6
23
4x 42
40
9
8
4
33
49
6x 52
6x 45
3x 36
50
35 4x
3x 54
46
5
44 4x
4x 53
30
14
55
17
16
32
4x 38
2
31
17
26
10
25
56
29
56
3
4x 46
14
29
13 4x
32 55
15
30
11
15
31
46 4x
63
24
28
12
46
41
12
59
60
4x 39
46
25
39
61
62
13.
HPV Parts List
KEY NO.
1
2
3
4
5
6
7
8
9
10
11
12
13
14
15
16
17
18
19
20
21
22
23
24
25
26
25
28
29
30
31
32
33
14.
PART NO.
SEE DETAIL
SEE DETAIL
600193
600184
600251
600186
600187
600114
600118
600182
600188
600137
600257
934
600195
600102
720420
600162
600104
600239
600176
600196
600177
600220
600252
600548
600555
600556
600258
312
600540
920532
915
DESCRIPTION
6.5 HP ENGINE ASSEMBLY
DECK ASSEMBLY
TRANSAXLE
HANDLE MOUNT
BELT GUARD
HOUSING - WITH OUT LINER HOLES
HOUSING - WITH LINER HOLES
IMPELLER-BALANCED
FRONT PLATE
BRACKET, FRONT WHEELS
AXLE, FRONT
SPACER, WHEEL
WEIGHT DISC
WHEEL, 10"
WHEEL, 13"
HOSE, NOZZLE, 7"D x 10" LG
BRIDGE CLAMP, HOSE, 7" D
KNOB, NOZZLE CONTROL, 5/16-18,
FEMALE
NOZZLE CONTROL CABLE
THROTTLE CABLE CONTROL LV
w/ Trans
BAND CLAMP
BAG SEAL STRAP
DEBRIS BAG
LEVER, DISCONNECT, LV TRANS
SPRING HANGER
HAIR PIN, 1/4" SHAFT
PIN, CLEVIS, 1/2" x 1-1/2" LG
PIN, HITCH
COLLAR, 5/8
SNAP RING, 5/8D
E CLIP
KEY 3/16 x 3/16 x 1-1/2" LG
KEY, 1/4" SQ x 2" LG
QTY.
1
1
1
1
1
1
1
1
1
1
1
2
4
2
2
1
2
1
1
1
1
1
1
1
1
1
1
1
2
2
2
2
1
KEY NO.
34
35
36
37
38
39
40
41
42
43
44
45
46
47
48
49
50
51
52
53
54
55
56
57
58
59
60
61
62
63
64
PART NO.
600504
600525
600537
600545
942
600547
600524
600546
910503
DESCRIPTION
BOLT, CARRIAGE, 3/8-16 x 2-1/4, GR.5
BOLT, CARRIAGE, 3/8-16 x 2" LG
BOLT, HEX, 1/4-20 x 3/4" LG
BOLT, HEX, 1/4-20 x 2.5" LG
BOLT, HEX, 5/16-18 x 1-3/4"LG
BOLT, HEX, 5/16-18 x 2-1/4"LG
BOLT, 3/8-24 x 1.75" LG
BOLT, SELF TAP, 5/16-8 x 3/4" LG
BOLT, SERRATED FLANGE,
5/16-24 x 3/4" LG
720518
NUT, NYLOCK, 3/8-16
720594
NUT, SERRATED FLANGE, 3/8-16
114C
NUT, NYLOCK, 5/16-18
114B
NUT, SERRATED FLANGE, 5/16-18
600507
NUT, WING, 5/16-18
600506
NUT, NYLOCK, 1/4-20
910527
WASHER, FAN, FLANGED
600523
WASHER, 5/16 ID x 3/16 TH
720516
WASHER, FLAT, 3/8, USS
720511
WASHER, FLAT, 5/16, USS
129D
WASHER, SPLIT LOCK, 5/16
600554
WASHER, LOCK, STAR, EXT, 1/4"
600269
WASHER, THRUST,
OILITE 3/4" ID x 1-1/4" OD x 1/16" TH
600268
WASHER, THRUST,
OILITE 3/4" ID x 1-1/4" OD x 1/8" TH
600518
WASHER, 1/4", COLLECTOR
720411
CABLE TIE, 7.5"
600521
HARDWARE BAG
16-102
WARRANTY CARD
600709
OWNERS MANUAL
N/A
ENGINE MANUAL
SEE DETAIL NOZZLE ASSEMBLY
SEE DETAIL COLLECTOR ASSEMBLY
QTY.
4
4
3
1
4
5
1
1
4
4
4
9
15
1
1
1
2
4
8
4
3
2
6
1
2
1
1
1
1
1
1
HPV Engine Assembly
KEY NO.
1
2
3
4
5
6
7
8
PART NO.
DESCRIPTION
600901
600901
600901
600901
600194
600249
600200
600238
ENGINE, 6.5 HP
RECOIL, SUPPLIED W/ ENGINE (600901)
NUT, SUPPLIED W/ ENGINE (600901)
BOLT, SUPPLIED W/ ENGINE (600901)
PULLEY, ENGINE
STANDOFF , ENGINE
BELT, V, LV W/ TRANS
KEY, ENGINE PULLEY
1
QTY.
1
1
1
4
1
4
1
1
8
4x 6
5
HPV Deck Assembly
7
3
4 4x
KEY NO.
1
2
3
4
5
6
7
8
9
10
11
12
13
14
15
16
17
18
19
20
21
22
23
2
PART NO.
DESCRIPTION
600199
600231
600244
600264
600266
600219
600204
600203
600555
600556
600270
600224
600201
600253
600526
600537
129C
600536
114B
600541
600554
600558
600557
DECK, LV W/ TRANS
BELLCRANK, DECK
BRACKET, BELLCRANK, DECK
BRACKET, IDLER, WELDMENT
LINK, BELLCRANK, WELDMENT
STRAP, TORQUE, LV
BRACKET, MOUNT, TENSION
BRACKET, TENSION
PIN, CLEVIS, 1/2" X 1-1/2" LG
PIN, HITCH
BUSHING, FLANGED, 1/2" ID X 5/8" OD X 1/2" LG
PULLEY, IDLER, LV
BEARING, NEEDLE, 1/2" ID X 11/16" OD
SPRING, PULLEY, IDLER
BOLT, SHOULDER, 1/2" X 1-1/4" LG
BOLT, HEX, 1/4-20 X 3/4" LG
BOLT, HEX, 5/16-18 X 3/4" LG
BOLT, SHOULDER, 3/8" X 3/8" LG
NUT, SERRATED FLANGE, 5/16-18
NUT, THIN JAM, 3/8-16
WASHER, LOCK, STAR, EXT, 1/4"
SHIM, SHOULDER BOLT, 1/2" OD X .015 TH
WASHER, BELVILLE SPRING 3/8 ID X 5/8 OD
QTY.
1
1
1
1
1
1
1
1
1
1
2
2
4
1
3
6
1
1
2
3
6
2
2
15.
HPV Collector Assembly
KEY NO.
1
2
3
4
5
6
7
8
9
10
11
12
13
14
15
16
17
18
19
20
21
22
23
24
25
26
27
28
29
30
31
32
33
34
35
36
37
38
16.
PART NO.
DESCRIPTION
600101
600130
600142
600138
600242
600206
600215
600211
600271
600161
600605
600260
600237
600210
600209
20950
600552
600545
600544
600543
600551
600506
114C
600542
114B
600528
600549
600550
600518
396
720510
720511
600259
600246
600262
600241
600263
600256
DISCHARGE COLLECTOR
HANDLE
FLANGE CLAMP PLATE
FLANGE ANGLE-COLLECTOR
BRACKET, BELLCRANK, HANDLE
BELLCRANK, HANDLE
BAIL HANDLE
REVERSE LEVER
CAP, REVERSE LEVER
HOOK STRIP
WARNING LABEL - DEBRIS BAG
SPRING, RETURN CONTROL
SPRING, TORSION, BAIL
ROD, CONTROL, UPPER
ROD, CONTROL, LOWER
SWIVEL ASSEMBLY 3/8-24
BOLT, HEX, 1/4-20 X 2" LG
BOLT, HEX, 1/4-20 X 2.5" LG
BOLT, HEX, 5/16-18 X 2"LG
BOLT, HEX, 5/16-18 X 3.5"LG
BOLT, SHOULDER, 5/16 DIA X 3/8" LG
NUT, NYLOCK, 1/4-20
NUT, NYLOCK, 5/16-18
NUT, NYLOCK, 3/8-24, YELLOW ZINC
NUT, SERRATED FLANGE, 5/16-18
NUT, THIN JAM, 3/8-24
NUT, ACORN, 1/4-20, SELF LOCKING
NUT, ACORN, 3/8-24, SELF LOCKING
WASHER, 1/4", COLLECTOR
WASHER, LOCK, 1/4", SPLIT
WASHER, FLAT, 1/4, USS
WASHER, FLAT, 5/16, USS
BUSHING, ACTUATOR
BUSHING, FLANGED, DRYLIN MFI-0608-04
SPACER, OILLITE, 1/4" ID X 3/8" OD X 3/8" LG
BUSHING, FLANGED, OILLITE, 5/16 ID X 7/16 OD X3/8" LG
SPACER, OILLITE, 5/16" ID X 3/8" OD X 3/8" LG
SPACER, OILITE, 5/16 ID X 5/8 OD X 1.25" LG
QTY.
1
1
1
1
1
1
1
1
1
1
1
1
1
1
1
3
2
3
1
1
1
6
2
3
2
5
1
1
7
1
5
6
1
2
2
2
1
2
HPV Liner Assembly
KEY NO.
1
2
3
4
5
(MODELS 5611 & 5631 ONLY)
PART NO.
DESCRIPTION
600187
600175
720592
720511
114C
HOUSING ASSEMBLY, WITH LINER HOLES
LINER
FLANGE BOLT, 5/16-18 X 1" LG
WASHER, FLAT, 5/16, USS
NUTS, NYLOCK, 5/16-18
QTY.
1
1
10
10
10
HPV Nozzle Assembly
KEY NO.
1
2
3
4
PART NO.
DESCRIPTION
600100
600133
600183
114B
NOZZLE
NOZZLE CLAMP PLATE ASSEMBLY
NOZZLE BRACKET, VER. 2"
NUT, SERRATED FLANGE, 5/16-18
QTY.
1
1
1
3
17.
1 YEAR LIMITED SERVICE & WARRANTY POLICY
FOR HIGH PERFORMANCE VAC
The Little Wonder High Performance Vac is guaranteed against defects in material
and workmanship for a period of ONE YEAR from date of purchase, when used for
RESIDENTIAL SERVICE, or COMMERCIAL SERVICE. Any Little Wonder High
Performance Vac or part found to be defective within the warranty period is to be returned
to any registered Little Wonder Dealer.
Engines for all gasoline powered products are warranted separately by the engine
manufacture for a period of one year. Therefore, there are no warranties made, expressed or
implied, for engines of gasoline powered products by Little Wonder.
Transportation charges for parts and units submitted for replacement under this warranty
must be borne by the purchaser.
THIS WARRANTY shall not be effective if the product has been subject to misuse,
negligence or accident, or if the product has been repaired or altered outside of our
Southampton factory in any respect which affects its condition or operation.
Little Wonder shall not be liable for any special indirect or consequential damages
arising from defective equipment. Any implied warranty, including merchantability of
fitness for a particular purpose, shall not extend beyond the written warranty period.
THIS WARRANTY shall only be effective if the enclosed Warranty/Registration card is
properly filled out and returned to Little Wonder, Div. of Schiller-Pfeiffer, Inc. at time
of purchase.
WARNING
DANGER
THE ENGINE EXHAUST FROM THIS PRODUCT
CONTAINS CHEMICALS KNOWN TO THE STATE OF
CALIFORNIA TO CAUSE CANCER, BIRTH DEFECTS
OR OTHER REPRODUCTIVE HARM.
LITTLE WONDER®
DIVISION OF SCHILLER-PFEIFFER, INCORPORATED
1028 STREET ROAD, P.O. BOX 38
SOUTHAMPTON, PA 18966
PHONE 877-596-6337 • FAX 215-357-8045
8 7 7 - LW O N D E R
www.littlewonder.com
P/N 600709
10/05
Specifications, descriptions, and illustrative material in this literature are as accurate as known at the time of publication, but are subject to change without notice.