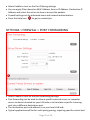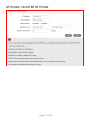
1
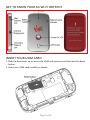
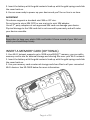
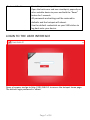
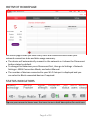
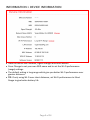
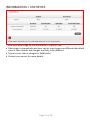
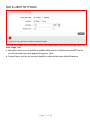
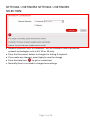
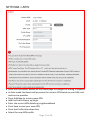
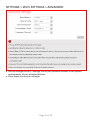
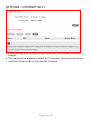
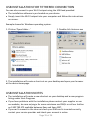
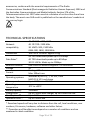
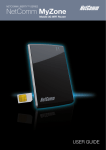
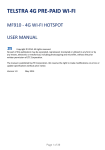
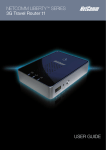
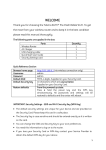
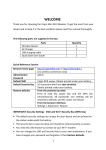
MF90C
4G WI-FI HOTSPOT
USER MANUAL
Page 1 of 36
CHECK YOUR SYSTEM REQUIREMENTS
Your 4G Wi-Fi hotspot will connect to any device that supports Wi-Fi, 802.11 b/g/n
A web browser is required to log in to your Wi-Fi hotspot if you wish to make any
configuration changes.
USB driverless connection is also supported for Windows, MAC and LINUX
operating systems:
• Windows 8 (not including RT) / 7 / XP / Vista
• MAC OS X 10.5.11 and above
• Linux
Using the USB connection requires administrator rights to install and run the
software.
We suggest you switch off your anti-virus software before connecting the hotspot
- In some cases protection software can prevent automatic installation.
It is possible to start the installation process manually by clicking the Autorun icon
when it appears.
Page 2 of 36
GET TO KNOW YOUR 4G WI-FI HOTSPOT
INSERT YOUR USIM CARD
1. Slide the back cover up to access the USIM and memory card slots and the Reset
button.
2. Insert your USIM card carefully as shown:
Page 3 of 36
3. Insert the battery with the gold contacts lined up with the gold springs and slide
the cover back on.
4. You are now ready to power up your device and you’ll be on-line in no time.
IMPORTANT
This device supports a standard mini SIM or 2FF size.
Do not insert a micro SIM (3FF) or use a micro to mini SIM adaptor.
Use of 3rd party adaptors or non approved SIM card can damage your device.
Physical damage to the SIM card slot is not covered by warranty and will make
your device unusable.
TIP
Remember to keep your plastic SIM card holder. It has a record of your SIM card
which you should keep handy.
INSERT A MEMORY CARD (OPTIONAL)
1. Your Wi-Fi hotspot supports up to 32GB microSD(HC)™ memory, you can add a
memory card to use for external storage and sharing files over your Wi-Fi network.
2. Insert the battery with the gold contacts lined up with the gold springs and slide
the cover back on.
3. Use your memory card as external storage and share files to all your connected
Wi-Fi devices. See SD CARD below for more information.
Page 4 of 36
Notes
• Adding a memory card is optional
• microSD™ up to 2GB are FAT 16 format.
• microSDHC™ up to 32GB are FAT 32 format.
POWER UP YOUR 4G WI-FI HOTSPOT
Press and hold the Power key for 3-4 seconds until the lights flash.
The LED’s flash in sequence to indicate the start up condition. During this
sequence the device functions are not available.
The Wi-Fi hotspot will be available after about 20 seconds.
Note: If you insert the charger with the device off, or the battery is flat, you can
only power up the device after about 20 seconds when the start up sequence is
complete.
Check the condition of your Wi-Fi hotspot as shown by the LED indicators.
LED INDICATORS
On, battery is low (<23%).
Flashing, battery is discharged, (< 12 %).
On, battery is OK (>23 %).
Flashing, battery is charging.
On, WPS is enabled, available for 2 minutes.
Flashing, Wi-Fi is On.
Off, Wi-Fi is off.
Not registered on the network.
No USIM, invalid USIM, PIN or PUK locked.
On, device is registered on 2G/3G,
Flashing, device is connected to 2G/3G.
Device is registered on 4G
Flashing, device is connected to 4G
During periods of inactivity it is normal for the LED’s to go out to preserve battery
life. Press the power key briefly to confirm the device status if required.
Page 5 of 36
CONNECT DEVICES BY WI-FI
Your 4G Wi-Fi hotspot can connect up to five devices via Wi-Fi providing internet
access for all your devices on the go.
• On the devices you wish to connect make sure Wi-Fi is switched on, then search
for Wi-Fi devices.
• The Wi-Fi hotspot will show up as Virgin Mobile 4G_xxxxxx, click on this device
to connect.
• Consult your SSID sticker and enter the default Wi-Fi key which is case sensitive.
Any letters entered must be in upper case (capitals).
Connection example for Windows 7 computer:
1. On your task bar, next to the clock, click on the Network Interface icon
2. Click on the Wireless device Virgin Mobile 4G_xxxxxx
3. Enter the password exactly as shown on your SSID sticker observing the correct
case for all letters
4. With Connect Automatically enabled your computer will remember the
password and connect to your Wi-Fi device when it is on and in range.
TIP
It is also possible to connect via USB connection. See later for details.
MONITOR YOUR WI-FI HOTSPOT ON YOUR ANDROID
DEVICE
You can download the ZTE Wi-Fi Monitor app from Google Play Store to monitor
your Wi-Fi status easily using an Android smart phone.
QUICK REFERENCES
Browser home page
Administrator login
Default SSID
Default Wi-Fi Key
http://192.168.0.1
Admin
Virgin Mobile 4G_xxxxxx
Supplied on your SSID Sticker on the device and a
spare sticker in the box.
10 characters which are case sensitive.
Supplied on your SSID Sticker.
Page 6 of 36
Restore defaults
From the powered up state:
Open the back cover and use a toothpick, paperclip or
other suitable device to press and hold the “Reset”
button for 5 seconds.
All passwords and settings will be restored to
defaults and the hotspot will reboot.
Use the default credentials on your SSID sticker to
log back onto your device.
LOGIN TO THE USER INTERFACE
Open a browser and go to http://192.168.0.1 to access the hotspot home page.
The default login password is ‘admin’
Page 7 of 36
HOTSPOT HOMEPAGE
The home page shows you how many users are connected and shows your
network connection state and data usage summary.
• The device will automatically connect to the network so it shows the Disconnect
button status by default.
• To change this behaviour press Disconnect first, then go to Settings > Network
Settings > WAN Connection Mode, and select Manual.
• The number of devices connected to your Wi-Fi hotspot is displayed and you
can select to Block unwanted devices if required.
STATUS INDICATORS
Tip use your mouse to hover over the icons to see a brief description for each icon.
Page 8 of 36
INFORMATION > DEVICE INFORMATION
• View the device IMEI number, Signal strength and other details.
• Press Change to set your own SSID name and to set the Wi-Fi performance
(range) settings.
• The default setting is long range which give you better Wi-Fi performance over
greater distances.
• TIP: If only using Wi-Fi over short distances, set Wi-Fi performance to Short
Range to give better battery life
Page 9 of 36
INFORMATION > STATISTICS
View your data usage on the Information > Statistics tab.
• Data usage is approximate and your carrier may charge you different data block
sizes so their records and charges are likely to be different.
• Typical carrier data is charged in 1MB blocks.
• Contact your carrier for more details.
Page 10 of 36
DATA LIMIT SETTINGS
You can set a data limit reminder to let you know when you have reached a pre-set
data usage limit.
• Example, Enter your monthly available data and set a Remind me at 80% to let
you know when you are approaching your limit.
• Consult your carrier or contract details to determine your data allowance.
Page 11 of 36
SD CARD
• If you have an SD card in your device you can share your files with other users
connected to your device
• Enable HTTP Share to share the contents of your SD card with other Wi-Fi users
connected to your device.
• Select USB Share to restrict access to USB mode only (like an external storage
device)
• Read only or Read / Write access can be configured.
• Select Entire SD Card to share the whole card.
• Custom sharing can be enabled to restrict access to certain paths.
• Press the Web Share button to view all the files.
• Remember to press Apply to save your settings to enable SD sharing.
Page 12 of 36
SETTINGS > QUICK SETTINGS:
Step through the Quick Settings wizard to quickly review your current default
settings.
SETTINGS > NETWORK SETTINGS > DIAL UP SETTINGS:
• The default connection setting will automatically connect to the network. The
setting is greyed out if you are connected.
• Press the Disconnect button to change this setting and to enable International
Roaming if required.
• If you make any changes, press Apply to save the change
• Press the Help icon
to get in context tips.
Page 13 of 36
SETTINGS > NETWORK SETTINGS > NETWORK
SELECTION:
• Network Selection is set to Automatic. You can choose to lock to preferred
network technologies such as 4G, 3G or 2G only.
• Press the Disconnect button to change this setting if required.
• If you make any changes, press Apply to save the change
• Press the Help icon
to get in context tips.
• Normally there is no need to change these settings.
Page 14 of 36
SETTINGS > APN:
• Press the Disconnect button on the home page to change this setting if required.
• In Auto mode the device will provision the correct APN based on your SIM card
and service provider.
• Press Add New to create a new APN
• Add the Profile Name, eg Virgin
• Enter the correct APN details eg virginbroadband
• Press Save to save your new APN
• Press the Profile drop down box
• Select the new APN profile
Page 15 of 36
• Click on ‘Set as default’ to set the new APN as your preferred setting
• Press the Help icon
to get in context tips.
• Normally there is no need to change these settings unless you change service
provider.
• The Wi-Fi hotspot is locked to Virgin. If you use a SIM card from another
provider you may not be able to connect to the network.
• Consult your new carrier to obtain alternate APN details for your device.
Page 16 of 36
SETTINGS > WI-FI SETTINGS > BASIC SETTINGS
• The SSID is the Wi-Fi name that is broadcast that represents your device:
• You can change the SSID to something more memorable or personal
• You can hide the SSID broadcast so unknown users will not even see your
network
• You can change the security settings and password to suit your own preferences
• You can set the number of available connections between 1 and 10. The default
setting for 5 users is to improve battery life and Wi-Fi data throughput.
• Press Apply to save your changes
Page 17 of 36
SETTINGS > WI-FI SETTINGS > ADVANCED
• You can change the Wi-Fi settings to suit your personal choices or for specific
requirements of your attached devices.
• Press Apply to save your changes
Page 18 of 36
SETTINGS > WI-FI SETTINGS > WPS
• WPS uses the push button on the front panel to connect seamlessly to
supported devices.
• Press WPS to enable, compatible devices can connect to your Wi-Fi network
without authorisation, or you can set a PIN if required.
• WPS is enabled for 2 minutes once pressed and the device LED’s will flash to
indicate WPS mode.
• If you have enabled PIN mode then you need to enter the same PIN on devices
you wish to connect.
Page 19 of 36
SETTINGS > DEVICE SETTINGS > ACCOUNT
MANAGEMENT
• Use the Account Management settings to change the administrator password if
required.
• The default password is admin. If you have changed and forgotten the password
then you need to restore the device to factory defaults:
1. With the device switched on open the back cover and locate the reset button on
the left hand side.
2. Using a blunt item such as a pencil, tooth pick or paperclip press and hold the
“Reset” button for 5 seconds.
3. The LEDs will flash and the device will re-boot to factory default settings.
Page 20 of 36
SETTINGS > DEVICE SETTINGS > PIN MANAGEMENT:
• Press the Disconnect button on the home page to change the PIN settings if
required.
• Enter your current SIM PIN code to change or disable the PIN.
• If you make any changes, press Apply to save the change.
• If you enter the incorrect PIN code three times in succession you will lock your
USIM card.
• Contact your service provider to obtain your PUK code.
SETTINGS > DEVICE SETTINGS > RESET
Press Reset to restore your original factory settings.
SETTINGS > DEVICE SETTINGS > RESTART
Press Restart to power cycle your device.
Page 21 of 36
SETTINGS > DEVICE SETTINGS > POWER SAVE
• The default setting provides the greatest reach for your Wi-Fi signal.
• Setting to Short Range will preserve battery life by reducing the Wi-Fi power.
• If there is no Wi-Fi traffic detected then the device will switch off Wi-Fi as
determined by the Wi-Fi sleep setting.
• Set Wi-Fi sleep time to Never Sleep to keep the Wi-Fi always on.
Page 22 of 36
SETTINGS > DEVICE SETTINGS > UPDATE MANAGEMENT
• You need to be in the Connected state to check for new versions
• Press the Check button to see if there are software updates for your device.
• Roaming Settings control if the device will update when roaming. This is
disabled to reduce high data charges when roaming.
Page 23 of 36
SETTINGS > FIREWALL > PORT FILTERING
Page 24 of 36
• Select Enable to turn on the Port Filtering settings
• You can apply filters based on MAC Address, Source IP Address, Destination IP
Address and select the action to drop or accept the packets.
• Firewall settings are for advanced users and network administrators.
• Press the Help icon
to get in context tips.
SETTINGS > FIREWALL > PORT FORWARDING
• Select Enable to turn on the port forwarding settings.
• Port forwarding can be used to allow a specific external server or computer
access to devices located on your LAN side or to translate a specific incoming
port into a different destination port.
• The destination port and address is on your local LAN side.
• Typical applications will be for multi party gaming, requiring specific control and
Page 25 of 36
communications channels between the remote server and the local machine.
• Firewall settings are for advanced users and network administrators.
• Press the Help icon
to get in context tips.
SETTINGS > FIREWALL > SYSTEM SECURITY
• Enable or Disable Remote Management (via WAN) and PING
• Firewall settings are for advanced users and network administrators.
SETTINGS > FIREWALL > UPNP
• Universal Plug and Play is a set of networking protocols that permits networked
devices, such as personal computers, printers, Internet gateways, Wi-Fi access
points and mobile devices to seamlessly discover each other's presence on the
network and establish functional network services for data sharing,
communications, and entertainment.
• UPnP is enabled by default on the LAN side (local) but if you require extra
security you should disable this setting.
• UPnP is not enabled on the WAN (Network) side.
• Firewall settings are for advanced users and network administrators.
SETTINGS > FIREWALL > DMZ
• Enable the DMZ Setting to open up all ports from the WAN side (mobile network)
to the LAN side for this particular allocated IP address.
• It is advisable to set a Static IP address for this device outside of the DHCP range
eg 192.168.0.20
Page 26 of 36
SETTINGS > ROUTER SETTINGS
Page 27 of 36
SETTINGS > INTERNET WI-FI
• Enable Internet Wi-Fi to share the data connection from another existing Wi-Fi
hotspot.
• This feature will re-broadcast another Wi-Fi hotspot to your connected devices
and divert all data traffic to the other Wi-Fi hotspot.
Page 28 of 36
USB INSTALLATION FOR TETHERED CONNECTION
You can also connect to your Wi-Fi hotspot using the USB lead provided.
• The installation software is pre-loaded on your device.
• Simply insert the Wi-Fi hotspot into your computer and follow the instructions
on-screen.
Example shown for Windows operating system.
1. Click on ‘Open folder…’
2. Double click Autorun.exe
3. The installation will create a short-cut on your desktop and open your browser
at the device homepage.
USB INSTALLATION NOTES
• The installation will create a new shortcut on your desktop and a new program
listing under Start-Programs
• If you have problems with the installation please contact your supplier or see
our website, zte.com.au/virgin for more assistance and FAQ’s or call our hotline
on 1300 789 475 available between 9am and 5pm AEST.
• If you can’t connect to the internet check your SIM card is inserted correctly,
contact your service provider and check your account is active.
Page 29 of 36
• To uninstall the application:
Windows users: Programs > Virgin Mobile 4G > Uninstall
MAC Users:
• Double click the CD Drive Virgin Mobile 4G on the desktop to install the
software.
• To uninstall, go to Applications and run Uninstall Virgin Mobile 4G
HELP
• Click Help button to access this full user guide
• Click the Help icon
to see in context help
• Go to zte.com.au/virgin for FAQ’s, product and warranty support
microSD™ MEMORY CARD
If you use a microSD™ memory card in your device your computer will display a
removable disk drive when connected via USB. You can use the device as an
external drive to store and transfer files.
microSD™ cards supported to 2GB are FAT 16 format.
microSDHC™ cards supported to 32GB are FAT 32 format.
If using a memory card use the Safe Removal of Hardware process or Eject the
device. Consult your operating system guidelines.
USING EXTERNAL ANTENNA(S)
Your 4G Wi-Fi hotspot has two external antenna ports for 4G LTE MiMo (Multiple
input, Multiple output) Networks. Network signal and data rates can be improved
by connecting a dual (2x2) antenna.
If you are using a single antenna then connect to the Main antenna port at the top
of the device.
The antenna connection is TS9 and dual and single antennas are available on line
or from major retailers.
Important Note: Always take care when connecting an external antenna or patch
lead.
Page 30 of 36
Using incorrect connectors may damage your device.
Do not trip over or pull harshly on the antenna cable which may damage the
antenna port connector.
Physical damage to the antenna ports is not covered by warranty and may
permanently damage your device.
NOTES FOR BATTERY CHARGING
The internal battery will last up to four hours in normal use but this is dependant
on many factors such as network signal strength, number of users connected and
the amount of data being transferred.
Battery time will reduce when the network signal is low, many Wi-Fi users are
connected or users are engaged in continuous data downloads or uploads (ie
streaming video, audio or FTP traffic).
It is normal for the device to get hot when the network signal is low and users are
engaged in continuous data traffic.
If the device temperature exceeds 45C then the battery will not be charged. This is
a safety feature required for Lithium-ion batteries.
In these cases it is possible for the battery to discharge, even though the device is
connected to the charger.
Page 31 of 36
TROUBLESHOOTING
If you have any problems with your connection or Wi-Fi hotspot please consult the
manual and check this section.
If the problem still exists contact your service provider or check our website for
more details at zte.com.au/virgin
Problem
Possible Causes
I cannot connect via Security settings, password
Wi-Fi
has been changed.
The user interface
doesn’t start after
the Wi-Fi hotspot is
plugged in.
The Wi-Fi hotspot
has no signal.
PC configuration is not
correct.
(No autorun)
You have no
network coverage.
Suggested Solution
Check the security settings SSID
and Password shown on your
Security Card.
If the password has been
changed reset the hotspot to
factory defaults:
1. With the device switched on
open the back cover and locate
the reset button on the left hand
side.
2. Using a blunt item such as a
pencil, tooth pick or paperclip
press and hold the “Reset”
button for 5 seconds.
3. The LEDs will flash and the
device will re-boot to factory
default settings.
Start the program manually by
going Start > Program Files or
use the shortcut on the desktop.
Try moving location until you get
good reception.
SIM card requires a PIN or
PUK number.
Contact your service provider to
obtain the PIN or PUK key.
You have no
network coverage.
Try moving location until you get
good reception.
SIM Card is locked
Data connection
failed.
Page 32 of 36
Problem
The Wi-Fi hotspot
cannot connect to
the internet when
overseas
The microSD™ card
cannot be read or is
not found.
Where can I get
more help and
technical support?
Possible Causes
You don’t have
international roaming
enabled on your plan.
Re-insert the microSD™
card. The maximum
capacity is 32GB SDHC card
If you get really stuck, we
are on hand to help
Suggested Solution
Consult your service provider
before you go overseas to enable
roaming.
Try another microSD™ card and
make sure the capacity and
format is correct.
Consult the manufacturer’s
website at zte.com.au/virgin or
call 1300 789 475 for full
technical support during office
hours, Mon – Fri 9am to 5pm
AEST.
PRECAUTIONS AND SAFETY INFORMATION
• Some electronic devices are susceptible to electromagnetic interference. The
Wi-Fi hotspot is a transmitting device and may cause interference to sensitive
electronic equipment such as audio systems, vehicle systems and medical
equipment. Please consult the manufacturer of the other device before using
the Wi-Fi hotspot.
• Operating the Wi-Fi hotspot may interfere with medical devices like hearing aids
and pacemakers. Please keep the Wi-Fi hotspot more than 20 centimetres away
from such medical devices. Turn the Wi-Fi hotspot off if necessary. Consult a
physician or the manufacturer of the medical device before using the Wi-Fi
hotspot near such devices.
• Be aware of regulations when using the Wi-Fi hotspot at places such as oil
refineries or chemical factories, where there are explosive gases or explosive
products being processed. Turn off your Wi-Fi hotspot as instructed.
• Don’t touch the antenna area unnecessarily whilst connected. This can affect
your Wi-Fi hotspot performance and reduce the signal quality.
• Store the Wi-Fi hotspot out of the reach of children. The Wi-Fi hotspot may
cause injury or get damaged.
• The Wi-Fi hotspot contains sensitive electronic circuitry. Do not expose the Wi-Fi
hotspot to any liquids, high temperatures or shock.
• Only use original accessories or accessories that are authorised by the
manufacturer. Using unauthorised accessories may affect your Wi-Fi hotspot’s
Page 33 of 36
•
•
•
•
•
•
performance or damage your Wi-Fi hotspot.
Avoid using the Wi-Fi hotspot in areas that emit electromagnetic waves or in
enclosed metallic structures eg lifts.
The Wi-Fi hotspot is not waterproof. Please keep it dry and store it in a cool, dry
place.
Don’t use the Wi-Fi hotspot immediately after a sudden temperature change eg
from an air conditioned environment to high temperature and humidity outside.
In such cases there could be condensing moisture inside the Wi-Fi hotspot
which can cause internal damage. Unplug the Wi-Fi hotspot and leave it for 30
minutes before use.
Always handle the Wi-Fi hotspot with care. Be careful not to drop or bend the
device.
There are no user serviceable parts. Unauthorised dismantling or repair will void
the warranty.
The battery will not be charged above 45C.
RF SAFETY INFORMATION
The wireless device has an internal antenna. For optimum performance with
minimum power consumption do not shield the device or cover with any object.
Covering the antenna affects signal quality and may cause the Wi-Fi hotspot to
operate at a higher power level than needed.
RADIO FREQUENCY ENERGY
The wireless device is a low-power radio transmitter and receiver. When switched
on it intermittently transmits radio frequency (RF) energy (radio waves).
The transmit power level is optimized for best performance and automatically
reduces when there is good quality reception.
Maximum power is only used at the edge of network coverage so under most
circumstances the power output is very low.
Under poor network conditions the Wi-Fi hotspot transmits at a higher power level
and may get hot.
SPECIFIC ABSORPTION RATE (SAR)
The wireless device is designed to be used in close proximity to the body. We
declare that the product detailed in this manual, and in combination with our
Page 34 of 36
accessories, conform with the essential requirements of The Radio
Communications Standard (Electromagnetic Radiation Human Exposure) 2003 and
the Australian Communications and Media Authority Section 376 of the
Telecommunications Act 1997 when used at a distance of not less than 5mm from
the body. The worst case SAR result is published on the manufacturer’s website at
zte.com.au/virgin
N14945
TECHNICAL SPECIFICATIONS
Network
compatibility
Dimensions
Data Rates*
External Antenna
Voltage
Current
Operating systems
Memory card
Operating
temperature
Battery capacity
Charge time
Standby time**
Operation time**
4G LTE FDD: 1800, 2600
4G LTE TDD: 2300 MHz
3G UMTS: 900, 2100 MHz
GSM: 900, 1800, 1900 MHz
106 x 58 x 15.8mm. Approx 103g
4G FDD download speeds up to 100Mbps
4G TDD download speeds up to 81Mbps
3G DC-HSPA+ Mode up to 42Mbps
Dual external antenna supports TS9 connector
5V
Resting: 100mA rms
Max: 500mA rms
Windows 8 (not RT), 7, XP SP3, Vista
MAC OS X 10.5 and above
Up to 32GB microSDHC™
-5ºC to +45ºC
2300mAh
Up to 3 hours with charger, up to 6 hours via USB
Up to 100 hours
Up to 4 hours use
* Download speeds will vary due to distance from the cell, local conditions, user
numbers, file source, hardware, software and other factors.
** Operation and Standby times depend on a number of conditions and are
measured in ideal conditions.
Page 35 of 36
Copyright © 2013. All rights reserved.
No part of this publication may be excerpted, reproduced, translated or utilized in any form
or by any means, electronic or mechanical, including photocopying and microfilm, without
the prior written permission of ZTE Corporation.
The manual is published by ZTE Corporation. We reserve the right to make modifications
on errors or update specifications without prior notice.
Version 2.1
December 2013
Page 36 of 36