1
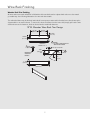
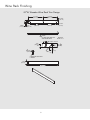
Use & Care Manual
15”W./24”W.
Undercounter Refrigeration
Congratulations
We hope you will enjoy and appreciate the care and attention we have put into every detail of your new, state-of-the-art
refrigerator.
Your appliance is designed to offer years of reliable service. This Use and Care Guide will provide you with the
information you need to become familiar with your refrigerator’s care and operation.
Your complete satisfaction is our ultimate goal. If you have any questions or comments about this product, please
contact the dealer from whom you purchased it, or contact our Consumer Support Center at 1-888-846-4641.
We appreciate your choice of our refrigerator and hope that you will again select our products for your other major
appliance needs.
For more information about the complete and growing selection
of products, contact your dealer or visit us online.
Table of Contents
Important Safety Instructions ______________________________________________________________________3
Electronic Controls ______________________________________________________________________________4
Temperature Controls ____________________________________________________________________________5
Using the Unit __________________________________________________________________________________6
Wine Rack Finishing ______________________________________________________________________________7
Interior Light ____________________________________________________________________________________9
Checking Temperature ____________________________________________________________________________9
Winterizing Outdoor Units ______________________________________________________________________10
Preparing for Spring Use ________________________________________________________________________10
Cleaning ______________________________________________________________________________________10
Troubleshooting ________________________________________________________________________________11
Service & Registration __________________________________________________________________________13
Warranty ______________________________________________________________________________________14
2
Important Safety Instructions
•
•
•
•
•
Before beginning, please read these instructions completely and carefully.
DO NOT remove permanently affixed labels, warnings, or plates from the product. This may void the warranty.
Please observe all local and national codes and ordinances.
Please ensure that this product is properly grounded.
The installer should leave these instructions with the consumer who should retain for local inspector’s use and for future
reference.
WARNING
To reduce the risk of fire, electric shock, or injury when using your unit, follow
these basic precautions:
• Read all instructions before using the unit.
• Never allow children to operate, play with, or crawl inside the unit.
• Never clean unit parts with flammable fluids. The fumes can create a fire
hazard or explosion.
• Always turn the power off to change light bulbs, clean, or service the
unit.
FOR YOUR SAFETY
DO NOT STORE OR USE GASOLINE OR OTHER FLAMMABLE VAPORS
AND LIQUIDS IN THE VICINITY OF THIS OR ANY OTHER APPLIANCE.
THE FUMES CAN CREATE A FIRE HAZARD OR EXPLOSION.
It
•
•
•
•
•
•
•
•
is your responsibility to be sure your undercounter refrigeration unit is:
located so the front is not blocked to restrict incoming or discharge air flow.
properly leveled.
located in a well ventilated area.
connected to the proper kind of outlet, with the correct electric supply and grounding. A 115V, 60 Hz, 15 amp fused electrical
supply is required. Note: Time delay fuse or circuit breaker is recommended.
not used by anyone unable to operate it properly.
used only for its intended purpose.
properly maintained.
If the power cord is damaged, it must be replaced by the manufacturer, its authorized service agent or certified personnel in
order to avoid a hazard
WARNING
State of California Proposition 65 Warning
• This product contains one or more chemicals know to the State of
California to cause cancer.
• This product contains one or more chemicals know to the State of
California to cause birth defects or other reproductive harm.
CAUTION
This appliance is not intended for use by persons (including
children) with reduced physical sensory or mental capabilities, or
lack of experience and knowledge, unless they have been given
supervision or instruction concerning use of the appliance by a
person responsible for their safety. Children should be supervised
to ensure that they do not play with the appliance.
•SAVE THESE INSTRUCTIONS•
3
Electronic Controls
Displays target set point
Activates Sabbath Mode
Increases temperature when changing
set point; Shows maximum stored
temperature when pressed alone.
Decreases temperature when changing
set point; Shows minimum stored
temperature when pressed alone.
On/Off Switch
Light Switch
LED Indicators
LED
FUNCTION
Cooling ON
An alarm is occurring
(See troubleshooting for alarm codes)
Light ON
°C/°F
Measurement Unit
4
Electronic Controls
Temperature Control Panel
The controller is located inside of the unit. The display will read OFF when the unit is off and will show temperature
when the unit is ON.
IMPORTANT: The LED display is reading actual air temperature not product temperature. Under these conditions, an air
temperature swing does not change the actual product temperature. Product temperature remains at a very stable
temperature.
Product Temperature Set Points and Ranges
All Refrigerator
Refrigerated Drawer
Beverage Center
Wine Center
38°F
38°F
42°F
55°F
Range:
Range:
Range:
Range:
32°F
32°F
32°F
44°F
to
to
to
to
39°F
39°F
48°F
68°F
To view the SET point:
1. Press and release the SET button. The display will show the set point value.
2. Press and release the SET button or wait for 5 seconds to display the actual temperature again.
To
1.
2.
3.
4.
change the SET point:
Press the SET button for 3 seconds to change the set point value.
The value of the set point will be displayed and the “°C” or “°F” LED will start blinking.
To change the set point value, press the UP or DOWN buttons within 10 seconds.
To store the new set point value, press the SET button again or wait 10 seconds.
To lock the control:
1. Press the UP+DOWN buttons simultaneously for 3 seconds.
2. The “PoF” message will be displayed and the keyboard will be locked. At this point it will only be possible to see
the set point, the MAX or the MIN temperature stored.
3. If a button is pressed more than 3 seconds, the “PoF” message will be displayed.
To unlock the control:
1. Press the UP and DOWN buttons simultaneously for 3 seconds until the “Pon” message is displayed.
To convert from Fahrenheit to Celsius:
1. Open door and hold F/C button for 3 seconds.
2. The unit will shut down briefly and then restart displaying the opposite temperature scale.
3. Repeat step 1 to convert back to original setting.
Sabbath Mode
To activate SABBATH mode, open door and pres SAB button. If display lighting was activated, it will remain activated.
Turn off display lighting before initiating Sabbath Mode if display light will not be used.
When in Sabbath mode:
• The display will be switched off (with the exclusion of the measurement temperature icon LED);
• The regulation will keep on working normally;
• The digital inputs will be deactivated (they will not work during SABBATH MODE);
• After any alarm condition the display will be switched on, coming back to the OFF mode at the end of the alarm
condition;
• The keyboard will be deactivated with the exclusion of the SAB button.
To exit the SABBATH mode, open door and press SAB button. Close door. The display and light will turn on.
5
Using the Unit
Loading Product
IMPORTANT: Before storing perishables, allow unit to run for a minimum of 24 hours to allow temperature
stabilization after start-up.
When loading items into unit, do no block internal louvers and fan guard openings or performance will be
decreased.
Shelving
IMPORTANT: To achieve maximum performance, interior louver openings and fan guard openings should never
be obstructed.
All Refrigerator
The single door unit comes standard with two adjustable, full extension, pullout shelves. Shelving positions are
adjustable.
Wine Center
The single door unit comes standard with five full extension black vinyl coated wine racks capable of storing 20
total wine bottles (15” models) or 40 total wine bottles (24” models). Shelves are removable and adjustable to
accommodate oversized (magnum) bottles.
Beverage Center
The single door unit comes standard with two full extension black vinyl coated wine racks and one full extension
pullout shelf allowing for storage of both wine and beverages. Shelving positions are adjustable.
Adjusting Full Extension Shelving
1. Pull the shelf out to its farthest position.
Locate the tabs in the middle of both
extenders. Press left tab up and right tab
down and pull shelf out.
2. Reposition each bracket separately.
Grasp the middle of the bracket, pull the
front end up and out, then forward to
remove.
3. Place bracket at the desired position.
Push the rear hook into the rear key slot.
Set front of bracket on the wall hook.
4. Repeat for other bracket(s).
5. Push extenders completely into the unit.
Align the shelf grooves with the
extenders and slide completely into the
unit.
To remove
brackets,
remove shelf,
lift front of
bracket to
disengage the
front key slot,
and pull
forward to
disengage the
rear key slot.
Press tabs and
pull out shelf
CAUTION
Completely empty the drawer before removing.
Removing drawers from Refrigerated Drawer Unit
Full-extension Drawers – Pull the drawer out to its farthest point. Locate the tabs in the middle on both sides of
the extenders. Press left tab up and right tab down; pull drawer out. To return drawer, first push both extenders
completely in then line up the shelf grooves and slide easily into the unit.
6
Wine Rack Finishing
Wooden Rack Trim Finishing
All wine racks come with unfinished solid hardwood fronts which can be replaced with other wood to match
your cabinetry. See following illustrations for wine rack face details.
The unfinished faces may be finished and sealed. In many cases stains and/or finishes have odors that may be
objectionable in an enclosed area. To remove the front wood-face from the wine shelf, simply pull out the wine
shelf and remove the fasteners, finish as desired and re-install with fasteners.
15”W. Wooden Wine Rack Trim Design
4-1/32”
(10.2 cm)
4-1/32”
(10.2 cm)
4-1/64”
(1.6 cm)
33/64”
(1.3 cm)
B
1 3/8”
(1.0 cm)
BREAK ALL
OUTSIDE
EDGES.
DETAIL B
SCALE 1.5 : 1
2 NOTE:
LIP AND SPUR DRILL BIT
ARE ACCEPTABLE
1/8” (0.3 cm) TYP
1/16”
(0.2 cm)
TYP
1/4”
(0.6 cm)
45°
1-1/2”
(3.8 cm)
9-21/64”
(23.7 cm)
7
1/4”
(0.6 cm)
3/8” 1
(1.0 cm)
Wine Rack Finishing
24”W. Wooden Wine Rack Trim Design
8-17/32”
(21.7 cm)
33/64”
(1.3 cm)
5/8”
(1.6 cm)
8-17/32”
(21.7 cm)
8”
(20.3 cm)
4-1/64”
(1.6 cm)
1-17/32”
(3.9 cm)
7-1/4”
(18.4 cm)
A
2 NOTE:
LIP AND SPUR DRILL BIT
ARE ACCEPTABLE
DETAIL A
SCALE 1.5 : 1
1/8” (0.3 cm) TYP
1/16”
(0.2 cm)
TYP
1/4”
(0.6 cm)
1 3/8”
(1.0 cm)
45°
BREAK ALL OUTSIDE
EDGES.
1-1/2”
(3.8 cm)
18-21/64”
(46.6 cm)
8
1/4”
(0.6 cm)
3/8” 1
(1.0 cm)
Interior Light
Interior Light
The unit is equipped with an interior light that is illuminated when the door is opened. The cabinet also comes standard
with a display light function located on the control panel for displaying your products through a glass door. To use
display lighting, press the Light button. The light icon on the display will go from flashing to continuous. Do not use
the display light function with a solid door product. If the display light is left on for an extended period of time, it may
increase the cabinet temperature, especially at the top and cause the refrigeration system to run longer. To turn off
display lighting, open door and press the Light button. The light icon on the display will go from continuous to
flashing.
Light Bulb Replacement
NOTE: Please contact your Viking Range parts distributor or dealer to order the LED light bulb.
To replace light bulb, unscrew the bulb counterclockwise and replace with new bulb.
Checking Product Temperature
To accurately check the temperature of the product stored in a refrigerated compartment, insert an accurate
thermometer into a plastic (non-breakable) bottle, partially filled with water. Tighten the bottle cap securely.
Place the bottle in the desired area for 24 hours. Refrain from opening the unit during the testing period. After 24
hours, check the temperature of the water. Adjust the control settings if necessary and re-test.
Your units are pre-set in order to achieve the recommended temperature range when installed in a 70°F ambient room
temperature. Factors, which affect the internal temperatures of the refrigerated cabinet, include:
•
•
•
•
•
•
•
•
•
Temperature setting
Room temperature where installed
Number of times the door is opened and closed
Length of times the door is opened and closed
Length of times the door is left open
Style of door installed
Door gasket sealing and condition
Amount of time the internal light is illuminated
Installation in direct sun light or near a heat source
9
Winterizing Outdoor Units
This process should occur when the daily low temperature is at or
below the set point temperature in the unit.
1. Turn unit to OFF position by pressing the OFF button on the
Leaving your product operating in temperatures lower
than those recommended will void the warranty.
controller. The controller displays the word OFF (If power cord
is accessible, unplug the cabinet. If not, turn off the circuit
breaker to the receptacle the cabinet is plugged into.)
2. Remove all contents from the unit.
3. Remove the kickplate from the unit.
4. Clean the condensor by using a vacuum cleaner to remove the loose debris (dirt, leaves, etc.) that may
have gotten inside the kickplate.
5. Reattach the kickplate.
6. Clean the interior using stainless steel cleaner and polish.
7. Clean the exterior using stainless steel cleaner and polish.
WARNING
NOTE: Do not place a cover over the unit.
NOTE: While not required, you may choose to remove the unit from the outdoor location and store indoors.
Preparing for Spring Use
This process should occur when the daily low temperature is at or above the set point temperature in the unit.
1.
2.
3.
4.
5.
6.
7.
Plug the unit into the electrical receptacle.
Press the OFF button one time to turn the unit ON. The controller will read the actual temperature inside the
unit on the display. It will soon begin the cooling process to bring the unit to the set temperature.
Remove the kickplate from the unit.
Check the condensing unit to ensure it is clear of loose debris, clean as necessary with vacuum cleaner.
Reattach the kickplate to the unit.
Clean the interior using stainless steel cleaner and polish.
Clean the exterior using stainless steel cleaner and polish.
Cleaning
CAUTION
Cleaning
DO NOT use abrasive cleaners or cloths on any of the
To clean stainless steel exterior or interior surfaces, use a soft, non- interior or exterior surfaces or removable parts.
abrasive stainless steel cleaner to wipe down these surfaces. Glass
door panels can be cleaned using any standard glass cleaner available on the market today.
To clean interior and exterior non-metallic surfaces and removable parts, wash with a mild solution of soap and
lukewarm water with a little baking soda. Rinse and dry thoroughly. Avoid getting water on lights, controllers, fan
motors, and unfinished wood wine rack faces.
Condenser Cleaning
CAUTION
WARNING
Failure to clean the condenser could result in temperature loss or
mechanical failure or damages. Clean this area every three months.
For cleaning the condenser and other routine
maintenance, shut off electricity to the unit.
In all instances, you should clean the condenser area every three months. The condenser is located behind the
kickplate. To clean the condenser remove the kickplate and use a soft bristle brush and vacuum to remove dust and lint.
Avoid damaging or crushing the condenser fins or tubing. Upon completion, re-install the kickplate.
10
Troubleshooting
Before Calling for Service
If the unit appears to be malfunctioning, read through NORMAL OPERATION first. If the problem persists, check the
TROUBLESHOOTING GUIDE. Locate the problem in the guide and refer to the cause and its remedy before calling for
service. The problem could be something, which can be solved without a service call.
WARNING
ELECTROCUTION HAZARD!!
Never attempt to repair or perform maintenance on the unit until the main
electrical power has been disconnected.
Problem
Solution
No interior light
• Check to ensure bulb is tight.
• Check to ensure bulb is not burned out.
Light stays on when door is closed • Manual ON/OFF light switch is turned ON.
• Check to ensure door switch is making contact with door.
Noise during operation
• Certain sounds are normal. Soft sounds from the compressor, fan motor
and valves will be heard.
Controller display is flashing “P1”
• There is a thermostat probe failure.
Controller display is flashing “HA”
• The internal compartment temperature has exceeded the high
temperature alarm preset value for over 30 minutes.
• Check to ensure door is closed.
• Check for door gasket seal.
• Product was just installed.
• Check to ensure condenser is clean.
• Check to ensure kickplate is unobstructed.
• Surrounding ambient temperature has changed dramatically.
• Check to ensure interior light is OFF.
Controller display is flashing
“DA”
Controller display is flashing
“LA”
• The door has been left ajar.
• Check to ensure door is closed.
• The internal compartment temperature has exceeded the low
temperature alarm preset value for over 30 minutes.
• Check to ensure door is closed.
• Check for door gasket seal.
• Surrounding air temperature has changed dramatically.
Controller display is flashing “EE”
• The controller has a data or memory failure.
The refrigerated cabinet isn’t
running
• Check to ensure there is electrical power to the unit.
• Check to ensure your home circuit breaker or fuse is on.
• Check to ensure your ON/OFF key pad is on.
• Check to ensure your condenser area is clean.
The refrigerated compartment is
warmer than usual
• Check to ensure your control is set properly.
• Check to ensure the light is not staying on.
• Check to ensure your condenser area is clean and free of obstructions.
• Check to ensure the door has not been open for a long time or more
frequent door openings aren’t occurring.
• Check to ensure the internal louvers and fan guard openings aren’t
obstructed.
• Check to ensure warm product hasn’t just been placed in the cabinet.
The refrigerated compartment is
colder than usual
• Check to ensure your control is set properly.
• Check to ensure your door is closing and sealing properly.
• Check to ensure the ambient temperature is within the normal
operating range.
11
Troubleshooting
Problem
Solution
The refrigeration system runs for
long periods of time
• Check to ensure the condenser area is clean and free of obstructions.
• Check to ensure the door has not beenopen for a long time or more
frequent door openings aren’t occurring.
• Check to ensure warm product hasn’t just been placed in the cabinet.
• On hot days and in warm room temperatures the system will run long.
Condensation forms inside the
refrigerated compartments
• This is normal during high humidity and frequent door openings.
• Check to ensure door is closed and sealing properly.
Condensation forms on the
outside of the unit
• During periods of high humidity some condensation might appear on
outside surfaces. The condensation will disappear when the humidity
drops. Meanwhile, be sure doors are closing and sealing properly. If
condensation persists, contact your local authorized servicer.
When pressing the UP button, the • If the UP button is pressed without pressing the SET button, the MAX
display shows a “Hi” message
stored temperature will be displayed. Press the UP button again or wait
followed by a temperature that
5 seconds for the normal temperature to be displayed. To reset the
does not match the set point.
MAX temperature, press and hold the SET button until the message
“rSt” starts blinking. Release the SET button and the new stored value
will be the current temperature. Frequent and/or extended door
openingsmay cause a higher than expected MAX temperature.
When pressing the DOWN button, • If the DOWN button is pressed without pressing the SET button, the
the display shows a “Lo” message
MIN stored temperature will be displayed. Press the DOWN button
followed by a temperature that
again or wait 5 seconds for the normal temperature to be displayed. To
does not match the set point.
reset the MIN temperature, press and hold the SET button until the
message “rSt” starts blinking. Release the SET button and the new
stored value will be the current temperature.
12
Service & Registration
If service is required after checking the troubleshooting guide, call your dealer or authorized service agency. The name of
the authorized service agency can be obtained from the dealer or distributor in your area.
When you make a service call, be sure to have the following information handy:
• Model Number
• Serial Number
• Date of Purchase
• Name of dealer from whom purchased
If you are unable to obtain the name of an authorized service agency, or if you continue to have service problems, contact
Viking Range, LLC at (888) 845-4641 or write to:
VIKING RANGE, LLC
PREFERRED SERVICE
111 Front Street
Greenwood, Mississippi 38930 USA
Record the following information indicated below. You will need it if service is ever required. The model and serial number
for your undercounter refrigeration unit are located in the top right under the control housing.
Model No. ________________________________________________________________________________________________
Serial No. _______________________________________________________________________________________________
Date of Purchase________________________________________________________________________________________
Date Installed____________________________________________________________________________________________
Dealer’s Name _________________________________________________________________________________________
Address
_________________________________________________________________________________________________
____________________________________________________________________________________________________________
If service requires installation of parts, use only authorized parts to insure protection under the warranty.
Keep this manual with your refrigerator for future reference.
13
Model and
Serial number
Warranty
VRCI/VBCI/VWCI/VRDI UNDERCOUNTER REFRIGERATION WARRANTY (INDOOR MODELS)
THREE YEAR FULL WARRANTY
Undercounter refrigeration and all of their components and accessories, except as detailed below*, are warranted to be free from defects in material or workmanship under normal household
use for a period of three (3) years from the date of original retail purchase. Viking Range Corporation, warrantor, agrees to repair or replace, at its option, any part which fails or is found to be
defective during the warranty period
*FULL NINETY (90) DAY COSMETIC WARRANTY: Painted and decorative items are warranted to be free from defective materials or workmanship for a period of ninety (90) days from the
date of original retail purchase. ANY DEFECTS MUST BE REPORTED TO THE SELLING DEALER WITHIN NINETY (90) DAYS FROM DATE OF ORIGINAL RETAIL PURCHASE.
†FULL NINETY (90) DAY WARRANTY IN "RESIDENTIAL PLUS" APPLICATIONS: This full warranty applies to applications where use of the product extends beyond normal residential use,
but the warranty period for products used in such applications is ninety (90) days. Examples of applications covered by this warranty are bed and breakfasts, fire stations, private clubs,
churches, yachts, etc. Under this "Residential Plus" warranty, the product, its components and accessories are warranted to be free from defective material or workmanship for a period of
ninety (90) days from the date of original retail purchase. This warranty excludes use of the product in all commercial locations such as restaurants, food service locations and institutional food
service locations.
SIX YEAR FULL WARRANTY
Any sealed refrigeration system component, as listed below, is warranted to be free from defective materials or workmanship in normal household use during the fourth through the sixth year
from the date of original retail purchase. Viking Range Corporation, warrantor, agrees to repair or replace, at its option, any part which fails or is found to be defective during the warranty
period.
Sealed Refrigeration System Components: Compressor, Evaporator, Condenser, Connecting Tubing, Dryer/Strainer
TWELVE YEAR LIMITED WARRANTY
Any sealed refrigeration system component, as listed above, which fails due to defective materials or workmanship in normal household use during the seventh through the twelfth year from the date of original
retail purchase will be repaired or replaced, free of charge for the part itself, with the owner paying all other costs, including labor.
TERMS AND CONDITIONS
This warranty extends to the original purchaser of the product warranted hereunder and to each transferee owner of the product during the term of the warranty and applies to products purchased
and located in the United States, Canada, Mexico, and the Caribbean (excluding Cuba, Dominican Republic, and Haiti). Products must be purchased in the country where service is requested. If the
product or one of its component parts contains a defect or malfunction during the full warranty period after a reasonable number of attempts by the warrantor to remedy the defect or malfunction,
the owner is entitled to either a refund or replacement of the product or its component part or parts. Replacement of a component part includes its free installation, except as specified under the
limited warranty. Under the terms of this warranty, service must be performed by a factory authorized Viking Range, LLC service agent or representative. Service will be provided during normal
business hours, and labor performed at overtime or premium rates shall not be covered by this warranty.
Owner shall be responsible for proper installation, providing reasonable and necessary maintenance, providing proof of purchase upon request, and making the appliance reasonably accessible for
service. The return of the Owner Registration Card is not a condition of warranty coverage. You should, however, return the Owner Registration Card so that Viking Range, LLC can contact you should
any question of safety arise which could affect you.
This warranty gives you specific legal rights, and you may also have other rights which may vary from jurisdiction to jurisdiction.
WHAT IS NOT COVERED BY THIS WARRANTY: This warranty shall not apply to damage resulting from abuse, failure to provide reasonable and necessary maintenance, accident, delivery,
negligence, natural disaster, loss of electrical power to the product for any reason, alteration, outdoor use, improper installation, improper operation, or repair or service of the product by anyone
other than an authorized Viking Range, LLC service agency or representative. This warranty does not apply to commercial usage.
LIMITATION OF REMEDIES AND DURATION OF IMPLIED WARRANTY
OWNER’S SOLE AND EXCLUSIVE REMEDY FOR A CLAIM OF ANY KIND WITH RESPECT TO THIS PRODUCT SHALL BE THE REMEDIES SET FORTH ABOVE. VIKING RANGE, LLC IS NOT
RESPONSIBLE FOR CONSEQUENTIAL OR INCIDENTAL DAMAGE, INCLUDING BUT NOT LIMITED TO FOOD OR MEDICINE LOSS, DUE TO PRODUCT FAILURE, WHETHER ARISING OUT
OF BREACH OF WARRANTY, BREACH OF CONTRACT OR OTHERWISE. Some jurisdictions do not allow the exclusion or limitation of incidental or consequential damages, so the above limitation
or exclusions may not apply to you. ANY IMPLIED WARRANTIES OF MERCHANTABILITY OR FITNESS FOR A PARTICULAR PURPOSE APPLICABLE TO THIS PRODUCT ARE LIMITED IN
DURATION TO THE PERIOD OF COVERAGE OF THE APPLICABLE EXPRESS WRITTEN LIMITED WARRANTIES SET FORTH ABOVE. Some states do not allow limitations on how long an
implied warranty lasts, so the above limitation may not apply to you.
WARRANTY SERVICE
To obtain warranty service, contact an authorized Viking Range, LLC service agent, or Viking Range, LLC, 111 Front Street, Greenwood, Mississippi 38930, (888) 845-4641. Provide model and serial
number and date of original purchase or closing date for a new construction. For the name of your nearest authorized Viking Range, LLC service agency, call Viking Range, LLC. IMPORTANT: Retain
proof of original purchase to establish warranty period.
Specifications subject to change without notice.
14
Warranty
VRCO/VRDO UNDERCOUNTER REFRIGERATION WARRANTY (OUTDOOR MODELS)
TWO YEAR FULL WARRANTY
Undercounter refrigeration and all of their components and accessories, except as detailed below*, are warranted to be free from defects in material or workmanship under normal household
use for a period of two (2) years from the date of original retail purchase. Viking Range Corporation, warrantor, agrees to repair or replace, at its option, any part which fails or is found to be
defective during the warranty period
*FULL NINETY (90) DAY COSMETIC WARRANTY: Painted and decorative items are warranted to be free from defective materials or workmanship for a period of ninety (90) days from the
date of original retail purchase. ANY DEFECTS MUST BE REPORTED TO THE SELLING DEALER WITHIN NINETY (90) DAYS FROM DATE OF ORIGINAL RETAIL PURCHASE.
†FULL NINETY (90) DAY WARRANTY IN "RESIDENTIAL PLUS" APPLICATIONS: This full warranty applies to applications where use of the product extends beyond normal residential use,
but the warranty period for products used in such applications is ninety (90) days. Examples of applications covered by this warranty are bed and breakfasts, fire stations, private clubs,
churches, yachts, etc. Under this "Residential Plus" warranty, the product, its components and accessories are warranted to be free from defective material or workmanship for a period of
ninety (90) days from the date of original retail purchase. This warranty excludes use of the product in all commercial locations such as restaurants, food service locations and institutional food
service locations.
FIVE YEAR LIMITED WARRANTY
Any sealed refrigeration system component, as listed above, which fails due to defective materials or workmanship in normal household use during the second through the fifth year from the
date of original retail purchase will be repaired or replaced, free of charge for the part itself, with the owner paying all other costs, including labor.
TERMS AND CONDITIONS
This warranty extends to the original purchaser of the product warranted hereunder and to each transferee owner of the product during the term of the warranty and applies to products purchased
and located in the United States, Canada, Mexico, and the Caribbean (excluding Cuba, Dominican Republic, and Haiti). Products must be purchased in the country where service is requested. If the
product or one of its component parts contains a defect or malfunction during the full warranty period after a reasonable number of attempts by the warrantor to remedy the defect or malfunction,
the owner is entitled to either a refund or replacement of the product or its component part or parts. Replacement of a component part includes its free installation, except as specified under the
limited warranty. Under the terms of this warranty, service must be performed by a factory authorized Viking Range, LLC service agent or representative. Service will be provided during normal
business hours, and labor performed at overtime or premium rates shall not be covered by this warranty.
Owner shall be responsible for proper installation, providing reasonable and necessary maintenance, providing proof of purchase upon request, and making the appliance reasonably accessible for
service. The return of the Owner Registration Card is not a condition of warranty coverage. You should, however, return the Owner Registration Card so that Viking Range, LLC can contact you should
any question of safety arise which could affect you.
This warranty gives you specific legal rights, and you may also have other rights which may vary from jurisdiction to jurisdiction.
WHAT IS NOT COVERED BY THIS WARRANTY: This warranty shall not apply to damage resulting from abuse, failure to provide reasonable and necessary maintenance, accident, delivery,
negligence, natural disaster, loss of electrical power to the product for any reason, alteration, outdoor use, improper installation, improper operation, or repair or service of the product by anyone
other than an authorized Viking Range, LLC service agency or representative. This warranty does not apply to commercial usage.
LIMITATION OF REMEDIES AND DURATION OF IMPLIED WARRANTY
OWNER’S SOLE AND EXCLUSIVE REMEDY FOR A CLAIM OF ANY KIND WITH RESPECT TO THIS PRODUCT SHALL BE THE REMEDIES SET FORTH ABOVE. VIKING RANGE, LLC IS NOT
RESPONSIBLE FOR CONSEQUENTIAL OR INCIDENTAL DAMAGE, INCLUDING BUT NOT LIMITED TO FOOD OR MEDICINE LOSS, DUE TO PRODUCT FAILURE, WHETHER ARISING OUT
OF BREACH OF WARRANTY, BREACH OF CONTRACT OR OTHERWISE. Some jurisdictions do not allow the exclusion or limitation of incidental or consequential damages, so the above limitation
or exclusions may not apply to you. ANY IMPLIED WARRANTIES OF MERCHANTABILITY OR FITNESS FOR A PARTICULAR PURPOSE APPLICABLE TO THIS PRODUCT ARE LIMITED IN
DURATION TO THE PERIOD OF COVERAGE OF THE APPLICABLE EXPRESS WRITTEN LIMITED WARRANTIES SET FORTH ABOVE. Some states do not allow limitations on how long an
implied warranty lasts, so the above limitation may not apply to you.
WARRANTY SERVICE
To obtain warranty service, contact an authorized Viking Range, LLC service agent, or Viking Range, LLC, 111 Front Street, Greenwood, Mississippi 38930, (888) 845-4641. Provide model and serial
number and date of original purchase or closing date for a new construction. For the name of your nearest authorized Viking Range, LLC service agency, call Viking Range, LLC. IMPORTANT: Retain
proof of original purchase to establish warranty period.
Specifications subject to change without notice.
15
Viking Range, LLC
111 Front Street
Greenwood, Mississippi 38930 USA
(662) 455-1200
For product information
call 1-888-845-4641, or visit online in the US
at www.vikingrange.com and in Canada at
www.brigade.ca
F20867D EN
(010115)