1
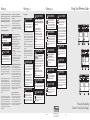
Surface Operation
Lighting the Burners
All burners are ignited by electric
ignition. There are no open-flame,
“standing” pilots.
VariSimmer™
Simmering is a cooking technique in
which foods are cooked in hot liquids kept at or just
barely below the boiling point of water. Simmering
ensures gentler treatment than boiling to prevent food
from toughening and/or breaking up. The size of the
pan and the volume of food can have a significant effect
on how high or low a flame is needed for simmering.
For this reason, Viking range and rangetop burners are
engineered with a VariSimmer setting. The VariSimmer
setting is not just one simmer setting, but provides a
variable range of simmer settings. This variable range of
simmer settings allows you to adjust the flame height to
achieve the best simmer depending on the type and
quantity of food being simmered. It is this ability that
makes the VariSimmer setting the most accurate and
trustworthy simmer on the market.
Setting the Clock
Oven Controls
grill grate are two slotted porcelainized flavor generator
plates which are designed to catch drippings and
circulate a smoke flavor back into the food. Beneath the
flavor generator plates is a two piece drip pan which
catches any drippings that might pass beyond the flavor
generator plates. This unique grilling system is designed
to provide outdoor quality grilling indoors.
Left Rear Burner
Control Knob
(15,000 BTU)
SET
HR
CLOCK/
OVEN
PROBE
FUNC
MIN/SEC
OVEN
TIMER
TEMP
SET
Clock Display (General)
ON
TIME
DELAY
CLOCK/
OVEN
PROBE
FUNC
MIN
88:88
STOP TIMER NO PROBE
STOP
CLEAN/
TIME
SETTINGS
Self-Clean
Left
Oven Indicator Oven Temperature
Light
Indicator light
To turn “ON”: If time is off, any key press will turn on
TIME display. When range is turned “ON” following the
selection of FUNCTION or TEMPERATURE, TIME
display turns “ON”.
ON
DELAY
TIMER
OVEN
TEMP
AM
PM
COOK
TIME
OFF
STOP
CLEAN/
TIME
SETTINGS
00000000
888°8
Griddle
Indicator Light
Broil element
Right Oven Selector Controls
Clock Display
SET
HR
MIN
CLOCK/
PROBE
SET
HR
OVEN
FUNC
MIN
MIN/SEC
TIMER
OVEN
ON
DELAY
PROBE
SET
HR
COOK
TIME
OFF
88:88
STOP TIMER NO PROBE
COOK TIME
12:00
AM
PM
2. Toggle ”SELECTOR” right to increase or left to
decrease to set desired time. Time will scroll in
1 minute increments per individual toggle. If
”SELECTOR” is held in either right or left position,
time will increase or decrease in 10 minute
increments until desired time is reached. Clock
automatically rolls from AM to PM.
3. Push in
”SELECTOR” to
CLOCK/
OVEN
PROBE
FUNC
accept time and
OVEN
MIN/SEC
TEMP
TIMER
start timer or after 5
COOK
OFF
seconds, time will
TIME
CLEAN/
STOP
auto-accept.
SETTINGS
TIME
(When clock is set
and needs to be
changed, press ”CLOCK/PROBE” button and
follow the two steps above. CLOCK display will
flash when activated.)
CLEAN/
TIME
SETTINGS
ON
DELAY
TIMER
OVEN
OVEN
TEMP
AM
PM
COOK
TIME
OFF
STOP
CLEAN/
TIME
SETTINGS
00000000
888°8
Two
tilt-proof
racks
STOP TIMER NO PROBE
COOK TIME ON DELAY
00000000
888°8
STOP
FUNC
MIN
MIN/SEC
PM
COOK TIME
CLOCK/
TEMP
AM
STOP TIMER NO PROBE
Oven light
One
TruGlide™
rack
Concealed bake element
Note: VDSC548T4GQ model range shown here.
Griddle/Simmer Plate Operation/Settings
• Turn the griddle control knob to desired
temperature setting.
• ALWAYS turn off when not in use, or lower
the heat between cooking loads.
Grill Operation/Settings
•
•
•
•
Clock/Probe
Button
Oven Function
Button
Allows clock to be set to desired time.
When probe is connected, use this button
to set desired temperature
Set the appropriate oven function
including: Bake, Convection Bake,
TruConvec™, Broil, Convection Broil,
Convection Roast, Auto Roast, Defrost,
Dehydrate, Proof, and Self-Clean.
Oven light
6
5
4
3
2
1
Turn on ventilator (separate product).
Turn control knob to HI.
Preheat on HI for 5 to 10 minutes.
Place food on grill, cook as desired.
BAKE (TwoElement Bake)
Min/Sec Timer
Button
Allows timer to be set to desired time.
Oven Temp
Button
Cook Time
Button
Allows appropriate oven temperature to be set.
Set a specific amount of time and a
specific cooking function to be performed.
Off Button*
Stop Time
Button
First press turns oven off. Second press turns
off time display. Activates Control Lock if
pressed in conjunction with
Clear/Settings button.
Set a delay bake time, giving an amount of
time before baking begins and an amount
of time for the duration of baking.
Clear/Settings
Button*
*Note: These keys have added importance.
Press Clear to acknowledge an expired timer.
Press Clear to cancel a function. When setting
a function, time etc., press the Clear key to
revert to previous setting.
BAKE
Full power heat is
radiated from the
bake element in
the bottom of the
oven cavity and
supplemental heat is
two-element bake
radiated from the
broil element. This
function is recommended for single rack baking. Many
cookbooks contain recipes to be cooked in the
conventional manner. Conventional baking/roasting is
particularly suitable for dishes that require a high
temperature. Use this setting for baking, roasting, and
casseroles.
CONV BAKE
(Convection
Bake)
TruConvec™ element
(behind baffle)
To turn “OFF”: Turn the range “OFF”. If TIME is on
display, a second press of “OFF” button will turn off
TIME display.
(Clock defaults to 12:00 and
flashes when first powered
up or if power is interrupted.)
1. Press “CLOCK/PROBE”
button. The clock display
will flash.
OFF
COOK TIME
When AC power is applied (including after
a power loss), CLOCK display shows a flashing
“12:00” and begins incremental time. Once set, clock
is “ON” or “OFF” based on user’s last setting.
Programming Clock
HR
MIN/SEC
COOK
STOP TIMER NO PROBE
COOK TIME
Right Rear Burner Right Front Burner
Right Display
Control Knob
Control Knob
(Function & Temp.)
(15,000 BTU)
(15,000 BTU)
MIN
PM
Certain model ranges are equipped with a TruPower
Plus 18,500 BTU burner in the front right burner
position. This burner is designed to provide extra high
heat output, especially when using large pans, and
should be used for boiling large quantities or if you
need to bring something to a boil quickly. While
TruPower Plus burner has the extra power needed to
bring large quantities of liquid to a boil rapidly, it is
also able to be turned down low enough to provide a
very low and delicate simmer making this burner the
most versatile on the market.
Char-Grill (where applicable)
The optional 18,000 BTU char-grill is equipped with a
single piece, heavy-duty porcelainized cast-iron grill
grate for easy movement of grilling items. Beneath the
Left Oven
Left Front Burner
Left Oven
Left Display
Griddle Control
Selector Control Temperature Grill Control
Control Knob
(Clock & Time)
Knob
Knob
Knob
(15,000 BTU)
Control Knob
AM
TruPower Plus™ Burner (where applicable)
Griddle/Simmer Plate (where applicable)
The optional 15,000 BTU griddle is constructed of
machined steel with a blanchard finish and is uniquely
designed to offer excellent cooking performance as well
as easy clean up. The griddle is equipped with an
electronic thermostat to maintain an even temperature
across the griddle once the desired temperature has
been set. The griddle has a power “ON” indicator light
which glows when the griddle thermostat has been
turned on. This will cycle on and off as needed to
indicate the thermostat is maintaining the selected
temperature. Before the griddle is used, it is important
to season the griddle. See instructions in the Use &
Care for steps on seasoning the griddle.
Oven Functions and Settings
CONV BAKE
The bottom element
operates at full
power, and the
top broil element
operates at
convection bake
supplemental power.
The heated air is
circulated by the motorized fan in the rear of the oven
providing a more even heat distribution. This even
circulation of air equalizes the temperature throughout
the oven cavity and eliminates the hot and cold spots
found in conventional ovens. A major benefit of
convection baking is the ability to prepare food in
quantity using multiple racks—a feature not possible in
a standard oven.
TRU CONV
(TruConvec™)
TRU CONV
The rear element only
operates at full power.
There is no direct
heat from the bottom
or top elements. The
motorized fan in the
TruConvec™
rear of the oven
circulates air in the
oven cavity for even heating. Use this setting for foods
that require gentle cooking such as pastries, souffles,
yeast breads, quick breads and cakes. Breads, cookies,
and other baked goods come out evenly textured with
golden crusts. No special bakeware is required. Use
this function for single rack baking, multiple rack baking,
roasting, and preparation of complete meals. This
setting is also recommended when baking large
quantities of baked goods at one time.
CONV ROAST
(Convection
Roast)
CONV ROAST
The convection
element runs in
conjunction with
the inner and outer
broil elements.
convection roast
The reversible
convection fan runs
at a higher speed in each direction. This transfer
of heat (mainly from the convection element) seals
moisture inside of large roasts. A time savings is
gained over existing, single fan convection roast
modes. Use this setting for whole turkeys, whole
chickens, hams, etc.
AUTO ROAST (Auto Roast)
Use this function to simplify roasting by automatically
searing the outside of roasts. When Set Auto Roast
Temperature is reached, one long beep will sound and
the display will show “SEARING.” The oven will remain
at searing temperature (set temperature plus 100ºF) for
30 minutes. If set, Cook Time timer will begin.
CONV BROIL
(Convection
Broil)
CNV BRL
The top element
operates at full
power. This function
is exactly the same
as regular broiling
convection broil
with the additional
benefit of air
circulation by the motorized fan in the rear
of the oven. Smoke is reduced since the airflow also
reduces peak temperatures on the food. Use this
setting for broiling thick cuts of meats.
HI BROIL
MED BROIL
LOW BROIL
BROIL LOW
This mode uses
only a fraction of
the available power
to the inner broil
element for
delicate topbrowning. The
low broil
inner broil element
is on for only part
of the time. Use this setting to gently brown meringue
on racks 3 or 4 in 3-4 minutes.
DEHYDRATE (Convection Dehydrate)
This oven is designed not only to cook, but also to
dehydrate fruits and vegetables by removing water
DEFR0ST
(Convection Defrost)
Use this function to defrost foods.
PROOF
Use this setting to allow yeast dough to rise.
Temperature can be set between 90º and 110ºF
(32º to 44ºC).
BROIL HI
Heat radiates from
both broil elements,
located in the top
of the oven cavity,
at full power. The
distance between
the foods and the
high broil
broil elements
determines broiling
speed. For fast broiling, food may be as close as
2 inches (5 cm) to the broil element or on the top
rack. Fast broiling is best for meats where rare
to medium doneness is desired. Use this setting for
broiling small and average cuts of meat.
BROIL MED
Inner and outer
broil elements
pulse on and off to
produce less heat
for slow broiling.
Allow about
4 inches (10 cm)
medium broil
between the top
surface of the food
and the broil element. Slow broiling is best for
chicken and ham in order to broil food without overbrowning it. Use this setting for broiling small and
average cuts of meat.
SELF CLEAN
Use this function to clean oven.
Warning and Important Safety Instructions appearing
in this manual are not meant to cover all possible
conditions and situations that may occur. Common
sense, caution, and care must be exercised when
installing, maintaining, or operating the appliance.
ALWAYS contact the manufacturer about problems or
conditions you do not understand.
Recognize Safety Symbols, Words, Labels
DANGER
Hazards or unsafe practices which WILL result in
severe personal injury or death
WARNING
Hazards or unsafe practices which COULD result
in death severe personal injury or death
CAUTION
Hazards or unsafe practices which COULD
result in minor personal injury.
All safety messages will identify the hazard, tell you
how to reduce the chance of injury, and tell you what
can happen if the instructions are not followed.
A GFI shall be used if required by NFPA-70
(National Electric Code), federal/state/local laws, or
local ordinances.
• The required use of a GFI is normally related to the
location of a receptacle with respect to any
significant sources of water or moisture.
• Viking Range Corporation will NOT warranty any
problems resulting from GFI outlets which are not
installed properly or do not meet the requirements
below.
If the use of a GFI is required, it should be:
• Of the receptacle type (breaker type or portable
type NOT recommended)
• Used with permanent wiring only (temporary or
portable wiring NOT recommended)
• On a dedicated circuit (no other receptacles,
switches, or loads in the circuit)
• Connected to a standard breaker of appropriate
size (GFI breaker of the same size NOT
recommended)
• Rated for Class A (5 mA +/- 1 mA trip current) as
per UL 943 standard
• In good condition and free from any loose-fitting
gaskets (if applicable in outdoor situations)
• Protected from moisture (water, steam, high
humidity) as much as reasonably possible
Important Safety Notice and Warning
Read and follow all instructions before using this
appliance to prevent the potential risk of fire, electric
shock, personal injury or damage to the appliance as
a result of improper usage of the appliance. Use
appliance only for its intended purpose as described
in this manual.
To ensure proper and safe operation: Appliance
must be properly installed and grounded by a
qualified technician. DO NOT attempt to adjust,
repair, service, or replace any part of your appliance
unless it is specifically recommended in this manual.
All other servicing should be referred to a qualified
servicer. Have the installer show you the location of
the gas shutoff valve and how to shut it off in an
emergency.
To prevent possible damage to cabinets and cabinet
finishes, use only materials and finishes that will not
discolor or delaminate and will withstand temperatures
up to 194° F (90° C). Heat and moisture resistant
adhesive must be used if the product is to be installed
in laminated cabinetry. Check with your builder or
cabinet supplier to make sure that the materials meet
these requirements.
The California Safe Drinking Water and Toxic
Enforcement Act of 1986 (Proposition 65) requires the
Governor of California to publish a list of substances
known to the State of California to cause cancer or
reproductive harm, and requires businesses to warn
customers of potential exposures to such substances.
Users of this appliance are hereby warned that when
the oven is engaged in the self-clean cycle, there may
be some low-level exposure to some of the listed
substances, including carbon monoxide. Exposure to
these substances can be minimized by properly
venting the oven to the outdoors by opening the
windows and/or door in the room where the appliance
is located during the self-clean cycle.
Important notice regarding pet birds:
NEVER keep pet birds in the kitchen or in rooms
where the fumes from the kitchen could reach. Birds
have a very sensitive respiratory system. Fumes
released during an oven self-cleaning cycle may be
harmful or fatal to birds. Fumes released due to
overheated cooking oil, fat, margarine and overheated
non-stick cookware may be equally harmful.
About Your Appliance
WARNING
NEVER use appliance as a space heater to heat or
warm a room to prevent potential hazard to the user
and damage to the appliance. Also, DO NOT use the
rangetop or oven as a storage area for food or
cooking utensils.
• Avoid touching oven vent area while oven is on
and for several minutes after oven is turned off.
When the oven is in use, the vent and surrounding
area become hot enough to cause burns. After
oven is turned off, DO NOT touch the oven vent or
surrounding areas until they have had sufficient
time to cool.
• The misuse of oven doors (e.g. stepping, sitting, or
leaning on them) can result in potential hazards
and/or injuries.
• The appliance must be installed and electrically
grounded according to local codes. Have the
installer identify the location and shut-off valve on
the oven so you know where and how to turn off
gas if necessary.
WARNING
This range features a self-cleaning cycle. During
this cycle, the oven reaches elevated temperatures
in order to burn off soil and deposits. A powder ash
residue is left in the bottom of the oven after
completion of the self-clean cycle.
Note: DO NOT use commercial oven cleaners
inside the oven. Use of these cleaners can
produce hazardous fumes or can damage the
porcelain finishes. DO NOT line the oven with
aluminum foil or other materials. These items can
melt or burn during a self-clean cycle, causing
permanent damage to the oven.
WARNING
To avoid risk of property damage,
personal injury or death; follow
information in this manual exactly to
prevent a fire or explosion. DO NOT
store or use gasoline or other flammable vapors
and liquids in the vicinity of this or any appliance.
Viking Quick Reference Guide
Warnings (cont.)
Warnings (cont.)
Warnings
WARNING
If the information in this manual is not
followed exactly, a fire or explosion may
result causing property damage, personal
injury or death.
WHAT TO DO IF YOU SMELL GAS:
• DO NOT try to light any appliance.
• DO NOT touch any electrical switch.
• DO NOT use any phone in your building.
• Immediately call your gas supplier from a
neighbor's phone. Follow the gas supplier's
instructions.
• If you cannot reach your gas supplier, call the fire
department.
Installation and service must be performed by a
qualified installer, service agency or the gas supplier.
WARNING
To avoid risk of property damage,
personal injury or death; follow
information in this manual exactly to
prevent a fire or explosion. DO NOT
store or use gasoline or other flammable vapors
and liquids in the vicinity of this or any appliance.
WARNING
ELECTRICAL SHOCK HAZARD
DO NOT touch a hot oven light bulb with
a damp cloth as the bulb could break.
Should the bulb break, disconnect power
to the appliance before removing bulb to avoid
electrical shock.
WARNING
WARNING
BURN OR ELECTRICAL
SHOCK HAZARD
TIPPING HAZARD
To reduce the risk of the
appliance tipping, it must be
secured by a properly installed
anti-tip bracket(s). To make sure the bracket has
been installed properly, look behind the range with
a flashlight to verify proper installation engaged in
the rear top left corner of the range.
• THIS RANGE CAN TIP
• INJURIES TO PERSONS CAN RESULT
• INSTALL ANTI-TIP DEVICE PACKED WITH
RANGE
• SEE INSTALLATION INSTRUCTIONS
Make sure all controls are OFF and
oven is COOL before cleaning.
Failure to do so can result in burns or
electrical shock.
CAUTION
DO NOT touch the exterior portions of
the oven after self-cleaning cycle has
begun, since some parts become
extremely hot to the touch!
During the first few times the self-cleaning feature
is used, there may be some odor and smoking
from the “curing” of the binder in the high-density
insulation used in the oven. When the insulation is
thoroughly cured, this odor will disappear. During
subsequent self-cleaning cycles, you may sense
an odor characteristic of high temperatures.
KEEP THE KITCHEN WELL-VENTED DURING
THE SELF-CLEAN CYCLE.
NOTICE
DO NOT turn the Temperature Control on during
defrosting. Turning the convection fan on will
accelerate the natural defrosting of the food
without the heat.
NOTICE
Avoid any damage to oven vents. The vents need
to be unobstructed and open to provide proper
airflow for optimal oven performance.
CAUTION
BURN HAZARD
The oven door, especially the glass,
can get hot. Danger of burning:
DO NOT touch the glass!
WARNING
DO NOT use commercial oven cleaners inside the
oven. Use of these cleaners can produce hazardous
fumes or can damage the porcelain finishes.
CAUTION
BURN HAZARD
NOTICE
The Cooling Fan should be operating when the
unit is in operation. If you notice the cooling fan is
not operating or you observe unusual or excessive
noise coming from the cooling fan, contact a
Viking Authorized Service Center before continuing
operation. Failure to do so can result in damage to
the oven or surrounding cabinets.
When self-cleaning, surfaces may get
hotter than usual. Therefore, children
should be kept away.
WARNING
ELECTRICAL SHOCK HAZARD
Disconnect the electric power at the
main fuse or circuit breaker before
replacing bulb.
Professional Freestanding
Electronic Control Dual Fuel Ranges
F20676A EN
VIKING RANGE CORPORATION
111 Front Street • Greenwood, Mississippi
38930 USA • (662) 455-1200
(102909J)