1
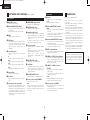
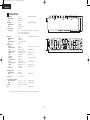
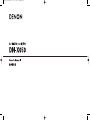
DN-X050_for PDF 07.7.27 07.7.27 11:09 AM Page 1
0.DN-X050_Frontpageのコピー 07.7.26 9:47 AM ページ 1
CAUTION
RISK OF ELECTRIC SHOCK
DO NOT OPEN
CAUTION:
TO REDUCE THE RISK OF ELECTRIC SHOCK, DO NOT REMOVE
COVER (OR BACK). NO USER-SERVICEABLE PARTS INSIDE. REFER
SERVICING TO QUALIFIED SERVICE PERSONNEL.
The lightning flash with arrowhead symbol, within an
equilateral triangle, is intended to alert the user to the
presence of uninsulated “dangerous voltage” within the
product’s enclosure that may be of sufficient magnitude to
constitute a risk of electric shock to persons.
The exclamation point within an equilateral triangle is
intended to alert the user to the presence of important
operating and maintenance (servicing) instructions in the
literature accompanying the appliance.
IMPORTANT SAFETY
INSTRUCTIONS
CAUTION:
USE OF CONTROLS OR ADJUSTMENTS OR PERFORMANCE OF
PROCEDURES OTHER THAN THOSE SPECIFIED HEREIN MAY RESULT IN
HAZARDOUS RADIATION EXPOSURE.
THIS PRODUCT SHOULD NOT BE ADJUSTED OR REPAIRED BY ANYONE
EXCEPT PROPERLY QUALIFIED SERVICE PERSONNEL.
This device complies with Part 15 of the FCC Rules. Operation is subject to
the following two conditions: (1) This device may not cause harmful
interference, and (2) this device must accept any interference received,
including interference that may cause undesired operation.
READ BEFORE OPERATING EQUIPMENT
This product was designed and manufactured to meet strict quality and safety
standards. There are, however, some installation and operation precautions
which you should be particularly aware of.
1. Read these instructions.
2. Keep these instructions.
This Class B digital apparatus meets all requirements of the Canadian
Interference-Causing Equipment Regulations.
3. Heed all warnings.
4. Follow all instructions.
Cet appareil numérique de la classe B respecte toutes les exigences du
Règlement sur le matériel brouilleur du Canada.
5. Do not use this apparatus near water.
6. Clean only with dry cloth.
7. Do not block any ventilation openings. Install in accordance with the
manufacture’s instructions.
8. Do not install near any heat sources such as radiators, heat registers, stoves,
or other apparatus (including amplifiers) that produce heat.
IMPORTANT TO SAFETY
WARNING:
9. Do not defeat the safety purpose of the polarized or grounding-type plug. A
polarized plug has two blades with one wider than the other. A grounding
type plug has two blades and a third grounding prong. The wide blade or the
third prong are provided for your safety. If the provided plug does not fit into
your outlet, consult an electrician for replacement of the obsolete outlet.
To reduce the risk of fire and electric shock, this apparatus should not
be exposed to rain or moisture and objects filled with liquids, such as
vases, should not be placed on this apparatus.
10. Protect the power cord from being walked on or pinched particularly at
plugs, convenience receptacles, and the point where they exit from the
apparatus.
CAUTION:
1. Handle the power supply cord carefully
Do not damage or deform the power supply cord. If it is damaged or
deformed, it may cause electric shock or malfunction when used. When
removing from wall outlet, be sure to remove by holding the plug attachment
and not by pulling the cord.
2. Do not open the rear cover
In order to prevent electric shock, do not open the top cover.
If problems occur, contact your DENON DEALER.
3. Do not place anything inside
Do not place metal objects or spill liquid inside the system.
Electric shock or malfunction may result.
11. Only use attachments/accessories specified by the manufacturer.
12. Use only with the cart, stand, tripod, bracket, or table
specified by the manufacturer, or sold with the apparatus.
When a cart is used, use caution when moving the
cart/apparatus combination to avoid injury from tip-over.
13. Unplug this apparatus during lightning storms or when unused for long
periods of time.
14. Refer all servicing to qualified service personnel. Servicing is required when
the apparatus has been damaged in any way, such as power-supply cord or
plug is damaged, liquid has been spilled or objects have fallen into the
apparatus, the apparatus has been exposed to rain or moisture, does not
operate normally, or has been dropped.
Please, record and retain the Model name and serial number of your set shown
on the rating label.
Model No. DN-X050
Serial No.
Additional Safety Information!
15.
I
Marked terminals are HAZARDOUS LIVE and that the external wiring
connected to those terminal requires installation by an instructed
person or the use of ready-made leads or cords.
DN-X050_for PDF 07.7.27 07.7.27 11:09 AM Page 3
0.DN-X050_Frontpageのコピー 07.7.26 9:47 AM ページ 2
NOTE ON USE
• Keep the apparatus free from moisture, water,
and dust.
• Do not let foreign objects in the set.
• Avoid high temperatures.
Allow for sufficient heat dispersion when
installed in a rack.
• Unplug the power cord when not using the
apparatus for long periods of time.
• Do not let insecticides, benzene, and thinner
come in contact with the set.
• Handle the power cord carefully.
Hold the plug when unplugging the cord.
* (For apparatuses with ventilation holes)
• Do not obstruct the ventilation holes.
• Never disassemble or modify the apparatus in
any way.
CAUTION:
•
•
•
•
•
The ventilation should not be impeded by covering the ventilation openings with items, such as newspapers, tablecloths, curtains, etc.
No naked flame sources, such as lighted candles, should be placed on the apparatus.
Attention should be drawn to the environmental aspects of battery disposal.
Do not expose the set to dripping or splashing fluids.
No objects filled with liquids, such as vases, shall be placed on the apparatus.
• DECLARATION OF CONFORMITY
We declare under our sole responsibility that this product, to which this declaration relates, is in conformity with the following standards:
EN60065, EN55013, EN55020, EN61000-3-2 and EN61000-3-3.
Following the provisions of 2006/95/EC, 2004/108/EC and 93/68/EEC Directive.
A NOTE ABOUT RECYCLING:
This product’s packaging materials are recyclable and can be reused. Please dispose of any materials in accordance with
the local recycling regulations.
When discarding the unit, comply with local rules or regulations.
Batteries should never be thrown away or incinerated but disposed of in accordance with the local regulations concerning
chemical waste.
This product and the accessories packed together constitute the applicable product according to the WEEE directive
except batteries.
CAUTION:
To completely disconnect this product from the mains, disconnect the plug from the wall socket outlet.
The mains plug is used to completely interrupt the power supply to the unit and must be within easy access by the user.
I
DN-X050_for PDF 07.7.27 07.7.27 11:09 AM Page 5
ENGLISH
2 INTRODUCTION
Thank you very much for purchasing the DENON DN-X050 DJ MIXER.
DENON proudly presents this advanced DJ MIXER to audiophiles and music lovers as a further proof of DENON’s noncompromising pursuit of the ultimate in sound quality. The high quality performance and easy operation are certain to
provide you with many hours of outstanding listening pleasure.
– TABLE OF CONTENTS –
z
x
MAIN FEATURES......................................................1
PART NAMES AND FUNCTIONS .............................2
2 ACCESSORIES
Please check to make sure the following items are
included with the main unit in the carton:
c
v
CONNECTIONS ....................................................2, 3
SPECIFICATIONS ......................................................4
q Operating instructions ..........................................1
w AC adaptor............................................................1
(AA-27 : for AC 230 V, AA-27-C : for AC 220 V)
1 MAIN FEATURES
1. 2-Channel DJ Mixer
4 LINE, 2 PHONO, 1 Microphone systems and 2
MASTER outputs are provided independently.
2. Channel Fader and Crossfader
3. Channel Fader and Crossfader contour adjustable
This feature allows adjusting the “shape” of the
Crossfader and Channel fader response from a gentle
curve for smooth to the steep pitch required for top
performance cut and scratch effects.
4. 3-Band Equalizer/Gain
LOW, MID, HI and GAIN controls are available on
every input channel.
5. 4 direction placement for input selector
1
DN-X050_for PDF 07.7.27 07.7.27 11:09 AM Page 6
ENGLISH
2 PART NAMES AND FUNCTIONS
(Refer to page II.)
(2) Rear panel
!7 AC inlet
(1) Front panel
q MIC LEVEL control
• Adjust the level of Mic signal.
w MIC BALANCED INPUT terminal
• Accepts an balanced microphone with 1/4” TRS
mono terminals.
• Pin layout: Tip=Hot Ring=Cold Sleeve=GND
e GAIN
• Adjusts the gain of each input channel.
r CUE buttons
• These buttons are used to activates a channels
“CUE” mode, the indicator above the cue button
will glow when cue mode is activated. Cue mode
will send a channels incoming signal to the
headphones.
t Source EQ controls
• Contour the frequency response of the selected
inputs.
HI:
• Adjusts the high-tone sound –19 dB to +10 dB.
MID:
• Adjusts the high-tone sound –26 dB to +10 dB.
LOW:
• Adjusts the high-tone sound –26 dB to +10 dB.
NOTE:
Clipping may occur if adjustments are set to harsh.
y Channel Fader
• Controls the channel output level.
u Crossfader
• Fades the overall mixer output between channels 1
and 2.
i Level meter mode select switch
• The position of this switch will determine the Level
Meter mode. In the “MASTER” position, the meter
will detail the out level of the left and right channels.
In the “PGM 1/2” position, the left side of the
meter will indicate monaural level of the PGM 1 and
the right side of the meter will indicate monaural
level of the PGM 2.
• Input connection for the included AC adaptor.
NOTE:
Use specified attached AC adaptor only.
o HEADPHONE output terminal
• Accept 1/4” stereo headphone plugs.
!8 Balanced MASTER OUT terminals
!0 PHONES LEVEL control
(BAL.)
• Adjusts the headphone output level.
• These 1/4” TRS terminals provide a balanced line
level output.
• Connect these terminals to the balanced analog
input terminals on an amplifier or console.
• Pin layout: Tip=Hot Ring=Cold Sleeve=GND
!1 Headphone PAN control
• This function allows you to monitor the CUE level as
well as the MASTER output in your headphones. A
CUE Level may only be monitored of the CUE signal
is selected.
• It changes the relative levels of the CUE and
MASTER mixed together in both ear cups.
!9 Unbalanced MASTER OUT terminals
• This stereo pair of RCA terminals provides an
unbalanced line level output.
• Connect these terminals to the unbalanced analog
input terminals on an amplifier or console.
!2 Input select switch
• Switches between the PHONO/LINE and LINE
inputs.
• When the lever of switch is vertical position, the
LINE2 or LINE4 input is selected.
• When the lever of switch is slope, the
PHONO1/LINE1 or PHONO2/LINE3 input is
selected.
@0 LINE2, 4 input terminals
• These stereo pair of unbalanced RCA terminals are
inputs for any line level device.
@1 PHONO1, 2 / LINE1, 3 input terminals
• These stereo pair of unbalanced RCA terminals are
inputs for a PHONO (RIAA) stage for magnetic
(MM) cartridges or a LINE stage suitable for any
device, such as a CD player.
!3 MASTER LEVEL control
• Adjust the level of the MASTER output.
!4 Level Meter
@2 PHONO1, 2 / LINE1, 3 switches
• The dual LED’s indicators are used to detail either
the master output level, a combination of the
master output level and the CUE signal level, or the
PGM1/2 monaural level.
(LN / PH)
• These switches change the input from PHONO to a
LINE level input.
• These switches set a LINE level input when
turntable is not connected.
!5 MASTER BALANCE control
• Adjust the L/R balance of the MASTER outputs.
NOTE:
Always be sure main power is shut off before change
the position of the Line Level Selector Switch.
!6 Power operation switch (POWER)
• Selects power “ON” or “OFF”.
@3 Phono ground screw (GND)
NOTE:
Whenever the power switch is in the OFF state, the
AC adaptor is still connected on AC line voltage.
Please be sure to unplug the cord when you don’t use
for along time.
• This screws provide a place to connect the ground
wire from a turntable.
• This terminal is exclusively for a turntable ground
and not a safety earth ground.
2
3 CONNECTIONS
Refer to the connection diagram below.
1. Make certain AC power is off while making
connections.
2. Quality cables make a big difference in fidelity and
punch. Use high-quality, audio cables.
3. Do not use excessively long cables. Be sure plugs and
terminals are securely fastened. Loose connections
cause hum, noise, or intermittents that could damage
your speakers.
4. Connect all stereo input sources. Then connect any
effects into the stereo effect, if used. Connect your
microphone(s) and monitor headphones. Make sure all
faders are at “zero” and the unit is off. Take care to
connect only one cable at a time. Pay attention to L and
R position of terminals, on both the DN-X050 and
outboard gear.
5. Connect the stereo outputs to the power amplifier(s)
and/or tape deck(s) and/or MD recorder(s) and/or CD
recorder(s). Plug the DN-X050 into AC power outlet.
NOTE:
Always switch on your audio input sources such as CD
players first, then your mixer, and finally any amplifiers.
When turning off, always reverse this operation by
turning off amplifiers, then your mixer, and then input
units.
DN-X050_for PDF 07.7.27 07.7.27 11:09 AM Page 7
ENGLISH
DN-D4500
DN-D4500
Turntable 2
Turntable 1
4
3
3
4
3 210
2
2
765
ANTI-S
765
ANTI-S
TING
KA
TING
KA
4
3 210
1
1
4
DN-X050
1/4” TRS
mono terminal
Balanced microphone
0
0
KEY ADJUST
KEY ADJUST
PITCH
PITCH
-12
-12
SLOW
BRAKE
SLOW
BRAKE
Quartz
Quartz
0
0
ON
OFF
POWER
ON
OFF
POWER
+12
+12
START
/STOP
START
/STOP
78
33
78
33
DP-DJ151 Digital
45
DP-DJ151 Digital
45
DN-X050
R
1/4” TRS terminal
L
R
Main balanced power amplifier
AA-27: for AC 230V
AA-27-C: for AC 220V
R
AA-27
or
AA-27-C
To power outlet
AC ADAPTOR
Main unbalanced power amplifier
NOTE:
Use specified attached AC
adaptor only.
3
L
L
L
R
R
L
L
R
DN-X050_for PDF 07.7.27 07.7.27 11:09 AM Page 8
ENGLISH
2 Stereo
20 kΩ/kohms
–14 dBV (200 mV)
Unbalanced RCA terminals
• EQ Control (Line):
Control Range
3 Bands
HI:
–15 dB to +10 dB (at 13 kHz), –19 dB to +10 dB (at 20 kHz)
MID: –26 dB to +10 dB (at 1 kHz)
LOW: –26 dB to +10 dB (at 70 Hz)
1 Mono
2 kΩ/kohms
–54 dBV (2 mV)
20 Hz to 20 kHz (±3 dB)
66 dB
Active Balanced 1/4” TRS terminal
Stereo
300 Ω/ohms
+4 dBm (1.23 Vrms)
20 Hz to 20 kHz (±2 dB)
LINE: Below 0.05 %
LINE: 85 dB
Over 75 dB
Stereo
1 kΩ/kohms
0 dBV (1 Vrms)V
20 Hz to 20 kHz (±2 dB)
LINE: Below 0.05 %
LINE: 85 dB
Over 75 dB
Active Balanced 1/4” TRS terminal
• Headphone Output:
Output Impedance
Level
Stereo
33 Ω/ohms
0 dBV (1 Vrms)
• Power Source:
AC 10 V 750 mA x 2
434 mm
88 mm
• Mic Inputs:
Input Impedance
Level
Frequency Response
S/N
• Master Output:
Balanced
Output Impedance
Level
Frequency Response
THD+N
S/N
Cross Talk
Unbalanced
Output Impedance
Level
Frequency Response
THD+N
S/N
Cross Talk
(600 Ω/ohms load)
482 mm
PHONO: Below 0.07 %
PHONO: 76 dB
Unbalanced RCA terminals
(10 kΩ/ohms load)
PHONO: Below 0.07 %
PHONO: 76 dB
(32 Ω/ohms load)
• Power Supply, Consumptions:
Europe, Asia, Oceania
AC 230 V ± 10 %, 50 Hz
(AC adaptor: AA-27)
China
AC 220 V ± 10 %, 50 Hz
(AC adaptor: AA-27-C)
• Unit Size
482 (W) x 88 (D) x 92 (H) mm
• Mass
2.5 kg
92 mm
24 mm
AC adaptor: 0.5 kg
✽ Specifications and design are subject to change without notice for purpose of improvement.
4
121.3 mm
• Line Inputs:
Input Impedance
Level
11 mm
Unbalanced RCA terminals
18.3
2 Stereo
47 kΩ/kohms
–50 dBV (3 mV)
15.2
• Phono Inputs:
Input Impedance
Level
17.9
4 SPECIFICATIONS
PROFESSIONAL BUSINESS COMPANY
http://www.dm-pro.jp
Professional Business Company, D&M Holdings Inc.
Printed in Japan 00D 511 4693 007