1
®
products with
products
withaawatertight
watertightreputation
reputation
WATER/DUST PROOF CD MEDIA
CONTROL CENTER
AQ-CD-4B
AQ-CD-4
WATER/DUST PROOF CD MEDIA CONTROL CENTER
PLEASE READ THIS INSTRUCTION MANUAL BEFORE
INSTALLATION AND OPERATION
AQ-CD-4B
AQ-CD-4
OWNERS MANUAL
SAFETY INFORMATION
CAUTION:
MOBILE CD PLAYER IS A CLASS I LASER PRODUCT. HOWEVER THIS MOBILE CD PLAYER USES
A VISIBLE/INVISIBLE LASER BEAM WHICH COULD CAUSE HAZARDOUS RADIATION EXPOSURE
IF DIRECTED. BE SURE TO OPERATE THE CD PLAYER CORRECTLY AS INSTRUCTED.
USE OF CONTROLS OR ADJUSTMENTS OR PERFORMANCE OF PROCEDURES OTHER THAN
THOSE SPECIFIED HEREIN MAY RESULT IN HAZARDOUS RADIATION EXPOSURE.
DO NOT OPEN COVERS AND - DO NOT REPAIR YOURSELF. REFER SERVICING TO QUALIFIED
PERSONNEL.
WARNING:
TO REDUCE THE RISK OF FIRE OR ELECTRIC SHOCK, AND ANNOYING INTERFERENCE, USE
ONLY THE RECOMMENDED ACCESSORIES.
THIS DEVICE IS INTENDED FOR CONTINUOUS OPERATION.
2
JUL12
www.aquaticav.com
Owners Manual - CD Media Control Center
Main Features..............................................................................4
AQ-CD-4B
CONTENTS
Disc Notes .................................................................................. 5
Disc Handling ............................................................................. 6
Installation .................................................................................. 7
Connections and 12-pin Harness ............................................... 8
Location of Controls ................................................................... 9
Function of Controls ................................................................... 10
Settings Menu ............................................................................ 11
Audio Menu ................................................................................ 16
Dual Zone Operation .................................................................. 17
Tuner Operation...........................................................................18
CD Operation ............................................................................. 21
MP3/WMA Operation ................................................................. 23
USB Operation ........................................................................... 25
iPod/iPhone Operation ............................................................... 26
Specifications ............................................................................. 29
Trouble Shooting ........................................................................ 30
www.aquaticav.com
3
Features
FEATURES
●• PLL
PLL synthesizer
Synthesizer stereo
Stereoradio
Radio
•● Automatic
memory
storing
Automatic Memory Storing
• CD/MP3/WMA player
● CD/MP3/WMA Player
• AM/FM radio
● Fold-down fascia panel
• Fold-down fascia panel
● USB interface
• USB interface
● iPod / iPone interface
• iPod / iPhone interface
●• Dual
Dual Zone/Dual
Zone/Dual Source
Source function
Function
●• Wired
Wired remote
Remoteready
Ready
(sold
separately)
(sold
separately)
●• Wireless
Wireless (RF)
(RF) remote
Remoteready
Ready
(sold
separately)
(sold
separately)
pre-outputs
●• Stereo
Left & Right
Stereo(4V)
4V pre-outputs for connection to external amplifiers
•● Subwoofer
output
Subwoofer output
●• Auxiliary
Auxiliary input
input
• 2x 12V Trigger
● Optional remote handles multi-function software
• Optional Remote Controls compatible with multi-function software
Compatible iPhone & iPod models:
4
www.aquaticav.com
AQ-CD-4B
MAIN FEATURES
SUPPORTED DISC
DISC TYPES
TYPES
SUPPORTED
● Compact Discs (CDs)
● CD Recordable (CD-R)
● CD Rewritable (CD-RW)
AQ-CD-4
AQ-CD-4B
DISC NOTES
SUPPORTED AUDIO FORMATS
● Playback CD-DA
● MP3
● WMA digital music files on CD-ROM.
MP3 and WMA:
Supported Sampling frequencies: 32kHz,44kHz,48kHz
Supported Bit-Rates:64-256kbps variable bit rate.
www.aquaticav.com
5
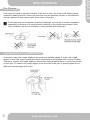
Disc Cleaning
DISC
CLEANING
Use a dry soft cloth to wipe the surface. If the disc is dirty, use a soft cloth slightly dampened with rubbing alcohol. Never use solvents such as benzene, thinner or conventional
record cleaners as they may scratch the surface of the disc.
A disc may become somewhat scratched (although not enough to make it unusable)
depending on the way it is handled and conditions in the usage environment. Note
these scratches are not an indication of any problem with the player.
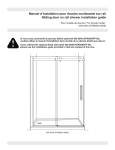
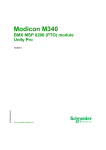
Preparing New
DiscsWITH
with ROUGH
Rough Spots
PREPARING
DISCS
SPOTS
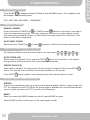
A new disc may have rough edges on its inside and outside edges. If a disc with rough
edges is used, the proper setting will not be performed and the player will not play the disc.
Therefore, remove the rough edges in advance by using a ballpoint pen or pencil as shown
on the right. To remove the rough edges, press the side of the pen or pencil against the inside and outside edges of the disc.
6
www.aquaticav.com
AQ-CD-4B
DISC HANDLING
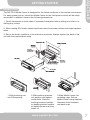
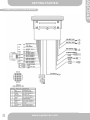
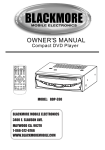
INSTALLATION
The AQ-CD-4 Media Center is designed for the harsh conditions of the marine environment.
For easy system set-up, mount the Media Center so the front panel controls will be easily
accessible. In addition, observe the following precautions:
AQ-CD-4
AQ-CD-4B
SYSTEM
GETTING
SET
STARTED
UP MENU
1. Check clearances on both sides of a planned installation before drilling any holes or installing any screws.
2. When routing RCA audio cables keep them away from power cables and output speaker
wires.
3. Due to the harsh conditions of the marine environment, Always support the back of the
unit with the supplied back strap.
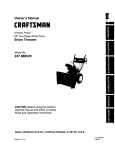
1.Slide mounting can
into DIN opening.
2.Slide backing brackets
into position and tighten
center bolts. Remove
backing brackets handles
by bending backet handles
by bending them until they
break off.
3.Slide Media Center into
mounting cage. Secure
Media Center using supplied
Stainless Steel hardware
and back strap.
www.aquaticav.com
7
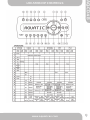
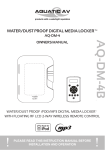
CONNECTIONS & 12-PIN HARNESS
8
www.aquaticav.com
AQ-CD-4B
GETTING STARTED
www.aquaticav.com
www.aquaticav.com
AQ-CD-4B
AQ-CD-4
LOCATION
LOCATIONOF
OFCONTROLS
CONTROLS
9
MAIN FUNCTION CONTROLS
POWER ON/OFF
Press the POWER
PANEL OPEN
Press OPEN
button to turn the unit ON or OFF
button to open the front panel/fascia and reveal disc slot.
MUTE
Short press the MUTE
button to mute the audio output and “MUTE” will appear on the
display. Press the MUTE button again to restore the audio output to the previous level.
MODE
MODE
Short press the MODE
button to cycle through the available modes of operation as
Short press the MODE
button to cycle through the available modes of operation as indiindicated on the display panel. Available modes are DISC, AUX, USB/IPOD, FM1, FM2, FM3,
cated on the display panel. Available modes are RADIO, DISC, AV IN, USB, IPOD.
AM1, AM2
VOLUME UP/DOWN
Press the volume up
or volume down
buttons to control volume to the desired level.
When the volume is adjusted the level is shown on the display panel as a number and
guage bar ranging from 00 (lowest) to 50 (highest).
12V DC EXTERNAL TRIGGERS
This unit has two buttons 12V trigger buttons named 12V-1 and 12V-2. These can be used
to transmit switching or ‘trigger’ signals, capable of driving 12VDC/350mA and operating relays for external equipment (not supplied) such as deck lighting etc.
The 2 triggers will be activated ON/OFF via the following.
● Trigger 1
● Trigger 2
: Short press
: Short press
RESET FUNCTIONS
To reset the main unit
Open the front panel/fascia and use a pencil or any non-metallic object to press & hold the
reset button for five seconds to reset the main unit and the unit will return to the factory default settings.
To reset the CD settings
When the CD is playing press AS/PS button to enter the Menu. Select DEFAULT then select
RESTORE and press ENTER to confirm. The CD Setting will resume to factory default
value.
Ejecting the Disc
Open the front panel and press the EJECT button to eject the disc. Close the front panel
manually.
10
www.aquaticav.com
AQ-CD-4B
FUNCTION OF CONTROLS
AQ-CD-4
AQ-CD-4B
SETTINGS MENU
SETTINGS MENU FUNCTIONS
● VOL PGM: Max is 20 volume
● LOC/DIST: Tuner settings for Local and Distance
● STEREO/MONO: Switch from stereo to mono output
● AREA: Tuner freq. Step spacing
● BEEP TONE: ON/OFF
● CONTRAST: Adjust display contrast
● DIMMER: Backlight High/Mid/Low
● LOW BATTERY: 10.5V low battery alert on/off
● RDS MENU: Tuner RDS mode ON/OFF
ACCESSING SETTINGS MENU
To access the SETTINGS menu press and hold the SETTINGS
seconds.
button more than 3
SETTINGS menu list will be displayed for 5 seconds on the LCD. If no other buttons are
pressed within the 5 second time-out the unit will exit the SETTINGS mode.
To navigate through the menu use VOLUME +/- buttons.
Press the ENTER button to select the item and enter into the sub menu.
To adjust the selected SETTINGS sub-menu item, press the VOLUME +/- buttons.
button to return to the preAfter the selected SETTINGS item has been changed press
vious item. If no other buttons are pressed within the 5 second time-out the unit will exit
SETTINGS mode.
www.aquaticav.com
11
DESCRIPTION
DESCRIPTION OF
OF SETTING
SETTINGSFUNCTIONS
FUNCTIONS
VOL PGM
Allows volume level to be set when the unit is turned on. VOL PGM 20 is the default setting.
Press the VOLUME +/- buttons to set to the desired VOL PGM level.
If in normal operation the volume is set louder than the VOL PGM value, the unit will revert
back to the set VOL PGM level when the unit is next turned on. If in normal operation the
volume is set lower than the VOL PGM value, the unit will maintain this level when next
turned on. Maximum VOL PGM level is 20.
LOC/DIST
Press the VOLUME +/- buttons to select LOCAL or DISTANCE mode. This feature is used
to determine the strength of the signals at which the tuner will lock on to during automatic
tuning. DISTANCE is the default setting, allowing the radio to tune into a broader range of
signals. To set the unit to select only strong local stations press the volume+/- button until
LOCAL appears in the display.
STEREO/MONO
STEREO is the default setting. User now has 5 seconds to adjust it from STEREO to
MONO by using SETTINGS OPERATION VOLUME+/- key.
AREA
“USA” is the default setting. User now has 5 seconds to select “USA” to “EUROPE” by
pressing the VOLUME+/-.
BEEP TONE
ON is the default setting. User now has 5 seconds to adjust from ON to OFF by pressing
the VOLUME+/- buttons.
CONTRAST
CONTRAST 5 is the default setting. The user has 5 seconds to change it from 0-10 by
pressing the VOLUME+/- buttons.
DIMMER
The dimmer feature of the display is set to DIMMER HIGH by default. User can use the
VOLUME+/- buttons to adjust it to High, Middle or Low.
LOW BATTERY ALARM
LOW BATTERY OFF is the default setting. User now has 5 seconds to use the VOLUME+/buttons to adjust it from OFF to ON.
If LOW BATTERY ON is selected the alarm unit will sound a beep tone over the speaker
output. The visual warning “LOW BATT” message will be displayed on the LCD. If selected
LOW BATTERY OFF no alert will be sounded and the “LOW BATT” message will not be displayed when in low voltage state.
12
www.aquaticav.com
AQ-CD-4B
SETTINGS OPERATION
1)
Traffic
Alert (TA)
RDS
- TRAFFIC
ALERT (TA)
TA SEEK is the default setting. User now has 5 seconds to select TA SEEK or TA ALARM by
pressing the VOLUME+/- buttons
TA SEEK
When a newly tuned station does not receive TP information for several seconds, the radio
retunes to next station which has not the same station (PI) as the last station, but has the
TP information. When TP information gets lost at the current station for retune time which is
set by RETUNE SHORT (30 sec.) or RETUNE LONG (90 sec.), the radio start to retune to
next same PI station. When same PI station does not catch in 1 cyclic search, the radio retunes to next station with TP information.
AQ-CD-4
AQ-CD-4B
SETTINGS OPERATION - RDS MENU
TA ALARM
When this mode is selected any automatic retune mode is not activated. Only double beep
sound (ALARM) is output.
When a newly tuned station does not have TP information for several seconds, beeps come
out. When TP information gets lost at the current station for retune time, the beep sound is
out-putted. When newly tuned station has not RDS signal PI SEEK is suppressed somewhat.
2)
Program
Identification
RDS
- PROGRAMME
IDENTIFICATION
PI MUTE is the default setting. User now has 5 seconds to select : PI MUTE to PI SOUND
by pressing the VOLUME+/- buttons.
While AF switching is implemented in C201 station, AF can switch to 100MHz, which is non
genuine AF (where, different PI with same AF) in short “DIP” with same AF) in short “DIP”.
The car radio has special procedure to reduce even this kind of unavoidable situation however there is a limit to be escaped from this serious case perfectly. In that serious case, 2
mode is selectable as follows:
www.aquaticav.com
13
PI SOUND
When above different PI sound (DIP) is heard once in a while, the DIP’s sound will be heard
for a short time.
PI MUTE
Under above same situation, a mute sound will be heard for a short time.
RDS
- RETUNE
3)
RETUNE
RETUNE SHORT is the default setting. User now has 5 seconds to select RETUNE SHORT
or RETUNE LONG by pressing the VOLUME+/- buttons.
The initial time of automatic TA search or PI search modes is selected.
When PI information is not caught for retune time, the radio starts to retune to next same PI
station. When same PI station does not catch 1 cyclic search, the radio goes to last station
and waits for several minutes until PI code is received.
RETUNE L mode: Selected as 90 seconds.
RETUNE S mode: Selected as 30 seconds.
4) MASK
RDS
- MASK
MASK DIP is the default setting. User now has 5 seconds to select MASK DIP to MASK ALL
by pressing the VOLUME+/- buttons.
The AF frequency (which has different PI or NO RDS signal with high field strength) is
masked during checking PI when the unit searches AF. The unit doesn’t search this AF
(DIP) for few minutes.
In the case of the AF of NO RDS signal with high field strength, if the real AF is wrongly
masked as DIP by some interference, the unit hesitates to search real Afs. For this reason,
the unit has the user option (MASK DPI) which doesn’t mask the AF of NO RDS signal with
high field strength.
In MASK DPI mode, the wrong sound or long mute (according to PI SOUND or PI MUTE)
can be heard from the AF station which has NO RDS signal and of which the field strength
is higher than that of the currently tuning AF (station). But, these phenomenons are rare and
the user will hardly Europe.
14
www.aquaticav.com
AQ-CD-4B
SETTINGS OPERATION - RDS MENU
MASK DPI
Masked only the AF which has different PI.
MASK ALL
Masked the AF which has different PI and NO RDS signal with high field strength. hear the
wrong sound in whole
AQ-CD-4
AQ-CD-4B
SETTINGS OPERATION - RDS MENU
RDS
- EON
5) EON
TA TA
EON TA LOCAL is the default setting. User now has 5 seconds to select EON TA LOCAL to
EON TA DISTANCE by pressing the VOLUME+/-.
EON TA LOCAL
When the filed strength level of EON linked is less than threshold level, the radio does not
switch that station, and a customer can hardly listen to any disturbances.
When EON TA LOCAL mode is selected, “EON TA LO” on numeric
display is indicated for a few seconds.
EON TA DISTANCE
EON TA switch is tried to implemented by the information of current station.
When EON TA DISTANCE mode is selected, “EON TA DX” on numeric display is indicated
for a few seconds.
The RDS data used are the PI, PS, AF, TP, TA, EON and PTY data.
RDS
TA VOL
6) TA-VOL
TA VOL 10 is the default setting. User now has 5 seconds to change it from 0-50 by pressing the VOLUME+/- buttons.
RDS
- REGION
7)
REGION
REGION OFF is the default setting. User now has 5 seconds to select REGION OFF to
REGION ON by press the VOLUME+/- buttons.
Some broadcasting stations change their program from normal broadcasting to regional
broadcasting for a certain time period. When in REGION ON mode the current listening program remains unchanged. When in REGION OFF mode it allows the reception moves to
the regional station.
www.aquaticav.com
15
AUDIO MENU
Short press AUDIO button to access the audio menu. User can navigate through the audio
menu items by pressing the VOLUME+/- button repeatedly. Once the desired menu item appears on the display, press the ENTER button to select the menu item to be adjusted and
adjust using the VOLUME+/- buttons within 5 seconds. Press
button to return to the
upper menu item.
BASS
User has 5 seconds to use the VOLUME+/- buttons to adjust the desired bass level range
from -10 to +10.
TREBLE
User has 5 seconds to use the VOLUME+/- buttons to adjust the desired treble level range
from -10 to +10.
BALANCE
User has 5 seconds to use the VOLUME+/- buttons to adjust the Balance between the right
and left speakers from 10R (full right) to 10L (full left). L=R represents equal balance between the right and left speakers.
FADER
User has 5 seconds to use the VOLUME+/- button to adjust the Fader between the front
and rear speakers from 10R (full rear) to 10F (full front). ”F=R” represents equal balance between the front and rear speakers.
SUBWOOFER MENU
SUB-W ON/OFF
Subwoofer off is the default setting. User now has 5 seconds to select OFF to ON by pressing the VOLUME+/- buttons.
SUBWOOFER FREQUENCY
User has 5 seconds to use the VOLUME+/- buttons to select the three different Low pass filters (80Hz,120Hz or 160Hz).
The Sub-woofer LPF control is only applicable if the unit is equipped with the optional
sub-woofer line out, and only if the unit is connected to an optional sub-woofer amp
and speaker.
SUBWOOFER VOLUME LEVEL
User has 5 seconds to use the volume up or down button to adjust the Sub-woofer volume
level from “00” to “50”
EQUALIZER MENU
User has 5 seconds to use VOLUME+/- to select desired audio mode. There are five
modes: OFF→FLAT→ROCK→POP→CLASSIC
16
www.aquaticav.com
AQ-CD-4B
AUDIO MENU
DUAL ZONE - AV INPUT
The unit can be connected to a portable audio player through the audio input cable on the
back of the unit. You can press MODE
button to change the mode to audio input mode.
The unit is equipped with Dual Zone operation. This function is used to select a different
audio output source for Front (Zone 1) and Rear (Zone 2) speakers. The details of Dual
Zone operation are as follows:
AQ-CD-4
AQ-CD-4B
DUAL ZONE OPERATION
DUAL ZONE - ON/OFF
button on the control panel and press the
OFF is the default setting. Press the 2-ZONE
VOLUME+/- button to select between Dual Zone ON or OFF then press ENTER to confirm
the selection. The “2-ZONE” icon will appear on the LCD after Dual Zone is selected ON.
DUAL ZONE - ZONE OPERATION
Once Dual Zone ON is selected short press the 2 ZONE
between the Zone 1(Front) and Zone 2(Rear) sources.
button repeatedly to change
If Front Zone (Zone 1) is selected the user has 10 seconds to navigate through the different
modes (Disc,
USB, AUX etc) by using
VOLUME
+/- buttons. buttons.
(Radio﹥Disc﹥USB﹥AUX
IN) the
by using
the VOLUME+/Press ENTER button to confirm selection for Front speaker audio output.
If Rear Zone (Zone 2) is selected, user has 10 seconds to navigate through different modes
(Radio﹥Disc﹥USB﹥AUX
IN) the
by using
the VOLUME+/(Disc,
USB, AUX etc) by using
VOLUME
+/- buttons. buttons.
Press ENTER button to confirm selection for Rear speaker audio output.
If no selection is made within 5 seconds the unit will resume to the previous mode.
OPERATE FUNCTION OF ZONE 1 / ZONE 2
When 2-ZONE is turned ON the MODE
Zone 2 sources.
Press MODE
button is used to change between Zone 1 &
button repeatedly to change between Zone 1 and Zone 2 modes.
DEFAULT SETTING WHEN ZONE 2 IS ON
The default source mode for Zone 1 is Radio & Zone 2 is Radio
The default volume level is 20 for both Zone 1 & Zone 2 audio outputs (or the volume level
set as VOL PGM level set in the Settings Menu detailed on page 11).
www.aquaticav.com
17
FM BAND OPERATION
Press BAND
to change between FM bands and AM (MW) bands. The reception band
will change in the following order:
FM1--FM2--FM3--AM1(MW1) --AM2(MW2)
TUNING UP / DOWN
MANUAL TUNING
Press and hold the TUNING up
or TUNING down
button for more than 3 seconds to
active the manual tuning mode. The radio frequency will tune up or down rapidly and will
stop when you released the button. If buttons have not been pressed for 5 seconds, it will
return to Auto Seek tuning mode
AUTO SEEK TUNING
Short press the TUNING up
or down
buttons to seek the next station automatically.
USING & STORING PRESET STATIONS
Six numbered buttons store and recall stations for each band
AUTO STORE (AS)
Select a band (if needed). Press and hold AS/PS
button for 3 seconds. It will select 6
strong stations and store them in the current band automatically.
PRESET SCAN (PS)
Scan stations stored in the current band. Select a band (if needed). Short press AS/PS
button. The unit will scan and listen to each preset station for 5 seconds.
Press AS/PS
button again to stop scanning when the desired station is found.
STEREO / MONO TUNER OPERATION
STEREO
The unit will automatically pick up a stereo signal when available. When in stereo mode, the
“ST” icon appears on the LCD. When no stereo signal is available the unit will automatically
revert to mono operation and “ST” icon will not be displayed.
MONO
When you select the MONO mode the unit will output MONO a signal.
Select MONO mode to reduce noise if the radio signal is weak.
18
www.aquaticav.com
AQ-CD-4B
AQ-CD-4
TUNER OPERATION
RDS FUNCTION
AF BUTTON
ON is the default setting for AF mode. “AF” icon is displayed on the LCD. AF search is activated when reception is bad.
AQ-CD-4
AQ-CD-4B
TUNER OPERATION
Press the AF button for more than 3 seconds to turn OFF AF mode and the “AF” icon will
disappear.
TA BUTTON
Press and hold the TA button for more than 3 seconds to turn on TA mode. The “TA” icon
appears on the LCD. Press the TA button again to turn off TA mode. ”TA” icon will disappear
on the LCD.
When traffic announcement is transmitted, regardless of the mode, traffic announcement is
received.
When TA is on SEEK, SCAN, AUTO MEMORY functions can be received or saved only
when traffic program identification code has been received.
When TA is ON traffic program identification code is not received during specified time. TA
ALARM : NO TA / TP is displayed and alarm is set off. TA SEEK : TA SEEK is activated.
PTY BUTTON
PTY is displayed when PTY button is pressed. If there are no keys pressed for 5 seconds,
previously selected PTY is searched. During 1 LOOP, i desired PTY is not found, NO PTY
SPEECH & MUSIC PROGRAM TYPES
Press PTY button
and “PTY MUSIC” will be displayed for 5 seconds
Press ENTER to access the PTY MUSIC program menu and use VOLUME+/- buttons to
cycle through the different program types as detailed below.
Press ENTER button to select the desired music type.
● POP MUSIC
● ROCK MUSIC EASY LISTENING
● LIGHT CLASSICS M
● SERIOUS CLASSICS
● OTHER MUSIC
● JAZZ MUSIC
● COUNTRY MUSIC
● NATIONAL MUSIC
● OLDIES MUSIC
● FOLK MUSIC
www.aquaticav.com
19
Press PTY
button then press the VOLUME+/- buttons to navigate to PTY SPEECH and
“PTY SPEECH” will be displayed for 5 seconds
Press ENTER button to access the PTY SPEECH program menu and use VOLUME+/- buttons to navigate the desired program types detailed below.
Press ENTER button to select the desired speech type.
● NEWS
● CURRENT AFFAIRS
● INFORMATION
● SPORT
● EDUCATION
● DRAMA
● CULTURES
● SCIENCE
● VARIED
● WEATHER
● FINANCE
● CHILDREN’S PROGS
● SOCIAL AFFAIRS
● RELIGION
● PHONE IN
● TRAVEL & TOURING
● LEISURE & HOBBY
● DOCUMENTARY
GENERAL TUNER OPERATION
AF: Alternative Frequencies
Frequency list of broadcasting stations transmitting the same program
TP: Traffic Program Identification
Identification data for traffic information-broadcasting station
TA: Traffic Announcement Identification
Identification data showing traffic information is being transmitted or not
PTY: Program Type Code
Contents of programs such as news, light music, sports etc
20
www.aquaticav.com
AQ-CD-4B
AQ-CD-4
TUNER OPERATION
PLAYING & CONTROLLING CDs
PLAY/PAUSE BUTTON
Press to pause playback.
AQ-CD-4
AQ-CD-4B
CD OPERATION
Press again to resume the playback.
FAST FORWARD & FAST REVERSE
or
Press and hold FAST FORWARD
for 3 seconds to fast forward through the disc.
Press PLAY
to resume normal playback.
Press and hold FAST REVERSE
for 3 seconds to fast reverse through the disc.
Press PLAY
to resume normal playback.
TRACK SELECT
or
Short press the TRACK UP
or TRACK DOWN
button to skip to the next or previous
track on the CD, The selected track number will appear on the display.
Press and hold Press the TRACK UP
or TRACK DOWN
button for more than 2
second to fast forward or fast reverse through the disc. CD play starts when the button is released.
REPEAT BUTTON
Short press RPT
peatly.
Press RPT
button to active the repeat function. It will play the current song re-
again to disable the repeat function.
ENTER BUTTON
Use this button to confirm selections.
www.aquaticav.com
21
PREVIEW/INTRO BUTTON
Press INT
LCD.
button to play first ten seconds of each track. “INTRO ALL” will appear on the
Press INT
displayed.
again to stop intro and listen to the track and “INTRO ALL” will no longer be
RANDOM PLAYBACK BUTTON
Short press RDM
Press RDM
button to active the random playback function
again to disable the random playback function.
SELECTING DIRECT UP / DOWN
Press DIR-
22
or DIR+
button to select up ten songs or down ten songs.
www.aquaticav.com
AQ-CD-4B
AQ-CD-4
CD OPERATION
PLAYING & CONTROLLING MP3/WMA FILES
TRACK SELECT
or
The player plays the first track automatically. When the track is finished the second track will
begin playing and the displayed track number will be updated.
AQ-CD-4
AQ-CD-4B
MP3/WMA OPERATION
Press the TRACK UP
or TRACK DOWN
button for less than one second to skip to
the next or previous track on the CD. The selected track number will appear on the display.
or TRACK DOWN
button for 2 seconds to
Press and hold Press the TRACK UP
fast forward or fast reverse through the disc.
PAUSE/PLAY BUTTON
Press to pause playback. Press again to resume normal playback.
FAST FORWARD & FAST REVERSE
or
Press FAST FORWARD
to fast forward through the disc. Each time the button is
pressed a new speed (2X,4X,8X or 20X) is selected.
Press PLAY
to resume normal playback.
Press FAST REVERSE
to fast reverse through the disc. Each time the button is
pressed a new speed(2X,4X,8X or 20X) is selected.
Press PLAY
to resume normal playback.
REPEAT PLAYBACK BUTTON
Press RPT
played.
button to active the repeat function. The current song will be repeatly
Press RPT
again to active the REPEAT DIR function. All files in the current folder will
be played repeatly.
Press RPT
a third time to disable the repeat function.
PREVIEW/INTRO BUTTON
Short press INT
button to play first ten seconds of each file in the current folder and
“INTRO DIR” will appear on the LCD.
Press INT
button for a second time to play first ten seconds of each file and “INTRO
ALL” will appear on the LCD.
Press INT
button for a third time to exit intro mode.
www.aquaticav.com
23
RANDOM PLAYBACK BUTTON
Press RDM
button to active random playback function and all songs on the USB will be
played in random mode.
Press RDM
a second time to active the RANDOM DIR function. All the songs in the current folder will be played in random mode.
Press RDM
a third time to disable random playback.
SELECTING DIRECT UP/DOWN
Press DIR-
or DIR+
button to select previous or next folder.
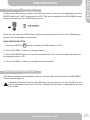
MP3/WMA OPERATION - MONITOR
When a MP3/WMA disc is inserted into the player and the following picture will appear on
the monitor.
NAVI SEARCH BUTTONS
When playing MP3/WMA discs press SEARCH
button to enter NAVI SEARCH.
Press the VOLUME+/- buttons to select MUSIC or PHOTO files and press ENTER to play.
NAVI SEARCH
Press SEARCH
button to view MP3/WMA folders on LCD.
Press VOLUME+/- buttons to select a folder and press ENTER button to enter this folder. It
will list all files of the folder on LCD.
24
www.aquaticav.com
AQ-CD-4B
AQ-CD-4
MP3/WMA OPERATION
Mode change
to USB memory
device
PLAYING
& CONTROLLING
USB
FILES
Connect the USB memory device to the USB connector of the unit and repeatedly press the
MODE button until “USB” is displayed on LCD. The unit can playback the MP3/WMA format
which are stored into the USB memory device.
AQ-CD-4
AQ-CD-4B
USB OPERATION
Once the unit reads the USB memory device successfully the first file on the USB memory
device will start playback automatically.
NAVI SEARCH BUTTON
1. Press the SEARCH
button to display the USB folders on LCD.
2. Press VOLUME+/- buttons to navigate folders.
3. Press the ENTER button to enter the selected folder. A list of all files within the folder will
be displayed on the LCD.
4. Press VOLUME+/- buttons to navigate to the desired file.
USB FILE
PLAYBACK
& OPERATION
PLAYBACK
AND OPERATION
USB device playback and operation functions are the same as the operation of MP3/WMA.
Please refer to page 23.
If important files are stored on the USB device do not connect it to the AQ-CD-4 unit to
play as operation could result in file loss. Aquatic AV assumes no responsibility for any
loss of data.
www.aquaticav.com
25
PLAYING & CONTROLLING iPod/ iPhone
SWITCH TO iPod/iPhone MODE
When the unit is powered ON and iPod/iPhone is connected to the 30 pin connector, press
the MODE button to change to iPod/iPhone mode and the unit will display “IPOD” then
“IPOD READING” shortly after. The music files contained in the iPod/iPhone will then automatically playback.
TURNING iPod/iPhone POWER ON/OFF
The iPod/iPhone power turns on automatically as soon as it is connected to the 30 Pin
connector and so long as the power is ON.
The iPod/iPhone power can be turned OFF by removing the iPod from the 30 Pin Connector
or if the AQ-CD-4B
AQ-CD-4 is turned OFF. Under this condition the iPod/iPhone will initially go into
pause mode and then into sleep mode approximately two minutes later.
While the iPod/iPhone is connected the power can not be turned on/off from the
iPod/iPhone itself.
26
www.aquaticav.com
AQ-CD-4B
AQ-CD-4
iPod & iPhone OPERATION
iPod/iPhone CHARGING
andiPod/iPhone
in iPod mode,
iPod/iPhonestart
will re-charging,
automaticallyso
start
While connected to the unit the
willthe
automatically
long as
re-charging,
long
as the
AQ-CD-4B
has power
switch
Enough battery
mustonbethe
the
AQ-CD-4so
has
power
ON.
Enough battery
power
mustON.
be available
to turn ON
available to turn
on the
in order to allow charging.
iPod/iPhone
in order
to iPod/iPhone
allow chargeing.
AQ-CD-4
AQ-CD-4B
iPod & iPhone OPERATION
DISPLAY iPod/iPhone INFO ON LCD
The AQ-CD-4 unit can display the Song, Artist, Album name and elapsed time on the LCD
display during iPod/iPhone playback.
SEARCHING IPod/IPhone
In the iPod/iPhone playback mode press BAND
searching mode
to enter into the iPod/iPhone NAVI
Use the VOLUME+/- buttons to navigate and press the ENTER button to enter iPod/iPhone
search methods as below:
1)
2)
3)
4)
5)
6)
7)
8)
Playlists
Artists
Albums
Genres
Songs
Composers
Audiobooks
Podcasts
Once the desired searching method is highlighted, and within 20 seconds, press the
ENTER button to confirm and enter the chosen search mode.
Press the VOLUME+/- buttons to navigate through the Albums, Artists, Songs etc contained
in the iPod/iPhone.
Press the ENTER button to confirm and play the selected song
During the searching mode press BAND
Playlists, Genres etc.
to move back to the last upper level of Albums,
SKIP SONGS
Short press the TRACK UP
ous song on the iPod/iPhone.
or TRACK DOWN
buttons to skip to the next or previ-
FAST FORWARD / FAST REVERSE
Press and hold Press the TRACK UP
or TRACK DOWN
seconds to fast forward or fast reverse through the song.
www.aquaticav.com
button for more than 2
27
PAUSE/PLAY BUTTON
Press to pause playback. Press again to resume normal playback.
PREVIEW/INTRO BUTTON
Press INT
the LCD.
button to play first ten seconds of each file and “INTRO ALL” will appear on
Press INT
button again to exit this mode.
REPEAT PLAYBACK BUTTON
Press RPT
is disabled.
button to repeat play the current song. The song will repeat until repeat play
Press RPT
again to disable the repeat function.
RAMDOM PLAYBACK BUTTON
Press RDM
button to enter random play of all songs on the iPod/iPhone.
Press RDM
again to disable the random function.
28
www.aquaticav.com
AQ-CD-4B
AQ-CD-4
iPod & iPhone OPERATION
CD Section
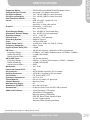
SPECIFICATIONS
Supported Media:..........................CD/iPod/iPhone/USB/MP3/AM/FM Media Center
Compatible Disc/Format.......... See page 5 for more detailed description
Compatible Disc/Format:..............See page 5 for detailed description
iPod/iPhone Ready:.......................Yes - via AQ-USBIP-6 cable (included)
CD Section
Signal
to Noise
Ratio................
﹥80
iPod/iPhone
Charging:..................
Yes
- viadB
AQ-USBIP-6 cable (included)
CompatibleResponse...............
Disc/Format.......... 20Hz
See page
5 for +/-3dB
more detailed description
Frequency
to 20kHz
Dual Zone/Dual Source:................Yes
Channel
Separation.................
2 Channel(Stereo)﹥60dB@1kHz
Inputs:............................................ USB
2.0 cable - female (5V, 1A)
Signal to Noise Ratio................
﹥80
Aux
- 2xdB
RCA
Frequency
Response...............
20Hz
20kHz Jack
+/-3dB
Audio
Section
Infra
Redto- 3.5mm
socket
Channel
Separation.................
2 Channel(Stereo)﹥60dB@1kHz
Max
output
power.....................
72W
x 4 -channels
(at 2 Ohms)
Subwoofer
1x RCA (2V)
Outputs:
........................................
Max load impedance................
2 Ohms
Aux
- 2x RCA (4V)
Audio
Line
outSection
level/load....................
4V/10K
ohm load
- AQ-WR-4F
(sold separately)
Wired
Remote
Ready:................... Yes
Max output
power.....................
72W
x 4 channels
(at 2 Ohms)
- AQ-RF-34
(sold separately)
Wireless
RF Remote
Ready:........ Yes
Max
load
impedance................
2
Ohms
Auxiliary
Input
Section
Operation Voltage:.........................10.7V - 15.6V DC
Line out
level/load....................
4V/10K
ohm
load
Frequency
response................
7A20Hz
(max),
(standby)
Current
Draw:................................
to17mA
20kHz
+/-3dB
Negative
Ground
Grounding
System:.......................
Input Maximum
Voltage............
1200mV
Auxiliary Input Section
15A mini ATM type
Fuse:..............................................
Frequency
response................
to 420kHz
45W @
Ohms,+/-3dB
4x 72W @ 2 Ohms
Output
Power
(max):..................... 4x20Hz
Radio
Section
Input Maximum
Voltage............
20Hz
- 20kHz
Frequency
Response:...................
1200mV
FM
80dB
Signal
to Noise
Ratio (CD):.......... > 87.5-107.9MHz(200KHz
Frequency
Range.....................
space) / 87.5-108MHz
18x
pre-setatmemory,
switchable US/Euro frequencies
FMUsable
Tuner:........................................
Radio
Section
Sensitivity.....................
≦15dB
S/N 30dB
(200kHz space) / 87.5MHz - 108MHz
Frequency
Range:........................87.5MHz
FM
Stereo
Separation....................
25dB at- 107.9MHz
1KHz
≤
15dB
(SNR
30dB)
Usable
Sensitivity:........................
Frequency
Range.....................
87.5-107.9MHz(200KHz
space) / 87.5-108MHz
S/N Ratio..................................50dB
Signal
to Sensitivity.....................
Noise Ratio:...................50dB
Usable
≦15dB at S/N 30dB
pre-set
memory
AM
or or
MWMW
Tuner:........................... 12x
Stereo
Separation....................
25dB
at 1KHz
AM
530kHz
1710kHz
(10kHz space) / 522kHz - 1620kHz
Frequency
Range:........................
S/N
Ratio..................................
50dB
Frequency Range.................... 530-1710(10KHz
space) / 522-1620kHz
≤ 40dB (SNR 20dB)
Usable
UsableSensitivity:........................
Sensitivity.....................
≦40dB
at
S/N
20dB
Signal
toMW
Noise Ratio:...................40dB
AM or
S/N
Ratio.................................
40dB
Yes - IP66
Waterproof:....................................
Frequency Range....................
530-1710(10KHz space) / 522-1620kHz
Yes
Conformal
Coated
PCB:...............
Usable Sensitivity..................... ≦40dB at S/N 20dB
General
ASTM D4329 compliant, 500 hrs stable
UVS/N
Protection:................................
Ratio.................................
40dB
Operating
Voltage.................... DC
10.7V
- 15.6V 500 hrs stable
B117 compliant,
Salt/Fog Protection:...................... ASTM
Grounding System................... Negative Ground
Certification:.................................. CE, RoHS, WEE, FCC
General
Fuse:........................................
15 Amp
Mini ATM Type
to 70°C
Operation Temperature:................-20°C
Voltage.................... -20℃
DChrs10.7V
- 15.6V
Operating
Temperature:...........
to 70℃
UV
stable, UL approved
Fascia Material:..............................500
Grounding
System...................
Negative
Ground
Unit
Mounting
Angle.................
﹤30° Steel
Chassis Material:...........................Stainless
Fuse:........................................ 15 Amp Mini ATM Type
Max Mounting Angle:....................30°
Operating Temperature:........... x 229 to
70℃
x 216
mm
Dimensions (HxWxD):...................90-20℃
Unit
Mounting
Angle.................
﹤30°
Accessories:..................................Protective Dust Cover AQ-SPC-4B (included)
Additional Features:......................4-line Dot Matrix LCD display
Adjustable LCD brightness
Back-up memory (EEPROM)
DSP EQ, Bass/Treble, Balance/Fader
2x 12V Trigger outputs
Stainless Steel mounting hardware
AQ-CD-4
AQ-CD-4
AQ-CD-4B
SPECIFICATIONS
Specifications are subject to change without notice.
www.aquaticav.com
29
Before staring the trouble shooting process:
1) Check all wiring connections are in good order.
2) Confirm the ‘2-zone’ feature is de-activated by pressing the ‘2-zone’ button on the
face of unit. The LCD will indicate 2-zone ON or OFF. If the LCD shows 2-zone is
ON, press the 2-zone button to switch to 2-zone mode OFF.
Trouble Shooting Guide
Problem
Test
Procedure
Failure to
power on
Check for +12V DC output from
power source.
Using a volt meter turn the setting of the volt meter to VDC.
Check black wire (ground) with one probe from the volt meter/
red wire (positive) with the other probe on the power supply.
Reading should be in range +11.6V DC to +14.7V DC output
from the power supply.
Check red, yellow and black power
wires are fully inserted into male
12-pin harness on source unit.
Push on the red, yellow and black wires to make
sure they are fully seated into the harness and will
make good connection to the female pins of the stereo.
Check for +12V DC across the red
and yellow fuses .
Using a volt meter set to VDC, insert the black (ground) probe
into the black wire on male harness. Using the red (positive)
probe on the volt meter check the fuse on the yellow wire,
located on the back of the stereo, by touching the terminal
on top of the fuse closest to the stereo. Reading should be in
range of +11.6V DC - +14.7V DC. Repeat these steps to test
the fuse on the red wire on the back of the stereo.
Check 12-pin wiring harness
components (male and female) are
connected properly and clicked in.
Check that male and female 12-pin harness have a good
connection and that the tabs on the side of the plastic 12-pin
harness are clicked in to prevent accidental disconnection.
$+#!$!%%%'+!$&!.'%
connection between male and female components.
Check for good connection with all
speakers.
With the stereo unplugged from the 12-pin connector, use a
("& &$%&&"& %&&!,&#$""
the meter into the grey/black striped wire on the female side
of the 12-pin harness. Place the red probe of the meter into
the solid grey wire. Readings below 2 Ohms or above 8 Ohms
indicate a problem or short in the line. Repeat test through all
speaker connections. Reconnect the stereo to the female 12#!$!%%!"!-$ &&&$+)&$!!#'$#
wires are fully and securely inserted in the 12-pin harness.
Check Audio options and settings.
Press the Audio button and use volume up (+) or volume
down (-) buttons to scroll through the audio options. Make sure
Balance is set to L=R and Fader is set to F=R. If either
option is not set as required, press volme up (+) or volume
down ( - ) to alter the setting.
Check for correct antenna
installation.
Make sure there is an antenna is correctly installed into the
the input labelled Antenna. Connect the antenna wires to
a metal structure (vehicle chassis for example) to improve
reception.
Check the Settings menu to make
sure that you are in the correct FM
Tuning Area
Hold down the Settings button for 3-5 seconds until the
Settings menu appears. Use volume down (-) button to scroll
down the menu to the AREA menu item and press ENTER.
Verify the correct FM tuning zone, either USA or Europe. Use
volume up (+) and volume down (-) to switch between USA
or Europe FM Tuning Areas.
Check disc for scratches and
imperfections.
Check the back of the disc for any scratches or rough edges
that may cause the disc to be unreadable. If scratches or
blemishes are present refer to Disc Handling section of this
user manual.
Verify the songs are the apprioiate
format
'%!"$($+&-*&!%&"!"&
%"!%-%"!&!"!&%
#
!
) -*&!%"!%$%'##"$&
Problem with
audio output
No FM radio
No CD functions
If any of the problems persist after checklist has been made consult your
nearest Aquatic AV service dealer.
30
www.aquaticav.com
AQ-CD-4B
AQ-CD-4
TROUBLE SHOOTING
FCC STATEMENT
FCC
FCCID:
ID:
MADE
MADEININCHINA
CHINA
This device complies with Part 15 of the FCC Rules. Operation is subject to the following two
conditions:
(1)complies
this devicewith
mayPart
not cause
harmful
interference,
and (2) this
device must
accept
This device
15 of the
FCC
Rules. Operation
is subject
to the
any
interference
received, including
cause
undesired
operation. and (2)
following
two conditions:
(1) this interference
device maythat
notmay
cause
harmful
interference,
this device must accept any interference received, including interference that may
NOTE:
cause
undesired
The
equipment
has operation.
been tested and found to comply with the limits for a Class B digital device,
pursuant to Part 15 of the FCC Rules. These limits are designed to provide reasonable protection
against
NOTE:harmful interference in a residential installation. This equipment generates, uses and can
radiate
radio frequency
energy
and, ifand
not found
installed
used with
in accordance
the
instructions,
The equipment
has been
tested
toand
comply
the limitswith
for a
Class
B digital
may
cause
harmful to
interference
radio
communications.
However,
there
is no guarantee
that
Part 15 oftothe
FCC
Rules. These
limits are
designed
to provide
device,
pursuant
interference
not occuragainst
in a particular
installation.
reasonablewill
protection
harmful
interference in a residential installation. This
generates,
uses
and can
radiate radio
frequency
energy
and,which
if not can
installed
Ifequipment
this equipment
does cause
harmful
interference
to radio
or television
reception,
be
determined
by turning thewith
equipment
off and on, may
the user
is encouraged
to try to correct
the
and
used in accordance
the instructions,
cause
harmful interference
to radio
interference
by one or
more of the
following
communications.
However,
there
is no measures:
guarantee that interference will not occur in a
installation.
•particular
Reorient or
relocate the receiving antenna.
• Increase the separation between the equipment and receiver.
this equipment
harmful
interference
to for
radio
or television reception,
•IfConsult
the dealerdoes
or an cause
experienced
radio/TV
technician
help.
which can be determined by turning the equipment off and on, the user is encouraged
The manufacturer is not responsible for any radio or TV interference caused by unauthorized
to try and correct
interference
by one or more
the the
following
measures:
modifications
to this the
equipment.
Such modifications
couldofvoid
user authority
to operate the
- Reorientate or relocate the receiving antenna.
equipment.
- Increase the separation between the equipment and the receiver.
- Consult the dealer or an experienced radio/TV technician for help.
This product incorporates copyright protection technology that is protected by method claims
The
manufacturer
is and
not other
responsible
forproperty
any radio
or TV
interference
caused
by
of
certain
U.S. patents
intellectual
rights
owned
by Macrovision
Corporation
and
other rightsmodifications
owners. Use oftothis
protection
must be
authorized
by user
unauthorized
thiscopyright
equipment.
Suchtechnology
modifications
could
void the
Macrovision
is intended for home and other viewing uses only unless otherwise
authority toCorporation,
operate theand
equipment.
authorized by Macrovision Corporation. Reverse engineering of disassembly is prohibited.
This product incorporates copyright protection technology that is protected by method claims of
certain U.S. patents and other intellectual property rights owned by Macrovision Corporation and
other rights owners. Use of this copyright protection technology must be authorized by Macrovision Corporation, and is intended for home and other limited viewing uses only unless otherwise
authorized by Macrovision Corporation. Reverse engineering or disassembly is prohibited.
iPhone, iPod, iPod touch and iPod nano are trademarks of Apple Inc., registered in the U.S. and
other countries.
Made for iPod and Made for iPhone mean that an electronic accessory has been designed to
connect specifically to iPod or iPhone respectively, and has been certified by the developer to
meet Apple performance standards. Apple is not responsible for the operation of this device or its
compliance with safety and regulatory standards. Please note that the use of this accessory with
iPod or iPhone may affect wireless performance.
Product design and specification subject to change without notice. E&OE.
Product
change
without
iPod anddesign
iPhoneand
arespecification
Trademarks subject
of AppletoInc,
registered
in notice.
the USE&OE.
and other countries.
Doc V6.1
www.aquaticav.com
31
Aquatic AV
282 Kinney Dr.
San Jose, CA 95112, USA
E-mail: [email protected]
US & Canada: 1 877 579 2782
International: +1 408 559 1668
Fax: +1 408 559 0125
w w w.aqua ti c a v. c o m
®
products with
withaawatertight
watertightreputation
reputation
products