1
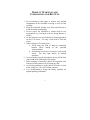
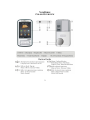
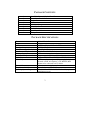
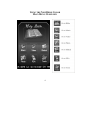
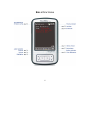
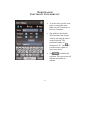
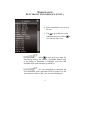
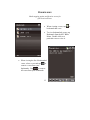
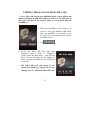
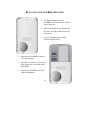
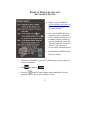
USER
MANUAL
THIS USER MANUAL CAN BE USED WITH ALL VERSIONS OF
THE NOWBIBLE COLOR.
TABLE OF CONTENTS
Product Warnings and Information for Best Use.......................1
NowBible Color Overview ........................................................2
Package Contents .......................................................................3
Package Specifications...............................................................3
Using the NowBible Color Main Menu Overview ....................4
Main Menu Navigation ..............................................................5
Bible Functions ..........................................................................6
Viewing Bible Verses ................................................................7
Word Search Electronic Concordance .......................................8
Bible Verse Quick Jump ..........................................................10
History .....................................................................................11
Bookmarks ...............................................................................12
Text Size ..................................................................................13
Bible Narration.........................................................................14
Highlighting .............................................................................15
Cross References......................................................................16
Setup Menu ..............................................................................17
Voice Notes..............................................................................18
Footnotes..................................................................................19
Reading Plans...........................................................................20
Bible Quiz ................................................................................21
Bible Promises .........................................................................22
Dictionary ................................................................................23
Entertainment Functions ..........................................................24
Transporting Files in USB Disc Mode.....................................24
Inserting a Micro SD Card.......................................................26
USB Disc Mode for the Micro SD Card ..................................27
Transferring MP3 Files to the NowBible................................29
Using Music .............................................................................30
Converting Video Files with the MP4 Converter Tool............32
Using Video .............................................................................33
i
Adding Photos to The NowBible .............................................34
Using Photos ............................................................................35
Using Sketch ............................................................................36
PDA Functions.........................................................................37
Contacts ...................................................................................38
Calendar ...................................................................................39
Task..........................................................................................40
Memo .......................................................................................41
Record......................................................................................42
World Clock.............................................................................43
Calculator.................................................................................44
Purchasing and Loading eBooks..............................................45
eBook .......................................................................................46
Tools ........................................................................................47
Backlight ..................................................................................48
Contrast....................................................................................48
Volume.....................................................................................48
Time/Date ................................................................................49
Alarm Clock.............................................................................50
On/Off......................................................................................51
Calibration................................................................................51
Software Updates .....................................................................52
Factory Settings .......................................................................52
Safely Removing the NowBible from Your PC.......................53
Charging the NowBible ...........................................................54
Battery Saving Tips..................................................................55
Replacing the NowBible Battery .............................................56
Product Registration and Software Updates ............................57
Backup Disc .............................................................................58
Troubleshooting .......................................................................59
Frequently Asked Questions ....................................................60
Warranty ..................................................................................65
Disclaimer and Limitation of Liability ....................................65
ii
PRODUCT WARNINGS AND
INFORMATION FOR BEST USE
1. Do not attempt to take apart or remove any internal
components of the NowBible as doing so will void the
warranty.
2. Keep the NowBible speaker away from metal objects to
avoid decreased sound quality.
3. Do not expose the NowBible to extreme high or low
temperatures (e.g., leaving it in the car during summer or
winter).
4. Do not attempt to use any chemicals or cleaning products
on the LCD screen. Use only a soft cloth to clean the
screen.
5. When using the LCD touch screen:
a. Avoid using any kind of sharp or potentially
harmful object instead of the provided
stylus/touch pen.
b. Avoid using excess force or pressure on the touch
screen.
Use only light strokes for making
selections.
6. In record mode, keep the microphone at least 10CM from
your mouth while speaking for best quality.
7. When inserting or removing a Micro SD expansion card,
first turn off the product to avoid losing any data.
8. Avoid using imitation or replica Micro SD cards, or cards
of the wrong size. This will void the warranty.
9. It is recommended to charge the battery regularly for
optimal product performance.
1
NOWBIBLE
COLOR OVERVIEW
2
PACKAGE CONTENTS
1
2
3
4
5
6
7
8
9
NowBible Color with Stylus/Touch Pen
Extra Stylus/Touch Pen
Earphones
USB Cable
USB Wall Charger
Vinyl Slip Case
User Manual
Quick Start Guide
Backup Disc
PACKAGE SPECIFICATIONS
Size
Weight
LCD
Data Speed
Max Power of Speaker Outlet
Max Power of Earphone Outlet
Memory Capacity
Multi-Media Expansion Cord
Music Player
Video Player
Battery Life
Temperature Guidelines
Operating Systems Supported
2.6” x 4.5” x 0.6”
112 g
3.2” 240 x 320 pixel 26K color TFT screen
USB 2.0 full speed
620mW (8 ohm)
(L) 15mW + 15mW (32 ohm)
4 GB
Supports up to 8 GB Micro SD Card
Supports ACC/ACC+, MP3/WMA/MIDI/WAV/AMR
AVI format player, supports full screen playback, fast
forward, rewind; unit requires 3 GP, MPEG4, MP4
formats to be converted to AVI format
6 hours maximum in play mode
Use only between 5°C - 40°C
Windows Vista/ME/2000/XP, Windows 98 (requires
installation process)
3
USING THE NOWBIBLE COLOR
MAIN MENU OVERVIEW
4
MAIN MENU NAVIGATION
For purposes of the
User Manual, the
menu to the left will
be referred to as the
KJV Bible Menu.
The title that appears
on your NowBible
will vary according
to the version you
own. Most verses in
the User Manual are
displayed in the King
James Version.
5
BIBLE FUNCTIONS
6
VIEWING BIBLE VERSES
Select the entire Bible
(All), the Old Testament
(Old), or the New
Testament (New).
Tap
to see book
names. Select the desired
chapter and verse
manually by using the
corresponding numbers or
.
arrows, then tap
For faster searching, click inside the
box beside Book and a keyboard will appear. Begin typing
the book name and the books beginning with that letter will
appear. Tap to select the book you want from the
alphabetical list that appears.
7
WORD SEARCH
ELECTRONIC CONCORDANCE
To search for a specific word,
select to search the entire
Bible, the Old Testament, or
the New Testament.
Tap inside the box beside
Word and enter the desired
word by selecting the letters
on the keyboard. The
maximum number of
to
characters is 20. Tap
switch between capital or
lower case letters.
8
Tap
to confirm the
selection. The next screen will
indicate the number of
matches.
WORD SEARCH
ELECTRONIC CONCORDANCE (CONT.)
Select a particular verse to view
the text.
Tap
to go to the next verse
containing that key word or
view the previous verse.
Select
to hear each verse from the
word search read by the narrator. NowBible features such
as the ability to bookmark or highlight verses are still
available when audio narration is turned on.
Are you struggling to remember the
verse associated with a particular word or phrase? Use the
word search to discover the verse you were thinking of.
9
to
BIBLE VERSE QUICK JUMP
“Quick Jump” to any verse in the Bible in seconds.
Tap the verse reference
at the top left corner
of the screen to access the Quick
Jump screen.
From the Quick Jump screen, select Old
Testament or New Testament.
Select the abbreviated book name.
Select the desired chapter and verse
manually by using the corresponding
.
numbers or arrows, then tap
10
HISTORY
Tap “Previous” or “Next” to see the last viewable verse
without losing your current place.
After using the Quick Jump to view a
to return to
particular verse, use the
the prior verse you were reading.
The history arrows
follow the same concept as the back button
on your internet browser. This is a
convenient way to skip back and forth
between visited passages. This is
particularly helpful while using the
NowBible at church, especially if your
pastor uses multiple texts in his sermons.
11
BOOKMARKS
Mark stopping points and favorite verses for
quick retrieval later.
When viewing a verse, tap
bookmark that verse.
To view bookmarked verses, tap
Bookmark from the KJV Bible
Menu. Double click on a
particular verse to view it.
When viewing the list of bookmarked
verses, select a verse and tap
to
remove a verse from your
bookmarks. Tap
to remove
all verses from your bookmarks.
12
to
TEXT SIZE
Increase text size to Large or Giant Print.
to
When reading a verse, tap
change the text size to large.
Tap
print.
Tap
again to return to standard
font size.
13
again to view the text in giant
BIBLE NARRATION
Press “Play” to turn on Bible narration; synchronized text
will scroll automatically. Press “Back” or “Forward” to
hear the next or previous verse.
To hear narration, tap
Tap
verse and
verse.
Do you want
to be inspired by God’s Word while
traveling or just sitting around the
house? Use the narration feature to hear
God’s word anytime.
14
.
to hear the previous
to hear the next
Tap
to view the volume
menu. Tap the arrows to
adjust the volume.
HIGHLIGHTING
Highlight important verses in 1 of 3 colors (Yellow, Blue,
Green). Press the highlighter icon, select color choice,
then touch verse text to highlight.
To highlight text when looking at a
verse, tap
. The screen below will
appear giving you the option of
selecting a particular color.
Select the color you want and tap the
verse text on your screen to highlight
the text.
and
To erase the highlighting, tap
then tap the text.
Color code
verses based on your needs by using
the highlighting tool. To label each
color, go to Highlights from the KJV
Bible Menu to see a list of all
highlighted verses. Click the box
under each color to assign that color a
name.
15
CROSS REFERENCES
When the R is “Black”, tap it to see additional Scripture
references that relate to the topic of the current verse.
on the verse screen
Tap
when it is black to see the cross
reference(s) associated with
that verse.
From the cross reference
screen, tap the desired verse to
view it.
In the example noted above, Matthew
6:9, The Lord’s Prayer, contains a cross
reference of Luke 11:2 – 11:4, which is
another Scripture reference pertaining to
The Lord’s Prayer.
16
SETUP MENU
Set auto-scrolling of text (when narration is off), Repeat
narration of a Verse, Chapter, or Book of the Bible, Record
a note about a verse, and turn the words of Christ in Red
On/Off.
To access the setup menu, tap
in the bottom right
corner of the screen.
Are you tired
of hitting the next button over and over?
Go to the setup menu, set the text to
scroll after a set amount of time, and
give your hands a rest.
17
Available options on the setup
menu include: setting the text
to manually scroll after a set
amount of time (when
narration is off) in addition to
repeating narration, recording a
note about the verse, or turning
off the red lettering feature.
VOICE NOTES
Record a voice note about the
verse being displayed.
To record a note about a
in
scripture, tap
the bottom right corner.
Tap
.
When you are ready to
record a note, tap
to begin recording.
Tap
to stop
recording.
To access recordings,
tap
or select
Voice Notes from the
KJV Bible Menu.
Working on a Bible study or lesson with
someone else? Record notes about the scripture or other topics to research.
Then, email the recorded file(s) to your co-worker the next time you
connect in USB Disc Mode.
18
FOOTNOTES
Some versions of the NowBible contain explanatory
footnotes indicated by an asterisk.
An asterisk will appear beside the
word or phrase when there is a
corresponding explanatory footnote,
and the asterisk symbol will also
appear next to the history arrows.
Tap
The footnote text will appear in a
popup window as illustrated by the
image to the right.
Tap
to close the footnote window.
19
to view the footnote.
READING PLANS
To access the reading plans, tap
Reading Plans from the KJV Bible
Menu.
The whole Bible plan is broken
down by day (recommended
option).
Old Testament plans are broken
down by month.
New Testament plans are broken
down by day.
Tap the correct date on the whole
Bible plan to see the passages
assigned to that day.
to return to the most recently
Tap
viewed verse.
Do you
want to read and study the Bible,
but are not sure where to begin?
Choose a reading plan that best
meets your needs whether you
have read the Bible many times or
if this is your first time.
20
BIBLE QUIZ
21
Select Bible Quiz under the
KJV Bible Menu to test your
knowledge.
Select a book of the Bible from
the list.
The first question will appear.
Tap the appropriate square
beside the desired answer. If
you answer correctly, the next
question will appear. An
incorrect answer will result in a
message indicating the correct
answer.
to view the
Tap
previous question and
to view the next question.
BIBLE PROMISES
Tap Bible Promises from the
Bible Menu to view all topics in
alphabetical order
Tap a topic from the list to view
the first verse.
Tap
beside each category
name to view the next category.
Tap
to adjust whether the text
scrolls manually or at a set speed.
In the bottom right corner,
shows that you are on verse 1 of 10 in
a particular category.
Use this
section as a quick reference to
answer questions that your friends
or colleagues ask you about a
particular topic. Allow them to
read the verses or tap
to listen
to them.
22
DICTIONARY
To search the Bible dictionary,
select Dictionary from the Bible
Menu. Then, tap Smith’s Bible
Dictionary or Easton’s Classic
Dictionary.
Scroll through the list, type an
entire word, or type the first few
letters of a word. Tap
or
to confirm the selection.
Use the arrows at the bottom of
the screen to scroll through all
terms in the dictionary.
23
ENTERTAINMENT FUNCTIONS
TRANSPORTING FILES IN USB DISC MODE
***The NowBible is a fully capable MP3 audio player, MP4 video
player, photo browser, and eBook reader. However, you must begin
by adding your own files in order to take advantage of all the
entertainment features that the NowBible offers.***
When the NowBible is off, connect it to your
PC using the included USB cable. Once the
NowBible is connected to your PC, you will
see the image to the left on the NowBible
screen.
Tap
.
After a few seconds, your computer may
display an “Auto Play” screen giving you the
option to “open folder to view files.” If this
screen does not automatically appear, you
can access the removable disc drive from
“My Computer” (XP or 2000) or
“Computer” (Vista) under the Start menu.
Note that the drive will vary depending on
the number of devices you have connected to
the USB ports on your PC.
24
TRANSPORTING FILES IN USB DISC MODE
(CONT.)
After completing these steps, you will see the following folders:
After adding the desired files to the NowBible (following the steps on
pages 29-35), follow the steps on page 53 of the User Manual to safely
remove the NowBible from your PC and exit USB Disc mode.
25
INSERTING A MICRO SD CARD
The NowBible features a Micro SD card slot that is
compatible with up to an 8GB Micro SD card allowing for
the additional storage of music, videos, photos and eBooks.
To insert a Micro SD card, turn the unit
over with the back facing you.
Move your thumb in the direction of the
arrow to slide up and remove the cover.
Use your thumbnail to “unlock” the latch by
moving it in a downward motion. The latch
will “click” when it is unlocked.
Flip the latch “downward” and insert a Micro
SD card. The arrow on the card should be
pointing “downward” and the grooves should
align with the slot on the NowBible.
Flip the latch “upward” and use your
thumbnail to “lock” the latch by moving it in
an upward motion. The latch will “click”
again when it is locked. Once the Micro SD
card is securely in place, place the cover back
on the Now Bible.
26
USB DISC MODE FOR THE MICRO SD CARD
***Use a Micro SD card to store additional music, videos, photos and
eBooks with up to an 8GB Micro SD card. However, it is necessary to
add your own files to the card in order to access them with the
NowBible.***
When the NowBible is off, connect it to
your PC using the included USB cable.
Once the NowBible is connected to your
PC, you will see the image to the left on the
NowBible screen.
Tap
.
Access the Micro SD slot from “My
Computer” (XP or 2000) or “Computer”
(Vista) under the Start menu. Note that the
drive will vary depending on the number of
devices you have connected to the USB ports
on your PC.
The Micro SD card will always be the
second port listed. (e.g. if ports (D:, E:) are
showing, the “E:” will be the Micro SD card.
27
USB DISC MODE FOR THE MICRO SD
CARD (CONT.)
It is necessary to manually create the following folders:
To create the folders, right click in the white background of the Micro
SD card folder and select “New” then “Folder.” Create four new
folders entitled: EBOOK, MUSIC, PHOTO, and VIDEO.
Copy the file or folder you want to load onto the Micro SD card by
right clicking on the file and selecting copy.
Right click in the white background of the appropriate folder on the
Micro SD card and select paste. Note: Paste Music files into the
Music folder, Video files into the Video folder, etc… (for additional
instructions refer to pages 29-35).
Once files have been added, follow the steps on page 53 of the User
Manual to safely remove the NowBible from your PC and exit USB
Disc mode.
Access files on the Micro SD card by tapping
or
within
Music, Video, Photo, or eBook.
Tap
to return to the internal memory of the NowBible.
28
TRANSFERRING MP3 FILES
TO THE NOWBIBLE
1. Turn the NowBible off and connect to your PC using the USB cable
. For more detailed
included with the NowBible. Tap
instructions on this step, please see page 24 of the User Manual.
2. Click on “My Computer” (XP or 2000) or “Computer” (Vista) on your
PC and locate the appropriate removable disc drive for your
NowBible. The drive will vary depending on the number of devices
you have connected to the USB ports on your PC.
3. Open the Music folder on the NowBible. Note that no music files
come preloaded on the NowBible so this folder will be empty.
4. Open the folder on your PC that contains your music files. Note that
the NowBible supports ACC, ACC+, MP3, WMA, MIDI, WAV, and
AMR file types.
5. Copy the audio file or folder you want to load onto your NowBible by
right clicking on the file and selecting copy.
6. Right click in the white background of the Music folder on the
NowBible and select paste. Note: If loading single songs, create a
new folder for each artist and drag and drop your file into the
corresponding folder.
7. Repeat these steps for all audio files or folders you want to load onto
the NowBible.
8. Follow the steps on page 53 of the User Manual to safely remove the
NowBible from your PC and exit USB Disc mode.
***A more detailed tutorial on transferring audio files to the Now
Bible can be found on our website under the “Tutorials” tab.***
29
USING MUSIC
To play music, tap Music from
the Main Menu.
Tap the artist to view all songs
on your NowBible by that artist.
Tap
to return to the list of
artists on your NowBible.
Tap the song title to begin
playing.
From the music screen, tap
to
delete a song, or tap
to delete
all songs.
Tap
to view a menu with
play mode options such as shuffle or
repeat.
30
USING MUSIC (CONT.)
From the play screen, tap
to view all songs by the artist
you are listening to.
To adjust the volume from the
play screen, tap
or
.
Tap
to adjust the equalizer.
Tap
to play. Tap
to
stop the song. Tap
or
to
play the previous or next song.
Tap
to hear
the corresponding part of the
song.
The NowBible offers the ability to play
audio files such as sermons and audio books as long as the audio
files are in a file format supported by the NowBible. See page 26
of the User Manual for a comprehensive list of supported file
types.
31
CONVERTING VIDEO FILES WITH THE
MP4 CONVERTER TOOL
1. Turn the NowBible off and connect to your PC using the USB cable
included with the NowBible. Tap
. For more detailed
instructions on this step, please see page 24 of the User Manual.
2. Click on “My Computer” (XP or 2000) or “Computer” (Vista) on your
PC and locate the appropriate removable disc drive for your
NowBible. The drive will vary depending on the number of devices
you have connected to the USB ports on your PC.
3. Open the MP4 Converter folder on the NowBible.
4. Double click on the MP4Tool-305E icon to begin installing the
software.
5. Follow the steps in the Setup Wizard until the installation process is
complete. The MP4 Tool should automatically open upon completion.
6. From the MP4 Tool, click “File” and then click on “Open Source.”
Locate the video you would like to convert on your hard drive and
double click on the file to select it.
7. Click on “File” and then “Select Target” to specify where to save the
converted file.
8. Click the “Convert” button. When the file is done converting, click
OK.
9. Copy and Paste the converted video files from the Select Target folder
into the NowBible Video folder.
10. Once all converted video files have been added, follow the steps on
page 53 of the User Manual to safely remove the NowBible from your
PC and exit USB Disc mode.
Consider creating a folder called “NowBible MP4
Videos” on your hard drive for storing all converted video files.
32
USING VIDEO
from the play screen to
Tap
return to the list of videos (as
shown to the right).
From the video screen, tap
to
to delete
delete a video, or
all videos.
33
To play videos, tap Video
from the Main Menu.
Tap the video you would like
to play to begin watching it.
to view the video in
Tap
full screen mode or tap the
screen.
Tap or to adjust the
volume or brightness.
ADDING PHOTOS TO
THE NOWBIBLE
1. Turn the NowBible off and connect to your PC using the USB cable
included with the NowBible. Tap the USB Disc Mode. For more
detailed instructions on this step, please see page 24 of the User
Manual.
2. Click on “My Computer” (XP or 2000) or “Computer” (Vista) on your
PC and locate the appropriate removable disc drive for your
NowBible. The drive will vary depending on the number of devices
you have connected to the USB ports on your PC.
3. Open the Photo folder on the NowBible.
4. Open the folder on your PC that contains your photo files. Note that
the maximum file size for photos is approximately 500 KB. You may
be able to load photos larger than this size onto your NowBible, but
you may not be able to view them in full screen mode.
5. Copy the photo you want to load onto your NowBible by right clicking
on the file and selecting copy.
6. Right click in the white background of the Photo folder on the
NowBible and select paste.
7. Repeat these steps for all photo files you want to load onto the
NowBible.
8. Follow the steps on page 53 of the User Manual to safely remove the
NowBible from your PC and exit USB Disc mode.
34
USING PHOTOS
Tap Photos from the Main Menu
to access photos.
Double tap an individual photo
to view the image in full screen.
to view the
Tap
images in a slide show. Specify
the amount of time between each
photo.
From the photo screen, tap
delete a picture.
Note that any sketches you have
created are accessed through the “My
Sketch” folder on the photo screen.
to
35
USING SKETCH
Tap Sketch from the Main Menu to
access the sketch feature.
to adjust the thickness of the
Tap
pencil. Note that the wider the tip, the
greater the accuracy of strokes.
Tap
to erase. Select the size of
the eraser and tap the text you would
like to erase until it disappears.
Tap
and
to save the file.
Tap
Use the keyboard to name the file.
to select the font color.
Tap
Note that any sketches you have created are accessed through the “My
Sketch” folder on the photo screen.
and
to delete a sketch.
To record a note that corresponds with your sketch,
tap
in sketch mode.
When you are ready to record, tap
recording. Tap
to stop recording. Tap
retrieve the recording later, tap
and
Then, tap
. To listen to the recording, tap
36
to begin
to close the record window. To
. Double click the sketch.
.
PDA FUNCTIONS
37
CONTACTS
Tap
from the contacts
screen to create, edit, or delete a
contact.
Use the
notes feature to store important
information about the person.
38
To view the contacts, tap
Contacts from the PDA Menu.
To add a new contact, tap
in the bottom left corner.
Complete the information using
the keyboard. Tap beside each
category to begin typing the
information. When finished,
.
tap
CALENDAR
To view the calendar, tap Calendar
from the PDA Menu.
To add a new entry, select
and New Calendar.
Tap beside each category to begin
typing the information. When
finished, tap
.
Tap
Tap
to move forward or
backward in the calendar. Select
week, month, or day to change the
mode.
Tap
an entry.
39
to return to today’s schedule.
to change the view or edit
TASK
To view the tasks, tap Task from
the PDA Menu.
To create a new task, tap
the bottom left corner.
Tap
a task.
Complete the information using
the keyboard. Tap beside each
category to begin typing the
information. When finished, tap
.
Under priority, select high (1),
normal (2), or low (3) and a
corresponding 1, 2, or 3 will appear
on the task screen.
Under status, select from the
available options to identify what
percentage of the task has been
completed. A corresponding square
will appear on the task screen.
40
in
to add, delete, or edit
MEMO
To view memos, tap Memo
from the PDA Menu.
To create a new memo, tap
in the bottom left corner.
Tap either the subject or the
event tab.
Complete the information using the
keyboard. When finished, tap
.
To delete a memo, tap
memo screen.
41
from the
RECORD
To access the record feature, tap
Record from the PDA Menu.
When you are ready to record, tap
to begin recording. Tap
to stop recording.
Choose whether you want to save
the recording. If you select yes,
use the keyboard to name your file.
Then, tap
Tap
from the record screen to listen
to the recording.
Tap
from the record screen to
rename the file.
Tap
from the record screen to
delete the file.
42
.
WORLD CLOCK
43
To access the world clock,
tap World Clock from the
PDA Menu.
Tap
to set your local
city, date, and time.
Tap
Tap
beside each
location or time zone to
change the location or time
zone displayed.
Tap
to return to the
previous menu.
to set the alarm.
CALCULATOR
To access the calculator, tap Calculator from the PDA
Menu.
44
PURCHASING AND LOADING EBOOKS
Several vendors exist for purchasing eBooks. Go to a search engine such as
www.google.com and type “buy eBooks” or “free eBooks” in the search box
to view a list of some of the websites that offer eBooks.
1. Turn the NowBible off and connect to your PC using the USB cable
2.
3.
4.
5.
6.
7.
8.
included with the NowBible. Tap
. For more detailed
instructions on this step, please see page 24 of the User Manual.
Click on “My Computer” (XP or 2000) or “Computer” (Vista) on your
PC and locate the appropriate removable disc drive for your NowBible.
The drive will vary depending on the number of devices you have
connected to the USB ports on your PC.
Open the eBook folder on the NowBible. Note that no eBook files come
pre-loaded on the NowBible so this folder will be empty.
Open the folder on your PC that contains your eBook files. Note that
eBooks must be in a .txt file format in order to be loaded on the
NowBible.
Copy the eBooks you want to load onto your NowBible by right clicking
on the file and selecting copy.
Right click in the white background of the eBook folder on the NowBible
and select paste.
Repeat these steps for all eBook files you want to load onto the
NowBible.
Follow the steps on page 53 of the User Manual to safely remove the
NowBible from your PC and exit USB Disc mode.
Adobe Reader offers the ability to save the text within a
PDF. When you have a PDF file open, select “File” and then “Save as text.” The
information will be converted to a .txt file format which can then be loaded on the
NowBible. Note that some PDFs are protected and do not offer the option of being
converted to text. The same concept applies to Word documents. Within Word,
select “File,” “Save As,” and change “Save as type” to “Plain Text.” Then, select
“Windows (Default).”
45
EBOOK
To access eBooks, tap eBook from
the PDA Menu.
Double tap the eBook you would
like to read.
Tap manual or auto scrolling at the
bottom of the screen. Tap the
to adjust the speed of the
automatic scrolling.
Tap
to bookmark the text. Use
the keyboard to label your bookmark.
Once a bookmark exists, tap
to
view a list of all bookmarks.
Tap
to enlarge the text.
Tap
to hide the toolbars.
46
TOOLS
47
BACKLIGHT
CONTRAST
VOLUME
Access the backlight, volume, and
contrast by selecting the appropriate
option from the Tools Menu.
Use the arrows to adjust.
Note that the volume setting on
the Tools Menu only controls the
volume of the alarm clock and
voice recordings.
48
TIME/DATE
To access the time and date, tap Time/Date from the Tools Menu.
Select the time zone.
Tap to highlight the hour or minutes and use the arrows to set the time.
Select the date on the calendar. Use the arrows to change the month.
Press OK once you have set the time and date. A popup will appear
that says “Time set successfully!”
49
ALARM CLOCK
To access the alarm clock, tap Alarm
Clock from the Tools Menu.
Note that there are three alarms available.
to move between the three alarms.
Tap
Tap on or off. Note that the alarm feature
works whether the NowBible is on or off.
Use the arrows to adjust the time.
Tap a specific day or select everyday.
Use the
to choose a
default ring or tap
song from your MP3 files (or a preloaded verse from the Ringtone
Select screen). From the Ringtone
Select screen, tap “Up One Level.”
Double tap “Music.” Tap the song
you would like to be your ringtone.
Tap
to preview the
.
ringtone. Then, tap
To use
a voice recording as your
ringtone, tap
. From the
Ringtone Select screen, tap “Up
One Level.” Tap “User.” Tap
“PDA Record,” select the file
name you would like to be your
ringtone, and then tap
.
50
ON/OFF
When manual is selected, the NowBible
must be turned on or off by the user
(recommended option).
The auto setting allows the user to specify
a set amount of time before the NowBible
will automatically turn off.
CALIBRATION
Setting the calibration for the NowBible Color
is important for best product use. Setting
calibration will ensure that the stylus is set to a
fixed position which will promote accuracy of
screen taps and faster menu navigation. If the
fixed position seems off or the screen is not
responding properly, set up calibration again.
Access the Calibration feature from the Tools
Menu.
51
SOFTWARE UPDATES
Please refer to pages 54 – 55 of
the User Manual for information
on software updates.
FACTORY SETTINGS
Restoring the factory settings will
restore the original settings of the
backlight, contrast, volume, and
on/off.
52
SAFELY REMOVING THE NOWBIBLE
FROM YOUR PC
Before disconnecting the NowBible from the USB cable, Left-Click on
the “Safely Remove Hardware” icon at the Bottom Right corner of your
screen (next to the clock):
The “Safely Remove Hardware” icon is the Green Left-Pointing Arrow
hovering over a Grey Disk.
(When the pointer is hovering over the correct icon, the words “Safely
Remove Hardware” will appear.)
Left-Click the “Safely Remove Hardware” icon.
Then Left-Click on “Safely Remove USB Mass Storage Device – Drives
(G:,H:)”
(***Please Note: These Drives may have different letters depending on
which USB port is occupied on your computer)
After doing so, a popup message will appear saying “Mass Storage
Device can now be safely removed,” and the NowBible screen will go to
the Main Menu.
53
CHARGING THE NOWBIBLE
Charging by PC with the USB Cable:
1. When the NowBible is turned off, connect it to a PC with the USB
cable, and the system/USB disc screen will appear. Turn off the
NowBible. The charging state will be shown on the screen as
indicated by the pictures below.
2. To use the NowBible while charging, connect it to a PC with the USB
cable, and select “System” from the screen that appears. The
NowBible will begin charging automatically, and can continue to be
used as normal.
Charging by Wall Adapter:
1. When the NowBible is turned off, connect it to the wall charger
adapter with the USB cable, and the system/USB disc screen will
appear. Turn off the NowBible. The charging state will be shown on
the screen as indicated by the pictures below.
2. To use the NowBible while charging, connect it to the wall charger
adapter with the USB cable, and select “System” from the screen that
appears. The NowBible will begin charging automatically, and can
continue to be used as normal.
54
BATTERY SAVING TIPS
The following tips will help prolong your battery life:
1. Adjust the backlight setting by going to Tools from the Main Menu.
Tap “Backlight” and adjust the amount of time before the backlight
automatically turns off. For example, setting the backlight to 30
seconds ensures that the screen will be turned off automatically after
30 seconds of inactivity. This is an excellent feature if you plan to
listen to the NowBible only, and not read from the screen.
2. Adjust the on/off setting by going to Tools from the Main Menu. Tap
“On/Off” to set the device to be turned off manually or after a
specified number of minutes if the NowBible is not in use. For
example, setting the “Auto off” to 15 means that the device will
automatically turn off after 15 minutes of inactivity. NOTE: The unit
will still turn off if audio narration is turned on. Only screen taps
and/or button presses will reset the internal timer.
3. Adjust the contrast by going to Tools from the Main Menu. Tap
“Contrast” and use the arrows to adjust the brightness of the screen.
As a general rule, the lower the contrast setting, the longer the battery
will last.
55
REPLACING THE NOWBIBLE BATTERY
To change the battery on the
NowBible, turn the unit over with the
back facing you.
Move your thumb in the direction of
the arrow to slide up and remove the
back cover.
Use your thumb to pop out and
remove the old battery.
Note that the NowBible requires a
3.7V li-ion battery.
Once the new battery is securely in
place, place the cover back on the
Now Bible.
Turn on the NowBible to test the
battery installation.
56
PRODUCT REGISTRATION AND
SOFTWARE UPDATES
Register your NowBible at
www.nowbible.com/register or
visit the “Product Registration”
tab on our website.
Once the NowBible has been
registered, you are eligible to
receive emails notifying you of
available software updates (or
you can periodically check the
“Software Updates” tab on our
website if you elect not to
receive email communications).
Download the available update
from our website.
Connect the NowBible to your PC by following the steps on page 24
of the User Manual.
Tap
Press the
button to enter upgrade mode and double click the
applicable update file on your computer screen.
and then tap
.
57
PRODUCT REGISTRATION AND
SOFTWARE UPDATES (CONT.)
A software wizard will pop up on your screen. Click next to go
through the software wizard.
Once the update has been installed, you will receive a message that
states, “New Software Upgrade Wizard Finished.”
Click finish to complete the software upgrade.
The NowBible screen will say “please reset”. Reset the device by
pressing the tip of the stylus into the reset slot on the back of the unit
to the left of the speaker (refer to the NowBible Color Overview on
page 2 of the User Manual).
Power the unit on and it should go to the Main Menu.
BACKUP DISC
The NowBible Backup Disc contains backup software for the internal
components of the NowBible. The disc is a DVD (not a CD) and requires
a DVD-Rom drive to be read on your computer. The disc is for restore
purposes only and is not required for normal use of the NowBible. All
software from the disc is already pre-installed on the NowBible unit which
means that the product will work out of the box. The backup disc is also
not necessary for the transfer of Music, Video, Photo, or eBook files. For
information on how to transfer Music, Videos, etc., see "Entertainment
Functions/Transporting Files in USB Disc Mode" on page 24.
58
TROUBLESHOOTING
Problem
Product will not turn on
Screen is Flashing
Cannot Play MP3 or
MP4
Cannot Hear Narration or
Music
Cannot Download or
Transfer Files
Suggested Solution
A. Low power, please charge the battery.
B. Press “Reset” with Stylus/Touch Pen.
A. Low power, please charge the battery.
B. Contrast could be too dark or light; adjust in Tools Menu.
A. Check format of songs
compatibility.
B. Check battery power.
and
video
to
confirm
A. Check volume setting.
B. Check battery power.
(Note: The built-in speaker is disabled when headphones are
connected.)
A. Check the USB cable for proper connection.
B. Check to see if internal memory is full or insufficient.
Cannot Charge Battery
A. Check the USB cable to ensure proper connection with PC
or Adapter.
B. Ensure that the battery is inserted correctly in its slot.
(Note: Product should be charged a minimum of once per
week, regardless of use, to keep the battery in working and
rechargeable condition.)
Recorded Note is
Garbled or Unclear
A. Check distance between mouth and microphone.
B. Make sure microphone is at least 10 CM from mouth
while recording.
USB Connection
Problems
A. Make sure the USB cable is fully inserted into the
NowBible and PC slots.
B. Make sure the device is formatted and your PC is using a
compatible Windows platform (Windows 2000 or later).
59
FREQUENTLY ASKED QUESTIONS
What is on the Backup Disc?
The backup disc is a recovery disc that contains all of the software that is
pre-installed on the NowBible. This disc is not required for the transfer of
files to the NowBible (such as MP3 Music, MP4 Video, Photos, or
eBooks). For additional information on the backup disc, please refer to
page 58 of the User Manual.
Do I need to install anything from the Backup Disc before using the
NowBible?
No, all NowBible software is pre-installed and the unit works right out of
the box. The backup disc will only be necessary if the unit becomes
damaged or if a problem develops with the software.
What Operating System does the NowBible use?
The NowBible uses custom software that is proprietary. It is independent
from any Palm or Windows based software that is common in other
PDA’s and electronic devices. The PDA Contacts section is also not
capable of importing address books used by any other devices or
programs.
60
FREQUENTLY ASKED QUESTIONS (CONT.)
Can I download other software and programs that I own to the
NowBible?
Since all NowBible programs use our own custom software, other
programs that are designed for Windows or Mac platforms will not be
compatible with the NowBible. Only custom software programs designed
specifically for the NowBible will be compatible. Any available software
updates or add-on
purchases would be available from
www.nowbible.com.
What are MP3's?
MP3 is a digital audio format that occupies only 1/10 of the memory of
audio CD’s. This file format can be played by certain digital audio
players, including the NowBible Color. Other forms of digital audio
include WMA and WAV files, of which some types can also be played on
the NowBible. The NowBible is compatible with any type of MP3 audio
file, including those downloaded from the internet or converted from an
audio CD. Note that songs downloaded from Apple/iTunes are in an M4P
format and therefore cannot be loaded onto the NowBible.
What are MP4's?
MP4 files, also known as MPEG-4, store digital audio and digital video
streams. The NowBible uses MP4 Video files that have been converted to
the .AVI extension, using the MP4 Converter Tool software that comes
pre-loaded on the device. All video types, even those that are currently
.AVI, must be converted using the MP4 Converter Tool software in order
to be viewed on the NowBible.
61
FREQUENTLY ASKED QUESTIONS (CONT.)
What are eBooks and where can I find them?
An eBook, or electronic book, forms the digital equivalent of a
conventional printed book. The NowBible is compatible with plain text
eBook files only, which is a .TXT file extension. Other common types of
eBook files include PDF and Word Documents, both of which can be
saved as plain text files for use on the NowBible Color. There are
thousands of websites that offer eBooks, many of which are free. A
Google or Yahoo search for “eBook” will reveal many such websites.
What is the internal memory capacity of the NowBible?
The NowBible Color features 4GB internal memory which is equal to
4,096 MB (or 1 Billion bits).
How much of the internal memory is consumed by the pre-installed
NowBible software?
In general, the NowBible software will take up approximately 2 GB of
space, leaving approximately 2 GB of free space remaining. This memory
can be utilized for adding MP3, MP4, Photo, and eBook files.
Can I use my own headphones or earphones?
Yes. In fact, a good pair of noise canceling headphones/earphones will
further enhance the NowBible listening experience.
62
FREQUENTLY ASKED QUESTIONS (CONT.)
Will I ever have to replace the battery?
Yes. The shelf life of the battery is for 500 full charge cycles. If product
performance begins to suffer from poor battery life, a replacement could
fix the problem. The NowBible is compatible with almost all brands of
lithium-ion batteries which are available at your local electronics
retailer. The battery and Micro-SD card compartment can be opened at
the back of the unit. Follow the steps on page 56 of the User Manual to
replace the battery.
Do you offer accessories for the NowBible such as protective cases,
arm bands, and car chargers?
Yes. Accessories for the NowBible can be found on our website,
www.nowbible.com, as they become available.
Can I download more than one bible translation onto my NowBible?
At this time, the NowBible is limited to one translation per unit. The
NowBible’s 4GB capacity could potentially be upgraded to have an
additional translation in the future. Potential upgrades would be available
for purchase as a download from www.nowbible.com, or on CD-Rom
from NowBible retail outlets.
63
FREQUENTLY ASKED QUESTIONS (CONT.)
When will there be software updates available?
As they become available, software updates can be found on the “Software
Updates” tab of our website. Software updates would include bug fixes
and enhancements to the existing software, and may also be utilized by the
NowBible Technical Support team.
What is the maximum file size on photos?
The maximum file size per photo is approximately 500 KB (1600 x 1200).
You may be able to load photos larger than 500 KB onto your NowBible,
but you may not be able to view them in full screen mode.
***Additional FAQ topics may be added from time to time on our
website.
64
WARRANTY
The NowBible includes a one year manufacturer warranty against defects
in hardware or software for all registered products. At this time, we do not
offer an extended warranty or accident insurance.
Actions that will void the warranty include, but are not limited to, the
following:
1. Attempting to take apart or remove any internal components of
the NowBible;
2. Using imitation or replica Micro SD cards, or cards of the wrong
size;
3. Using an object other than the provided stylus for touch screen
operation; and
4. Attempting to charge the NowBible with any wall charger not
specifically designed for use with the NowBible.
DISCLAIMER AND LIMITATION OF
LIABILITY
Zhongshan Highyes electronic company and Danteck Group Inc. retain the
rights to expand and/or revise this User Manual. To avoid losing or
erasing personal data, it is recommended to back up all personal files to a
PC or external storage device. Responsibility for any lost, destroyed, or
corrupted data through user operation such as during file transporting,
battery charging, or as the result of product misuse shall be assumed by
the customer.
65
DANTECK GROUP, INC.
www.nowbible.com
(888) 713-2146