1
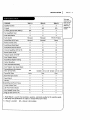
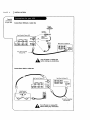
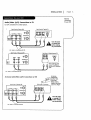
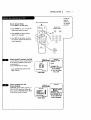
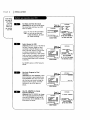
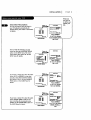
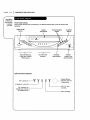
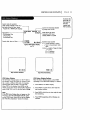
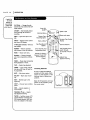
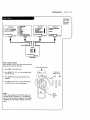
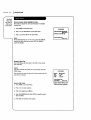
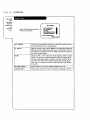
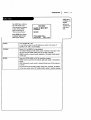
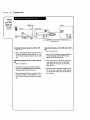
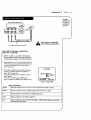
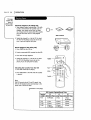
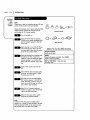
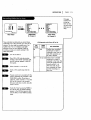
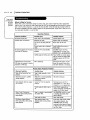
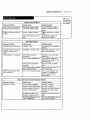
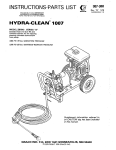
_211
0
Re
Co
z e n i t h_enterta|
nment
mach|
nes
RECORD
YOUR
MODEL
NUMBER
(Now,whileyoucanseeit)
|
/
The modeland serialnumberofyour newVCRare Located
on the backof the VCRcabinet.Foryourfuture convenience,
we suggestthat you record these numbershere:
SAFETY TIPS:
MODEL NO.
Refer to the "Safety Tips" Leaflet that
came with your product for Important
SERIAL NO.
Safety Instructions.
WARNING
WARNING:
TO REDUCETHE RISKOF ELECTRIC
SHOCK DO NOT REMOVE COVER (ORBACK).NO USERSERVICEABLEPARTSINSIDE.
REFERSERVICINGTO QUALIFIEDSERVICEPERSONNEL.
TheLightning
flash
witharrowhead
symboL,withinan equiLateraL
triangle,
isintended
toalert
theusertothepresenceofuninsuLated
"dangerous
voltage"
withintheproduct's
enclosure
thatmay be ofsufficient
magnitude
to constitute
a risk
ofelectric
shocktopersons.
TheexcLamationpoint within an equilateral triangle is intended to alert the user to the presenceof important operating and maintenance (servicing)instructionsin the literatureaccompanying
the appliance.
i
WARNING:
TOPREVENT
FIREOR SHOCKHAZARDS,
DO NOTEXPOSETHISPRODUCTTORAINOR MOISTURE.
POWER
CORD POLARIZATION:
CAUTION:To Prevent
ELectric
Shock,matchwidebladeofplugto wideslot,
fuLLy
insert.
ATTENTION:Pour _viter teschocs _Lectriques,introduire la tamela pLusLargede Lafiche dansla bome
correspondante
de Laprise et pousserjusqu'aufond.
NOTETO CABLE/IV INSTALLER:
This reminderis provided to caLLthe cableTV systeminstaLLers
attention to ArticLe820-40 of the NationaLELectric
Code(U.S.A.). Thecode providesguidelinesfor propergroundingand,in particular, specifiesthat the cableground
shaLL
be connectedto the grounding systemof the buiLding,as closeto the point of the cableentryas practicaL.
REGULATORY INFORMATION:
Thisequipmenthasbeentested
and foundto complywiththeEmitsfora CLass
B digital
device,
pursuant
to Part15
oftheFCCRuLes.
TheseLimits
aredesigned
to provide
reasonable
protection
against
harmful
interference
when the
equipment
isoperated
ina residentiaL
instaLLation.
Thisequipmentgenerates,
usesandcanradiate
radio
frequency
energyand,ifnotinstaLLed
andusedinaccordance
withtheinstruction
manuaL,may causeharmfulinterference
to
radiocommunications.
However,
thereisno guarantee
thatinterference
wiLLnotoccurina particular
instaLlation.
If
thisequipmentdoescauseharmfuL
interference
to radio
ortelevision
reception,
whichcanbe determined
byturning
theequipmentoffandon,theuse_isencouraged
totryto correct
theinterference
by oneormoreofthefoLLowing
_.
measures: • Reorient
orrelocate
thereceiving
antenna.
_. Increase
theseparation
betweentheequipmentandreceiver.
• Connecttheequipmentintoan outlet
on a circuit
different
fromthattowhichthereceiver
is
connected.
• ConsuLtthe dealeror an experiencedradio/TV technician for help.
CAUTION:
Do not attempt to modify this productin any way without written authorizationfrom Zenith ELectronics
Corporation. Unauthorizedmodification couldvoid the user'sauthorityto operate this product.
This class B digital apparatus meets aLLrequirements of the Canadian Intefference-Causin 9 Equipment
ReguLations.
"Ce appareit num_ffque de [a class b respecte toutes tes exigences du R_guLementsur te materiel brouiLtier
du Canada."
INSTALLATION
I
PAGE
3
This page
shows the feaFEATURES
VRA211
VRA411
VRA421
SpeakEZ Function
X
X
X
2-Heads
X
N/A
N/A
N/A
X
X
FullLoad/QuickStart
X
X
X
Auto Head CLeaner
X
X
X
tures of your
VCRand the
differences
betweenthe
models
m-
4-Heads(Special
Video Effects)
Audio System
Monaural
Monaural
Audio/Video (A/V) 3acks
MTS Hi-FiStereo
Monaural
Monaural
Stereo
Remote Control
SC411
X
X
X
Auto/ManualBand Select
X
X
X
Auto/ManualChannelSearch
X
X
X
181
181
181
RecordSpeeds SP/EP
X
X
X
PlaybackSpeedsSP/LP/EP
X
X
X
Auto PlaybackSystem
X
X
X
Auto/Manual Digital Tracking
X
X
X
Instant Recording
X
X
X
Timer-Controlled Recording
X
X
X
Auto Playback Tape Speed Adjust
X
X
X
ChannelCapability
(CATV & TV)
Forward/ReverseSlow-Motion
Video (4-head VCR)
Pause/Still
Video
-
N/A
Noise
X
X
Variable 1/10 to 1/32 Variable 1/10 to 1/32
Clear
Clear
Real-TimeTape Counter
X
X
X
Speed Search
X
X
X
CM Skip "
X
X
X
X
X
X
1-Year,
8-EventTimer
X
X
X
LED FrontPanelIndicator
X
X
X
Auto Daylight
SavingTime
_X
X
X
Hook-up Cable(VCR to TV)
X
X
X
Eng[ish-/Spanish/French
Menus
1. Model VRA421 is used for the description, operation, and details provided in this operating guide.
2. VCRdesign and specifications are subject to change without prior notice.
X = Feature is provided
N/A = Feature is Not Available
J
J
PAGE
+4
I INSTALLATION
f
Required
connections
for your VCR
Connections Without a Cable Box
Tum
offmaking
power any
or unplug
VCR
before
connections.
Connections With a Cable Box
Tum
offmaking
power any
or unplug
VCR
before
connections.
INSTALLATION
I
PAG E 5
OpUonal
connections
for your VCR
Audio/Video (A/V) Connections to TV
Use A/V connections for a better picture.
Back Panelof Stereo VCR
BackPanel of Typical TV
@
ANT
IN
VHFiUHFICATV
or unplug VCR
um off power
before making
any connections.
A
A/V cableis not providedwith VCR.
Back Panel of Monaural VCR
BackPanelofTypicaLMonauralTV
VHF/UHFICATV
IN
Note:If the backpanel
onyourTVis different,
referto the T!i'soperating
9uide.
A/V
cable is not provided
with
Accessory Audio/Video
VCR.
(A/V)
Back Panelof Stereo VCR
Accessory
Component:
Another VCR,
Camcorder,
Video Camera,
Connections to VCR
Jack panel of Accessory
Satellite Receiver,
Laser Disc P|ayer
VHF/UHFiCATV
A
A/V
came is not provided with
orum
unplug
VCR
off power
before malting
any connections.
VCR.
J
PAGE
6
I INSTALLATION
f
Thingsyou
must do
before you
can operate
yourVCR
PROGRAM
0
,u,o
o: K: L:ON
SETUPM_U
MONTH:
lION BOFF
:
:
STOP
:
CHANNEL
SPEED
REPEAT
MANUAL CLOCK SET:_
Pressnumber
DAY
START
keY_T" =ex.
Iq.AYBACK:
CH. ADD/DEL:
SOURCE:
ON-SCREEN DISPLAY:
AUTOPROGRAM:
LANGUAGE SELECT:
:
:
:
(14)
to select program
ENTER to adjust program
RECORD:
Press number keys
Press number keys
QUIT =exit
TIMER
CLOCK
AUDIO MENU
Sp_kEZ:
ONlION mOFF
then ENTER
SETUP
Press NUMBER (1, 2, 3, 4)button
SpeakEZ
Note:
Audio menu's PLAYBACK
and
RECORD
options are avaiLableonLy
with stereo VCRs.
tIMER
SETUP
AUDIO
Press number keys
QUIT: exit
MAINMENU
Connect the Power
(Required) PLugyourVCRinto an unswitched
120 Vac, 60 Hz householdpoweroutlet. Turn
on the VCRby pressingthe POWERon the
remote or on the VCR'sfront paneL.
_
SWITCH
WALL
o not outlet.
plug the
VCRinto when
a switched
power
Otherwise,
the
power is switched oj_, the VCR turns
oj_. You may then hove to reset the
time and date, and reprogram opera-
OUTLET
POWER
tional features.
TYPICALZENITHVCR
Set Position of the CH3/CH4 Switch
(Required) The CH3/CH4switch on the VCR's
back panel determineswhich channelthe VCR
usesto sendvideo signalsto yourTV. TheTV
must be tuned to the samechannelyou set
with the CH3/CH4switch to seetape playback andstatus displaysfrom the VCR.To
determine which video channelprovidesthe
best picture for your system,try the switch
in CH3 position and tune yourTV to channel e,
3; then try the CH4 position andtune your
TV to channeL4.
For a test display,pressTV/VCRon remote
repeatedly unULthe VCRindicator appearsin
the VCR'sfront panel display.PressMENUon
the remoteto seethe main menu.
_F]
_-_
QUIT : exlt
AUDIO
' ij;
r
;
INSTALLATION
I
PAGE
Things you
must do
before you
PointremotetowardVCR
can operate
your VCR
How to Access Menus
1. PressMENUto see Main Menu.
Choosesand
0
2. Press NUMBER (1, 2, 3, or 4) to see
desired sub menu to be used.
/
modifiesoptions
3. Press NUMBER to choose desired
option to be changed.
4. PressQUIT to exit menu, or wait a
few minutes and the VCRreturnsto
norma[ operation.
5etec'_
VCRtuner
Select SpeakEZ Function (On/Off)
Press 4.
A voice te|ls you how to use the features
I
"_
SpeakeZ:ON
UONBOFF
PLAYBACK:
in the menus if SpeakEZ is 0N. (0N is
recommended.).
See the AUDIO Menu for details.
I
RECORD:
AUDIO MENU
CLOCK
TIMER
SETUP
| Press number keys
_, then ENTER
QUIT : exit
AUDIO
Press NUMBER
_
peakEZonlyfunctions
with
ENGLISH.
Press number
keys
(1 or 2) to choose
ON or OFF
QUIT = exit
MAIN MENU
Select Language
I '°--NU
1
for VCR
Menus/Disptays
(Optiona
D SetectEnglish,Spanish,or
French for VCR menus and status c_splays. See the LANGUAGESELECToption
on the SETUP menu for details.
SETUP MENU
AUTO PROGRAM:
|
|
l
I
_, then ENTER
QUIT = exit ,)
| Press number keys
I
SOURCE:
ON-SCREEN
DISPLAY:
CH. ADO/DEL:
LANGU*GESELECT:
I Press
number keys
QUIT = exit. •
SETUP MENU
LANGUAGESELECT : ENGLISH I
BE NGLISH IEIESPAiTK)L_
[]
_FRAI_"tAIS
|
Press NUMBER (1, 2,
or 3) to select the
desired tanguage
,J
7
PAG E 8
J INSTALLATION
f
Some things
you must do
and others
you may
want to do
before you
can operate
Set Date and Time for Clock
Press 3.
(Required) Set the clock in the VCR to
the current date and time. See CLOCK
Menu for detaiLs.
I
your VCR
I
CLOCK MENU
MONTH
: n
:
: 1996
1 THU
TIME
: 12.00 PM
CLOCK MENU
AUTO DAYt_tiT ._VING.'ON
BONBOFF
Pre. n.m_ keys
theft ENTER
Youmustset
the timer-conclockbefore
you
con use any
trolled VCRfeotures, for exomple, TIMERrecordings.
JANUARY
DAY
YEAR
MANUALCLOCK SET:El
QUIT=exit
Press NUMBER
Pros numbw Iwys
QUiT=exit
(0-9) then ENTER to
set date and time
CLOCK MENU
Select Source for VCR
(Optional) Set the sourceof the VCRfor
the type of programsignal you have
connectedto the ANTIN jack on the
backof the VCR. ChooseTVif you have
an antenna connectedto the VCR.
ChooseCAWif you have a cablesystem
(with or without a cable box) connected
to the VCR.ChooseAUXif you have an
accessoryAudio/Video(A/V) connected
to the VCR.
Press3.
I
Y
SETUP
CH.
ADD/DEL:
1
Prestonumber keys
|
• then ENTER
QUIT = exit ,)
SOURCE:
AUTO PROGRAM:
ON-SCREEN
DISPLAY:
LANGUAGE
MENU
SOURCE:TUNER (TV)
SETUPMENU
SELECT:
Press NUMBER
Press number keys
(1, 2, or 3) to select
the desired source
QLRT: exit
SETUP MENU
See SOURCE optionon SETUP menu for
details.
Use Auto
Channels
Program
to Find
(Required)
Use AUTO PROGRAM to find
Press 1_
active channels in your broadcast area.
AUTO PROGRAMstores the active chan-
I
I
nels that you can access by using the
Channel Up/Down arrows. See AUTO
PROGRAMon the SETUP Menu for
'
sETUP MENU
AUTO PROGRAM:
CH, ADD/DEL:
[]
[]
SOURCE:
[]
ON-SCREEN
DISPLAY:
[]
LANGUAGE
SELECT:
[]
Press
number
I
AUTO PRSETUP
OG RAM:
[_J-'-l_T_m_
MENU
QUIT
= exit
I
a)
keys
details.
QUIT
= exit
SETUP MENU
Use CH. ADD/DEL
Favorite Channels
to Create
(Optional) Use CH. ADD/DEL to change
the list of active channels found when
using AUTO PROGRAM,so you can list
your favorites. See CH.ADD/DEL on the
SETUP Menu fordetails.
II
f
SETUP
MENU
re
iIs--
J
AUTO PROGRAM:
|
CH. ADOIDEL:
|
SOURCE:
ON-S_EEN
DISPLAY:
|
LANGUAGE
SELECT:
|
CH. ADO/DEL: CH. []
ADO
[]
Press number keys
| Prmm number keys
_,
_
QuIT: exit
SETUPMENU
then ENTER
PressNUMBER
(0-9)
|
QUIT = exit ,)
then ENTER
INSTALLATION
Setect Other Menu Options
You may not want to have the clockin
your VCRadjusted automaticallyfor
DaylightSavingTime. Referto CLockMenu
for details.
I
PAGE
Thingsyou
may want to
do beforeyou
operate your
VCR.
CLOCK MENU
Press1.
9
AUTO DAYLIGHT SAVING,_0N
nONBOFF
spwez
MANUAL CLOCK SET:N
TIMER
SETUP
AUIXO
P_
numberI_m
QUIT =exit
PressNUMBER
(1 or 2) to choose
Auto Daylight Saving
ON or OFF
QUIT = exit
MAIN MENU
Show or hide the VCR status on your
screen by using the ON-SCREEN DISPLAY
Press4.
I
r
option on the SETUP menu. We recommend keeping this option ON. See the
SETUP menu for details.
AUTOF_O_AN:
CH. ADlYDEL:
SOURCE:
ON-SCREENDISPLAY:
l
|
'
SI_ekEZ
_
f
|
XU_O.E.U
l SpeakEZ:
/
RECORD:
Press NUMBER
(1 or 2) to choose
HI-FI or NORMAL
ou=:_t
MAIN MENU
Press 4.,.._
r
H:o':MA,
/ Press number keys
_ then ENTER
QUIT = exn
Press nunter keys
I
•
PressNUMBER
(1 or 2) to choose
ON or OFF
/
TIMER
AUDIoSETUP
HON imOFF
Preu number keys
then ENTER
QUIT = exit
SETUPMENU
Press4.
SETUP
IdENU
I
uu_uAoe
SELECT:
/_, _'"m_rkw" Qurr:,xn
If you have a stereo VCR,se|ect the audio
format (HI-F1 or NORMAL)to use when
you play a tape. We recommendsetting
• this option to HI-FI. Seethe PLAYBACK
MODEoption on the AUDIO Menu for
detaiLs.
J
I
AUDIO MENU
pLAtypi"
K:
S_kEZ
If you have a stereo VCR,select the audio
format (STEREO,MONOor SAP) to use
when recording. We recommendusing
STEREO.
See the RECORD
MODEoption on
the AUDIOMenu for detaiLs.
°-iI
TIMER
SETUP
AUDK)
Prim W
k_/j
OUIT=iw,lt
MAIN MENU
RECORD: STEREO _0
_
_t_r
_
I_TER
k_
QUIT = HI|,
Press NUMBER
(1, 2 or 3) to choose
STEREO,MONO,or
SAP
J
•
PAGE
10
Descriptions
of items you
needto know
to operate
your VCR.
I CONTROLS
AND
DISPLAYS
Front Panel ControLs
These controls performbasicVCRoperations.The Remoteperformsbasicas weir as advancedVCR
operations.
POWEROn/Off
Button
Cassette
Compartment
Channel Up/Down
Se|ector
Stop/Eject
SeLector
zenith
\
LEDFron/tPanet
PLAY,REW(Rewind),
F FWD(Fast Forward),
PAUSESelector
Recording
SpeedSelector
Indicators
REC/ITR
(Instant Timer
Record) Setector
LED Front P;net Indicators
power
VCRis turned on
A Cassette is in the VCR
VCR functions are
available and channeLs
are setectedat VCR
cst.in
"T
vcr
rec
T
timer
t
_Keep
\
RemoteWindow:
this area free
of obstruction.
VCRis in Timer
recording
VCRis recording
CONTROLS AND DISPLAYS
I
PAGE
11
On-Screendisplays teU you
the status of
the tape
inserted and
VCRfunctions.
Current mode of operation
(STOP,PAUSE,RECORD,PLAY,etc.)
and audioformat of tape, where
Ptay-.}iI-F! or NORMAL(Nodisplay)
I
PLAY HI-FI
SP
TapeSpeed
. EP-ExtendedPlay
LP-LongPlay
SP-StandardPlay
Current date, day, and time
I
•
Current CH (Channet)setected
by usingtuner in VCR
VCR CH 11
ST/SAP- Audio format of signat
receivedby VCRtuner:
STEREO,MONOor ST/SAP
J
I
15 MON
7:17 AM
M-1:35:45- mRea|-time tape counter
M = Counter Memory is active
Typicat VCRStatus Disptay
- = Tapeis rewoundpast index
on TV
mark.
1:35:45 135 45 -
M-1:35:45
Tape Counter Position
Lengthof tape (in time)
1 hour
35 minutes
45 seconds
REM 1:35
Tape Time Remaining
VCR Status Disptay
TheVCRStatusDispLay3ppears on the TV when a
VCRfunction starts, Uke whenyou changea channet or setect a different VCRmode.For exampte,
pressingSTOPwhite the VCRis in PLAYmode
showsSTOPin the display.PressENTERon the
remote at any time (except SpeciatEffect Playback
mode; SLOW,STILLetc.) to seethe Status Display.
VCR Status Display Options
Whenthe Status Displayappears,pressENTER
repeatedtyto see abbreviateddisplays,as fottows:
Note:
If the _CR Status Displaydoes not appearon the
TVscreen, checkthe ON-SCREEN
DISPLAYoption
on the SETUPmenu. SetectON to see the display.
See"VCRMenu Operations"section for details.
3. PressENTERa third time to showonly the tape
time remaining.
1. PressENTERto see Status Display.
2. PressENTERa secondtime to showonty the
tape counterposition.
4. PressENTERrepeatedly untit atLdisplaysare
removed.
J
PAGE
12
I OPERATION
f
A quick List
of aLLthe
buttonson
your remote
control and
what they do.
CH (V/A) -- Changesfavorite
channel List. ALsoselectsAUX A/V
input channeL.
CMSKIP -- Fastforwardspicture
searchthrough30 secondsof
recording.
FJECT-- Ejectsthe tape in the
VCR.
ENTER -- Programs menu options
and shows VCR display.
F FWD (Fast Forward)--Advances
tape rapidly.
MEMORY-
Returns reaL-time
tape counter to zero (M 0:00:00).
MENU --
Shows main menu.
Numbers -- Chooseschannels
and enters programminginformation.
TurnsVCR
On
Ejectsa tape
Exits Any
main menu
ChoosesTape
RecordingSpeed
Enters a
TapePLay/Record
Options
DirectChannel and
ProgrammingEntnj
SwitchesTVPicture
betweenTV and
ChannelSeLectors
(Tuner)
PAUSE-- Pausestape temporarily
during playbackor record.
PLAY-- Beginstape pLayback.
POWER-- TurnsVCROn and Off.
Alsoturns VCRTimer Off and On,
if programmed.
QUIT -- Exitsmenu system.
REC/ITR-- Beginstape recording.
REW-- Rewindstape to the
beginning.
SP/EP -- Choosestape recording
speed.
STOP-- CanceLsplaybackor
record modes,
f
TRACKING (Y/A) -- Adjusts
tapeplayback
tracking.
W/VCR -- Switches sourceof TV
picture between TVchanneland
VCRchannelselection. VCRfunctions are avaiLabLe
in VCRmode.
Instat|ing Batteries
Besure to instaLLthe batteries
providedwith this remote. Match
positive(+) and negative (-) with
markings shownin battenj compartment.
Note: All VCRoperationsand menu
optionscan be accessedby using
the remote controL.
AccessesTapeCounter
DispLay
hannet SeLectors
Fast forwardspicture
through
30 secondsof recording
tape
playbacktracking.
OPERATION
PAG E 1 3
Introdudng
you to the
Main Menu
selections
CLOCK MENU
AUTGDAYUGHT
SAVING:ON
lIONBOFF
MANUALCLOCKSET:E
Press
number
keys
QUIT = exit
MONTH
DAY
SETUP MENU
:
:
START
STOP •
CHANNEL
SPEED
REPEAT
PROGRAM
CH. ADD/DEL:
SOURCE:
ON-SCREEN
DISPLAY:
AUTOPROGRAM:
LANGUAGESELECT:
:
:
[]
(1-8) to selecl program
ENTER to adjust progriem
CLOCK
AUDIO MENU
SpeekEZ:ON
PLAYBACK:
ILION BOFF
RECORD:
1
Press numbw keys
QUIT = exit
•
TIMER
I=_
number keys
then ENTER
QUIT = exit
SETUP
AUDZO
J
Press NUMBER (1, 2, 3, 4) button
SpeakF.Z
TIMER
SETUP
AUDIO
P_ss number keys
QUIT =exit
1
MAIN MENU
How to Access Menus
Menu operationis easy--just fo[[ow the instructions
shown at the bottom of the menu.
Point remote toward VCR
I
1. PressMENUto see main menu.
2. PressNUMBER(1, 2,3, or 4) to.see desiredsub
menuto be used.
3. PressNUMBERto choose desired option to be
changed.
4. Press-QUITto exit menu, or wait a few minutes
and the VCRreturns to normal operation.
Choosesoptions
and
modifies
C
C
(D
-
(3_ (3_ (_
C
Note:.
Performmenu operationswith the VCRand TV on,
andtune the TV to channe|3 or 4. The VCRmust
also be in the VCRmodeof operation. PressTV/VCR
repeatedlyuntil VCRindicator appearsin the front
panel.
Selects
VCRtuner
J
PA G E 14
I OPERATION
f
The CLock
Menu sets
the clockin
VCRto the
currenttime.
How to Access Auto Dayttght Saving
ThisVCRcan adjust the clock automaticallyfor Daylight
SavingTime.
I. PressMENU to seeMainMenu.
2. PressI toseeClockMenu on theMainMenu.
CLOCKMENU
AUTO DAYLIGHT SAVlI_:ON
mON mOFF
MANUAL CLOCK Sb-I':IB
3. Press1 to choose ON on the Clock Menu.
Note:
We recommendthat you set the clock usingthe MANUAL
method the first time you useyour VCR.SeeMANUAL
option for details.
PreNnumber
keys
QUIT=exit
Manual Clock Set
The CLOCKMenu sets the clockin the VCRto the current
date andtime.
Notes:
The clock must be set before you can record by using the
TIMER menu.
You may have-to reset the dock if a power outageLastsfor
morethan 3 seconds.
CL_KM_U
MONTH
DAY
YEAR
TIME
: O JANUARY
: 1 THU
: 1998
: 12._0 PM
Preu number keys
then ENTER
QUIT = exit
How to Set Clock
1. PressMENUto see Main Menu.
2. Press1 to see clockoptions.
t
3. Press3_to adjust your options.
4. Pressthe NUMBER(0-9) then ENTERto speciEjcurrent
date and time.
5. PressQUIT to exit the menusystem.
Typical CLOCKMenu with
date and Ume settings
OPERATION
I
"CLOCK
=AV =
sr_r
Press2
REPEAT
_
•
/ OAr ;
m,xr :
cvauemL:
SPEED
:
AUDIO
•
:
QUIT=exit
•
/
(1.8)tom,ct_rogrm
num_k_m
•
15
The TLMER
Menu teLLsthe
VCRwhen to
recorda program on a day
and at a time
you specify
Youcanspecifyeightdifferentevents to be recordedin a one-yearperiod.
"TIElln
SETUP
PAGE
REPEAT
:
/ (t.e) to,ek_tpro_=m
ENTERto =dlumti_
_, ENIT=Rto =cmu=ti_
J
Month
of Recording
Day of Recording
Start Time of Recording___
/
PROGRAM
"MONTH: 7 JULY
='DAY
MaN
=_rAFrr
:: 20
11:15AM
Stop Time of Recording_._,w_roP
IvCHANNEL : 11:4_Aa
: 20"IV
Channet of Recording_
Speedof Recording
_
R-4dk""--
_speeo
r_REPEAT
: ep
: ONCE
•q!'(1-8)
tomNprwm(o)
to select program
Frequencyof Recording/
•
ProgramNumber
When highlighted, pressNUMBER(18) to chooseprogramNumber•
REPEATOPTtONS
ONCE-- Recordsonce.
WEEKLY
-- Recordsonce each week.
DAILY-- Recordsone time each day,
Monday- Friday.
CHANNEL OPT]ONS
To select an AUX channel.,se[ect the
next highestor Lowestchannel programmedin the VCRwith the CHANNELUp/Down arrows.
How to Use Timer
1. ChooseTIMERmenu as describedin "How to
AccessMenus."
2. PressNUMBER(0-9)then ENTERto set the timer.
3. PressQUIT to exit the menu sysiem.
SPEED 0m0NS
(sP or EP)
The SPmodedetermineshow much
tape is [eft and switchesspeed from
SPto EP,if necessary,to complete
recordingthe program.TherewiLLbe
somepicture and sounddistortion at
the point of the speed change.
Note:
Set the VCR in TIMER mode by pressing POWERto
turn off the-VCR. The TIMER indicator
front pa_ne[of the VCR.
_
appears in the
operate
the POWER
VCRmanuallywhile
itou
is cannot
recording.
Pressing
stops the
recording.
To Erase a Program
1. ChooseTIMER menuas describedin "How to
Ac_ss Menus."
2. PressNUMBER(I-8) to setect desiredPROGRAM
to
be erased.
3. Press0 to erase the program,
4. PressQUIT to exit the menusystem.
r PROGRAMB
MONTH : 7 JULY
DAY
: 20 MaN
START : 11:16 AM
STOP : 11:46 AM
CHANNEL : 20 TV
SPEED
: EP
REPEAT : ONCE
(1-8) to selectprogram
, to erase prass (0)
Fo[tow
/-'l./Lhese
)'-_trsteps
Press0 to erase program
J
PAGE
16
I OPERATION
The SETUP
Menu
ustomizes
the VCR's
r
SETUPMENU
eration for
your
ChooseSETUPMenu as describedin
_How to AccessMenus."
Par_n'eCU_ar
"
CH. ADDIDEL:
SOURCE:
AUTO PROGRAM:
ON-SCREEN
DISPLAY:
LANGUAGE SELECT:
Press number keys
QUIT = exit
AUTO PROGRAM
FindsaLLactive channelsand storesthem in the VCR'smemonj for access
by Channel Up/Down. Press% to begin search.
CH. ADD/DEL
Editsthe channelsfound by AUTOPROGRAM.Usenumberkeys foLLowedby
ENTERto selectthe channelto be edited (e.g., to ADDchannel3, press3
then ENTER).PressENTERto ADDor DEL(DeLete) channelsto create your
own Listof favorite channels.
SOURCE
SeLectsTV, CATV,or AUX as the sourceof the programto watch or record.
ChooseTV if you havean antenna connectedto the VCR.ChooseCATVif
you havea cablesystem (with or without a cable box) connectedto the
VCR. ChooseAUXif you want to see the programfrom accessonjequipment, suchas a camcorder,connectedto the Audio/Video(A/V) IN jacks
on the VCR.
ON-SCREEN
DISPLAY
SeLectswhether or not you seeVCRStatus Displayson the TV.
LANGUAGE
SELECT
SeLectsEngLish,Spanishor Frenchfor VCRmenusand displayson the TV.
OPERATION
I " PAGE
17
AUDIO Menu's
PLAYBACKand
RECORD
The AUDIO Menu indicates
the audio format
options are
used
when recording or pbying
SpeakF.Z:ON EION BOFF
PLAYBACK:
a tape. Choose AUDIO
Menu as described in
"How to Access Menus."
SpeakEZ
VCRs.
RECORD:
Press ENTER (and repeat)
to choose items in the
menu (some models).
available only
with stereo
AUDIOMENU
Press number keys
_. then ENTER
QUIT = exit
Turns SpeakEZ ON or OFF.
A voice tells you how to use the features you select in the menus if
SpeakEZ is ON. (ON is recommended.)
PLAYBACK
_RECORD
SelectsHI-FI or NORMALfor tape playback.
HI-FI (High Fidelity) providesstereo sound,if presenton the tape, to the
left and right VCRAUDIOoutput jacks on the backof the VCR.
NORMALprovidesmonaura|sound,regardlessof the audioformat present
on the tape.
Selectthe STEREO,MONO,or SAPfor recordinga program.
STEREOrecordssound from the Leftand right audiotracks in stereophonic
format.
MONO(Monaural! recordssoundin monaural format evenif the programis
in stereo.
SAPrecords the SecondAudio Program(SAP)track, if present,in addition
to the stereo audio tracks. SAPusuallycontainsaudioin another language.
J
PAGE
18
I OPERATION
f
Thispage
showsa
typical video
systemand
explains how
to select
_'channeLs.
Zenith TV
Cable"IV
Zenith Stereo VCR
W_k
_nect Cab_
_Or
__v
T_c_
cable Box
CHANNE,I
31-14 I
•
I yen
o,_,_toTv
AUDIO
'IV
IN
VIOEOI
(Channe!. 3 or 4 w_en
VIDEO
IN
AUDIO
IN
OUT
I"LI/t
Selecting ChanneLs when the VCR is OFF
1. TurnTV on.
2. SeLectchannelyou'd Liketo watch at the W. If
you havea cablebox, select channel3 or 4 at
the TV. SeLectscable boxchannelsat the cable
box.
SeLectingChanneLs at the W when VCRis
ON
1. TurnTVandVCRon.
2. PLaceVCRin TV mode by pressingTV/VCRon
the remoterepeatedly until the VCRindicator
disappearsfrom the VCRfront paneL.
3,
SeLect channelyou'd Liketo watch at the TV.If
you have a cable box, select channel3 or 4 at
the "iV.SeLectcable box channelsat the cable
box.
SeLecting ChanneLs at the VCR when VCR is
ON
1. Turn TVand VCRon.
2. PLaceVCRin VCRmode by pressingTV/VCRon
remote repeatedly until the VCRindicator
appearsin the VCRfront paneL.
3.
SeLectchannels3 or 4 at the TV.If you have
connectedyourVCRto the TV'sA/V input
jacks, select the A/V sourceat the TVfor a
better picture.
4.
SeLectthe channelyou'd Liketo watch at the
VCR.If you have a cable box, select channel3
or 4 at the VCR.SeLectcable boxchannelsat
the cable box.
OPERATION
J
I
-1- _nDEO--I
VHFIUHFICATV
I
l
4
V
Turn
offmaking
power any
or unplug
VCR
before
connections.
cabte is not provided with VCR.
Select AUX for Viewing an Audio/Video
source like a Camcorder
1. With TV and VCRon, ptace VCRin VCRmode by
pressingTV/VCRon the remote (and repeat) untit
the VCRindicator appearsin the VCR'sfront pane[.
2. Setect channet 3 (or 4) on the TV. Note: If your TV
has A/V jacks, you may get a better picture if you
connect your VCR there. (Then, select the A/V
source on the TV.)
SETUPMENU
3. At the VCR,Channet Down towerthan the towest
channet(or CharmerUp above the highest) to
setect "AUX" Or,you mayChoosethe SETUPmenuas describedin "How to
AccessMenus."
Press3 for the SETUPmenu'sSOURCE
item.
Press3 for AUX, then ENTER.(PressQUIT to exit.)
SOURCE:
TUNER(7!/)
Pressnumberkeys
then ENTER
QUIT =
exit
Press 3 to select AUX
Items in the Menu
SOURCE
Shows the programsource--TV, CATV,or AUX--setected for the VCRto receive
TUNER
TheVCRis usingits Tunerto receiveprogramsfrom an antenna or cabte.
TV
.
19
This page
describeshow
to connecta
camcorderto
your VCR.
BackPane[of StereoVCR
A/V
PAGE
SeLectsprogramsfor the VCRfrom a rooftop-typeantenna.
CATV
Selects programsfor the VCRfrom CabteTV.
AUX
SeLectsprogramsfor the VCRfrom the R-AUDIO-L--VIDEOIN jacks (where you may have
connected your camcorder).
J
L
PAGE
20
I OPERATION
f
This page
explainsthe
basicsof
playing tapes
in yourVCR.
Automatic Playback (No Safety Tab)
1. TapeplaybackbeginsautomaticaLLy,
if the safety tab is removedfrom the cassettecase. For
example,most rental movies haveno safely
tab. SimpLyinsert the prerecordedVHScassette
into the VCR. Powerturns on and playback
begins.
power
VCR'sControLs
2. SeLectthe channel 3 or 4 at the TV. Or,select
the TV'sAUX(Auxitianj) sourceto seethe picture, if you are usingthe A/V jacks.
\nl
'
I]
Cassette_'_/_"_
SafeLy
Tab
Manual PLayback(Has Safety Tab)
1. PressPOWER
to turnVCRon.
I
Shownin
,
PLace "_"
2. Insert a prerecorded VHScassetteinto the VCR.
3. PressPLAYto begin playback.
4. SeLectthe channel3 or 4 at the TV. Or,select
the TV'sAUX (AuxiLiary)sourceto seethe
picture, if you are usingthe A/V jacks.
POWER
UnLoadingthe Cassette from the VCR
1. PressSTOP
if the tape is playing.
2.-Press STOR/E3ECT
at the VCRuntil the cassette
is ejected.
IV/VCR
Note:
This VCR records onLy in SP and EP speeds. Your
VCR sets the playback speed automaticaLLy to the
speed used to record the tape.
Continued on next page)
VHS Cassette Playback/RecordTimes
Cassette
SP
LP
EP
Length (Standard Play) (Long Play) (Extended Play)
T-30
30 Minutes
1 Hour
1 Hour,
30 Minutes
T-60
I Hour
2 Hours
T-120
2 Hours
4 Hours
6 Hours
T-160
2 Hours,
40 Minutes
5 Hours,
20 Minutes
8 Hours
3 Hours
OPERATION
I
PAGE
21
This page
explainshow
to usethe
Auto/Manuat Tracking Adjustment
YourVCRadjuststracking automaticallywhen
you play a tape. If the tape was recordedon
a different VCR,streaks (video noise) may
appear.Whilethe tape is playing,press
TRACKING
(Y/A) to adjust the tracking
manually.
remoteto pLay
tapes on your
VCR.
FWD
FastForward)
Rear-Time Tape Counter
PressENTERtwice to keepthe tape counter
! on the TVscreen. PressENTERrepeatedlyto
i removeall displays.The counterresetsto
! 0:00:00 when youinsert a cassette or when a
tape is rewoundto its beginning.
Pause/Forward/Reverse
Video
J
SKIP
Stow-Motion
(While in play mode) PressPAUSEfor still
video. PressPAUSEagain, and fol|ow
on-screeninstructions for Forwardor Reverse
slow moUon. PressF FWDor REWto control
stowspeedduring slow motion. PressPLAYto
resumenormaltape playing.
Note: Whenthe reverseslowmodecontinues_or
more than 30 secondes,the VCRwiUautomati- caUychangeto play mode.
Tape Rewind and Fast Forward
(While in Stop mode) Pressand releaseREW
or F FWD(Fast Forward), as desired. Press
STOPwhen tape reachesdesired location.
Reverse/Forward Search
(While in Playmode) Pressand releaseREWor
F FWD,as desired.Press.PLAY
to resume
normaltape playing.
CM Skip (Commerdai Skip)
(Whitein play mode) PressingCN SKIP on the
remote skipscommercialsor other program
material. Pressing1, 2, 3, or 4 times skips
30, 60, go, or 120 seconds,respecUvely.CM
SKIP skipsa full 120 secondsof commercials
in a few seconds,then resumesnormalplayback.
J
PAGE
22
I OPERATION
f
Recording
what you are
watching
on TV.
OpUons You Can Use White Recording
Instant recording[etsyou recorduntil you reach
the end of tape or you pressSTOPto stop recording.
pow@r
©
1. TurnTV and VCRon,
Remote's ControLs
2. Place VCRin VCRmodeby pressing W/VCR on
the remote repeatedlyuntil the VCRindicator
appearsin the VCRfront paneL.
3.
SeLect channel 3 or 4 at the "IV. If you have
VCR's ControLs
connected your VCR to the TV's A/V input jacks,
select the A/V source at the TV for a better picture.
4.
SeLectthe channelto be watched and recorded
at the VCR.If you have a cablebox, select the
cable box output channel(usuaLLy3 or 4) at the
VCR.SeLectcable boxchannelsat the cable box.
Instant Recording
(until end of tape)
PAUSE-
5. Insert a VHS cassettetape into the VCR.
6. PressSP/EPto select recordingspeed,if
desired. Recordingspeedis alwaysSP,unless
you select EP.
7. Press REC/ITRuntil recordingbegins. RECindicator appears in the VCRfront pane|. Recording
continuesunlit you reachthe end of the tape,
or until you pressSTOPto stop recording.
Instant TimerRecording
(Preset
recording
times)
STOPor SIOP/E3ECi"
MomentariLyPauses
Stopsandexits recording
mode.
recording,PressPAUSE
again to resumerecording.
STOPor STOP/FJECT
Stopsandexitsrecording
mode.
I
OPERATION
PAG E 2 3
Recording
usingpreset
time periods.
Preset Time Periods for ITR Recording.
Note:
power
Preset recordingtime counts down until the recording tim_ is over.
Instant
(attended)
Remote's Controls
Timer Recording (ITR) Lets you
record where you record for a specific preset time
period, instead of recording until the end of tape is
reached. For example, you can record a 30-minute
J
show using the preset time period.
Turn"INandVCRon.
VCR's
Controls
PtaceVCRin VCRmode by pressing
TV/VCRon the remote repeatedly untit
the VCRindicator appearsin the VCR
front panet.
Select channel3 or 4 at the TV. If you
have connectedyourVCRto the TV's
A/V input jacks, selectthe A/V source
at the TVfor a better picture.
Setectthe channe[ to be watched and
recordedat the VCR.If you have a
cabte box, select the cable boxoutput
charmer(usuaUy3 or 4) at the VCR.
Setect cabtebox channelsat the cabte
box.
Pressesof
• REC/I'rR
Disptay
1 (Press)
2
3
4
Current Time
0:30
1:00
1:30
5
9
10
Insert a VHS_assette tai)e into the
VCR.
PressSP/EPto setect recordingspeed,
if desired.Recordingspeedis atways
SP,untessyou setect EP.
2:00
4:00
No display
Preset Time For
Recording
Untit end of tape
30 minutes
1 hours
I hour and
30 minutes
2 hours
4 hours
normat recording
Note: TheSP modedetermineshow muchtape
is le_t andswitchesspeed_rom SP to EP,if
necessary,
to completerecordingthe program.
Therewil! be somepictureand sound distortion
ot the point of the speedchange.
PressREC/ITRuntit recordingbegins.
TheRECindicator appearsin the VCR
front panet. Recordingcontinuesuntit
you reachthe end of the tape, or unUit
you pressSTOPto stop recording.
PressREC/_TRrepeatedlyto setect a
preset recordingtime period. Eachsubsequentpressof REC/ITRincreasesthe
recordingtime by 30 minutesuntil you
reacha maximum of 4 hours.
J
PAGE
24
I OPERATION
f
Recording
one show
while
watching
another.
Note:
If you have a cable box connectedto yourVCR,you
cannot record oneshowand watch another.
Choosethe showyou wish to recordusingthe VCR's
channelselector. Choosethe showyou wish to
watch usingthe TV'schannelselector.
_Turn
power
©
Remote's ControLs
lV and VCR on.
PLaceVCRin VCRmodeby pressing
TV/VCRon the remote repeatedlyuntil
the VCRindicator appearsin the VCR
front paneL.
SeLectchannel 3 or 4 at the TV.If you
haveconnectedyour VCRto the TV's
A/V input jacks, select the AiV source
at the TV for a better picture.
Select the channeLto be watchedand
recordedat the VCR.If you havea
cablebox, select the cable box output
channel (usuatty3 or 4) at the VCR.
SeLectcable box channelsat the cable
box.
_
nsert a VHS cassette tape into the
VCR.
_
ressSP/EPto select recordingspeed,
if" desired. Recordingspeedis always
SP, unlessyou select EP.
PressREC/ITRuntil recordingbegins.
RECindicator appearsin the VCRfront
paneL.Recordingcontinuesuntil you
reachthe end of the tape, or until you
pressSTOPto stop recording.
PLace VCR in TV mode by pressing
TV/VCR on renlote to turn off VCR indicator in the VCR front paneL.
SeLectthe showyou wish to watch
usingthe TV'schannelselector.
Note:
To return to the show you're recording, select
channel 3 or 4 at the TV. PLacethe VCR in the VCR
mode by pressing TV/VCR on the remote to show
the VCR indicator in the VCR'sfront paneL.
VCR's ControLs
OpUons You Can Use White Recording
Instant Recording
(until end of tape)
PAUSEMomentariLypausesrecording.PressPAUSE
again to resumerecording.
STOPor STOP/E3ECT- Stopsand exits
recordingmode.
•
SpeakEZ
_
"riMER
SETUP
CLOCK ii I
AUDIO
Pressnumber keys
QUIT = exit
OPERATION
1
Press 2
PF_,_
_OGRAM
[]
D
MONTH
DAY
START
STOP
CHANNEL :
SPEED
:
REPEAT
:
(1-8) to select program
ENTER
MAIN MENU
to adjust
I
MONTH:
DAY
I
I
I
:
START :
STOP
"
CHANNEl.
SPEED
:
:
REPEAT
:
PAGE
25
This page
explains how
to use the
timer so that
you can record
white you are
away.
(1-8) to select program
ENTER to adjust program
program
TIMER MENU
TIMER MENU
for Program 8
for Program 1
J
Timer-controLLed
recordingLetsyou recordshows
unattended.Picka day and time up to oneyear in
advance.The showmay be recordedonceor on
muLtipLedays.You can scheduleup to eight
different eventsinto the PROGRAMTIMERfor
recording,as tong as no eventsoverlapin the
sametime period.
VCR Operation with Timer Off or On
VCR
POWER
SeLect channel 3 or 4 at the TV.
Insert a VHScassette tape into the
VCR.
Programevents to be recordedwith the
Timer by foLLowingthe procedure in the
TIMERMENUsection.If you havea
cable box. select channel3 or 4 (ar the
VCR)as the channelto be recorded.
Keep your cable box on when usingthe
Timer to record.
EnabLethe Timer by pressingPOWERto
turn off the VCR.TheTIMERindicator
appearsin the VCRfront panel to indicate the VCRis in the TIMERrecording
mode.
VCR OPERATZON
DisabLes
timer-controLLed,
recording if an event is
ScheduLedin the Timer. ALL
other MCRoperations can
be used as desired.
On
Off
off
On (or set)EnabLestimer-controLLed
recordingif an event is
scheduledin the Timer. You
TurnTV and VCRon.
PLaceVCRin VCRmodeby pressing
TViVCRon the remote repeatedLyuntil
the VCRindicator appearsin the VCR
front paneL.
TIMER
STATUS
cannot be operate the VCR
manuaLLy
while it is in
Timer Set mode. If you
have scheduled the Timer,
you'LLbe recordingat a
Latertime.
PAGE
26
Somequick
and easy tips
to fixing
problems
yourself.
I TROUBLESHOOTING
Before Calling for Service
Pleaserefer to this chart beforecalling for service. First,turn on the TVand VCR.Select appropriate
input for the TV to receivethe video signalfrom the VCR.You will probablyuse the Antenna In connect-ion to the TV. Select channel3 or 4 at the TV. Place the VCR in the VCRmodeby pressingTV/VCRon
the remote repeatedlyuntil VCRindicator appearsin the VCRfront panel. If you have a cable box,turn
it on and select channel3 or 4 at the VCR.
Operating Problems
Observed Condition
Possible Cause
Probable Sotution
No powerto the VCR.
Power cordis not connected.
Connect power cord.
Remotedoes not function.
Batteriesare weak.
Replacewith new batteries.
You are too far away from the
VCR.
Move closerto the VCR.
Remotemay be at an awkward
angle.
Avoid holdingthe remote at
sharp angle.
Sourcefor TVis not selected
properly.
Set INPUT soIJrceon TVto
No picture appearson TV screen
from any VCRfunction.
Audio/Video In, or tune TVto
Channel3 or 4, as appropriate.
W/VCR mode for VCRis set to W. PressTV/VCRon remote repeatedly to chooseVCRmode. VCR
indicator appears in VCRfront
panel.
VCRfeatures do not function.
VCRdoesnot respond to remote
functions or VCRkeys.
VCRis locked up
Disconnect VCRpower cordfor
three (3) seconds.Reset clock
and other features as necessary.
Playing Tapes (Playback) Problems
Observed Condition
Possible Cause
Probable Solution
Tapewilt not rewind or fast
forward.
Tapeis fully rewoundor is at
its end.
No action necessary.
Mechanical soundis audible
during playback.
Note: This is normaloperating
soundfrom internal
mechanisms.
No action necessary.
Tape playback
on TV screen.
Sourcefor TVis not selected
properly.
Set Input sourceon TVto
Audio/Video In, or tune TVto
Channel 3 or 4, as appropriate.
TV/VCRmode for VCRis set to
TV.
PressTV/VCRrepeatedly to
chooseVCRmode. VCRindicator
appears in VCRfront panel.
Tapeis a rental or was recorded
on anotherVCR.
UseTRACKING(_r/A) for manual tracking adjustmentwhile
tape is playing.
Tape headsare dirty.
Cleanvideo heads.
Tapetracking needsto be
adjustedwhile in slow-motion
playback.
FromSTILLvideo mode,enable
slow-motion playback. Use
TRACKING(v/A) to adjust
tracking for best picture. Return
to PLAYmode,then pressPAUSE
for STILLvideo.
does not appear
Video "noise" (horizontal
streaks)appearduring normal
tape playing.
VCRStatus Displayflickers
when usingSTILLvideo during
tape playback.
TROUBLESHOOTING
I
PAGE
27
Some quick
and easy tips
to fixing prob-
Channel Tuning Problems
lems yourse|f.
Observed Condition
Possible Cause
Probable Solution
Some channels are skipped over
Thosechannels were deleted
with the CH. ADD/DELoption.
Use CH. ADD/DEL to restore
channels. See SETUP Menu for
when _sing
Channel Up/Down.
details.
Picture and sound are weak or
Antenna or cables are Loose.
missing.
Tighten connections or replace
cable.
L
Wrong SOURCEoption is being
used.
Recording
Observed Condition
PossiMe
Camcorder image is not shown.
Camcorder is off.
T_ all SOURCE
options. See
SETUPmenu for details.
J
Problems
Cause
Probable
Solution
Turn camcorder on and operate
property.
Camcorder image via A/V input
VCR SOURCEis not set to AUX.
to VCR is not shown on TV
screen.
Timer recording is not possible.
Use Channel Up/Down to select
AUX A/V input channel.
Clock in VCRis not set to
correct time.
Set clock to correct time. See
VCRis on which disablestimer.
Turn VCR off to enable timer.
CLOCK menu.
TIMER indicator
appears in the
VCR front panel.
Timer has been programmed
incorrectly.
Reprogram Timer. See TIMER
menu.
TIMER indicator does not appear
Reprogram Timer and turn VCR
off to enable timer.
after programming timer.
TIMER indicator appears after
VCR is turned off.
VCR is in Timer Recording mode.
This is normal indication
that
the VCR is in TIMER mode. If
needed, disable TIMER by
turning VCR on.
Stereo
Audio
Record and/or
Playback
Probtems
Observed Condition
Possible Cause
Probable
Solution
Stereo is not present.
TV is not Stereo-compatible.
No action
is possible.
Program is not in stereo format.
No action
is possible.
VCRA/V Out jacks are not connectedto T_ A/V In jacks.
Make A/V connections. Stereo is
available only via A/V output
from VCR.
VCRAudio/VideoOut is not
selected for viewing at the TV.
SeLectAUX or A/V sourceas TV
input.
VCRAUDIORECORDmodeis set
to SAPor MONAURAL.
Set VCRAUDIO RECORD
mode to
Stereo. SeeAUDIO Menu.
J
PAGE
28
I TROUBLESHOOTING
f
Somequick
andeasy tips
to fixing
problems
yoursetf.
Moisture CondensaUon
Moisture condensationcan occur:
In tocations where moisture condensationmay
Occur:
• Whenthe video recorderis movedfrom a cord
place to a warm place.
• Under extremelyhumid conditions
• Keepthe powercord ptuggedinto an ACoutlet
and POWEROn. This wilt hetp preventcondensation.
o,_/hen condensationhas occurred,wait a few
hoursfor the VCRto dry before usingit.
MagneUc FieLd from Other Equipment
Keepthe VCRand videotapes away from strong magnetic fields, suchas those producedby a vacuum
cleaner,refrigerator,or air conditioner.
Video Head CLeaning
YourVCRautomaticattycleansthe headsas it is used. However,after tong periodsof use, your video
heads may becomeclogged with accumulateddirt, causingdistortion. Whenthis occurs,use a do-ityoursetfwet-type head cteaningcassette avaiLabLe
from your Zenith dealer.
Caution:
Do not use a dry-type head cleaningsystem.It may seriouslydamagethe VCRand cassettesusedin the
VCR.Snow,streakingin picture, and horizontatpuLLingindicatethe need for professionatvideo head
cteaning. Seeyour Zenith approvedse_ce center for cteaning.
Cabinet Cleaning
.
Cteanthe outsidesurfacesof the VCRwith a soft Lint-freecloth as required. Usecare not to scratchthe
VCRduring cLeaning.
INDEX
I
29
AGE
Find what you
want quickly.
FEATURE
PAGE
Audio'Menu......................................
Auto Channel Search ..............................
17
8, 16
Connections ..................................
4-5, 19
Ch. Add/De[....................................
8, 16
CLockSet .....................................
8, 14
Features Chart .....................................
Front Panel Diagram ................................
3
10
Instant Recording ...............................
22-24
Language Menu ...................................
16
Main Menu ......................................
13
Maintenance .....................................
28
Playing Tapes ..................................
20-21
RemoteControl ...................................
Safety Information ..................................
SetupMenu......................................
SpeakEZFunction...................................
12
2
16
7
Timer Menu......................................
15
Timer-ControlledRecording............................
25
TroubLeshooting
.................................
26-28
VCRStatus Displays ................................
11
Warranty. .......................................
32
WatchingTV .......
18
: .............................
J
J
STEREO SURROUND
SOUND SPEAKERS
For u.se with any Surround Sound compatible TV. These
sp_eakers create a sound so reaL, it's as if you were part
of the action. The convenient,
sp.ace-saving shelf design
_make these speakers an ideal ad_lition to any Home
rheat.er System. The contemporary black fimsh
complements any room.
cvsooo
ONLY $224.95
SHIPPING
J_ HANDL]N
I'I._$17.95
REPLACEMENT REMOTE
Broken or Lost remote? Perhaps you would just Like the
convenience
of having a second remote on hand. Order
your repLacement remote.controL
direct from Zenith! To
ensure-that you receive the correct remote, have your
television's
model number ready when you caLL.
ONLY$39 95 "'""
•
SHIPPING
81 HANDLING
zenith
, -
Use Your Visa or MasterCard to Order
PLEASE ALLOW 3-4 WEEKS FOR DELIVERY
NOTES I
PA G E 3 1
Usethis page
to makes
notes.
J
J
VIDEOCASSETTE
RECORDER
OR PLAYER
WeLcomeinto the Zenith family! We beUevethat you wit| be pleased with your newZenith EntertainmentMachine.PLeaseread this
warranty carefully, it is a "LIMITEDWARRANTY"
as defined underFederalLaw. This warranbjgives you specific [ega| rights,
andyou may aLsohave other rightsthat vary from state to state within the U.S.A.
"ZENITH'S RESPONSIBILITY
Service Labor
During a period of 90 daysfrom effective warrantydate, Zenith wilt provideservicelaborby a Zenith authorized servicecenter
when needed as determined by Zenith, as a result of manufacturing defects.
Parts
Not Covered
OWNER'S
New or remanufacturodreplacements for factory-defective partswilt be suppliedby a Zenith authorized sewicecenter for one year
From effective warranty date. Suchreplacementparts are warrantedfor the remaining portion of the original warranty period.
This warrantycovers manufacturing defects and doesnot cover installation, adjustmentof customercontroLsin the home,installation
or repair of homeantenna systems,cable convertersor cable company-supplied
equipment; it also does not coverdamagedue to misuse, abuse,negligence, acts of God or other causesbeyondthe control of Zenith. Any alteration of the product after manufacturevoids
this warrantyin its entirety.
RESPONSIBILITY
Effective Warranty Date
Warranty beginson the date of originalconsumerpurchase.Foryour convenience, keep the dealer'sdated bill of sate or a deliveryticket as evidenceof the purchasedate.
Operating Guide
Readyour Operating Guidecarefullyso that you witt understandthe operation of your set and howto adjustthe customercontrols.
Camj-In Senfice
The video product must be taken to a U.S. or Canadian Zenith authorized servicecenter for warranty serviceand must be picked up by
the owner.
:i!
W Set Performance
Important
Warranty Service
It is the owners responsibility to maintainthe TV receiver with which the video productis used,and the associatedantenna system,
in properoperating condition..
ProductRegistration--PLeasefill out and mail your ProductRegistration Card. It is imperative that Zenith know howto reach you
promptlyif We shouLddiscovera safety problemthat couldaffect you.
Forwarranty serviceinformation, contact any Zenith authorizedservice center. Partsand service labor that are Zeniths responsibility
(see above) will be providedwithout charge. Othersewice is at the owner'sexpense.If you have any problemin obtaining satisfactory
warranty service,ca[[ or write the Zenith ResponseCenter. You must providethe modelnumber, serial number and date of purchaseor
date of originalinstatbtion. Beforeyou ask for warrantyservice, read"MaintenanceAndTroubLeshooting" in your operating guide.You
might avoid a service call
THISWARRANTY ISIN lIEUOF ANY OTHER WARRANTY,EXPRESSOR IMPLIED,
INCLUDINGWITHOUT LIMITATION,
ANY WARRANTY
OF MERCHANTABILITYOR FITNESSFORA PARTICULARPURPOSE,AND ZENITHSHALL NOT BE lIABLEFORANY CONSEQUENTIAL,
INDIRECT,
OR INCIDENTAL
DAMAGES OF ANY KIND,INCLUDINGLOSTREVENUESOR PROFITSIN CONNECTIONWITH THE PRODUCT.
Zenith Electronics Corporation
Customer Service Department
1000 Milwaukee Avenue
Glenview, Illinois 60025-2493
Telephone: (847) 391-8752
Mon-Fri, 8:00 a.m. - 4:30 p.m. Central Time
ZENITH ELECTRONICS CORPORATION
1000 MILWAUKEE AVENUE
" GLENVIEW, ILLINOIS 60025-2493
Zenith Part No. 206-3389
GS# 3835RM0024G
Printed in Korea