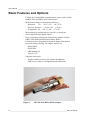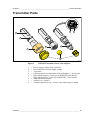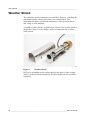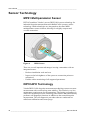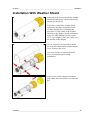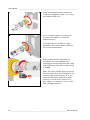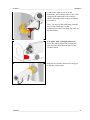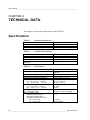
1
USER'S GUIDE
Vaisala Multiparameter Transmitter
DPT145 for SF6 Gas
M211371EN-D
PUBLISHED BY
Vaisala Oyj
Street address:
Mailing address:
Phone:
Fax:
Vanha Nurmijärventie 21, FI-01670 Vantaa, Finland
P.O. Box 26, FI-00421 Helsinki, Finland
+358 9 8949 1
+358 9 8949 2227
Visit our Internet pages at www.vaisala.com.
© Vaisala 2014
No part of this manual may be reproduced, published or publicly displayed in any form
or by any means, electronic or mechanical (including photocopying), nor may its
contents be modified, translated, adapted, sold or disclosed to a third party without prior
written permission of the copyright holder. Translated manuals and translated portions
of multilingual documents are based on the original English versions. In ambiguous
cases, the English versions are applicable, not the translations.
The contents of this manual are subject to change without prior notice.
This manual does not create any legally binding obligations for Vaisala towards
customers or end users. All legally binding obligations and agreements are included
exclusively in the applicable supply contract or the General Conditions of Sale and
General Conditions of Service of Vaisala.
_________________________________________________________________________________
Table of Contents
CHAPTER 1
GENERAL INFORMATION ............................................................................ 7
About This Manual ................................................................... 7
Contents of This Manual ....................................................... 7
Version Information ............................................................... 8
Related Manuals ................................................................... 8
Documentation Conventions ................................................. 8
Safety ......................................................................................... 9
ESD Protection .................................................................... 10
Recycling ................................................................................ 10
Regulatory Compliances ....................................................... 11
Patent Notice .......................................................................... 11
Trademarks ............................................................................. 11
Software License .................................................................... 12
Warranty .................................................................................. 12
CHAPTER 2
PRODUCT OVERVIEW ................................................................................ 13
Introduction to DPT145 .......................................................... 13
Basic Features and Options .................................................. 14
Transmitter Parts .................................................................... 15
Weather Shield ....................................................................... 16
CHAPTER 3
FUNCTIONAL DESCRIPTION ..................................................................... 17
Measurement Needs of SF6 Insulation ................................. 17
Sensor Technology ................................................................ 18
MPS1 Multiparameter Sensor ............................................. 18
DRYCAP® Technology ....................................................... 18
Auto-Calibration ............................................................. 19
Sensor Purge ................................................................. 19
BAROCAP® Technology .................................................... 19
DPT145 Start-up Sequence ................................................... 20
CHAPTER 4
INSTALLATION ............................................................................................ 21
Transmitter Configuration Before Installation .................... 21
Selecting the Location ........................................................... 22
Warning – Read Before Installation ...................................... 23
Installation Without Weather Shield ..................................... 24
Installation With Weather Shield .......................................... 25
Wiring ...................................................................................... 28
Standard Wiring .................................................................. 28
VAISALA _________________________________________________________________________ 3
User's Guide _______________________________________________________________________
Alternate Wiring for Power Supply ...................................... 29
Stabilization of Dewpoint Reading After Installation .......... 29
CHAPTER 5
OPERATION ................................................................................................. 30
Transmitter Start-Up ............................................................... 30
Serial Communication ............................................................ 31
Connecting to the Serial Interface ....................................... 31
Installing the Driver for the USB Service Cable ............. 31
Terminal Application Settings .............................................. 32
List of Serial Commands ....................................................... 33
Device Information ................................................................. 34
Show Device Information..................................................... 34
Show Currently Active Errors .............................................. 35
Show Command List ........................................................... 35
Show Firmware Version ...................................................... 36
Show Serial Number............................................................ 36
Serial Line Output Commands .............................................. 36
Start Measurement Output .................................................. 36
Stop Measurement Output .................................................. 36
Set Output Interval............................................................... 37
Output a Reading Once ....................................................... 37
Configuring Measurement Parameters ................................ 38
Set Mixing Ratio .................................................................. 38
Set Molar Weight of Other Gas ........................................... 38
Set Pressure Normalization Temperature ........................... 38
Set Measurement Output Format ........................................ 39
Select Unit ........................................................................... 41
Configuring Serial Line Operation ........................................ 41
Set Serial Line Operating Mode .......................................... 41
Set Serial Line Settings ....................................................... 42
Set Transmitter Address ...................................................... 42
Set Serial Line Response Time ........................................... 43
Other Commands.................................................................... 43
Opening the Transmitter in POLL Mode.............................. 43
Closing the Connection to a Transmitter in POLL Mode ..... 44
Show Transmitter Uptime .................................................... 44
Reset Transmitter ................................................................ 44
Restore Factory Settings ..................................................... 44
Modbus Communication ........................................................ 45
Addressing with Modbus Protocol ....................................... 45
Accessing Serial Port Command Interface from
Modbus Mode ................................................................. 45
Configuration Commands Related to Modbus ............... 46
CHAPTER 6
MAINTENANCE ............................................................................................ 47
Periodic Maintenance ............................................................. 47
Cleaning .............................................................................. 47
Calibration and Adjustment ................................................. 47
Field Check Using an MI70 Indicator .................................. 47
Repair Maintenance ................................................................ 49
4 ____________________________________________________________________ M211371EN-D
_________________________________________________________________________________
CHAPTER 7
TROUBLESHOOTING ................................................................................. 50
Solving Typical Problems...................................................... 50
Error Messages ...................................................................... 51
Unknown Serial Settings ....................................................... 52
Technical Support .................................................................. 52
Product Returns ..................................................................... 53
CHAPTER 8
TECHNICAL DATA ...................................................................................... 54
Specifications ......................................................................... 54
Spare Parts and Accessories ................................................ 57
Dimensions in mm ................................................................. 57
APPENDIX A
MODBUS REFERENCE ............................................................................... 60
Default Communication Settings .......................................... 60
Supported Modbus Functions .............................................. 60
Modbus Register Map ............................................................ 61
VAISALA _________________________________________________________________________ 5
User's Guide _______________________________________________________________________
List of Figures
Figure 1
Figure 2
Figure 3
Figure 4
Figure 4
Figure 5
Figure 6
Figure 7
Figure 8
Figure 9
Figure 10
Figure 11
Figure 12
Figure 13
Figure 14
Figure 15
Figure 16
DPT145 with DILO DN20 Adapter ............................................ 14
DPT145 Transmitter Parts and Adapters ................................. 15
Weather Shield ......................................................................... 16
MPS1 Sensor............................................................................ 18
DPT145 Startup Sequence ....................................................... 20
DPT145 Configuration with the MI70 Indicator ......................... 21
Indoor Installation in a Circuit Breaker ..................................... 22
Wiring Non-Isolated RS-485 ..................................................... 28
Wiring Power Supply Using Port I ............................................ 29
PuTTY Terminal Application ..................................................... 33
Comparing Dewpoint Readings on MI70 .................................. 48
DPT145 Dewpoint Measurement Accuracy ............................. 55
DPT145 with DILO DN20 Adapter ............................................ 57
DPT145 with DILO DN8 Adapter .............................................. 58
DPT145 with ABB Malmkvist Adapter ...................................... 58
DPT145 with Alstom G1/2" Adapter ......................................... 59
DPT145 with DILO DN20 Adapter and Weather Shield ........... 59
List of Tables
Table 1
Table 2
Table 3
Table 4
Table 5
Table 6
Table 7
Table 8
Table 9
Table 10
Table 11
Table 12
Table 13
Table 14
Table 15
Table 16
Table 17
Table 18
Table 19
Table 20
Table 21
Table 22
Manual Revisions ....................................................................... 8
Related Manuals ......................................................................... 8
Output Parameters of DPT145 ................................................. 13
Default Serial Interface Settings ............................................... 32
List of Serial Commands .......................................................... 33
FORM Command Parameters .................................................. 40
FORM Command Modifiers ...................................................... 40
Selection of Output Modes ....................................................... 41
Configuration commands for Modbus RTU .............................. 46
Troubleshooting Table .............................................................. 50
Error Messages ........................................................................ 51
Measured Parameters .............................................................. 54
Calculated Parameters ............................................................. 54
Performance ............................................................................. 54
Operating Environment ............................................................. 55
Outputs ..................................................................................... 55
General ..................................................................................... 56
DPT145 Spare Parts and Accessories ..................................... 57
Default Communication Settings .............................................. 60
Supported Function Codes ....................................................... 60
Modbus Register Map ............................................................. 61
Device Identification Objects .................................................... 62
6 ____________________________________________________________________ M211371EN-D
Chapter 1 _________________________________________________________ General Information
CHAPTER 1
GENERAL INFORMATION
This chapter provides general notes for the manual and the DPT145.
About This Manual
This manual provides information for installing, operating, and
maintaining Vaisala Multiparameter Transmitter DPT145 for SF6 Gas.
Contents of This Manual
This manual consists of the following chapters:
- Chapter 1, General Information, provides general notes for the manual
and the DPT145
- Chapter 2, Product Overview, introduces the features, advantages, and
the product nomenclature.
- Chapter 3, Functional Description, describes the primary application
and the sensor technology of DPT145.
- Chapter 4, Installation, provides you with information that is intended
to help you install the DPT145.
- Chapter 5, Operation, contains information that is needed to operate
the DPT145.
- Chapter 6, Maintenance, provides information that is needed in basic
maintenance of the DPT145.
- Chapter 7, Troubleshooting, describes common problems, their
probable causes and remedies, and provides contact information for
technical support.
- Chapter 8, Technical Data, provides the technical data of the DPT145.
VAISALA _________________________________________________________________________ 7
User's Guide _______________________________________________________________________
Version Information
Table 1
Manual Code
M211371EN-C
M211371EN-C
Manual Revisions
Description
This manual. Added a minimum baud rate
requirement when using the Modbus protocol.
Added a packing recommendation for return
shipment.
Previous version.
Related Manuals
Table 2
Manual Code
M211369EN
Related Manuals
Manual Name
DPT145 Quick Guide
Documentation Conventions
Throughout the manual, important safety considerations are highlighted
as follows:
WARNING
Warning alerts you to a serious hazard. If you do not read and follow
instructions very carefully at this point, there is a risk of injury or even
death.
CAUTION
Caution warns you of a potential hazard. If you do not read and follow
instructions carefully at this point, the product could be damaged or
important data could be lost.
NOTE
Note highlights important information on using the product.
8 ____________________________________________________________________ M211371EN-D
Chapter 1 _________________________________________________________ General Information
Safety
The DPT145 transmitter delivered to you has been tested for safety and
approved as shipped from the factory. Note the following precautions:
WARNING
Ground the product and verify outdoor installation grounding
periodically to minimize shock hazard.
CAUTION
Do not modify the unit. Improper modification can damage the product
or lead to malfunction.
CAUTION
Do not drop or hit the transmitter. The sensor is fragile and may break
from a sudden shock.
When transporting the transmitter, use the original shipping box from
Vaisala.
CAUTION
Do not open the connection between the adapter and the transmitter.
They are connected at the factory, and the connection should remain
unopened to guarantee tightness.
Use tools only on the nut of the adapter, where the transport protection
cap is connected.
NOTE
Keep the transmitter dry and clean.
Do not remove the yellow transport protection cap before you are ready
to install the transmitter. Uncapped transmitters will absorb moisture
which will affect the dewpoint measurement.
NOTE
Connect the transmitter directly to the main SF6 gas volume, not behind
a sampling line.
After installation, the transmitter will have a small amount of moisture
inside it. In still, dry gas it takes a long time until vapor pressure inside
the measurement cell reaches equilibrium with the main gas tank. It is not
unusual for the stabilization of the dewpoint reading to take several days
after installation.
VAISALA _________________________________________________________________________ 9
User's Guide _______________________________________________________________________
ESD Protection
Electrostatic Discharge (ESD) can cause immediate or latent damage to
electronic circuits. Vaisala products are adequately protected against
ESD for their intended use. It is possible to damage the product,
however, by delivering electrostatic discharges when touching,
removing, or inserting any objects inside the equipment housing.
To make sure you are not delivering high static voltages yourself:
- Handle ESD sensitive components on a properly grounded and
protected ESD workbench.
- When an ESD workbench is not available, ground yourself to the
equipment chassis with a wrist strap and a resistive connection cord.
- If you are unable to take either of the above precautions, touch a
conductive part of the equipment chassis with your other hand before
touching ESD sensitive components.
- Always hold component boards by the edges and avoid touching the
component contacts.
Recycling
Recycle all applicable material.
Dispose of the unit according to statutory regulations. Do not dispose of
with regular household refuse.
10 ___________________________________________________________________ M211371EN-D
Chapter 1 _________________________________________________________ General Information
Regulatory Compliances
The Vaisala Multiparameter Transmitter DPT145 for SF6 Gas is in
conformity with the provisions of the following EU directive(s):
- EMC-Directive
Conformity is shown by compliance with the following standards:
- EN 61326-1: Electrical equipment for measurement, control, and
laboratory use – EMC requirements – for use in industrial locations.
- EN 550022: Information technology equipment – Radio disturbance
characteristics – Limits and methods of measurement.
Patent Notice
The Vaisala Multiparameter Transmitter DPT145 for SF6 Gas is
protected by, for example, the following patents and their corresponding
national rights:
Finnish patent 98861, French patent 6650303, German patent 69418174,
Japanese patent 3585973, UK patent 0665303, and U.S. patent 5607564.
Trademarks
BAROCAP® and DRYCAP® are registered trademarks of Vaisala Oyj.
Windows® is a registered trademark of Microsoft Corporation in the
United States and/or other countries.
VAISALA ________________________________________________________________________ 11
User's Guide _______________________________________________________________________
Software License
This product contains software developed by Vaisala. Use of the software
is governed by license terms and conditions included in the applicable
supply contract or, in the absence of separate license terms and
conditions, by the General License Conditions of Vaisala Group.
Warranty
Visit our Internet pages for more information and our standard warranty
terms and conditions: www.vaisala.com/warranty.
Please observe that any such warranty may not be valid in case of
damage due to normal wear and tear, exceptional operating conditions,
negligent handling or installation, or unauthorized modifications. Please
see the applicable supply contract or Conditions of Sale for details of the
warranty for each product.
12 ___________________________________________________________________ M211371EN-D
Chapter 2 ___________________________________________________________ Product Overview
CHAPTER 2
PRODUCT OVERVIEW
This chapter introduces the features, advantages, and the product
nomenclature.
Introduction to DPT145
Vaisala Multiparameter Transmitter DPT145 for SF6 Gas is a digital
transmitter with a non-isolated RS-485 output. Its compact size makes it
well suited for integration into OEM systems.
DPT145 is always delivered with an integrated mechanical adapter:
DILO DN20, DILO DN8, ABB Malmkvist, or Alstom G1/2". The
connection between the adapter and the transmitter is helium leak tested
at the factory.
DPT145 combines online measurement of dewpoint, pressure, and
temperature. DPT145 also calculates four other quantities, including SF6
density.
Table 3
Parameter
Output Parameters of DPT145
Abbreviation Metric Unit Non-Metric
Unit
Tdf
ºC
ºF
Tdfatm
ºC
ºF
Dewpoint/frost point temperature*
Dewpoint/frost point temperature*,
converted to atmospheric pressure
ppm moisture, by volume
H20
ppm
ppm
Pressure, absolute
P
bara
psia
Pressure, normalized to 20 °C
Pnorm
bara
psia
(68 °F)
3
3
Density
Rhoo
kg/m
kg/m
Temperature
T
ºC
ºF
* When the dewpoint is below 0 °C, the transmitter outputs frostpoint for Td
VAISALA ________________________________________________________________________ 13
User's Guide _______________________________________________________________________
Basic Features and Options
- Utilizes the Vaisala MPS1 multiparameter sensor with Vaisala’s
BAROCAP® and DRYCAP® technologies.
- Measurement ranges of measured parameters:
- Dewpoint
-50 ... +30 °C (-58 ... +86 °F) Td
- Pressure, absolute 1 ... 12 bar (14.5 ... 174 psi)
- Temperature -40 ... +80 °C (-40 ... +176 °F)
- Measurement is configurable for pure SF6 or mixed gas.
- Non-isolated RS-485 digital output.
- Easy verification of dewpoint measurement with the Vaisala
DRYCAP® Hand-Held Dewpoint Meter DM70.
- Delivered with an integrated mechanical adapter that must be
specified during ordering. The adapter options are:
- DILO DN20
- DILO DN8
- ABB Malmkvist
- Alstom G1/2"
- Optional accessories:
- Weather shield: necessary for outdoor installations.
- USB service cable for configuration and calibration.
1107-031
Figure 1
DPT145 with DILO DN20 Adapter
14 ___________________________________________________________________ M211371EN-D
Chapter 2 ___________________________________________________________ Product Overview
Transmitter Parts
1
3
2
4
7
6
5
8
1107-033
Figure 2
1
2
3
4
5
DPT145 Transmitter Parts and Adapters
=
=
=
=
=
Port I: Supply voltage only (optional)
Port II: RS-485 line and supply voltage
Type label
Connection between transmitter body and adapter – do not open
DILO DN20 adapter: 50 mm nut with M45X2 inner thread /
DILO DN8 adapter: 32 mm nut with M26X1.5 inner thread
6 = ABB Malmkvist adapter
7 = Alstom G1/2" adapter
8 = Transport protection cap – remove only when ready to install
VAISALA ________________________________________________________________________ 15
User's Guide _______________________________________________________________________
Weather Shield
The transmitter and its connectors are rated IP65. However, installing the
transmitter outside without protection is not recommended. The
installation should be such that the transmitter is not exposed to direct
rain, icing, or solar radiation.
A suitable weather shield is available from Vaisala. The weather shield is
designed to clamp over the adapter, and to accommodate the available
cable options.
1108-022
Figure 3
Weather Shield
DPT145 is assembled to the weather shield at the factory if the weather
shield is ordered with the transmitter. Weather shields are also available
separately.
16 ___________________________________________________________________ M211371EN-D
Chapter 3 _______________________________________________________ Functional Description
CHAPTER 3
FUNCTIONAL DESCRIPTION
This chapter describes the primary application and the sensor technology
of DPT145.
Measurement Needs of SF6 Insulation
Sulphur hexafluoride (SF6) is used as an insulating gas in transmission
and distribution equipment such as switchgears and circuit breakers. It
effectively prevents arcing during switch-offs and protects equipment
from failures.
In order to maintain SF6 insulation properties and to reduce the formation
of unwanted secondary decomposition products, the amount of water
vapor in the gas insulated system (GIS) should be kept to a minimum.
Also, the SF6 system needs to be pressure tight for best insulation
performance and safe operation of the equipment.
There is always some diffusion of water molecules from high ambient
water vapor pressure to low vapor pressure inside the system. The more
connection points the higher the diffusion rate. DPT145 is ideally suited
to the online monitoring of dewpoint, pressure, and temperature in such a
system. Sudden and minor leakages are immediately detected by the
direct normalized pressure measurement, while online dewpoint
measurement alerts the user to moisture issues.
With online monitoring, on-site visits can be kept to a minimum. The
long calibration interval of DPT145 means practically service-free
operation.
VAISALA ________________________________________________________________________ 17
User's Guide _______________________________________________________________________
Sensor Technology
MPS1 Multiparameter Sensor
DPT145 combines Vaisala’s proven DRYCAP® sensor technology for
industrial dewpoint measurement with BAROCAP® pressure sensor
technology. Both technologies are integrated on the same MPS1
multiparameter sensor element, allowing for a highly compact and
versatile transmitter.
1108-021
Figure 4
MPS1 Sensor
There are several important advantages in using a transmitter with an
integrated sensor:
- Reduces installation work and cost.
- Improves the leak tightness of the system as connection points are
minimized.
- Enables online monitoring of all supported parameters.
DRYCAP® Technology
Vaisala DRYCAP® dewpoint measurement technology ensures accurate
measurement with excellent long term stability. This results in very low
maintenance requirements for the transmitter. The lasting performance is
achieved with microprocessor technology and software that automatically
performs self-diagnostic functions in addition to the normal dewpoint
measurement. The self-diagnostic procedures that are conducted are
called auto-calibration and sensor purge.
18 ___________________________________________________________________ M211371EN-D
Chapter 3 _______________________________________________________ Functional Description
Auto-Calibration
The auto-calibration feature of the MPS1 multiparameter sensor is an
automatic procedure which greatly reduces the possible drift in the dry
end of the dewpoint measurement. It is performed at one hour intervals,
and when the power is switched on. During auto-calibration the sensor is
warmed for a short period (< 1 min) and the sensor capacitance values
are evaluated at the elevated temperature. The possible dry end drift is
then corrected to correspond to the calibrated values. During the autocalibration the transmitter outputs the dewpoint value prior to the
procedure.
Auto-calibration is carried out only if several criteria for the
measurement environment are fulfilled. This ensures the reliability of the
adjustments, and maintains the excellent long term stability. These
criteria include, for example, a stable enough moisture level in the
measured atmosphere. If the conditions are not fulfilled, the autocalibration function is postponed until satisfactory conditions are
reached.
Sensor Purge
Sensor purge is also an automatic procedure that minimizes the drift at
the wet end readings of the dewpoint measurement. Sensor purge is
performed twice a day, and five minutes after the power is switched on.
The sensor is heated for several minutes which will then evaporate all
excess molecules out of the sensor polymer. This, together with the autocalibration, results in a very small drift of the sensor due to the very
linear behavior of the polymer technology.
BAROCAP® Technology
The BAROCAP® silicon capacitive absolute pressure sensor was
developed by Vaisala for barometric pressure measurement applications.
The BAROCAP® sensor has excellent hysteresis and repeatability
characteristics, low temperature dependence, and a very good long-term
stability. The ruggedness of the BAROCAP® sensor is outstanding and
the sensor is resistant to mechanical and thermal shocks. The pressure
measurement of the MPS1 multiparameter sensor is based on an
advanced RC oscillator and reference capacitors against which the
capacitive pressure sensor is continuously measured. The microprocessor
of the transmitter performs compensation for pressure linearity and
temperature dependence.
VAISALA ________________________________________________________________________ 19
User's Guide _______________________________________________________________________
DPT145 Start-up Sequence
When the transmitter is powered up, it will perform the sequence shown
in Figure 5 below. After a five-second startup, the transmitter will
measure normally for five minutes, after which it will perform the sensor
purge and auto-calibration functions. This can take up to six minutes,
during which time the output is frozen: it will display the last measured
values before the sensor purge began.
Normal operation and output is typically achieved no later than 11
minutes after startup. The sensor purge will repeat every 12 hours, and
auto-calibration every hour. The output will again be frozen for their
duration.
Purge*
3 ... 4 min
Startup
Normal output
Autocal**
<2 min
Output frozen
Normal output
Time
5s
5 min
3 ... 6 min
* Purge will repeat every 12 hours
** Autocal will repeat every 60 minutes (is postponed if environment is not suitable)
1108-033
Figure 5
NOTE
DPT145 Startup Sequence
The transmitter always performs this sequence when starting up. Keep
the transmitter continuously powered to optimize its measurement
performance and availability.
20 ___________________________________________________________________ M211371EN-D
Chapter 4 ________________________________________________________________ Installation
CHAPTER 4
INSTALLATION
This chapter provides you with information that is intended to help you
install the DPT145.
Transmitter Configuration Before Installation
Depending on your application, you may need to configure some
transmitter features before physically installing it.
1.
2.
3.
By default, DPT145 transmitters are configured for single
transmitter operation. Serial operation mode is STOP and
address is 0.
To configure transmitters for operation on a common line, you
must give each transmitter a unique address (range 0 ... 255) and
set their serial operation mode to POLL.
The default serial line settings may not be right for your RS-485
line.
You may need to change the transmitter’s settings for the measured
gas. You can configure the mixing ratio of SF6, and the molar
weight of the other gas.
An easy way to configure the measured gas is to connect the DPT145 to
the MI70 indicator using the MI70 connection cable (Vaisala order code
219980). You can change the settings in the Measurement Settings
menu. See Figure 6 below.
1108-039
Figure 6
DPT145 Configuration with the MI70 Indicator
For full configuration options, use the USB service cable and a terminal
program on a PC. Instructions for using the serial line and the serial
commands are provided in Chapter 5, Operation, on page 30.
VAISALA ________________________________________________________________________ 21
User's Guide _______________________________________________________________________
Selecting the Location
Online dewpoint measurement in still gas is much more demanding than
pressure or temperature measurement. A very tight installation is crucial:
not only pressure tight, but also vapor tight.
It is always best to connect the transmitter directly to the main SF6
gas volume, not behind a sampling line. Avoid extension pipes,
T-pieces, and multi-connection points.
1108-034
Figure 7
Indoor Installation in a Circuit Breaker
22 ___________________________________________________________________ M211371EN-D
Chapter 4 ________________________________________________________________ Installation
Warning – Read Before Installation
CAUTION
Do not drop or hit the transmitter. The sensor is fragile
and may break from a sudden shock.
When transporting the transmitter, use the original
shipping box from Vaisala.
CAUTION
Do not open the connection between the adapter and
the transmitter. They are connected at the factory, and
the connection should remain unopened to guarantee
tightness.
Use tools only on the nut of the adapter, where the
transport protection cap is connected.
NOTE
Keep the transmitter dry and clean.
Do not remove the yellow transport protection cap
before you are ready to install the transmitter.
Uncapped transmitters will absorb moisture which will
affect the dewpoint measurement.
NOTE
Connect the transmitter directly to the main SF6
gas volume, not behind a sampling line.
After installation, the transmitter will have a small
amount of moisture inside it. In still, dry gas it takes a
long time until vapor pressure inside the measurement
cell reaches equilibrium with the main gas tank. It is
not unusual for the stabilization of the dewpoint
reading to take several days after installation.
VAISALA ________________________________________________________________________ 23
User's Guide _______________________________________________________________________
Installation Without Weather Shield
1. Remove the yellow transport protection plug when
you are ready to install the transmitter.
2. Install the transmitter to the mechanical coupling
and tighten by hand.
3. Use a wrench to tighten the connection. Turn from
the adapter, not from the transmitter body!
Use sufficient force to achieve a tight installation.
The system must be leak-free for accurate
measurement.
4. Connect the cable to port II on the transmitter.
Use a cable with a suitable connector for your
installation (straight or angled).
Let some of the cable hang from the back of the
transmitter, so that condensation cannot run along
the cable to the transmitter.
24 ___________________________________________________________________ M211371EN-D
Chapter 4 ________________________________________________________________ Installation
Installation With Weather Shield
1. When DPT145 is ordered with the weather
shield, the transmitter is delivered already
attached to the shield.
If you have ordered the weather shield
separately, attach the transmitter to the
weather shield before continuing this
procedure. Fit the clamp of the weather
shield over the adapter, not the transmitter
body. For ABB Malmkvist and Alstom
G1/2" type adapters, place the clamp over
the notches in the adapter.
2. Use an 8 mm box-end wrench to loosen
the four bolts that hold the weather shield
cover. Remove the cover.
It is not necessary to remove the bolts,
they can remain in place during
installation.
3. Remove the yellow transport protection
plug. Make sure the surfaces are clean and
dry.
VAISALA ________________________________________________________________________ 25
User's Guide _______________________________________________________________________
4. Install the transmitter to the mechanical
coupling and tighten by hand. Try to keep
the weather shield level.
5. Use a wrench to tighten the connection.
Turn from the adapter, not from the
transmitter body!
Use sufficient force to achieve a tight
installation. The system must be leak-free
for accurate measurement.
If the weather shield is tilted after the
installation, you can straighten it by
loosening the two nuts that keep the clamp
tight. Tighten the nuts after weather shield
is straight.
Note: The cable with the angled connector
has a fixed direction, and is designed to be
routed straight down from port II. If you
rotate the transmitter inside the weather
shield, or if you have the Alstom G1/2"
type adapter, you may have to use a cable
with a straight connector.
26 ___________________________________________________________________ M211371EN-D
Chapter 4 ________________________________________________________________ Installation
6. Connect the cable to port II on the
transmitter, and route the cable to the cable
clamp on the underside of the weather
shield. Attach the cable using a crosshead
screwdriver.
Note: Let some of the cable hang from the
back of the transmitter, so that
condensation cannot run along the cable to
the transmitter.
For cables with a straight connector:
move the rubber plug to the bottom hole
and route the cable from the back of the
weather shield.
7. Replace the weather shield cover using an
8 mm box-end wrench.
VAISALA ________________________________________________________________________ 27
User's Guide _______________________________________________________________________
Wiring
Standard Wiring
Connect supply voltage and RS-485 to port II. Port I does not need to be
used at all, and can remain covered.
2
4
1
3
1
+
2
-
15 ... 28 VDC
GND
RS-485 +
RS-485 -
3
4
SHIELD
1108-015
Figure 8
Wiring Non-Isolated RS-485
Wire Colors for Vaisala Cables
Pin
1
2
3
4
Connection on Port I
VDC supply+
GND
Connection on Port II
VDC supply+
RS-485 D0GND
RS-485 D1+
Wire Color
Brown
White
Blue
Black
Note the following:
- The ground pin (pin 3) on both ports is internally connected to each
other and to transmitter chassis. The chassis connection is through a
1 MΩ resistor and a 40 nF capacitor that are connected in parallel.
- The frames of the M8 connectors are not connected to the chassis.
28 ___________________________________________________________________ M211371EN-D
Chapter 4 ________________________________________________________________ Installation
Alternate Wiring for Power Supply
If necessary, you can provide supply voltage using Port I, and only wire
RS-485 for Port II. Do not supply power from both ports.
2
1
4
3
1 = VDC+
+
3 = GND
-
15 ... 28 VDC
1108-016
Figure 9
Wiring Power Supply Using Port I
Stabilization of Dewpoint Reading After
Installation
After installation, the transmitter will have a small amount of moisture
inside it. In still, dry gas it takes a long time until vapor pressure inside
the measurement cell reaches equilibrium with the main gas tank. It is not
unusual for the stabilization of the dewpoint reading to take several days
after installation.
VAISALA ________________________________________________________________________ 29
User's Guide _______________________________________________________________________
CHAPTER 5
OPERATION
This chapter contains information that is needed to operate the DPT145.
Transmitter Start-Up
When the transmitter is connected to power supply, there is a delay of
five seconds as the transmitter starts up. After the start-up is complete,
the transmitter will behave according to the configured serial mode:
- In STOP mode, the transmitter outputs the transmitter model and
software version.
- In RUN mode a measurement output starts immediately.
- In POLL mode the transmitter does not output anything after powerup.
- In MODBUS mode, the transmitter does not output anything after
power-up.
For a description of the modes, see section Set Serial Line Operating
Mode on page 41.
For a description of how the diagnostic functions of the sensor affect the
availability of live measurement at start-up, see section DPT145 Start-up
Sequence on page 20.
30 ___________________________________________________________________ M211371EN-D
Chapter 5 _________________________________________________________________ Operation
Serial Communication
Connecting to the Serial Interface
DPT145 can be connected to a PC using the RS-485 line on
Port II. It is recommended that you use the USB service cable (Vaisala
order code 219690) for the connection, since the cable also provides the
operating power from the USB port.
If you have not used the USB service cable before, install the driver that
came with the cable. Refer to section Installing the Driver for the USB
Service Cable below for detailed instructions.
Installing the Driver for the USB Service Cable
Before taking the USB service cable into use, you must install the
provided USB driver on your PC. When installing the driver, you must
acknowledge any security prompts that may appear. The driver is
compatible with Windows 2000, Windows XP, Windows Server 2003,
and Windows Vista.
1.
Check that the USB service cable is not connected. Disconnect the
cable if you have already connected it.
2.
Insert the media that came with the cable, or download the driver
from www.vaisala.com.
3.
Execute the USB driver installation program (setup.exe), and
accept the installation defaults. The installation of the driver may
take several minutes.
4.
After the driver has been installed, connect the USB service cable
to a USB port on your PC. Windows will detect the new device,
and use the driver automatically.
5.
The installation has reserved a COM port for the cable. Verify the
port number, and the status of the cable, using the Vaisala USB
Instrument Finder program that has been installed in the
Windows Start menu.
Windows will recognize each individual cable as a different device, and
reserve a new COM port. Remember to use the correct port in the
settings of your terminal program.
There is no reason to uninstall the driver for normal use. However, if you
wish to remove the driver files and all Vaisala USB cable devices, you
can do so by uninstalling the entry for Vaisala USB Instrument Driver
from the Add or Remove Programs (Programs and Features in
Windows Vista, or later) in the Windows Control Panel.
VAISALA ________________________________________________________________________ 31
User's Guide _______________________________________________________________________
Terminal Application Settings
The serial interface settings of the DPT145 RS-485 line are presented in
Table 4 below.
Table 4
Property
Baud rate
Parity
Data bits
Stop bits
Flow control
Default Serial Interface Settings
Description / Value
19200
None
8
1
None
The steps below describe how to connect to the DPT145 using the
PuTTY terminal application for Windows (available for download at
www.vaisala.com) and a USB serial interface cable:
1.
2.
3.
4.
5.
Connect the USB serial interface cable between your PC and the
RS-485 port of DPT145 (port II).
Start the PuTTY application.
Select the Serial settings category, and check that the correct COM
port is selected in the Serial line to connect to field.
Note: You can check which port the USB cable is using with the
Vaisala USB Instrument Finder program that has been installed
in the Windows Start menu.
Check that the other serial settings are correct for your connection,
and change if necessary. Flow control should be set to None unless
you have a reason to change it.
Click the Open button to open the connection window and start
using the serial line.
Note: If PuTTY is unable to open the serial port you selected, it
will show you an error message instead. If this happens, restart
PuTTY and check the settings.
6.
You may need to adjust the Local echo setting in the Terminal
category to see what you are typing on the serial line. To access the
configuration screen while a session is running, click the right
mouse button over the session window, and select Change
Settings... from the pop-up menu.
If the DPT145 is in Modbus mode, to access the serial port command
interface, follow the procedure in Accessing Serial Port Command
Interface from Modbus Mode on page 45.
32 ___________________________________________________________________ M211371EN-D
Chapter 5 _________________________________________________________________ Operation
0807-004
Figure 10
PuTTY Terminal Application
List of Serial Commands
All commands can be issued either in uppercase or lowercase. In the
command examples, the keyboard input by the user is in bold type.
The notation <cr> refers to pressing the carriage return (Enter) key on
your computer keyboard. Enter a <cr> to clear the command buffer
before starting to enter commands.
Table 5
List of Serial Commands
Command
?
??
ADDR [0 … 255]
CLOSE
Description
Show device information
Show device information (overrides poll mode)
Show or set transmitter address
Close the temporary connection and return the
device to POLL mode
ERRS
Display the currently active errors
FORM [modifier string] Set output format
FRESTORE
Restore factory settings
HELP
Show list of currently available serial commands
INTV [0 ... 255 S/MIN/H] Set the continuous output interval (for RUN mode
and R command)
OPEN [0 … 255]
Open a line to transmitter at defined address
R
Start the continuous outputting
RESET
Reset the transmitter
S
Stop the continuous outputting
SDELAY [0 … 255]
Set response sending delay
SEND [0 … 255]
Output readings once (specify address for
transmitters in POLL mode)
VAISALA ________________________________________________________________________ 33
User's Guide _______________________________________________________________________
Command
SERI [baud p d s]
SMODE [mode]
SNUM
TIME
UNIT [m/n]
VERS
PNORMT [-100 ... 100]
MIXRATIO [0 ... 100]
N2MOLW [weight]
Description
Show or set the serial interface settings
Show or set startup serial mode:
RUN, STOP, POLL, or MODBUS
Display transmitter serial number
Show transmitter uptime
Select metric or non-metric units
Show transmitter firmware version
Show or set the temperature for pressure
normalization
Show or set ratio (%) of SF6 in the measured
environment
Show or set molecular weight of other gas
Device Information
Show Device Information
The ? command outputs a listing of device information.
?<cr>
Command ?? is a similar command that is designed to be used if the
transmitter is in POLL mode but its address is unknown. The transmitter
will respond to the ?? command even while in POLL mode. Do not use
the ?? command if you have more than one transmitter on an RS-485
line.
Example:
?
DPT145 1.0.23
Serial number :
Batch number
:
Module number :
Sensor number :
Cal. date
:
Cal. info
:
Time
:
Serial mode
:
Baud P D S
:
Output interval:
Serial delay
:
Address
:
Mixing ratio
:
Ideal gas MolW :
F4040007
F3420050
F3410001
F1610000
20110907
Vaisala/HEL
02:41:01
STOP
19200 N 8 1
5 S
10
0
100.00% SF6 and
0.00% ideal gas
2.8013401e-02 kg/mol
34 ___________________________________________________________________ M211371EN-D
Chapter 5 _________________________________________________________________ Operation
Show Currently Active Errors
Use the ERRS command to display the currently active transmitter error
messages. Possible errors and their causes are listed in Table 11 on page
51.
ERRS<cr>
Example:
errs
No errors
Example (one active error, caused by physical damage to the sensor):
errs
T MEAS error
Show Command List
Use the HELP command to list the serial commands:
HELP<cr>
Example:
help
ADDR
CLOSE
ERRS
FORM
FRESTORE
INTV
OPEN
R
RESET
SDELAY
SEND
SERI
SMODE
SNUM
TIME
UNIT
VERS
PNORMT
MIXRATIO
N2MOLW
VAISALA ________________________________________________________________________ 35
User's Guide _______________________________________________________________________
Show Firmware Version
VERS<cr>
Example:
vers
DPT145 1.0.23
Show Serial Number
SNUM<cr>
Example:
snum
Serial number
: F4040007
Serial Line Output Commands
Start Measurement Output
Use the R command to start the continuous outputting of measurement
values as an ASCII text string to the serial line. The format of the
measurement message is set with the FORM command.
R<cr>
Example (measurement message in default format):
r
Tdf= 12.5 'C Tdfatm= 13.6
Pnorm= 0.943 bara Rhoo=
Tdf= 12.5 'C Tdfatm= 13.6
Pnorm= 0.942 bara Rhoo=
Tdf= 12.5 'C Tdfatm= 13.5
Pnorm= 0.943 bara Rhoo=
...
'C H2O= 15561 ppm P=
1.1 kg/m3 T= 24.5 'C
'C H2O= 15563 ppm P=
1.1 kg/m3 T= 24.5 'C
'C H2O= 15555 ppm P=
1.1 kg/m3 T= 24.5 'C
0.947 bara
0.947 bara
0.948 bara
Outputting the results continues in intervals issued with the command
INTV. You can stop the output by pressing the Esc key, or with the
command S. Since the interface is half-duplex, you must enter the
commands when the transmitter is not outputting.
Stop Measurement Output
You can stop the measurement output by pressing ESC, or with the S
command:
S<cr>
36 ___________________________________________________________________ M211371EN-D
Chapter 5 _________________________________________________________________ Operation
Set Output Interval
Use the INTV command to change the output interval of the
automatically repeating measurement messages. The measurement
messages are repeated in the RUN mode, or after the R command has
been given.
INTV [n xxx]<cr>
where
n
xxx
=
=
time interval, range 0 ... 255
time unit = "S", "MIN", or "H"
The shortest output interval (with n = 0) outputs the measurement
messages as quickly as the transmitter’s internal measurement cycle
produces them, without additional delay.
Example:
intv 1 min
Output interval:
1 MIN
Output a Reading Once
Use the SEND command to output a single measurement message. The
output message is sent in the format that has been set using the FORM
command.
SEND [address]<cr>
where
address =
Address of the transmitter, range 0 ... 255.
Specifying the address is only necessary if the target
transmitter is in POLL mode, and has not been accessed
with the OPEN command.
Example:
send
Tdf= 15.4 'C Tdfatm= 16.2 'C H2O= 18539 ppm P=
Pnorm= 0.951 bara Rhoo= 1.1 kg/m3 T= 25.4 'C
0.959 bara
VAISALA ________________________________________________________________________ 37
User's Guide _______________________________________________________________________
Configuring Measurement Parameters
Set Mixing Ratio
Use the MIXRATIO command to set the mixing ratio of SF6 and the
other gas.
MIXRATIO [ratio]<cr>
where
ratio = Amount of SF6 in the measurement environment, range
0 ... 100%.
Example:
mixratio 50
MIX RATIO
:
50.00 %
Set Molar Weight of Other Gas
Use the N2MOLW command to set the molar weight of the other gas
(not SF6) in the measurement environment.
N2MOLW [weight]<cr>
where
weight = Molar weight of the other gas in kg/mol. The default is
2.8013401e-02, which is the molar mass of N2.
Example:
n2molw
OTHER GAS MOLAR: 2.8013401e-02 kg/mol ?
Set Pressure Normalization Temperature
Use the PNORMT command to set the temperature that is used to
calculate the normalized pressure parameter.
PNORMT [t]<cr>
where
t = Temperature in Celsius, range -100 ... 100. The default is 20.
Example:
pnormt 20
P_NORM_T
:
20.00 'C
38 ___________________________________________________________________ M211371EN-D
Chapter 5 _________________________________________________________________ Operation
Set Measurement Output Format
Use the serial line command FORM to change the measurement message
sent by the transmitter. You can freely define the output message to
include the desired parameters, formatting options, text strings, and
additional fields.
FORM [modifier string]<cr>
where
modifier string =
String of parameters and modifiers that defines the
output format, length 1 ... 153 characters.
Maximum length may be shorter when text strings
are used. See Table 6 and Table 7 on page 40, and
examples below.
You can return to the default format using the "FORM /" command.
Example of default output (continuous output from RUN mode):
Tdf= 8.1 'C Tdfatm= 8.2
Pnorm= 0.992 bara Rhoo=
Tdf= 8.1 'C Tdfatm= 8.2
Pnorm= 0.992 bara Rhoo=
...
'C H2O= 10870 ppm
6.0 kg/m3 T= 22.8
'C H2O= 10878 ppm
6.0 kg/m3 T= 22.8
P=
'C
P=
'C
1.002 bara
1.002 bara
Command to set output format as Tdf and P with Modulus-256
checksum:
form 3.1 "Tdf=" Tdf U3 3.3 "P=" P " " U4 " " CS2 \r \n
Output example:
Tdf= 12.5'C P=
Tdf= 12.5'C P=
...
0.949 bara 72
0.950 bara 6A
Command to set output format as Tdf and P, with start of text (ASCII
character 002) and end of text (003) ASCII codes, and without line feed
and carriage return at the end:
form #002 3.1 "Tdf=" Tdf U3 3.3 "P=" P " " U4 #003
Output example (ASCII codes not visible here):
Tdf= 11.6'C P= 0.952 baraTdf= 11.6'C P= 0.951 baraTdf=
11.6'C P= 0.951 baraTdf= 11.6'C P= 0.950 baraTdf= 12.5'C
P= 0.951 baraTdf= 12.3'C P= 0.952 bara
...
VAISALA ________________________________________________________________________ 39
User's Guide _______________________________________________________________________
Table 6
FORM Command Parameters
Measured Parameter
Dewpoint/frost point temperature
Dewpoint/frost point temperature,
converted to atmospheric pressure
ppm moisture, by volume
Pressure, absolute
Pressure, normalized
Density
Temperature
Table 7
Modifier
x.y
#t
#r
#n
""
#xxx
ADDR
ERR
SN
TIME
Ux
CS2
CS4
CSX
Abbreviation in FORM Command
Tdf
Tdfa
H20
P
Pnorm
Rhoo
Ta
FORM Command Modifiers
Description
Length modifier (number of digits and decimal places)
Tabulator
Carriage-return
Line feed
String constant, length 1 ... 15 characters
ASCII code value (decimal) of a special character;
for example, #027 for ESC
Transmitter address (0 ... 255)
Currently active transmitter errors in a four bit field:
bit0bit1bit2bit3bit4
bit0 T MEAS error
bit1 P out of range error
bit2 Fmeas error
bit3 Flash csum error
Transmitter serial number
Time since transmitter was started or reset
Shows the name of the measurement unit using “x” number
of characters. For example, U3 shows the name of the
measurement unit with three characters
Modulus-256 checksum of message sent so far, ASCII
encoded hexadecimal notation
Modulus-65536 checksum of message sent so far, ASCII
encoded hexadecimal notation
NMEA xor-checksum of message sent so far, ASCII encoded
hexadecimal notation
40 ___________________________________________________________________ M211371EN-D
Chapter 5 _________________________________________________________________ Operation
Select Unit
Use the UNIT command to select metric or non-metric output units.
UNIT [x]<cr>
where
x
=
Selects the unit type to output:
m = metric units, for example, Celsius
n = nonmetric units, for example, Fahrenheit
Example:
unit m
Units
: Metric
Configuring Serial Line Operation
Set Serial Line Operating Mode
Use the SMODE command to set the start-up operating mode of the
serial line.
SMODE [mode]<cr>
where
mode =
Table 8
Mode
STOP
RUN
POLL
MODBUS
STOP, RUN, or POLL.
Selection of Output Modes
Measurement Output
Only with the SEND command.
Automatic output.
Only with the SEND [addr]
command.
Must be read from the
transmitter using MODBUS
protocol.
Available Commands
All (default mode).
Only command S.
SEND [addr] and OPEN [addr].
Other commands available after
opening a line to the transmitter
using the OPEN command.
Use with RS-485 buses where
multiple transmitters can share
the same line.
Modbus protocol only; see
Appendix A, Modbus Reference
on page 60.
If the Modbus mode is activated, serial port commands cannot be used
with the device. To access the serial port command interface, follow the
procedure in Accessing Serial Port Command Interface from Modbus
Mode on page 45.
VAISALA ________________________________________________________________________ 41
User's Guide _______________________________________________________________________
Selected output mode will be activated at next reset or power up.
Example:
smode poll
Serial mode
:
POLL
Set Serial Line Settings
Use the SERI command to set the serial line settings. The new settings
will be taken into use when the transmitter is reset or powered up.
Note that changing the serial line settings will slightly alter how the
transmitter works with the MI70 indicator. If you are not using the
default settings of 19200 N 8 1, you will have to power off the MI70
before it can find the transmitter (you will not be able to connect it onthe-fly).
When using the Modbus protocol, the baud rate must be 9600 or higher.
SERI [b p d s]<cr>
where
b
p
d
s
=
=
=
=
baud rate (300, 600, 1200, 2400, 4800, 9600, or 19200)
parity (n = none, e = even, o = odd)
data bits (7 or 8)
stop bits (1 or 2)
Example:
seri 9600 e 7 1
Baud P D S
:
9600 E 7 1
Set Transmitter Address
To operate in the POLL mode, the transmitter must have an address. If
multiple transmitters share the same serial line, each transmitter must
have a different address.
For a description of the serial interface modes, see section Set Serial Line
Operating Mode on page 41.
ADDR [address]<cr>
where
address
=
Transmitter address, range 0 ... 255.
42 ___________________________________________________________________ M211371EN-D
Chapter 5 _________________________________________________________________ Operation
Example:
addr
Address
:
0
?
Set Serial Line Response Time
With the SDELAY command you can set delay (response time) of the
serial line, or view the currently set delay value. Increasing the value by
one increases the delay by 4 milliseconds. For example, the default value
is 10 which equals a ~40 ms answer delay.
SDELAY [delay]<cr>
where
delay =
Serial line delay, range 0 … 255.
Example:
sdelay 20
Serial delay
:
20
Other Commands
Opening the Transmitter in POLL Mode
Use the OPEN command to connect to a transmitter that is in POLL
mode.
OPEN [address]<cr>
where
address = Transmitter address, range 0 ... 255.
Example (target transmitter in POLL mode, with address 5):
open 5
DPT145
5 line opened for operator commands
VAISALA ________________________________________________________________________ 43
User's Guide _______________________________________________________________________
Closing the Connection to a Transmitter
in POLL Mode
The CLOSE command closes the connection to a transmitter.
CLOSE<cr>
Example:
close
line closed
Show Transmitter Uptime
Use the TIME command to show how long the transmitter has been
operating since it was last reset or powered up.
TIME<cr>
Example:
time
Time
: 00:51:41
Reset Transmitter
Use the RESET command to reset the transmitter.
RESET<cr>
When the RESET command is given, the transmitter will restart as if it
had just been powered on. All transmitter settings are retained. The serial
line mode of the transmitter will be set to the mode that was set using the
SMODE command.
Restore Factory Settings
Use the FRESTORE command to restore the factory settings to the
transmitter. All user settings will be lost.
FRESTORE<cr>
44 ___________________________________________________________________ M211371EN-D
Chapter 5 _________________________________________________________________ Operation
Modbus Communication
Addressing with Modbus Protocol
The Modbus variant used in DPT145 communication is Modbus RTU.
An example of Modbus addressing is shown below.
Request:
0x01 0x03 0x00 0x04
addr. func.
reg. 5
Response:
0x01 0x03 0x04 0xBC 0xC0 0x41 0xC2 0x6E 0x5E
addr. func. len.
reg. 5
reg. 6
CRC check
0x00 0x02
2 registers
0x85 0xCA
CRC check
For a list of available Modbus registers, see Appendix A, Modbus
Reference on page 60.
Accessing Serial Port Command Interface from
Modbus Mode
You cannot change configuration settings (other than Modbus address)
while the device is in the Modbus mode. To use the configuration
commands on a Modbus-enabled device:
1.
2.
3.
Connect the USB service cable to the PC and install the driver, if
necessary.
Open the terminal program and open a connection to the
corresponding COM port using settings 19200, 8, N, 1, no flow
control.
Plug the service cable to the connector II of the instrument.
4.
In less than five seconds, send a hash character (#) and carriage
return (Enter) to the device using the terminal program. The device
is now ready for configuration commands. The Modbus mode is
restored on next power-up unless Modbus is disabled with
command SMODE.
For example, if you want to deactivate the Modbus mode on a DPT145
device, follow the procedure above and deactivate the Modbus mode
with the command SMODE STOP. On subsequent power-ups, the serial
command interface will be activated.
VAISALA ________________________________________________________________________ 45
User's Guide _______________________________________________________________________
Configuration Commands Related to Modbus
In addition to enabling the Modbus protocol in the device, Modbus over
RS-485 needs the following software settings: serial bit rate, parity,
number of stop bits, and Modbus device address.
Use the service commands listed in Table 9 below to configure the
Modbus RTU using the USB service cable.
Table 9
Configuration commands for Modbus RTU
Service Command
SMODE MODBUS
SERI b p 8 s
Description
Enable Modbus communication protocol.
See section Set Serial Line Operating Mode on page
41.
Change baud rate and parity.
b = baud rate (minimum 9600 when using Modbus)
p = parity (E, N, or O)
8 = number of data bits must be 8
s = number of stop bits (2 if parity is N, 1 otherwise*)
ADDR a
See section Set Serial Line Settings on page 42.
Set Modbus address.
a = new address (0…255)**
SDELAY d
See section Set Transmitter Address on page 42.
Add extra Modbus response delay.***
d = new delay in units of 1/250 seconds (0…255)
See section Set Serial Line Response Time on page 43.
* Modbus specification defines that two stop bits must be used if parity is N.
** Setting address to zero switches the instrument offline from the Modbus bus.
Addresses 248 … 255 are not supported by the Modbus standard but DPT145 works
with them.
*** Extra response delay can be used, for example, to avoid problems caused by
direction-switching delays in bus converters.
NOTE
The instrument must be switched off and on before the configuration
changes made with the service cable take effect.
46 ___________________________________________________________________ M211371EN-D
Chapter 6 _______________________________________________________________ Maintenance
CHAPTER 6
MAINTENANCE
This chapter provides information that is needed in basic maintenance of
the DPT145.
Periodic Maintenance
Cleaning
The body of the transmitter can be cleaned by wiping with a moistened
lint-free cloth. Do not immerse the transmitter in liquid, and do not use
cleaning agents or solvents.
Calibration and Adjustment
DPT145 is fully calibrated as shipped from factory. If there is a reason to
believe that the device is not within the accuracy specifications, you can
perform a field check using the DM70 hand-held dewpoint meter, or an
MI70 indicator with another DPT145.
If the field check indicates that the DPT145 is not within its accuracy
specifications, contact a Vaisala Service Center or your local Vaisala
representative to have the DPT145 adjusted.
Field Check Using an MI70 Indicator
Vaisala recommends the following equipment for field checking:
- A fully charged MI70 indicator (the measurement display that is
included in the DM70 package)
- A calibrated reference probe that is suitable for the intended
measurement environment and dewpoint range. The DMP74C probe
is recommended for checking the dewpoint and temperature
measurement accuracy. For checking all parameters, you can use
another DPT145 transmitter as a reference.
- You also need a connection cable (Vaisala order code: 219980) to
connect the DPT145 to the MI70 indicator. If you have two DPT145
transmitters, you need two cables.
VAISALA ________________________________________________________________________ 47
User's Guide _______________________________________________________________________
NOTE
In the procedure below, the readings of the transmitter and the reference
probe are checked simultaneously. You can also check the reference
probe and the DPT145 separately if they cannot be connected at the
same time.
Perform the check as follows:
1.
Place the reference probe and the DPT145 in the reference
environment.
2.
Connect the reference probe and the DPT145 to the MI70 indicator:
- Reference probe to Port I
- DPT145 to Port II
3.
4.
5.
Turn on the MI70 indicator.
Check and adjust the environment settings if prompted. Refer to the
DM70 User’s Guide for the settings of the DMP74C probe.
Disable the Auto power off function of the MI70 indicator to
prevent the indicator from powering off in the middle of the check.
Check the setting in the Settings - User Interface menu, and
change if necessary.
6.
The MI70 can display three parameters at one time. To compare
the readings of the DPT145 and the reference probe, select the desired
parameter from the Display – Quantities and Units menu of the MI70.
Select the same parameter from port I and II, and the delta parameter that
shows the difference between the two. For example, ∆Td/f shows the
difference in dewpoint between the two probes.
1108-039
Figure 11
7.
8.
Comparing Dewpoint Readings on MI70
After the measurement has stabilized, check the difference between
the readings. It will give you an indication of the approximate drift
of the DPT145 and its need for calibration. The difference between
the readings should be no greater than the combined measurement
uncertainty of the DPT145 and the reference probe.
Write down the results and repeat the comparison for each
parameter you want to check.
48 ___________________________________________________________________ M211371EN-D
Chapter 6 _______________________________________________________________ Maintenance
9.
NOTE
If adjustment is required, contact a Vaisala Service Center or your
local Vaisala representative to have the DPT145 adjusted.
Some notes on using the MI70 indicator with the DPT145:
- If you disconnect the DPT145 while the MI70 indicator is on,
the quantities measured will remain on the screen, but no
measurement will be shown.
- Temperature measured by the DPT145 is shown as parameter
Ta (not T) in the MI70.
- The messages from the transmitter will appear in English even if
the MI70 has been set to another language.
Repair Maintenance
There are no user serviceable parts inside the transmitter. If there is a
problem with your transmitter that you are unable to solve yourself or
with the help of the Vaisala Helpdesk, contact a Vaisala Service Center
to have the transmitter repaired.
For troubleshooting instructions and Vaisala contact information, see
Chapter 7, Troubleshooting, on page 50.
VAISALA ________________________________________________________________________ 49
User's Guide _______________________________________________________________________
CHAPTER 7
TROUBLESHOOTING
This chapter describes common problems, their probable causes and
remedies, and provides contact information for technical support.
Solving Typical Problems
Some problems can be solved by simply resetting the transmitter. You
can reset the transmitter by disconnecting the power or issuing the
RESET command using the service port.
If resetting does not help, and if the problem is related to transmitter
software or settings, you can restore the factory configuration of the
transmitter by issuing the FRESTORE command. If you are unable to
solve your problem with the transmitter, contact Vaisala technical
support. See section Technical Support on page 52.
Table 10
Troubleshooting Table
Problem
Dewpoint reading is not stable
after installation: reading
indicates slow drying.
Pressure reading is not stable:
reading indicates falling
pressure. Dewpoint
temperature may be rising.
Transmitter outputs stars "****"
instead of measurement data
Possible Causes and Solutions
This is normal behavior after installation. See
section Stabilization of Dewpoint Reading
After Installation on page 29.
Leak in the measurement environment.
Locate and repair the leak.
Possible causes: damaged sensor, incorrect
supply voltage, and unsuitable measurement
environment.
Power cycle or reset the transmitter, and see
if the problem continues. Check the active
errors using the ERRS command. Check the
power supply.
Unable to access transmitter on Possible causes: Incorrect wiring, unknown
the RS-485 line.
serial settings, transmitter in POLL mode
with unknown address.
Check wiring. Try connecting as instructed in
section Unknown Serial Settings on page 52.
Issue the ?? command to make the
transmitter respond in POLL mode.
50 ___________________________________________________________________ M211371EN-D
Chapter 7 ____________________________________________________________ Troubleshooting
Error Messages
The transmitter has error codes that can be displayed on the serial line
using the ERRS command. See section Show Currently Active Errors on
page 35.
Table 11
Error Messages
Error Message
T MEAS error
F meas error
Voltage error
Voltage too low error
Program flash check sum error
Parameter flash check sum error
INFOA check sum error
SCOEFS check sum error
CURRENT check sum error
Possible Cause and Solution
MPS1 sensor damaged or missing.
Contact a Vaisala Service Center.
Supply voltage out of range.
Check and correct.
Internal transmitter error. If the error
remains after a reset and restoring the
factory settings, contact a Vaisala
Service Center.
VAISALA ________________________________________________________________________ 51
User's Guide _______________________________________________________________________
Unknown Serial Settings
If you are not sure what the current serial settings of your transmitter are,
follow the steps below to connect to the transmitter. This procedure
assumes you have the USB service cable available.
For more information on the USB service cable and the PuTTY terminal
application, see section Serial Communication on page 31.
1.
2.
3.
4.
5.
Connect the USB service cable to your PC, but do not connect it to
the transmitter yet.
Start a terminal application and open a terminal session using the
default serial settings of 19200 8 N 1.
Plug the USB service cable into the transmitter, and immediately
send the hash character # to the serial line:
#
The normal startup of the transmitter is now interrupted, and the
transmitter is available for commands with the default serial
settings.
You can now check the transmitter’s information by issuing
the ? command:
?
The transmitter’s currently stored serial settings are visible on the
line marked Baud P D S.
Technical Support
For technical questions, contact the Vaisala technical support by e-mail at
[email protected]. Provide at least the following supporting
information:
-
Name and model of the product in question
Serial number of the product
Name and location of the installation site
Name and contact information of a technically competent person who
can provide further information on the problem.
52 ___________________________________________________________________ M211371EN-D
Chapter 7 ____________________________________________________________ Troubleshooting
Product Returns
If the product must be returned for service, see www.vaisala.com/returns.
It is important to protect the product from damage during the return
shipment:
- Put the yellow transport protection cap on the sensor head, if
available.
- Pack the product in the original product package.
- If the original package is not available, wrap at least 2 cm of
protective material around each individual product, for instance,
bubble wrap or plastic foam.
For contact information of Vaisala Service Centers, see
www.vaisala.com/services/servicecenters.
VAISALA ________________________________________________________________________ 53
User's Guide _______________________________________________________________________
CHAPTER 8
TECHNICAL DATA
This chapter provides the technical data of the DPT145.
Specifications
Table 12
Measured Parameters
Parameter
Dewpoint
Pressure, absolute
Temperature
Table 13
Calculated Parameters
Parameter
Pressure, normalized to 20 °C (68 °F)
SF6 or SF6/N2 mixture density
ppm moisture, by volume
Dewpoint, converted to atmospheric
pressure
Table 14
Measured Range
-50 ... +30 °C (-58 ... +86 °F)
1 ... 12 bar (14.5 ... 174 psi)
-40 ... +80 °C (-40 ... +176 °F)
Measured Range
1 ... 12 bara (14.5…174 psia)
3
0 ... 100 kg/m
40 ... 40 000 ppm
-65 … +30 °C (-85 ... +86 °F)
Performance
Property
Dewpoint accuracy
Description / Value
±3 °C (±5.4 °F), see Figure 12 on
page 55
typical drift < 2 °C (3.6 °F)/5a
±0.04 %FS
±0.01 bar/10 °C (18 °F)
Dewpoint stability
Pressure accuracy at 23 °C (73.4 °F)
Pressure temperature dependence
Temperature accuracy
0 ... +40 °C (+32 ... +104 °F)
±0.5 °C (± 0.9 °F)
-40 ... +80 °C (-40 ... +176 °F)
±1 °C (± 1.8 °F)
Density accuracy (pure SF6, 1 ... 10 bara)
0 ... 40 °C (+32 ... +104 °F)
±1 %FS
-40 ... +60 °C (-40 ... +140 °F)
±2.2 %
ppm accuracy, typical
(5 ... 1000 ppm, 7 bar)
±(7 ppm + 15 % of reading)
Sensor response time
Pressure response time
<1s
Dewpoint response time*
63% [90%] at 20°C and 1 bar
-50 -> -10 °C Tdf
5 s [10 s]
-10 -> -50 °C Tdf
10 s [2.5 min]
* system equilibrium related response time is typically longer
54 ___________________________________________________________________ M211371EN-D
Chapter 8 _____________________________________________________________ Technical Data
40
Dewpoint temperature (°C)
30
Not recommended for
continuous measurement
20
10
0
-10
Accuracy
±3 °C Td
-20
-30
-40
-50
Accuracy not specified
-60
-70
Dewpoint measurement low limit
-40 -30 -20 -10
0
10
20
30
40
50
60
70
80
Temperature of measured gas (°C)
1107-032
Figure 12
DPT145 Dewpoint Measurement Accuracy
Table 15
Operating Environment
Property
Operating temperature of electronics
Description / Value
-40 … +60 °C (-40 ... +140 °F)
Pressure
0 … 50 bar (0…725 psi)
Relative humidity
Measured gases
0 ... 100 %
SF6
SF6/N2 mixture
Table 16
Property
Digital output
Connector
Outputs
Description / Value
RS-485, non-isolated, Vaisala protocol
4-pin M8
VAISALA ________________________________________________________________________ 55
User's Guide _______________________________________________________________________
Table 17
General
Property
Sensor
Operating voltage
Supply current
during normal measurement
during self-diagnostics
Housing material
Housing classification
Storage temperature range
transmitter only
shipment package
Mechanical connection
Weight (with DILO adapter)
Electromagnetic compatibility
Tested levels
EN/IEC 61000-4-2,
Electrostatic Discharge
EN/IEC 61000-4-3,
RF field immunity
EN/IEC 61000-4-4,
Electric Fast Transient
EN/IEC 61000-4-5, Surge
EN/IEC 61000-4-6,
Conducted RF Immunity
Mechanical vibration
EN/IEC 60068-2-6,
Fc Sinusoidial vibration
Description / Value
Vaisala MPS1 multiparameter sensor
15 ... 28 VDC
20 ... 28 VDC in cold temperatures
(-40 ... -20 °C (-40 ... -4 °F))
20 mA
max 300 mA pulsed
AISI316L
IP65 (NEMA4)
Weather shield to be used for
continuous outdoor installations
-40 … +80 °C (-40 ... +176 °F)
-20 … +80 °C (-4 ... +176 °F)
DILO DN20, DILO DN8, ABB
Malmkvist, or Alstom G1/2" compatible
connector
765 g (27.0 oz)
Complies with EMC standard
EN61326-1, Electrical equipment for
measurement, control and laboratory
use - EMC requirements; Industrial
environment
8kV con / 15kV air
10V/m (80MHz-4.2GHz)
±2kV power and signal
±2kV power line to ground
/ ±1kV signal line to ground
and power line to line
10Vemf power line and digital output
±6 g,
5-500 Hz sweep 60 min/axis, 3-axis
56 ___________________________________________________________________ M211371EN-D
Chapter 8 _____________________________________________________________ Technical Data
Spare Parts and Accessories
Table 18
DPT145 Spare Parts and Accessories
Description
Connection cable for MI70 Indicator
/ DM70 Dewpoint Meter
USB connection cable
Protection plug for connector
1.5 m shielded PUR cable with 90° connector
3m shielded PUR cable with 90° connector
5 m shielded PUR cable with 90° connector
10 m shielded PUR cable with 90° connector
3.0m shielded FEP cable with straight connector
15 m shielded PUR cable with straight connector
20 m shielded PUR cable with straight connector
Weather shield
Order Code
219980
219690
218675SP
231519SP
231520SP
231521SP
231522SP
226902SP
236407SP
235859SP
ASM210326SP
Dimensions in mm
29.5
30.6
AW32
M45x2
7
20
83
AW50
160
57.7
1108-017
Figure 13
DPT145 with DILO DN20 Adapter
VAISALA ________________________________________________________________________ 57
User's Guide _______________________________________________________________________
1311-249
DPT145 with DILO DN8 Adapter
M30x2
AW27
20
29.5
Figure 14
7
53.5
63.5
41.6
145.5
AW36
1108-018
Figure 15
DPT145 with ABB Malmkvist Adapter
58 ___________________________________________________________________ M211371EN-D
29.5
Chapter 8 _____________________________________________________________ Technical Data
G1/2 ISO 228-1
6
AW27
20
7
5
60
70
152
33
1108-019
Figure 16
DPT145 with Alstom G1/2" Adapter
37
52
8
44
80
44
30
200
AW8
4 .8
51
59
1108-020
Figure 17
DPT145 with DILO DN20 Adapter and Weather
Shield
VAISALA ________________________________________________________________________ 59
User's Guide _______________________________________________________________________
APPENDIX A
MODBUS REFERENCE
This appendix describes the Modbus protocol implementation of the
DPT145 transmitters.
Default Communication Settings
Table 19 below shows the default communication settings when Modbus
is enabled at the factory.
Table 19
Setting
Default Communication Settings
Default Value
Bit rate
Number of data bits
Parity
Number of stop bits
Device address
Response delay
Communication mode
* See Table 5 on page 33.
NOTE
19200
8
E
1
240
0
MODBUS
Configuration Command
for Changing the Value)*
SERI
ADDR
SDELAY
SMODE
You can also change device address with Modbus itself (register 1537).
Supported Modbus Functions
Table 20
Supported Function Codes
Function Function Code
Code
(hexadecimal)
(decimal)
3
03
Function Name
(as defined by the
specification)
Read Holding Registers
16
10
Write Multiple Registers
43 14
2B 0E
Read Device Identification
NOTE
Notes
See Table 21 on page 61 for
available registers.
See Table 21 on page 61 for writable
registers.
See Table 22 on page 62 for
available device identification objects.
After power-up, wait for five seconds before sending Modbus requests.
60 ___________________________________________________________________ M211371EN-D
Appendix A _________________________________________________________ Modbus Reference
Modbus Register Map
Table 21
Modbus Register Map
Logical
Address
(decimal)
5
6
7
8
11
12
21
22
45
46
47
48
49
50
513
PDU Address
(hexadecimal)
Register Description
00 04
00 05
00 06
00 07
00 0A
00 0B
00 14
00 15
00 2C
00 2D
00 2E
00 2F
00 30
00 31
02 00
T (measured)
514
02 01
Online status
516
517
775
776
781
782
783
784
02 03
02 04
03 06
03 07
03 0C
03 0D
03 0E
03 0F
1283
05 02
Molar mass of other
gas (set value)
Gas mixing ratio
(set value)
Pressure
normalization
temperature (set
value)
Automatic purge on/off*
1284
05 03
Start-up purge on/off*
1285
05 04
Purge in progress*
1537
06 00
Address
Td/f (measured)
T d/f (atm) (measured)
H2O (measured)
P (measured)
ρ (measured)
Pnorm (measured)
Fault status
Error code
LSW
MSW
LSW
MSW
LSW
MSW
LSW
MSW
LSW
MSW
LSW
MSW
LSW
MSW
LSW
MSW
LSW
MSW
LSW
MSW
LSW
MSW
Data
Format
Register
Type
Notes
32-bit
float
32-bit
float
32-bit
float
32-bit
float
32-bit
float
32-bit
float
32-bit
float
16-bit
boolean
16-bit
boolean
32-bit bit
field
32-bit
float
32-bit
float
32-bit
float
read-only
°C
read-only
°C
read-only
°C
read-only
ppmv
read-only
bara
read-only
kg/m3
read-only
bara
read-only
1 = no errors
read-only
read-only
1 = online data
available
0 = no errors
read/write
kg/mol
read/write
0 …100 % of
SF6
-100 … 100°C
16-bit
boolean
16-bit
boolean
16-bit
boolean
read/write
16-bit
integer
read/write
read/write
read/write
read/write
1= automatic
purge on
1 = start-up
purge on
1 = purge in
progress, write
1 for manual
start
1…255 (1 …
247 allowed in
Modbus)
*Device specifications are valid only if purge functions are kept enabled. Do not modify registers 1283, 1284,
and 1285. Regular purge is needed to guarantee accurate measurements. Modify only if instructed to by Vaisala.
PDU address
LSW
MSW
16-bit integer
16-bit boolean
32-bit bit field
32-bit float
read-only
read/write
Actual address bytes used in a Modbus Protocol data unit
Least significant word (bits 15 … 0)
Most significant word (bits 31 … 16)
Numeric value in range 0 … 65535
Numeric value, 0 or 1
32 individual values, each 0 or 1
Floating point, IEEE 754 format
Register value cannot be changed with Modbus functions
Register value can be changed with Modbus functions
VAISALA ________________________________________________________________________ 61
User's Guide _______________________________________________________________________
Table 22
Object Id
(decimal)
Object Id
(hexadecimal)
0
1
2
3
4
00
01
02
03
04
Device Identification Objects
Object Name (as
defined by the
specification)
VendorName
ProductCode
MajorMinorVersion
VendorUrl
ProductName
128
80
SerialNumber*
129
81
CalibrationDate*
130
82
CalibrationText*
*
Vaisala-specific device information object
NOTE
Example
Vaisala
DPT145
1.3.27
http://www.vaisala.com
Vaisala Multiparameter Transmitter
DPT145 for SF6 Gas
D0710040
2009-08-07
Vaisala/HEL
Both stream access and individual access to the device identification
objects are supported.
62 ___________________________________________________________________ M211371EN-D
www.vaisala.com
*M211371EN*