1
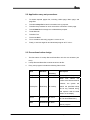
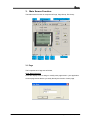
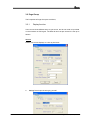
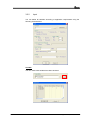
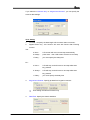
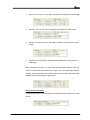
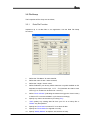
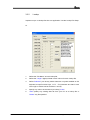
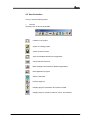
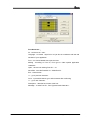
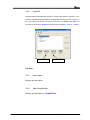
ArgoBuilder® User’s Manual
In this manual, you will learn
How to design an application program for a portable data collector (PDC)
DOC. NO. UM-PT105-02
Oct. 2006
V1.0
Table of Contents
1. INTRODUCTION................................................................................................... 1
2. BASIC CREATION CONCEPT............................................................................ 2
2.1 FIVE BASIC SETTING GROUPS TO CREATE A PROGRAM ........................................ 2
2.2 APPLICATION CARRY OUT PROCEDURES............................................................. 4
2.3 PRECAUTIONS BEFORE DESIGN .......................................................................... 4
3. MAIN SCREEN FUNCTION ................................................................................ 5
3.1 PAGE ................................................................................................................. 5
3.2 PAGE GROUP ..................................................................................................... 8
3.2.1 Display function .................................................................................... 8
3.2.2 Input .....................................................................................................11
3.2.3 Menu ................................................................................................... 18
3.3 FILE GROUP .................................................................................................... 19
3.3.1 Data File Function............................................................................... 19
3.3.2 Lookup ................................................................................................ 20
4. MAIN MENU ........................................................................................................ 21
4.1 FILE MANAGER ............................................................................................... 21
4.2 EDIT FUNCTION ............................................................................................... 21
4.3 VIEW SECLECTION .......................................................................................... 22
4.4 SETUP.............................................................................................................. 24
4.4.1 Data file setup ..................................................................................... 24
4.4.2 Lookup file setup................................................................................. 24
4.4.3 Scanner setup ...................................................................................... 24
4.4.4 Font define .......................................................................................... 28
4.5 TOOLS ............................................................................................................. 30
4.5.1 Build.................................................................................................... 30
4.5.2 Simulator ............................................................................................. 30
4.5.3 ArgoLink ............................................................................................. 31
4.6 HELP ............................................................................................................... 31
4.6.1 Help Topics ......................................................................................... 31
4.6.2 About ArgoBuilder .............................................................................. 31
5. FONT BAR ............................................................................................................ 32
ArgoBuilder (V1.00) II
1. Introduction
ArgoBuilder is a user-friendly software program for developing custom data
collection applications for the PT10 and PT12 portable data collectors. No
special programming knowledge or experience is required to use ArgoBuilder.
This easy-to-use simulator-based editor package allows end-users to design and
edit professional data collection programs. The ArgoBuilder software is
multi-language and available for most popular Windows environments.
ArgoBuilder includes a collector simulator that helps you correct bugs and iron
out problems before downloading the program to a collector. The bundled
ArgoLink software saves you time and trouble transferring PDC files between
your PC and collector.
System requirement:
PC System: 586 processor or higher
Operating System: Microsoft Windows 98/ME/2000/XP
Memory: at least 64MB RAM
Hard Disk: 60MB of available space
ArgoBuilder (V1.00) 1
2. Basic creation concept
2.1 Five basic setting groups to create a program
A program is composed of Page, Page Group, File Group, Scanner setup, and
Font define configuration. Below graphic shows the structure of ArgoBuilder.
1.
Page Name: There are total 20 pages can be used for each project and
you can give different names for each page. “Page” is the most important
structure in ArgoBuilder. User can string all pages together to create your
desired program.
2.
Page setting Group: User can use the “display”, “input” and “menu”
functions in the Page Group to create a program. Such as to show string
directly on the screen, or input again by oneself, or search data from the
existing files. Designer may depend on project demand to arrange proper
procedures. (For detailed operations, please refer to 3.2 Page Group
instructions.)
3.
File setting Group:User can use the “data” and “lookup” functions in File
Group. Data file and lookup file may establish not in the same file. Data
file may establish based on the variable correlation to do storage and
renew work. Lookup file is to search for the fence position based on the
hypothesis file which tallies with the input project, and then show according
to the field set up.
4.
Scanner Setup:Can support ten different barcode (Code 39、EAN 8、EAN
13、UPCA、UPCE、Code 128、 Interleaved 2 of 5、Codabar、Code 93、
China Post)。 Each kind of barcode has its correlation setting. If user use
bar code scanner to input data, please establish the bar code correlation
setting first.
ArgoBuilder (V1.00) 2
5.
Font setting:User can establish font by oneself. More detailed information,
please refer to 4.4.4 Font Define. At present the pre-set Font size is as
follows
8X8
1 Byte Font
12X8
16X12
12X12
2 Bytes Font
16X16
ArgoBuilder (V1.00) 3
2.2 Application carry out procedures
1.
To devise required pages first, including LOGO page, Menu page, and
page flow.
2.
To build Lookup file for basic information look up purpose.
3.
To define the procedure for each row and the connection of each page.
4.
To build Data file for storage new collected data purpose.
5.
To set Barcode
6.
To define Font.
7.
To execute Build.
8.
To run simulator and verify program is correct or not.
9.
Finally, to execute ArgoLink and download program to PT-10/12。
2.3 Precautions before design
1
The files name of Lookup files and Data files can’t be over 8 letters. (8.3
form)
2
Lookup files and Data files must be saved as .dat file。
3
Every user program includes the following files in PDC:
Item
Attribute
Program
Read Only
Stored
directory
C:\Program
Description
Main program in Project
When
user
collects
and
confirms the collected data to
collector, the
Lookup file
Read Only
D:\Lookup
system will
search the specified lookup
file for any matched string,
and replace it with the data
shown on the display.
Fonts
Read/Write
D:\Fonts
Data
Read/Write
C:\Data
SFT is the system font and
CFT is downloaded font. (
The stored area of collected
data in program
ArgoBuilder (V1.00) 4
3. Main Screen Function
The Main screen function is composed of Page, Page Group, File Group.
3.1 Page
The Properties of a Page are as follows,
Page Name Function
Press this display block to assign or modify each page name in your application.
Choose page names that let you easily identify the function of each page.
ArgoBuilder (V1.00) 5
1.
First Page Arrow
This button takes you to the first page of the application.
2.
Previous Page Arrow
This button takes you to the previous LCD page—a total of 20 pages are allowed
for each application. For example, if you are now on Page 9, click this button to
go to page 8. Note that the page sequence DOES NOT always match steps in
an operation, i.e. the previous operation step of page 6 might be page 12, not
page 5.
3.
Next Page Arrow
This button takes you to the next LCD page—a total of 20 pages are allowed for
each application. For example, if you are now on Page 9, click this button to go
to page 10. Note that the page sequence DOES NOT always match the steps in
an operation, i.e. the next operation step of page 6 might be page 12, not page 7.
4.
Last Page Arrow
This button takes you to the last page of the application—for the PT-10 it is
always page 20, the last of the maximum number of pages allowed.
5.
Next Step Arrow
This yellow arrow button takes you to the page of the next defined step—a total
of 20 pages are allowed for each application. For example, if you are now on
page 9, by clicking on this button, you will be switched to page 4 which was
defined as next step of page 9.
6.
ESC Arrow
This yellow arrow button takes you to the page of the escape step—a total 20
pages are allowed for each application. For example, if you are now on Page 9,
click this button to go to page 12, which was defined as the escape step of page
9.
ArgoBuilder (V1.00) 6
7.
LCD Screen Scrolling Function
As PT-10 can adopt various fonts, it is necessary for ArgoBuilder to cover these
differences so complete LCD screen display can be reviewed by the user during
application development stage. For example, If 8x8 fonts are used, LCD screen
can hold up to 8-line information. However, in ArgoBuilder, for better visibility,
the LCD screen can display only 6-line information. Therefore, it will be
necessary for user to use the scrolling bar to view the last 2 lines information.
High
(H*W)
row
Maximum
characters
in one line
8
1 Byte Font:8*8
8
15
12
1 Byte Font:12*8
5
15
2 Byte Font:12*12
5
10
1 Byte Font:16*12
4
10
2 Byte Font:16*16
4
7
16
ArgoBuilder (V1.00) 7
3.2 Page Group
The Properties of Page Group are as follows,
3.2.1
Display function
User can use three different ways to get source, and do not need to input data
on the simulator or PDC again. The data will show as pre-set and it is set up as
follows:
Source
Define LCD screen displays on a line-by-line basis
1.
String: Direct input the string by yourself.
ArgoBuilder (V1.00) 8
When “String” is chosen, the Format, File Name and Show Column
can’t be set.
2.
Variable: Select a variable that already defined and you can set the length.
Variable must be established in “input” of Page Group function. Or
there will be no data for choose here.
When source is “variable”, then user can set Format (to show data
length), but File Name and Show Column is still not for choose.
3.
Search File (using the variable): Same as the “Variable”. And you must
specify the search file name and display column. You can use the “View”
button explores the column data.
When source is “ Search File”, then all other fields can be choose.
After file name is choose, then click “View” then you can see the
content in each column.
ArgoBuilder (V1.00) 9
EX. Take above graph for example, if you choose column 1, then the
content 1000 will be brought out.
Setting:
1.
Prefix: add a “Prefix” strings to the data entered
2.
Suffix: add a “Suffix” strings to the data entered
3.
Position: Specify this display line to its proper location on the LCD screen
(left, middle, right)
4.
Pause after showing: You can specify “None” or “Always” or “Delay”. If
you select the “Delay” item, you must specify the delay time. (1*0.5second
to 254*0.5seconds)
ArgoBuilder (V1.00) 10
3.2.2
Input
You can define all variables according to application requirements using the
following characteristics:
Variable
You can cheek what variable have been declared
ArgoBuilder (V1.00) 11
Advanced: this option can set the search file and specify the column.
1.
Display Method: If the result in the search process is match, you can
specify how to show the string.
2.
Search Error/Process Set: If there are any errors in the search process,
you can specify the method to process the error.
3.
Search Error/Message Set: If the errors occur, the can specify the prompt
message and specify the out message (LED or Beep or Both).
Source:
Specify how this specific variable is entered. Any data entry attempt via invalid
device show an error message on the LCD screen and no data entry allowed.
1.
Keypad Only: Specify get data from keypad.
2.
Scanner Only: Specify get data from scanner.
ArgoBuilder (V1.00) 12
If you select the “Scanner Only” or “Keypad and Scanner”, you can specify the
scanner data settings.
Scan Setting
1.
Truncate:to specify the data length which scanner want to truncate。
2.
Append Enter Key:this function will work with Pause After Entering
function.
Yes:
a. None:
LCD screen will move to next step automatically
b. Always:
press enter,then LCD screen will move to next step
c. Delay:
you must specify the delay time
a. None:
LCD will stop, and will move to next step after enter
No:
key pressed
b. Always:
LCD will stop, and will move to next step after enter
key pressed
c. Delay:
3.
you much specify the delay time
Keypad and Scanner: Specify get data from keypad or scanner.
Scan setting the same as Scanner only
4.
Date/Time: Specify the data is data/time.
ArgoBuilder (V1.00) 13
When Date/Time is chosen, then some relative options will
appear accordingly. In addition, this function will work with Pause
after entering function in data setting.
Yes:
a. None:
LCD screen will stop, and shows Data Type Format for
choose. LCD will move to next step after enter key is
pressed.
b. Always:
LCD screen will stop, and shows Data Type Format for
choose. LCD will move to next step after enter key is
pressed twice.
c. Delay:
LCD screen will stop, and show Data. You must
specify the delay time
No:
a. None:
LCD will stop, and will move to next step after enter
key pressed
b. Always:
LCD will stop, and will move to next step after enter
key pressed
c. Delay:
You much specify the delay time
There are 14 types for option:
mm:Month (01~12)
dd:Day (01~31)
yy:Year (00~99)
HH:Hour (00~23)
MM:Minute (00~59)
Data type & Data Length
To minimize human error, you can specify the data type for each variable defined.
Any invalid data type prompts an error message on the LCD screen and no data
entry is allowed. You can specify the data length/value in the max and min field.
(Below setting only focus on data source from Keypad only, Scanner only and
Keypad and Scanner options)
ArgoBuilder (V1.00) 14
1.
Alpha: You can use a-z, A-Z, and 0-9 character, and specify the data length
2.
Numeric: You can only use 0-9 character, and specify the value range
3.
Decimal: You can only use 0-9 and dot (.) character, and specify the value
range.
4.
Password: You can edit the password in the default field, and specify the
data length.
When password is chosen, you must input the password in default area. The
system compares this content with user’s input in PT-10/12 and judges whether
correctly. If the data length does not been specified, the system will automatically
establish the password length in default area.
Data Type Error Message
If there are any errors in the data type, this message will be showing on the LCD
Screen.
ArgoBuilder (V1.00) 15
Data Setting
1.
Prefix: Specify the prefix string on the Input.
2.
Suffix: Specify the suffix string on the Input.
3.
Pause after entering: You can specify “None” or “Always” or “Delay”. If you
select the “Delay” item, you must specify the delay time. (1*0.5second to
254*0.5seconds)
Default
To avoid repeated entry of certain value, user can specify a Default value to each
variable. For example, in applications like retail check-out, the most commonly
value encountered is "1". Therefore, user can specify "1" as default value for
variables as "product". While the file has no the key value, this area will be leave
space and system has no any warning. In order to avoid this situation, please
recheck this setting.
1.
String: Direct input the string by yourself.
2.
Variable: Select the variable from the variable list.
ArgoBuilder (V1.00) 16
3.
Search File Using Variable: Specify the File Search check box enable, and
select the variable, file name and edit the show column
When data type is password, just input user’s desired password in default
area.
ArgoBuilder (V1.00) 17
3.2.3
Menu
This function allows user to define Menu Selection of the application by
specifying page sequence of each selection made in a menu list. Below are the
specifications for each filed of a menu,
Setting
1.
"Menu String" allows user to enter or specify the menu selection item.
2.
"Shortcut" gives the capability for user to define anyone among numeric
keys (from 0 ~ 9) for selection.
3.
"Goto" is provided for user to specify the destination page of the selection
made. User can specify among all pages defined in this application.
Columns
"Columns" is a selection, you can use it to set one column or tow columns
showing.
ArgoBuilder (V1.00) 18
3.3 File Group
The Properties of File Group are as follows,
3.3.1
Data File Function
Implement up to 10 data files in one application. Use the Data File Setup
function to:
1.
Define the "File Name" for each data file;
2.
Define the name of each "Value" entered;
3.
Define the" Length" of each value;
4.
Define "Delimiter" (can be any visible character or symbol available on PC
keyboard, except Function Keys, i.e. F1 ~ F12) between two data in each
record ( up to 10 data can be stored as 1 record );
5.
Define "Save Indicator" (indicating the entered to trigger the "store" action)
to instruct PT-10 to store all data in cyclic format accordingly.
6.
Specify any column as the search (or lookup) "key".
7.
"Add" (select) any existing data file from your PC as a lookup file or
"Delete" any file specified.
8.
Specify the "Save Data" to instruct PT-10 to store all data.
9.
Specify the "Save Method" to append or modify.
10.
Specify "Modify Method" as replace, add, subtract or keep.
ArgoBuilder (V1.00) 19
3.3.2
Lookup
Implement up to 10 lookup files into one application. Use the Lookup File Setup
to:
1.
Define the "File Name" of each lookup file;
2.
Define the "Length" (digits) of data in each column for each lookup file;
3.
Define "Delimiter" (can be any visible character or symbol available on PC
keyboard, except Function Keys, i.e. F1 ~ F12) between two data in each
record (up to 10 data can be stored as 1 record);
4.
Specify any column as the search (or lookup) "Index".
5.
"Add" (select) any existing data file from your PC as a lookup file or
"Delete" any file specified.
ArgoBuilder (V1.00) 20
4. Main Menu
The main menu contains the following commands,
4.1 File Manager
File Manager include the following:
1.
New: to create a new application template
2.
Open: to open an existing application template file
3.
Save: to save current editing template to the file
4.
Save as: to save current editing application template file to a new file
5.
To edit the current application template existing in the PC Exit: to leave the
ArgoBuilder
4.2 Edit Function
Edit Functions include the following:
1.
EDIT any existing settings entered.
2.
DELETE any existing settings.
3.
CUT object which at present choose (fast key:Ctrl+X)
4.
COPY object which at present choose (fast key:Ctrl+C)
5.
PASTE object which from cut or duplication (fast key:Ctrl+V)
ArgoBuilder (V1.00) 21
4.3 View Seclection
Lets you view the following items:
1.
Tool Bar
Showing icons of all tools accessible.
Creates a new project
Opens an existing project
Saves the active project
Show all variables defined in this application
Set the barcode functions
Make multiple fonts needed for different applications
Build application program
Start the Simulator
Execute ArgoLink
Displays program information and version number
Displays help for clicked-on buttons, menus, and windows
ArgoBuilder (V1.00) 22
2.
Font Bar
Showing status of font selected for LCD screen
3.
Status Bar
Showing operation status of ArgoBuilder.
4.
Variable List
Variable List provides a consolidated table showing all variables defined in this
application and illustrate all pages where each variable is used and displayed.
5.
Language
ArgoBuilder has various languages embedded for screen display: English
(default), Traditional Chinese, and Simplified Chinese.
Auto Switch changes the screen display language automatically based
on the Windows OS language version (limited to these three languages
only).
ArgoBuilder (V1.00) 23
4.4 Setup
4.4.1
Data file setup
The detailed content can be consulted 3.3.1 Data in File Group
4.4.2
Lookup file setup
The detailed content can be consulted 3.3.2 Lookup in File Group
4.4.3
Scanner setup
The PT-10’s onboard long-range scanning engine can read the 10 most
commonly used barcode symbologies. (Code 39、EAN 8、EAN 13、UPCA、
UPCE、Code 128、 Interleaved 2 of 5、Codabar、Code 93、China Post)
This function lets you:
1.
Enable or Disable the reading of any symbologies; and
2.
Configure related parameters of each symbologies as shown on the
screen.
ArgoBuilder (V1.00) 24
Code 39
Check-sum Verification: this parameter specifies whether the scanner will
perform checksum verification when decoding barcodes. If the checksum is
incorrect, the barcode will not be read
Check-sum Transmission: this parameter specifies whether the checksum
character is included in the data being transmitted
Start / End Transmission: this parameter specifies whether the start / stop
characters of Code 39 are included in the data being transmitted.
Format: User can choose to read either Standard Code 39 or Full ASCII Code
39 by configuring this parameter.
Interleaved 2 of 5
Check-sum Verification: this parameter specifies whether the scanner will
perform checksum verification when decoding barcodes. If the checksum is
incorrect, the barcode will not be read
Check-sum Transmission: this parameter specifies whether the checksum
character is included in the data being transmitted
Codabar
Check-sum Verification: this parameter specifies whether the scanner will
perform checksum verification when decoding barcodes. If the checksum is
incorrect, the barcode will not be read
Check-sum Transmission: this parameter specifies whether the checksum
character is included in the data being transmitted
Start / End Character: Four different start / end pairs can be selected as start /
end characters as listed below
abcd / abcd
abcd / tn*e
ABCD / ABCD
ABCD / TN*E
ArgoBuilder (V1.00) 25
UPC-A
Check-sum Transmission: this parameter specifies whether the checksum
character is included in the data being transmitted
Truncate Leading Zero: the leading “0” digits of UPC-A data characters can be
truncated when the function is enabled.
Supplement Digits: this parameter specifies the Supplement digits barcode is
none or auto detection.
UPC-E
Check-sum Transmission: this parameter specifies whether the checksum
character is included in the data being transmitted
Truncate Leading Zero: the leading “0” digits of UPC-A data characters can be
truncated when the function is enabled.
Supplement Digits: this parameter specifies the Supplement digits barcode is
none or auto detection
EAN 13
Check-sum Transmission: this parameter specifies whether the checksum
character is included in the data being transmitted
Supplement Digits: this parameter specifies the Supplement digits barcode is
none or auto detection
ISBN / ISSN Conversion: If this parameter is enabled, the checksum character
will be included in the data being transmitted
ArgoBuilder (V1.00) 26
EAN 8
Check-sum Transmission: if this parameter is enabled, the checksum
character will be included in the data being transmitted.
Truncate Leading Zero: the leading “0” digits of EAN 8 data characters can be
truncated when the function is enabled.
Supplement Digits: the parameter specifies the supplement digits barcode is
none or auto detection
Code 128
Check-sum Verification: this parameter specifies whether the scanner will
perform checksum verification when decoding barcodes. If the checksum is
incorrect, the barcode will not be read
Check-sum Transmission: this parameter specifies whether the checksum
character is included in the data being transmitted
Format: Standard / UCC-EAN28
Code 93
Check-sum Transmission: this parameter specifies whether the checksum
character is included in the data being transmitted
China Post
ArgoBuilder (V1.00) 27
4.4.4
Font define
ArgoBuilder can manage multiple fonts needed for different applications. You
can create special fonts by clicking on the GENERATOR icon. A special font like
ARIAL BLACK can be selected via the "FONT" button. You can edit fonts in the
yellow area.
Font Define:
1.
Font File will list all FontXXX.cft at present for users to choose, and
will bring out the relevant information after choosing.
2.
If your desired font is not in the existing Font File, users can turn on
the generator to produce your desired font.
ArgoBuilder (V1.00) 28
Font Generator:
ID:can be set 16 ~ 255。
Language:to choose 1 byte font or 2 byte font in accordance with the real
situation of your application
Font:can choose default font, style and size
Making : according to Font ID, Font type to make special application
characters
Open:have a look existing Font file * . cft
Save Edit:save file FontXXX.cft,XXXisFont ID。
Exit:close window。
<<:go to previous character。
Go to:input edit character, go to edit character after confirming
>>:go to next character。
Description:describe the content of the font
Message:to show Font ID,Font Type and total characters。
ArgoBuilder (V1.00) 29
4.5 Tools
There are three tools embedded in the ArgoBuilder: Build, Simulator, and
ArgoLink.
4.5.1
Build
Build compiles all pages, variables, and values together into a complete
application program. The build function occurs in the background and you can
observe the progress bar displayed on the left of the screen.
4.5.2
Simulator
The Simulator lets you confirm that all program steps, flows, and formats
conform to your application requirements. Click on the Simulator icon and
ArgoBuilder activates the Simulator together with the application program just
compiled. A simulated PT-10 with an interactive LCD screen is displayed on the
left. Click "1" to select "Application" and you will see your application program’s
name. Note that barcode input is simulated by clicking the keypad in the
Simulator.
ArgoBuilder (V1.00) 30
4.5.3
ArgoLink
After all programmed steps are verified, it comes to the need to connect PT-10 to
the PC to transfer all files needed for the application. Clicking on the " ArgoLink "
icon will prompt the screen as shown in the left. For detailed description for
functions of each part in ArgoLink, please refer to separate " ArgoLink " section.
From PC to PDC
From PDC to PC
4.6 Help
4.6.1
Help Topics
Brings up help topics.
4.6.2
About ArgoBuilder
Brings up information on ArgoBuilder.
ArgoBuilder (V1.00) 31
5. Font Bar
Icon
Description
Select font size
Choose single-byte / multi-byte character set
ArgoBuilder (V1.00) 32