1
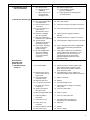
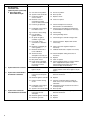
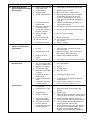
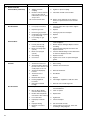
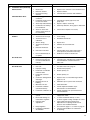
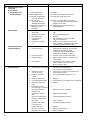
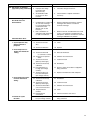
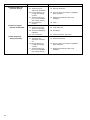
75-551.5
December, 2003
SERVICE DIAGNOSIS
Modine heating & ventilating equipment
A Problem/Remedy Guide for
Modine:
Gas-Fired Unit Heaters
Gas-Fired Duct Furnaces
Steam/Hot Water Unit Heaters
Electric Unit Heaters
Oil-FIred Unit Heaters
Infra-Red Heaters
The Modine Service Diagnosis Guide was compiled as a
trouble shooting guide intended to define the most common
types of service problems found with heating equipment, the
possible causes of these problems, and possible remedies. This
trouble shooting guide, used in conjunction with the appropriate
product Installation and Service Manual, should enable a
serviceperson to identify, investigate and resolve most field
service problems found with industrial/commercial unit heaters.
Remember:
When servicing any unit heater locate the rating plate and
record the model number, power code number, control code
number, and serial number shown. This information is required
to identify components and date of manufacture.
If a service problem is encountered which can not be resolved
with the use of this service guide, and the appropriate
installation and service manual, further assistance can be
obtained by contacting your local Modine factory representative.
TABLE OF CONTENTS
PROBLEM
A.
B.
See Page
UNIT WILL NOT OPERATE . . . . . . . . . . . . . . . . . . . .3
All Units
Gas-Fired Units
Oil-Fired Units
Electric Units
PILOT WILL NOT LIGHT OR STAY LIT . . . . . . . . . . .3
Gas-Fired Units
Duct Furnaces
Infra-Red Heaters
C.
PILOT FLAME NOT NORMAL . . . . . . . . . . . . . . . . .4
Gas-Fired Units
Infra-Red Heaters
D.
BURNER WILL NOT LIGHT OR STAY LIT . . . . . .4, 5
Gas-Fired Units
Infra-Red Heaters
Oil-Fired Units
E.
F.
BURNER FLAME IS NOT NORMAL . . . . . . . . . . .5, 6
Gas-Fired Units
Infra-Red Heaters
Oil-Fired Units
BURNER WILL NOT SHUT-OFF . . . . . . . . . . . . . . . .6
All Units
Gas-Fired Units
Infra-Red Heaters
G. BURNER SHUTS OFF TOO SOON . . . . . . . . . . . . . .6
All Units
H.
CONTROL FAILURE . . . . . . . . . . . . . . . . . . .6, 7, 8, 9
Gas-Fired Units
Infra-Red Heaters
I.
MOTOR FAILURE . . . . . . . . . . . . . . . . . . . . . . . . 9, 10
All Units
J.
FAN OPERATES BUT BURNER DOES NOT
OPERATE . . . . . . . . . . . . . . . . . . . . . . . . . . . . . . . .10
Gas-Fired Units
Oil-Fired Units
K.
L.
BURNER OPERATES BUT FAN WILL NOT
OPERATE . . . . . . . . . . . . . . . . . . . . . . . . . . . . . . . .10
Gas-Fired Units
Oil-Fired Units
BURNER MOTOR DOES NOT START . . . . . . . . . .10
Oil-Fired Units
M. BURNER MOTOR OPERATES BUT NO OIL
DELIVERED AT NOZZLE . . . . . . . . . . . . . . . . . . . .11
Oil-Fired Units
N.
2
BURNER MOTOR OPERATES, DELIVERS OIL,
BUT NOT FLAME . . . . . . . . . . . . . . . . . . . . . . . . . .11
Oil-Fired Units
PROBLEM
P.
See Page
NO GAS OR NO OIL . . . . . . . . . . . . . . . . . . . . .11, 12
Gas-Fired Units
Oil-Fired Units
Q. OIL LEAK OR GAS LEAK . . . . . . . . . . . . . . . . . . .12
Gas-Fired Units
Oil-Fired Units
R.
INSUFFICIENT HEAT . . . . . . . . . . . . . . . . . . . .12, 13
All Units
Gas-Fired Units
Electric Units
Steam/Hot Water Units
S.
TOO MUCH HEAT . . . . . . . . . . . . . . . . . . . . . . . . . .13
All Units
Gas-Fired Units
T.
FUEL ODORS . . . . . . . . . . . . . . . . . . . . . . . . . . . . .13
Gas-Fired Units
Oil-Fired Units
U.
NOISY OPERATION . . . . . . . . . . . . . . . . . . . . . . . .14
All Units
Gas-Fired Units
Oil-Fired Units
V.
PULSATING PRESSURE . . . . . . . . . . . . . . . . . . . .14
Gas-Fired Units
Oil-Fired Units
W. LOW OIL OR GAS PRESSURE . . . . . . . . . . . . . . .14
Gas-Fired Units
Oil-Fired Units
X.
NOISE OF IGNITION OR EXTINCTION . . . . . . . . . .15
Gas-Fired Units
Oil-Fired Units
Y.
CONDENSATION PROBLEMS . . . . . . . . . . . . . . . .15
Gas-Fired Units
Infra-Red Heaters
Z.
HEAT EXCHANGER FAILURE . . . . . . . . . . . . .15, 16
Gas-Fired Units
Oil-Fired Units
Steam/Hot Water Units
AA. UNIT CYCLES ON OVERHEAT . . . . . . . . . . . . .16, 17
All Units
BB. CORROSIVE DAMAGE . . . . . . . . . . . . . . . . . . . . . .17
Gas-Fired Units
Oil-Fired Units
Steam/Hot Water Units
CC. THERMOSTAT PROBLEMS . . . . . . . . . . . . . . .17, 18
All Units
Problem
A.
Possible Remedy
Unit Will Not Operate
1.
Electrical circuit in open
position.
1.
Turn on power, turn up thermostat, or
replace fuse(s) and reset disconnect.
All Units
2.
Defective or incorrectly
adjusted thermostat.
2.
Replace or adjust thermostat.
3.
Defective or incorrect
wiring.
3.
Check wiring and connections. If necessary
rewire unit according to Modine wiring diagram.
4.
Inoperable or defective
automatic controls.
4.
Check controls and replace if required.
See “Control Failure,” pages, 6, 7, 8, 9.
5.
Motor failure.
5.
See “Motor Failure,” pages 9. 10.
1.
Main manual gas valve
inoperable or in closed
position.
1.
Open main manual valve or replace
defective valve.
2.
Pilot light extinguished.
2.
Light pilot.
1.
No oil.
1.
Fill oil tank, or open supply valve, or
check filter.
2.
Primary control locked out
on safety.
2.
Push reset button on primary control only
if heat exchanger is cool. Try this only twice.
See control service instructions in
Installation Manual.
3.
Defective cad cell.
3.
Replace cad cell if necessary. Check continuity.
4.
Burner or fan motor out
on overload.
4.
Check voltage, wiring and motor. Reset
overload button on burner motor. Fan motor
automatically resets.
1.
Blown fuses.
1.
Replace fuses. Check for cause of blown fuses.
2.
Defective or burned out
transformer.
2.
Check secondary voltage with voltmeter.
Replace if necessary.
Pilot Will Not Light or
Stay Lit
1.
Pilot valve inoperative or
in closed position.
1.
Open pilot valve or replace defective
pilot valve.
Gas-Fired Units,
Duct Furnaces and
Infra-Red Heaters
2.
Safety pilot reset button or
plunger not depressed
correctly or safety pilot
valve defective.
2.
Refer to manufacturer’s lighting instructions
on serial plate and relight pilot. Replace
safety pilot valve.
3.
Pilot line clogged.
3.
Clean or replace.
4.
Pilot orifice clogged.
4.
Clean or replace.
5.
Pilot flame too low or
too high.
5.
Adjust pilot per manufacturer’s
recommendations.
6.
Air in pilot line.
6.
Purge air from pilot line as per manufacturer’s
recommendations.
7.
Excessive draft blowing
pilot away from thermocouple.
7.
Either move or shield unit from draft.
8.
Loose or dirty thermocouple connections or
defective thermocouple.
8.
Tighten or clean connections. Replace
defective thermocouple.
9.
Pilot being blown out
when excessive gas
remains in burner on
ignition or extinction
causing flashback.
9.
See “Burner Flame is Not Normal,” pages 5, 6.
Gas-Fired Units
Oil-Fired Units
Electric Unit Heaters
B.
Possible Cause
10. Flame impinging on cold
joint of thermocouple
from loose pilot tube
connection.
10. Tighten all pilot tube fittings.
3
Problem
C.
D.
4
Possible Cause
Possible Remedy
Pilot Flame is Not Normal
1. Lazy yellow flame
1.
Pilot orifice too large.
1.
Check orifice size.
2. Waving blue flame
2.
Excessive draft at pilot.
2.
Either move or shield unit from draft.
3. Small blue flame
3.
Low gas pressure.
3.
Check gas pressure and adjust as per
manufacturer’s recommendations.
4. Flame being lifted off
pilot burner
4.
Gas pressure too high.
4.
Check gas pressure and adjust as per
manufacturer’s recommendations.
5. Hard sharp flame
5.
Pilot orifice too small.
5.
Check orifice size.
Burner Will Not Light
or Stay Lit
1.
Electrical circuit in
open position.
1.
Turn on power, turn up thermostat, or
replace fuse(s) and reset disconnect switch.
Gas-Fired Units and
Infra-Red Heaters
2.
Main manual gas valve
closed or inoperative.
2.
Open valve or replace defective valve.
3.
Pilot extinguished.
3.
Relight pilot.
4.
Defective or incorrect
wiring.
4.
Check wiring and connections. If necessary
rewire unit according to proper wiring diagram.
5.
Pilot flame too low.
5.
Adjust pilot per manufacturer’s
recommendations.
6.
Inoperative or defective
automatic controls.
6.
Check controls and replace if required.
See “Control Failure,” pages 6, 7, 8, 9.
7.
Excessive draft blowing
pilot away from
thermocouple.
7.
Move or shield unit from draft.
8.
Loose or dirty thermocouple connections or
defective thermocouple.
8.
Tighten or clean thermocouple connections.
Replace defective thermocouple if necessary.
9.
Defective or damaged
burner.
9.
Replace burner.
10. Excessive primary air.
10. Adjust primary air per manufacturer’s
recommendations. See Installation Manual.
11. Carry-over ports on
burner plugged. Lint or
spider webs in venturi
tubes or bugs or
obstructions in main
burner orifices.
11. Clean and replace if necessary.
12. Improper pilot location.
12. Reposition pilot.
13. Mis-aligned burner.
13. Align burner with main burner orifices.
14. Low gas pressure.
14. Check gas pressure and adjust as per
manufacturer’s recommendations.
15. Unit Installed with pilot
on low side of units
mounted on an angle
(infra-red only).
15. Reinstall unit with pilot on high side as per
manufacturer’s recommendations.
16. Low pilot gas pressure
on milli-volt control
system for infra-red unit.
16. Check pilot gas pressure and adjust to
recommended water column.
Problem
D.
Possible Cause
Possible Remedy
Burner Will Not Light
or Stay Lit (continued)
1.
Burner motor runs
but no spark.
1.
Check electrode spacing or replace ignition
transformer.
Oil-Fired Units
2.
Primary control locked
out on safety.
2.
Push reset button on primary control only
if heat exchanger is cool. Try this only twice.
See Control Service Instructions in
Installation Manual.
3.
Defective cad cell.
3.
Replace cad cell if necessary. Check continuity.
4.
Burner or fan motor out
on overload.
4.
Check voltage, wiring and motor. Reset
overload button on burner motor. Fan motor
automatically resets.
5.
Clogged nozzle.
5.
Replace nozzle. Use only exact replacement.
See Installation Manual for size and type.
6.
Air leaks in suction line.
6.
Tighten all fittings.
7.
Faulty ignition.
7.
a. Reset electrodes in burner assembly.
Check insulators.
b. Check wiring at primary control.
c. Replace ignition transformer, if required.
d. Check for proper contact between
transformer springs and electrode bus bars.
E.
8.
High draft, too much air.
8.
Check draft regulator adjustment. Adjust
combustion air openings on burner.
9.
Improper oil pressure.
9.
Adjust fuel pump using pressure gauge for
proper setting.
Burner Flame is Not Normal
Gas-Fired Units
1. Long yellow tipped flames.
2. Flames lifting from burner.
3. Flame unstable.
1a. Lack of combustion air
in building.
1a. Provide proper combustion air.
1b. Insufficient primary air.
1b. Increase primary air by adjusting primary
air shutters back, or adjusting burner
manifold back.
1c. Main burner orifices
incorrectly sized.
1c. Check main burner orifice size against
manufacturer’s recommended sizes.
1d. Clogged burner ports,
damaged burner.
1d. Clean or replace burner if necessary.
1e. Mis-aligned main burner
orifice(s).
1e. Re-align orifices with burner.
1f. Vent obstruction.
1f. Clean vent pipe.
2a. Excessive gas pressure.
2a. Check gas pressure and adjust per
manufacturer’s recommendations.
2b. Main burner orifices
incorrectly sized.
2b. Check main burner orifices size against
manufacturer’s recommendations.
2c. Defective regulator.
2c. Replace regulator.
3a. Excessive draft.
3a. Move unit or shield unit so flames will not
be affected by draft.
3b. Defective regulator.
3b. Replace regulator.
4. Flashback at
extinction of burner flame.
4a. Ports of burner too large.
4a. Repair or replace burner.
4b. Excessive primary air.
4b. Reduce primary air by moving primary air
shutters forward, or adjusting burner
manifold forward.
5. Flashback on burner
ignition.
5.
5.
Excessive primary air.
Reduce primary air by moving primary air
shutters forward.
5
Problem
E.
Possible Cause
Possible Remedy
Burner Flame is Not Normal
(continued)
Infra-Red Heaters
1. Gas burning at orifice.
1b. Replace ceramics.
1c. Loose or missing seal in
ceramic mounting frames
or under ceramics
mounting frames.
1c. Inspect and replace if necessary.
1d. Warped burner or ceramic
mounting frames.
1d. Replace.
2a. Low gas pressure.
2a. Check gas pressure and adjust as per
manufacturer’s recommendations.
2b. Mis-aligned main
burner orifice.
2b. Re-align burner orifice.
2c. Incorrectly sized main
burner orifice.
2c. Check main burner orifice size against
manufacturer’s recommended sizes.
1.
Excessive combustion air.
1.
See start-up procedure in Installation Manual.
2.
Excessive draft.
2.
Adjust draft regulator. See Installation Manual.
3.
Poor atomization of oil.
3.
Change nozzle with same type and capacity.
4.
Uneven flame.
4.
Change nozzle with same type and capacity.
Burner Will Not Shut Off
1.
Unit wired incorrectly.
1.
Check wiring and rewire if necessary.
All Units
2.
Thermostat set too high.
2.
Reset thermostat.
3.
Thermostat wire shorted.
3.
Correct short.
4.
Short circuit in wiring.
4.
Check wiring and correct.
5.
Thermostat out of
calibration or defective.
5.
Recalibrate or replace.
1.
Dirt under gas valve seat.
1.
Replace valve.
2.
Ruptured gas valve.
2.
Turn off gas at manual valve. Check line
pressure to gas controls and adjust per
manufacturer’s recommendation. Replace
gas valve.
1.
Thermostat out of
calibration or defective.
1.
Recalibrate or replace thermostat.
2.
Unit is cycling on overheat
control.
2.
See “Unit Cycles on Overheat,”
pages 16, 17.
3.
Defective overheat control.
3.
Replace.
Oil-Fired Units
Gas-Fired Units and
Infra-Red Heaters
G. Burner Shuts Off Too Soon
All Units
H.
1a. Tighten screws.
1b. Cracked ceramics.
2. Burner color appears
dull red, not bright.
F.
1a. Loose screws holding
ceramic mounting frames.
Control Failure
Gas-Fired Units
Standing Pilot Systems
1. Pilot Will Not Light or
Stay Lit.
1a. Defective thermocouple.
1a. Check and replace if necessary.
1b. Dirty thermocouple
connections.
1b. Clean.
1c. Inoperative magnetic
pilot valve operator.
1c. Replace.
1d. Gas valve turned to off
position.
1d. Turn to pilot position.
1e. Condensate in pilot line.
1e. Clean.
1f. Inoperative pressure
sensing switch (power
vented models only).
6
aa. Defective switch.
aa. Replace switch.
bb. Vacuum leaks at
power venter housing
connection.
bb. Seal leaks.
cc. Excessive static
pressure in vent system.
cc. Check venting for compliance with
manufacturer’s recommendations.
Problem
1. Pilot Will Not Light or
Stay Lit (continued).
2. Main Burner Will Not Light.
Possible Cause
Possible Remedy
dd. Unit over fired.
dd. Adjust to proper input.
ee. Negative pressure
in building.
ee. Correct building negative
pressure conditions.
ff.
ff.
Blower drive not set
correctly; blower
running too slow.
Adjust air blower per manufacturer’s
recommendations.
2a. Defective electric operator.
2a. Replace.
2b. Gas valve turned to OFF
or PILOT position.
2b. Turn to ON position.
2c. Unit mis-wired or loose
connections.
2c. Check all connections and rewire if necessary.
2d. Loose connections on
limit control or
defective limit control.
2d. Check wiring. Replace limit control if defective.
2e. Defective or plugged
gas valve regulator.
2e. Inspect gas valve regulator. Replace if
defective.
2f. Defective thermostat or
thermostat out of calibration.
2f. Calibrate thermostat or replace if necessary.
2g. Thermostat heat
anticipator incorrectly set
(low voltage controls).
2g. Check anticipator setting and correct if necessary.
2h. Power venter centrifugal
switch not closing or
wired incorrectly.
2h. Check centrifugal switch if unit is supplied with
a power venter. Check wiring. Check power
venter motor.
2i. On units equipped with
energy cut-off (ECO)
device fuse in energy
cut-off may be blown
or defective.
2i. If fuse if blown, replace fuse and determine
reason for blown fuse. The ECO is an over
heat protection control and the cause of
overheating must be corrected before
putting the equipment back into service.
(See Section “AA”).
1a. No spark at ignitor.
1a. Check connections. Check for proper spark
gap, cracked or broken electrode ceramic,
blown controller fuse or brittle, cracked or
loose high tension cable.
1b. Defective flame sensor
or loose connections to
flame sensor.
1b. Check mili-amps of sensor. Tighten loose
connections. Replace flame sensor if necessary.
1c. Pilot valve electrical
connections loose.
1c. Tighten connections.
1d. Defective pilot valve.
1d. Replace.
1e. Poor ground connections.
1e. Check grounding means.
1f. No power from control
transformer.
1f. Check transformer voltage on secondary
side for 25V.
1g. Spark not located in
pilot gas stream.
1g. Correct or replace pilot.
1h. Dirty or plugged pilot orifice.
1h. Clean or replace.
1i. Pilot line kinked or
obstructed.
1i. Correct or replace pilot line.
1j. Pilot flame too low.
1j. Check pilot flame and adjust per
manufacturer’s recommendations.
1k. Flame sensor out
of position.
1k. Reposition.
1l. Defective ignition controller.
1l. Replace.
1m. Dirty flame sensor.
1m. Clean or replace.
Gas-Fired Units
Intermittent Pilot
Ignition Systems
1. Pilot Will Not Light
or Stay Lit.
7
Problem
Possible Cause
Possible Remedy
Gas-Fired Units
Intermittent Pilot
Ignition Systems (continued)
2. Pilot Lights, Main
Burner Will Not Light.
2a. Turn to on position.
2b. System in lock-out mode.
2b. Reset system.
2c. Cracked or broken
sensor ceramic.
2c. Replace sensor.
2d. Defective or loose
connections to flame
sensor or flame sensor lead.
2d. Correct or replace.
2e. Incorrect gas pressure.
2e. Check and adjust if necessary to
manufacturer’s recommendations.
2f. Insufficient current signal
from flame sensor.
2f. Check current according to manufacturer’s
recommendations and replace if necessary.
2g. Incorrect or loose wiring.
2g. Check wiring.
2h. Poor ground to
ignition controller.
2h. Check grounding means.
2i. No power to ignition
controller or gas valve.
2i. Check voltage to controller and gas valve.
2j. Loose limit control
connections or defective
limit.
2j. Check connections. Replace limit control
if necessary.
2k. Defective or plugged gas
valve regulator.
2k. Inspect gas valve regulator. Replace if
necessary.
2l. Defective thermostat or
out of calibration.
2l. Calibrate thermostat or replace if necessary.
2m. Thermostat heat
anticipator incorrectly set.
2m. Check anticipator setting and correct if
necessary.
2n. Defective ignition controller.
2n. Replace.
2o. Dirty flame sensor.
2o. Clean or replace.
2p. Power venter centrifugal
switch or vacuum switch
not closing or wired
incorrectly.
2p. Check centrifugal switch or vacuum switch if
unit is supplied with a power venter.
Check wiring. Check power venter motor.
Check vent pipe for obstructions.
3.
3.
System Goes Into Lock-Out.
3.
4.
System Shuts Down Before
Thermostat is Satisfied.
4a. Defective thermostat or
incorrect heat anticipator
setting.
5.
8
2a. Gas valve in off position.
System Fails to Shut-Off
after Thermostat is Satisfied.
Refer to “Pilot will not
light or stay lit”.
Reset system. If lock-out persists, check
causes listed for “Pilot will not light or stay lit,”
page 3.
4a. Check heat anticipator setting. Replace
defective thermostat.
4b. Defective ignition controller.
4b. Replace.
4c. Failure of flame sensing
circuit.
4c. Check for cracked or broken ceramic of
flame sensor, loose connections. Replace
if defective.
4d. Insufficient current signal
from flame sensor.
4d. Check flame sensor location to be sure it is
correctly located.
4e. System is in lock-out mode.
4e. Reset system.
5a. Defective thermostat or
incorrectly set heat
anticipator.
5a. Check heat anticipator setting. Replace
defective thermostat.
5b. Defective ignition controller.
5b. Replace.
5c. Defective gas valve.
5c. Replace.
Problem
Possible Cause
Possible Remedy
Infra-Red Heaters
Direct Spark Ignition Systems
1. No Spark.
2. Spark, but Main Burner
Will Not Light.
3. Spark Stays on After Main
Burner is Lit.
I.
1a. Thermostat defective or
incorrectly set heat
anticipator.
1a. Check thermostat and anticipator setting.
Replace thermostat if necessary.
1b. Ignitor ceramic cracked
or broken.
1b. Replace.
1c. Incorrect spark gap.
1c. Check for proper spark gap or replace pilot
ignitor.
1d. Poor ground connection.
1d. Correct.
1e. Loose connections on
ignition cable.
1e. Tighten connections.
1f. Ignition cable deteriorated.
1f. Replace.
1g. Blown fuse on ignition
controller.
1g. Replace.
1h. No power to controller.
1h. Check for loose wires. Check voltage on
secondary side of control transformer for
25V supply.
2a. No power to main
gas valve.
2a. Check voltage.
2b. Defective main gas valve.
2b. Replace.
2c. Poor ground.
2c. Correct ground.
3a. Loss of continuity of flame
sensor wire.
3a. Check flame sensor wire continuity.
3b. Ignition cable deteriorated.
3b. Replace.
3c. Insufficient current signal
from flame sensor.
3c. Check flame sensor location to be sure it
is correctly located.
3d. Spark shorting out across
protective screen.
3d. Check spark and ignitor position. Correct
if necessary.
3e. Faulty electrical connections.
3e. Correct.
1a. Electrical circuit in open
position.
1a. Turn up thermostat or close disconnect switch.
1b. Blown fuses.
1b. Replace fuses.
1c. Defective or incorrect
wiring.
1c. Check wiring.
1d. Defective fan time delay
relay or fan switch.
1d. Check and replace if necessary.
Motor Failure
1. Motor Will Not Run.
1e. Incorrect voltage to motor.
1e. Check voltage.
1f. Defective or incorrectly
calibrated thermostat.
1f. Recalibrate thermostat or replace if necessary.
1g. Bearings froze up.
1g. Lubricate and free bearings.
1h. Defective or burned out
thermal overload in motor.
1h. Replace motor.
1i. Defective motor.
1i. Replace motor.
2. Motor Runs Backward.
2.
2.
3. Motor Overheats or
Burns Out
3a. Voltage too high or low.
3a. Check voltage to motor.
3b. Motor not lubricated.
3b. Lubricate.
Incorrect wiring to motor
or motor supplied with
wrong rotation.
Correct wiring to motor. Replace motor with
one with correct rotation.
3c. Worn motor bearings.
3c. Replace bearings or motor.
3d. Insufficient air across
motor due to obstructions
around unit.
3d. Clear obstructions so proper airflow across
motor can be obtained.
3e. Duct work attached to
propeller unit heaters.
3e. Remove duct work.
9
Problem
3. Motor Overheats or
Burns Out. (continued)
4. Motor bearing failure.
5. Excessive belt wear
on blower units.
6. Motor operates but
fan or blower won’t turn.
J.
Oil-Fired Units
Oil-Fired Units
3f. Check motor amp draw against nameplate
amps. If amp draw exceeds nameplate amps
redesign of duct work may be necessary.
3g. Incorrect blower rpm
setting.
3g. Check blower rpm. Correct if necessary.
3h. Belt tension too tight on
blower units.
3h. Check belt tension.
3i. Ambient temperature too
high.
3i. Check air temperature near motor.
3j. Clogged condenser
(Steam/Hot Water Units).
3j. Clean condenser.
4a. Motor not lubricated.
4a. Replace and lubricate bearings.
4b. Belt tension too tight on
blower units.
4b. Reset belt tension. Replace bearings.
5a. Belt tension too tight, or
too loose.
5a. Reset belt tension. Replace belt.
5b. Motor and blower pulleys
mis-aligned.
5b. Align pulleys. Replace belt.
6a. Set screws loose on fan or
on blower and motor pulley.
6a. Tighten set screws.
6b. Broken drive belt on
blower units.
6b. Replace belt.
6c. Belt tension too loose
on blower units.
6c. Adjust belt tension.
1.
Incorrect wiring or loose
connections.
1.
Check wiring and connections.
2.
Control failure.
2.
See “Control Failure,” pages, 6, 7, 8, 9.
1.
Manual fan switch is on.
1.
Turn off manual fan switch.
2.
See burner service
diagnosis, L, M, N, P.
2.
Pages 10, 11.
1.
Incorrect wiring or loose
connections.
1.
Check wiring and connections.
2.
Motor failure.
2.
See “Motor Failure,” pages 9, 10.
1.
Fan motor failure.
1.
See “Motor Failure,” pages, 9, 10.
2.
Loose fan.
2.
Tighten fan set screw.
3.
Defective fan switch in
fan limit control.
3.
Replace entire control.
4.
Defective or incorrect
wiring.
4.
Check all wiring and connections.
1.
Incomplete electrical
circuit.
1.
Check main disconnect switch, fuses,
thermostat contracts, and operating and
limit controls.
2.
Primary control locked
out on safety.
2.
Wait five minutes and until heat exchanger
is cool. Actuate external reset on relay.
Determine cause for lock-out and correct.
3.
Motor bearings frozen.
3.
Free shaft and lubricate. Replace motor
if necessary.
4.
Motor on
thermo-overload.
4.
Allow motor to cool and push reset button.
If motor cuts out again, check wiring to
locate cause, or replace burner motor.
Burner Motor Does Not Start
Oil-Fired Units
10
3f. Excessive static pressure
on blower unit heaters
(motor overload).
Burner Operates but Fan
Will Not Operate
Gas-Fired Units
L.
Possible Remedy
Fan Operates but Burner
Does Not Operate
Gas-Fired Units
K.
Possible Cause
Problem
M. Burner Motor Operates
but No Oil Delivered at Nozzle
Oil-Fired Units
N.
Possible Remedy
1.
Oil level below intake line
inside supply tank.
1.
Fill tank with oil and bleed air from the line.
2.
Clogged strainer.
2.
Remove and clean strainer.
3.
Clogged nozzle.
3.
Remove and clean or replace nozzle.
4.
Air leak in the intake line.
4.
Tighten all fittings in the intake line. Tighten
unused intake port plug in the fuel unit.
If there are valves in the line, be sure the
valve stems are packed solid and tightened
securely.
5.
Restricted intake lines.
(High Vacuum)
5.
Replace any kinked tubing and check all
valves in the intake line.
6.
A two pipe system that
becomes air bound.
6.
Insert by-pass plug if not in place. Prime pump.
7.
A single pipe system that
becomes air bound.
7.
See start-up procedure in Installation Manual.
8.
Slipping or broken
coupling.
8.
Tighten or replace coupling.
9.
Frozen fuel unit shaft.
9.
Return unit to factory.
10. Excessive vacuum.
10. Use next larger tubing size. Too high of a lift.
Also see M, 5.
11. Dirty oil filter cartridge.
11. Replace cartridge.
1.
No spark.
1.
Check the ignition transformer and high
tension insulators.
2.
Poor atomization of oil.
2.
Adjust oil pressure to 100 psi, check for oil
line restriction and nozzle defects.
3.
Improper electrode
setting.
3.
Remove firing assembly and adjust.
4.
Excessive combustion air.
4.
See start-up procedure in Installation Manual.
1.
Gas valve turned to OFF
position or PILOT position.
1.
Turn to ON position.
2.
Defective gas regulator.
2.
Replace.
3.
Incorrect pipe sizing.
3.
Check pipe size.
4.
Main valve to gas supply
turned off.
4.
Open main valve.
5.
Problem with propane
supply system.
5.
Check propane supply system.
6.
Propane tank incorrectly
sized.
6.
Check tank size and capacity. Change tank
or add vaporizer.
7.
Inoperative or defective
automatic controls.
7.
Check controls and replace if necessary
See “Control Failure,” pages 6, 7, 8, 9.
1.
Oil level below intake line
in supply tank.
1.
Fill tank with oil. (Bleed air from oil lines).
2.
Clogged strainer or filter.
2.
Remove and clean strainer. Replace filter
element.
3.
Clogged nozzle.
3.
Replace nozzle.
4.
Air leak in intake line.
4.
Tighten all fittings in intake line. Tighten unused
intake port plug. Check filter cover and gasket.
5.
Restricted intake line
(high vacuum reading).
5.
Replace any kinked tubing and check any
valves in intake line. Check for correct line sizes.
6.
A two-pipe system that
becomes airbound.
6.
Check for and insert by-pass plug. Make sure
return line is below oil level in tank.
7.
A single-pipe system that
becomes airbound.
7.
Loosen gauge port plug or easy flow valve and
bleed oil for 15 seconds after foam is gone in
bleed hose. Check intake line fittings for
tightness. Check all pump plugs for tightness.
Burner Motor Operates,
Delivers Oil, but No Flame
Oil-Fired Units
P.
Possible Cause
No Gas or No Oil
Gas-Fired Units
Oil-Fired Units
11
Problem
P.
Possible Cause
Possible Remedy
No Gas or No Oil
Oil-Fired Units (continued)
8.
Slipping or broken
coupling.
8.
Tighten or replace coupling.
9.
Rotation of motor and fuel
unit is not the same as
indicated by arrow on pad
at top of unit.
9.
Install fuel unit with correct rotation.
10. Frozen fuel unit shaft.
10. Return unit to approved service station or
factory for repair. Check for water and dirt
in tank.
1.
Loose pipe connections.
1.
2.
Ruptured gas valve.
2.
Replace.
3.
Excessive gas pressure.
3.
Check gas pressure and adjust.
4.
Cracked pressure regulator
or gas valve body.
4.
Replace.
5.
Loose fittings on gas
controls.
5.
Tighten.
1.
Loose plugs or fittings.
1.
Dope with good quality oil-resistant thread
sealer. Retighten.
2.
Leak at pressure adj.
screw or nozzle plug.
2.
Washer may be damaged. Replace washer
or O-Ring.
3.
Blown seal (single-pipe
system).
3.
Check if by-pass plug has been left in unit.
Replace fuel unit.
4.
Blown seal (two-pipe
system).
4.
Check for kinked tubing or other obstructions
in return line. Replace fuel unit.
5.
Seal leaking.
5.
Replace fuel unit.
6.
Cover loose.
6.
Tighten cover screws or replace damaged
gasket.
1.
Thermostat set too low.
1.
Raise setting.
2.
Thermostat being affected
by heat source such as sun,
steam pipes, hot air, etc.
2.
Shield or move thermostat.
3.
Thermostat improperly
located.
3.
Relocate thermostat.
4.
Thermostat out of
calibration.
4.
Recalibrate.
5.
Defective limit control.
5.
Replace.
6.
Heating equipment
too small.
6.
Install larger equipment or add more units.
7.
Unit heater mounted
too high.
7.
Relocate unit or install larger unit.
1.
Gas-pressure too low.
1.
Check and adjust as per manufacturer’s
recommendations.
2.
Dirty air filters (blower
units and duct furnaces).
2.
Clean or replace.
3.
Broken drive belt (blower
unit heater or duct furnace).
3.
Replace belt.
4.
Loose drive belt.
4.
Tighten belt.
5.
Improperly set blower
rpm.
5.
Check and adjust.
6.
Improper ducting.
6.
Size and install correctly.
7.
Defective or incorrect
wiring.
7.
Check all wiring. If necessary, rewire unit
according to wiring diagram.
Q. Oil Leak or Gas Leak
Gas-Fired Units
Oil-Fired Units
R.
Insufficient Heat
All Units
Gas-Fired Units
12
Check for leaks with soap solution. Tighten
connections.
Problem
R.
Steam/Hot Water Units
1.
Blown fuses.
1.
Replace fuses. Check for cause of blown fuses.
2.
Defective element.
2.
Replace element.
3.
Burned out heating
element.
3.
Check element resistance with ohmmeter.
1.
Dirty or clogged
condenser.
1.
Clean condenser.
2.
Insufficient steam pressure
or lack of hot water.
2.
Check boiler capacity, pipe sizes and
pump sizes.
3.
Steam trap malfunctioning.
3.
Repair or replace steam trap.
4.
Condensate not draining
from condenser.
4.
Steam trap defective, wrong type or undersized.
5.
Steam or water valve
shut-off, stuck closed, or
not functioning.
5.
Check valves. Replace if necessary.
1.
Thermostat set too high.
1.
Lower setting.
2.
Thermostat out of
calibration.
2.
Recalibrate thermostat.
3.
Short in wiring.
3.
Repair short.
4.
Thermostat located in
draft.
4.
Shield or relocate thermostat.
5.
Defective thermostat.
5.
Replace.
6.
Unit heater oversized.
6.
Install smaller unit or reduce water flow or
steam pressure (steam/hot water units).
7.
Hot air aimed directly at
occupants.
7.
Redirect air stream or relocate unit.
1.
Gas valve sticking.
1.
Replace valve.
2.
Excessive gas pressure
or incorrect main burner
orifice(s).
2.
Check pressure and adjust per manufacturer’s
recommendations. Check main burner
orifice size.
1.
Gas leak.
1.
See “Oil or Gas Leak,” page 12.
2.
Improper venting.
2.
Re-install vent properly.
3.
Flash back on extinction
of burner flame.
3.
Reduce primary air.
4.
Flash back on burner
ignition.
4.
Reduce primary air.
5.
Cracked or damaged heat
exchanger.
5.
Replace. Also see “Heat Exchanger Failure,”
pages 15, 16.
6.
Negative pressure in
building.
6.
Add make-up air or power vent unit heater.
7.
Obstruction in vent.
7.
Clear obstruction.
8.
Insufficient ventilation
(Infra-Red Heaters).
8.
Provide required ventilation air per
manufacturer’s recommendation.
9.
Insufficient combustion air.
9.
Provide combustion air per manufacturer’s
recommendations.
1.
Oil or air leak in supply
system.
1.
Tighten all fittings and check for leaking
supply valve stems.
2.
Down draft blowing out
of barometric regulator.
2.
a. Check for blocked chimney or vents.
b. Check regulator setting and adjust to correct.
3.
Improper flame
adjustment.
3.
Inspect flame through inspection port.
Adjust burner air openings and/or fuel oil
pressure. See Installation Manual.
4.
Delayed ignition.
4.
See section N, page 11, or section X, page 15.
5.
Inadequate combustion
air/ventilation.
5.
Check recommendations for combustion
air openings.
Too Much Heat
All Units
Gas-Fired Units
T.
Possible Remedy
Insufficient Heat (continued)
Electrical Units
S.
Possible Cause
Fuel Odors
Gas-Fired Units
Oil-Fired Units
13
Problem
U.
Possible Cause
Possible Remedy
Noisy Operation
All Units
1.
Loose screws or fasteners.
1.
Tighten.
2.
Bent sheet metal.
2.
Repair or replace.
3.
Fan bent or out of balance.
3.
Replace.
4.
Dirt on fan blades.
4.
Clean fan.
5.
Fan hub or blade rivets
loose.
5.
Replace fan.
Gas-Fired Units
1. Noisy burner flame.
V.
1a. Too much primary air.
1a. Adjust primary air.
1b. Burr in orifice.
1b. Remove burr or replace orifice.
1c. Burning in venturi.
1c. Adjust primary air and gas pressure or
replace defective gas valve.
1d. Burner ribbon loose.
1d. Replace burner.
1e. Defective gas regulator.
1e. Replace.
1f. External gas regulator
freeze-up (propane gas).
1f. Replace or thaw.
2. Noisy pilot flame.
2.
Pilot too large.
2.
Adjust pilot flame as per manufacturer’s
recommendations.
Oil-Fired Units
1.
Bad coupling alignment.
1.
Loosen fuel unit mounting screws slightly
and shift unit in different positions until
noise is eliminated. Retighten mounting screws.
2.
Air in inlet line.
2.
Check all connections. Use only good flare
fittings.
3.
Tank hum on two-pipe
system and inside tank.
3.
Install hum eliminator in return line.
1.
Defective gas regulator.
1.
Replace.
2.
Improper pipe sizing on
multiple unit hook-ups.
2.
Check piping and correct.
3.
Improper tank size on
propane systems.
3.
Check tank size. Replace with larger tank
or add vaporizer.
1.
Partially clogged strainer
or filter.
1.
Remove and clean strainer. Replace filter.
Replace filter element.
2.
Air leak in intake line.
2.
Tighten all fittings.
3.
Air leaking around cover.
3.
Be sure strainer cover screws are tightened
securely. Check for damaged cover gasket.
4.
High vacuum. Should not
exceed 17 inches Hg.
(Mercury).
4.
Closed shut-off valve, clogged filter, kinked
tubing, too small oil line.
1.
Defective gas regulator.
1.
Replace.
2.
Improper pipe sizing.
2.
Check piping and correct.
3.
Improper tank size on
propane systems.
3.
Check tank size. Replace with larger tank
or add vaporizer.
4.
Regulator freeze-up on
propane systems.
4.
Replace or thaw.
5.
Defective gas valve
regulator.
5.
Replace.
6.
Improperly set main
regulator or gas valve
regulator.
6.
Adjust per manufacturer’s recommendations.
1.
Defective gauge.
1.
Check gauge against master gauge, or
other gauge.
Pulsating Pressure
Gas-Fired Units
Oil-Fired Units
W. Low Oil or Gas Pressure
Gas-Fired Units
Oil-Fired Units
14
Problem
X.
Possible Cause
Possible Remedy
Noise of Ignition or
Extinction
Gas-Fired Units
1.
Improper burner adjustment, damaged burner
or obstruction.
1.
See “Burner Flame is Not Normal,”
pages 5, 6.
Oil-Fired Units
1.
Water in oil.
1.
Bleed line at fuel unit. Replace supply if
necessary.
2.
Delayed ignition.
2a. Reset electrode gaps.
2b. Nozzle worn or dirty. Replace nozzle.
2c. Check voltage drop when burner motor starts.
High current draw can result in weak spark
from transformer.
2d. Inspect ignition transformer and wiring.
Y.
Condensation Problems
Gas-Fired Units
Infra-Red Heaters
Z.
1.
Improper venting.
1.
Check vent and correct.
2.
Unit under-fired.
2.
Check main burner orifices, gas pressure and
piping for correct sizing and adjustment.
3.
No drip pockets in
piping or vent system.
3.
Add drip pockets.
4.
Conditioned air over
heat exchanger too cold
(duct furnaces).
4.
Add drain pan with drain connector to collect
and remove condensate.
1.
Insufficient ventilation
air.
1.
Provide required ventilation air per
manufacturer’s recommendations.
Heat Exchanger Failure
Gas-Fired Units
1. Complete burn-out of
lower portion of heat
exchanger.
1a. Gas pressure too high.
1a. Adjust per manufacturer’s recommendations.
1b. Main burner orifices
too large.
1b. Check orifice size and replace with
proper orifices.
1c. Defective automatic
controls.
1c. See “Control Failure,” pages 6, 7, 8, 9.
1d. Unit not hung level.
1d. Level unit.
1e. Fan operating
backwards.
1e. Check rotation of fan. Replace motor if
required.
1f. Excessive drafts.
1f. Move or shield unit.
1g. Insufficient air across
heat exchanger
caused by:
1g.
-
Duct work attached to
propeller units.
-
-
Improperly set blower
rpm (blower units).
-
-
Excessive external
static pressure in duct
system (blower units
and duct furnaces).
-
Check duct design and correct.
-
Dirty filters.
-
Clean or replace.
-
Defective motor or
fan relay.
-
Replace.
-
Broken drive belt.
-
Replace.
-
Drive belt too loose.
-
Adjust to proper tension.
-
Improper duct design
to and from unit.
-
Check duct design and correct.
-
Blockage in duct system.
-
Remove blockage.
1h. Improper air distribution
over heat exchanger
(duct furnaces).
Remove duct work or polytubes.
Adjust to proper setting.
1h. Check duct design and correct.
15
Problem
Z.
Possible Cause
Possible Remedy
Heat Exchanger Failure
(continued)
Gas-Fired Units
2. Localized burn-out
of heat exchanger.
Oil-Fired Units
2a. Damaged burner.
2a. Replace.
2b. Mis-aligned burner.
2b. Check burner alignment and correct.
2c. Improper air distribution
over heat exchanger.
2c. Check duct design and correct.
2d. Air leaks from
connecting duct work
disturbing burner flames.
2d. Check for leaks. Tighten sheet metal
screws. Seal with heat resistant caulking or
straighten sheet metal.
2e. Pilot flame too high and
impinges on heat
exchanger.
2e. Adjust pilot flame per manufacturer’s
recommendations.
1.
Improper nozzle size
and/or type.
1.
See rating plate for correct nozzle size and
type.
2.
Oil pressure too high.
2.
Set at 100 PSIG maximum.
3.
Damaged fire pot.
3.
Replace.
4.
Improper burner
adjustment.
4.
5.
Insufficient circulating
air.
5.
Use instruments to set over fire draft,
CO2 and smoke levels.
Remove any obstructions on or near fan.
Clean fan blades. Absolutely no duct work
should be attached to Oil-Fired Units.
1.
Internal corrosion.
1.
Check type and frequency of boiler water
treatment. Check traps for proper
condensate removal. Send sample of
condensate to Modine for analysis.
2.
External corrosion.
2.
Check for corrosive fumes and vapors.
3.
Ruptured tube(s).
3.
Water hammer/excessive steam pressure
(above 150#).
4.
Joint leaking.
4.
Check for internal or external corrosion,
water hammer or excessive steam
pressure (above 150#).
1.
Gas (oil) pressure too high.
1.
Check pressure and adjust per
manufacturer’s recommendations.
2.
Main burner orifices
(nozzle) too large.
2.
Check orifice (nozzle) size and replace with
proper orifices (nozzle).
3.
Defective automatic
controls.
3.
See “Control Failure,” pages 6, 7, 8, 9.
4.
Defective limit control.
4.
Replace.
5.
Fan operating backwards.
5.
Check rotation of fan. Replace motor if required.
6.
Defective motor or fan
relay.
6.
Replace.
7.
Insufficient air across
heat exchanger caused by:
7.
-
Duct work attached to
propeller units.
-
Remove duct work or polytube.
-
Improperly set blower
rpm.
-
Adjust to proper setting.
-
Excessive external static
pressure in duct system.
-
Check duct design and correct.
-
Dirty filters.
-
Clean or replace.
-
Improper duct design
to and from unit.
-
Check duct design and correct.
-
Broken drive belt.
-
Replace.
-
Drive belt too loose.
-
Adjust to proper tension.
-
Blockage in duct system.
-
Remove blockage.
Steam/Hot Water Units
Leaking condenser
AA. Unit Cycles on Overheat
(high limit cycles)
16
Problem
AA. Unit Cycles on Overheat
(high limit cycles) (continued)
Possible Cause
Possible Remedy
8.
Improper duct design
to and from unit
(duct furnaces).
8.
Check duct design and correct.
9.
Air distribution baffle
not in place on duct
furnaces.
9.
Check if baffle is required and install if
necessary.
1.
Conditioned air or make-up
air over heat exchanger
too cold resulting in high
condensation rates.
(Blower units or duct
furnaces.)
1.
Replace aluminized steel burner and heat
exchanger with stainless steel burner
and heat exchanger.
2.
Unit is installed in an
atmosphere with chlorinated
or acidic contaminants.
2.
Remove unit from contaminated area or find
source of contaminants and eliminate from
atmosphere. Stainless steel burners and heat
exchangers will not solve problem.
BB. Corrosive Damage
Gas-Fired Units and
Oil-Fired Units
Steam/Hot Water Units
See Section Z.
CC. Thermostat Problems
1. System operates only
when thermostat is
jumpered.
2. Room temperature is
higher than thermostat
setting.
3. Room temperature does
not reach thermostat
setting.
4. Thermostat cycles
too often.
1a. Thermostat contacts
dirty.
1a. Clean.
1b. Thermostat defective.
1b. Replace.
2a. Thermostat mounted
on cold wall or surface.
2a. Relocate thermostat.
2b. Thermostat is exposed
drafts.
2b. Shield or move thermostat.
2c. Thermostat not level
(Mercury switch type).
2c. Level thermostat.
2d. Thermostat incorrectly
calibrated.
2d. Recalibrate.
2e. Heat anticipator set
too high (low voltage
controls).
2e. Reset to match current draw of equipment
being controlled.
2f. Thermostat does not
have heat anticipator
(low voltage controls).
2f. Replace with thermostat with anticipator.
3a. Thermostat incorrectly
calibrated.
3a. Recalibrate.
3b. Thermostat not level
(Mercury switch type).
3b. Level thermostat.
3c. Thermostat mounted in
sun or near heat source.
3c. Shield or move thermostat.
3d. Dirty thermostat
contacts.
3d. Clean.
3e. Bad thermostat
connections.
3e. Check connections and correct.
4.
4.
Heat anticipator set too
low (low voltage controls).
Reset to match current draw of equipment
being controlled.
17
Problem
5. Thermostat does not
cycle often enough.
6. Thermostat appears
to be out of calibration.
7. Room temperature
swings excessively.
18
Possible Cause
Possible Remedy
5a. Thermostat is not
exposed to circulated air.
5a. Relocate thermostat.
5b. Heat anticipator is set
too high (low voltage
controls).
5b. Reset to match current draw of equipment
being controlled.
5c. Thermostat does not
have a heat anticipator
(low voltage controls).
5c. Replace with thermostat with a heat
anticipator.
5d. Dirty thermostat
contacts.
5d. Clean.
6a. Thermostat not level
(Mercury switch type).
6a. Level thermostat.
6b. Thermostat improperly
calibrated.
6b. Recalibrate.
6c. Poor connections.
6c. Check connections and correct.
7a. Thermostat not
exposed to circulated
air.
7a. Relocate thermostat.
7b. Heat anticipator set
too high (low voltage
controls).
7b. Reset to match current draw of equipment
being controlled.
7c. Thermostat does not
have a heat anticipator
(low voltage controls).
7c. Replace with thermostat with a heat
anticipator.
19
Heating Division • Modine Manufacturing Company • 1500 DeKoven Avenue • Racine, Wisconsin 53403-2552
Phone: 1.800.828.4328 (HEAT) • Fax: 262.636.1665
© Modine Manufacturing Company 2003
12/03 - 1.25M Litho in USA