1
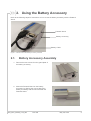
Battery Accessory Product Technical Specification AirLink FXT Series WA_DEV_FEX20_PTS_003 002 May 26, 2010 Battery Accessory Product Technical Specification Important Notice Due to the nature of wireless communications, transmission and reception of data can never be guaranteed. Data may be delayed, corrupted (i.e., have errors) or be totally lost. Although significant delays or losses of data are rare when wireless devices such as the Sierra Wireless modem are used in a normal manner with a well-constructed network, the Sierra Wireless modem should not be used in situations where failure to transmit or receive data could result in damage of any kind to the user or any other party, including but not limited to personal injury, death, or loss of property. Sierra Wireless accepts no responsibility for damages of any kind resulting from delays or errors in data transmitted or received using the Sierra Wireless modem, or for failure of the Sierra Wireless modem to transmit or receive such data. Safety and Hazards Do not operate the Sierra Wireless modem in areas where blasting is in progress, where explosive atmospheres may be present, near medical equipment, near life support equipment, or any equipment which may be susceptible to any form of radio interference. In such areas, the Sierra Wireless modem MUST BE POWERED OFF. The Sierra Wireless modem can transmit signals that could interfere with this equipment. Do not operate the Sierra Wireless modem in any aircraft, whether the aircraft is on the ground or in flight. In aircraft, the Sierra Wireless modem MUST BE POWERED OFF. When operating, the Sierra Wireless modem can transmit signals that could interfere with various onboard systems. Note: Some airlines may permit the use of cellular phones while the aircraft is on the ground and the door is open. Sierra Wireless modems may be used at this time. The driver or operator of any vehicle should not operate the Sierra Wireless modem while in control of a vehicle. Doing so will detract from the driver or operator’s control and operation of that vehicle. In some states and provinces, operating such communications devices while in control of a vehicle is an offence. Limitations of Liability This manual is provided “as is”. Sierra Wireless makes no warranties of any kind, either expressed or implied, including any implied warranties of merchantability, fitness for a particular purpose, or noninfringement. The recipient of the manual shall endorse all risks arising from its use. The information in this manual is subject to change without notice and does not represent a commitment on the part of Sierra Wireless. SIERRA WIRELESS AND ITS AFFILIATES SPECIFICALLY DISCLAIM LIABILITY FOR ANY AND ALL DIRECT, INDIRECT, SPECIAL, GENERAL, INCIDENTAL, CONSEQUENTIAL, PUNITIVE OR EXEMPLARY DAMAGES INCLUDING, BUT NOT LIMITED TO, LOSS OF PROFITS OR REVENUE OR ANTICIPATED PROFITS OR REVENUE ARISING OUT OF THE USE OR INABILITY TO USE ANY SIERRA WIRELESS PRODUCT, EVEN IF SIERRA WIRELESS AND/OR ITS AFFILIATES HAS BEEN ADVISED OF THE POSSIBILITY OF SUCH DAMAGES OR THEY ARE FORESEEABLE OR FOR CLAIMS BY ANY THIRD PARTY. Notwithstanding the foregoing, in no event shall Sierra Wireless and/or its affiliates aggregate liability arising under or in connection with the Sierra Wireless product, regardless of the number of events, occurrences, or claims giving rise to liability, be in excess of the price paid by the purchaser for the Sierra Wireless product. WA_DEV_FEX20_PTS_003 Rev 002 May 26, 2010 2 Battery Accessory Product Technical Specification Patents Portions of this product may be covered by some or all of the following US patents: 5,515,013 6,191,741 6,653,979 6,968,171 7,287,162 5,629,960 6,199,168 6,697,030 6,985,757 D442,170 5,845,216 6,339,405 6,785,830 7,023,878 D459,303 5,847,553 6,359,591 6,845,249 7,053,843 D599,256 5,878,234 6,400,336 6,847,830 7,106,569 D560,911 5,890,057 6,516,204 6,876,697 7,145,267 5,929,815 6,561,851 6,879,585 7,200,512 6,169,884 6,643,501 6,886,049 7,295,171 and other patents pending. This product includes technology licensed from QUALCOMM® 3G Manufactured or sold by Sierra Wireless or its licensees under one or more patents licensed from InterDigital Group. Copyright © 2010 Sierra Wireless. All rights reserved. Trademarks AirCard® and Watcher® are registered trademarks of Sierra Wireless. Sierra Wireless™, AirPrime™, AirLink™, AirVantage™ and the Sierra Wireless logo are trademarks of Sierra Wireless. , , ®, inSIM®, WAVECOM®, WISMO®, Wireless Microprocessor®, Wireless CPU , Open AT are filed or registered trademarks of Sierra Wireless S.A. in France and/or in other countries. ® ® Windows® and Windows Vista® are registered trademarks of Microsoft Corporation. Macintosh and Mac OS are registered trademarks of Apple Inc., registered in the U.S. and other countries. QUALCOMM® is a registered trademark of QUALCOMM Incorporated. Used under license. Other trademarks are the property of the respective owners. Contact Information Sales Desk: Post: Fax: Web: Phone: 1-604-232-1488 Hours: 8:00 AM to 5:00 PM Pacific Time E-mail: [email protected] Sierra Wireless 13811 Wireless Way Richmond, BC Canada V6V 3A4 1-604-231-1109 www.sierrawireless.com Consult our website for up-to-date product descriptions, documentation, application notes, firmware upgrades, troubleshooting tips, and press releases: www.sierrawireless.com WA_DEV_FEX20_PTS_003 Rev 002 May 26, 2010 3 Battery Accessory Product Technical Specification Document History Version Date Updates 001 November 24, 2009 Creation Updated charging specifications to specify charging method precedence. 002 May 26, 2010 Updated battery accessory photographs. Reformatted in the rebranded SWI template. Added section 2 Using the Battery Accessory WA_DEV_FEX20_PTS_003 Rev 002 May 26, 2010 4 Contents 1. GENERAL DESCRIPTION ................................................................................... 8 1.1. Overall Dimensions....................................................................................................... 8 1.2. Battery Cable................................................................................................................ 8 2. USING THE BATTERY ACCESSORY ................................................................. 9 2.1. Battery Accessory Assembly ......................................................................................... 9 3. BATTERY ACCESSORY INTERFACE DESCRIPTION .................................... 12 3.1. Front Interface ............................................................................................................ 12 3.1.1. Operating Voltage ................................................................................................ 13 3.2. Back Interface............................................................................................................. 13 4. BATTERY ACCESSORY CHARGING ............................................................... 14 4.1. DC-IN Charging .......................................................................................................... 14 4.2. USB Charging............................................................................................................. 15 4.3. Charging Time ............................................................................................................ 15 4.4. Charging Voltage Specification ................................................................................... 16 4.5. LED Indicator.............................................................................................................. 16 5. BATTERY CELL INFORMATION ...................................................................... 17 6. AT COMMANDS FOR THE BATTERY ACCESSORY ...................................... 18 6.1. DC-IN Status .............................................................................................................. 18 6.2. USB Power Status ...................................................................................................... 18 6.3. Battery Level Status.................................................................................................... 20 6.4. Battery Cell Connection Anomaly ................................................................................ 20 7. RECOMMENDATIONS AND OTHER INFORMATION ...................................... 21 8. REFERENCES ................................................................................................... 22 WA_DEV_FEX20_PTS_003 Rev 002 May 26, 2010 5 List of Figures Figure 1. Fastrack Xtend Battery Accessory ................................................................................ 8 Figure 2. Battery Accessory 6-pin Micro-Fit Connector................................................................. 8 Figure 3. Fastrack Xtend with Battery Accessory Attached ........................................................... 9 Figure 4. Battery Accessory Front Interface ............................................................................... 12 Figure 5. Battery Accessory Back Interface................................................................................ 13 Figure 6. DC-IN Charging .......................................................................................................... 14 Figure 7. USB Connection from the Fastrack Xtend ................................................................... 15 Figure 8. USB Charging............................................................................................................. 15 Figure 9. USB Detection by Modem Software ............................................................................ 19 Figure 10. Setting Up USB Communications................................................................................ 19 Figure 11. ADC1 Reading Using USB.......................................................................................... 20 WA_DEV_FEX20_PTS_003 Rev 002 May 26, 2010 6 List of Tables Table 1: Interface Connector Pin Description ............................................................................ 12 Table 2: Battery Accessory Charging Time ............................................................................... 15 Table 3: Charging Voltage Specifications ................................................................................. 16 Table 4: Charger State ............................................................................................................. 16 WA_DEV_FEX20_PTS_003 Rev 002 May 26, 2010 7 1. General Description The Fastrack Xtend battery accessory consists of a slow charging circuit and a NiMH battery cell. It is designed for use with the Fastrack Xtend to suit M2M system requirements. The 85°C operating temperature fulfills the high power transmission condition required in GPRS class 12 and WCDMA. With the ADC (Analog to Digital Converter) feature of the Fastrack Xtend, the battery accessory status can be easily monitored by AT commands. 1.1. Overall Dimensions Length: 89 mm Width: Thickness: 60mm 30mm Weight: 115g Battery Accessory Interface Connector Figure 1. Fastrack Xtend Battery Accessory 1.2. Battery Cable The battery accessory is connected to the Fastrack Xtend through the battery cable. The battery cable is a 6-pin Micro-Fit connector that comes packaged with the battery accessory. Pin 6 Pin 10 Pin 1 Pin 4 Pin 6 Pin 1 Figure 2. Battery Accessory 6-pin Micro-Fit Connector WA_DEV_FEX20_PTS_003 Rev 002 May 26, 2010 8 2. Using the Battery Accessory Refer to the following steps for instructions on how to use the battery accessory with the Fastrack Xtend. Fastrack Xtend Battery Accessory Battery Cable Figure 3. Fastrack Xtend with Battery Accessory Attached 2.1. Battery Accessory Assembly 1. Remove the two screws from the guard plate of the battery accessory. 2. Mount the Fastrack Xtend on the battery accessory by aligning the groove above the battery accessory with the notch beneath the Fastrack Xtend. WA_DEV_FEX20_PTS_003 Rev 002 May 26, 2010 9 Battery Accessory Product Technical Specification Using the Battery Accessory 3. Slide the Fastrack Xtend all the way into the battery accessory. 4. Make sure that the Fastrack Xtend and the battery accessory are properly aligned together. WA_DEV_FEX20_PTS_003 Rev 002 May 26, 2010 10 Battery Accessory Product Technical Specification Using the Battery Accessory 5. Screw the guard plate back into the battery accessory. 6. Connect the Fastrack Xtend and the battery accessory using the battery cable. 7. Connect the battery cable to the 6-wire power cable. WA_DEV_FEX20_PTS_003 Rev 002 May 26, 2010 11 3. Battery Accessory Interface Description 3.1. Front Interface Figure 4. Battery Accessory Front Interface Refer to the following table for the pin description of the interface connector. Table 1: Interface Connector Pin Description Voltage Pin # Signal Name I/O Type Description Min Typical 4.75 5V USB power input External power input (Power coming in from the Fastrack Xtend) 1 Vbus I 2 Vbatt I 4V 3 Bat O 4.2V 4 GND - GND 5 DC-IN I 6 BAT-ID O WA_DEV_FEX20_PTS_003 7.5V 13.2V TBD Rev 002 Max 4.8V Rechargeable Battery output Power Ground 32V DC input power for battery charging Battery ID with a resistor connected to GND May 26, 2010 12 Battery Accessory Product Technical Specification 3.1.1. Battery Accessory Interface Description Operating Voltage The input operating voltages for DC-IN and USB are as follows: DC-IN 7.5V to 32V USB 5.0V And the output voltage is as follows: Battery 4.2V(typical, at the end of charge) DC-IN is the power supply input of the Fastrack Xtend ranging from 4.75V to 32V. In case the battery accessory is used, the DC-IN voltage range should be restricted to 7.5V to 32V to ensure proper battery accessory charging (charging is not effective below 7.5V). For more details about the Fastrack Xtend operating voltage and current consumption, refer to document [2] AirLink FXT Series User Guide. 3.2. Back Interface LED Status Indicator Figure 5. Battery Accessory Back Interface Note: The LED Status indicator is a bi-color LED that is located at the back of the battery accessory. Refer to section 4.5 LED Indicator for more information on the LED status indicator. WA_DEV_FEX20_PTS_003 Rev 002 May 26, 2010 13 4. Battery Accessory Charging The battery accessory charges the battery cell in slow charging mode by either DC-IN or USB power source. The charging current is controlled by the battery accessory to avoid DC-IN or USB current surges and protects the internal battery cell against over voltage. The output voltage of the battery accessory ranges from 3Vmin to 4.3Vmax at room temperature. Note: 4.1. If both DC-IN and the USB power source are connected, charging through DC-IN takes precedence if the input USB voltage is 5V or below. Otherwise, charging via USB takes precedence. DC-IN Charging Pin 5 of the Micro-fit connector is connected to DC-IN, which can be used to charge the battery accessory. DC-IN is the external power source of the Fastrack Xtend accessible through the battery cable. To use DC-IN charging, the power cable with DC-IN (7.5V to 32V) is plugged to the battery cable and attached to the battery accessory as shown in the figure below. Fastrack Xtend Power Cable Battery Cable Battery Accessory Figure 6. DC-IN Charging WA_DEV_FEX20_PTS_003 Rev 002 May 26, 2010 14 Battery Accessory Product Technical Specification 4.2. Battery Accessory Charging USB Charging Pin 1 of the Micro-fit connector is connected to Vbus, which is used to charge the battery accessory via USB. The USB connector is located on the front interface of the Fastrack Xtend. USB Interface from the Fastrack Xtend Figure 7. USB Connection from the Fastrack Xtend For USB charging, a USB cable is connected to the Fastrack Xtend while it is connected to the battery accessory via the battery cable as shown in the figure below. Fastrack Xtend Battery Cable USB Cable Battery Accessory Figure 8. USB Charging For more information about these connections, refer to document [2] AirLink FXT Series User Guide. 4.3. Charging Time Refer to the following table for the charging times for both DC-IN and USB charging. Table 2: Battery Accessory Charging Time Battery Type Battery Capacity NiMH 500mAH WA_DEV_FEX20_PTS_003 Rev 002 Power Source Charging Time DC-IN ~14Hrs USB ~16Hrs May 26, 2010 15 Battery Accessory Product Technical Specification 4.4. Charging Voltage Specification Refer to the following table for the charging voltage specifications for both DC-IN and USB charging. Table 3: Charging Voltage Specifications Charging Current Power Source Input Voltage Maximum Charging Voltage Maximum Continue DC-IN DC 7.5 – 32V 4.9V 128mA 20mA USB DC 5V 4.8V 118mA 14mA Note: There is a discrepancy between the input voltage of the Fastrack Xtend and the input voltage of the battery accessory to ensure proper battery accessory charging. For more information, refer to document [2] AirLink FXT Series User Guide. 4.5. LED Indicator The operating status of the charger is defined by the bi-color LED indicator. Refer to the following table for the LED status and its corresponding definition. Table 4: Charger State LED Light Activity Charger Status Red LED ON Battery level is below 3.6V Green LED On Battery level is above 3.7V LED OFF DC-IN or USB is NOT connected WA_DEV_FEX20_PTS_003 Rev 002 May 26, 2010 16 5. Battery Cell Information Type of Battery Cell: NiMH Nominal Voltage: 3.6V Typical Capacity: 500mAh Temperature Range: Storage: -40°C to 85°C Discharge: -20°C to 85°C Charge: 0°C to 85°C Maximum Discharge Current (cont): 1500mA Life Expectancy (typical): At least 1 year IEC Cycle: 1000 Cycles (IEC61951-2) WA_DEV_FEX20_PTS_003 Rev 002 May 26, 2010 17 6. AT Commands for the Battery Accessory There are three different methods for monitoring the battery status. The user can: check the presence of DC-IN charging check the presence of USB charging check how much charge is available in the battery accessory 6.1. DC-IN Status GPIO1 is an internal signal of the Fastrack Xtend and is dedicated for DC-IN status monitoring. GPIO1 can be controlled by Fastrack Xtend users using AT Commands. When the power is applied on DC-IN, GPIO1 is pulled down to logic 0, and when the power is disconnected on DC-IN, it is pulled up to logic 1. To monitor the GPIO1 level, use a communication software such as HyperTerminal and enter the following AT Commands: Note: 6.2. To set GPIO1 as input, enter AT+WIOM=1,”GPIO1”,0 GPIO1 needs to be set as an input initially. To read GPIO1 status, enter AT+WIOR=”GPIO1” USB Power Status The standard USB interface provides a +5V power supply signal, which can be used to charge the battery accessory. This source is limited since the default mode of the USB power cannot provide more than 100mA. Consequently, the Fastrack Xtend cannot be used in Communication mode with the USB source unless a charged battery is connected. Likewise, the USB power input has the capability to charge the battery with a maximum current of 100mA. Note: The USB power may provide more than 100mA provided the mode of the USB power is changed to something other than the default mode. USB detection is done via modem software. To enable USB communications between the Fastrack Xtend and the application, use the UART1 connection and a communication software such as HyperTerminal and enter the AT Command AT+WMFM=0,1,3. Note: Sending the AT Command AT+WMFM=0,1,3 is only done via UART1. WA_DEV_FEX20_PTS_003 Rev 002 May 26, 2010 18 Battery Accessory Product Technical Specification AT Commands for the Battery Accessory Figure 9. USB Detection by Modem Software After USB connection has been detected and the USB driver has been installed, additional options – Wavecom USB Wireless CPU and an extra COM port are made available in the COM port selection list. Figure 10. Setting Up USB Communications For more information about USB communications between the Fastrack Xtend and applications, refer to document [3] AirLink FXT Series Quick Starting Guide and Development Kit Description. For more details regarding enhanced power mode, refer to document [4] USB Power Distribution. WA_DEV_FEX20_PTS_003 Rev 002 May 26, 2010 19 Battery Accessory Product Technical Specification 6.3. AT Commands for the Battery Accessory Battery Level Status ADC1 is an internal signal of the Fastrack Xtend and is dedicated for measuring the battery accessory voltage. From the ADC1value, a specific conversion is necessary to get the battery voltage. The formula of the battery level to ADC1 reading (expressed in mV) is detailed below: Battery voltage (Vbat) = 3.212 x ADC1 reading For example, if ADC1 reading by AT command is 1218, then Vbat level = 3.212 x 1218 = 3912mV. To monitor the battery level status, use a communication software such as HyperTerminal and enter the following AT Command: AT+ADC? ADC1 Reading 6.4. Battery Cell Connection Anomaly It is possible to detect if the battery cell is not properly connected inside the battery accessory. There are two different readings to identify this anomaly as described below. If DC-IN is used, ADC1 reads 5V steady on the battery terminal. If USB is used, ADC1 reads a pulse-shaped voltage waveform on the battery terminal (due to the USB current limitation which is 100mA). Consequently, the voltage measured is not stable. Refer to the following figure. Figure 11. ADC1 Reading Using USB WA_DEV_FEX20_PTS_003 Rev 002 May 26, 2010 20 7. Recommendations and Other Information When used for the first time, or after a long time (more than a month) of storage, 2 to 3 times of charging and discharging cycles are required to optimize the battery performance (capacity). When the battery has not been used for a long period of time, recharge it before use. Disconnect the DC-IN or the USB cable from the Fastrack Xtend modem if the device is not to be used for a long time. It is normal for the battery accessory to increase in temperature by up to 10°C during charging. The charging temperature of the battery accessory is from 0°C to 85°C. Do not open or modify the battery accessory. The battery accessory is designed using NiMH and modifying the product by using other types of battery cells (e.g. NiCd, Alkaline etc.) with different capacities may lead to a burst, causing personal injury. Battery storage temperature is from -40°C to 85°C. Do not wet, incinerate or disassemble the battery accessory. Do not short circuit the battery accessory. For indoor and dry location use only. Do not expose the battery accessory to rain, snow or extreme conditions. WA_DEV_FEX20_PTS_003 Rev 002 May 26, 2010 21 8. References For more details, several reference documents can be consulted. The Sierra Wireless documents referenced herein are provided in the Sierra Wireless documentation package; however, the general reference documents which are not Sierra Wireless owned are not provided in the documentation package. [1] AT Commands Interface Guide Reference: WM_DEV_OAT_UGD_079 [2] AirLink FXT Series User Guide Reference: WA_DEV_FEX20_UGD_002 [3] AirLink FXT Series Quick Starting Guide and Development Kit Description Reference: WA_DEV_FEX20_UGD_003 [4] USB Power Distribution Reference: Universal Serial Bus Specification Revision 2.0 WA_DEV_FEX20_PTS_003 Rev 002 May 26, 2010 22