1
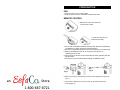
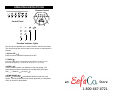
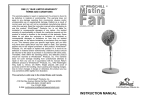
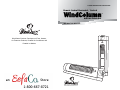
PLEASE READ BEFORE USE AND SAVE
Remote Control Horizontal / Vertical
WindColumn
TM
with Ion Generator
INSTRUCTION MANUAL
ion
WindChaser Products: Developers of Fans, Heaters,
Air-Treatment Products, Portable Air-Conditioners and
Portable Ice Makers
ion
©2005 WindChaser Products, Inc.
CONTENTS
Remote Control Horizontal / Vertical
WindColumn
TM
with Ion Generator
MODEL WCH3iRO
Before Initial Use
2
For Your Safety
3
Parts
4
Preparation
5
Operating Instructions
6
Cleaning and Storage
7
Limited Warranty
8
BEFORE INITIAL USE
Read this Entire Instruction Manual Before Use.
Attach your purchase receipt here
PLEASE KEEP YOUR RECEIPT.
YOUR RECEIPT IS YOUR PROOF OF
PURCHASE AND IS NECESSARY FOR
WARRANTY SERVICE
For your reference:
Serial No.
Name and Address of Dealer
Date of Purchase
FOR YOUR SAFETY
IMPORTANT INSTRUCTIONS
Read and save these important safety instructions before using this fan. When
using electrical appliances, basic safety precautions should always be followed
including the following:
1) Use this fan only as described in this manual. Other uses not recommended
may cause fire or electric shock.
2) This product is intended for household use ONLY and not for commercial,
industrial or outside use.
3) To protect against electrical shock, do not place fan in window, immerse unit,
plug or cord in water, or spray with liquids.
4) When touching the unit, be sure hands are dry to prevent electric shock.
5) Do not use outdoors.
6) Do not run the power cord under carpets, and do not cover the unit with
a rug or any type of cloth material. Arrange the cord in such that it will not
be tripped over.
7) Close supervision is necessary when any appliance is used near children.
8) Unplug the fan from the outlet when not in use, when moving fan from one
location to another and before cleaning.
9) Do not operate the fan in the presence of explosive and/or flammable fumes.
10) Do not place the fan or any parts near an open flame, cooking or other
heating appliance.
11) Do not operate the fan with a damaged cord , plug, after a malfunction or if
dropped or damaged in any manner.
12) Avoid contact with moving fan parts.
13) To disconnect, grip the plug and pull it from the wall outlet. Never yank the
cord.
14) The use of attachments is not recommended and may cause hazards.
15) Always use on a dry level surface.
16) Do not operate if the fan housing is removed or damaged.
17) THIS PRODUCT IS EQUIPPED WITH A POLARIZED A.C. (Alternating
Current) PLUG - a plug having one blade wider than the other. This plug will
fit into the power outlet only one way. This is a safety feature. If you are
unable to insert the plug fully into the outlet, try reversing the plug. If the
plug should still fail to fit, contact an electrician to replace the obsolete
outlet. DO NOT DEFEAT THE SAFETY PURPOSE OF THIS POLARIZED
PLUG.
WARNING: The unit has an ion generator inside. DO NOT ATTEMPT TO
OPEN THE HOUSING. There is the presence of high voltage and risk of electric shock. No user servicable parts available.
WARNING: To reduce the risk of fire or electrical shock, DO NOT USE
THIS FAN WITH ANY SOLID STATE SPEED CONTROL DEVICE.
SAVE THESE INSTRUCTIONS
PARTS
Fan Body
Power
Indicator Lights
ion
Front Grills
Function
Indicator Lights
ion
Control Panel
Remote Control
Storage Compartment
ion
ion
PREPARATION
FAN
1. Place the unit on a dry, level surface.
2. Plug the power cord into a standard 120VAC wall outlet.
REMOTE CONTROL
1. Remove the cover from the back
of the remote control.
2. Insert two AAA dry-cell
batteries (included).
3. Do not use rechargeable batteries because they differ from standard dry
cell batteries in shape, dimension and performance.
4. Be sure to replace the batteries with two new batteries of the same type.
5. Remove the batteries if the fan is not going to be used for an
extended period of time.
6. Always point the remote control toward the unit when operating with the
remote control.
7. All function keys are enabled after pressing the ON/OFF button.
9.8ft
Fig.1
Fig.2
8. Make sure nothing is obstructing the remote control signal infront of the fan
(Fig. 1)
9. The maximum distance the remote control can operate the fan from is
9.8ft (3m)(Fig. 2).
OPERATING INSTRUCTIONS
Remote Control
1
3
2
5
4
6
1
6
Control Panel
3
2
5
4
ion
2
5
4
3
Function Indicator Lights
The unit can be operated by the Control Panel or the Remote Control.
The unit will beep each time a button on the remote or control panel is
pressed.
1. OSCILLATE (
)
Press to turn the oscillation function ON or OFF.
2. TIMER (
)
Press the TIMER button until the desired Shut-Off time is shown on the
timer indicator lights (2). The timer can be set for 1, 2, 4, 8 hours.
3.SPEED (
)
Press to select between Low, Medium or High fan speeds. The
speed selected will be indicated by the corresponding LED lights Low (
), Medium (
) or High (
).
4. WIND MODES (
)
Natural ( ) and Sleep ( ) Wind Modes both run under a pre-set
rhythm. The only difference is that the fan speed will go a step down
every 30 minutes in Sleep Mode.
.
ANTES DE USAR POR PRIMERA VEZ
For example, the fan is running on HIGH speed while in SLEEP MODE:
HIGH (Natural Wind) for 30 min. - MED (Natural Wind) for 30 min. then the fan will continuously run on LOW (Natural Wind).
In MEDIUM speed while in SLEEP MODE:
MED (Natural Wind) for 30 min. - then the fan will continuously run on
LOW (Natural Wind).
In LOW speed while in SLEEP MODE the fan will continuously run on
LOW (Natural Wind
NOTE: The timer can be used while running any of the Wind Modes.
The selected mode will be indicated by an LED light on the display.
5. ION GENERATOR (
)
Press to turn ON or OFF the Ion Generator. The Ion light (3) will illuminate
when the Ion Generator is on.
NOTE: The ion generator produces negatively charged ions which remove
airborne contaminants such as smog, pollen and dust. Ion Generator is
capable of cleaning the air in a 21.22 ft2. (2m2) room.
6. POWER BUTTON (
)
Press to turn the unit ON or OFF.
CLEANING AND STORAGE
1. Turn the unit OFF and unplug the unit before cleaning.
2. Use only a soft, damp cloth to clean the exterior. A can of
compressed air and a vacuum cleaner can be used to clean
the interior. Spray compressed air through the grills and then
vacuum the dust that comes out.
3. Do not immerse the unit in water and never allow water to drip into
the Motor Housing.
4. Do not use gasoline, paint thinner or other chemicals to clean the fan.
5. Store unit in it’s original box and store in a cool, dry place.
NOTE: If you experience a problem, please return the unit to the
place of the original purchase or see your warranty. Do not
attempt to open the motor housing yourself. Doing so may void
your warranty and cause damage to the fan or personal injury.
LIMITED WARRANTY
One (1) Year Limited Warranty Terms and Conditions
This warranty applies to repair or replacement if a product is found to be
defective in material or workmanship. This warranty does not apply to
any damage resulting from commercial, abusive and/or unreasonable
use or supplemental damage. Defects as a result of normal wear and
tear will not be considered manufacturing defects under this warranty.
Read the instruction manual before attempting to use this product.
WindChaser Products, Inc. is not liable for incidental or consequential
damages of any nature. Any implied warranty of merchantability or
fitness for a particular purpose on this product is limited in duration to
the duration of this warranty. Some states do not allow the exclusion or
limitation of incidental or consequential damages or limitations on how
long an implied warranty lasts, so the above limitations or exclusions
may not apply to you. This warranty gives you specific legal rights, and
you also may have other rights which vary from state to state. This
warranty applies only to the original purchaser of this product.
WindChaser Products, Inc. will repair or replace this product if it is
found to be defective in material and/or workmanship. Defective product
should be returned to the place of purchase in accordance with store
policy. Thereafter, while within the warranty period, any defective
product should be returned to WindChaser Products, Inc.. This warranty
does not cover damage resulting from unauthorized attempts to repair
or from any use not in accordance with its manual.
CONTENIDO