1
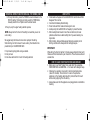
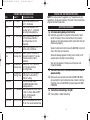
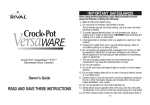
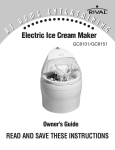
TO450.02.NA.OM1
2/10/03
11:45 AM
Page 1
TO450
LIMITED ONE-YEAR WARRANTY
Rival® warrants this product to be free from defects in materials or workmanship for one (1) year from date of
original purchase. If you have a claim under this warranty please follow these procedures:
1) Within the first 45 days from date of original purchase, defective product should be returned to original
place of purchase for replacement (with proof-of-purchase).
2) Within the first 12 months from date of purchase Rival will repair or replace (at no charge) the defective
product if it is delivered freight prepaid during that period to an authorized service station. To obtain warranty
service visit:
www.rivalproducts.com
4-Slice Toaster Oven
and Broiler
Or, you may write to Rival c/o The Holmes Group, attention: Consumer Returns, 32 B Spur Drive, El Paso, TX
79906. Proof of purchase is required when requesting warranty service - SAVE YOUR SALES RECEIPT. This
warranty is extended only to the original purchaser and does not apply to commercial use, unreasonable use,
or to damage to the product (not resulting from defect or malfunction) while in the possession of the
consumer. Rival disclaims all responsibility for consequential, incidental, or commercial losses caused
by the use of this product. Some states do not allow this exclusion or limitation of incidental or
consequential losses, so the foregoing disclaimer may not apply to you. This warranty gives you specific legal
rights, and you may also have other legal rights which vary from state to state.
Owner’s Guide
READ AND SAVE THESE INSTRUCTIONS
©2003, Rival®
A Division of The Holmes Group
Printed in China
TO450/428-0935
TO450.02.NA.OM1
2/10/03
11:45 AM
Page 3
IMPORTANT SAFEGUARDS
IMPORTANT SAFEGUARDS (CONT.)
When using electrical appliances, basic safety precautions should
always be followed including the following:
1. Read all instructions before using.
2. Do not touch hot surfaces. Use handles and knobs.
3. To protect against electrical shock do not immerse cord, plugs or
oven in water or other liquid.
4. Close supervision is necessary when any appliance is used by or near
children.
5. Unplug from outlet when not in use and before cleaning. Allow to
cool before putting on or taking off parts.
6. Do not operate any appliance with a damaged cord or plug or after
the appliance malfunctions or has been damaged in any manner.
Return appliance to the manufacturer (see warranty) for examination,
repair, or adjustment.
7. The use of accessory attachments not recommended by the
appliance manufacturer may cause injuries.
8. Do not use outdoors.
9. Do not let cord hang over edge of table or counter, or touch heated
surfaces.
10. Do not place on or near a hot gas or electric burner, or in a heated
oven.
11. Extreme caution must be used when moving an appliance containing
hot oil or other hot liquids.
12. To disconnect, rotate the TIMER DIAL to the OFF position, then
remove plug from wall outlet.
13. Do not use appliance for other than intended use.
14. Oversize foods or metal utensils must not be inserted in the Toaster
Oven as they may create a fire or risk of electric shock.
15. A fire may occur if the Toaster Oven is covered or touching
flammable material, including curtains, draperies, walls, or the like,
when in operation. Do not store any item on top of the appliance
when in operation.
16. Do not clean with metal scouring pads. Pieces can break off the pad
and touch electrical parts involving a risk of electric shock.
17. Extreme caution should be exercised when using containers
constructed of other than metal or glass.
18. Do not store any cardboard, paper, plastic or other flammable items
inside the oven. Store only the accessories provided inside the oven.
19. Do not cover crumb tray or any part of the oven with metal foil. This
will cause overheating of the oven.
20. To turn the oven off, rotate the TIMER DIAL to the OFF position.
21. Use extreme caution when removing pan or disposing of hot grease.
-2-
-3-
SAVE THESE INSTRUCTIONS
• FOR HOUSEHOLD USE ONLY. .
• No user-serviceable parts inside. Do not attempt to service this
product.
• A short power supply cord is provided to reduce the risk of becoming
entangled in or tripping over a longer cord. An extension cord may
be used with care. However, the marked electrical rating should be at
least as great as the electrical rating of the Toaster Oven Broiler. The
extension cord should not be allowed to drape over the counter or
tabletop where it can be pulled on by children or tripped over.
POLARIZED PLUG
This appliance has a polarized plug (one blade is wider than
the other). To reduce the risk of electric shock, this plug is
intended to fit into a polarized outlet only one way. If
the plug does not fit fully into the outlet, reverse the
plug. If it still does not fit, contact a qualified electrician.
Do not attempt to modify the plug in any way. If the plug fits loosely into
the AC outlet or if the AC outlet feels warm do not use that outlet.
11:45 AM
Page 5
ADDITIONAL IMPORTANT
SAFETY INSTRUCTIONS
15
250
0 200
0
30
350
• Leave 6 – 8 inches of open surface all around the exterior of the
Toaster Oven.
• Place the Toaster Oven on a dry, level heat resistant surface.
• The Toaster Oven should be operated on a separate electrical circuit
from other appliances. If the circuit is overloaded, this appliance may
not operate correctly.
• Do not use airtight containers inside the oven. Containers must have
room to allow for expansion of liquids.
• Do not touch hot surfaces such as the GLASS DOOR, top and sides.
• Watch the toasting process carefully when toasting items such as
stale toast, croutons and crackers. Select a light setting for these
types of foods.
• Do not use any sharp utensils to clean the GLASS DOOR as this may
cause damage to the glass or breakage. Clean only with a soapy
damp rag.
KNOW YOUR TOASTER OVEN AND BROILER
400
2/10/03
45
0
TO450.02.NA.OM1
Toast Broil
TEMPERATURE DIAL
TIMER DIAL
TEMP
huh
0
huh
huh
10
Off
huh
TIME
15
R
WIRE OVEN RACK
GLASS DOOR
HANDLE
BAKE PAN
PREPARING YOUR TOASTER OVEN AND BROILER FOR USE
Your Rival® Toaster Oven is equipped with all of the options of a full-size
oven in a countertop appliance – it toasts, bakes and broils.
NOTE: Initial start up operation may result in minimal smell and smoke
(about 15 min). This is normal. It is due to the protective substances on
the heating elements, which protect them from salt effects during
shipment from the factory.
-4-
-5-
TO450.02.NA.OM1
2/10/03
11:45 AM
Page 7
OPERATING INSTRUCTIONS FOR TOASTING
1. Rotate the TEMPERATURE DIAL to toast
A. Open the GLASS DOOR and place the bread on the wire rack (up
to 4 slices).
B. The WIRE OVEN RACK will slide out when the door is opened.
C. Remember to remove the BAKE PAN first.
2. The TIMER DIAL is the ON/OFF switch
A. Choose your color preference by adjusting the TIMER DIAL to
select light, medium or dark.
B. To test the toasting of your type of bread, we suggest starting at a
medium setting as bread varies according to humidity, thickness
and texture. Each type of bread will toast differently according to
these properties.
IMPORTANT:
When choosing toast color (light, medium or dark) always rotate the
timer over 5 minutes and then rotate back to dark, medium or light. This
will ensure that the timer operates correctly and safely.
• When the toast cycle is finished the bell will ring and the electrical
power is automatically turned off.
• To stop the cycle at any time, turn the timer clockwise to the OFF
position and the bell will ring.
• Four (4) slices will be lighter than one (1) slice, adjust TIMER DIAL
accordingly.
• If toasting only one slice, place bread in the center of the WIRE OVEN
RACK, 4 slices should be toasted side by side.
In this cycle, both the top and bottom heating elements operate.
-6-
OPERATING INSTRUCTIONS FOR BAKING
1. Place the food on the multi-use pan and then place the pan on top of the
WIRE OVEN RACK in the oven. Close the GLASS DOOR.
NOTE: We suggest to always preheat the oven at this setting before placing
the food inside.
2. Rotate the TEMPERATURE DIAL to the desired temperature.
3. The TIMER DIAL is the ON/OFF switch.
After rotating the TEMPERATURE DIAL to your desired temperature, you must
select the TIMER DIAL with the following options.
A. For short baking times, rotate the TIMER DIAL clockwise (up to 15
minutes). At the sound of the bell, the bake function will turn off
automatically.
B. For longer baking times, rotate the TIMER DIAL counter-clockwise to
the STAY ON setting. The cooking will continue until the TIMER DIAL is
manually turned off. The bell will sound after the timer is manually
switched off.
NOTE: In this cycle, both the top and bottom heating elements operate.
OPERATING INSTRUCTIONS FOR BROILING / TOP BROWN
1. Place the food on the multi-use pan and then place the pan on the top of
the wire rack in the oven. Close the GLASS DOOR.
2. Rotate the TEMPERATURE DIAL clockwise to the BROIL position.
3. The TIMER DIAL is the ON/OFF switch.
After rotating the TEMPERATURE DIAL to the BROIL position, select the TIMER
DIAL with the following options.
A. For short time broiling, rotate the TIMER DIAL clockwise (up to 15
minutes). At the sound of the bell, the broil function will automatically
turn off.
-7-
TO450.02.NA.OM1
2/10/03
11:45 AM
Page 9
OPERATING INSTRUCTIONS FOR BROILING / TOP BROWN (CONT.)
B. For long time broiling, rotate the TIMER DIAL counter-clockwise to the
STAY ON setting. The broiling will continue until the TIMER DIAL is
manually turned to the off position and the bell will sound.
In this cycle, only the upper heating element operates.
NOTE: Always monitor the food at this setting to ensure that you are not
over cooking.
We suggest using the timer as food can burn quickly at this setting.
When broiling, turn the food over for even cooking. Food should not be
placed directly on the WIRE OVEN RACK.
For top browning simply broil as long as desired.
Do not pre-heat.
Do not allow aluminum foil to touch the heating elements.
USEFUL TIPS
1. Condensation will appear on the GLASS DOOR for some foods and then
disappear. This is normal.
2. Cook food immediately after defrosting.
3. Frozen foods and thick meats will take longer to cook.
4. Avoid opening the GLASS DOOR too frequently to prevent heat loss.
5. When toasting frozen bread or more than one fresh slice, the toast
preference should be at a darker setting than if you were toasting one
regular slice.
6. When broiling, smoke will likely appear. Removing excess fat prior to
broiling can reduce this. Always use the multi-purpose pan.
IMPORTANT:
When setting the timer for less than 5 minutes, always rotate the timer past 5
minutes and then rotate back to your chosen time. This will ensure a safe and
accurate time.
HOW TO CLEAN YOUR TOASTER OVEN AND BROILER
1. Before using your Rival® Toaster Oven, wash all of the accessories –
WIRE OVEN RACK and BAKE PAN – in hot water with detergent soap.
2. Initial start up operation may result in minimal smell and smoke
(about 15 minutes). This is normal. It is due to the protective
substance on the heating elements which protects them from salt
effects during shipping from the factory.
3. Always make sure that the appliance is unplugged and cooled before
cleaning.
-8-
-9-
TO450.02.NA.OM1
2/10/03
11:45 AM
Page 11
HOW TO CLEAN YOUR TOASTER OVEN AND BROILER (CONT.)
4. The WIRE OVEN RACK can be removed easily for cleaning. Open the
GLASS DOOR, tilt up slightly and pull toward you until it slides out
completely. Once the rack is removed, clean the interior with a damp
cloth. To replace the WIRE OVEN RACK, open the GLASS DOOR and
tilt upward slightly. Slide the rack into the two rack grooves on either
side of the chamber, push straight to the back of the oven chamber.
Ensure that the automatic door hook is in the correct position to push
the WIRE OVEN RACK towards the rear of the chamber. The exterior
may be wiped with a damp cloth.
Remember: Do not place the entire unit in water or any liquid.
DO NOT WIPE THE HEATING ELEMENTS – They are self cleaning.
5. Cleaning the bottom of the crumb tray
A. This appliance has a drop open crumb tray at the bottom of the
baking chamber. First, unplug the appliance and allow it to cool.
B. To clean out the crumbs, simply tilt the unit backwards and pull
down on the crumb knob located at the exterior center bottom of
the baking chamber and allow to drop on the counter top.
C. Washing of the interior of the crumb tray is accomplished by
placing the unit on its backside and allowing the crumb tray to fall
forward for easy cleaning.
D. DO NOT use the dishwasher to clean any of the accessories, which
are included with this product.
E. DO NOT use any abrasive cleaning products.
F. Clean accessories with a soft cloth in hot water with liquid
detergent or soap.
G. After cleaning, close the access panel and check that it is locked
securely into position.
-10-
HOW TO CLEAN YOUR TOASTER OVEN AND BROILER (CONT.)
CAUTION
• TO PROTECT COUNTERTOP FROM DAMAGE, THE TOASTER OVEN /
BROILER MUST BE OPERATED WITH THE CRUMB TRAY IN PLACE,
SECURELY CLOSED AND CLEANED OF EXCESS FOOD.
• NEVER OPERATE YOUR TOASTER OVEN / BROILER WITH THE GLASS
DOOR OPEN.
• NEVER PUT THE BAKE PAN (OR ANY OTHER ACCESSORY) DIRECTLY
ON THE TOP OF THE LOWER HEATING ELEMENT.
• THE EDGES OF THE METAL GUARD COVERING THE LOWER HEATING
ELEMENT SHOULD NEVER BE TOUCHED DURING CLEANING.
ALWAYS USE A SOFT BRUSH OR OTHER UTENSIL TO PREVENT
INJURY.
TAKE CARE
• Always leave at least 1” between the top of food and the top heating
elements.
• Remove all plastic and paper from food, TV dinners, etc. before
cooking.
• Always use oven mitts to remove multi-use pan after cooking.
RECIPE GUIDE
• Remember in BAKE function only, preheat oven for 5 minutes
• Always use oven mitts to remove multi-use pan after cooking.
-11-
TO450.02.NA.OM1
2/10/03
11:45 AM
Page 13
COOKING TIME AND TEMPERATURE
FOOD
QUANTITY
Frozen Pizza
2 – 4 Slices
Bacon
Hot Dogs
Hamburgers
Frozen French
Fries
Leftovers
Chicken
TV Dinners
Baked Potato
Pork Chops
COOKING INSTRUCTIONS
Bake on multi-use pan at 450º F
for 15 – 20 minutes.
4 – 6 strips
Bake on multi-use pan at 450º F.
Use timer set to 7 – 12 minutes
according to taste preference.
4 – 8 hot dogs Broil on multi-use pan. Set timer
to 15 minutes and add time
according to taste. Turn hot
dogs often.
Up to 4 pieces Bake on multi-use pan at 450º F for
(1/4 lb. each) 20 minutes.
Fill BAKE PAN Bake in “Stay On” mode for 20
one layer only minutes, then broil for 5 minutes
or more according to taste
preference.
Fill BAKE PAN Bake at 250 – 375º F with timer
one layer only for 15 minutes. Continue
according to taste.
Fill BAKE PAN Bake at 450º F for 35 minutes or
one layer only until juices run clear with the
“Stay On” setting.
Place foil container directly
on WIRE OVEN RACK. Follow
package directions.
1 – 5 potatoes Wash and pierce with a fork. Option
– brush on olive oil. Bake at 450º F
for 60 – 95 minutes with
“Stay On” setting.
Up to 4 chops Place on multi-use pan and broil for
35 min. Turn over at least two times.
-12-
COOKING TIME AND TEMPERATURE (CONT.)
NOTE: The recipe guide is for suggestion only. Temperatures may vary
depending on the size and consistency of the food. Frozen food will take
longer to cook than thawed food.
QUESTIONS AND ANSWERS
Q
A
Unit smokes during baking or broil function
Initial start up operation may result in minimal smoke or smell
(about 15 minutes). This is normal and due to the protective
substance on the heating elements which protects them from salt
effects during shipping.
Smoke in baking function often means the BAKE PAN or interior of
oven is dirty. Clean per instructions.
Smoke almost always appears in broiling and is normal. Cut off
excess fat prior to broiling to reduce smoking.
Stop using the appliance if smoke source is the power cord.
Unplug immediately.
Q
A
The WIRE OVEN RACK is stuck and GLASS DOOR does not
operate smoothly.
Remove wire oven rack and clean inside the WIRE OVEN RACK
grooves inside the oven chamber. Also clean inside of crumb tray.
Check that hook on GLASS DOOR is properly aligned into WIRE
OVEN RACK.
Q
A
Toast is black and smoking or too light.
Choose lighter or darker toast setting.
-13-
TO450.02.NA.OM1
2/10/03
11:45 AM
NOTES
-14-
Page 15