1
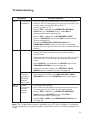
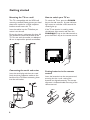
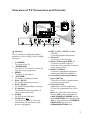
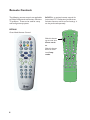
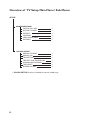
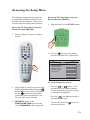
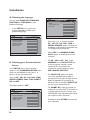
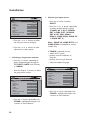
Philips Professional and Business Solutions
User Manual
26HF7875
26HF5445
32HF7875
32HF5445
42HF7845
Contents
Contents ................................................ 1
Installing a System SmartCard or
System Box ......................................... 35
Introduction .......................................... 2
Diagnosing Basic Problems ............... 37
Kensington Security Slot ..................... 2
Safety ..................................................... 3
Appendix A – Multi Remote Controls
Support ............................................... 39
Troubleshooting ................................... 4
Appendix B – Resolutions Table ....... 40
Getting started ..................................... 6
Environmental Information .............. 41
Mounting the TV on a wall ........................... 6
Connecting the aerial and mains ................. 6
Putting batteries in the remote control .... 6
Overview of TV Connectors and
Controls ................................................ 7
Remote Controls .................................. 8
RC2886 ............................................................. 8
Guest Remote Control Keys ............... 9
Overview of TV Setup Main Menu /
Sub-Menus ........................................... 11
Overview of TV Setup Main Menu /
Sub-Menus ........................................... 12
Accessing the Setup Menu ................ 13
Installation ......................................... 14
A. Selecting the language ............................ 14
B. Selecting your Communication Source
.......................................................................... 14
C. Defining the number of available
channels .......................................................... 15
D. Installing the Programmes ..................... 15
E. Specifying and Configuring the settings
and options ................................................... 19
F. Setting up the TV Clock ........................ 31
Cloning the TV and the SmartLoader
configuration ....................................... 34
Information for Users in the UK ...... 42
Introduction
Congratulations on your purchase and
welcome to Philips!
This manual contains information about how
to install and operate your TV.
If you still have problems after reading
this manual, call your Local Philips Customer
or Service Centre. The telephone numbers
and addresses are given in the worldwide
guarantee booklet supplied with the TV.
Product information
The model and serial number can be found
at the rear of the TV, on left side of the TV,
and on the packaging
2
Kensington Security Slot
(if present)
Your TV is equipped with a Kensington
Security Slot, to prevent it from getting
stolen. An anti-theft Kensington lock has to
be purchased separately. The Kensington
lock is a plastic-coated steel cable with a
lock. One end has to be fixed to the opening
of the TV and locked with a special key. The
other end is attached to a fixed point.
® Kensington and MicroSaver are
registered US trademarks of ACCO World
Corporation with issued registrations and
pending applications in other countries
throughout the world. All other registered
and unregistered trademarks are the
property of their respective owners.
Safety
1. Two people are required to lift and
carry a TV that weighs more than 25
kilograms. Improper handling of the TV
can cause serious injury.
2. If you place the TV set on a solid surface,
ensure the surface is level and that it can
withstand the weight of the TV.
3. Mounting the TV on the wall requires
special skill that should only be
performed by a qualified personnel.
You should not attempt to do the work
yourself. Philips bears no responsibility
for improper mounting or mounting that
results in accident or injury.
4. This TV is compatible with the VESA
wall mounting standard. Please contact
your local electronics supplier for a
VESA compliant bracket to wall mount
this TV. Before you mount your TV on a
wall, ensure the wall is suitable to carry
the weight of the TV.
5. Wherever you place or mount the
TV, ensure that air can circulate freely
through the ventilation slots. Do not
place the TV in a confined space.
6. Do not place naked flame sources such
as lighted candles close to the TV.
7. Do not expose the TV or the batteries
of the remote control to heat, direct
sunlight, rain, or water.
X
X
8. Do not place vessels filled with water on
top of or near to the TV. Spilling water
into the TV can result in electric shock.
If you spill water into the TV, do not
operate the TV.
Immediately disconnect the TV from
the mains and have the TV checked by a
qualified technician.
9. Do not touch any part of the TV, power
lead, or aerial lead during lightning
storms.
10. Do not leave the TV in stand-by mode
for an extended period of time. Instead,
disconnect the TV from the mains.
11. The TV set is always connected to the
mains. You can disconnect the TV from
the mains by doing one of the following
tasks:
• unplugging the mains cord located at
the back of TV set
• unplugging the mains plug from the
mains socket outlet
Pull the power cord by the plug - do not
pull on the power cord.
12. Ensure that you always have easy access
to the mains cord or the mains plug to
disconnect the TV from the mains.
13. Ensure the power cord is fully inserted
into the TV mains socket and the wall
socket.
14. If the TV is mounted on a swivel base
or swivel arm, ensure no strain is placed
on the power cord when the TV is
swivelled. Strain on the power cord can
loosen connections and cause arcing or
fire.
15. Verify that the mains supply voltage in
your home corresponds to the voltage
printed on the sticker at the rear of the
TV.
3
Troubleshooting
If you are experiencing problems, check this list of symptoms and suggested steps to take
before requesting service. You may be able to solve the problem yourself.
Note: Please be familiar with the commercial features as described in the TV installation. The effects
of several of these features if not thoroughly understood might appear as faulty operation.
Symptoms
Installation
Picture
Possible Solutions
TV does not
respond to
commands of the
Setup Remote
Control
• Check the button on the left hand side of the remote
control must be in the SETUP location (see page 13).
TV does not
respond to the
Guest Remote
Control
• Check if YES is selected in the Remote Control Lock
feature. Select NO if YES is selected (see page 23)
Unable to enter
Setup menu via
Guest Remote
Control
• Use the Green Remote Control (RC2573) to access
Setup menu to reset SECURITY setting (see page 22).
No picture
• Check that the antenna / cable is connected
properly at the rear of the TV.
• Check picture adjustments (brightness, contrast,
colour, tint).
• Possible TV station problem. Try another channel.
• Ensure VIDEO is not selected in the MUTE feature of
the PROGRAM INSTALL menu (see page 18).
Power
Double image /
“ghost” image
• Check antenna, cable or set-top box.
Snowy / noisy
picture
• Check antenna, cable and /or set-top box
connections. Ensure that they are properly connected.
No power
• Ensure that the TV's AC power cord is plugged into the
main socket and to your TV. If there is still no power,
disconnect the plug. Wait for 60 seconds and re-attach
plug. Switch on the TV again.
TV switch off by
itself
• Check ESP (Energy Saving Programmability) setting in
TV installation / setup (see page 24).
• Check that POWER SCART in the AUTO SCART
feature is not selected (see pages 25 and 26).
TV cannot be
switched off
4
• Ensure FORCED ON is not selected in the POWER
ON feature of the SWITCH ON / OSD menu (see
pages 20 and 21).
Troubleshooting
Symptoms
Power
Possible Solutions
TV cannot be • If you are using the POWER button of the remote control to
switched on
switch on the TV, note that button is only use to set the TV to
stand-by mode. Use the Digit 0-9 or CH + / –
buttons to switch on TV.
• Check if YES is selected in the REMOTE CONTROL
LOCK feature in SECURITY menu. Select NO to
deactivate lock function (see page 23).
• Check if ALL is selected in the KEYBOARD LOCK
feature in SECURITY menu. Select NO to deactivate lock
function (see page 22).
Note: If both REMOTE CONTROL LOCK and
KEYBOARD LOCK feature are activated, use the Setup
Remote Control to go into these two menus to deactivate lock
function.
Sound
No Sound
• Check if the volume of TV is not at the minimum. Try
pressing the Volume Up button of the remote control to
increase sound.
• Check that the mute mode is not on. If mute mode is on, press
the Mute button on the remote control to deactivate mute
mode.
• Check AUDIO is not selected in the MUTE feature of the
PROGRAM INSTALL menu (see page 18).
• Check that the audio source in the DEFAULT HDMI
AUDIO feature is selected correctly (see page 30).
Remote
Control
Volume level
cannot be
increased or
decreased
beyond a
certain value
• Check the limit setting for the Minimum and Maximum Volume
and re-specify the setting in the MIN VOLUME / MAX
VOLUME features in the CONTROL menu (see page 27).
TV does
not respond
to Guest
Remote
Control
• Try changing the batteries.
• Aim remote control directly at remote control sensor lens on
TV and try pressing any button on the remote control.
• Check if YES is selected in the REMOTE CONTROL
LOCK feature in SECURITY menu. Select NO to
deactivate lock function (see page 23).
• Deselect HM - LINK in the COMMUNICATION feature
(see page 14).
Note: The Troubleshooting section is applicable only to TV that is installed as a stand-alone.
If TV is connected to an interactive system, the behaviour of the TV will be controlled by the
system.
5
Getting started
Mounting the TV on a wall
How to switch your TV on
This TV is compatible with the VESA wall
mounting standard. Please contact your local
electronics retailer for a VESA compliant
bracket to wall mount this TV.
To switch the TV on, press the POWER
key on the side controls. A green indicator
light comes on and after a few seconds the
screen lights up.
Insert the cables into the TV before you
mount it on the wall.
If the TV set remains in stand-by mode,
the indicator light remains red. Press the
PROGRAM +/- key on the side controls or
press the TV +/- key on the remote control.
Ensure that there is a distance of at least 30
mm between the wall and the back of the
TV. For sets with sub-woofer, an additional
10 mm is required for optimal sound effect.
Connecting the aerial and mains
Insert the aerial plug and the mains cord
firmly into their respective socket at the
bottom of the TV before connecting them
into the wall socket.
6
Putting batteries in the remote
control
Insert the batteries into the remote control,
ensuring that the + and - ends of the
batteries are aligned correctly. The correct
alignment is indicated inside the casing of the
remote control.
Overview of TV Connectors and Controls
9
DATA 1
DATA 2
4
8
VGA In
3
15
PROGRAM
10
2
1
EXT 4
EXT 3
11
12
13
Warning
Do not connect any telephone cables or
equipment to Data 1 (RJ12) & Data 2 (RJ45)
connectors.
1. . POWER
To switch off the TV.
2. - PROGRAM +
To switch on TV and also to select the
next or previous programme.
3. MENU
To display or close menus.
4. - VOLUME +
To increase or decrease volume.
5. Data 1 (RJ 12)
For System Terminal connection.
6. Data 2 (RJ 45)
For SmartCard XpressBox connection.
7. 8 Ω Speaker
To connect to bathroom speaker. A
stereo jack must be used.
8. VGA In
For PC/Lap-top VGA input.
9. Headphones
To connect headphones. The mute
function does not work when headphones are plugged in.
14
10. EXT 1 (RGB) and EXT 2 (CVBS/
S-VIDEO)
To connect peripheral equipment.
11. TV Aerial
To connect to the aerial plug.
12. Audio / Video Inputs (EXT 3)
To connect to video camera or
camcorder. Only one video connection
can be used at a time.
13. HDMI 1 / HDMI 2
To connect to peripheral equipment,
including high-definition equipment.
14. Component Video Inputs/Audio
Inputs (EXT 4)
To connect to DVD or decoder which
have the same connectors.
15. Smart Card Slot
(Applicable to certain models only).
For use with compatible 32 pin smart
card.
Note: For the System SmartCard to
function, NO must be selected in the
LOW POWER STANDBY feature
of the FEATURES menu (see page 28).
YES must be selected in the ENABLE
CARD SLOT feature of the
COMMUNICATION menu.
7
Remote Controls
The following remote controls are applicable
to Philips Professional and Business Solutions
TV products. These can be used for setup
and configuration purposes.
RC2573 is an optional remote control for
Institutional TV / Professional and Business
Solutions features and SmartCard settings. It
can be purchased separately.
RC2886
POWER
Guest Mode Remote Control
RECALL
TEXT
SMART
SLEEP
CC
Slide this button
up to enter into
Guest mode.
or
Slide this button
down to enter
into Setup
mode.
GUEST
DCM
SETUP
1
2
3
4
5
6
7
8
RESET
0
CH
M
A/CH
_
+
+
VOL
+
_
A
8
9
GUIDE
_
B
C
E
F
CLOCK
A/V
CH
D
G
Guest Remote Control Keys
1. Alarm On
To activate the alarm function.
Applicable to models with the clock
display.
1
2
3
4
5
6
7
8
9
2. Alarm Off
To deactivate the alarm function.
Applicable to models with the clock
display.
3. Smart Sound
To select the predefined sound settings.
4. Sleep
To activate the sleep timer. Press the
button repeatedly to increase countdown time.
5. Menu
To call up or exit the menus when a
System Box or System SmartCard is
installed. For stand alone installation,
this function is not applicable.
6. Navigation cursors
To navigate through the menus/submenus.
7. Volume + / –
To adjust the TV volume.
8. Teletext On / Off
To switch on / off the teletext function.
9. Teletext
In teletext mode, it allows you to access
teletext functions.
9
Guest Remote Control Keys
10
11
12
13
14
15
16
17
10. Power
To set the TV to stand-by mode.
11. PAY TV / INFO / RADIO
To access the first available Pay TV, Info
or Radio channel. The + and – buttons
allow you to access the next and
previous programme.
12. Smart Picture
To select predefined picture settings.
13. OK
To confirm a selection.
14. TV + / –
To switch on TV.
To select the next or previous
programme.
15. Mute
To turn off or on sound.
16. 0 to 9 Digit keys
To switch on TV.
To select a TV channel. For a two digit
number, enter the second digit before
the dash disappears.
17. Format
To select TV screen formats.
10
Overview of TV Setup Main Menu / Sub-Menus
SETUP
LANGUAGE
COMMUNICATION
COMMUNICATION
STORE
DCM TYPE
NO. OF PROGRAMS
TV
PAY TV
INFO
RADIO
STORE
PROGRAM INSTALL
PROGRAM NO.
INPUT
SYSTEM
FREQUENCY
LABEL
STORE
FINE TUNE
MUTE
TELETEXT LANGUAGE
PROTECTION
ENGLISH, FRANCAIS, DEUTSCH,
ITALIANO
SP - SPI, SP - I2C, HM -LINK,
SERIAL XPRESS, MULTI RC,
SMART RC, OFF
>
GENERIC, NO SOURCE SWITCH
35
5
5
5
>
TV 1, INFO 1, PAYTV, RADIO
TUNER, AV1, AV2, SVIDEO, EXT3 CVBS,
EXT3 SVIDEO, EXT4 CVI. VGA, HDMI1,
HDMI 2, *CARD CVBS, *CARD-YC,
*CARD EXT4
WEST EU, UK, EAST EU, FRANCE
559.2500 >
(
)>
>
0
NONE, AUDIO, VIDEO
WEST EU, EAST EU, CYRILLIC, GREEK
NO, YES
* CARD CVBS, CARD-YC, CARD EXT4 are available for certain models only.
11
Overview of TV Setup Main Menu / Sub-Menus
SETUP
CONFIGURATION
SWITCH ON / OSD
PICTURE / SOUND
SECURITY
CONTROL
VIDEO ADJUSTMENT
FEATURES
>
>
>
>
>
>
* CLOCK SETUP
DISPLAY STANDBY
DISPLAY ON
TIME SETTING
TELETEXT TIME DOWNLOAD
DOWNLOAD PROGRAM
TIME OFFSET
BUZZER VOLUME
>
>
>
>
>
>
>
* CLOCK SETUP function is avaliable for certain models only.
12
Accessing the Setup Menu
The following remote control commands
are applicable to Philips Professional and
Business Solutions products. These can be
used for setup and configuration purposes.
Accessing TV Setup Menu using the
Remote Control (RC2573)
1. Slide the button to the SETUP location.
Accessing TV Setup Menu using the
Remote Control (RC2886)
POWER
RECALL
TEXT
1. Press the Digit 0 -9 buttons to select a
channel.
SMART
SLEEP
CC
GUEST
DCM
SETUP
1
2
3
4
5
6
7
8
RESET
0
9
GUIDE
CH
button on the remote
2. Press the
control to activate the TV Setup Menu.
SETUP
LANGUAGE
COMMUNICATION
NO. OF PROGRAMS
PROGRAM INSTALL
CONFIGURATION
CLOCK SETUP
ENGLISH
>
>
>
>
>
To scroll through the menu :
2. Use the Digit 0 -9 buttons to press digits
319753 followed immediately by the
button. Note: Digit buttons 3,1,9,7,5,3
and the
button must be pressed
successively within 20 seconds for the
TV setup menu to be activated.
3. SECURITY option in the
CONFIGURATION menu must be
set to STANDARD (refer to page 22).
–
Press the
or
button on the
remote control. A highlight indicates
that the respective menu item’s setting
is selected for modification.
–
Press the
to modify the setting of
the selected menu item.
–
To exit menu, press the
the remote control.
button on
13
Installation
A. Selecting the language
COMMUNICATION
COMMUNICATION
STORE
ENABLE CARD SLOT
DCM TYPE
You can select ENGLISH, FRANCAIS,
DEUTSCH or ITALIANO as your
preferred language.
•
OFF
>
YES
GENERIC
In the SETUP menu, press the >
button repeatedly to select your
preferred language.
SETUP
LANGUAGE
COMMUNICATION
NO. OF PROGRAMS
PROGRAM INSTALL
CONFIGURATION
CLOCK SETUP
ENGLISH
>
>
>
>
>
•
Press the < or > button to select
SP - SPI, SP - I2C, HM - LINK or
SERIAL XPRESS options to allow you
to identify a connection link between the
TV Display and the setup box.
•
Select YES in the ENABLE CARD
SLOT option to enable System Card
functions.
•
For SP - SPI and SP - I2C, select
GENERIC for the DCM TYPE item
if the set-top box requires source
switching. For set-top box that
requires no source switching, select
NO SOURCE SWITCH.
•
For MULTI RC, select this option
to use the specified colour code to
correspond to the guest remote control.
Refer to Appendix A on page 39 for
details on how to configure MULTI RC
on your guest remote control.
•
For SMART RC, select this option to
enable you to access PAYTV channels via
a special remote control. Contact your
local PHILIPS sales representative should
you require further assistance.
•
Proceed to select STORE and store all
your selections.
B. Selecting your Communication
Source
In the SETUP menu, there are seven
options in the COMMUNICATION menu
which can be selected by using the < >
buttons on the remote control.
They are SP - SPI, SP - I2C, HM - LINK,
SERIAL XPRESS, MULTI RC, SMART
RC and OFF.
The factory default is OFF.
SETUP
LANGUAGE
COMMUNICATION
NO. OF PROGRAMS
PROGRAM INSTALL
CONFIGURATION
CLOCK SETUP
14
ENGLISH
>
>
>
>
>
Installation
Note: The total number of programmes
you can define for TV, PAYTV, INFO
and RADIO is 125. For example, if you
define 50 programmes for TV, 30 for
PAYTV and 20 for INFO, the number
of programmes available for RADIO is
25. The total number of programmes
allowed is 125.
C. Defining the number of available
channels
This feature allows you to define the number
of available channels for TV, Pay TV, Info
(Info Channel) and Radio.
•
In the SETUP menu, press the >
button to highlight NO. OF
PROGRAMS and press the >
button to enter into the
NO. OF PROGRAMS menu.
SETUP
LANGUAGE
COMMUNICATION
NO. OF PROGRAMS
PROGRAM INSTALL
CONFIGURATION
CLOCK SETUP
ENGLISH
>
>
>
>
>
NO. OF PROGRAMS
TV
PAYTV
INFO
RADIO
STORE
35
5
5
5
>
D. Installing the Programmes
The PROGRAM INSTALL feature allows
you to perform the following activities:
1.
2.
3.
4.
5.
6.
7.
8.
–
select a programme number
select an input source
* select a TV system
* tune a channel manually
name a channel
fine-tune a channel
mute the audio or video source
* select the teletext language
lock a channel
* These activities are only available when
TUNER is selected in the INPUT
feature.
SETUP
LANGUAGE
COMMUNICATION
NO. OF PROGRAMS
PROGRAM INSTALL
CONFIGURATION
CLOCK SETUP
•
Press the < or > buttons to select
TV, PAYTV, INFO (Info Channel) or
RADIO.
•
Use the Digit 0 - 9 buttons to define
the number of available channels.
•
Press the > button repeatedly until
STORE is highlighted and press the >
button to store all the available number
of programmes.
ENGLISH
>
>
>
>
>
• Press the > button to enter
PROGRAM INSTALL menu.
15
Installation
2. Selecting an input source
PROGRAM INSTALL
PROGRAM NO.
INPUT
SYSTEM
FREQUENCY
LABEL
STORE
FINE TUNE
MUTE
TELETEXT LANGUAGE
PROTECTION
TV 1
TUNER
WEST EU
559.2500 >
(
)>
>
0
NONE
WEST EU
NO
• Press the < or > button to select
the item you want to configure.
• Press the < or > button to make
adjustment or select option.
1. Selecting a programme number
• Press the > button repeatedly to
select the desired type of program
TV, PAYTV, INFO (Info Channel)
or RADIO.
• Press the Digit 0 - 9 buttons to select
the programme number.
PROGRAM INSTALL
PROGRAM NO.
INPUT
SYSTEM
FREQUENCY
LABEL
STORE
FINE TUNE
MUTE
TELETEXT LANGUAGE
PROTECTION
TV 8
TUNER
WEST EU
559.2500 >
(
)>
>
0
NONE
WEST EU
NO
• Press the > button repeatedly until
STORE is highlighted and press the
> button to store selection.
16
• Press the > button to select
INPUT.
• Press the < or > button repeatedly
to select the desired input source
(TUNER, AV 1, AV 2, SVIDEO,
EXT 3 CVBS, EXT 3 SVIDEO,
EXT 4 CVI, VGA, HDMI 1,
HDMI 2, CARD-CVBS, CARD-YC
or CARD EXT 4).
Note : CARD-YC, CARD EXT 4 and
CARD CVBS are available for certain
models only.
If TUNER is selected, you can:
– select the TV system
– perform manual installation of
channels
– perform fine tuning of channels
– select the teletext language.
PROGRAM INSTALL
PROGRAM NO.
INPUT
SYSTEM
FREQUENCY
LABEL
STORE
FINE TUNE
MUTE
TELETEXT LANGUAGE
PROTECTION
TV 1
TUNER
WEST EU
559.2500 >
(
)>
>
0
NONE
WEST EU
NO
• Press the > button repeatedly until
STORE is highlighted and press the
> button to store selection.
Installation
3. Selecting the TV system
Note: You can only select SYSTEM
if TUNER is selected in the INPUT
source.
• Press the > button to select
SYSTEM and press the > button
repeatedly to select the desired
system (WEST EU, UK, EAST EU
or FRANCE).
PROGRAM INSTALL
PROGRAM NO.
INPUT
SYSTEM
FREQUENCY
LABEL
STORE
FINE TUNE
MUTE
TELETEXT LANGUAGE
PROTECTION
TV 1
TUNER
WEST EU
559.2500 >
(
)>
>
0
NONE
WEST EU
NO
PROGRAM INSTALL
PROGRAM NO.
INPUT
SYSTEM
FREQUENCY
LABEL
STORE
FINE TUNE
MUTE
TELETEXT LANGUAGE
PROTECTION
TV 1
TUNER
WEST EU
559.2500 >
(
)>
>
0
NONE
WEST EU
NO
• Press the > button repeatedly until
STORE is highlighted and press the
> button to store selection.
Repeat all the above steps to continue
manual installation of channels.
5. Naming a channel
• Press the > button repeatedly until
STORE is highlighted and press the
> button to store selection.
You can assign a label (name) to a
channel.
• Press the > button to select
LABEL.
4. Installing the channels manually
Note: You can only tune channels
manually if TUNER is selected in the
INPUT feature.
• Press the > button to move to the
first character slot. A red dash will
appear.
• Press the < or > button repeatedly
to select your desired first character.
• Press the > button to select
FREQUENCY.
PROGRAM INSTALL
• Press the > button to start installation
of channels or you can use the Digit 0
- 9 buttons to key in the frequency.
• Press the > button to start installation.
Once a programme is found, the
searching stops.
PROGRAM NO.
INPUT
SYSTEM
FREQUENCY
LABEL
STORE
FINE TUNE
MUTE
TELETEXT LANGUAGE
PROTECTION
TV 1
TUNER
WEST EU
559.2500 >
(A
)>
>
0
NONE
WEST EU
NO
17
Installation
• Press the > button to move to
the next character slot and continue
to select the next character with the
< or > button (maximum of 8
characters).
• Press the
mode.
button to exit label
• Press the > button to select STORE.
• Press the > button to store name.
The name will appear on the top left
hand corner of the TV screen when
you switch to the channel which have
been assigned a name.
7. Muting the Audio or Video source
You can choose to mute the Audio or
the Video source.
• Press the > button to select
MUTE.
• Press the > button repeatedly to
select NONE, AUDIO or VIDEO.
• Press the < button repeatedly until
STORE is highlighted.
• Press the > button to store selection.
PROGRAM INSTALL
6. Fine-tuning the channels
Note: You can only fine tune channels
if TUNER is selected in the INPUT
source.
• If the reception is not satisfactory,
press the > button to select FINE
TUNE and adjust using the < or >
button.
PROGRAM NO.
INPUT
SYSTEM
FREQUENCY
LABEL
STORE
FINE TUNE
MUTE
TELETEXT LANGUAGE
PROTECTION
TV 1
TUNER
WEST EU
559.2500 >
(SPORTS
)>
>
2
AUDIO
WEST EU
NO
8. Selecting the Teletext language
PROGRAM INSTALL
PROGRAM NO.
INPUT
SYSTEM
FREQUENCY
LABEL
STORE
FINE TUNE
MUTE
TELETEXT LANGUAGE
PROTECTION
TV 1
TUNER
WEST EU
559.2500 >
(SPORTS
)>
>
2
NONE
WEST EU
NO
• Press the < button to select
STORE.
• Press the > button to store selection.
18
Note: You can only select the
TELETEXT LANGUAGE if
TUNER is selected in the INPUT
feature.
• Press the > button to select
TELETEXT LANGUAGE.
• Press the > button repeatedly to
select the desired teletext language
(WEST EU, EAST EU, CYRILLIC
or GREEK).
Installation
• Press the > button to select YES.
PROGRAM INSTALL
PROGRAM NO.
INPUT
SYSTEM
FREQUENCY
LABEL
STORE
FINE TUNE
MUTE
TELETEXT LANGUAGE
PROTECTION
TV 1
TUNER
WEST EU
559.2500 >
(SPORTS
)>
>
2
NONE
WEST EU
NO
PROGRAM INSTALL
PROGRAM NO.
INPUT
SYSTEM
FREQUENCY
LABEL
STORE
FINE TUNE
MUTE
TELETEXT LANGUAGE
PROTECTION
TV 1
TUNER
WEST EU
559.2500 >
(SPORTS
)>
>
2
NONE
WEST EU
YES
• Press the < button repeatedly until
STORE is highlighted.
• Press the < button repeatedly until
STORE is highlighted.
• Press the > button to store selection.
• Press the > button to store selection.
Note: If you access any locked
channel, LOCKED will appear on
the screen.
9. Locking the Channels
This feature allows system integrators
to lock selected channels to prevent any
access to them.
To unlock channel, do the following:
• select PROGRAM INSTALL in the
SETUP menu.
• select PROTECTION in the
PROGRAM INSTALL menu
• select NO in the PROTECTION
feature.
• select STORE and store selection.
• Press the > button repeatedly to
select the desired type of program
TV, PAYTV, INFO (Info Channel)
or RADIO.
• Press the Digit 0 - 9 buttons to
select the channel you want to lock.
PROGRAM INSTALL
PROGRAM NO.
INPUT
SYSTEM
FREQUENCY
LABEL
STORE
FINE TUNE
MUTE
TELETEXT LANGUAGE
PROTECTION
TV 1
TUNER
WEST EU
559.2500 >
(SPORTS
)>
>
2
NONE
WEST EU
NO
• Press the > button repeatedly until
PROTECTION is highlighted.
E. Specifying and Configuring the
settings and options
The CONFIGURATION menu allows
you to select and configure the settings and
options for :
1.
2.
3.
4.
5.
6.
SWITCH ON / OSD
PICTURE / SOUND
SECURITY
CONTROL
*VIDEO ADJUSTMENT
FEATURES
19
Installation
* VIDEO ADJUSTMENT feature is
only available when the input source
selected is EXT4 CVI, VGA,
HDMI 1 or HDMI 2.
• Press the > button to enter
SWITCH ON / OSD menu.
SWITCH ON / OSD
WELCOME MESSAGE
SWITCH ON PROGRAM
SWITCH ON VOLUME
SWITCH ON PIC FMT
POWER ON
VOLUME INDICATOR
PROGRAM DISPLAY
• Press the > button to enter
CONFIGURATION menu.
CONFIGURATION
SWITCH ON / OSD
PICTURE / SOUND
SECURITY
CONTROL
VIDEO ADJUSTMENT
FEATURES
>
TV 2
30
WIDESCREEN
LAST STATUS
YES
ALL
>
>
>
>
>
>
• Press the < or > button to select
the item you want to configure.
• Press the < or > button to select
the item you want to configure.
• Press the < or > button to make
adjustment or select option.
1. Specifying the configurations when
switching on TV
The SWITCH ON / OSD menu allows
you to select and configure the settings
and options for :
–
–
–
–
–
–
–
20
WELCOME MESSAGE
SWITCH ON PROGRAM
SWITCH ON VOLUME
SWITCH ON PICTURE FORMAT
POWER ON
VOLUME INDICATOR
PROGRAM DISPLAY
• Press the < , > or Digit 0 -9 buttons
to make adjustment or select options.
– WELCOME MESSAGE: key in a
welcome message.
– SWITCH ON PROGRAM: set a
channel which you desire the TV
to always tune to at startup.
Note: If STANDARD is selected in
the SWITCH ON PROGRAM
feature, the TV will switch to the last
viewed channel upon start-up.
– SWITCH ON VOLUME: specify
the volume setting at startup.
– SWITCH ON PIC FMT: select your
preferred picture format at startup
(AUTO, 4:3, ZOOM 14:9, ZOOM
16:9, SUBTITLE ZOOM,
WIDESCREEN, SUPERWIDE or
FULLSCREEN).
– POWER ON: select the status
(LAST STATUS, ON, STANDBY
or FORCED ON) of the TV when
switched on.
Installation
If LAST STATUS option is selected,
the last power status will be activated
when TV is switched on.
If ON option is selected, the TV will
always switch on when the mains
cord is inserted in the mains socket
and turn on. The POWER buttons on
the Guest Remote Control and the
TV will be enabled.
If STANDBY option is selected, the
TV will switch on to stand-by mode
whenever the main power is switched
on.
If FORCED ON option is selected,
the TV will always switch on when the
mains cord is inserted in the mains
socket and turn on. The POWER
buttons on the Guest Remote Control
and the TV will be disabled.
– VOLUME INDICATOR: display the
volume indicator.
– PROGRAM INDICATOR: display
the programme number, label (if any)
or both.
CONFIGURATION
SWITCH ON / OSD
PICTURE / SOUND
SECURITY
CONTROL
VIDEO ADJUSTMENT
FEATURES
>
>
>
>
>
>
• Press the > button to enter the
PICTURE / SOUND menu.
PICTURE / SOUND
BRIGHTNESS
COLOUR
CONTRAST
SHARPNESS
TINT
ACTIVE CONTROL
TREBLE
BASS
BALANCE
AVL
45
38
70
50
36
YES
52
55
0
ON
• Press the < or > button to select
the item you want to configure.
• Press the < or > button to make
adjustment or select option.
2. Specifying the configurations for
PICTURE / SOUND
In the CONFIGURATION menu,
the PICTURE / SOUND feature
allows you to select and configure the
settings and options for BRIGHTNESS,
COLOUR, CONTRAST,
SHARPNESS, TINT, ACTIVE
CONTROL, TREBLE, BASS,
BALANCE and AVL.
3. Specifying the Security options
In the CONFIGURATION menu,
the SECURITY feature allows you to
select an option to enable access to the
SETUP menu without a RC2573 setup
remote control.
• Press the > button to select
PICTURE / SOUND.
21
Installation
The SECURITY feature allows you
to select and configure the settings and
options for :
The SECURITY feature offers you two
security modes: STANDARD and
HIGH.
–
–
–
–
• Press the < or > button to select
STANDARD or HIGH.
SECURITY
KEYBOARD LOCK
REMOTE CONTROL LOCK
VIDEO OUT MUTE
If STANDARD option is selected, the
TV SETUP menu can be accessed by
entering a special security code with a
guest remote control.
• Press the > button and select
SECURITY.
CONFIGURATION
SWITCH ON / OSD
PICTURE / SOUND
SECURITY
CONTROL
VIDEO ADJUSTMENT
FEATURES
>
>
>
>
>
>
• Press the > button to enter the
SECURITY menu.
SECURITY
SECURITY
KEYBOARD LOCK
REMOTE CONTROL LOCK
VIDEO OUT MUTE
STANDARD
NO
NO
NO
Contact your local PHILIPS sales
representative should you require
further assistance.
If HIGH is selected, the TV setup menu
can be accessed only with a RC2573
setup remote control in setup mode.
Note: The default security setting is
STANDARD. When security setting
is in STANDARD mode, it may be
vulnerable to unauthorized operations.
The KEYBOARD LOCK feature
allows you to lock the TV keyboard
buttons.
• Press the > button to select
KEYBOARD LOCK.
SECURITY
• Press the < or > button to select
the item you want to configure.
• Press the < or > button to make
adjustment or select option.
22
SECURITY
KEYBOARD LOCK
REMOTE CONTROL LOCK
VIDEO OUT MUTE
STANDARD
ALL
NO
NO
Installation
• Press the > button to select YES
to lock the TV keyboard buttons
except for the POWER button.
The VIDEO OUT MUTE feature
allows you to mute the Video from
the TV to any external devices.
• Select ALL to lock all the TV
keyboard buttons including the
POWER button.
• Press the > button to select
VIDEO OUT MUTE.
• Select NO to unlock all the TV
keyboard buttons including the
POWER button.
The REMOTE CONTROL LOCK
feature allows you to lock all the guest
remote control buttons. This feature
is particularly suited for television sets
that are used in public areas to prevent
guests with a remote from changing the
channels, volume, etc.
SECURITY
SECURITY
KEYBOARD LOCK
REMOTE CONTROL LOCK
VIDEO OUT MUTE
STANDARD
ALL
YES
YES
• Press the > button to select YES
to activate the VIDEO OUT MUTE
feature.
• Press the > button to select
REMOTE CONTROL LOCK.
4. Configuring the Control options
SECURITY
SECURITY
KEYBOARD LOCK
REMOTE CONTROL LOCK
VIDEO OUT MUTE
STANDARD
ALL
YES
NO
• Press the > button to select YES
to lock all the guest remote control
buttons.
In the CONFIGURATION menu,
the CONTROL feature allows you to
select and configure the settings and
options for :
– ESP (Energy Saving Programmability)
– AUDIO / VIDEO MUTE
– STEP TUNING
– DIGIT TIMEOUT
– AUTO SCART
– ALWAYS RGB
– MINIMUM VOLUME
– MAXIMUM VOLUME
• Press the > button to select
CONTROL.
23
Installation
CONFIGURATION
SWITCH ON / OSD
PICTURE / SOUND
SECURITY
CONTROL
VIDEO ADJUSTMENT
FEATURES
>
>
>
>
>
>
Note : If a remote or keyboard
command is received before the ESP
time period expires, the Timer will
reset and begin counting down again.
• Press the < or > button to select a
specified time period.
CONTROL
• Press the > button to enter the
CONTROL menu.
CONTROL
ESP
AUDIO / VIDEO MUTE
STEP TUNING
DIGIT TIMEOUT
AUTO SCART
ALWAYS RGB
MIN VOLUME
MAX VOLUME
OFF
NO
NO
3.0
NO
NO
0
99
• Press the < or > button to select
the item you want to configure.
• Press the < or > button to make
adjustments or select option.
The ESP (Energy Saving
Programmability) function allows you to
select a specified period of time (from
1 HR / 2 HR ......... / 99 HR) to power
down your TV automatically. If it does
not receive any commands during this
period from the remote control or the
TV keyboard, this energy saving feature
will take effect.
24
ESP
AUDIO / VIDEO MUTE
STEP TUNING
DIGIT TIMEOUT
AUTO SCART
ALWAYS RGB
MIN VOLUME
MAX VOLUME
2
NO
NO
3.0
NO
NO
0
99
The AUDIO / VIDEO MUTE feature
allows you to mute the AUDIO and
VIDEO source if any loss of signal
transmission occurs.
• Press the > button to select
AUDIO / VIDEO MUTE.
CONTROL
ESP
AUDIO / VIDEO MUTE
STEP TUNING
DIGIT TIMEOUT
AUTO SCART
ALWAYS RGB
MIN VOLUME
MAX VOLUME
2
YES
NO
3.0
NO
NO
0
99
• Press the > button to select YES
to mute AUDIO and VIDEO source.
Installation
The STEP TUNING feature allows
tuning to be performed for each digit
entry if YES is selected.
• Press the > button to select STEP
TUNING.
CONTROL
ESP
AUDIO / VIDEO MUTE
STEP TUNING
DIGIT TIMEOUT
AUTO SCART
ALWAYS RGB
MIN VOLUME
MAX VOLUME
2
YES
YES
3.0
NO
NO
0
99
CONTROL
ESP
AUDIO / VIDEO MUTE
STEP TUNING
DIGIT TIMEOUT
AUTO SCART
ALWAYS RGB
MIN VOLUME
MAX VOLUME
2
YES
YES
3.0
NO
NO
0
99
• Press the > button to select YES
to activate STEP TUNING function.
• Press the < or > button to specify a
time period.
In the AUTO SCART feature, the
TV will automatically switch to the
designated source where scart signal
at the designated source is detected.
• Press the > button to select
AUTO SCART.
The DIGIT TIMEOUT feature allows
you to specify a time period (from 1
second to 9.9 seconds) for the channel
to switch to another channel when you
key in the channel number. It is advisable
not to specify too short a time period
especially when you want to key in a
2- digit channel number. For example, if
you specify a 1 second time period, you
may not have enough time to key the
second digit as the channel will switch
after you key in the first digit.
• Press the < or > button to select
NO, AV1 (EXT 1), AV2 (EXT 2),
ALL or POWER SCART.
CONTROL
ESP
AUDIO / VIDEO MUTE
STEP TUNING
DIGIT TIMEOUT
AUTO SCART
ALWAYS RGB
MIN VOLUME
MAX VOLUME
2
YES
YES
3.0
AV1
NO
0
99
Note : The recommended and default
setting is 3.0 seconds.
• Press the > button to select
DIGIT TIMEOUT.
If AV 1 (EXT 1) is selected and you are
watching TV from the RF source, the TV
switches automatically to the AV1
channel when a scart cable is connected
to a AV1 connector.
25
Installation
If ALL is selected, the TV will then react
to both AV1 and AV2.
If POWER SCART is selected, the
TV when in stand-by mode will
automatically switch on when a
scart signal is detected. Likewise,
when a scart signal is not detected, the
TV will go to stand-by automatically.
CONTROL
ESP
AUDIO / VIDEO MUTE
STEP TUNING
DIGIT TIMEOUT
AUTO SCART
ALWAYS RGB
MIN VOLUME
MAX VOLUME
2
YES
YES
3.0
POWER SCART
NO
0
99
The ALWAYS RGB feature controls
RGB insertion in TV auxiliary sources.
• Press the > button to select
ALWAYS RGB.
• Select AV1 (EXT 1) to allow RGB
insertion in AV1 (EXT 1) and other
sources.
CONTROL
ESP
AUDIO / VIDEO MUTE
STEP TUNING
DIGIT TIMEOUT
AUTO SCART
ALWAYS RGB
MIN VOLUME
MAX VOLUME
2
YES
YES
3.0
POWER SCART
AV1
0
99
• If COMMUNICATION is SP-SPI
or SP-I2C, select AUTO to allow
RGB insertion in AV1 (EXT 1) and
other sources.
COMMUNICATION
COMMUNICATION
STORE
ENABLE CARD SLOT
DCM TYPE
SP - SPI
>
YES
GENERIC
• Press the < or > button to select
NO, AUTO or AV1 (EXT 1).
• Select NO to allow RGB insertion
in AV1 (EXT 1) only.
CONTROL
CONTROL
ESP
AUDIO / VIDEO MUTE
STEP TUNING
DIGIT TIMEOUT
AUTO SCART
ALWAYS RGB
MIN VOLUME
MAX VOLUME
26
2
YES
YES
3.0
POWER SCART
NO
0
99
ESP
AUDIO / VIDEO MUTE
STEP TUNING
DIGIT TIMEOUT
AUTO SCART
ALWAYS RGB
MIN VOLUME
MAX VOLUME
2
YES
YES
3.0
POWER SCART
AUTO
0
99
Installation
• If COMMUNICATION is not
SP-SPI or SP-I2C, select AUTO
to allow RGB insertion in AV1
(EXT1) and not other sources.
The MIN and MAX VOLUME options
allow you to specify the limit setting for
Minimum and Maximum Volume.
• Press the > button repeatedly to
select MIN VOLUME or MAX
VOLUME.
* Functions available only when the
input sources selected are VGA,
EXT4 CVI and CARD EXT4.
Note: VIDEO ADJUSTMENT
feature is only available when the input
source is in EXT4 CVI, VGA,
HDMI 1 or HDMI 2.
• Press the > button repeatedly until
VIDEO ADJUSTMENT is
highlighted.
CONFIGURATION
• Press the < or > button to specify a
minimum or maximum volume setting.
CONTROL
ESP
AUDIO / VIDEO MUTE
STEP TUNING
DIGIT TIMEOUT
AUTO SCART
ALWAYS RGB
MIN VOLUME
MAX VOLUME
2
YES
YES
3.0
NO
NO
10
38
SWITCH ON / OSD
PICTURE / SOUND
SECURITY
CONTROL
VIDEO ADJUSTMENT
FEATURES
>
>
>
>
>
>
• Press the > button to enter
VIDEO ADJUSTMENT menu.
VIDEO ADJUSTMENT
5. Adjusting the Picture
In the CONFIGURATION menu,
the VIDEO ADJUSTMENT feature
allows you to :
– adjust the picture horizontally and
vertically.
– *eliminate horizontal and vertical
interfering lines.
– *adjust the positioning of the picture
automatically.
– *return to the factory settings (default
settings).
HORIZONTAL
VERTICAL
PHASE
CLOCK
AUTO ADJUST
RESET
<
<
<
<
>
>
>
>
>
>
The HORIZONTAL and VERTICAL
options allow you to adjust the picture
horizontally and vertically. This is useful
for configuring channels that have tickers
or scrolling banners at the bottom such
as news and sports channels.
27
Installation
Note: HORIZONTAL and
VERTICAL options are only available
when the input sources selected are
HDMI 1 or HDMI 2.
• Press the < or > button to select
HORIZONTAL or VERTICAL.
VIDEO ADJUSTMENT
HORIZONTAL
VERTICAL
PHASE
CLOCK
AUTO ADJUST
RESET
<
<
<
<
>
>
>
>
>
>
VIDEO ADJUSTMENT
HORIZONTAL
VERTICAL
PHASE
CLOCK
AUTO ADJUST
RESET
<
<
<
<
>
>
>
>
>
>
• Press the < or > button to adjust
the picture horizontally or vertically.
The PHASE and CLOCK options
allow you to eliminate the horizontal
and vertical interfering lines.
Note: CLOCK refers to the video
properties of the VGA signal.
• Press the > button to select
PHASE or CLOCK.
• Press the < or > button to
select PHASE or CLOCK to
eliminate the horizontal or vertical
interfering lines.
Note: PHASE and CLOCK options
are only available when the input
sources selected are VGA, EXT4
CVI and CARD EXT4.
The AUTO ADJUST option allows
you to adjust the positioning of the
picture automatically. Note: AUTO
ADJUST is only available when the
input sources selected are VGA,
EXT4 CVI and CARD EXT4.
• Press the > button to select
AUTO ADJUST.
VIDEO ADJUSTMENT
HORIZONTAL
VERTICAL
PHASE
CLOCK
AUTO ADJUST
RESET
<
<
<
<
>
>
>
>
>
>
• Press the > button to activate option.
28
Installation
The RESET option allows you to return
to the factory settings (default settings).
Note: RESET is only available when
the input sources selected are VGA,
EXT4 CVI and CARD EXT4.
CONFIGURATION
SWITCH ON / OSD
PICTURE / SOUND
SECURITY
CONTROL
VIDEO ADJUSTMENT
FEATURES
>
>
>
>
>
>
• Press the > button to select
RESET.
VIDEO ADJUSTMENT
HORIZONTAL
VERTICAL
PHASE
CLOCK
AUTO ADJUST
RESET
<
<
<
<
>
>
>
>
>
>
• Press the > button to enter the
FEATURES menu.
FEATURES
SMART POWER
SMART SOUND KEY
DEFAULT HDMI 1 AUDIO
DEFAULT HDMI 2 AUDIO
LOW POWER STANDBY
OFF
SMART SOUND
EXT3 AUDIO
HDMI
NO
• Press the > button to return to the
factory settings (default settings).
• Press the < or > button to select
the item you want to configure.
6. Configuring the Features options
and settings
In the CONFIGURATION menu,
FEATURES allows you to select and
configure the settings and options for:
– SMART POWER
– SMART SOUND KEY
– DEFAULT HDMI 1 AUDIO
– DEFAULT HDMI 2 AUDIO
– LOW POWER STANDBY
• Press the < or > button to select
the options.
The SMART POWER feature allows
you to put the TV in an energy saving
mode which can reduce energy
consumption.
• Press the < > buttons to select
LOW, MEDIUM or HIGH to
activate energy saving mode. To
de-activate energy saving mode,
select OFF.
29
Installation
FEATURES
SMART POWER
SMART SOUND KEY
DEFAULT HDMI 1 AUDIO
DEFAULT HDMI 2 AUDIO
LOW POWER STANDBY
FEATURES
LOW
SMART SOUND
EXT3 AUDIO
HDMI
NO
The SMART SOUND KEY option
allows you to select between AUDIO
SELECT or SMART SOUND.
• Press the > button to select
SMART SOUND KEY.
FEATURES
SMART POWER
SMART SOUND KEY
DEFAULT HDMI 1 AUDIO
DEFAULT HDMI 2 AUDIO
LOW POWER STANDBY
LOW
AUDIO SELECT
EXT3 AUDIO
HDMI
NO
SMART POWER
SMART SOUND KEY
DEFAULT HDMI 1 AUDIO
DEFAULT HDMI 2 AUDIO
LOW POWER STANDBY
LOW
SMART SOUND
EXT3 AUDIO
HDMI
NO
The DEFAULT HDMI 1 AUDIO or
DEFAULT HDMI 2 AUDIO option
allows you to define the HDMI Audio
from different Sources. This feature is
particularly useful for connecting DVI
sources to this television. DVI Video can
convert easily to HDMI with a simple
adaptor, but the audio signal is not
present and must then be connected to
one of the other inputs on the TV. This
feature allows you to match the DVI
video to the Audio signal you have
connected.
• Press the > button to select
DEFAULT HDMI 1 AUDIO or
DEFAULT HDMI 2 AUDIO.
• Press the < or > button to select
AUDIO SELECT or SMART
SOUND.
Select AUDIO SELECT to allow
you to configure the Smart Sound
button on the Guest remote control
to toggle the different audio sources.
Select SMART SOUND to allow
you to configure the Smart Sound
button on the Guest remote control
to listen to different SMART
SOUND modes.
30
FEATURES
SMART POWER
SMART SOUND KEY
DEFAULT HDMI 1 AUDIO
DEFAULT HDMI 2 AUDIO
LOW POWER STANDBY
LOW
SMART SOUND
EXT3 AUDIO
HDMI
NO
• Press the < or > button to select
EXT3 AUDIO, EXT4 AUDIO or
HDMI.
Installation
The LOW POWER STANDBY
option allows you to save electricity
when TV is in stand-by mode.
• Press the > button repeatedly until
LOW POWER STANDBY is
highlighted.
FEATURES
SMART POWER
SMART SOUND KEY
DEFAULT HDMI 1 AUDIO
DEFAULT HDMI 2 AUDIO
LOW POWER STANDBY
LOW
SMART SOUND
EXT3 AUDIO
HDMI
NO
• Press the > button to select YES
to activate LOWER POWER
STANDBY option.
7. BUZZER VOLUME
Note : CLOCK SETUP feature is
applicable for certain models only.
• Press the < or > button repeatedly
until CLOCK SETUP is highlighted.
SETUP
LANGUAGE
COMMUNICATION
NO. OF PROGRAMS
PROGRAM INSTALL
CONFIGURATION
CLOCK SETUP
ENGLISH
>
>
>
>
>
• Press the > button to enter CLOCK
SETUP menu.
CLOCK SETUP
Note: By default, LOW POWER
STANDBY is set to NO.
LOW POWER STANDBY must
be set to NO if connected to a
System Box or System SmartCard.
DISPLAY STANDBY
DISPLAY ON
TIME SETTING
TELETEXT TIME DOWNLOAD
DOWNLOAD PROGRAM
TIME OFFSET
BUZZER VOLUME
>
>
>
>
>
>
>
F. Setting up the TV Clock
For some models, the TV has a clock
displayed at the front bottom of the TV.
In the SETUP menu, the CLOCK SETUP
feature allows you to select and configure
the settings and options for :
1.
2.
3.
4.
5.
6.
DISPLAY STANDBY
DISPLAY ON
TIME SETTING
TELETEXT TIME DOWNLOAD
DOWNLOAD PROGRAM
TIME OFFSET
• Press the < or > button to select
the item you want to configure.
• Press the < or > button to select
the option or make adjustment.
1. Setting the brightness level of the
clock when the TV is on Standby
In the CLOCK SETUP menu, the
DISPLAY STANDBY allows you to set
the brightness level of the clock
display when the TV is in stand-by mode.
31
Installation
•
Press the < or > button to set the
brightness level (1 - 5 and OFF).
•
CLOCK SETUP
DISPLAY STANDBY
DISPLAY ON
TIME SETTING
TELETEXT TIME DOWNLOAD
DOWNLOAD PROGRAM
TIME OFFSET
BUZZER VOLUME
CLOCK SETUP
3
>
>
>
>
>
>
2. Setting the brightness level of the
clock when the TV is switched on
You can also set the brightness level of the
clock display when the TV is switched on.
•
Press the > button to select
DISPLAY ON.
CLOCK SETUP
DISPLAY STANDBY
DISPLAY ON
TIME SETTING
TELETEXT TIME DOWNLOAD
DOWNLOAD PROGRAM
TIME OFFSET
BUZZER VOLUME
Press the < or > button to select
TIME SETTING.
3
3
>
>
>
>
>
DISPLAY STANDBY
DISPLAY ON
TIME SETTING
TELETEXT TIME DOWNLOAD
DOWNLOAD PROGRAM
TIME OFFSET
BUZZER VOLUME
•
3
3
10 : 10
>
>
>
>
Press the <, > or the Digit 0 - 9
buttons to key in the time.
4. Setting the time of the Clock via
Teletext Time Download
You can also set the time of the clock
to activate or deactivate the function for
automatic time downloading via Teletext.
The TV clock will be automatically
synchronised to the correct time.
•
Press the < or > button to select
TELETEXT TIME DOWNLOAD.
CLOCK SETUP
•
DISPLAY STANDBY
DISPLAY ON
TIME SETTING
TELETEXT TIME DOWNLOAD
DOWNLOAD PROGRAM
TIME OFFSET
BUZZER VOLUME
Press the < or > button to set the
brightness level (1 - 5 and OFF).
3
3
10 : 10
YES
>
>
>
3. Setting the time of the Clock
manually
You can set the time of the clock manually
by keying in the time in the TIME
SETTING option.
32
•
Press the < or > button to select
YES to download time automatically
via teletext.
Installation
5. Retrieving the correct time from
Teletext of the selected channel
•
You can select a channel which has teletext
transmission from which the correct time
from the teletext is
retrieved.
•
Press the < or > button to select
TIME OFFSET.
CLOCK SETUP
DISPLAY STANDBY
DISPLAY ON
TIME SETTING
TELETEXT TIME DOWNLOAD
DOWNLOAD PROGRAM
TIME OFFSET
BUZZER VOLUME
Press the < or > button to select
DOWNLOAD PROGRAM.
3
3
10 : 10
YES
TV 2
1
>
CLOCK SETUP
DISPLAY STANDBY
DISPLAY ON
TIME SETTING
TELETEXT TIME DOWNLOAD
DOWNLOAD PROGRAM
TIME OFFSET
BUZZER VOLUME
3
3
10 : 10
YES
TV6
1
LOW
•
Press the < or > button to select
the time difference (1 to 12 hours).
7. Setting the Buzzer Volume
•
•
Press the < or > button to select
TV1, INFO 1, PAY TV, AV1
(EXT 1), SVIDEO or AV2
(EXT 2).
The BUZZER VOLUME option
allows you to set the volume of the alarm
buzzer.
•
Use the Digit 0 - 9 buttons to select
the teletext channel for TV1,
INFO 1, PAY TV, AV1 (EXT 1),
SVIDEO or AV2 (EXT 2).
Press the < or > button to select
BUZZER VOLUME.
CLOCK SETUP
DISPLAY STANDBY
DISPLAY ON
TIME SETTING
TELETEXT TIME DOWNLOAD
DOWNLOAD PROGRAM
TIME OFFSET
BUZZER VOLUME
For example, if you select Channel 6 in
TV1 option, the time of the selected
teletext channel will be retrieved.
3
3
10 : 10
YES
TV 2
1
LOW
6. Offsetting the clock time
The TIME OFFSET option allows you
to set the offset time needed to adjust the
time received from the teletext channel to
represent the current time in the current
location.
•
Press the < or > button to select
OFF, LOW, or HIGH.
33
Cloning the TV and the SmartLoader configuration
Cloning the TV configuration to
the SmartLoader
Cloning the SmartLoader
configuration to the TV
•
•
Slide button on the left of the
SmartLoader up to the
position. Aim SmartLoader at
green LED of the TV (5 to 15 cm
away).
Slide button on the left of the Smart
Loader up to the
position. Aim
SmartLoader at green LED of the TV
(5 to 15 cm away).
MENU
MENU
SmartLoader
SmartLoader
SMART-LOADER
SMART-LOADER
•
•
Press the MENU button on the SmartLoader to display the menu on TV.
Press the MENU button on the SmartLoader to display the menu on TV.
SMARTLOADER
SMARTLOADER TO TV
TV TO SMARTLOADER
SMARTLOADER
SMARTLOADER TO TV
TV TO SMARTLOADER
>
•
Press the > button to select TV TO
SMARTLOADER.
•
Press the > button to start cloning the
TV configuration to the
SmartLoader.
34
>
•
Press the < or > button to select
SMARTLOADER TO TV.
•
Press the > button to start cloning
the SmartLoader configuration to the
TV.
Installing a System SmartCard or System Box
NOTE: Before installing a System
SmartCard or System Box, ensure the
TV is switched off.
Sample of
System Box
1. Inserting the System SmartCard or
System Box
•
•
Insert the SmartCard into the
SmartCard slot on the rear of the TV
(available for certain models only) and
connect the other cables as directed by
the System provider.
After the SmartCard has been inserted
and the cables connected, switch on the
TV.
Sample of
System
SmartCard
•
•
For For the System Box, insert the
RJ12 cable of the System Box to the
DATA 11 (RJ12) connector on the rear
of the TV and connect the other cables
as directed by the System provider.
After all the connection of cables are
completed, switch on the TV.
Connect to the Data 1 (RJ 12)
connector at the rear of the TV.
2. Setting up the correct
Communication Source
Note: The default setting in the
Communication menu is OFF. If a
System SmartCard or System Box is used
with this TV, the Communication menu item
must be set to the correct
communications protocol. For purposes of
providing an example only, SP - I2C
is selected as the communications protocol.
•
In the SETUP menu, select
COMMUNICATION.
•
Press the > button to enter
COMMUNICATION menu.
•
Press the > button to select
SP - I2C.
COMMUNICATION
COMMUNICATION
STORE
ENABLE CARD SLOT
DCM TYPE
SP - 12C
>
NO
GENERIC
35
Installing a System SmartCard or System Box
3. Enabling the Card Slot
FEATURES
For the System SmartCard or System Box to
function, the Card Slot must be enabled.
•
SMART POWER
SMART SOUND KEY
DEFAULT HDMI 1 AUDIO
DEFAULT HDMI 2 AUDIO
LOW POWER STANDBY
Press the > button to select
ENABLE CARD SLOT.
COMMUNICATION
COMMUNICATION
STORE
ENABLE CARD SLOT
DCM TYPE
SP - 12C
>
YES
GENERIC
•
LOW
SMART SOUND
EXT3 AUDIO
HDMI
NO
Press the > button to select NO.
5. Checking the installation of System
SmartCard or System Box
•
•
Press the > button to select YES
(if applicable).
•
Press the > button to select STORE
and press the > button to store
selections.
To check whether the installation is
done correctly, press the RECALL
button on the green remote control to
display menu.
01 26HF7875 / 10
02 SV1A0707100003
03 IC7E1 - 0 . 18
04 LC71HEL1 - 0 . 22
05 OPT (2C) 12 28 D3 6F
06 OPT - MODEL 26HF7875 / 10
07 CLOCK OK
08 COMMUNICATION SP - I2C OFFLINE
09 TV 1 NOT TUNED
4. Selecting the Low Power Standby
For the System SmartCard or System Box to
function, NO must be selected.
•
In the CONFIGURATION menu,
select FEATURES.
•
Press the > button to enter the
FEATURES menu.
•
Press > button and select LOW
POWER STANDBY.
36
•
See item 08 of the menu. If SP - I2C
shows “OFFLINE”, check whether the
System SmartCard is correctly inserted
into the card slot of the TV.
•
For System Box, check whether the
RJ12 cable and connection between
terminal and TV is properly connected.
•
For more information, see “Diagnosing
Basic Problems” on pages 38-39.
Diagnosing Basic Problems
1. TV does not seem to communicate
with the external interactive
terminal.
–
COMMUNICATION
COMMUNICATION
STORE
ENABLE CARD SLOT
DCM TYPE
Check the Communication Source
• Press the RECALL button on the
remote (in Setup position). Item 08
of the menu should read
COMMUNICATION SP - I2C
ONLINE.
01 26HF7875 / 10
02 SV1A0707100003
03 IC7E1 - 0 . 18
04 LC71HEL1 - 0 . 22
05 OPT (2C) 12 28 D3 6F
06 OPT - MODEL 26HF7875 / 10
07 CLOCK OK
08 COMMUNICATION SP - I2C ONLINE
09 TV 1 NOT TUNED
• If it is not SP - I2C, press the
MENU button on the remote
to display the Setup menu. Press
the > button to select
COMMUNICATION.
SETUP
LANGUAGE
COMMUNICATION
NO. OF PROGRAMS
PROGRAM INSTALL
CONFIGURATION
CLOCK SETUP
ENGLISH
>
>
>
>
>
• Press the > button to enter
COMMUNICATION menu.
SP - 12C
>
NO
GENERIC
• Press the > button to select
SP - I2C.
–
Check the insertion and connection
• If the TV still does not communicate
with the external interactive terminal
after selecting the correct
Communication source, press the
RECALL button on the remote.
Check item 08 of the menu.
01 26HF7875 / 10
02 SV1A0707100003
03 IC7E1 - 0 . 18
04 LC71HEL1 - 0 . 22
05 OPT (2C) 12 28 D3 6F
06 OPT - MODEL 26HF7875 / 10
07 CLOCK OK
08 COMMUNICATION SP - I2C OFFLINE
09 TV 1 NOT TUNED
• If it reads “COMMUNICATION
SP - I2C OFFLINE”, check the
RJ12 cable and connection between
terminal and TV is properly
connected for the System Box.
• For the System SmartCard, check
the SmartCard is correctly inserted
into the card slot of the TV.
37
Diagnosing Basic Problems
–
Check whether the Card Slot is
enabled
• If the TV still does not communicate
with the System SmartCard, in the
COMMUNICATION menu, press
the > button repeatedly until
ENABLE CARD SLOT is
highlighted.
COMMUNICATION
COMMUNICATION
STORE
ENABLE CARD SLOT
DCM TYPE
OFF
>
YES
GENERIC
FEATURES
SMART POWER
SMART SOUND KEY
DEFAULT HDMI 1 AUDIO
DEFAULT HDMI 2 AUDIO
LOW POWER STANDBY
LOW
SMART SOUND
EXT3 AUDIO
HDMI
NO
• Press > button and select LOW
POWER STANDBY.
2. An “F” appears in the upper hand
corner of the TV screen.
• Press the > button to select YES to
enable System Card or System Box
functions.
• Press the < button to select
STORE and press the > button to
store all selections.
–
Check the Low Power Standby
option
• For the System SmartCard or
System Box to function, NO must
be selected.
• In the CONFIGURATION menu,
select FEATURES.
• Press the > button to enter the
FEATURES menu.
38
This indicates that the TV is in factory
mode.
• To restore to normal operation,
press and hold the PROGRAM
DOWN and VOLUME DOWN
keyboard buttons on the side of the
TV for a few seconds.
3. Picture performance not at
optimum when using VGA or
EXT 4 source
• To ensure optimal picture
performance and no distortion
when using this TV with a VGA or
EXT 4 source, avoid connecting a
VGA input and a EXT 4 input
simultaneously to the TV.
Appendix A – Multi Remote Controls Support
Programming the Multi Remote
Controls function
Multi RC function supports up to four
TV sets operating in one room without
any interference from each other remote
controls. Each Guest Remote Control must
be programmed individually to one of the
four colour (Blue, Yellow, Green and Red)
buttons on the remote control.
button on the GREEN
1. Press the
remote control to activate the TV
SETUP Menu.
2. Press the > button to select
COMMUNICATION.
SETUP
LANGUAGE
COMMUNICATION
NO. OF PROGRAMS
PROGRAM INSTALL
CONFIGURATION
CLOCK SETUP
ENGLISH
>
>
>
>
>
3. Press the > button to enter the
COMMUNICATION menu.
COMMUNICATION
COMMUNICATION
MULTI RC
STORE
>
REMOTE CONTROL
BLUE
4. Press the > button repeatedly until
MULTI RC is selected.
5. Press the > button to select
REMOTE CONTROL.
COMMUNICATION
COMMUNICATION
MULTI RC
STORE
>
REMOTE CONTROL
YELLOW
6. Press the > button repeatedly to toggle
through the four colours and select your
preferred colour.
7. Press the < button to select STORE
and press the > button to store your
selection. Press the
button to exit
menu.
8. Using the Guest Remote Control, press
the MENU and the YELLOW buttons
simultaneously to set the remote control
to the corresponding colour that you
have selected in the REMOTE
CONTROL option. If BLUE colour is
selected at the REMOTE CONTROL
option, correspondingly, you must select
BLUE colour button on the Guest
Remote Control.
You can now use the Guest Remote
Control to operate the TV set.
9. To check whether you have
programmed the MULTI RC function
correctly, press the OK button on the
Guest Remote Control for five seconds.
Information of the Remote Battery,
Remote Colour and the TV Colour will
be shown on the screen. If the Remote
Colour and the TV Colour do not
match, you need to re-programme and
ensure they match to enable the Guest
Remote Control to operate the TV.
39
Appendix B – Resolutions Table
Refer to the HDMI INPUT table if you use the HDMI connector to plug in a PC (PC Format)
or a Video Input (Video Format), for example, a HDMI DVD player.
HDMI INPUT
Mode
PC Format
Video Format
Signal Format
640 x 480
60 Hz, 72 Hz, 75 Hz, 85 Hz
800 x 600
60 Hz, 72 Hz, 75 Hz, 85 Hz
1024 x 768
60 Hz, 70 Hz, 75 Hz, 85 Hz
1280 x 768
60 Hz
1280 x 1024
60 Hz
1360 x 768
60 Hz
720 x 480p
60 Hz
720 (1440) x 480i
60 Hz
720 x 576p
50 Hz
720 (1440) x 576i
50 Hz
1280 x 720p
60 Hz
1280 x 720p
50 Hz
1920 x 1080i
50 Hz, 60 Hz
1920 x 1080p
50 Hz, 60 Hz
Refer to the PC Analogue, D-sub input table if you connect the PC via VGA connector.
To ensure optimal picture performance and no distortion when using this TV with a VGA
or EXT 4 (Y Pb Pr) source, avoid connecting a VGA input and a EXT 4 (Y Pb Pr) input
simultaneously to the TV.
PC Analogue, D-sub input
Mode
PC Format
40
Signal Format
640 x 480
60 Hz, 72 Hz, 75 Hz, 85 Hz
720 x 400
70 Hz
800 x 600
60 Hz, 72 Hz, 75 Hz, 85 Hz
1024 x 768
60 Hz, 70 Hz, 75 Hz, 85 Hz
Environmental Information
Recycling
The packaging of this product is intended to
be recycled. Contact your local authorities
for information about how to recycle the
packaging.
Note: Specifications and information are
subject to change without notice.
For further assistance, call the
customer support service in your country.
The telephone numbers and addresses are
given in the worldwide guarantee booklet
supplied with the TV.
Disposal of your old product
Your product is manufactured with highquality materials and components which can
be recycled and reused. When you see the
crossed-out wheel bin symbol attached to a
product, it means the product is covered by
the European Directive 2002/96/EC.
Please familiarise yourself about your local
systems for the disposal of electrical and
electronic products. Please act according to
your local regulations and do not dispose
your old products with your normal
household waste. The correct disposal
of your old product will help to prevent
potential negative consequences for the
environment and for human health.
Disposal of batteries
The supplied batteries do not contain the
heavy metals, mercury and cadmium. Please
dispose off exhausted batteries according to
your local regulations.
Electric, Magnetic and Electromagnetic
Fields (EMF)
•
Royal Philips manufactures and sells
many products targeted at consumers,
which, like any electronic apparatus,
in general have the ability to emit and
receive electromagnetic signals.
•
One of Philips’ leading Business
Principles is to take all necessary health
and safety measures for our products, to
comply with all applicable legal requirements and to stay well within the EMF
standards applicable at the time of
producing the products.
•
Philips is committed to develop, produce
and market products that cause no
adverse health effects.
•
Philips confirms that if its products are
handled properly for their intended use,
they are safe to use according to scientific evidence available today.
•
Philips plays an active role in the
development of international EMF and
safety standards, enabling Philips to
anticipate further developments in
standardization for early integration in
its products.
Power consumption
•
•
This TV consumes minimal energy in
standby mode to minimise environmental
impact.
Active power consumption is given on
the type plate at the rear of the TV.
For more product specifications, see
the product leaflet on www.philips.com/
professional.
41
Information for Users in the UK
(Not applicable outside UK)
Important
Positioning the TV
For the best results, choose a position
where light does not fall directly on the
screen, and at some distance away from
radiators or other sources of heat. Leave
a space of at least 5 cm all around the TV
for ventilation, making sure that curtains,
cupboards etc. cannot obstruct the air flow
through the ventilation apertures. The TV is
intended for use in a domestic environment
only and should never be operated or stored
in excessively hot or humid atmospheres.
This apparatus is fitted with an approved
moulded 13 AMP plug. Should it become
necessary to replace the mains fuse, this
must be replaced with a fuse of the same
value as indicated on the plug.
General Points
Please take note of the section entitled ‘Tips’
at the end of this booklet.
Interference
The Department of Trade and Industry
operates a Radio Interference Investigation
Service to help TV licence holders improve
reception of BBC and IBA programmes
where they are being spoilt by interference.
If your dealer cannot help, ask at a main Post
Office for the booklet “How to Improve
Television and Radio Reception”.
Mains connection
Before connecting the TV to the mains,
check that the mains supply voltage corresponds to the voltage printed on the
type plate on the rear panel of the TV. If
the mains voltage is different, consult your
dealer.
1. Remove fuse cover and fuse.
2. The replacement fuse must comply with
BS 1362 and have the ASTA approval
mark. If the fuse is lost, make contact
with your retailer in order to verify the
correct type.
3. Refit the fuse cover.
If for any reason the fitted plug is not
suitable for your socket outlet, please
consult your retailer or a qualified
electrician before proceeding with the
installation.
Connecting the aerial
The aerial should be connected to the
socket marked : at the back of the set.
An inferior aerial is likely to result in a poor,
perhaps unstable picture with ghost images
and lack of contrast. Make-shift loft or settop aerials are often inadequate. Your dealer
will know from experience the most suitable
type for your locality. Should you wish to
use the set in conjunction with other
equipment, which connects to the aerial
socket such as TV games, or a video camera
it is recommended that these be connected
via a combiner unit to avoid repeated
connection and disconnection of the aerial
plug.
Fitting the stand (if provided)
Use only the stand provided with the set,
making sure that the fixings are properly
tightened. A diagram showing how to
assemble the stand is packed with the stand.
Never use a make-shift stand, or legs fixed
with woodscrews.
42
© 2007 Koninklijke Philips N.V.
All rights reserved
Document order number