1
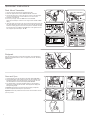
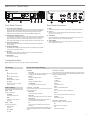
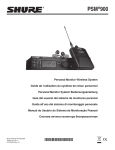
PSM®900
Personal Monitor Wireless System
Guide de l’utilisation du système de retour personnel
Personal Monitor System Bedienungsanleitung
Guía del usuario del sistema de monitoreo personal
Guida all’uso del sistema di monitoraggio personale
Manual do Usuário do Sistema de Monitoração Pessoal
Система личного монитора беспроволочная
© 2014 Shure Incorporated
Printed in U.S.A.
27A16400 (Rev. 2)
*27A16400*
ACHTUNG!
WARNING!
MÖGLICHST GERINGE LAUTSTÄRKEPEGEL VERWENDEN.
Längerfristiges Hören bei übermäßigen Schallpegeln kann zu Hörschäden und zu
permanentem, durch Lärm verursachten Gehörverlust führen. Bitte orientieren Sie sich
an den folgenden von der Occupational Safety Health Administration (OSHA; USArbeitsschutzbehörde) erstellten Richtlinien für die maximale zeitliche Belastung durch
Schalldruckpegel, bevor es zu Hörschäden kommt.
LISTENING TO AUDIO AT EXCESSIVE VOLUMES CAN CAUSE PERMANENT HEARING
DAMAGE.
USE AS LOW A VOLUME AS POSSIBLE.
Over exposure to excessive sound levels can damage your ears resulting in permanent noiseinduced hearing loss (NIHL). Please use the following guidelines established by the Occupational
Safety Health Administration (OSHA) on maximum time exposure to sound pressure levels before
hearing damage occurs.
90 dB SPL
at 8 hours
95 dB SPL
at 4 hours
100 dB SPL
at 2 hours
110 dB SPL
at ½ hour
115 dB SPL
at 15 minutes
105 dB SPL
at 1 hour
120 dB SPL
Avoid or damage may occur
SAFETY PRECAUTIONS
CAUTION: Ignoring these cautions may cause moderate injury or property damage as a result of incorrect operation.
WARNING
ACHTUNG
• Falls Wasser oder andere Fremdstoffe/-körper in das Gerät gelangen, kann es
zu Bränden oder Stromschlägen kommen.
WARNING: This product contains a chemical known to the State of California to cause cancer and
birth defects or other reproductive harm
• Nicht versuchen, dieses Produkt zu modifizieren. Ansonsten könnte es zu
Verletzungen und/oder zum Produktausfall kommen.
CAUTION
VORSICHT
• Never disassemble or modify the device, as failures may result.
• Das Gerät nie auseinanderbauen oder modifizieren, da dies zu Ausfällen
führen kann.
• Do not subject to extreme force and do not pull on the cable or failures
may result.
• Keinen extremen Kräften aussetzen und nicht am Kabel ziehen, da dies zu
Ausfällen führen kann.
• Keep the microphone dry and avoid exposure to extreme temperatures
and humidity.
• Das Mikrofon trocken halten und keinen extremen Temperaturen oder
extremer Luftfeuchtigkeit aussetzen.
ADVERTENCIA
AVERTISSEMENT !
EL ESCUCHAR REPRODUCCIONES DE AUDIO A NIVELES EXCESIVOS DE VOLUMEN
PUEDE CAUSAR DAÑOS PERMANENTES AL OIDO. USE EL VOLUMEN MAS BAJO
POSIBLE.
La exposición prolongada a niveles sonoros excesivamente intensos puede dañar los oídos y
causar una pérdida permanente del oído causada por ruidos. Respete los lineamientos dados
a continuación, los cuales fueron establecidos por la Administración de Salud y Seguridad
Ocupacional (OSHA) de los EE.UU. e indican el tiempo máximo que puede escucharse un
nivel determinado de presión sonora (SPL) antes de producirse daños al oído.
115 dB SPL
por 15 minutos
120 dB Schalldruckpegel
vermeiden; ansonsten können Schäden
auftreten
VORSICHT: Die Nichtbeachtung dieser Vorsichtshinweise kann mittelschwere Verletzungen oder Sachschäden infolge des fehlerhaften
Gebrauchs verursachen.
• Do not attempt to modify this product. Doing so could result in personal
injury and/or product failure.
110 dB SPL
por 1/2 hora
bei 115 dB
Schalldruckpegel
max. 15 Minuten
bei 105 dB
Schalldruckpegel
max. 1 Stunde
ACHTUNG: Die Nichtbeachtung dieser Warnhinweise kann schwere oder
tödliche Verletzungen infolge des fehlerhaften Gebrauchs verursachen.
• If water or other foreign objects enter the inside of the device, fire or
electric shock may result.
100 dB SPL
por 2 horas
bei 110 dB
Schalldruckpegel
max. ½ Stunde
bei 100 dB
Schalldruckpegel
max. 2 Stunden
Die möglichen Folgen des fehlerhaften Gebrauchs, die durch eines der
beiden Symbole - „ACHTUNG“ und „VORSICHT“ - markiert sind, hängen von
der Unmittelbarkeit der bevorstehenden Gefahr und des Schweregrads der
Beschädigung ab.
WARNING: Ignoring these warnings may cause severe injury or death
as a result of incorrect operation.
95 dB SPL
por 4 horas
bei 95 dB
Schalldruckpegel
max. 4 Stunden
SICHERHEITSVORKEHRUNGEN
The possible results of incorrect use are marked by one of the two symbols
- “WARNING” AND “CAUTION” - depending on the imminence of the danger
and the severity of the damage.
90 dB SPL
por 8 horas
bei 90 dB
Schalldruckpegel
max. 8 Stunden
L'ÉCOUTE AUDIO À UN VOLUME SONORE EXCESSIF PEUT CAUSER DES LÉSIONS
AUDITIVES PERMANENTES. RÉGLER LE VOLUME LE PLUS BAS POSSIBLE.
Une surexposition à des volumes sonores excessifs peut causer des lésions aux oreilles
entraînant une perte auditive permanente due au bruit. Se conformer aux directives ci-dessous,
établies par l'Occupational Safety Health Administration (OSHA) pour les limites de durée
d'exposition aux pressions acoustiques (SPL) avant de risquer des lésions auditives.
SPL de 90 dB
pendant 8 heures
105 dB SPL
por 1 hora
SPL de 110 dB pendant 1/2 heure
120 dB SPL
Evítese por completo, puesto que puede
causar daños inmediatos
SPL de 95 dB
pendant 4 heures
SPL de 115 dB
pendant 15 minutes
SPL de 100 dB
pendant 2 heures
SPL de 105 dB
pendant 1 heure
SPL de 120 dB
À éviter : risque de lésions auditives
PRÉCAUTIONS DE SÉCURITÉ
PRECAUCIONES DE SEGURIDAD
Les résultats possibles d'une utilisation incorrecte sont signalés par l'un des deux
symboles - AVERTISSEMENT et ATTENTION - selon l'imminence du danger et
la sévérité des dommages.
Los posibles resultados del uso incorrecto de este producto se denotan por
medio de uno de dos símbolos - “ADVERTENCIA” y “PRECAUCION” - según la
inminencia del peligro y el grado de severidad de los daños.
AVERTISSEMENT : L'ignorance de ces avertissements peut causer des
blessures graves ou la mort suite à une utilisation incorrecte.
ADVERTENCIA: Si se pasan por alto estas advertencias se podría causar
lesiones graves o mortales como resultado del uso incorrecto.
ATTENTION: L'ignorance de ces mises en garde peut causer des blessures modérées ou des dégâts matériels suite à une utilisation incorrecte.
PRECAUCION: Si se pasan por alto estas precauciones se podría causar
lesiones moderadas y daños a la propiedad como resultado del uso
incorrecto.
AVERTISSEMENT
• Si de l'eau ou autres matériaux étrangers pénètrent dans l'appareil, il y a
risque d'incendie ou de choc électrique.
ADVERTENCIA
• Si el agua u otros objetos extraños penetran el dispositivo, se podría causar
un incendio o sacudidas eléctricas.
• Ne pas essayer de modifier ce produit. Une telle opération est susceptible
d'entraîner des blessures ou la défaillance du produit.
• No intente modificar este producto. Hacerlo podría causar lesiones
personales y/o la falla del producto.
ATTENTION
• Ne jamais désassembler ou modifier cet appareil sous peine de provoquer
des défaillances.
PRECAUCION
• Nunca desarme ni modifique el dispositivo, ya que esto podría causar fallas.
• Ne pas soumettre le câble à des forces extrêmes et ne pas tirer dessus sous
peine de provoquer des défaillances.
• No someta el aparato a fuerzas extremas ni tire de su cable, ya que esto
podría causar fallas.
• Maintenir le microphone sec et éviter de l'exposer à des températures
extrêmes et à l'humidité.
• Mantenga el micrófono seco y evite exponer el aparato a niveles extremos de
temperatura y humedad.
iii
AVVERTENZA
ВНИМАНИЕ:
L'ASCOLTO A VOLUME ECCESSIVAMENTE ELEVATO PUÒ DANNEGGIARE L'UDITO IN
MODO PERMANENTE. MANTENETE IL VOLUME AL PIÙ BASSO LIVELLO POSSIBILE.
La sovraesposizione a livelli sonori eccessivi può danneggiare l'udito provocando una perdita
di udito permanente causata dal rumore. Si consiglia di attenersi alle seguenti direttive stabilite
dalla OSHA (Occupational Safety Health Administration) sul tempo massimo di esposizione
a vari livelli di pressione sonora (SPL), oltre il quale si rischia di causare lesioni all'apparato
uditivo.
90 dB di SPL
per 8 ore
95 dB di SPL
per 4 ore
110 dB di SPL
per mezz'ora
115 dB di SPL
per 15 minuti
100 dB SPL
per 2 ore
ПРОСЛУШИВАНИЕ ЗВУКА ПРИ ЧРЕЗМЕРНО ВЫСОКОЙ ГРОМКОСТИ МОЖЕТ
ПРИВЕСТИ К НЕОБРАТИМОМУ ПОВРЕЖДЕНИЮ СЛУХА.ИСПОЛЬЗУЙТЕ КАК МОЖНО
БОЛЕЕ НИЗКУЮ ГРОМКОСТЬ.
Длительное воздействие звука чрезмерно высокого уровня может причинить
вам вред, вызвав необратимую потерю слуха из-за шума. Во избежание потери
слуха руководствуйтесь следующими правилами, установленными Управлением
105 dB di SPL
per 1 ora
охраны труда (OSHA) в отношении максимального времени воздействия
различных уровней звукового давления (УЗД).
120 dB di SPL
Evitate l'esposizione per non rischiare
di danneggiare l'udito
PRECAUZIONI DI SICUREZZA
I possibili effetti di un uso errato sono contrassegnati da uno dei due simboli
- “AVVERTIMENTO” E “ATTENZIONE” — a seconda dell'incombenza del pericolo e della gravità del danno.
AVVERTIMENTO: come conseguenza di un funzionamento errato, ignorare
questi messaggi può comportare lesioni personali gravi o mortali.
ATTENZIONE: come conseguenza di un funzionamento errato, ignorare
questi messaggi può comportare lesioni personali di media gravità o danni
alla cose.
ВНИМАНИЕ
• Если в устройство попадет вода или иные посторонние предметы, это
может привести к возгоранию или поражению электрическим током.
• Не пытайтесь модифицировать это изделие. Это может привести к
личной травме и (или) поломке изделия.
ОСТОРОЖНО
ATENÇÃO!
• Ни в коем случае не разбирайте и не модифицируйте это устройство,
поскольку это может привести к поломке.
OUVIR O SOM COM VOLUME MUITO ALTO PODE CAUSAR DANOS PERMANENTES
À AUDIÇÃO. USE O VOLUME MAIS BAIXO POSSÍVEL.
A exposição a sons excessivamente altos pode danificar os ouvidos e resultar em perda
• Не подвергайте сильным нагрузкам и не тяните за кабель - это может
привести к поломке.
permanente da audição devido ao ruído. Siga as recomendações estipuladas pela
• Содержите микрофон сухим и не подвергайте его воздействию очень
высоких или низких температур и влажности.
Administração de Saúde e Segurança do Trabalho dos E.U.A. (U.S. Occupational Safety
Health Administration-OSHA) sobre o máximo tempo de exposição a determinados níveis
de pressão sonora (SPL) a fim de evitar danos à audição.
115 dB SPL
por 15 minutos
УЗД 120 дБ
Недопустимо — ведет к повреждению слуха
ОСТОРОЖНО: Игнорирование этих предупреждений может привести
к незначительной травме или повреждению имущества в результате
неправильной эксплуатации.
non tiratelo.
• Mantenete il prodotto asciutto e non esponetelo a temperature estreme ed all'umidità.
110 dB SPL
por ½ hora
УЗД 115 дБ
15 минут
УЗД 105 дБ
1 час
ВНИМАНИЕ: Игнорирование этих предупреждений может привести к
серьезной травме или смерти в результате неправильной
эксплуатации.
ATTENZIONE
• Per evitare di provocare possibili danni, non smontate nè modificate il dispositivo.
• Per evitare di provocare possibili danni, non applicate una forza estrema sul cavo e
100 dB SPL
por 2 horas
УЗД 110 дБ
1/2 часа
УЗД 100 дБ
2 часа
Возможные результаты неправильного использования отмечены одним
из двух знаков - «ВНИМАНИЕ» и «ОСТОРОЖНО» - в зависимости от
неизбежности опасности и серьезности повреждений.
• Non tentate di modificare il prodotto. Tale operazione può causare infortuni e/o il guasto
del prodotto stesso.
95 dB SPL
por 4 horas
УЗД 95 дБ
4 часа
УКАЗАНИЯ ПО ТЕХНИКЕ БЕЗОПАСНОСТИ
AVVERTIMENTO:
• L'eventuale introduzione di acqua o di altri corpi estranei nel dispositivo può dare luogo
allo sviluppo di incendi o a folgorazione.
90 dB SPL
por 8 horas
УЗД 90 дБ
8 часов
105 dB SPL
por 1 hora
120 dB SPL
Evite ou poderá ocorrer dano
MEDIDAS DE SEGURANÇA
Os possíveis resultados do uso incorreto são marcados por um de dois símbolos
- “ATENÇÃO” e “CUIDADO” - dependendo da iminência do perigo e da
severidade
do dano.
TENÇÃO: Não seguir esses avisos de atenção pode causar lesão grave ou
morte em conseqüência da operação incorreta.
CUIDADO: Não seguir esses avisos de cuidado pode causar lesão moderada ou danos à propriedade em conseqüência da operação incorreta.
ATENÇÃO
• Incêndio ou choque elétrico pode ocorrer caso água ou objetos estranhos entrem no
dispositivo
• Não tente modificar este produto. pois pode resultar em lesão pessoal e/ou falha do
produto.
CUIDADO
• Não desmonte ou modifique o dispositivo uma vez que pode resultar em falhas.
• Não sujeite à força demasiada e não puxe o cabo pois pode resultar em falhas.
• Mantenha o microfone seco e evite expor a temperaturas extremas e umidade.
iv
PSM900
The PSM 900 Wireless Personal Monitor System from Shure offers an unprecedented combination of superb audio quality, robust RF performance, and category-leading setup
features for the most demanding professional applications. All new, patent-pending CueMode allows the sound engineer to monitor different stage mixes with the touch of a
button. Precision front-end RF filtering significantly reduces dropouts from RF interference, and the enhanced digital stereo encoder provides excellent stereo separation and
audio clarity.
Features
Superb audio quality
Robust RF Performance
Advanced Setup and Operation
• Patented Audio Reference Companding sounds more
like wired
• Exceptional transmitter linearity vastly reduces
frequency intermodulation, allowing more channels
per frequency band.
• Front panel RF mute switch for disabling RF
transmission during setup
• Digital stereo encoder provides a wider stereo field
with exceptional separation, enhancing audio detail
and clarity
• Available with Shure SE425 Sound Isolating™
Earphones featuring dual high-definition MicroDrivers
for accurate and balanced audio response
• Precision front-end RF filtering for a cleaner, stronger
RF signal and fewer dropouts and audible artifacts.
• Automatic RF gain control prevents signal distortion
due to RF overload.
• Patent-pending CueMode allows monitoring of the
stage mixes of up to 20 separate transmitters from
one bodypack.
• Scan and Sync setup identifies the best group and
channel for your system and assigns it over a wireless
IR link
• MixMode® Technology allows the bodypack user to
adjust their own onstage monitor mix
• High-frequency EQ boost on bodypack
Components
②
①
menu
③
④
• P9T: Rack Unit Transmitter
• P9RA: Bodypack Receiver
⑤
⑥
⑦
Rackmount supplies
• PS41: Power supply
• Protective bumpers with 8 screws
① Short rack ear
② Long rack ear
③ Link bar to mount to similar rack unit
④ 2 antenna hole plugs
⑤ 8 rack ear screws
⑥ 4 rack mount screws with washers
⑦ Extension cables and connectors for front-mounting antennas
1
Quickstart Instructions
6. Adjust the audio source level so that, for the average input signal level, the top
two yellow LEDs flicker and the lower LEDs are solid. If the red clip LED illuminates and a warning appears on the LCD, the inputs are overdriven. Decrease
the audio input level to +4 dBu from the Audio menu. If the signal level is too
low, change the input sensitivity to –10 dBV
2.
AC ADAPTER
50 - 60 Hz
INPUT: 100 - 240 V
250 mA Max.
600 mA Max.
OUTPUT: 15 V
IV
EFFICIENCY LEVEL
TÜV Rheinland Group
ID
1. Connect to a power outlet using the supplied power cable.
2. Attach the supplied antennas to the antenna out BNC connectors.
3. Connect the audio source, such as the output of a mixer, to the audio inputs.
You can use both input jacks or choose either one for a mono source.
4. Switch RF off and power on.
5. For mono (one input), access the Audio menu and select Mono.
Set the input sensitivity to match the source using the Util > Audio > INPUT
setting.
1.
:1
00
Rack Mount Transmitter
00 0 0 0 0 0
CAUTION
RISK OF ELECTRIC SHOCK,
DO NOT OPEN.
DRY LOCATION USE ONLY.
MADE IN CHINA
4.
3.
www.shure.com
5.
6.
menu
Bodypack
A
Open by pressing the latches on both sides and pulling. Insert the batteries or
battery pack and attach antennas. Turn on using the volume knob. The battery
light illuminates.
A
A
Scan and Sync
1. On the bodypack, press the scan button. The display flashes SYNC NOW....
2. Align the IR windows on the bodypack and rack unit, the IR window on the
transmitter illuminates. Press the sync button on the transmitter. The rack
unit Level LEDs flash, and the screen displays SYNC SUCCESS.
3. Turn the RF switch on. The blue RF LED illuminates on the bodypack to
indicate that it is detecting the transmitter. The bodypack also displays the
RF signal strength (RF).
4. Important: Turn bodypack volume down before plugging in earphones.
5. Insert the earphones and slowly turn up the volume.
1.
AA
3.
Important: Remove the protective film from the face of the transmitter or the IR
sync may not work.
5.
2
2.
4.
Rack Unit Transmitter
level
L
R
menu
sync
volume
power
CLIP
sync
Front Panel Controls
Rear Panel Connectors
① Input Level Control and Display
Use the ▼▲ buttons to adjust the audio so that, for the average input signal level,
the top two yellow LEDs flicker and the lower LEDs are solid. The red clip LED
indicates the inputs are overdriven. Reduce the level at the audio source or
change the input sensitivity of the rack unit from the AUDIO > INPUT menu.
⑦ Power
Connect the transmitter to a power outlet using the supplied power adapter.
② Status Display and Menu Controls
Use the enter and exit buttons and the menu wheel to access the configuration
menu. Push the menu wheel to move the cursor to the next item. Turn the menu
wheel to change a parameter—the enter button flashes. Press it to save the
value. Press the exit button to cancel changes and return to the previous menu.
③ Synchronization Button
Press the sync button while rack unit and bodypack IR windows are aligned to
transfer settings.
⑧ LOOP OUT
Sends a copy of the audio signal going into the transmitter to another device. See LOOP Applications.
⑨ Audio Inputs
Connect to balanced or unbalanced outputs. Use either connector for mono
input. Accepts both 1/4-inch or male XLR connectors.
⑩ Antenna (BNC)
Attach supplied antenna. If you are rack mounting, use a front panel or remote mounting kit from Shure.
④ Headphone Monitoring
The volume control adjusts signal output to the 3.5 mm headphone jack. NOTE:
it does not affect rear panel outputs.
⑤ RF switch
Mutes RF output. For setting up multiple systems or adjusting settings without
transmitting unwanted RF or audio signals.
⑥ Power Button
Turns the unit on and off.
Configuration Menu
Note: Configuration menu items may vary with regional model variations.
RF Settings
Utilities and Display Settings
RADIO
UTILITIES
G
Sets the group number
CH
Sets the channel number
888.888MHz
Manual frequency selection
RF POWER
Select from 10, 50, or 100 mW
(varies by region)
Audio Settings
AUDIO > MODE
Selects monitor mode
STEREO/MX
Transmits both channels
MONO
Transmits a mono signal to
bodypack
AUDIO > INPUT
Sets nominal input level
LINE +4 dBu
line level
AUX -10dBV
aux level
EDIT NAME
Changes the name on the LCD display (this name
is uploaded to the bodypack with sync)
UTILITIES > RX SETUP
These settings are sent to the bodypack during a sync (when the sync
direction is from the transmitter). The default KEEP parameter will not
change the bodypack settings.
DISPLAY
Changes the display format
LOCK
Lock bodypack
CONTRAST
Changes the display contrast
V LIMIT
Volume limiter
CUSTOM GROUP
For creating custom frequency groups
LIM VAL
Volume limiter value
UTILITIES > LOCK PANEL
Locks front panel controls. To unlock, press exit, select
OFF, and press enter.
MENU+LEVEL
Locks menu and level controls.
MENU ONLY
Locks only the configuration menu (menu controls).
MENU+SWITCH
Locks all controls except for the level buttons (including the RF and power switches).*
ALL
Locks all controls (including the RF and power
switches).*
*RF is automatically activated when locked. When you
unlock the unit, RF and power turns off if the swithes
are off.
MODE
Stereo (ST) or MixMode (MX)
BAL MX
CH. 1 (L) and CH. 2 (R) mix for MixMode
BAL ST
Left (L) and right (R) balance for stereo mode
HIBOOST
high frequency boost
UTILITIES > RESET SYSTEM
Returns all settings to the factory defaults
NO
Exit and do not reset system.
YES
Reset system settings.
3
Bodypack Receiver
① Power Switch and Volume Control
Turns the bodypack on and off and adjusts earphone volume.
② 3.5 mm Earphone Jack
Insert earphones here.
③ Scan Button
Press the scan button to find an available frequency. Press and hold for two seconds to find the group with the most available channels.
④ IR Window
For transmitting settings between bodypack and rack unit.
⑤ Battery Compartment
Requires 2 AA batteries or Shure rechargeable battery. Open by pressing the
latches on both sides and pulling.
⑥ Menu buttons
Use in conjunction with the ▼▲ buttons to access the configuration menus.
A
⑦ ▼▲ Buttons
Use to adjust the audio mix (in MixMode only), or in conjunction with the menu
buttons to change settings.
⑧ LCD Screen
Displays current settings and menus.
⑨ Tri-Color Battery LED
Illuminates green, amber, or red to indicate battery power. When red, change
battery immediately.
⑩ Blue RF LED
Indicates the bodypack is receiving a signal from the transmitter.
⑪ SMA Connector
For detachable antennas.
⑫ Removable AA Adapter
Remove to use with a Shure SB900 rechargeable battery.
Note: To remove adapter, open door and slide out. To reinstall adapter, place
over the clip and press, there will be an audible click when seated.
Battery Life
Battery Indicator
Tri-Color
Battery LED
Approximate Hours Remaining (h:mm)
Alkaline
Shure SB900 Rechargeable Battery
Volume Level
6
8
4
6
8
Green
6:00 to 3:50
4:20 to 2:45
3:15 to 2:05
8:45 to 4:00
7:15 to 4:00
6:25 to 4:00
Green
3:50 to 2:50
2:45 to 2:00
2:05 to 1:30
4:00 to 3:00
4:00 to 3:00
4:00 to 3:00
Green
2:50 to 1:15
2:00 to 1:00
1:30 to 0:50
3:00 to 2:00
3:00 to 2:00
3:00 to 2:00
Green
1:15 to 0:25
1:00 to 0:20
0:50 to 0:20
2:00 to 1:00
2:00 to 1:00
2:00 to 1:00
Amber
0:25 to 0:15
0:20 to 0:10
0:20 to 0:10
1:00 to 0:30
1:00 to 0:30
1:00 to 0:30
Red
Total Battery Life
Volume Level
4
< 0:15
< 0:10
< 0:10
< 0:30
< 0:30
< 0:30
6:00
4:20
3:15
8:45
7:15
6:25
Note: Battery life using Energizer brand AA Alkaline batteries and the following conditions:
• Receiver audio set to HIBOOST = OFF and V LIMIT = OFF
• Transmitter audio INPUT set to Line+4 dBu and Level set to −9 dB
• Audio input to the transmitter: pink noise at +8.7 dBV
• Audio output at receiver: 115 dB SPL in ear with SE425 earphones (impedence at 22 Ώ)set at volume level 4.
Note: Using lower-impedance earphones or ones with different sensitivity, different battery types, and higher gain settings in the PSM system may cause
the receiver battery life to be different than specified.
Pink noise is a signal with a frequency spectrum such that the power spectral density is inversely proportional to the frequency. In pink noise, each octave
carries an equal amount of noise power.
4
Configuration Menu
RF Settings
Access the following RF settings from the RADIO menu.
RADIO
G:
Group number. Each group contains channels selected to work well
together in a single installation.
CH:
Channel number. Sets the receiver to a channel in the selected
group.
888.888 MHz
Displays the frequency to which the receiver is set. Highlight and
use the ▼▲ buttons to set to a specific frequency.
SQUELCH
Adjusts the squelch setting.
RF PAD
Attenuates antenna signals in 3 dB increments.
Audio Settings
Utilities and Display Settings
Access the following audio settings from the Audio menu.
Access the following settings from the UTILITIES menu.
MODE
UTILITIES
Output Mode
STEREO
Stereo
MIXMODE
MixMode
HIBOOST
High-Frequency EQ Boost
OFF
No boost (flat).
4 dB
4 dB boost at 10 kHz.
2 dB
2 dB boost at 10 kHz.
CUEMODE
Enters CUEMODE (to exit, press enter and select EXIT CUEMODE)
DISPLAY
Change the display settings on the bodypack
CONTRAST
Sets display brightness to high, low, or medium.
LOCK PANEL
Locks all controls except power and volume.To unlock, press exit,
select OFF, and press enter.
BATTERY
Displays the following: Hrs: Min Left, temperature, Status, Cycle
Count, and Health.
RESTORE
Returns receiver to factory default settings.
V LIMIT
Volume Limiter
V LIMIT
Turns limiter on (ON) or off (OFF) .
VALUE
3 to 9: analogous to volume knob position (for example, 5
is equal to the 5th dot on the volume knob).
BAL ST / BAL MX
Balance
▼▲ Buttons
Left and right balance for earphones when in stereo mode,
or mix of left and right channel for MixMode
GAIN
Output Gain
HIGH
Increases gain by 10 dB
STANDARD(STD)
0 dB of gain.
5
Multiple System Setup
Managing CueMode Mixes
When setting up multiple systems, designate a single bodypack to scan for available
frequencies and download them to all the rack units.
While in Cue Mode, you can access the following menu by pressing enter:
The bodypack must be from the same frequency band as all the transmitters.
1. Power on all the rack units. Turn off the RF. (This prevents them from interfering
with the frequency scan.)
Note: Turn on all other wireless or digital devices as they would be during the
performance or presentation (so the scan will detect and avoid any interferance
they generate).
2. Use the bodypack to scan for a group by pressing and holding the scan button
for two seconds. The bodypack displays the group and the number of available
channels, and flashes SYNC NOW....
Important: Note the number of available channels. If you have more rack units
than available channels, eliminate potential sources of interference and try again,
or call Shure Applications for assistance.
3. Sync the bodypack with the first rack unit by aligning the IR windows and pressing
sync.
4. Press scan again on the bodypack to find the next available frequency.
5. Sync the bodypack with the next rack unit.
6. Repeat with all the rack units.
7. Sync each performer's bodypack to its respective rack unit by aligning the IR windows and pressing snyc. DO NOT press scan on the bodypacks.
8. Turn on the RF on all rack units. The systems are ready to use.
CueMode
CueMode allows you to upload the name and frequency settings from multiple rack
units and store them as a list on a single bodypack. You can then, at any time, scroll
through that list to hear the audio mix from each transmitter, just as each performer
does during a show.
REPLACE MIX: Select and press sync on a rack unit to upload new data for the
current mix (for example, if you have changed the transmitter frequency).
DELETE MIX: Removes the selected mix.
DELETE ALL: Removes all mixes.
EXIT CUEMODE: Exits CueMode and returns the bodypack to the previous frequency setting.
Frequency Scan
Use a frequency scan to analyze the RF environment for interference and identify
available frequencies.
• Channel Scan Press the scan button on the bodypack. Finds the first available
channel.
• Group Scan Press and hold the scan button for two seconds. Finds the group
with the greatest number of available channels. (Each group contains a set of
frequencies that are compatible when operating multiple systems in the same
environment.)
Note: When performing a frequency scan:
• Turn off the RF on the transmitters for the systems you are setting up. (This
prevents them from interfering with the frequency scan.)
• Turn on potential sources of interference such as other wireless systems or
devices, computers, CD players, large LED panels, effects processors, and digital
rack equipment so they are operating as they would be during the presentation or
performance (so the scan will detect and avoid any interference they generate).
CueMode lists are retained even if CueMode is exited, the bodypack is turned off, or
batteries are removed.
Note: Set the channel frequency and assign display names for each transmitter before creating your CueMode list.
Adding Transmitters to the CueMode List
Note: The transmitter must be from the same frequency band as the bodypack.
1. Open the battery door and press the enter button.
2. From the main menu, scroll to UTILITIES and press enter. Select CueMode and
press enter again.
3. Align IR windows and press sync on the rack unit.
The LCD displays SYNC SUCCESS after frequency and name data are uploaded
to the CueMode list. It also displays the CueMode number for that transmitter and
the total number of transmitters.
4. Repeat the above step for each transmitter.
Note: Syncing while in CueMode does not change any of the settings on the
bodypack.
Auditioning Mixes
1. Enter CueMode from the UTILITIES menu.
2. Use the ▼▲ buttons to scroll through your CueMode list to hear the mixes.
Exiting CueMode
Exit CueMode by pressing enter and selecting EXIT CUEMODE.
6
Sync
You can transfer frequency settings in either direction: from the bodypack to the rack
unit, or from the rack unit to the bodypack.
Note: You can also choose to transfer other settings to the bodypack during a
sync, such as lock or mode settings, using the Sync > RxSetup menu on the rack
transmitter.
Downloading settings from the bodypack
1. Press the scan button on the bodypack.
2. Align the IR windows and press the sync button from the rack transmitter LCD
menu while the bodypack display is flashing "SYNC NOW...".
The level LEDs on the rack unit flash.
Sending settings to the bodypack
1. Press the Sync button on the rack transmitter to access the sync menu.
2. Align the IR windows.
When properly aligned the IR window on the transmitter illuminates.
3. Press Sync to transfer settings
The blue LED on the bodypack flashes.
MixMode
Squelch
Some performers need to hear more of their own voice or instrument, while others
want to hear more of the band. With MixMode, the performer creates their own mix
using the balance control (▼▲ buttons) on the bodypack.
Squelch mutes audio output from the bodypack when the RF signal become noisy.
While squelch is activated, the blue LED on the bodypack turns off.
To use MixMode, send a solo mix of the performer to the CH. 1 IN input on the
transmitter, and send a band mix to the CH. 2 IN input.
Set the performer's bodypack for MixMode. The bodypack combines the two signals
and sends them to both earphones, while the balance control on the bodypack adjusts the relative levels for each.
LOOP Applications
Use LOOP OUT L (left) and R (right) outputs to send a copy of the audio signal going
into the transmitter to other devices. Following are a few of the many applications for
these outputs.
Note: The input level control and the input pad do not affect the LOOP OUT signals.
MixMode for Multiple Systems
Configure each system for MixMode. From the mixing console, send a mix of the
whole band to input 2 of the first transmitter. Connect the LOOP OUT R output to the
CH. 2 IN input of the next transmitter. Continue the chain with all the transmitters.
Next, create solo mixes for each performer. Send each mix to input 1 of the transmitter for that performer.
Floor Monitors
Send the audio from the LOOP outputs to onstage loudspeakers. The bodypack and
the onstage monitors receive the same audio signals.
Note: The LOOP audio outputs will not drive passive loudpeakers, and must be sent
to a power amplifier or an active loudspeaker.
Recording Devices
For most installations, squelch does not need adjustment, and it keeps the performer
from hearing hiss or noise bursts if the RF signal becomes compromised. However,
in congested RF environments or in close proximity to sources of RF interference
(such as large LED video panels), the squelch may need to be lowered to prevent
excessive audio dropouts. With lower squelch settings, the performer may hear more
noise or hiss, but will experience fewer audio dropouts.
Important: Before lowering squelch, first try to eliminate the problem by finding
the best set of frequencies for your installation and removing potential sources of
interference.
Caution: Turning off or lowering the squelch setting can increase the noise level and
cause discomfort to the performer:
• Do not lower the squelch setting unless absolutely necessary.
• Turn earphone volume to the lowest setting before adjusting squelch.
• Do not change the squelch setting during a performance.
• Turn up the transmitter level setting to make noise or hiss less noticeable.
Squelch Settings
HIGH (NORMAL)
Default factory setting.
MID
Moderately decreases the signal-to-noise ratio required
to squelch the receiver.
LOW
Greatly decreases the noise squelch threshold.
PILOT ONLY*
Turns off noise squelch leaving only pilot squelch on.
NO SQUELCH*
Turns off noise and pilot tone squelch. (Sometimes
used as a debugging tool by monitor engineers or RF
coordinators to "listen" to the RF environment.)
* Symbol appears in display window.
To record a performance, connect the LOOP outputs to the inputs of a recording
device.
Point-to-Point Wireless Audio
Use PTP mode to allow a P9T to transmit to a UHF-R receiver. This allows a transmitter
and receiver setup where both units are racked and powered by AC.
level
L
R
menu
sync
volume
power
CLIP
sync
For more information visit: www.shure.com/americas/products/personal-monitor-systems
RF
Audio
XX YYY-ZZZ MHz
Navigate
Monitor
Control
POWER
OFF
UR4S
Wireless Receiver
with Audio Reference Conpanding
sync
ENTER
OL
push
Monitor Clip
EXIT
push
A
B
7
SPECIFICATIONS
P9T
PSM900
RF Carrier Range
470–952 MHz
varies by region
Compatible Frequencies
Tuning Bandwidth
Per
band:
20
36–40 MHz
Note: varies by region
RF Output Power
selectable: 10, 50, 100 mW (+20 dBm)
RF Output Impedance
50 Ω (typical)
Net Weight
850 g
Dimensions
42 x 197 x 166 mm, H x W x D
Power Requirement
100–15V AC, 415 mA, typical
Audio Input
Operating Range
environment dependent
90 m (300 ft)
Connector Type
Audio Frequency Response
35 Hz–15 kHz +/- 1dB
Polarity
Signal-To-Noise Ratio
A-Weighted
90 dB (typical)
Total Harmonic Distortion
ref. ±34 kHz deviation @1 kHz
<0.5% (typical)
Combination XLR and 6.35 mm (1/4") TRS
XLR:
6.35 mm
(1/4")
TRS:
Configuration
Non-inverting (pin 2 positive with
respect to pin 3)
Tip positive with respect to ring
Electronically balanced
Patented Shure Audio Reference
Companding
Impedance
70.2 kΩ (actual)
Spurious Rejection
ref. 12dB SINAD
Nominal Input Level
switchable: +4 dBu, –10 dBV
>80 dB (typical)
Maximum Input Level
Frequency Stability
±2.5 ppm
+4 dBu:
-10 dBV:
MPX Pilot Tone
19 kHz (±0.3 kHz)
Pin Assignments
XLR:
6.35 mm
(1/4")
TRS:
Companding
Modulation
FM*, MPX Stereo
*ref. ±34 kHz deviation @1 kHz
Operating Temperature
-18°C to +57°C
Phantom Power Protection
+29.2 dBu
+12.2 dBu
1=ground, 2=hot, 3=cold
Tip=hot, Ring=cold,
Sleeve=ground
Up to 60 V DC
Audio Output
P9RA
Tri-Band RF Filtering
Active RF Gain Control
–3 dB at 30.5 MHz from the center frequency
of each band
31 dB
Adjusts RF sensitivity to provide more RF dynamic
range
Active RF Sensitivity
at 20 dB SINAD
2.2 µV
Image Rejection
>90 dB
Adjacent Channel Rejection
>70 dB
Squelch Threshold
22 dB SINAD (±3 dB)
default setting
6.35 mm (1/4") TRS
Configuration
Electronically balanced
Impedance
Connected directly to inputs
Frequency Range and Transmitter Output Level
Band
Range
Output
G6
470-506 MHz
10/50/100 mW
G6E
470-506 MHz
10/50 mW
G7
506-542 MHz
10/50/100 mW
G7E
506-542 MHz
10/50 mW
G14
506-542 MHz
6/10 mW
Intermodulation Attenuation
>50 dB
Blocking
>80 dB
Audio Output Power
1kHz @ <1% distortion, peak
power, @32Ω
100 mW (per output)
Minimum Load Impedance
9.5 Ω
P7
702-742 MHz
10/50 mW
High Boost
Selectable: +2 dB, +4 dB @ 10 kHz
Q15
750-790 MHz
10/50 mW
Volume Limiter
8
Connector Type
K1
596-632 MHz
10/50/100 mW
K1E
596-632 MHz
10/50 mW
L6
656-692 MHz
10/50/100 mW
L6E
656-692 MHz
10/50 mW
Selectable: 3–9
Q20
750-787 MHz
10/50 mW
Limits volume adjustment knob. Selected value
analogous to volume knob increment.
R20
794-806 MHz
10 mW
R21
794-806 MHz
10/50 mW
Net Weight
200 g (with batteries)
Dimensions
99 x 66 x 23 mm (3.9 in. x 2.6 in. x 0.9 in.) H
xWxD
Battery Life
4–6 hours (continuous use) AA batteries
R22
790-830 MHz
10/50 mW
A24
779-806 MHz
10 mW
X2
925-932 MHz
10 mW
X1
944-952 MHz
10/50/100 mW
ACCESSORIES AND PARTS
P9T, P9RA
Furnished Accessories
This Class B digital apparatus complies with Canadian ICES-003.
Cet appareil numérique de la classe B est conforme à la norme NMB-003 du
Canada.
P9R Antenna
470–542 MHz
UA700
596–692 MHz
UA720
670–830 MHz
UA730
830–952 MHz
UA740
470–530 MHz
UA820G
500–560 MHz
UA820G7
518–578 MHz
UA820H4
578–638 MHz
UA820J
638–698 MHz
UA820L3
690–746MHz
UA820B
740–814 MHz
UA820Q
774–865 MHz
UA820A
900–1000 MHz
P9T Antenna
UA820X
Front Mount Antenna Cable
95A9023
Zipper Bag
95A2313
Rackmount Bracket, Long
53A8612
Rackmount Bracket, Short
53A8611
Link Bar
53B8443
Hardware Kit (Rackmounting
Screws)
Bumper Kit
90AR8100
90B8977
Energy Efficient Switching Power Supply
USA
PS41US
Brazil
PS41BR
Argentina
PS41AR
Europe
United Kingdom
PS41E
PS41UK
Austrailia/New Zealand
PS41AZ
China
PS41CHN
Taiwan
PS41TW
Japan
PS41J
Meets requirements of EMC standards EN 300 422 Parts 1 and 2 and EN 301 489
Parts 1 and 9.
Meets essential requirements of European R&TTE Directive 99/5/EC, eligible to bear
the CE mark.
P9T
Certified under FCC Part 74. (FCC ID: DD4P9TA, DD4P9TB, DD4P9TC,
DD4P9TD, DD4P9TJ). Certified by IC in Canada under RSS-123 and RSS-102. (IC:
616A-P9TA, 616A-P9TB, 616A-P9TC, 616A-P9TD).
P9RA
Approved under the Declaration of Conformity (DoC) provision of FCC Part
15. Certified in Canada by IC to RSS-123. (IC: 616A-P9RAA, 616A-P9RAB,
616A-P9RAC, 616A-P9RAD).
Operation of this device is subject to the following two conditions: (1) this device may
not cause interference, and (2) this device must accept any interference, including
interference that may cause undesired operation of the device.
The CE Declaration of Conformity can be obtained from Shure Incorporated or any
of its European representatives. For contact information please visit www.shure.com
The CE Declaration of Conformity can be obtained from: www.shure.com/europe/
compliance
Authorized European representative:
Shure Europe GmbH
Headquarters Europe, Middle East & Africa
Department: EMEA Approval
Jakob-Dieffenbacher-Str. 12
75031 Eppingen, Germany
Phone: +49-7262-92 49 0
Fax: +49-7262-92 49 11 4
Email: [email protected]
LICENSING INFORMATION
Licensing: A ministerial license to operate this equipment may be required in certain
areas. Consult your national authority for possible requirements. Changes or modifications not expressly approved by Shure Incorporated could void your authority to
operate the equipment. Licensing of Shure wireless microphone equipment is the
user’s responsibility, and licensability depends on the user’s classification and application, and on the selected frequency. Shure strongly urges the user to contact the
appropriate telecommunications authority concerning proper licensing, and before
choosing and ordering frequencies.
Information to the user
This equipment has been tested and found to comply with the limits for a Class B
digital device, pursuant to Part 15 of the FCC Rules. These limits are designed to
provide reasonable protection against harmful interference in a residential installation. This equipment generates uses and can radiate radio frequency energy and,
if not installed and used in accordance with the instructions, may cause harmful
interference to radio communications. However, there is no guarantee that interference will not occur in a particular installation. If this equipment does cause harmful
interference to radio or television reception, which can be determined by turning the
equipment off and on, the user is encouraged to try to correct the interference by one
or more of the following measures:
• Reorient or relocate the receiving antenna.
• Increase the separation between the equipment and the receiver.
• Connect the equipment to an outlet on a circuit different from that to which the
receiver is connected.
• Consult the dealer or an experienced radio/TV technician for help.
Note: EMC conformance testing is based on the use of supplied and recommended
cable types. The use of other cable types may degrade EMC performance.
Changes or modifications not expressly approved by the manufacturer could
void the user’s authority to operate the equipment.
9
PSM900 FREQUENCIES FOR EUROPEAN COUNTRIES
*IMPORTANT
NOTE: THIS EQUIPMENT MAY BE CAPABLE OF OPERATING ON SOME FREQUENCIES NOT AUTHORIZED IN YOUR REGION. PLEASE CONTACT YOUR NATIONAL AUTHORITY TO OBTAIN INFORMATION ON AUTHORIZED FREQUENCIES AND RF POWER LEVELS FOR WIRELESS
MICROPHONE PRODUCTS IN YOUR REGION.
A ministerial license may be required to operate this equipment in certain areas. Consult your national authority for possible requirements.
PSM 900-G6E 470 - 506 MHz, max. 10 - 50 mW, 100 mW
B, DK, FIN, M, N
*
Country Code
Frequency Range
HR, E, IRL, LV, TR
*
Code de Pays
Gamme de frequences
All other Countries
*
Codice di paese
Gamme di frequenza
Código de país
Gama de frequencias
Länder-Kürzel
Frequenzbereich
Country Code
Frequency Range
A, B, BG, CH, CY, CZ, D, EST
470 - 506 MHz *
Code de Pays
Gamme de frequences
F, GB, GR, H, I, IS, L, LT
470 - 506 MHz *
Codice di paese
Gamme di frequenza
NL, P, PL, S, SK, SLO
470 - 506 MHz *
Código de país
Gama de frequencias
PSM 900-P7 702 - 742 MHz, max. 10 - 50 mW, 100 mW
DK, FIN, M, N
*
Länder-Kürzel
Frequenzbereich
HR, E, IRL, LV, RO, TR
*
A, B, BG, CH, CY, CZ, D, EST
702 - 742 MHz *
All other Countries
*
F, GB, GR, H, I, IS, L, LT
702 - 742 MHz *
NL, P, PL, RO, S, SK, SLO
702 - 742 MHz *
DK, FIN, M, N
*
HR, E, IRL, LV, TR
*
All other Countries
*
PSM 900-G7E 506 - 542 MHz, max. 10 - 50 mW, 100 mW
Country Code
Frequency Range
Code de Pays
Gamme de frequences
Codice di paese
Gamme di frequenza
Código de país
Gama de frequencias
Länder-Kürzel
Frequenzbereich
Country Code
Frequency Range
A, B, BG, CH, CY, CZ, D, EST
506 - 542 MHz *
Code de Pays
Gamme de frequences
F, GB, GR, H, I, IS, L, LT
506 - 542 MHz *
Codice di paese
Gamme di frequenza
NL, P, PL, S, SK, SLO
506 - 542 MHz *
Código de país
Gama de frequencias
PSM 900-Q15 750 - 790 MHz, max. 10 - 50 mW, 100 mW
DK, FIN, M, N
*
Länder-Kürzel
Frequenzbereich
HR, E, IRL, LV, RO, TR
*
A, BG, CH, CY, CZ, D, EST
750 - 790 MHz *
All other Countries
*
F, GB, GR, H, I, IS, L, LT
750 - 790 MHz *
NL, P, PL, RO, S, SK, SLO
750 - 790 MHz *
B, DK, FIN, M, N
*
HR, E, IRL, LV, TR
*
All other Countries
*
PSM 900-K1E 596 - 632 MHz, max. 10 - 50 mW, 100 mW
Country Code
Frequency Range
Code de Pays
Gamme de frequences
Codice di paese
Gamme di frequenza
Código de país
Gama de frequencias
Länder-Kürzel
Frequenzbereich
Country Code
Frequency Range
A, BG, CH, CY, CZ, D, EST
596 - 632 MHz *
Code de Pays
Gamme de frequences
F, GB, GR, H, I, IS, L, LT
596 - 632 MHz *
Codice di paese
Gamme di frequenza
NL, P, PL, S, SK, SLO
596 - 632 MHz *
Código de país
Gama de frequencias
PSM 900-R22 790 - 830 MHz, max. 10 - 50 mW, 100 mW
B, DK, FIN, M, N
*
Länder-Kürzel
Frequenzbereich
HR, E, IRL, LV, RO, TR
*
A, BG, CH, CY, CZ, D, EST, F, GR,
790 - 830 MHz *
All other Countries
*
H, I, IS, L, LT, NL, P, PL, SLO
790 - 830 MHz *
DK, N
800.1 -819.9 MHz*
FIN
790.1 -821.9 MHz*
B, HR, E, GB, IRL, LV, M, RO, S, SK, TR
*
All other Countries
*
PSM 900-L6E 656 - 692 MHz, max. 10 - 50 mW, 100 mW
Country Code
Frequency Range
Code de Pays
Gamme de frequences
Codice di paese
Gamme di frequenza
Código de país
Gama de frequencias
Länder-Kürzel
Frequenzbereich
A, BG, CH, CY, CZ, D, EST
656 - 692 MHz *
F, GB, GR, H, I, IS, L, LT
656 - 692 MHz *
NL, P, PL, RO, S, SK, SLO
656 - 692 MHz *
i
United States, Canada, Latin
America, Caribbean:
Shure Incorporated
5800 West Touhy Avenue
Niles, IL 60714-4608 USA
Phone: 847-600-2000
Fax: 847-600-1212 (USA)
Fax: 847-600-6446
Email: [email protected]
www.shure.com
Europe, Middle East, Africa:
Shure Europe GmbH
Jakob-Dieffenbacher-Str. 12,
75031 Eppingen, Germany
Phone: 49-7262-92490
Fax: 49-7262-9249114
Email: [email protected]
Asia, Pacific:
Shure Asia Limited
22/F, 625 King’s Road
North Point, Island East
Hong Kong
Phone: 852-2893-4290
Fax: 852-2893-4055
Email: [email protected]